
III – THE HAND > General Principles and Anatomy > CHAPTER 37 –
PRINCIPLES OF HAND SURGERY AND SURGICAL APPROACHES TO THE HAND AND WRIST
Orthopaedics, Professor of Surgery, Division of Plastic Surgery, Chief,
Hand and Upper Extremity Service, University of California—Davis,
School of Medicine, Sacramento, CA, 95817.
hand surgery, said, “Next to the brain, the hand is man’s greatest
asset and to it is due the development of man’s handiwork. The hand
begins in the opposite cerebral cortex and extends from there to the
tips of the nails” (5,6).
He emphasized the importance of a detailed knowledge of structural and
functional anatomy of the hand and a basic comprehension of the entire
upper extremity (10). He also stressed the
importance of atraumatic surgical technique in reconstructive hand
surgery. Reconstruction of the hand is often a composite problem,
requiring knowledge of orthopaedic, plastic, microvascular, and
neurologic surgical techniques. The hand surgeon must be trained to
handle all of the tissues in the extremity. Surgical reconstruction of
the hand requires careful technique to minimize the formation of
adhesions, which tend to bind together the nicely adjusted movable
parts. Although cosmesis is important, the primary purpose of surgical
reconstruction is to restore enough function to allow the patient to be
self-sufficient (2,5,6,7,10,12,13,14,15 and 16).
to examine the extremity carefully to determine the severity of
involvement of the skin, vessels, nerves, tendons, and skeleton. He or
she can then plan the anticipated surgical procedure, which, after
cleansing and debridement, might call for a skin graft or repair of
lacerated radial, ulnar, and digital arteries and nerves. Through
clinical examination and radiographs, the physician can evaluate the
skeletal structures and plan for reduction and internal fixation of
subluxations, dislocations, and fractures.
disease entities, staged surgical repair and reconstructive procedures
may be indicated. In these cases, a sequence of
surgical procedures can be planned and, in most cases, can be discussed with the patient and relatives before surgery.
restoration of the position of function, nutrition, sensibility,
motion, and good skin cover. The ends of the digits should have
noncicatricial touch surfaces. The thumb should oppose the fingers, and
the hand should open and close for the functions of pinch, hook, and
grasp. The wrist should usually be in an extended position or
occasionally in a straight position, and the fingers should be flexed
partially at the metacarpophalangeal, proximal interphalangeal, and
distal interphalangeal joints. The priorities of reconstruction are, in
order of their importance, artery, skin, bone and nerve, and tendon.
discontinue any medications (aspirin, nonsteroidal antiinflammatory
drugs) that may increase perioperative bleeding at least 4 days before
surgery. Patients on warfarin should be under supervision by an
internist, who should be consulted regarding management.
can be attached to it. The distal end should have a stable,
perpendicular appendage that extends to the floor. When fluoroscopy is
needed, use a radiolucent table without legs that interfere with
positioning of the fluoroscope. Always choose a table supported by legs
when using a microscope, otherwise the operative field will drift out
of focus as weight is placed on and taken off the table. With the
patient in a comfortable supine position, abduct the extremity to 90°
and place it on the table. Arrange the overhead lights opposite each
other in line with the hand table so that neither surgeons’ nor nurses’
heads obstruct the focused light. The stools on which the surgeon and
the assistant sit opposite from each other should be firm and stable,
and their height should be adjustable. Both the surgeon and the
assistant must be comfortably erect, with their forearms resting on the
hand table.
As Bunnell said, “A jeweler can’t repair a watch in a bottle of ink,
and neither can we repair a hand in a pool of blood” (6). A bloodless field allows very small vessels and nerves to be seen and dissected with accuracy and minimal trauma.
tourniquet palsy was not uncommon. Likewise, with the use of blood
pressure cuffs that were not monitored by a mercury manometer or
equipped with protective safety devices, false pressure readings, which
sometimes masked extremely high pressures, remained undetected. The
tourniquet gauge should, therefore, be checked and calibrated at least
daily and the figures recorded (24). The
calibration of many newer tourniquets is more stable and reliable.
Become familiar with the one you are using and be confident that the
pressure readings are accurate. Until a time of 2 hours was established
by Wilgis as a safe period for a tourniquet to remain in place,
tourniquet palsy was common (25).
-
Properly position the patient and the
extremity, then smoothly wrap several layers of sheet wadding or
Webril-type soft cast padding around the upper arm and into the lower
axilla. -
Apply the pneumatic cuff snugly and as high as is comfortably possible over the padding.
-
Securely attach the cuff to the tubing
that leads from a nitrogen source, and inflate the tourniquet briefly
to ensure that the system is operating properly. -
During skin preparation, take care to
avoid seepage of solutions onto the cast padding and tourniquet cuff.
Accomplish this by placing a vinyl drape around the tourniquet with an
adhesive border sticking to the upper arm. Be careful that this drape
is not completely circumferential because when the tourniquet is
inflated, a shearing force is applied to the skin that could result in
injury. -
After preparation and draping, mark the skin with a methylene blue pen to outline the proposed incisions.
-
Elevate and exsanguinate the extremity
with a snugly wrapped 4-inch rubber or elastic bandage. In most adults,
inflate the tourniquet to a pressure of 250 mm Hg; occasionally, in
patients with heavily muscled arms or significant hypertension, inflate
the tourniquet to 300 mm Hg.
mm Hg. Exsanguination is contraindicated in patients with infections or
tumors. However, in these patients, elevate the extremity for a few
minutes before inflating the tourniquet.
-
In most surgical procedures requiring
more than 2 hours of operating time, deflate the tourniquet for 10 to
15 minutes at the end of the first 1 to 1.5 hour. During this period,
apply pressure to the wound with a soft pad for the first 5 minutes. -
Then gently remove the pad and secure
hemostasis with electrocautery and ligatures. Elevate the extremity
again and reinflate the tourniquet. -
Following application of the dressing,
splint, or cast (if required), immediately remove the tourniquet and
underlying padding to avoid venous congestion.
-
Wrap several layers of Webril-type soft
cast padding circumferentially around the proximal forearm and apply a
pneumatic tourniquet approximately 5 cm below the medial epicondyle. -
Protect with a vinyl drape (as described under upper arm tourniquet) to keep the Webril dry.
-
Exsanguinate with an Esmarch bandage before tourniquet inflation.
-
Apply an encircling rubber tourniquet (Penrose drain 1.25 mm, or 1/2 inch, in diameter) at the base of the digit.
-
Wrap the drain once around the base of
the digit without tension, then mark and clamp with a hemostat the
points at which the surfaces of the drain meet on the circumference. -
Remove the loop. Shorten the distance between the two marks by 20 mm.
-
Reposition the Penrose drain around the base of the digit.
-
As the assistant elevates and compresses
the finger, stretch the drain around the finger so that the length is
shortened by 20 mm. Then clamp the drain with the hemostat.
the risk of digital nerve and arterial damage secondary to this
pressure is minimal.
simultaneous exsanguination of the finger and application of a digital
tourniquet (21).
-
Cut a finger from a sterile rubber glove and roll it onto the finger.
-
Cut the tip from it and roll the remaining portion proximally to form a rubber ring at the base of the finger.
infection or tumors. There is no good way to standardize or measure
pressure beneath a digital tourniquet, and there have been cases of
ischemia from the surgeon forgetting to remove the digital tourniquet
before applying the dressing. For these reasons, an arm or forearm
tourniquet is preferable.
Discuss with the anesthesiologist the patient’s concerns and wishes,
the estimated length of the operation, and the length of time the
tourniquet will be in place. For most children, for apprehensive
adults, and for extensive procedures and patients requiring surgery
elsewhere on the body, general anesthesia is usually preferable. A
general anesthetic may also be necessary because infection or neoplasm
may contraindicate regional anesthesia.
axillary, brachial, and peripheral nerve blocks is very satisfactory
for many procedures involving the upper extremity. Preoperative and, if
necessary, intraoperative sedation may be used to keep the patient from
moving and to lessen discomfort from the tourniquet.
two tourniquets on the arm, when administered by a competent
anesthesiologist, is satisfactory for many surgical procedures on the
hand that take no longer than 1 ½ hours. The three main problems with
this technique are tourniquet pain, oozing at the surgery site, and
risk of systemic anesthetic toxicity from cuff failure.
Re-exsanguination 15 to 20 minutes after injection of the local
anesthetic by firm reapplication of a sterile Esmarch bandage, followed
by complete release and immediate reinflation of the double cuff
tourniquet provides a better surgical field with improved tourniquet
tolerance (18).
intravenous sedation, an arm tourniquet is generally well tolerated for
half an hour or longer. Many procedures can be performed simply with
local anesthesia or a digital block. Some clinical anesthesia is
produced almost immediately with a 1% solution of plain lidocaine
hydrochloride, but the full effect takes 3 to 7 minutes and lasts about
an hour (20). Avoid local anesthetics with
epinephrine for procedures on the hand. Injection in or close to an
artery can result in ischemic necrosis of digits.
-
Keep the position of the neurovascular bundles in mind.
-
Insert a 26-gauge needle dorsally between the metacarpal heads and just proximal to the finger web space.
-
Make a small skin wheal and advance the needle to the palmar aspect of the web space.
-
Aspirate to make sure that you are not in the digital artery or vein. Then inject 2 to 3 ml of 1% lidocaine.
-
Rotate the needle 90° and advance it
subcutaneously to the opposite side of the finger and repeat the
injection of 2 to 3 ml lidocaine into the other web space.
desirable during surgery, a block of the superficial branch of the
radial nerve above the styloid process of the radius, as well as of the
ulnar and median nerves on the palmar aspect of the wrist, is indicated
-
Block the median nerve between the
palmaris longus and flexor carpi radialis tendon. In this interval at
the proximal wrist crease, insert a 22-gauge needle directed 45°
distally and 45° dorsally toward the floor of the carpal tunnel. If
paresthesias are elicited, withdraw slightly and redirect the needle.
Inject 5 ml of 1% lidocaine. -
Block the radial sensory nerve three fingerbreadths proximal to the radial styloid.
-
Inject about 5 ml of 1% lidocaine evenly distributed dorsally and palmarly.
-
Block the ulnar nerve at the level of the proximal wrist crease, just radial to the flexor carpi ulnaris.
-
Using a 26-gauge needle, inject about 5 ml of 1% lidocaine after aspirating to be certain that you are not in the ulnar artery.
-
Block the dorsal cutaneous branch of the
ulnar nerve by injecting 5 ml of 1% lidocaine subcutaneously beginning
at the intersection of the flexor carpi ulnaris and the proximal wrist
flexion crease, and ending at the midpoint of the dorsal wrist.
often more delicate than those required for most other surgical
procedures. Small knife blades, such as Bard-Parker #15 and #11; small
Adson forceps; pointed, curved, and straight scissors; osteotomes and
chisels; ronguers and small bone cutters; probes; hemostats; curets;
gouges; tendon strippers; sharp hook and blade retractors; needles;
sutures; and ligatures are indispensable for hand surgery. Other
special instruments, various hand holders (including those made of
malleable lead), hand and motorized
drills, special sutures, and small needles should be available in the operating suite before starting a procedure.
magnifying glasses or loupes when dissecting. With magnification, the
planes between diseased and normal tissue are immediately apparent.
Likewise, the small branches of the digital nerves and arteries are
seen and protected easily. Operating loupes have been designed on one
of three basic types of magnification systems: simple, compound
(galilean), and prismatic. For discussion of the fundamental optical
principles and terminology, and a concise description of various loupes
available on the market, the reader is referred to Baker and Meals’
article (1).
of microsurgical instruments, as well as a double-headed or
triple-headed binocular microscope with electric foot controls that
allows 6 × to 15 × magnification. Learn, practice, and develop the
technical skills of operating with microscopic magnification in the
microsurgery laboratory; only after gaining this experience can the
skill be applied to patients.
available, there is no vaccination against either the hepatitis C virus
or the human immunodeficiency virus (HIV). Take care to avoid injury to
the surgical team by needle sticks (27).
Although the incidence of glove puncture varies with the type of
surgery, it is suggested that, on average, 5.6 injuries occur per 100
procedures (9). Double surgical gloves
significantly protect the surgeon against needle perforations, but they
impair comfort, sensitivity, and dexterity (instrument and tissue
handling) during operations (26). Each surgeon
must individually deliberate whether the price of perceived impairment
of sensation and dexterity is worth the benefit of extra protection
against injury.
establish a standardized routine for preparation of the skin and
draping, thereby ensuring that each patient receives the same careful
attention to detail that is necessary for successful hand surgery. If
the surgical procedure is an elective one, caution the patient at the
time of scheduling to avoid scratches and abrasions to the hand and the
entire extremity for 2 weeks before surgery. Advise patients who are
manual laborers and who are accustomed to having grease and dirt on
their hands to scrub their hands with a detergent solution twice daily
for several days before surgery.
extremity, but it has been shown that this is unnecessary and, in fact,
may do more harm than good. Shaving should be limited to the site of
the proposed incisions and is done in the operating room immediately
before final skin preparation. The nails should be cleansed and
trimmed, and polish should be removed before the patient enters the
operating room.
positioned, scrub the hand and forearm for 10 minutes with a sterile
povidone-iodine solution from the tips of the nails to the upper arm,
where the pneumatic tourniquet is in position. Then dry the extremity
with sterile towels and paint it with povidone-iodine. Povidone-iodine
stains the digits and obscures the evaluation of capillary flow in
patients whom the vascular status must be assessed intraoperatively
(e.g., replants, revascularizations). Consider an alternative scrub
solution like chlorhexidine or hexachlorophene, particularly in these
situations. Next, apply sterile drapes and stockinette to the hand and
forearm. Cover the hand table with a waterproof drape to prevent
contamination of the drapes should they become wet during the
procedure. Then exsanguinate or elevate the extremity and request that
the tourniquet be inflated. Take a seat, usually on the axillary side
of the patient, and cut the stockinette to expose the hand.
cosmesis to the greatest extent possible within the shortest, safest
period of time. In acute injuries, this can often be done by thorough
cleansing and debridement of the wound, followed by primary repair of
nerve, bone, and tendon injuries. However, in some severe and
mutilating injuries, the primary object of treatment is to obtain
healing of the skin and subcutaneous tissues and skeletal stabilization
without intercurrent wound infection. These injuries often mandate
delayed wound closure and a further delay in the repair of tendons and
nerves. For each injury or reconstructive procedure, formulate a basic
plan, which may consist of one or more stages (12,13).
follows each injury and surgical procedure to subside is variable and
must be anticipated. It is best to wait until all inflammatory signs
have subsided, the danger of infection is past, the tissues are soft
and supple, and the joints are flexible. During this waiting period,
proper positioning, encouragement of active motion, and the use of
corrective splinting help to prevent permanent stiffness.
possible exposure, protection of important structures, and healing with
minimal scar. For some conditions, they should parallel the flexion
creases in the fingers, palm, and wrist. Zigzag incisions described by
Bruner or the traditional Bunnell incision in a midlateral location are
often most appropriate (4,5). On the dorsum, curved and S-shaped
incisions are often appropriate for the fingers, metacarpal area, and
wrist. Transverse incisions are often used at the level of the wrist.
See Table 37.1 and Table 37.2 and the approaches described later in this chapter.
 |
|
Table 37-1. Surgical Approaches in the Hand and Wrist
|
 |
|
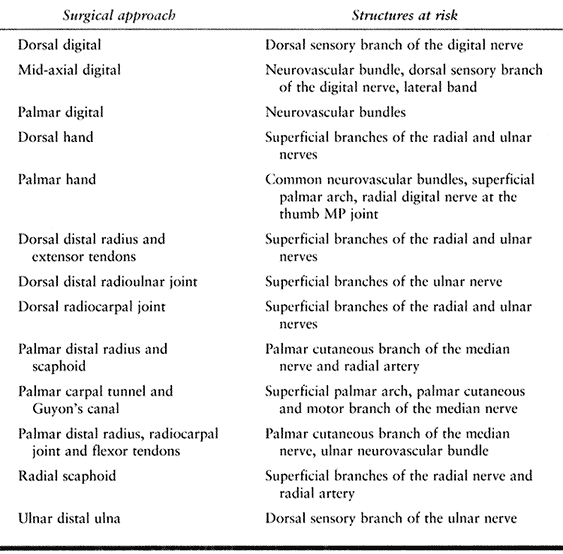
Table 37.2. Structures at Risk in Hand and Wrist Exposures
|
glasses, Bard-Parker #15 and #11 blades, and small curved Littler
scissors is essential for the atraumatic technique that has been
championed by Bunnell and his disciples.
cautery unit, both during the surgical procedure and just before wound
closure, when the tourniquet is deflated. Then, irrigate the wound with
Ringer’s or normal saline solution before you close the skin.
Injections of 0.25% bupivacaine (Marcaine) into the subcutaneous as
well as deep tissues at this point decreases the amount of analgesics
needed for immediate postoperative pain control.
procedures and some sharp traumatic wounds. Interrupted 5-0 nylon
sutures are usually used for closure of surgical wounds of the hand. An
occasional subcutaneous absorbable suture allows removal of the skin
sutures at the end of 1 week. If necessary, Steri-Strips can then be
applied, thereby eliminating cross-hatch suture scars. For young
children, always use small absorbable sutures to obviate the need for
suture removal.
Plaster of Paris splints are incorporated in the well-padded dressing,
which usually extends from the proximal level of the nails to above the
elbow. Circumferential casting should be avoided, but in some
situations (e.g., tendon transfers in a patient with cerebral palsy),
strong rigid support is essential. If flexor tendons or nerves are
repaired, the wrist and involved digit are immobilized in a semiflexed
position to remove tension but are never positioned in full flexion. In
extensor tendon injuries, the wrist and fingers are immobilized in
extension.
 |
|
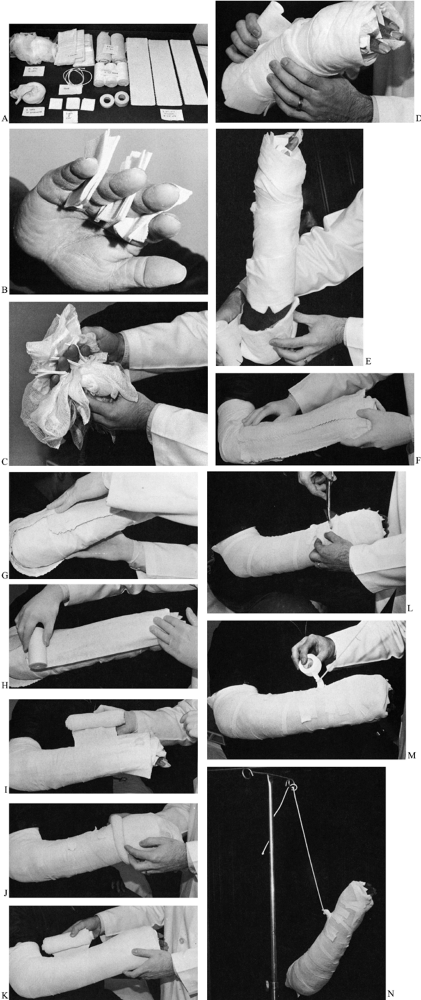
Figure 37.1. Bulky well-padded compression dressing. A:
Use fourteen 4 × 4 inch fluffs; six 2 × 2 inch gauze; three combines; three rolls of 4-inch cast padding; two rolls of 6-inch bias stockinette; 1 yard of 4-inch stockinette; twenty-one 4 × 15 inch plaster splints; one ½ and one 1-inch tape; rope. B: Place three 2 × 2 inch gauze squares between the fingers. C: Distribute fluffs evenly about the hand. D: Place a combine dorsally and palmarly around the wrist, and wrap the hand with 4-inch cast padding. E: Place an additional combine around the elbow, which is maintained at 90°. F: Place plaster slabs (4 × 15 inches) dorsally and (G) around the elbow. H: Cover plaster with cast padding. I: Wrap the dressing with 6-inch bias. J,K: Place a tubular stocking and overwrap with 6-inch bias. L: Apply tape, and cut a slot posteriorly. M: Secure rope into the slot with tape. N: Elevate the extremity with the rope. (Reprinted with permission from Szabo RM.. Upper extremity emergency problems. In: Kravis TC, Warner CG, Jacobs LM, eds. Emergency Medicine, 3rd ed. New York: Raven Press, Ltd., 1993:164.) |
applied with the forearm in slight supination. This is especially
important if the splints or cast extend above the elbow. Sometimes, the
forearm should be in a midposition, but rarely should it be immobilized
in pronation.
record the status of circulation in the exposed fingertips. Keep the
hand elevated on pillows that are appreciably higher than the shoulder.
Evaluate the neurovascular status at regular intervals if the procedure
was extensive enough to warrant hospitalization. If there is any
question about adequacy of circulation, loosen the bandages and
splints; if a cast has been applied, it should be split and spread
along its full length.
should be held in an elevated position at shoulder level or above. This
position is often easiest to maintain if the patient places the
operated hand on the opposite shoulder. Caution the patient not to
place the hand in a dependent position. If the extremity is placed in a
sling, more dependent edema and postoperative stiffness occurs than
when cooperative patients keep the extremity elevated by use of their
own muscles.
patients and their relatives are instructed to check circulation in the
fingertips by the blanch test and to observe for any numbness or
tingling that was not previously present. Patients are advised to
return immediately should there be any concern about changes in
sensibility or the adequacy of circulation.
hand surgery. Splinting is used to prevent deformity, immobilize the
operated part, protect joints and tendons, change or correct the
position of joints, substitute for paralyzed muscles, and move joints
passively.
of the hand, whereas the metacarpophalangeal joint is of primary
importance in the mechanical balance of a finger. Splinting the wrist
in extension and the metacarpophalangeal joints in flexion is of
fundamental importance unless specifically contraindicated.
after many surgical procedures. Splints may be made with plaster of
Paris, fiberglass, plastic, or malleable metal. They are usually padded
with sheet wadding, cotton, or felt, and are fastened to the extremity
with web straps and buckles or Velcro fasteners.
fractured bones in place, and facilitating healing after trauma or
surgery. A limb is held in a certain position to protect against
separation of newly repaired tissues, such as tendons, nerves,
ligaments, and arteries; to keep paralyzed muscles in a relaxed
position; and in some cases, to allow tissues to grow until they adapt
to the desired position. Joints are gradually pulled into increased
flexion or
extension to correct deformities, to place the limb in the position of function, or to produce more motion in a joint.
function but should also allow function of all uninjured parts. Dynamic
splinting is used to draw joints into flexion or extension gradually,
as in changing the position from one of nonfunction to that of
function. Rubber bands, spring wire, or flat blue spring steel produce
tension that is controllable yet insufficient to injure the joints or
to cause ischemia.
plates is used to pin and immobilize fractured bones or joints. Special
internal removable sutures can be used to pull the proximal ends of
severed tendons distally, thereby eliminating or diminishing tension at
the site of repair where individual sutures are used (3,8).
are advertised in orthopaedic periodicals and can be obtained from
surgical supply houses or manufacturers. Hospitals and outpatient
facilities should maintain a supply of commonly used hand splints in
several sizes.
of the Hand?” was published as an editorial in 1961 and is as relevant
today as it was then (14). It is reprinted by permission of Surgery, Gynecology & Obstetrics.
services of a physician or a surgeon, whether in the emergency
department of a metropolitan hospital or the office of a rural
practitioner, involve the hand. The physician administering the primary
treatment for such injuries has a great responsibility, since his
treatment determines, to a large extent, the final outcome.
should govern the treatment of an injury to the hand. They must know
that it is important to protect wounds from contamination and infection
and that adequate help, facilities, and proper instruments must be
available before one starts to care for the injured hand. The
traumatized hand must be cleansed thoroughly but gently. When compared
with injuries of the arm, leg, or abdomen, the involved tissue of the
hand should be sparingly debrided. Whereas many wounds of the arms and
legs should be treated by delayed closure, almost all wounds of the
hand should be closed primarily and this closure must be without
tension. In some instances, the use of skin grafts is necessary to
avoid tension. When possible, fractures should be reduced and
immobilized at the time of the primary treatment. However, if the
physician is not trained to care adequately for the bone injury, less
harm will be done if the skin is closed, the hand is placed in a
position of moderate dorsiflexion of the wrist, moderate flexion of the
fingers, and moderate abduction and opposition of the thumb, and a
bulky dressing is applied to prevent edema. In such selected instances,
the fractures can be dealt with after the cutaneous wound has healed.
Even more important is the necessity to realize that severed nerves and
tendons do not require primary repair; less harm will be done under
unfavorable conditions by secondary repair of nerves and tendons after
the initial wound has healed. A surgeon who attempts primary suture of
a flexor tendon in its digital sheath should have had considerable
education, training, and experience in reconstructive surgical
treatment of the hand and should be capable of performing a tendon
graft.
rehabilitative surgery of the hand should be carried out in hospitals
by surgeons well qualified and dedicated to this field of surgery. The
surgeon interested in treatment of the severely injured hand must be
educated to work in orthopedic surgery, plastic surgery, and
neurosurgery. He should have knowledge of dermatologic, circulatory,
paralytic and arthritic diseases which are prone to affect the hand. He
must be well versed in the most minute details of the surgical and
functional anatomy of the entire upper extremity. He must be versed in
rehabilitative procedures and trained in splinting and bracing. He must
be capable of teaching the patient how to prevent and overcome
stiffness of joints and how to co-ordinate muscles which formerly had
one function but after a tendon transfer have another function.
surgery of the hand must teach medical students, interns, and residents
how to care properly for injuries which affect the hand. Many of the
principles established by such pioneers as Allen Kanavel, Sterling
Bunnell, and Sumner Koch are still basic and pertinent. It is important
that these principles be learned if crippling of the hand is to be
minimized.
predicament that results in pondering to yourself “if there were only
an operation that could undo the results of my last operation!”
scheme: *, classic article; #, review article; !, basic research
article; and +, clinical results/outcome study.
RJ, Foad N.. Early Mobilization of Repaired Flexor Tendons within
Digital Sheath Using an Internal Profundus Splint: Experimental and
Clinical Data. Ann Plastic Surg 1984;12:187.
KU, Moran CG, Briggs PJ. Glove Perforation during Hip Arthroplasty. A
Randomised Prospective Study of a New Taperpoint Needle. J Bone Joint Surg Br 1993;75B:918.
when choosing the surgical approach to the hand and wrist. An ideally
planned incision will give the maximum exposure of the pathology with
the minimum necessary length of incision and risk of injury to the
surrounding structures. If possible, the incision should fall within
Langer’s lines to produce the most cosmetically pleasing scar and avoid
hypertrophy (i.e., a transverse incision rather than a longitudinal one
for excision of a dorsal ganglion). Injury to surrounding structures
includes not only intraoperative injury but postoperative fibrosis that
may limit range of motion. For instance, the dorsal approach to a
metacarpal fracture avoids the dissection of the neurovascular bundles
and flexor tendons necessary in a palmar approach. The dorsal approach
is not only more facile but decreases the chance of postoperative
fibrosis of the flexor tendons that may hamper rehabilitation and
ultimately decrease range of motion. Cutaneous nerves should always be
preserved whenever possible to decrease the risk of neuroma formation
and painful scars. Loupe magnification is recommended for visualization
of all the small structures of the wrist and hand. Microscope
magnification is often necessary for repair of nerves and vessels.
dorsal approach, the midaxial approach, and the palmar approach. The
midaxial approach and the midlateral approach are similar, except that
the midaxial incision is dorsal to the midlateral. The midlateral
incision is made at the anatomic midpoint of the finger. The midaxial
incision is made at the connection of the centers of rotation of the
respective joints and is slightly dorsal to the midlateral because the
joints are dorsal to the rest of the soft tissues in the digit (flexor
tendons). The midaxial incision is more often used because it is right
over the bone and, on deep dissection, leaves the neurovascular
structures safely in the palmar flap.
extensor mechanism and bone of the proximal and middle phalanx,
proximal interphalangeal (PIP) joint and metacarpophalangeal (MP)
joints.
for which a palmar approach is usually more effective. A transverse or
H-type incision may be more appropriate for the exposure of the distal
interphalangeal (DIP) joint for excision of a mucous cyst or
arthrodesis. A longitudinal incision over the DIP joint may extend into
the germinal matrix of the nail bed and cause nail deformity with
growth.
 |
|
Figure 37.2. The dorsal approach to the digit. The dorsal sensory branch of the digital nerve and the dorsal veins have been retracted.
|
-
Make a longitudinal incision over the
dorsum of the digit in the midline. Take care with deep dissection to
protect the dorsal veins when possible and the dorsal sensory branches
of the digital nerves. -
The extensor mechanism is well
visualized. For exposure of the middle phalanx, incise the extensor
mechanism between the two lateral bands. For exposure of the proximal
phalanx, make an incision between the central slip and lateral band,
being careful to preserve the insertion of the central slip on the base
of the middle phalanx. If an arthrodesis of the PIP joint is to be
performed, the central slip is divided longitudinally and is elevated
off the base of the middle phalanx, along with subperiosteal dissection
of the proximal and middle phalanx. In the thumb, make the exposure on
one side of the extensor pollicis longus tendon. Expose the MP joint
with proximal extension of the incision. Incise the dorsal hood 2 mm
radial or ulnar to the extensor tendon, leaving a rim of hood attached
to the extensor tendon for later repair.
neurovascular bundle, the proximal, middle or distal phalanx, and the
flexor sheath. Because the incision lies in the axis of the finger, it
heals very well despite early mobilization and is often barely visible
when healed. It provides excellent visualization of phalangeal
fractures for placement of internal fixation (either screws or plates)
on the radial or ulnar aspect of the bone. In this position, they are
less likely to interfere with gliding of the adjacent tendon than in
the dorsal or palmar position. The radial or ulnar midaxial incision
may be favored based on the fracture anatomy, and this decision should
be made preoperatively. Visualization of the neurovascular bundles is
excellent through this incision, and it is ideal for isolated digital
nerve repair. Visualization of the flexor tendons is sufficient to
allow for debridement of tenosynovitis, but flexor tendon repair may be
difficult.
limited through this approach and is better accomplished through a
palmar approach.
 |
|
Figure 37.3. The midaxial approach to the digit. A: The incision is made by connecting the flexion creases of the digits. B:
The phalanges, fibrous sheath, and neurovascular bundles are visualized. The extensor hood is retracted or incised proximally, and the dorsal sensory branch is retracted dorsally. C: Axial schematic demonstrating midaxial approach. |
-
Flex the digit completely at the MP, PIP,
and DIP joints. Mark the dorsal aspect of the flexion creases at these
joints. Then extend the digit and connect these marks by a longitudinal
line. It can be extended distally along the distal phalanx palmar to
the nail. Proximally, it can be extended up dorsally over the MP joint
except on the radial aspect of the index and ulnar aspect of the little
finger, where it may be extended radially and ulnarly, respectively.
Similarly, the incision can be extended palmarly proximal to the MP
joint in a zigzag fashion to increase palmar exposure. -
Carry the incision down through the deep
tissues dorsal to the neurovascular bundles. Divide Clelands’ ligaments
to expose the neurovascular bundle. With the neurovascular bundle in
the palmar flap, the periosteum of the phalanges can be visualized.
Palmarly, the flexor tendon sheath can be identified. -
Proximal dissection of the proximal
phalanx will encounter two structures that limit exposure. The first is
the dorsal branch of the digital nerve. This nerve lies dorsal over the
middle phalanx but travels palmar to dorsal over the proximal phalanx
and needs to be identified and protected. The second is the lateral
band. This can be incised longitudinally to allow for excellent
exposure of the proximal phalanx. Repair is optional if the
contralateral lateral band is intact.
flexor tendons for repair, tenosynovectomy, or tumor excision. It is
extensile into the hand. It also provides excellent visualization of
the neurovascular bundles and is frequently used for the excision of
Dupuytren’s disease. It is the exposure of choice for a volar plate
arthroplasty or the palmar articular fracture (2).
 |
|
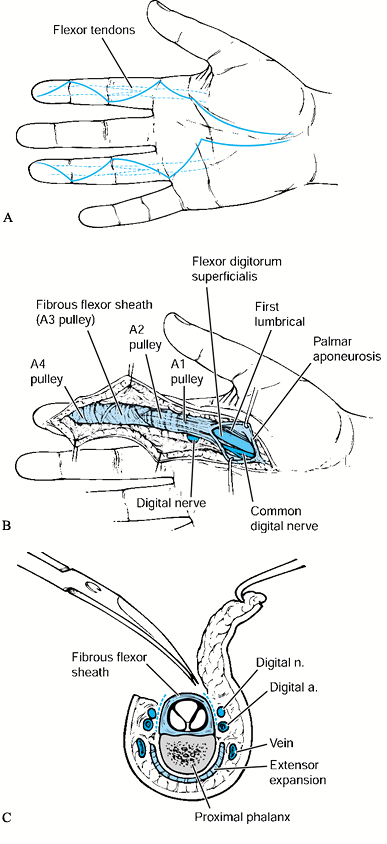
Figure 37.4. A and B:
The palmar approach to the digit and palm. With incision of the A3 or A1 and palmar pulley with retraction of the flexor tendons, the volar plate of the PIP and MP joints can be visualized respectively. C: Axial schematic demonstrating palmar approach. |
-
Plan a zigzag Brunner incision across the
digit, extending from the distal phalanx into the palm. Cross the
digital flexion creases at 45° angles to create a flap with a 90°
corner. Any portion of this incision can be used. -
Now incise the flexor sheath by creating
an L with a radially or ulnarly based flap to allow access to the
flexor tendons. This should be done between, proximal, or distal to the
A2 and A4 pulleys. Take care to preserve these pulleys to prevent
bowstringing of the flexor tendons postoperatively. -
If access to the PIP joint is desired,
create a flap in the sheath over the joint, retract the flexor tendons,
and expose the volar plate of the joint. Dissect the flexor plate from
the middle phalanx to expose the joint.
The dorsal approach exposes the extensor tendons, metacarpals (MP), and
carpometacarpal (CMC) joints, and the intrinsic muscle compartments.
The palmar approach exposes the flexor tendons and lumbricals,
neurovascular bundles, and Dupuytren’s disease.
palmar articular fractures of the MP joint. It also does not provide
visualization of the neurovascular bundles or flexor tendons.
 |
|
Figure 37.5. The dorsal approach to the hand. A: The longitudinal incision is centered over the desired metacarpal. B:
Deep dissection reveals the extensor tendon, which can be retracted, and the juncturae, which can be transected, to visualize the metacarpal. |
-
Make a longitudinal incision over the
desired metacarpal. Extend it proximally or distally to expose the MP
or CMC joint. Perform subcutaneous dissection to avoid injury to the
cutaneous nerves, which are branches of the radial or ulnar nerve. The
extensor tendons are visualized and may consist of multiple slips and
multiple juncturae (8,11,12 and 13). -
If deeper exposure is desired, make an
incision in the investing fascia of the extensor tendons and retract
the extensor tendons. Occasionally, it will be necessary to divide the
juncturae tendinae to provide exposure of the metacarpal or MP joint.
These can be later repaired if desired. -
Subperiosteal dissection of the
metacarpal is then possible to complete the exposure. The interosseous
muscles are evident on either side of the metacarpal. In the thumb, the
deep dissection is in the interval between the extensor pollicis longus
and extensor pollicis brevis. -
Distal extension exposes the MP joint.
Divide the extensor hood on either the radial or ulnar side, then
incise the capsule to expose the MP joint. Proximal extension exposes
the capsule of the CMC joint, which can be incised longitudinally and
elevated subperiosteally.
such as for repair of a lacerated extensor tendon or harvesting of the
extensor indicis proprius tendon, make a transverse incision directly
over the site of repair. This gives a more cosmetic scar because the
incision falls within Langer’s lines.
visualization of flexor tendons, neurovascular bundles, lumbricals, or
Dupuytren’s disease. It is also recommended for palmar articular
fractures of the MP joint.
-
Make a zigzag Brunner incision in the
palm over the desired area of exposure, usually over the flexor tendon.
This can be extended to a Brunner incision of the digit and across the
carpal tunnel. -
Incise the palmar fascia longitudinally.
Careful dissection reveals the flexor tendon and common digital
arteries and nerves on either side. -
The A1 pulley is visualized over the MP joint, and a palmar pulley can be identified proximally (7). The arteries can be traced proximally to the superficial palmar arch.
-
Accomplish visualization of the MP joint
with incision of the A1 pulley and detachment of the volar plate from
the base of the proximal phalanx. -
In the thumb, care must be taken when
dissecting over the flexor tendon because the radial neurovascular
bundle originates ulnar to the flexor tendon and crosses to its radial
side at the metacarpal level. -
For surgical release of trigger fingers,
center a single longitudinal incision over the A1 pulley for the index
through little fingers. A transverse incision for the thumb may be used
(Fig. 37.6). Alternatively, the incision can be
placed in the distal palmar crease transversely for the little, ring
and long finger, and the proximal palmar crease for the index finger.
If the longitudinal incision is used, do not cross any palmar creases
or a scar contracture can form.![]() Figure 37.6. Planned incision for release of trigger fingers (A1 pulleys).
Figure 37.6. Planned incision for release of trigger fingers (A1 pulleys).

longitudinal incision with a few exceptions. It can be extended
proximally to include the distal radius and ulna, and it can be
extended distally into the hand as already described. Depending on the
exposure desired, make the incision in the midline or displaced
slightly radially or ulnarly. In certain situations, such as the
approach to the scapholunate joint, the approach to the scaphoid, or
for a proximal row carpectomy, a transverse incision may be used for a
more cosmetic result.
for internal fixation of fractures or wrist fusion, or to expose the
extensor tendons for tenosynovectomy.
effective in exposing the palmar aspect of the radius for fractures
with palmar displacement or palmar articular fractures.
 |
|
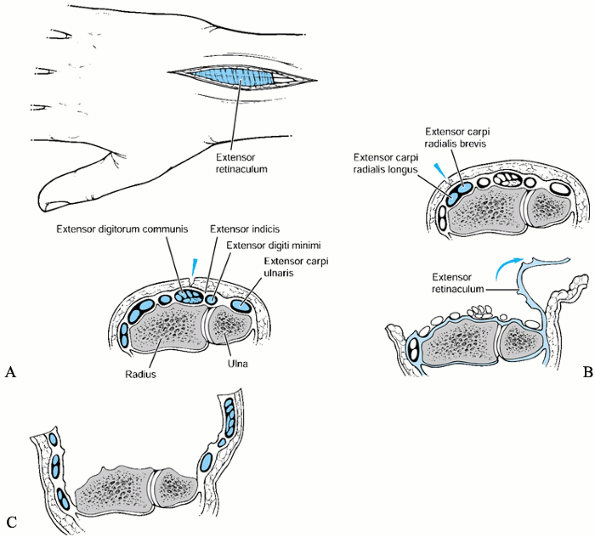
Figure 37.7. The dorsal approach to the distal radius and extensor tendons. A: The incision is usually placed in the midline. B:
Exposure of the extensor tendons. Axial schematic demonstrating incision of the dorsal retinaculum over the second dorsal compartment with radial and ulnar dissection of the extensor retinaculum. C: Exposure of the distal radius. Axial schematic demonstrating incision of the dorsal retinaculum over the third dorsal compartment with subperiosteal radial and ulnar dissection of the extensor tendons. |
-
Make a longitudinal incision over the
digital extensor tendons. It may be midline or displaced slightly
radially or ulnarly, depending on the location of the pathology. -
Use blunt dissection through the
subcutaneous tissue to prevent injury to cutaneous nerves and the
dorsal veins, when possible. Expose the extensor retinaculum and make
deep skin flaps just superficial to the retinaculum if an extensor
tenosynovectomy is planned. For the approach to the distal radius, skin
flaps are not necessary.
-
Incise the dorsal retinaculum
longitudinally over the index or fifth dorsal compartment. Then dissect
radially and ulnarly cutting the intercompartmental septa to expose all
six dorsal compartments as desired. Do not dissect the compartments
superiosteally and avoid damage to the adjacent extensor tendons. This
procedure can be aided by placing a small elevator in the next
compartment to be exposed. This method easily identifies the
intercompartmental septum for division. -
The retinaculum is particularly difficult
to dissect between the second and third compartment. Here,
subperiosteal dissection is necessary on Lister’s tubercle to maintain
continuity of the retinaculum. This approach is easily extensile into
the hand and up the forearm. -
Often in closing the retinaculum after
tenosynovectomy, it is split transversely, with half placed below the
tendons and half above. Repair of the dorsal retinaculum is necessary
to prevent bowstringing of the tendons.
-
Incise the dorsal retinaculum over the
third dorsal compartment and retract the extensor pollicis longus
tendon radially from the compartment. -
Perform subperiosteal
dissection of the remaining compartments radially and ulnarly to expose
the distal radius. Subperiosteal dissection of the fourth compartment
decreases the likelihood of postoperative adhesion of the extensor
digitorum communis tendons. -
This exposure can be extended distally to the carpus or proximally up the forearm to the extensor pollicis brevis muscles.
-
After internal fixation of the radius,
often the third dorsal compartment can be closed over the plate. The
extensor pollicis longus tendon does not need to be replaced in its
compartment.
-
To include the distal radioulnar joint,
continue ulnar dissection using the above-mentioned technique. If only
the distal radioulnar joint needs to be approached, then a smaller skin
incision can be made directly over the fifth dorsal compartment. -
Incise the extensor retinaculum over the
fifth dorsal compartment and retract the extensor digitorum quinti
tendon radially. The capsule of the distal radioulnar joint is
immediately beneath this compartment and can be incised longitudinally.
A synovectomy of the joint
P.1241
can then be performed, the distal ulna excised, or the triangular fibrocartilage complex (TFCC) repaired. -
After synovectomy or TFCC repair, repair
the dorsal capsule primarily. After distal ulnar excision, reattach the
dorsal capsule of the distal radioulnar joint to the palmar capsule
over the end of the distal ulna with several nonabsorbable sutures to
prevent subluxation of the distal ulna. Repair the extensor retinaculum
with nonabsorbable sutures and close the skin as usual.
extension of the previously described approach to the distal radius,
with the dissection continued distally to dissect the carpal bones
subperiosteally. This approach is useful for radiocarpal fusions. When
a limited exposure of the wrist is known to be needed preoperatively, a
transverse incision may be used with a more cosmetically appealing
result. Often the scar, when healed, is barely visible within Langer’s
lines. If a later radiocarpal fusion is necessary, a longitudinal
incision can be made at a right angle to this incision without
complication. It is possible to excise the terminal branch of the
posterior interosseous nerve through this transverse incision, if
desired. Carry out the dissection proximally with incision of the third
dorsal compartment under the proximal skin flap. The terminal branch of
the posterior interosseous nerve is then evident between the third and
fourth compartments and can be excised.
approximately 1.5 cm distal to Lister’s tubercle. The length of the
incision is dependent on the pathology to be explored. (Fig. 37.8).
 |
|
Figure 37.8.
The dorsal approach to the radiocarpal joint. A transverse incision is made over the radiocarpal joint distal to Lister’s tubercle. After longitudinal incision of the extensor retinaculum and T-incision of the dorsal capsule, the radiocarpal joint is exposed. |
-
Carry the incision down through the
subcutaneous tissue, taking care to identify and protect the cutaneous
branches of the radial and ulnar nerves. -
Incise transversely the capsule overlying
the proximal row. Make a T over the lunate. Then expose the scaphoid,
lunate, and triquetrum subperiosteally. -
After removal of the carpus, repair the capsule with nonabsorbable suture and close the skin.
-
Make a dorsal transverse incision 2 to 3
cm in length centered over the scaphoid or scapholunate joint,
respectively. The scapholunate joint can be palpated 1 to 1.5 cm
directly distal to Lister’s tubercle. -
After the cutaneous nerves are dissected
free, incise the capsule over the scapholunate joint, and dissect
radially and ulnarly along the radiocarpal joint as necessary. Take
care to avoid damage to the dorsal vessels entering the waist of the
scaphoid. -
After repair of the scapholunate ligament
or fixation of the scaphoid fracture, repair the capsule with
nonabsorbable suture and close the wound with a subcuticular suture.
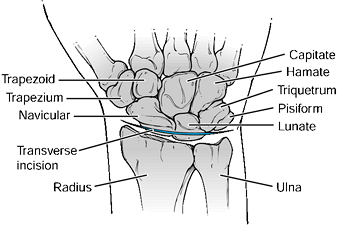
visualization of the distal radius, carpal tunnel, digital flexor
tendons, palmar aspect of the carpus, median and ulnar nerve, and the
radial and ulnar arteries. One of two incisions can be used. The more
radial incision centered over the flexor carpi radialis exposes the
distal radius, radial artery, and scaphoid. The more midline incision
exposes the carpal tunnel, median and ulnar nerve, ulnar artery,
digital flexor tendons, carpus and distal radius, ulna, and palmar
distal radioulnar joint. For the isolated exposure of the distal
radius, the radial incision is preferred because it does not involve
dissection around the digital flexor tendons and thereby decreases the
chance of postoperative adhesions.
scaphoid is indicated when the only structures that are necessary to be
exposed are the distal radius, scaphoid, and radial artery. It has the
advantage of not
dissecting
around the flexor tendons, therefore minimizing postoperative
adhesions. It can be extended to include exposure of the
scaphotrapezial joint distally and the palmar radius proximally.
incision but can be visualized through a separate incision. The flexor
tendons, median and ulnar nerves, and ulnar artery, as well as the
remainder of the carpus, are not visualized either and are better
exposed through the midline palmar approach.
-
Make a longitudinal incision over the flexor carpi radialis tendon, extending proximally as far as necessary (Fig. 37.9).
Distally, end the incision at the proximal palmar wrist flexion crease
if only the radius is to be exposed. If exposure of the scaphoid is
necessary, the incision begins 2 cm proximal to and then extends just
past the distal wrist flexion crease to the scaphoid tubercle. This
approach is known as the Russe approach to the scaphoid. Carry the
incision down through subcutaneous tissue in line with the flexor carpi
radialis. It is important not to deviate ulnar to the flexor carpi
radialis because injury to the palmar cutaneous branch of the median
nerve can occur (6).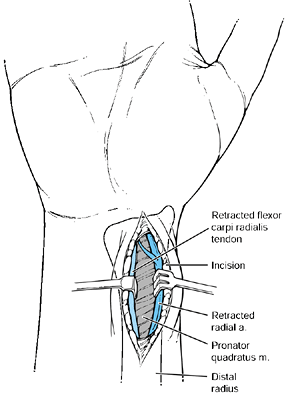 Figure 37.9.
The palmar approach to the distal radius and scaphoid. The incision is
based over the flexor carpi radialis tendon and is curved radially
distal to the distal wrist flexion crease. -
Incise the sheath overlying the flexor carpi radialis and retract the flexor carpi radialis ulnarly.
-
Expose the radial artery along the radial border of the sheath and protect it.
-
Incise the sheath deep to the flexor
carpi radialis and retract the flexor tendons ulnarly. Identify the
pronator quadratus on the palmar radius and incise it longitudinally on
its radial aspect, leaving a small portion radially for reattachment. -
Then subperiosteally expose the radius ulnarly to the distal radioulnar joint.
-
If exposure of the scaphoid is desired,
incise the palmar capsule longitudinally to the scaphoid tubercle and
expose the scaphoid. -
Close with repair of the palmar capsule
and reattachment of the pronator, if possible. Then repair the skin
with interrupted or running subcuticular sutures as desired.
nerve in the carpal tunnel and ulnar nerve in Guyon’s canal. Limited
visualization of the flexor tendons and palmar aspect of the carpus is
afforded (4,10).
rheumatoid flexor tenosynovectomy for rheumatoid arthritis requires
proximal extension of this incision.
 |
|
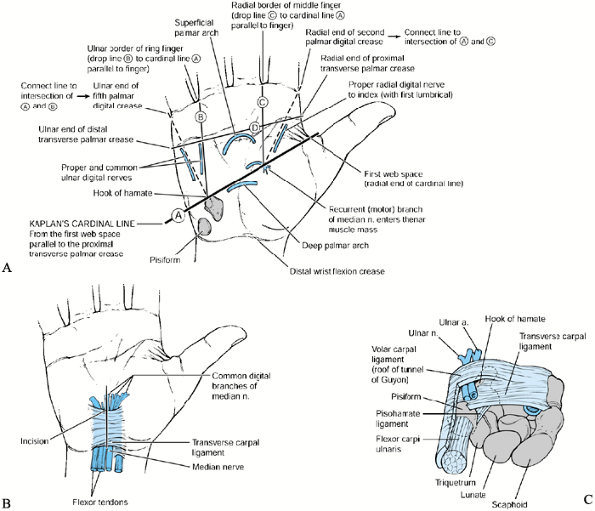
Figure 37.10. Palmar approach to the carpal tunnel and Guyon’s canal. A:
The skin incision is made in line with the radial aspect of the fourth finger. Care should be taken not to stray radial to this line because injury of the palmar cutaneous branch of the median nerve may result. B: The palmar fascia fibers are noted to run longitudinally and are transected. After transection of the transverse carpal ligament, the median nerve and flexor tendons are identified within the wound and can be retracted for exposure of the palmar carpus. C: The location of Guyon’s canal, which can be identified in the ulnar aspect of the wound. |
-
Make a longitudinal incision in the palm
in line with the radial border of the ring finger. The distal extent of
the incision intersects Kaplan’s cardinal line (a line determined by
abducting the thumb and drawing a horizontal line from the first web
space parallel to the proximal transverse palmar crease). The proximal
extent of the incision is the distal wrist flexion crease. Then incise
sharply down through the subcutaneous tissue because the palmar
cutaneous nerve is out of potential harm. -
Incise the palmar fascia longitudinally,
and identify the ulnar nerve and artery beneath the palmar fascia in
the ulnar aspect of the wound. Remember that the ulnar artery can be
palmar to the palmaris brevis, and other anomalies have been reported
as well (5,9). The ulnar artery and sensory branch of the ulnar nerve continue distally and may cross radial to the hook of the hamate (3).
tendons, median and ulnar nerves, and radiocarpal joint. The distal
radius can also be exposed through this incision.
better to approach it through the radial palmar incision. This midline
approach has an increased incidence of flexor tendon adherence owing to
the dissection necessary around the tendons.
 |
|
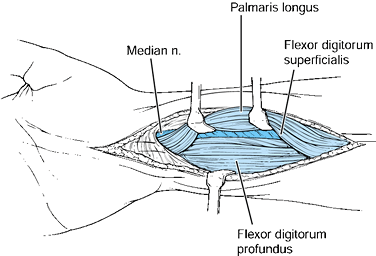
Figure 37.11.
Palmar approach to the digital flexor tendons, radiocarpal joint, and distal radius. Extension radial to the palmaris may produce injury to the palmar cutaneous branch of the median nerve. Deep dissection allows visualization of the digital flexor tendons, which may be retracted radially to expose the palmar distal radius and pronator. Subperiosteal dissection of the pronator exposes the distal radius. The radiocarpal joint is exposed through a longitudinal or T-incision. |
-
The incision is a proximal extension of
the incision made for exposure of the carpal tunnel. Cross the wrist
flexion creases at 45° angles. Proximal to the proximal wrist flexion
crease, the incision can be a straight line, ulnar to the palmaris
tendon. -
Divide the antebrachial fascia. Identify
the median nerve and flexor tendons, and the ulnar nerve in the ulnar
aspect of the wound. -
Retract the flexor tendons to expose the
distal radius and distal radioulnar joint. To expose the distal radius,
incise the pronator along its radial margin, leaving a small cuff of
tissue to which to repair it. Expose the radius subperiosteally. The
distal radioulnar joint can be visualized by longitudinal incision into
the palmar capsule. Take care distally not to incise the triangular
fibrocartilage complex (TFCC). -
Close the wound with repair of the pronator and the capsule. Close the skin with interrupted or subcuticular sutures.
visualization of the proximal pole, waist, and distal pole of the
scaphoid. It useful in procedures in which a dorsal extensile exposure
of the scaphoid is desired, such as for vascularized bone grafting of
the scaphoid, and provides excellent exposure of the radial styloid for
radial styloidectomy.
need to be exposed, then the palmar approach to the scaphoid provides
better visualization of the palmar wrist structures.
 |
|
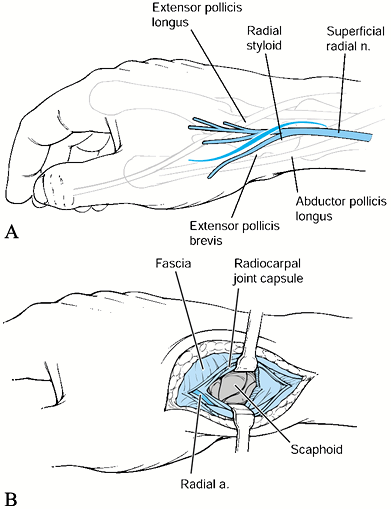
Figure 37.12. The radial approach to the scaphoid. A:
The curvilinear incision is made over the anatomic snuffbox, between the extensor pollicis longus and extensor pollicis brevis. B: A longitudinal incision is made in the radiocarpal joint capsule, and the radial artery is retracted distally. The scaphoid is visualized. |
-
Make a curvilinear incision over the
anatomic snuffbox. Extend it proximally over the dorsal or radial
aspect of the wrist as needed. Then proceed between the extensor
pollicis longus dorsally and the extensor pollicis brevis palmarly.
These tendons are easily identified because traction on the extensor
pollicis longus produces extension of the thumb IP joint and traction
on the extensor pollicis brevis produces extension and abduction of the
thumb ray without extension of the IP joint. -
Take care to avoid injury to the superficial branches of the radial nerve, which may be multiple (1).
-
Retraction of the tendons allows
visualization of the radial artery and its dorsal branches, which must
be preserved to maintain the vascularity of the scaphoid. Incise the
joint capsule longitudinally and expose the scaphoid with distal and
palmar retraction of the radial artery. It is important when exposing
the scaphoid not to disrupt the dorsal blood supply to the bone by
stripping the vessels that enter the scaphoid through the dorsal waist.
distal ulnar excision or internal fixation, exposure of the extensor
carpi ulnaris tendon, or open visualization of the TFCC.
 |
|
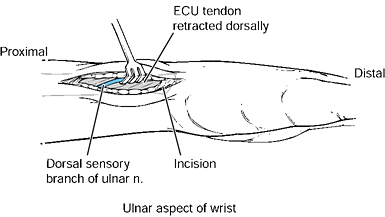
Figure 37.13. The ulnar approach to the distal ulna. A: The longitudinal incision is made along the palmar aspect of the extensor carpi ulnaris tendon. B:
The sheath over the extensor carpi ulnaris tendon is incised, and the extensor carpi ulnaris is retracted dorsally. Care must be taken to avoid injury to the dorsal sensory branch of the ulnar nerve, which travels from palmar to dorsal in this region. Subperiosteal dissection may be performed on the distal ulna and the ulnocarpal joint may be incised longitudinally to expose the TFCC. |
-
Perform deep dissection in a blunt
fashion because the dorsal sensory branch of the ulnar nerve runs from
palmar to dorsal across the distal ulna in this region. -
Incise the retinaculum over the extensor carpi ulnaris tendon longitudinally and retract the tendon dorsally.
-
Incise the ulnocarpal joint capsule
longitudinally along its ulnar aspect to visualize the TFCC. Start the
incision distally and do not cut into the TFCC. Proximally, the distal
radioulnar joint capsule and ulnar periosteum may similarly be elevated
off the distal ulna to allow its exposure. -
Closure of the wound may include repair
of the distal radioulnar joint capsule and the retinaculum over the
extensor carpi ulnaris tendon if it is noted to sublux palmarly.
PA, Richards RS, McFarlane RM. The Palmar Cutaneous Branch of the
Median Nerve and the Palmaris Longus Tendon: A Cadaveric Study. J Hand Surg 1994;19:199.