
Cole & Sekiya: Surgical Techniques of the Shoulder, Elbow and Knee in Sports Medicine, 1st ed.
Copyright ©
2008 Saunders, An Imprint of Elsevier
Section – Surgical Techniques of the Anterior Cruciate Ligament
CHAPTER 60 – Patellar Tendon Autograft for Anterior Cruciate Ligament Reconstruction
Charles A. Bush-Joseph, MD,
Bernard R. Bach Jr., MD
Anterior cruciate ligament (ACL) rupture commonly occurs among both professional and amateur athletes. As the ACL is the primary restraint to anterior displacement of the tibia on the femur and a secondary stabilizer to tibial rotation, an ACL-deficient knee can lead to meniscal injury, functional instability, and early-onset osteoarthritis.[3] These are potentially devastating consequences in certain populations of patients, especially in athletes who participate in cutting or pivoting activities. The ACL is the most frequently torn knee ligament requiring surgical repair, and there are more than 100,000 ACL reconstructions each year in the United States.[14]
There are a variety of treatment options in regard to surgical technique, graft source, and graft fixation for ACL reconstruction. Graft options may include autograft (bone–patellar tendon–bone, hamstring, and quadriceps tendon) or allograft (bone–patellar tendon–bone, Achilles tendon, and anterior tibialis tendon) tissue. The bone–patellar tendon–bone autograft is the most commonly used graft during the last 15 years and the graft of choice of physicians treating NCAA Division 1A and professional athletes. [2] [6] [7] [8] [12] This is due to the graft’s ready accessibility, good mechanical strength, bone healing, and interference screw fixation. This chapter details the surgical technique for endoscopic ACL reconstruction with a bone–patellar tendon–bone autograft.
The diagnosis of ACL injury is often apparent from the characteristic history alone that is provided by the patient. Typical descriptions of the injury mechanism include the following:
The physical examination is essential in the diagnosis of ACL injury and the evaluation of associated pathologic changes, such as meniscal or chondral damage and associated ligamentous injury.
Assessment of the injured knee includes evaluation of gait, limb alignment, presence of an effusion, knee range of motion, patellar instability, anterior knee or joint line tenderness, and varus or valgus laxity. The Lachman and pivot shift tests remain the most specific examinations for the evaluation of ACL injury. A positive result of the posterior drawer test, posterior sag, or increased tibial external rotation at 30 or 90 degrees signals the presence of associated posterior cruciate ligament (PCL) or posterolateral corner injury. Instrumented knee arthrometry with anterior drawer testing at 30 degrees can be helpful in confirming ACL injury when the side-to-side difference is greater than 3 mm.
Despite recent trends, plain radiographic imaging remains critical in the initial evaluation of patients with suspected ACL injuries. Weight-bearing radiographs are essential to visualize joint space, notch architecture, and bone alignment. Lateral radiographs may reveal an avulsion of the tibial eminence or lateral capsule (Segond fracture). Radiographic views commonly used in evaluating patients with knee ligament injuries include the following:
Magnetic resonance imaging is performed to evaluate the ACL, PCL, medial collateral ligament, lateral collateral ligament, menisci, and associated articular cartilage injury.
Indications and Contraindications
The ideal candidate for an ACL reconstruction with bone–patellar tendon–bone autograft is a young, active patient with no effusion, full range of motion, and no patellar tendon disease. In addition, those patients with symptomatic intraarticular disease, such as meniscal injury or loose bodies, may benefit from earlier surgical intervention. Of note, it is vital to educate the patient concerning the risks and benefits of the various graft options for the patient to make the final informed decision. For example, patients with certain professions, such as roofers and carpet layers, should be counseled about the increased incidence of discomfort with kneeling.
ACL reconstruction with a bone–patellar tendon–bone autograft is relatively contraindicated in patients with degenerative joint disease, in patients with a history of patellar tendon disease, and in those patients who are sedentary, inactive, or elderly. In addition, patients who have limited motion preoperatively or who are unable to comply with a rigorous postoperative protocol are poor candidates as well. Patients with a history of anterior knee pain or pain with kneeling should be advised to choose a different graft option. Last, ACL reconstruction in the skeletally immature patient remains a challenge and requires extensive discussion of the risks and benefits involved. In patients with significant growth remaining, soft tissue grafts such as hamstring, rather than bone–patellar tendon–bone grafts, are thought to pose less risk of premature physeal closure.
Preoperative rehabilitation is essential to successful surgical outcomes. Before surgery, all patients undergo extensive physical therapy, focusing on closed-chain hamstring and quadriceps stretching and strengthening to regain full range of motion and a normal gait pattern.
After induction of general, spinal, or regional anesthesia, the patient is placed in the supine position on a standard operating room table. A thorough examination under anesthesia is performed.
Examination under anesthesia includes the Lachman test, anterior and posterior drawer tests, varus and valgus stress testing, and pivot shift test. Evaluation of external rotation at 30 and 90 degrees of flexion is important to assess the stability of the posterolateral corner. Comparison examination of the contralateral knee is done as well. If pivot shift testing demonstrates clear ACL insufficiency, the bone–patellar tendon–bone graft can be harvested before diagnostic arthroscopy.
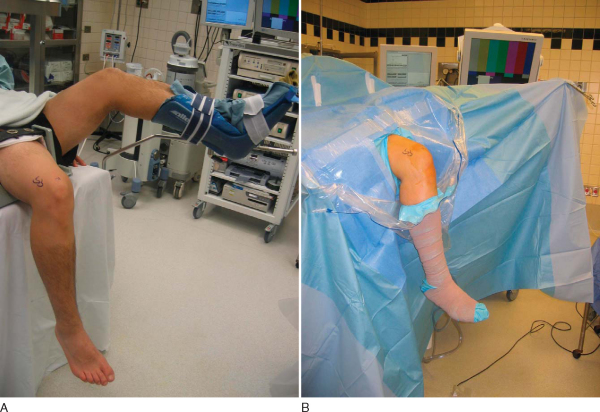
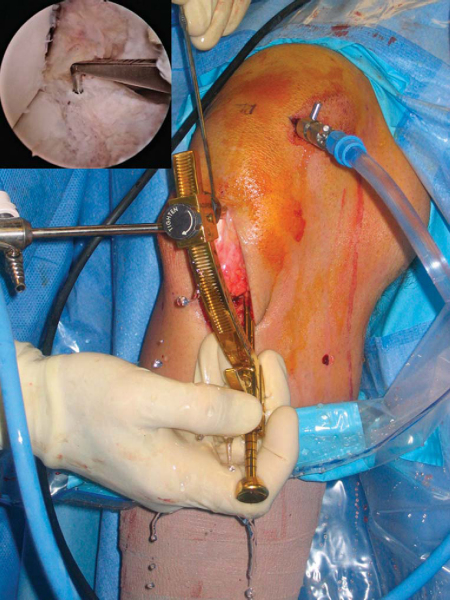
At this time, a tourniquet is placed and the thigh secured in a leg holder for added stability. The contralateral leg is positioned in a well-padded foot holder with the knee and hip flexed to protect the peroneal nerve. The foot of the operating room table is then dropped and the waist is flexed to diminish the amount of lumbar extension (
Fig. 60-1
). The leg is prepared and draped in sterile fashion as preoperative antibiotics are administered.
Surgical Landmarks, Incisions, and Portals
| • | Patella | |
| • | Patellar tendon | |
| • | Tibial tubercle | |
| • | Fibular head | |
| • | Gerdy tubercle |
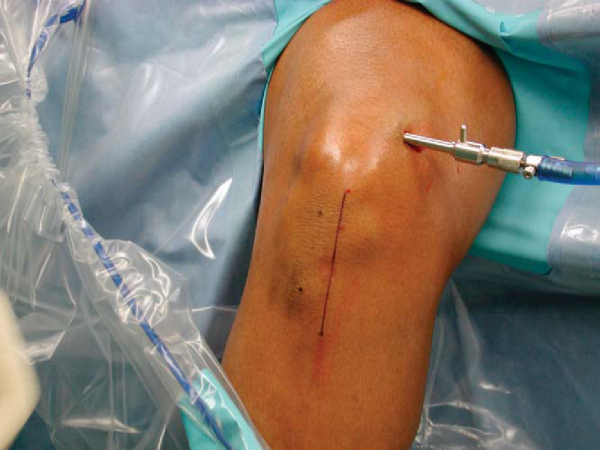
The longitudinal incision for the bone–patellar tendon–bone harvest starts at the most distal aspect of the patella, just medial to the midline, coursing distally to 2 cm below the tibial tubercle (
Fig. 60-2
).
| • | Superomedial portal | |
| • | Inferolateral portal | |
| • | Inferomedial portal (made through graft harvest site) |
Examination Under Anesthesia and Diagnostic Arthroscopy
Examination under anesthesia is completed as previously described. Of note, if the examination under anesthesia is unclear regarding ACL rupture, diagnostic arthroscopy is performed before harvesting of the bone–patellar tendon–bone graft.[7]
Diagnostic arthroscopy evaluates the patellofemoral joint, medial and lateral gutters, suprapatellar pouch, and medial and lateral compartments to assess for any meniscal disease, loose bodies, and articular cartilage injury. The intercondylar notch is visualized as well to evaluate the PCL and ACL for injury.
Specific Steps (
Box 60-1
)
1. Bone–Patellar Tendon–Bone Graft Harvest
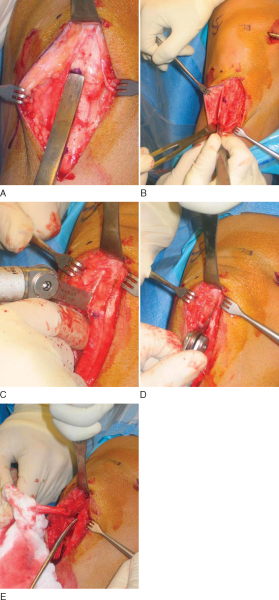
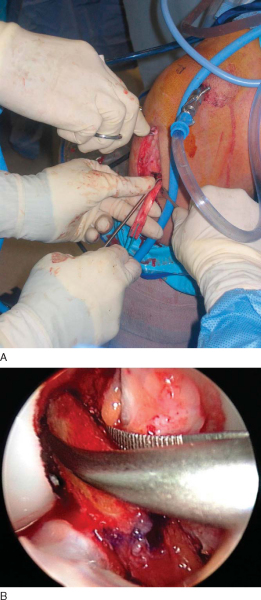
After the anatomic landmarks have been appropriately marked and the knee is flexed, a longitudinal incision, just medial to midline, is made from the distal tip of the patella to 2 cm distal to the tibial tubercle. This incision allows graft harvest and placement of the tibial tunnel through the same operative approach. This incision is carried directly down to the transverse fibers of the peritenon of the patellar tendon. After skin flaps are raised both medially and laterally, a No. 15 blade is used to incise the peritenon longitudinally at its midline. Metzenbaum scissors extend this cut proximally and distally as well as undermine the peritenon medially and laterally to fully expose the entire patellar tendon.
| Surgical Steps | |||||||||||||||||||||
|
The patellar tendon’s width is measured proximally and distally and marked with a marking pen. The bone–patellar tendon–bone autograft ideally is 10 mm wide with 10×25-mm bone plugs. Parallel longitudinal incisions spaced 10 mm apart are made in the patellar tendon, then the periosteum and soft tissues overlying the tibial and patellar bone cuts are outlined with the blade. The tendon incisions are performed with the knee flexed, thus keeping the patellar tendon on tension; extension of the knee aids in the transverse crosscuts at the patellar and tibial bone block edges.
At this point, an oscillating saw is used to make first the tibial, then the patellar bone plug. With use of the nondominant thumb to stabilize the saw and the index finger to protect the graft between the inner and outer portion of the graft (
Fig. 60-3
), the tibial cortex is scored longitudinally on profile to remove an equilateral triangle of bone. This leaves a maximal amount of bone around the tibial tubercle and remaining patellar tendon to minimize the risk of postoperative complications, such as patellar tendon avulsion or tubercle fracture. The distal transverse tibial crosscut is made with the saw held at a 45-degree oblique angle to the cortex by use of the corner of the blade on each side of the plug, but the tibial bone plug is left in place at this time. The patellar tendon bone plug is then made in a trapezoid shape, with a depth not exceeding 6 to 7 mm to avoid damage to the articular surface. Once again, the proximal transverse crosscut is made at a 45-degree oblique angle to the cortex. The saw is then placed parallel to the medial and lateral edges to complete the patellar bone plug crosscuts. Half-inch and quarter-inch curved osteotomes are now used to carefully mobilize the bone plugs without levering. A lap sponge can be placed around the freed tibial plug to improve traction, and Metzenbaum scissors are used to carefully remove any remaining fat or soft tissues. Once it is freed, the graft is wrapped in a moist sponge and walked to the back table by the operative surgeon, where it is placed in a safe location known to all members of the surgical team.
|
|
|
|
Figure 60-3 |
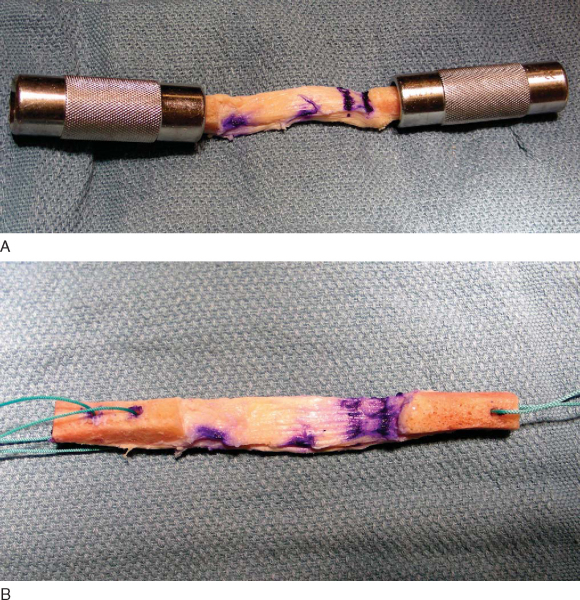
Ideally, 10×25-mm bone plugs are sized. The first step involves measurement and documentation of the overall graft length, the length of the bone plugs, and the length of the tendinous portion of the graft. At this time, the bone plugs are sized with a small rongeur to remove excess bone and to contour the bone appropriately to fit the desired tunnel diameter, frequently 10 mm. Excess bone should be saved for grafting of the harvest sites. The longer bone plug can be placed on the femoral side, thus avoiding a length mismatch between the tibial tunnel and graft. If one bone plug is wider, we prefer to use it on the tibial side, where we usually drill an 11-mm tunnel.
Next, drill holes are made in the tibial and femoral bone blocks. Various configurations have been described. We prefer two holes in the tibial and one hole in the femoral bone block for heavy nonresorbable sutures (
Fig. 60-4
). These holes can be placed either through the cortex or parallel to it; the latter decreases the risk of cutting the sutures during interference screw placement but also decreases pullout strength from the bone block. If a “push-through” technique is used, the femoral bone plug does not require any holes or sutures and remains as is. A sterile pen is used to mark the cortical surface of the tibial bone plug to assist in graft orientation; the femoral bone plug is marked at the bone-tendon junction to better assess correct seating of the plug within the tunnel.
|
|
|
|
Figure 60-4 |
3. Notch Preparation and Notchplasty
While the graft is being prepared on the back table, the intercondylar notch is prepared and notchplasty may be performed as needed. The ACL stump as well as residual soft tissue is removed from the lateral wall of the notch and the tibial footprint by arthroscopic instruments, the shaver, and electrocautery. A curet can also be a helpful and efficient tool to remove residual soft tissue from the posterior aspect of the lateral wall. Fat pad and ligamentum mucosum are removed as needed to improve visualization. Once all remaining soft tissue is removed from the notch, a notchplasty is performed if needed to avoid graft impingement, particularly in full knee extension (
Fig. 60-5
).
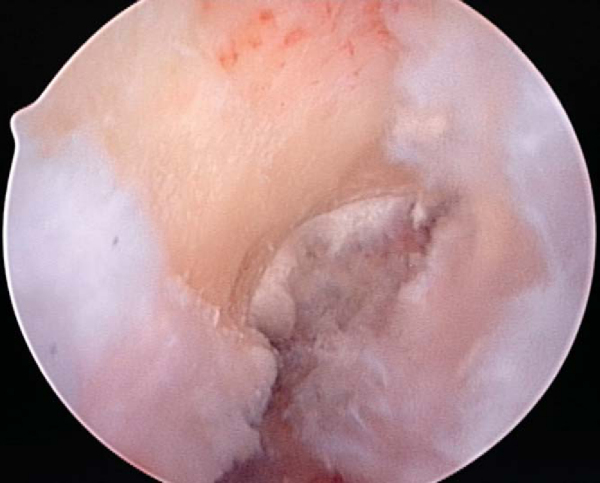
A notchplasty can also be necessary to improve visualization of the “over-the-top” position on the femur. A ¼-inch curved osteotome, placed through the inferomedial portal, is used to begin the notchplasty on the articular surface, and the arthroscopic grasper is used to remove the fragments. Next, with a 5.5-mm spherical bur, the notch is widened from posterior to anterior and apex to inferior. Commonly, a vertical ridge is present approximately 1 cm anterior to the posterior edge, which can be misidentified as the posterior wall (“resident’s ridge”). A probe must be able to hook under the over-the-top position, and it is used to confirm the sharp edge signifying the correct posterior aspect of the notch (
Fig. 60-6
). It is important to avoid excessive removal of bone along the lateral femoral condyle to prevent excessive lateralization of the isometric point.
|
|
|
|
Figure 60-6 |

The tibial tunnel is placed through the same incision that was used for the graft harvest. The entrance for the tibial tunnel is approximately 1.5 cm medial to the tibial tubercle and 1 cm proximal to the pes anserine tendons. A 1-cm longitudinal periosteal incision is made parallel and just proximal to the hamstrings, and a medially based rectangular periosteal flap is elevated to expose cortical bone. Care is taken to avoid injury to the medial aspect of the patellar tendon, the superficial medial collateral ligament, or the pes anserine tendons. Orientation of the tibial tunnel is crucial because it determines the position of the femoral tunnel as the femoral guide is placed through the tibial tunnel.
A tibial guide aids in drilling and proper placement of the tibial tunnel. In general, the N+7 rule helps determine the tibial guide angle. The rule adds 7 degrees to the length of the graft (e.g., 48-mm tendon, plus 7, yields a 55-degree angle); in a majority of cases, a 55-degree angle can be used. The guide is then introduced through the inferomedial portal. At times, an accessory portal inferior to the inferomedial portal can become necessary if the soft tissues would otherwise push up the aiming arm, which would result in a shortened tibial tunnel (
Fig. 60-7
).
|
|
|
|
Figure 60-7 |
The ideal placement of the guide pin is at the level of the posterior edge of the anterior horn of the lateral meniscus, or approximately 7 mm anterior to the PCL, and just lateral to the medial tibial spine. As there frequently is a large amount of soft tissue overlying the tibial plateau, where the pin appears to be entering the joint is actually posterior and lateral to the true entry point on the tibial plateau. Thus, it is advised that the pin enter the posterior aspect of the tibial footprint to avoid anterior tunnel placement.
The stylet is appropriately positioned intra-articularly, and the cannulated guide aimer is placed on the tibial cortex 1.5 cm medial to the tibial cortex and 1 cm proximal to the pes anserinus tendons. The guide pin is placed through the guide arm and drilled into the joint, and proper pin position is confirmed arthroscopically. The leg is then extended slowly to make certain that the pin is not impinging on the superior notch. After the knee is returned to a flexed position, the pin is advanced with a mallet until it contacts the intercondylar notch, thus stabilizing the pin during reaming.
The arthroscopy pump is turned off, the appropriately sized cannulated reamer (usually 10 or 11 mm) is placed over the guide pin, and the tibial tunnel is reamed. Bone chips can be collected with Owens gauze as the reamer is removed. At this time, the inflow pump is turned on; the ledge at the posterior aspect of the tibial tunnel is removed with a chamfer reamer and smoothed down with an arthroscopic hand rasp.
The retrograde femoral tunnel offset guide is placed through the tibial tunnel. This guide courses through the joint and hooks the posterior aspect of the notch in the over-the-top position. Ideally, the tunnel originates at the 11-o’clock position in the right knee and the 1-o’clock position in the left knee (
Fig. 60-8
). The guide assists in avoiding posterior cortical wall blowout if it is positioned appropriately. A 10-mm-diameter tunnel is usually drilled in the posterior cortex with a 7-mm offset guide, resulting in a 2-mm posterior wall. On occasion, when the orientation of the tibial tunnel interferes with correct placement of the femoral tunnel, the femoral offset guide can be placed (with the knee hyperflexed) through an accessory inferomedial portal. The arthroscopic pump is turned off, the femoral guide is placed in the over-the-top position, and a probe is placed into the joint through the inferomedial portal to retract and protect the PCL.

A guide pin is drilled approximately 3 cm into the femur; in the pull-through technique, a Beath pin is used in place of the shorter guide pin and drilled through the femur and out the skin. A 10-mm reamer is placed over the guide pin, and the tunnel is reamed initially only to a depth of 1 cm. The reamer is then retracted, allowing verification of posterior wall integrity. Reaming is resumed to a depth of 5 to 7 mm greater than the length of the femoral bone plug to eliminate graft mismatch. As the reamer is removed, the pump inflow is turned on, and loose bone can once again be collected with Owens gauze. [7] [8] Final tunnel integrity can be assessed by removal of the reamer and guide pin and placement of the arthroscopic camera through the tibial tunnel and directly into the femoral tunnel.
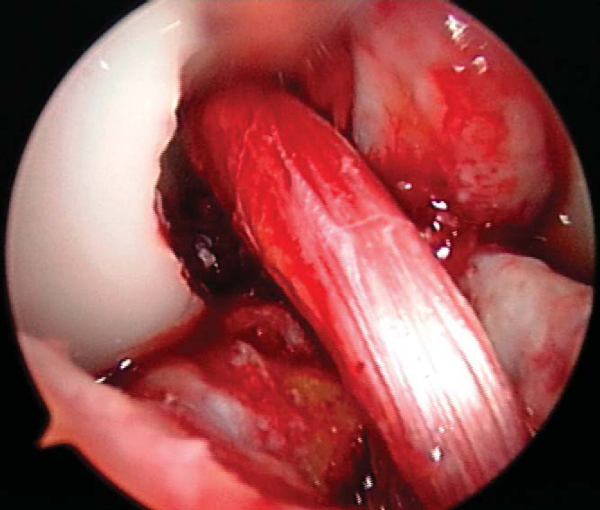
6. Graft Placement and Fixation
In the push-in technique, the graft is advanced through the tibial tunnel into the joint by use of a two-pronged pusher at the base of the femoral plug (
Fig. 60-9A
). A hemostat is placed through the inferomedial portal, grasping the femoral bone plug at the junction of the proximal and middle thirds. With the cortical surface of the femoral plug oriented posteriorly, the hemostat is used to guide the femoral plug into the femoral tunnel (
Fig. 60-9B
).
In the pull-through technique, the femoral bone plug suture is threaded through the eye of the Beath pin and retrieved proximally by pulling the Beath pin from its exit site in the thigh. The sutures of the femoral bone plug and the tibial bone plug are held taught as the graft is pulled through the knee. A probe or hemostat can be used to ensure proper orientation of the femoral bone plug as it enters the femoral tunnel.
Once the femoral bone plug is completely seated in the femoral tunnel, a nitinol guide pin (Linvatec, Largo, Fla) is placed into the femoral tunnel at the 11-o’clock position of the graft. The knee is flexed to 110 to 120 degrees, allowing easier passage of the guide pin within the femoral tunnel. The pin should be introduced without resistance; otherwise pin divergence should be suspected. A satellite pusher can be used to seat the femoral bone plug as needed. The tibial bone plug should be evaluated at this time for graft-tunnel mismatch. If the tibial plug is overhanging from the tibial tunnel, the graft can be removed and the femoral tunnel further recessed.
Femoral graft fixation is performed with an interference screw placed over the nitinol guide wire with the knee hyperflexed. The screw should be placed against the cancellous surface of the bone plug, away from the tendon insertion, to diminish the risk of graft injury or laceration. While tension is held on the tibial plug sutures, the knee is brought from 100 degrees to full extension to cycle the graft to ensure minimal graft motion as well as to assess impingement.
At this time, the tibial bone plug is externally rotated 180 degrees (toward the lateral side). This maneuver allows the tibial screw to be placed along the cortical surface and anterior. This screw placement avoids possible damage to the graft by a posteriorly placed screw with the knee in flexion as well as limits impingement that may occur with an anteriorized graft and a posteriorly placed screw.
The knee is placed in full extension, tension is held firmly on the tibial sutures, a nitinol wire is placed anterior to the tibial plug, and the interference screw is advanced and seated just below the cortical surface of the tibia. At this time, the arthroscope is placed into the knee, the ACL is visualized and probed to ensure proper tension, and a Lachman test and pivot shift test are performed (
Fig. 60-10
).
After irrigation with sterile saline, the knee is flexed to avoid excessive shortening. The patellar tendon defect is approximated with three or four simple interrupted No. 1 Vicryl sutures. The periosteal flap raised to drill the tibial tunnel is closed with No. 1 Vicryl as well. Bone graft from the reamings is placed in the patellar and tibial bone defects. The peritenon is closed with a running 2-0 Vicryl suture, and the incision is closed with interrupted 2-0 Vicryl for the subcutaneous tissues and a running 3-0 Prolene pullout stitch for the skin. The arthroscopy portals are closed with simple 3-0 Prolene stitches.
The wound and portals are injected with 0.5% bupivacaine (Marcaine) for postoperative analgesia. Steri-Strips and a sterile dressing are applied, followed by Kerlix, an ice cryotherapy device, and an elastic wrap. Finally, the leg is placed in a knee immobilizer or hinged knee brace locked in extension.
Patients are seen by a physical therapist the day of surgery before discharge home from the surgical center. On postoperative day 1, patients return to the office for evaluation of the wound and assessment for any effusion consistent with hemarthrosis. A sterile joint aspiration is recommended for decompression of any large postoperative hemarthrosis to accelerate rehabilitation.
Rehabilitation focuses on accelerated, closed-chain exercises with a goal of achieving full range of motion while maintaining stability and avoiding patellofemoral symptoms.
Immediate full weight bearing is permitted locked in extension.
The reoperation rate after patellar tendon reconstruction with bone–patellar tendon–bone autograft ranges from 4% to 31%.[12] In a comprehensive literature review of arthroscopic ACL reconstruction with bone–patellar tendon–bone autografts, Nedeff detailed the mean rates of reoperation as 13%, arthrofibrosis as 7% (1% to 12%), and infection as 0.4% (0% to 4%).[12] Other complications include the following:
The clinical results of ACL reconstruction with bone–patellar tendon–bone autograft are shown in
Table 60-1
.
| Author | Followup | Outcome—Subjective Assessment |
|---|---|---|
| Buss et al[4] (1993) | 2-year minimum | 59/68 (86%) excellent or good |
| Bach et al[2] (1998) | 2-year minimum | 96/103 (93%) mostly or completely satisfied |
| Kleipool et al[11] (1998) | 4-year minimum | 26/32 (70%) normal–nearly normal |
| Otto et al[13] (1998) | 9-year minimum | 52/68 (80%) normal–nearly normal |
| Webb et al[16] (1998) | 2-year minimum | 71/82 (86%) normal–nearly normal |
| Jomha et al[10] (1999) | 7-year minimum | 55/59 (93%) normal–nearly normal |
| Ao et al[1] (2000) | 1-year minimum | 18/20 (90%) excellent or good |
| Deehan et al[6] (2000) | 5-year minimum | 81/90 (90%) normal–nearly normal |
| Jager et al[9] (2003) | 10-year minimum | 62/74 (84%) normal |
| Chaudhary et al[5] (2005) | 1-year minimum | 68/78 (87%) excellent or good |
| Salmon et al[15] (2006) | 13-year minimum | 65/67 (96%) normal–nearly normal |
1.
Ao Y, Wang J, Yu J, et al: Arthroscopically assisted anterior screw [in Chinese].
Zhonghua Wai Ke Za Zhi 2000; 38:250-252.15.
2.
Bach Jr BR, Levy ME, Bojchuk J, et al: Single-incision endoscopic anterior cruciate ligament reconstruction using patellar tendon autograft. Minimum two-year followup evaluation.
Am J Sports Med 1998; 26:30-40.
3.
Beynnon BD, Johnson RJ, Abate JA, et al: Treatment of anterior cruciate ligament injuries, part I.
Am J Sports Med 2005; 33:1579-1602.
4.
Buss DD, Warren RF, Wickiewicz TL, et al: Arthroscopically assisted reconstruction of the anterior cruciate ligament with use of autogenous patellar-ligament grafts. Results after twenty-four to forty-two months.
J Bone Joint Surg Am 1993; 75:1346-1355.
5.
Chaudhary D, Monga P, Joshi D, et al: Arthroscopic reconstruction of the anterior cruciate ligament using bone–patellar tendon–bone autograft: experience of the first 100 cases.
J Orthop Surg (Hong Kong) 2005; 13:147-152.
6.
Deehan DJ, Salmon LJ, Webb VJ, et al: Endoscopic reconstruction of the anterior cruciate ligament with an ipsilateral patellar tendon autograft. A prospective longitudinal five-year study.
J Bone Joint Surg Br 2000; 82:984-991.
7.
Ferrari J, Bush-Joseph C, Bach Jr BR: Endoscopic anterior cruciate ligament reconstruction with patellar tendon autograft: surgical technique.
Tech Orthop 1998; 13:262-274.
8.
Flik K, Bach Jr BR: Anterior cruciate ligament reconstruction using an endoscopic technique with patellar tendon autograft.
Tech Orthop 2005; 20:361-371.
9.
Jager A, Welsch F, Braune C, et al: Ten year followup after single incision anterior cruciate ligament reconstruction using patellar tendon autograft [in German].
Z Orthop Ihre Grenzgeb 2003; 141:42-47.
10.
Jomha NM, Pinczewski LA, Clingeleffer A, Otto DD: Arthroscopic reconstruction of the anterior cruciate ligament with patellar-tendon autograft and interference screw fixation. The results at seven years.
J Bone Joint Surg Br 1999; 81:775-779.
11.
Kleipool AE, Zijl JA, Willems WJ: Arthroscopic anterior cruciate ligament reconstruction with bone–patellar tendon–bone allograft or autograft. A prospective study with an average follow up of 4 years.
Knee Surg Sports Traumatol Arthrosc 1998; 6:224-230.
12.
Nedeff DD, Bach Jr BR: Arthroscopic anterior cruciate ligament reconstruction using patellar tendon autografts: a comprehensive review of contemporary literature.
Am J Knee Surg 2001; 14:243-258.
13.
Otto D, Pinczewski LA, Clingeleffer A, Odell R: Five-year results of single-incision arthroscopic anterior cruciate ligament reconstruction with patellar tendon autograft.
Am J Sports Med 1998; 26:181-188.
14.
Owings MF, Kozak LJ: Ambulatory and inpatient procedures in the United States 1996.
Vital Health Stat 13 1998; 139:1-119.
15.
Salmon LJ, Russell VJ, Refshauge K, et al: Long-term outcome of endoscopic anterior cruciate ligament reconstruction with patellar tendon autograft: minimum 13-year review.
Am J Sports Med 2006; 34:721-732.
16.
Webb JM, Corry IS, Clingeleffer AJ, Pinczewski LA: Endoscopic reconstruction for isolated anterior cruciate ligament rupture.
J Bone Joint Surg Br 1998; 80:288-294.