
usually are straightforward; the bones and joints that are explored
commonly are superficial, if not subcutaneous. Apart from technical
problems associated with the surgery itself, the most common
complication in foot and ankle surgery is poor wound healing. For this
reason, it is important to evaluate both the circulation and the
sensation of the foot. Ischemic or neuropathic feet heal poorly and are
a frequent contraindication to elective surgery. In patients with
diabetes, ischemia and neuropathy may coexist; all feet of such
patients must be evaluated carefully before any foot surgery is
undertaken. Smoking is also a relative contraindication to surgery,
especially in cases of open reduction and internal fixation for
fractures of the calcaneus.
skin flaps that are cut; it is important to cut these flaps as thickly
as possible and to avoid forceful retraction. Longer incisions require
less forceful retraction to achieve identical exposure. As a result,
they often are safer than are short incisions. (Remember that skin
incisions heal from side to side and not from end to end.)
describes approaches to the ankle and the hindpart of the foot, because
most provide access to both areas. The anterior approach to the ankle is used for arthrodesis; it offers excellent exposure of the anterior compartment of the ankle joint. The approach to the medial malleolus is a commonly used incision, providing access to the distal tibia in cases of fracture. A more extensive approach to the medial side of the ankle joint also exposes the distal tibia, but involves an osteotomy. The posteromedial approach to the ankle
exposes the soft tissues of the area. It is used frequently for
soft-tissue operations, including the surgical correction of clubfoot.
The posterolateral approach to the ankle joint provides limited access to the back of the joint and the posterior facet of the subtalar joint. The lateral approach to the ankle and hindpart of the foot exposes the ankle and the joints of the hindfoot. The lateral approach to the hindpart of the foot and the posterolateral approach to the talocalcaneal joint
are used for surgery on the joints of the posterior part of the foot.
The lateral approach to the calcaneus exposes the lateral aspect of the
calcaneus, the calcaneocuboid, and subtalar joints. It is mainly used
for open reduction and internal fixation of the os calcis.
to the midportion of the foot, the tarsometatarsal and midtarsal joints
and those muscles that attach to them. Surgery in this area is
relatively uncommon in general orthopaedic practice; it usually is
associated with specific operative procedures designed for single
pathologic states. Because these structures are very superficial, the
approaches are dealt with mainly pictorially.
can be used for the treatment of several conditions, including Morton’s
neuroma. The latter approach also can be used to reach the
metatarsophalangeal joint.
after this group of approaches. The first section deals with the
applied anatomy of the approaches, that is, the applied anatomy of the
dorsum of the foot. The second section, an account of the anatomy of
the sole of the foot, should provide an understanding of those
structures that may be damaged in severe foot trauma or infection.
The decision to use this approach rather than the lateral transfibular
approach, the medial transmalleolar approach, or the posterior approach
depends on the condition of the skin and the surgical technique to be
used. Its other uses include the following:
-
Drainage of infections in the ankle joint
-
Removal of loose bodies
-
Open reduction and internal fixation of comminuted distal tibial fractures (pilon fractures)
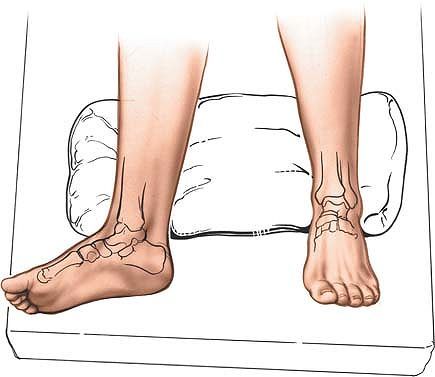
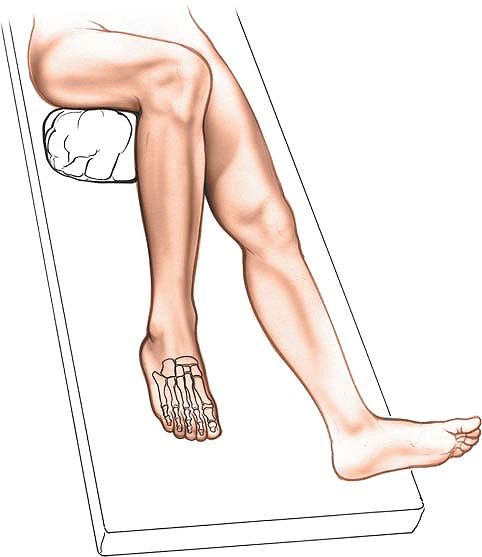
Partially exsanguinate the foot either by elevating it for 3 to 5
minutes or by applying a soft rubber bandage loosely to the foot and
binding it firmly to the calf. Then, inflate a thigh tourniquet.
Partial
exsanguination
allows the neurovascular bundle to be identified, because the venous
structures will appear blue. Some continuous vascular oozing must be
expected, however (Fig. 12-1).
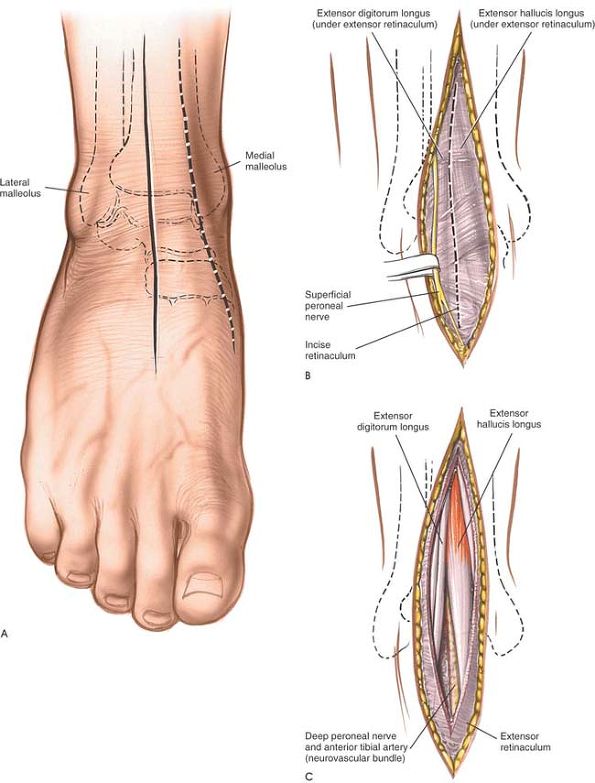
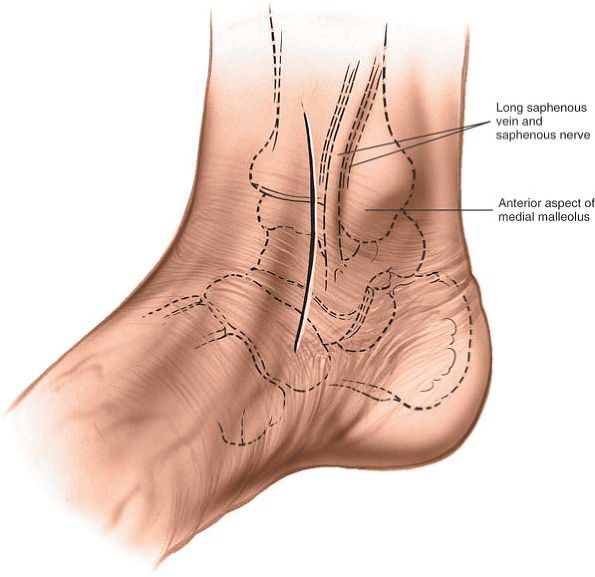
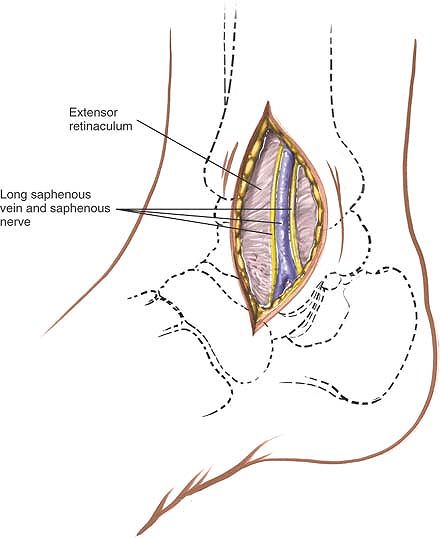
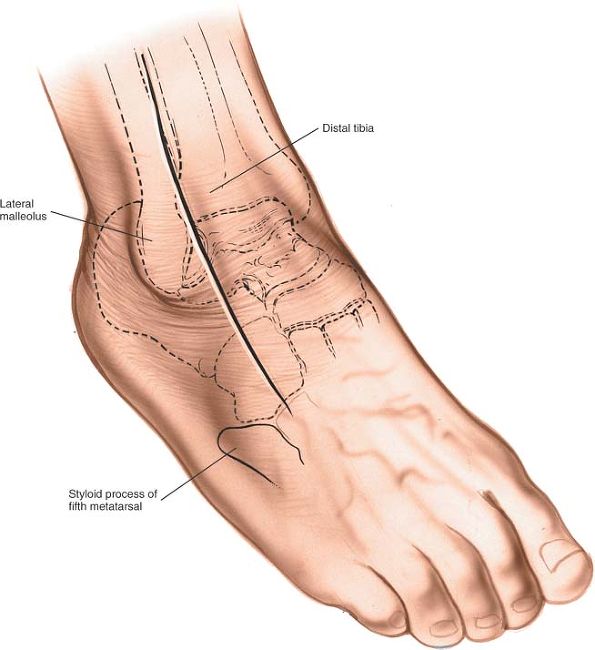
aspect of the ankle joint. Begin about 10 cm proximal to the joint, and
extend the incision so that it crosses the joint about midway between
the malleoli, ending on the dorsum of the foot. Take great care to cut
only the skin; the anterior neurovascular bundle and branches of the
superficial peroneal nerve cross the ankle joint very close to the line
of the skin incision (Fig. 12-2A). Alternatively, make a 15-cm longitudinal incision with its center overlying the anterior aspect of the medial malleolus (see Fig. 12-2).
muscles define a clear intermuscular plane. Both muscles are supplied
by the deep peroneal nerve, but the plane may be used because both
receive their nerve supplies well proximal to the level of the
dissection. The plane must be used with great caution, however, because
it contains the neurovascular bundle distal to the ankle (see Figs. 12-58 and 12-59).
 |
|
Figure 12-1 Position for the anterior approach to the ankle.
|
Find the plane between the extensor hallucis longus and extensor
digitorum longus muscles a few centimeters above the ankle joint, and
identify the neurovascular bundle (the anterior tibial artery and the
deep peroneal nerve) just medial to the tendon of the extensor hallucis
longus (see Fig. 12-2C).
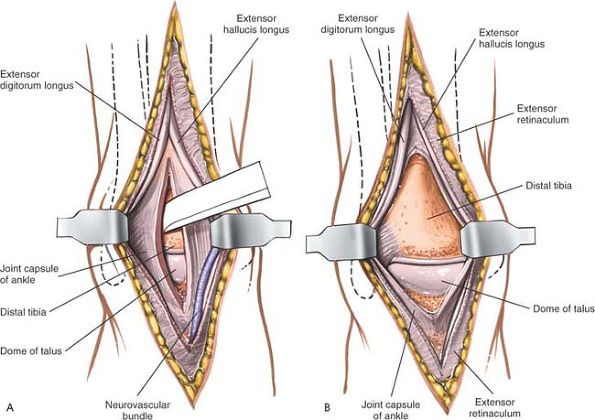
Trace the bundle distally until it crosses the front of the ankle joint
behind the tendon of the extensor hallucis longus. Retract the tendon
of the extensor hallucis longus medially, together with the
neurovascular bundle. Retract the tendon of the extensor digitorum
longus laterally. The tendons become mobile after the retinaculum has
been cut, but the neurovascular bundle adheres to the underlying
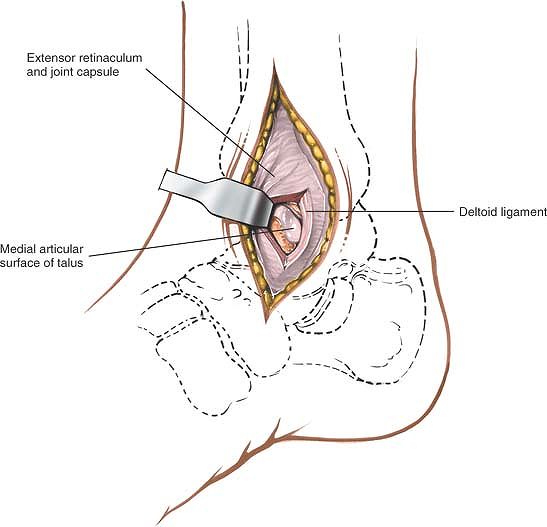
tissues and requires mobilization (Fig. 12-3A).
the tibia together with the anteromedial ankle joint capsule.
 |
|
Figure 12-2 (A) Make a longitudinal incision over the anterior aspect of the ankle joint. (B) Identify and protect the superficial peroneal nerve. Incise the extensor retinaculum in line with the skin incision. (C)
Identify the plane between the extensor hallucis longus and the extensor digitorum longus, and note the neurovascular bundle between them. |
 |
|
Figure 12-3 (A)
Retract the tendon of the extensor hallucis longus medially with the neurovascular bundle. Retract the tendon of the extensor digitorum longus laterally. Incise the joint capsule longitudinally. (B) Retract the joint capsule to expose the ankle joint. |
 |
|
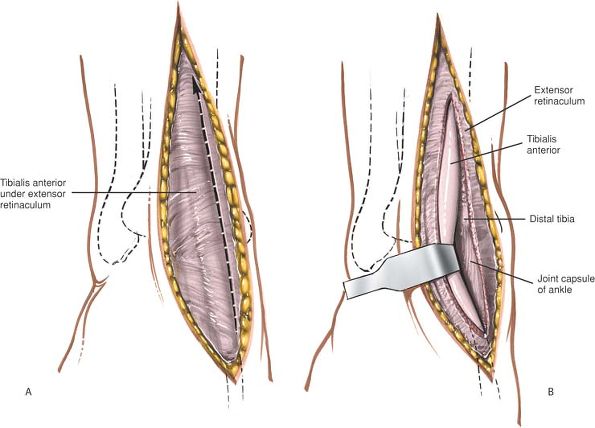
Figure 12-4 (A) Alternately, incise the extensor retinaculum on the medial side of the tibialis anterior tendon. (B) Retract the tibialis anterior laterally to expose the anterior surface of the ankle joint.
|
tissues longitudinally to expose the anterior surface of the distal
tibia. Continue incising down to the ankle joint, then cut through its
anterior capsule. Expose the full width of the ankle joint by detaching
the anterior ankle capsule from the tibia or the talus by sharp
dissection (see Fig. 12-3). Some periosteal
stripping of the distal tibia may be required. Although the periosteal
layer usually is thick and easy to define, the plane may be obliterated
in cases of infection; the periosteum then must be detached piecemeal
by sharp dissection.
care to preserve as much soft-tissue attachments to bone as possible.
Meticulous preoperative planning will allow smaller, precise incisions
with consequent reduction in soft-tissue damage.
(the anterior neurovascular bundle) must be identified and preserved
during superficial surgical dissection. They are in greatest danger
during the skin incision, because they are superficial and run close to
the incision itself (see Figs. 12-58 and 12-59).
Above the ankle joint, the neurovascular bundle lies between the
tendons of the extensor hallucis longus and tibialis anterior muscles
at the joint; the tendon of the extensor hallucis longus crosses the
bundle. The plane between the tibialis anterior and the extensor
hallucis longus can be used as long as the neurovascular bundle is
identified and mobilized so as to preserve it (see Fig. 12-59).
internervous plane, on occasion it can be extended proximally to expose
the structures in the anterior compartment. To expose the proximal
tibia, use the plane between the tibia and the tibialis anterior muscle
(see Fig. 12-4). Distal extension to the dorsum of the foot is possible, but rarely, if ever, required (see Fig. 12-59).
for open reduction and internal fixation of fractures of the medial
malleolus.2 The approaches provide excellent visualization of the malleolus.
natural position of the leg (slight external rotation) exposes the
medial malleolus well. Exsanguinate the limb by elevating it for 3 to 5
minutes, then inflate a tourniquet. Standing or sitting at the foot of
the table makes it easier to angle drills correctly (Fig. 12-5).
-
The anterior incision
offers an excellent view of medial malleolar fractures. It also permits
inspection of the anteromedial ankle joint and the anteromedial part of
the dome of the talus.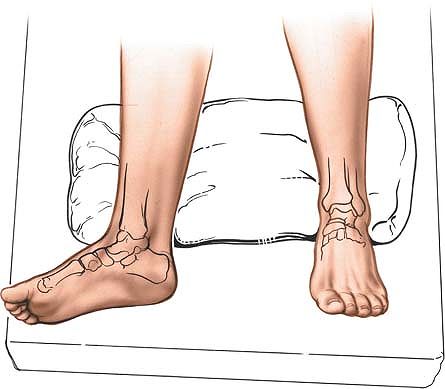 Figure 12-5
Position for the approach to the medial malleolus. The leg falls
naturally into a few degrees of external rotation to expose the
malleolus.Make a 10-cm longitudinal curved incision on the medial
aspect of the ankle, with its midpoint just anterior to the tip of the
medial malleolus. Begin proximally, 5 cm above the malleolus and over
the middle of the subcutaneous surface of the tibia. Then, cross the
anterior third of the medial malleolus, and curve the incision forward
to end some 5 cm anterior and distal to the malleolus. The incision
should not cross the most prominent portion of the malleolus (Fig. 12-6). -
The posterior incision allows reduction and fixation of medial malleolar fractures and visualization of the posterior margin of the tibia.Make a 10-cm incision on the medial side of the ankle.
Begin 5 cm above the ankle on the posterior border of the tibia, and
curve the incision downward, following the posterior border of the
P.630
medial malleolus. Curve the incision forward below the medial malleolus to end 5 cm distal to the malleolus (see Fig. 12-10).
 |
|
Figure 12-6 Keep the incision just anterior to the tip of the medial malleolus.
|
the approach is safe because the incision cuts down onto subcutaneous
bone.
and preserve the long saphenous vein, which lies just anterior to the
medial malleolus. Accurately locating the skin incision will make it
unnecessary to mobilize the skin flaps extensively. Next to the vein
runs the saphenous nerve, two branches of which are bound to the vein.
Take care not to damage the nerve; damage leads to the formation of a
neuroma. Because the nerve is small and not easily identified, the best
way to preserve it is to preserve the long saphenous vein, a structure
that on its own is of little functional significance (Fig. 12-7).
the bone fragment as possible to preserve its blood supply.
 |
|
Figure 12-7 Widen the skin flaps. Identify the long saphenous vein and the accompanying saphenous nerve.
|
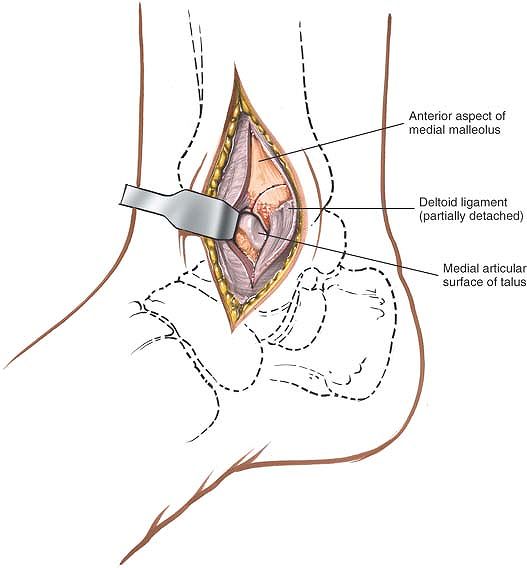
longitudinally to expose the fracture site. Make a small incision in
the anterior capsule of the ankle joint so that the joint surfaces can
be seen after the fracture is reduced (Fig. 12-8).
This is especially important in vertical fractures of the medial
malleolus where impaction at the joint surface frequently occurs. The
superficial fibers of the deltoid ligament run anteriorly and distally
downward from the medial malleolus; split them so that wires or screws
used in internal fixation can be anchored solidly on bone, with the
heads of the screws covered by soft tissue (Fig. 12-9; see Fig. 12-56).
Take care not to cut the tendon of the tibialis posterior muscle, which
runs immediately behind the medial malleolus; the incision into the
retinaculum permits anterior retraction of the tibialis posterior
tendon. Continue the dissection around the back of the malleolus,
retracting the other structures that pass behind the medial malleolus
posteriorly to reach the posterior margin (or posterior malleolus) of
the tibia. The exposure allows reduction of some fractures of that part
of the bone.
visualization of most fractures using appropriate reduction forceps,
the angle of the approach is such that the displaced fragments cannot
be fixed internally from this approach. Separate anterior approaches
are required to lag any posterior fragments back. It always is
advisable to obtain an intraoperative radiograph showing the displaced
fragment fixed temporarily with a K-wire before definitive fixation is
inserted. Reduction of these fragments is difficult because of limited
exposure, and inaccurate reduction may occur. To improve the view of
the posterior malleolus, externally rotate the leg still further (Fig. 12-12; see Figs. 12-55 and 12-56).
 |
|
Figure 12-8 Make a small incision in the anterior capsule of the ankle joint to see the articulating surface.
|
 |
|
Figure 12-9 Split fibers of the deltoid ligament to allow for internal fixation of the fractured malleolus.
|
 |
|
Figure 12-10 The posterior incision for the approach to the medial malleolus follows the posterior border of the medial malleolus.
|
 |
|
Figure 12-11 Retract the skin flaps and begin to incise the retinaculum behind the medial malleolus.
|
 |
|
Figure 12-12
Anteriorly retract the tibialis posterior. Free up and retract the remaining structures around the back of the malleolus posteriorly to expose the posterior aspect of the medial malleolus. |
may form a neuroma and cause numbness over the medial side of the
dorsum of the foot. Preserve the nerve by preserving the long saphenous
vein.
at risk when the anterior skin flaps are mobilized. Preserve it if
possible, so that it can be used as a vascular graft in the future (see
Fig. 12-54).
(the tibialis posterior muscle, the flexor digitorum longus muscle, the
posterior tibial artery and vein, the tibial nerve, and the flexor
hallucis longus tendon) are in danger if the deep surgical dissection
is not carried out close to bone (see Figs. 12-54, 12-55 and 12-56).
incision along the subcutaneous surface of the tibia. Subperiosteal
dissection exposes the subcutaneous and lateral surfaces of the tibia
along its entire length.
-
Arthrodesis of the ankle
-
Excision or fixation of osteochondral fragments from the medial side of the talus
-
Removal of loose bodies from the ankle joint
Exsanguinate the limb either by elevating it for 5 minutes or by
applying a soft rubber bandage firmly; then inflate a tourniquet. The
natural external rotation of the leg exposes the medial malleolus. The
pelvis ordinarily does not have to be tilted to improve the exposure
(see Fig. 12-5).
 |
|
Figure 12-13
Make a 10-cm longitudinal incision on the medial aspect of the ankle joint, with its center over the tip of the medial malleolus. Distally, curve the incision forward onto the medial side of the middle part of the foot. |
of the ankle joint, centering it on the tip of the medial malleolus.
Begin the incision over the medial surface of the tibia. Below the
malleolus, curve it forward onto the medial side of the middle part of
the foot (Fig. 12-13).
the surgery is safe because the tibia is subcutaneous and all
dissection stays on bone.
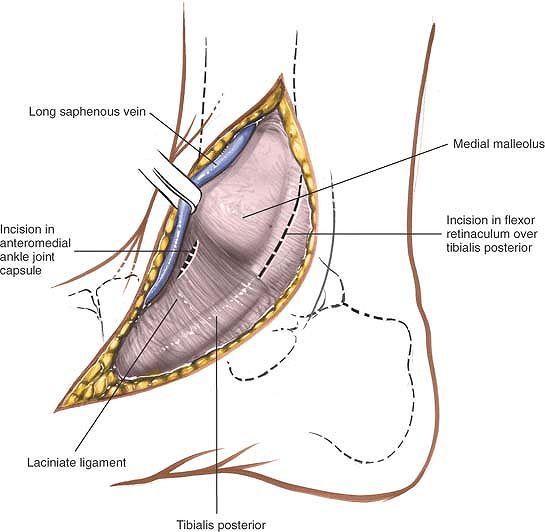
long saphenous vein and the saphenous nerve, which run together along
the anterior border of the medial malleolus (Fig. 12-14).
the shaft of the tibia, make a small longitudinal incision in the
anterior part of the joint capsule.
the tibialis posterior muscle, which runs immediately behind the medial
malleolus, grooving the bone (see Fig. 12-14). Retract the tendon posteriorly to expose the posterior surface of the malleolus (Fig. 12-15A).
 |
|
Figure 12-14
Carefully retract the skin flaps to protect the long saphenous vein and the accompanying saphenous nerve. Incise the posterior retinaculum, and make a small incision into the anterior joint capsule. |
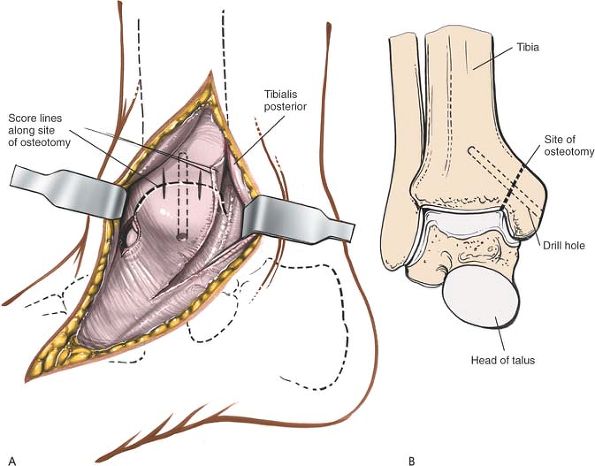
alignment of the malleolus during closure. Then, drill and tap the
medial malleolus so that it can be reattached (see Fig. 12-15B).
medial malleolus obliquely from top to bottom; cut laterally at its
junction with the shaft of the tibia, checking the position of the cut
through the incision in the anterior joint capsule (see Fig. 12-15).
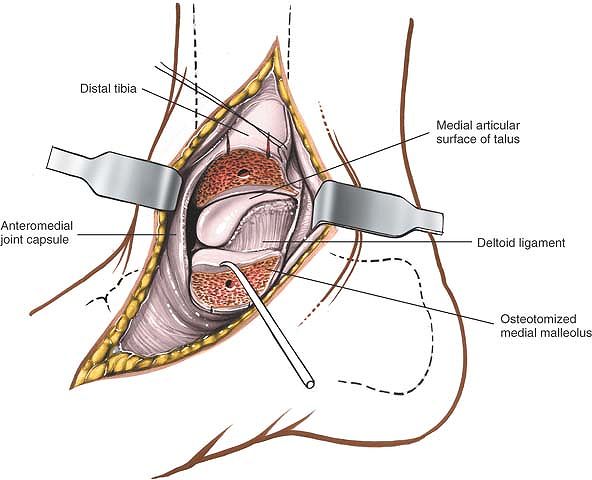
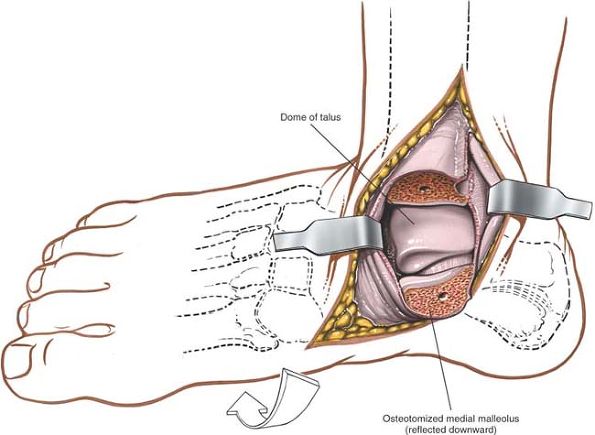
ligaments) downward and forcibly evert the foot, bringing the dome of
the talus and the articulating surface of the tibia into view (Figs. 12-16 and 12-17). Eversion is limited because of the intact fibula.
 |
|
Figure 12-15 (A)
Retract the tibialis tendon posteriorly. Drill and tap the medial malleolus, and score the potential osteotomy site for future alignment. (B) The line of the osteotomy and the score marks for the reattachment of the medial malleolus. |
 |
|
Figure 12-16 Retract the osteotomized medial malleolus downward.
|
 |
|
Figure 12-17 Forcefully evert the foot to bring the dome of the talus and the anterior surface of the tibia into view.
|
long saphenous vein should be preserved as a unit, largely to prevent
damage to the saphenous nerve and subsequent neuroma formation.
is in particular danger during this approach, because it lies
immediately posterior to the medial malleolus. Preserve the tendon by
releasing and retracting it while performing osteotomy of the malleolus
(see Figs. 12-14 and 12-15A).
The tendons of the flexor hallucis longus and flexor digitorum longus
muscle, together with the posterior neurovascular bundle, lie more
posteriorly and laterally. They are in no danger as long as the
osteotomy is performed carefully (see Figs. 12-55 and 12-57).
ends of bone prevents rotation between the two fragments when a screw
is inserted and tightened. No such interdigitation exists in an
osteotomy. Therefore, two Kirschner wires should be used in addition to
a screw to prevent rotation when the screw is tightened. After the
osteotomy has been stabilized with the screw, the two Kirschner wires
can be removed. Tension band fixation also may be used. In any case,
align the bones correctly by aligning the score marks made on the bone
before the osteotomy.
routinely used for exploring the soft tissues that run around the back
of the medial malleolus. This approach is used for the release of soft
tissue around the medial malleolus in the treatment of clubfoot.
posterior malleolus of the ankle joint, but gives limited exposure of
the fracture site and is technically demanding. For this reason
reduction and fixation of posterior malleolar fractures is usually
achieved by indirect techniques.4
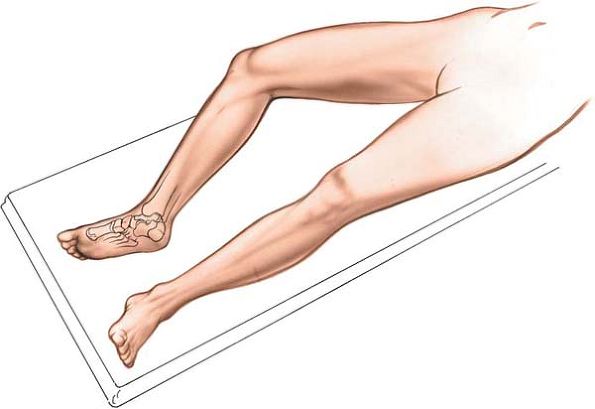
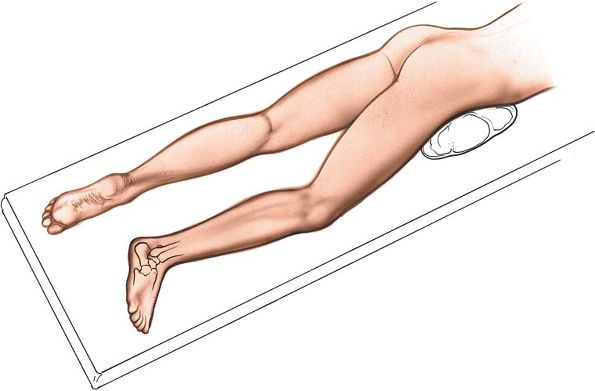
First, place the patient supine on the operating table. Flex the hip
and knee, and place the lateral side of the affected ankle on the
anterior surface of the opposite knee. This position will achieve full
external rotation of the hip, permitting better exposure of the medial
structures of the ankle (Fig. 12-18).
Alternatively, place the patient in the lateral position with the
affected leg nearest the table. Flex the knee of the opposite limb to
get its ankle out of the way.
 |
|
Figure 12-18 Place the patient supine on the operating table with the knee and the hip flexed to expose the medial structures of the ankle.
|
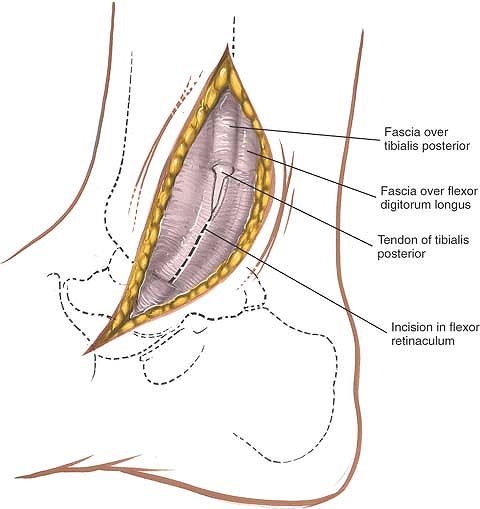
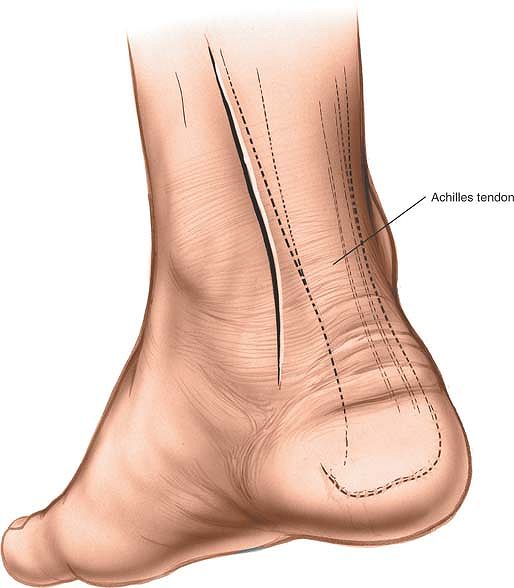
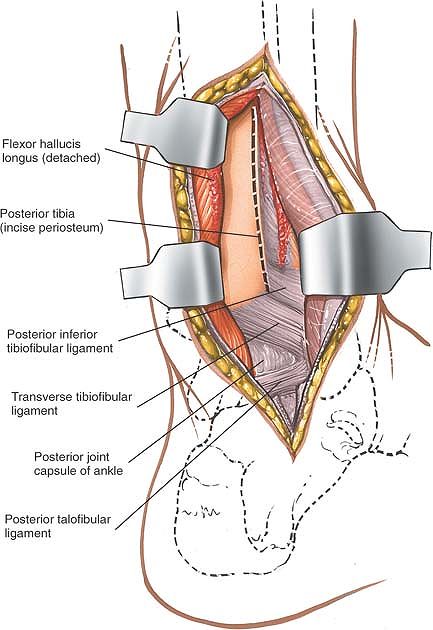
enter the fat that lies between the Achilles tendon and those
structures that pass around the back of the medial malleolus. If the
Achilles tendon must be lengthened, identify it in the posterior flap
of the wound and perform the lengthening now. Identify a fascial plane
in the anterior flap that covers the remaining flexor tendons. Incise
the fascia longitudinally, well away from the back of the medial
malleolus (Figs. 12-20 and 12-21).
 |
|
Figure 12-19 Make an 8- to 10-cm longitudinal incision roughly between the medial malleolus and the Achilles tendon.
|
the dissection anteriorly toward the back of the medial malleolus.
Preserve the neurovascular bundle by mobilizing it gently and
retracting it and the flexor hallucis longus laterally to develop a
plane between the bundle and the tendon of the flexor digitorum
longus. This approach brings one onto the posterior aspect of the ankle joint rather more medially than does the first approach.
 |
|
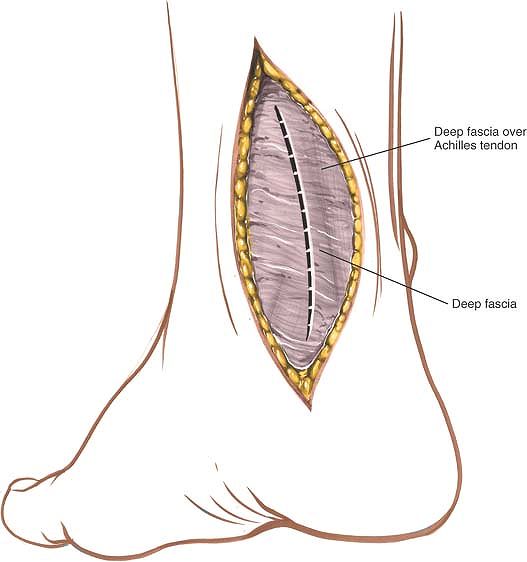
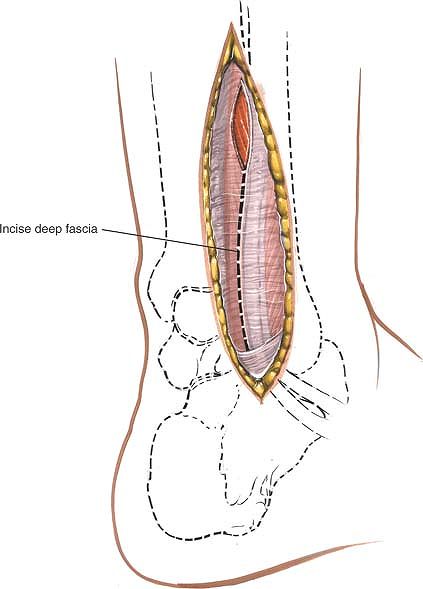
Figure 12-20 Incise the deep fascia in line with the skin incision.
|
 |
|
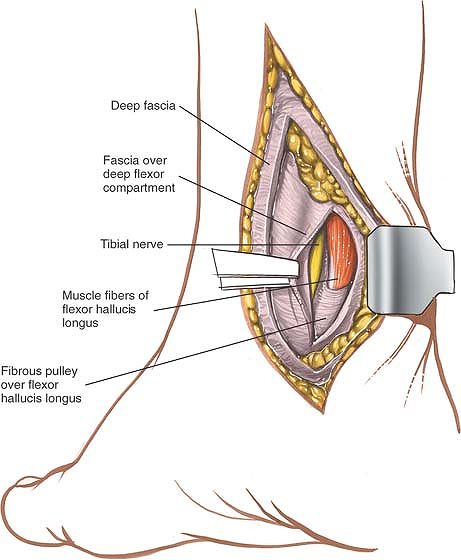
Figure 12-21
Retract the Achilles tendon and the retrotendinous fat laterally, exposing the fascia of the deeper flexor compartment. Open the compartment, and identify the muscle fibers of the flexor hallucis longus. |
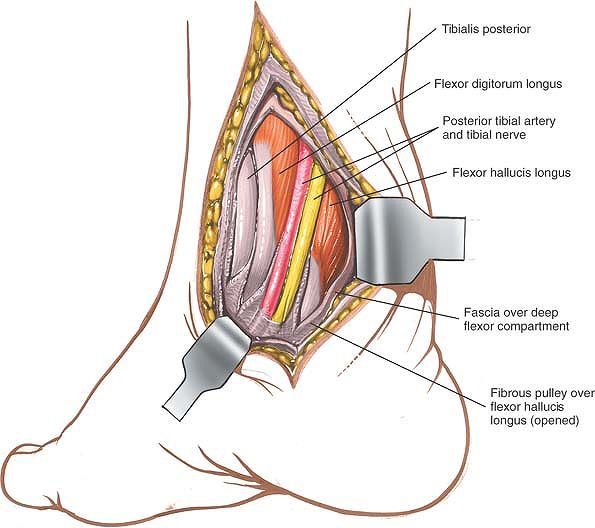 |
|
Figure 12-22
Identify the posterior tibial artery and tibial nerve. Then, incise the fibro-osseous tunnel over the flexor hallucis longus tendon and the other medial tendons so that the structures can be mobilized and retracted medially. |
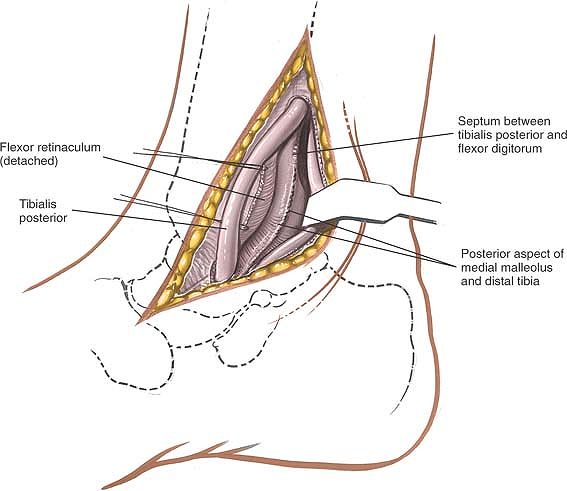
the medial malleolus (the tibialis posterior, flexor digitorum longus,
and flexor hallucis longus) must be lengthened, the back of the ankle
can be approached directly, because the posterior coverings of the
tendons must be divided during the lengthening procedure.
posterior neurovascular bundle) are vulnerable during the approach.
Take care not to apply forceful retraction to the nerve, as this may
lead to a neurapraxia. Note that the tibial nerve is surprisingly large
in young children and that the tendon of the flexor digitorum longus
muscle is extremely small. Take care to identify positively all
structures in the area before dividing any muscle tendons (see Figs. 12-54 and 12-55).
medial border of the ankle, ending over the talonavicular joint. This
extension exposes both the talonavicular joint and the master knot of
Henry. As is true for all long, curved incisions around the ankle, skin
necrosis can result if the skin flaps are not cut thickly or if
forcible retraction is applied.
 |
|
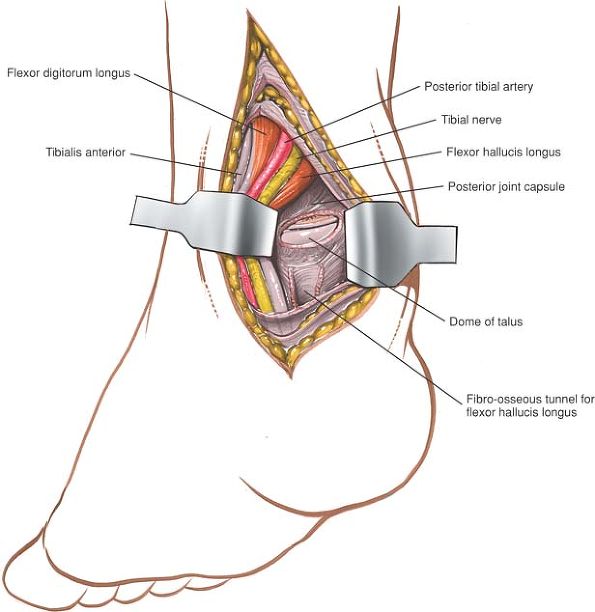
Figure 12-23 Retract the posterior structures medially, exposing the posterior portion of the ankle joint.
|
of the posterior aspect of the distal tibia and ankle joint. It is well
suited for open reduction and internal fixation of posterior malleolar
fractures. Because the patient is prone, however, it is not the
approach of choice if the fibula and medial malleolus have to be fixed
at the same time. In such cases, it is better to use either a
posteromedial approach or a lateral approach to the fibula, and to
approach the posterolateral corner of the tibia through the site of the
fractured fibula. Neither of these approaches provides such good
visualization of the bone as does the posterolateral approach to the
ankle, but both allow other surgical procedures to be carried out
without changing the position of the patient on the table halfway
through the operation. Its other uses include the following:
-
Excision of sequestra
-
Removal of benign tumors
-
Arthrodesis of the posterior facet of the subtalar joint
-
Posterior capsulotomy and syndesmotomy of the ankle
-
Elongation of tendons
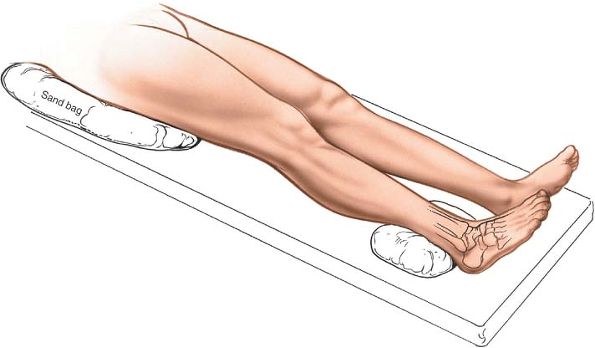
always, when the prone position is being used, longitudinal pads should
be placed under the pelvis and chest so that the center portion of the
chest and abdomen are free to move with respiration. A sandbag should
be placed under the ankle so that it can be extended during the
operation. Next, exsanguinate the limb by elevating it for 3 to 5
minutes or applying a soft rubber bandage; then inflate a tourniquet (Fig. 12-24).
 |
|
Figure 12-24 Position of the patient for the posterolateral approach to the ankle joint.
|
 |
|
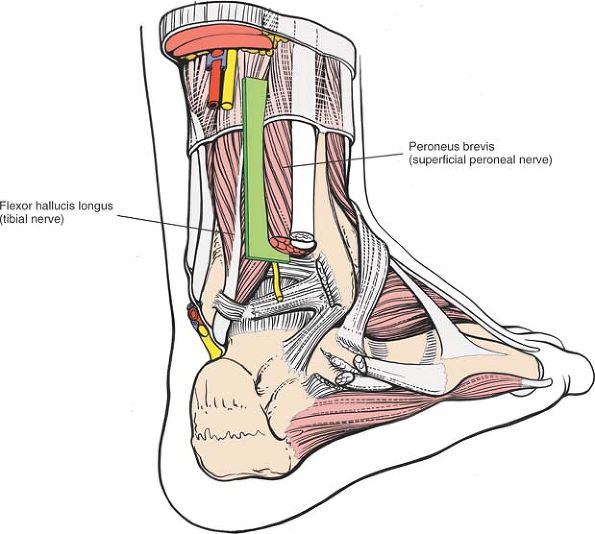
Figure 12-25 The internervous plane lies between the peroneus brevis (which is supplied by the superficial peroneal nerve) and the flexor hallucis longus (which is supplied by the tibial nerve).
|
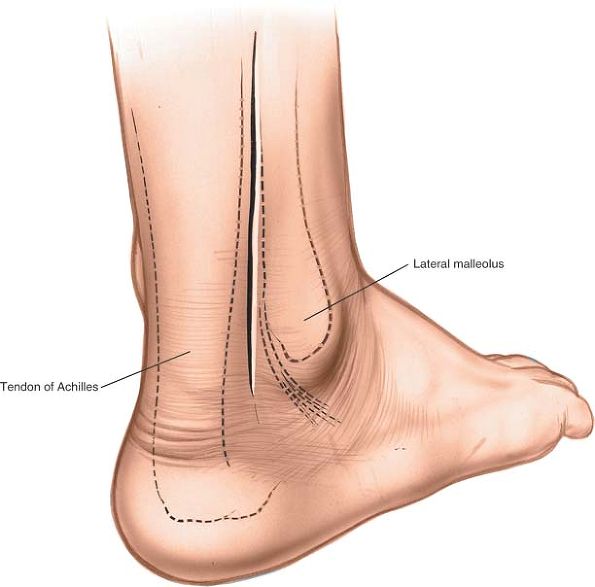
posterior border of the lateral malleolus and the lateral border of the
Achilles tendon. Begin the incision at the level of the tip of the
fibula and extend it proximally (Fig. 12-26).
sural nerves run just behind the lateral malleolus; they should be well
anterior to the incision. Incise the deep fascia of the leg in line
with the skin incision, and identify the two peroneal tendons as they
pass down the leg and around the back of the lateral malleolus (Fig. 12-27).
The tendon of the peroneus brevis muscle is anterior to that of the
peroneus longus muscle at the level of the ankle joint and, therefore,
is closer to the lateral malleolus. Note that the peroneus brevis is
muscular almost down to the ankle, whereas the peroneus longus is
tendinous in the distal third of the leg (see Figs. 12-64 and 12-65).
 |
|
Figure 12-26
Make a 10-cm longitudinal incision halfway between the posterior border of the lateral malleolus and the lateral border of the Achilles tendon. |
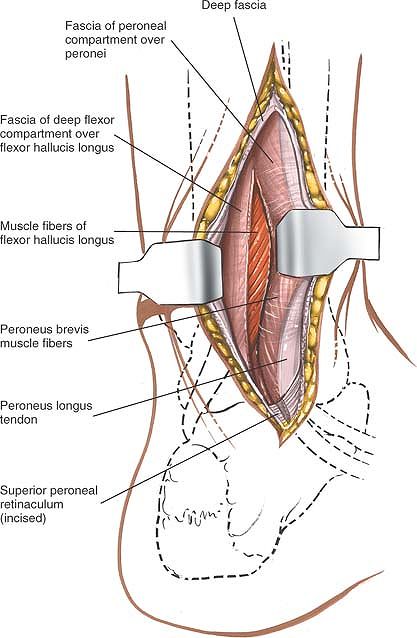
and retract the muscles laterally and anteriorly to expose the flexor
hallucis longus muscle (Fig. 12-28). The flexor
hallucis longus is the most lateral of the deep flexor muscles of the
calf. It is the only one that is still muscular at this level (see Fig. 12-65).
 |
|
Figure 12-27
Mobilize the skin flaps. Incise the deep fascia of the leg in line with the skin incision. Identify the two peroneal tendons as they pass around the ankle. |
 |
|
Figure 12-28
Incise the peroneal retinaculum to release the tendons. Retract them laterally and anteriorly. Incise the fascia over the flexor hallucis longus to expose its muscle fibers. |
 |
|
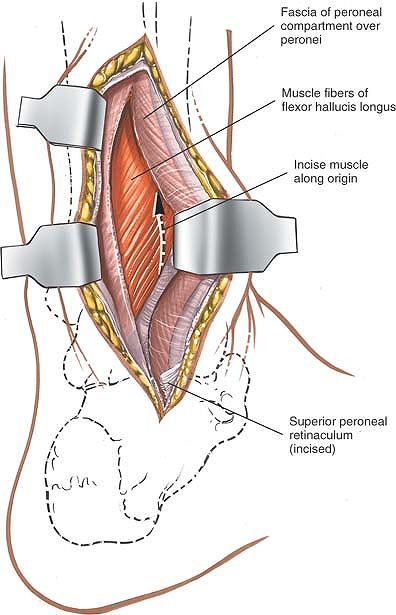
Figure 12-29 Make a longitudinal incision through the lateral fibers of the flexor hallucis longus as they arise from the fibula.
|
 |
|
Figure 12-30 Retract the flexor hallucis longus medially to reveal the periosteum covering the posterior aspect of the tibia.
|
through the lateral fibers of the flexor hallucis longus muscle as they
arise from the fibula (Fig. 12-29). Retract the flexor hallucis longus medially to reveal the periosteum over the posterior aspect of the tibia (Fig. 12-30).
If the distal tibia must be reached, develop an epi-periosteal plane
between the periosteum covering the tibia and the overlying soft
tissues. To enter the ankle joint, follow the posterior aspect of the
tibia down to the posterior ankle joint capsule and incise it
transversely.
incision superiorly and identify the plane between the lateral head of
the gastrocnemius muscle and the peroneus muscles. Develop this plane
down to the soleus muscle; retract it medially with the gastrocnemius.
Next, reflect the flexor hallucis longus muscle medially, detaching it
from its origin on the fibula. Continue the dissection medially across
the interosseous membrane to the posterior aspect of the tibia (see Posterolateral Approach to the Tibia in Chapter 11).
for open reduction and internal fixation of lateral malleolar
fractures. It also offers access to the posterolateral aspect of the
tibia.
sandbag under the buttock of the affected limb. The sandbag causes the
limb to rotate medially, bringing the lateral malleolus forward and
making it easier to reach (Fig. 12-31). Tilt
the table away from you to further increase the internal rotation of
the limb. Operating with the patient on his or her side also provides
excellent access to the distal fibula, but the medial malleolus cannot
be reached unless the patient’s position is changed, something that is
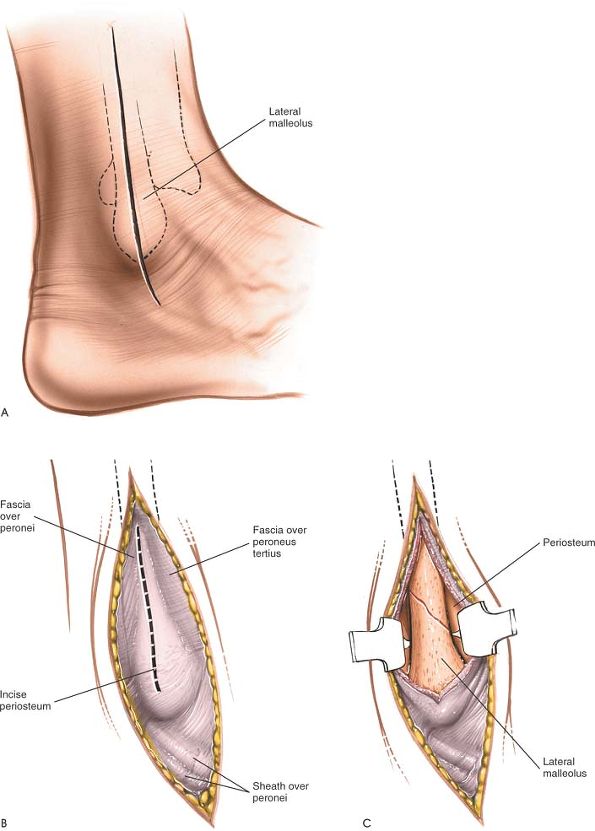
necessary in the fixation of bimalleolar fractures (Fig. 12-32). Exsanguinate the limb by elevating it for 3 to 5 minutes, then inflate a tourniquet.
posterior margin of the fibula all the way to its distal end and
continuing for a further 2 cm (Fig. 12-33A). In fracture surgery, center the incision at the level of the fracture.
is being performed down to a subcutaneous bone. For higher fractures of
the fibula, the internervous plane lies between the peroneus tertius muscle (which is supplied by the deep peroneal nerve) and the peroneus brevis muscle (which is supplied by the superficial peroneal nerve). (See Approach to the Fibula in Chapter 11.)
short saphenous vein, which lies posterior to the lateral malleolus.
The sural nerve, which runs with the short saphenous vein, also should
be preserved.
enough of it at the fracture site to expose the fracture adequately.
Take care to keep all dissection strictly subperiosteal, because the
terminal branches of the peroneal artery, which lie close to the
lateral malleolus, may be damaged. Only strip off as much periosteum as
is necessary for accurate reduction; periosteal stripping markedly
reduces the blood supply of the bone in cases of fracture (Fig. 12-33B, C; see Fig. 12-64).
 |
|
Figure 12-31 Position of the patient for exposure of the lateral malleolus.
|
 |
|
Figure 12-32
An alternate position for exposure of the lateral malleolus. Place the patient prone or on his or her side, with a sandbag under the pelvis of the affected side. |
 |
|
Figure 12-33 (A)
Make a 10- to 15-cm incision along the posterior margin of the fibula all the way to its distal end. From there, curve the incision forward, below the tip of the lateral malleolus. (B) Incise the periosteum on the subcutaneous surface of the fibula longitudinally. (C) Expose the distal fibula subperiosteally. |
mobilized. Cutting it may lead to the formation of a painful neuroma
and numbness along the lateral skin of the foot, which, although it
does not bear weight, does come in contact with the shoe. The nerve
also is valuable as a nerve graft. Preserve it if possible (see Fig. 12-61).
immediately deep to the medial surface of the distal fibula. They can
be damaged if dissection is extensive. The damage may not be noticed
during surgery because of the tourniquet, but a hematoma may form after
the tourniquet is taken off. That is why it is best to deflate the
tourniquet before closure to ensure hemostasis; then, the wound can be
drained with a suction drain (see Fig. 12-64).
the incision along the posterior border of the fibula, incising the
deep fascia in line with the skin incision. Develop a new plane between
the peroneal muscles (which are supplied by the superficial peroneal
nerve) and the flexor muscles (which are supplied by the tibial nerve).
The upper third of the fibula can be exposed if the common peroneal
nerve can be identified near the knee and traced down toward the ankle.
(For details of this approach, see Approach to the Fibula in Chapter 11.)
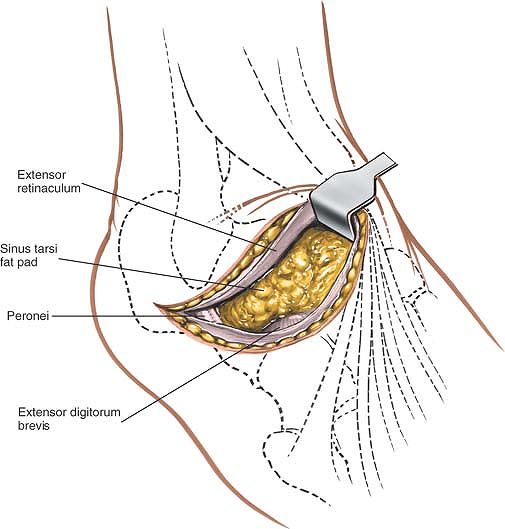
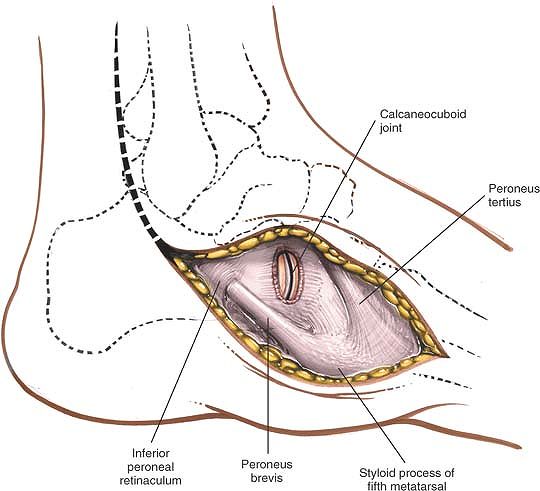
extend the approach distally, curve the incision down the lateral side
of the foot. Identify the peroneal tendons and incise the peroneal
retinacula. Detach the fat pad in the sinus tarsi and the origin of the
extensor digitorum brevis muscle to expose the calcaneocuboid joint on
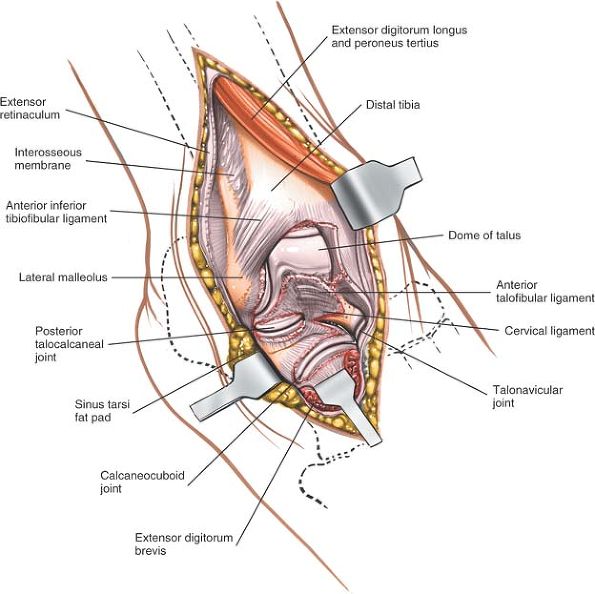
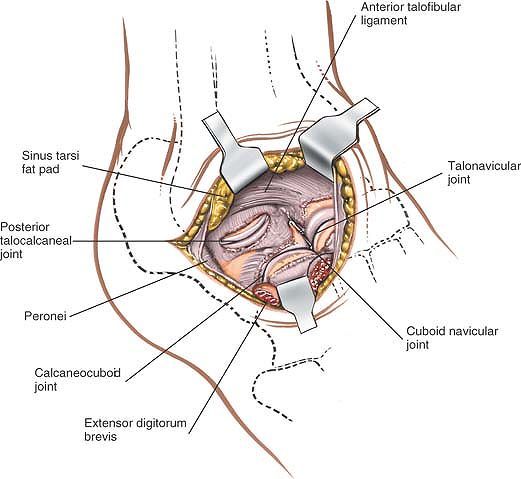
the lateral side of the tarsus (see Figs. 12-61 and 12-62).
ankle and hindpart of the foot allows exposure not only of the ankle
joint, but also of the talonavicular, calcaneocuboid, and talocalcaneal
joints. The approach is used commonly for ankle fusions, but also can
be used for triple arthrodesis and even pantalar arthrodesis. In
addition, it is possible to excise the entire talus through this
approach, or to reduce it in cases of talar dislocation.
large sandbag underneath the affected buttock to rotate the leg
internally and bring the lateral malleolus forward. Exsanguinate the
limb either by elevating it for 3 to 5 minutes or by applying a soft
rubber bandage; then inflate a tourniquet (see Fig. 12-31).
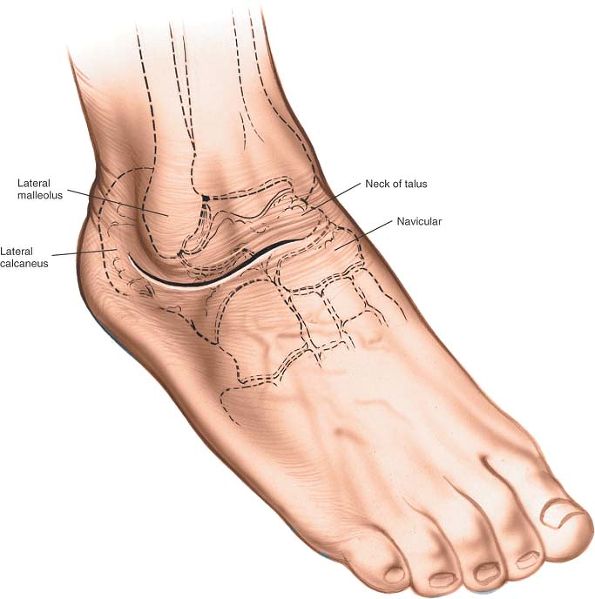
anterolateral aspect of the ankle. Begin some 5 cm proximal to the
ankle joint, 2 cm anterior to the anterior border of the fibula. Curve
the incision down, crossing the ankle joint 2 cm medial to the tip of
the lateral malleolus, and continue onto the foot, ending some 2 cm
medial to the fifth metatarsal base, over the base of the fourth
metatarsal (Fig. 12-34).
 |
|
Figure 12-34
Incision for the anterolateral approach to the ankle. Make a 15-cm slightly curved incision on the anterolateral aspect of the ankle. Begin approximately 5 cm proximal to the ankle joint and 2 cm anterior to the anterior border of the fibula. Curve the incision downward to cross the ankle joint 2 cm medial to the tip of the lateral malleolus, and continue onto the foot, ending about 2 cm medial to the fifth metatarsal. |
 |
|
Figure 12-35
Incise the deep fascia and the superior and inferior retinacula in line with the incision. Take care to preserve the superficial peroneal nerve. |
 |
|
Figure 12-36
Identify the peroneus tertius and the extensor digitorum longus muscles, and incise down to bone lateral to them in the upper half of the wound. |
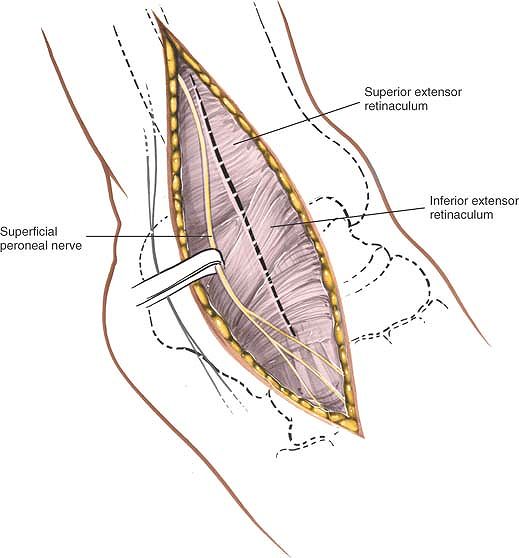
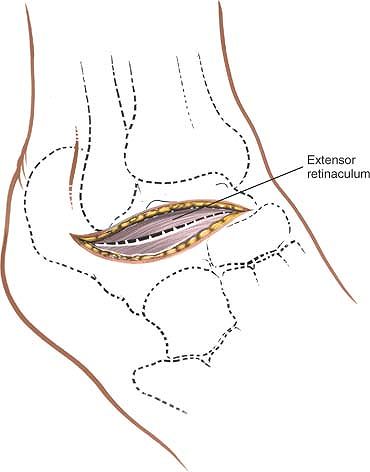
cutting through the superior and inferior extensor retinacula. Do not
develop skin flaps. Take care to identify and preserve any dorsal
cutaneous branches of the superficial peroneal nerve that may cross the
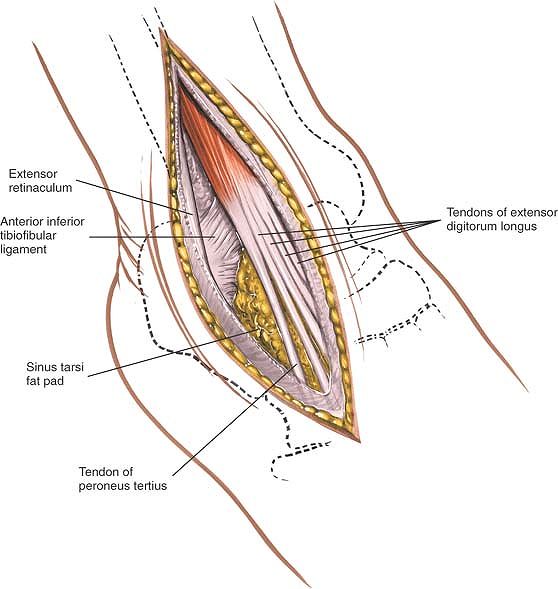
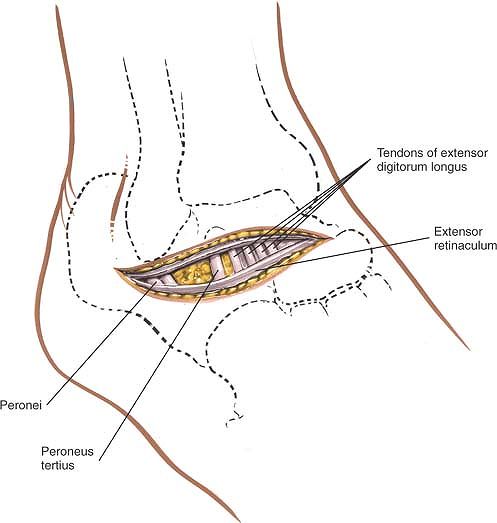
field of dissection (Fig. 12-35). Identify the
peroneus tertius and extensor digitorum longus muscles, and, in the
upper half of the wound, incise down to bone just lateral to these
muscles (Fig. 12-36).
 |
|
Figure 12-37
Retract the extensor musculature medially to expose the anterior aspect of the distal tibia and ankle joint. Identify the origin of the extensor digitorum brevis. |
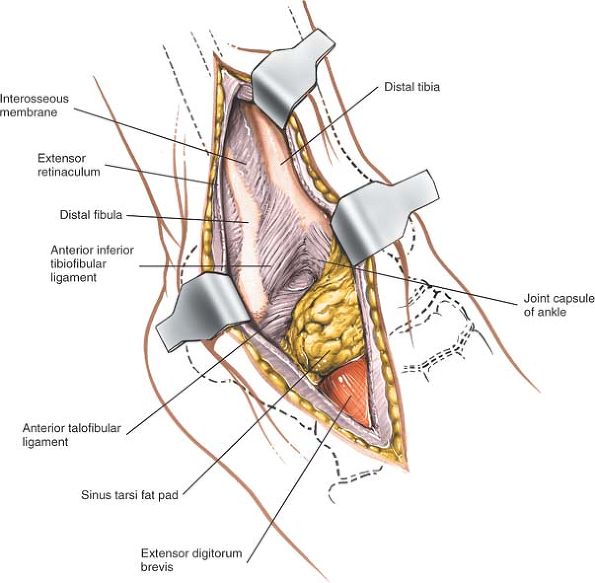
anterior aspect of the distal tibia and the anterior ankle joint
capsule. Distally, identify the extensor digitorum brevis muscle at its
origin from the calcaneus (Fig. 12-37) and
detach it by sharp dissection. During dissection, branches of the
lateral tarsal artery will be cut; cauterize (diathermy) these to
prevent the formation of a postoperative hematoma. Reflect the detached
extensor digitorum brevis muscle distally and medially, lifting the
muscle fascia and the subcutaneous fat and skin as one flap. Identify
the dorsal capsules of the calcaneocuboid and talonavicular joints,
which lie next to each other across the foot, forming the clinical
midtarsal joint (see Fig. 12-60). Next,
identify the fat in the sinus tarsi and clear it away to expose the
talocalcaneal joint, either by mobilizing the fat pad and turning it
downward or by excising it.
Preserving
the fat pad prevents the development of a cosmetically ugly dimple
postoperatively. Preserving the pad also helps the wound to heal (Fig. 12-38).
exposed. To open the joints, forcefully flex and invert the foot in a
plantar direction (see Fig. 12-38).
 |
|
Figure 12-38
The extensor digitorum brevis has been detached from its origin and reflected distally. The fat pad covering the sinus tarsi has been detached and reflected downward. Incise the joint capsules that have been exposed. |
structures in the anterior compartment of the leg. Continue the
incision over the compartment, and incise the thick deep fascia in line
with the skin incision.
tarsometatarsal joint on the lateral half of the foot. Continue the
incision over the fourth metatarsal, and expose the subcutaneous
tarsometatarsal joints.
talocalcaneonavicular, posterior talocalcaneal, and calcaneocuboid
joints. It permits arthrodesis of any or all these joints (triple
arthrodesis).
Place a large sandbag beneath the affected buttock to rotate the leg
internally, and bring the lateral portion of the ankle and hindpart of
the foot forward. Further increase internal rotation by tilting the
table away from you. Exsanguinate the limb either by elevating it for 5
minutes or by applying a soft rubber bandage, and then inflate a
tourniquet (see Fig. 12-31).
 |
|
Figure 12-39
Make a curved incision starting just distal to the distal end of the lateral malleolus and slightly posterior to it. Continue distally along the lateral side of the hindpart of the foot and over the sinus tarsi. Then, curve the incision medially toward the talocalcaneonavicular joint. |
stabilize the foot, holding the calcaneus with one hand, and place the
thumb of the free hand in the soft-tissue depression just anterior to
the lateral malleolus. The depression lies directly over the sinus
tarsi.
distal end of the lateral malleolus and slightly posterior to it.
Continue distally along the lateral side of the hindpart of the foot
and over the sinus tarsi. Then, curve medially, ending over the
talocalcaneonavicular joint (Fig. 12-39).
skin flaps may necrose. Ligate any veins that cross the operative
field. Open the deep fascia in line with the skin incision, taking care
not to damage the tendons of the peroneus tertius and extensor
digitorum longus muscles, which cross the distal end of the incision (Figs. 12-40 and 12-41).
Retract these tendons medially to gain access to the dorsum of the
foot. Do not retract the peroneal tendons, which run through the
proximal end of the wound, at this stage (Fig. 12-42).
 |
|
Figure 12-40 Incise and open the deep fascia in line with the skin incision.
|
 |
|
Figure 12-41
Take care not to damage the tendons of the peroneus tertius and the extensor digitorum longus, which cross under the distal end of the incision. |
 |
|
Figure 12-42 Retract the extensor tendons medially.
|
tarsi by sharp dissection, leaving it attached to the skin flap; under
it lies the origin of the extensor digitorum brevis muscle. Detach its
origin by sharp dissection, and reflect the muscle distally to expose
the dorsal capsule of the talocalcaneonavicular joint in the distal end
of the wound and the dorsal capsule of the calcaneocuboid joint more
laterally (Fig. 12-43). Incise these capsules and open their respective joints by inverting the foot forcefully (Fig. 12-44).
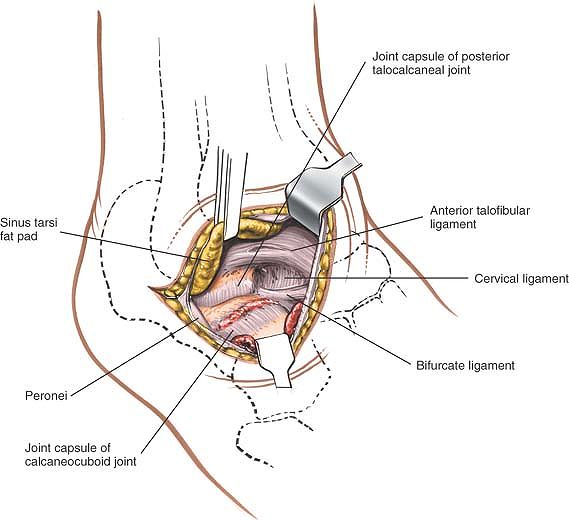
Next, incise the peroneal retinacula and reflect the peroneal tendons
anteriorly. Identify and incise the capsule of the posterior
talocalcaneal joint. Open it by inverting the heel (Fig. 12-45).
calcaneocuboid joints now are exposed. Note that, in virtually all
cases in which this approach is used, these joints are in abnormal
position. The approach should remain safe as long as it stays on bone
while the joints are being identified.
necrosis of skin flaps. Therefore, skin flaps should be cut as thickly
as possible, stripping and retraction should be kept to a minimum, and
sharp curves in the skin incision should be avoided.
subtalar joint must be incised before inversion will open either one.
 |
|
Figure 12-43
Retract the fat pad with the skin flap. Detach the origins of the extensor digitorum brevis, and retract the muscle distally to expose the dorsal capsule of the talocalcaneonavicular joint in the distal end of the wound and the more lateral dorsal capsule of the calcaneocuboid joint. |
 |
|
Figure 12-44 Incise the joint capsules of the respective joints.
|
 |
|
Figure 12-45 Reflect the peroneal tendons anteriorly. Incise the joint capsule of the posterior talocalcaneal joint.
|
incision, curving it along the posterior border of the fibula. By
developing a plane between the peroneal muscles and the flexor muscles,
the entire length of the fibula can be exposed (see Approach to the Fibula in Chapter 11). In practice, however, this extension is required rarely, if ever.
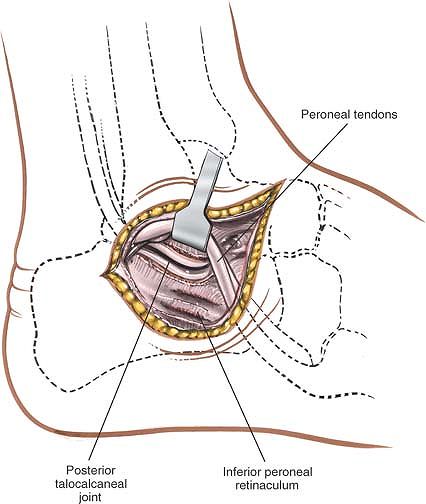
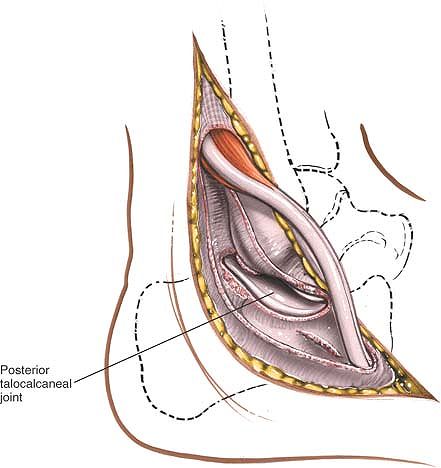
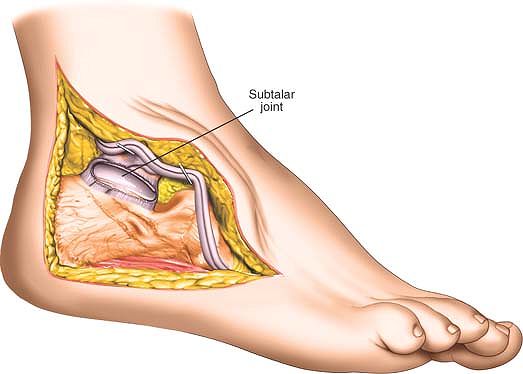
joint exposes the posterior facet of the talocalcaneal joint more
extensively than does the anterolateral approach. It is mainly used for
arthrodesis of the posterior part of the talocalcaneal joint.
sandbag under the buttock of the affected side to bring the lateral
malleolus forward. Place a support
on
the opposite iliac crest, then tilt the table 20° to 30° away from the
surgeon to improve access still further. Exsanguinate the limb either
by elevating it for 3 to 5 minutes or by applying a soft rubber
bandage; then inflate a tourniquet (see Fig. 12-31).
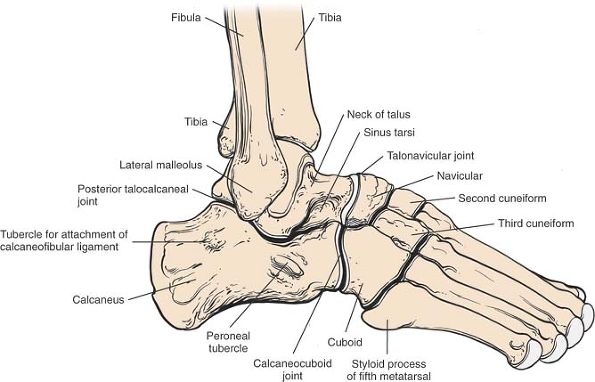
is a small protuberance of bone on the lateral surface of the calcaneus
that separates the tendons of the peroneus longus and brevis muscles.
It lies distal and anterior to the lateral malleolus.
aspect of the ankle. Begin some 4 cm above the tip of the lateral
malleolus on the posterior border of the fibula. Follow the posterior
border of the fibula down to the tip of the lateral malleolus, and then
curve the incision forward, passing over the peroneal tubercle parallel
to the course of the peroneal tendons (Fig. 12-46).
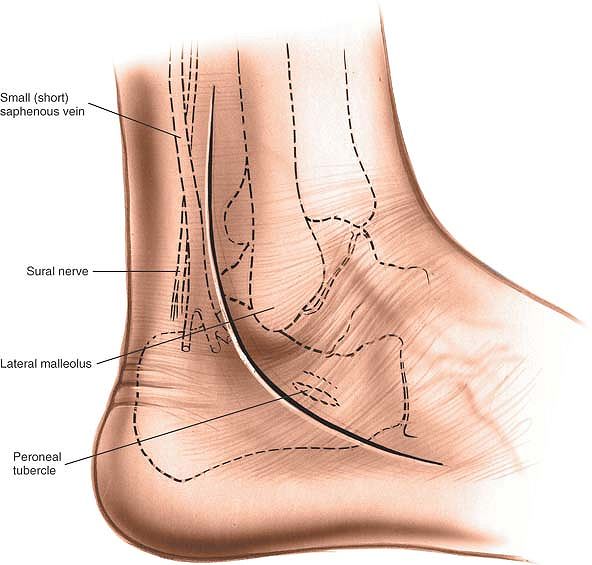 |
|
Figure 12-46 Make a curved incision 10 to 13 cm long on the lateral aspect of the ankle.
|
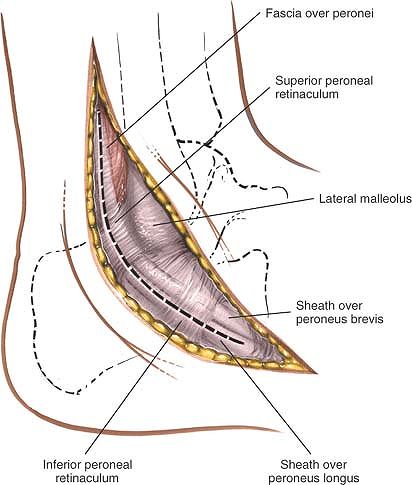
peroneus muscles, whose tendons are mobilized and retracted anteriorly,
share a nerve supply from the superficial peroneal nerve. The approach
is safe because the muscles receive their supply at a point well
proximal to it.
malleolus with the short saphenous vein. Begin incising the deep fascia
in line with the upper part of the skin incision to uncover the two
peroneal tendons. The tendons of the peroneus longus and peroneus
brevis muscles curve around the back of the lateral malleolus. The
peroneus brevis tendon, which is closest to the lateral malleolus, is
muscular almost down to the level of the malleolus itself (see Fig. 12-61).
 |
|
Figure 12-47
Incise the deep fascia in line with the upper part of the skin incision. Continue the fascial incision distally, following the course of the tendons. Incise the inferior peroneal retinaculum, and expose the peroneal tendons. |
tendons. The peroneus brevis is covered by the inferior peroneal
retinaculum distal to the tip of the fibula. Incise it in line with the
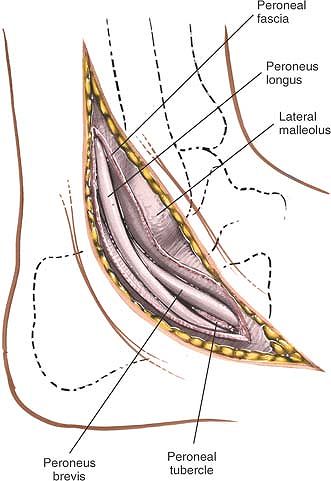
tendon (Fig. 12-47). The peroneus longus is
covered by a separate fibrous sheath of its own; incise that sheath in
line with the tendon as well. These ligaments of the retinaculum must
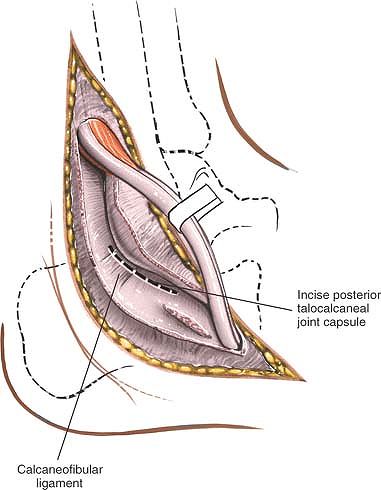
be repaired during closure to prevent tendon dislocation (Fig. 12-48). When both peroneal tendons have been mobilized, retract them anteriorly over the distal end of the fibula (Fig. 12-49).
 |
|
Figure 12-48
Incise the deep fascia in line with the upper part of the skin incision. Continue the fascial incision distally, following the course of the tendons. Incise the inferior peroneal retinaculum and expose the peroneal tendons. |
 |
|
Figure 12-49
Mobilize the peroneal tendons, and retract them anteriorly over the distal end of the fibula. Identify the calcaneofibular ligament. Incise it transversely to open the capsule of the posterior talocalcaneal joint. |
 |
|
Figure 12-50 Open the joint capsule to expose the posterior talocalcaneal joint.
|
the lateral malleolus down and back to the lateral surface of the
calcaneus. The ligament is bound closely to the capsule of the
talocalcaneal joint. The joint itself is difficult to palpate and
identify, and a small amount of subperiosteal dissection on the lateral
aspect of the calcaneus usually is required before the joint can be
located. Having identified the joint, incise the capsule transversely
to open it up (Fig. 12-50; see Figs. 12-49, 12-62, and 12-63).
incise the peritoneum over its lateral surface and strip it inferiorly
by sharp dissection. To see the talus better, cut the calcaneofibular
ligament and the capsule of the talocalcaneal joint superiorly to
uncover its lateral border.
achieved only by inverting the foot. Forcible inversion does not open
up the joint if the anterior part of the talocalcaneal
(talocalcaneonavicular) joint remains intact.
for open reduction and internal fixation of calcaneal fractures. Such
fractures are always associated with significant soft-tissue swelling;
it is critical to allow this soft-tissue swelling to subside before
surgery is carried out to reduce the risk of skin necrosis. An accurate
assessment of the vascular status of the patient is critical before
undertaking surgery. Diabetes, especially with associated neuropathy
and smoking, are relative contraindications to this surgery approach.
The indications for the surgical approach include:
-
Open reduction and internal fixation of displaced calcaneal fractures
-
Treatment of other lesions of the posterior facet of the subtalar joint and lateral wall of the os calcis
operating table. Ensure that the bony prominences are well padded.
Place the leg that is to be operated on posteriorly with the under leg
anterior. Exsanguinate the limb either by elevating it for 3 to 5
minutes or by applying a soft rubber bandage. Inflate a tourniquet.
the lateral border of the Achilles tendon. Next, identify the styloid
process at the base of the fifth metatarsal bone, which is easily felt
along the lateral aspect of the foot.
of the incision at the base of the fifth metatarsal and extend it
posteriorly, following the junction between the smooth skin of the
dorsum of the foot and the wrinkled skin of the sole. Make a second
incision beginning approximately 6 to 8 cm above the skin of the heel,
halfway between the posterior aspect of the fibula and the lateral
aspect of the Achilles tendon. Extend this second incision distally to
meet the first incision overlying the lateral aspect of the os calcis (Fig. 12-51).
taking care not to elevate any flaps. Distally, dissect straight down
to the lateral surface of the calcaneus by sharp dissection (Fig. 12-52).
 |
|
Figure 12-51
Begin the distal limb of the incision at the base of the fifth metatarsal and extend it posteriorly, following the junction between the smooth skin of the dorsum of the foot and the wrinkled skin of the sole. Make a second incision beginning approximately 6 to 8 cm above the skin of the heel, halfway between the posterior aspect of the fibula and the lateral aspect of the Achilles tendon. Extend this second incision distally to meet the first incision overlying the lateral aspect of the os calcis. |
calcaneus and develop a full thickness flap consisting of periosteum
and all the overlying tissues. Stick to the bone and continue to
retract the soft tissue flap proximally. The peroneal tendons will be
carried forward with the flap. Divide the calcaneofibular ligament to
expose the subtalar joint. Continue the dissection proximally to expose
the body of the os calcis as well as the subtalar joint. Distally
expose the calcaneocuboid joint by incising its capsule. If at all
possible, try not to cut into the muscle belly of abductor digiti
minimae (Fig. 12-53).
 |
|
Figure 12-52
Deepen the skin incision through subcutaneous tissue, taking care not to elevate any flaps. Distally dissect straight down to the lateral surface of the calcaneus by sharp dissection. Next, elevate a thick flap consisting of periosteum subcutaneous tissues and skin. The peroneal tendons will be elevated in this flap. Do not attempt to dissect out layers in this flap. |
 |
|
Figure 12-53
Continue to develop the anterior flap. Divide the calcaneofibular ligament to expose the subtalar joint. Continue the dissection proximally to expose the body of the os calcis as well as the subtalar joint. Distally expose the calcaneocuboid joint by incising its capsule. |
The risk of skin necrosis can be minimized if the flap is elevated as a
full thickness flap because the skin derives its blood supply from the
underlying tissues. Dissecting the skin flaps in this area, which has
always been severely traumatized, is associated with a significant
incidence of wound breakdown. Accurate assessment of the patient’s
preoperative vascular status is critical. Most surgery in this area has
to be delayed for a significant period of time to allow soft-tissue
swelling to diminish before surgery commences.
to the Achilles and plantaris tendons, which lie posteriorly in the
midline.
-
The flexor tendons—the tibialis
posterior, flexor digitorum longus, and flexor hallucis longus (which
are supplied by the tibial nerve)—pass behind the medial malleolus. -
The extensor tendons—the tibialis
anterior, extensor digitorum longus, extensor hallucis longus, and
peroneus tertius (which are supplied by the deep peroneal nerve)—pass
in front of the ankle joint. -
The evertor tendons—the peroneus longus
and peroneus brevis (which are supplied by the superficial peroneal
nerve)—pass behind the lateral malleolus.
the ankle by thickened areas in the deep fascia of the leg, called the
retinacula.
potential internervous planes through which the ankle can be
approached: medially, between flexors (tibialis posterior) and
extensors (tibialis anterior); posterolaterally, between flexors
(flexor hallucis longus) and evertors (peroneus brevis); and laterally,
between extensors (peroneus tertius) and evertors (peroneus brevis).
 |
|
Figure 12-54
The superficial structures of the medial aspect of the foot and ankle. Fibers of the flexor retinaculum cross the neurovascular bundle, binding it to the medial side of the foot. |
and supply the foot. They present the major surgical concerns for all
approaches around the ankle.
-
The anterior neurovascular bundle
crosses the front of the ankle roughly halfway between the malleoli. It
lies between the tibialis anterior and extensor hallucis longus muscles
proximal to the joint (see Fig. 12-59), and
between the tendons of the extensor hallucis longus and extensor
digitorum longus muscles distal to the joint. The tendon of the
extensor hallucis longus crosses the bundle in a lateral to medial
direction at the level of the ankle joint (see Fig. 12-58).The anterior tibial artery,
which crosses the front of the ankle joint before becoming the dorsalis
pedis artery, is palpable on the dorsum of the foot. It also
communicates with the medial plantar artery through the first
metatarsal space. Fractures through the base of the metatarsal bones
and dislocations at the tarsometatarsal joint (Lisfranc’s
fracture/dislocation)* can damage both elements of this anastomosis and
cause ischemia to the medial side of the distal portion of the foot.The deep peroneal nerve
accompanies the anterior tibial artery. It supplies two small muscles
on the dorsum of the foot: the extensor digitorum brevis and the
extensor hallucis brevis. It also supplies a sensory branch to the
first web space. Anesthesia in this web space is one of the first
clinical signs of anterior compartment compression. Ischemia of
P.669
the deep peroneal nerve occurs before ischemic muscle damage (see Figs. 12-58 and 12-59).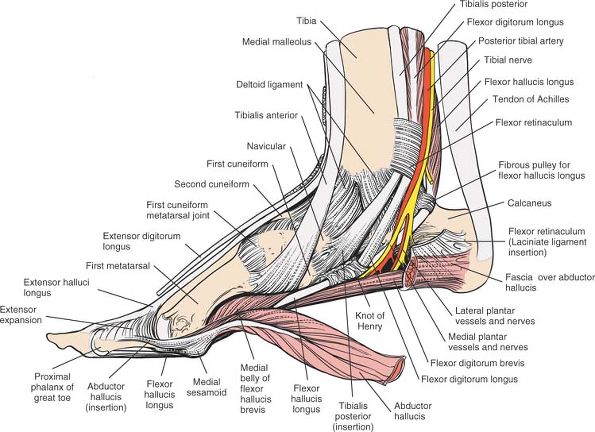 Figure 12-55
The extensor retinaculum and part of the flexor retinaculum have been
removed to reveal the deeper tendons and the neurovascular bundle. The
abductor hallucis has been detached from its origin to reveal the knot
of Henry and the medial and lateral plantar arteries and nerves. -
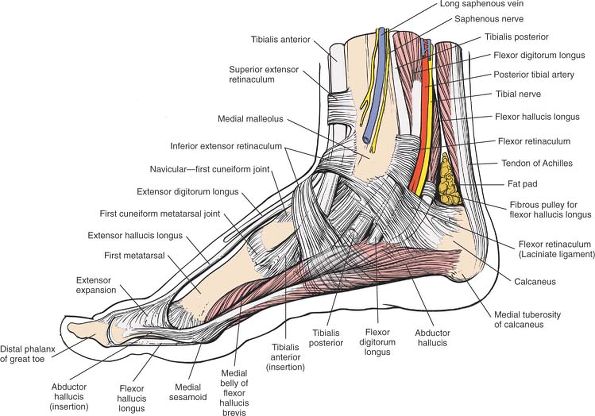
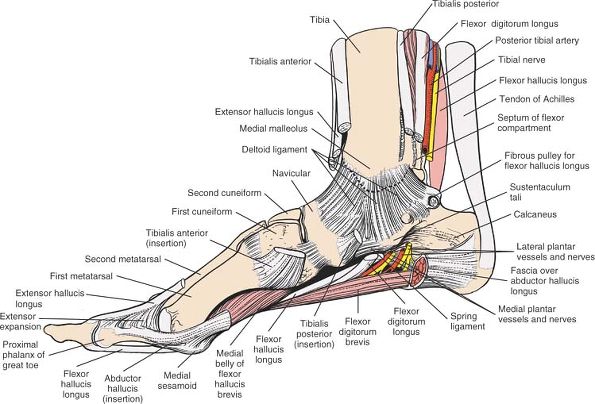
The posterior neurovascular bundle runs behind the medial malleolus, between the tendons of the flexor digitorum longus and flexor hallucis longus muscles (Figs. 12-54 and 12-55).
passes behind the flexor digitorum longus before entering the sole of
the foot, where it divides into medial and lateral plantar arteries
(see Fig. 12-55).
behind the medial malleolus with the posterior tibial artery. It gives
off a calcaneal branch to the skin of the heel. After entering the sole
of the foot, it divides into the medial and lateral plantar nerves,
which supply motor power to the small muscles of the foot and sensation
to the sole (see Fig. 12-55).
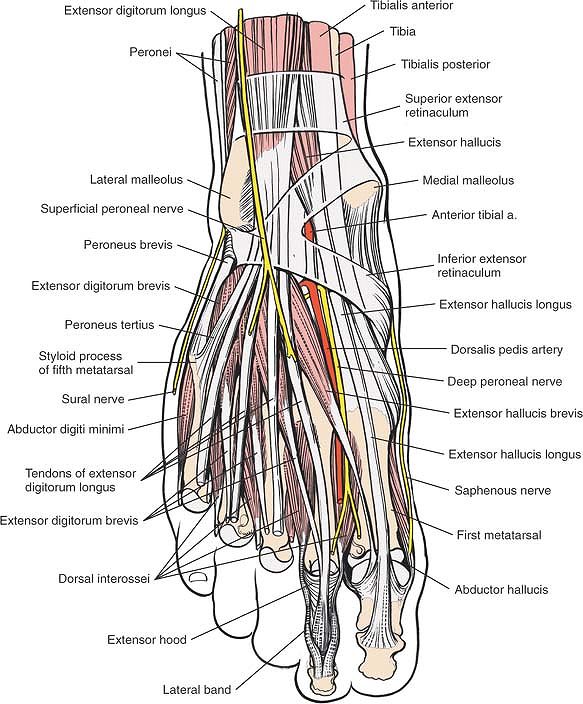
superficially, all supplying the dorsum of the foot. Knowledge of their
course is vital in planning skin incisions. The sensory supply to the
sole and heel comes from the lateral and medial plantar nerves, which
are branches of the tibial nerve that lies deep at the level of the
ankle.
-
The saphenous nerve
is the terminal branch of the femoral nerve. It runs with the long
saphenous vein in front of the medial malleolus, where it usually
divides into two branches that lie on either side of the vein and bind
closely to it. It supplies the medial, non–weight-bearing side of the
middle part and hindpart of the foot (see Fig. 12-54).P.670![]() Figure 12-56 The flexor and extensor tendons have been resected to expose the deltoid ligament of the ankle joint.
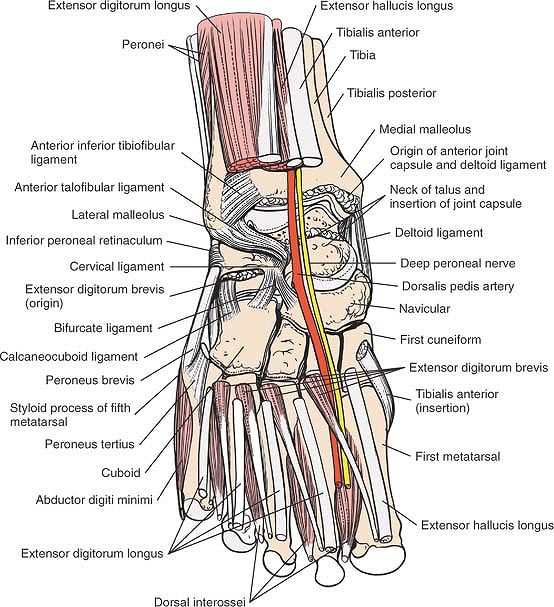
Figure 12-56 The flexor and extensor tendons have been resected to expose the deltoid ligament of the ankle joint.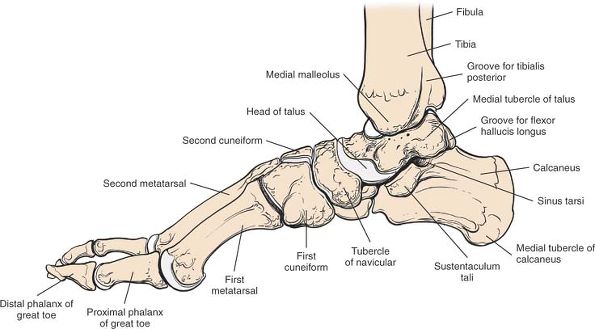 Figure 12-57 Osteology of the medial side of the foot and ankle.
 -
The superficial peroneal nerve
is a terminal branch of the common peroneal nerve. It crosses the ankle
joint roughly along the anterior midline, where it usually divides into
several branches. It supplies non–weight-bearing skin on the dorsum of
the foot. The nerve is quite superficial at the level of the ankle
joint; great care must be taken with skin incision in its area (Fig. 12-58; see Fig. 12-78).![]() Figure 12-58
Figure 12-58
The anatomy of the superficial structures of the anterior portion of
the ankle and the dorsum of the foot. At the level of the ankle joint,
the neurovascular bundle lies immediately lateral to the extensor
hallucis longus tendon. -
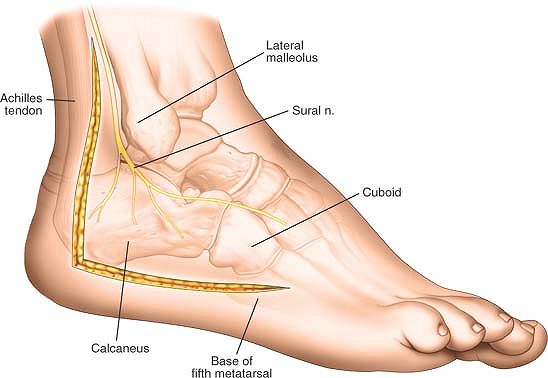
The sural nerve,
a terminal branch of the tibial nerve, runs with the short saphenous
vein just behind the lateral malleolus. Similar to the saphenous nerve,
the sural nerve binds very closely to its vein; preserving the vein is
the key to preserving
P.672
the nerve during surgery. The sural nerve supplies an area of non–weight-bearing skin on the lateral side of the foot (see Fig. 12-61).
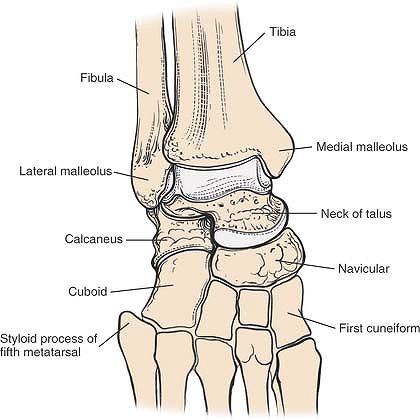
of the tibia form the articulation that bears weight in the ankle. The
joint itself is stabilized by the medial and lateral malleoli, the bony
landmarks of the area. The medial malleolus is both shorter and more
anterior. It remains in contact with the medial side of the talus
throughout the range of motion (see Fig. 12-57).
 |
|
Figure 12-59
The extensor tendons have been resected to reveal the ligaments of the anterior portion of the ankle joint and the joints of the middle part of the foot. |
mortise to point 15° laterally. During dorsiflexion, the widest portion
of the talus (the anterior portion) is the ankle mortise, forcing the
mortise itself to widen. The mortise narrows to accommodate the
narrower part of the talus during plantar flexion. Hence, if an ankle
must be immobilized, it must be put in the functional position, that
is, dorsiflexion (Figs. 12-63; see Figs. 12-57 and 12-60, and 12-66).
Note also that, if a screw is inserted between the fibula and the tibia
(as in the reconstruction of a diastasis), then that screw should be
inserted with the ankle placed in maximal dorsiflexion.
 |
|
Figure 12-60 Osteology of the anterior part of the ankle joint and middle part of the foot.
|
 |
|
Figure 12-61
The superficial anatomy of the lateral and dorsolateral aspects of the foot and ankle. The peroneal tendons are held in place by their superior and inferior retinacula. |
 |
|
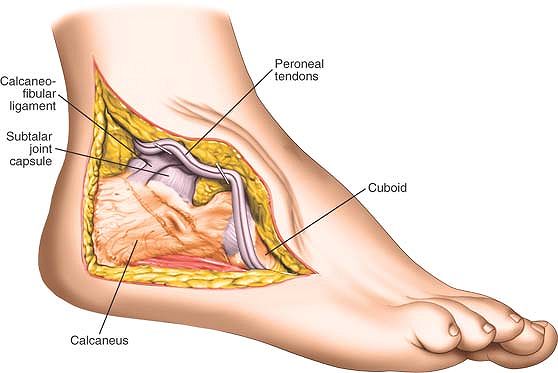
Figure 12-62
The peroneal and extensor tendons have been resected to reveal the ligaments of the lateral and anterolateral ankle joint. Note the peroneal tubercle and the resected portion of the inferior peroneal retinaculum, which forms separate fibroosseous tunnels for the peroneal tendons. The calcaneofibular ligament is visible deep to the superior peroneal retinaculum. |
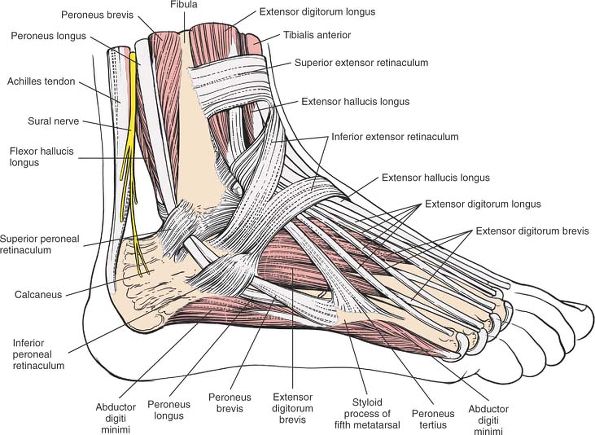
-
Three plantar flexors of the ankle and
foot insert into the plantar surface of the foot and are supplied by
the tibial nerve. Their positions behind the medial malleolus are
remembered best in the form of the mnemonic “Tom, Dick, and Harry.” The
tibialis posterior is closest to the medial malleolus; the flexor digitorum longus is behind it; and the flexor hallucis
longus is the most posterior and lateral of the three. A second
mnemonic, “Timothy Doth Vex Nervous Housemaids,” is older; it points
out that the posterior tibial vessels and tibial nerve lie between the flexor digitorum longus and flexor hallucis longus muscles (see Figs. 12-54 and 12-55). -
The three muscles that insert into the
posterosuperior part of the os calcis (the gastrocnemius, soleus, and
plantaris) do so via their common Achilles tendon. Supplied by the
tibial nerve, they are the most powerful plantar flexors of the ankle.
Because they insert more to the medial side of the posterior surface of
the calcaneus than to the lateral side, they also invert the heel.
posterior surface of the calcaneus. The collagen fibers that comprise
the tendon rotate about 90° around its longitudinal axis, between its
origin and its insertion onto bone. Viewed from behind, the rotation is
in a medial to lateral direction. Thus,
fibers
that begin on the medial side of the tendon lie posteriorly, and those
that begin on the lateral side lie anteriorly at the level of the
insertion. This anatomic fact makes it possible to lengthen the
Achilles tendon by dividing its anterior two thirds near the insertion
and its medial two-thirds 5 cm more proximally. Dorsiflexion of the
foot lengthens the tendon, and no suture is required. The operation can
be done either as an open or as a subcutaneous procedure.5
This arrangement of the fibers can be remembered by thinking of this
tendon lengthening as the “DAMP operation,” which stands for distal anterior medial proximal.
 |
|
Figure 12-63 Osteology of the lateral side of the foot and ankle.
|
with a bursa that may become inflamed. A second bursa exists between
the insertion of the tendon into the os calcis and the skin (see Fig. 12-54).
thickening of the fascia that stretches from the medial malleolus to
the back of the calcaneus. It covers the three flexor tendons that pass
around the back of the tibial malleolus, as well as the neurovascular
bundle.
producing pain and paresthesia in the distribution of the medial and
lateral plantar nerves and their calcaneal branches. The syndrome is
known as the tarsal tunnel syndrome (see Fig. 12-54).
joint. All are extensors of the ankle and are supplied by the deep
peroneal nerve. The muscles, from medial to lateral, are the tibialis
anterior, extensor hallucis longus, extensor digitorum longus, and
peroneus tertius. The neurovascular bundle crosses the front of the
ankle virtually under the tendon of the extensor hallucis longus (see Fig. 12-58).
is a thickening of the deep fascia above the ankle. It runs between the
tibia and the fibula, and is split by the tendon of the tibialis
anterior muscle, which lies in a synovial sheath just above the ankle
(see Fig. 12-58).
on the dorsum of the foot, is attached to the lateral side of the upper
surface of the os calcis. The retinaculum is split medially; the upper
part attaches to the medial malleolus, whereas the lower part travels
across the foot, where it sometimes joins the plantar aponeurosis in
the sole. The two retinacula prevent the anterior tendons from
bowstringing; they should be repaired after any approach that cuts them
(see Fig. 12-58).
pass behind the lateral malleolus to reach the foot. Both evert the
foot and are supplied by the superficial peroneal nerve (see Fig. 12-61).
behind the lateral malleolus, often is used in reconstruction of the
lateral ligaments of the ankle. In cases of instability, maintain the
distal insertion of the tendon intact; the proximal portion of the
tendon is detached surgically, threaded through the fibula, and
attached to the talus, calcaneus, or itself to substitute for the
damaged ligaments. The peroneus brevis is recognizable both by its
position immediately behind the lateral malleolus and by its
muscularity almost down to the level of the ankle joint.
as they pass around the back of the lateral malleolus. The sheath
encloses both tendons down to the peroneal tubercle. At this point,
each tendon gains its own separate sheath (see Figs. 12-61 and 12-62). This also is the site of peroneal tendinitis, which commonly occurs in joggers.
confined almost exclusively to three joints: the posterior part of the
subtalar joint, the talocalcaneonavicular joint, and the calcaneocuboid
joint. The anatomy of the approaches is the anatomy of the joints
themselves, because they all are superficial structures (see Figs. 12-63 and 12-66).
obliquely across the foot, between the talus and the calcaneus. The
canal is formed by two grooves, one on the inferior surface of the
talus and the other on the superior surface of the calcaneus. The canal
separates the talocalcaneonavicular joint from the talocalcaneal joint
and acts as a landmark for surgical access to the two joints. At its
lateral end, the canal widens considerably into the sinus tarsi.
ligamentum cervicis tali, and a large fat pad; the ligament must be
divided and the fat pad mobilized for access to the sinus and joints.
The extensor digitorum brevis muscle originates from the top of the
anterior wall of the sinus. It must be detached for access to the
calcaneocuboid joint.
subtalar joint, which consists of a convex superior facet of the talus
and a concave facet of the talus. The joint line is oblique when viewed
from the lateral (operative) side. To see it better, the peroneal
tendons that overlie it partially must be mobilized and retracted
anteriorly.
subtalar joint, the talocalcaneonavicular joint. This complex joint
consists of a ball (the head of the talus) articulating with a socket
(the concave posterior aspect of the navicular, the concave anterior
end of the superior surface of the calcaneus, and the spring
ligament—short plantar calcaneonavicular ligament—that connects the two
bony elements of the socket). From the lateral side, the talonavicular
part of the joint appears nearly vertical. From a dorsal point of view,
the joint runs transversely across the foot, in line with the
calcaneocuboid joint.
formed by the anterior end of the calcaneus and the posterior aspect of
the cuboid. From the lateral side, the joint looks vertical. A more
dorsal view shows that it runs transversely across the foot in line
with the talonavicular joint.
become accessible if surgery remains on bone and the surgeon is aware
of the different planes of the joints.
 |
|
Figure 12-64
Superficial anatomy of the posterolateral aspect of the foot and ankle. Note that the muscle fibers of the peroneus brevis run all the way to the ankle joint and lie immediately posterior to the lateral malleolus. |
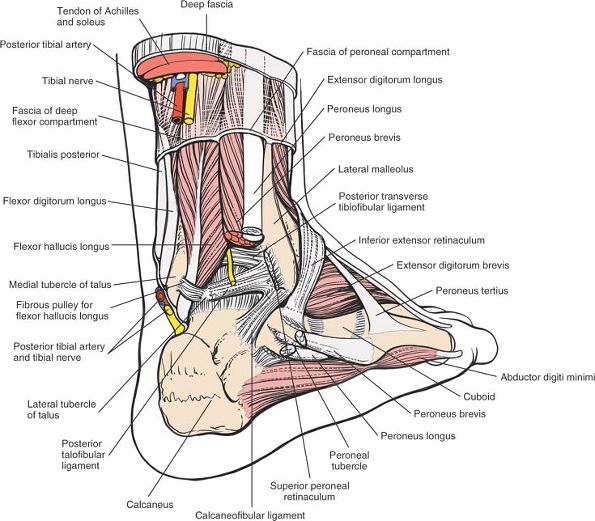 |
|
Figure 12-65
The Achilles tendon and the peroneus muscles have been resected to reveal the posterolateral aspect of the ankle joint and the deep flexor tendons of the foot. The flexor hallucis longus is immediately medial to the peroneus brevis. The fascia investing these muscles is deep to the deep fascia; it separates them into peroneal and deep flexor compartments. The flexor hallucis longus remains muscular down to the ankle joint. |
 |
|
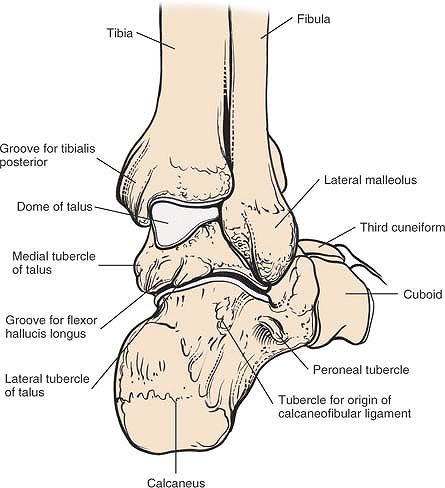
Figure 12-66 Osteology of the posterolateral aspect of the foot and ankle.
|
calcaneocuboid and talonavicular joints to the tarsometatarsal
Lisfranc’s joints. All these bones and joints are superficial and can
be approached directly by dorsal, medial, lateral, and plantar
approaches. Operations in this area (which are performed rarely)
usually involve surgery on the insertions of the four powerful muscles
that, together, are responsible for controlling inversion and eversion
of the foot. These muscles are the tibialis anterior, which inserts
into the medial surface and undersurface of the medial cuneiform bone,
and into the adjoining part of the base of the first metatarsal bone;
the peroneus longus, which inserts into the lateral side of the medial
cuneiform bone; the peroneus brevis, which inserts into the base of the
lateral side of the metatarsal bone; and the tibialis posterior, which
inserts into the tuberosity of the navicular bone, the inferior surface
of the medial cuneiform bone, the intermediate cuneiform bone, and the
bases of the second, third, and fourth metatarsal bones (see Figs. 12-55, 12-58, and 12-62).
specialized procedures for the treatment of muscle imbalance, mobile
flatfoot, and an accessory navicular bone. It also is approached for
open reduction and internal fixation of fractures in and around
Lisfranc’s joint, and for local tarsal fusion. Only the general
surgical approaches are considered here, because the details of
operative technique and indications are beyond the scope of this book.
Dorsomedial approaches and medial approaches are carried out with the
leg in its natural position of slight external rotation, whereas
dorsolateral approaches require internal rotation of the limb, which is
achieved by placing a sandbag under the buttock. For
all
procedures, exsanguinate the limb either by elevating it for 3 to 5
minutes or by applying a soft rubber bandage. Then, inflate a
tourniquet (see Fig. 12-31).
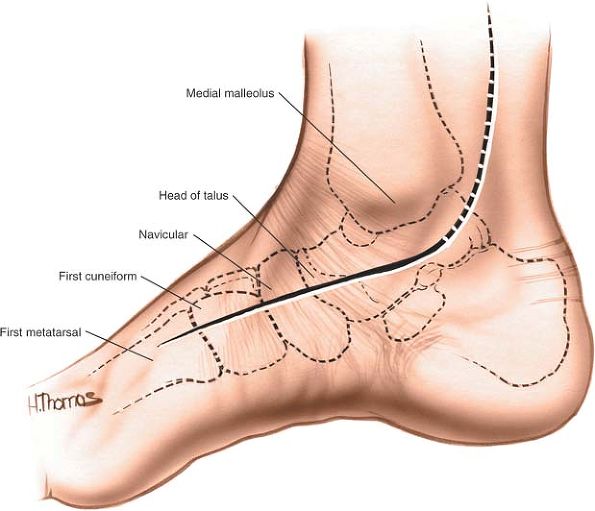
feel along the medial border of the foot in a distal to proximal
direction. The first metatarsal flares slightly at its base to meet the
first cuneiform.
is immediately proximal to the navicular. It can be located by
inverting and everting the forepart of the foot. The motion that occurs
between the talus and the navicular is palpable (Fig. 12-67).
 |
|
Figure 12-67
Incision for exposure of the middle part of the foot. Make a longitudinal incision directly over the area to be exposed. A dorsomedial incision exposes the talonavicular joint, the navicular-medial cuneiform joint, and the first metatarsocuneiform joint. |
by feeling along the lateral side of its shaft in a distal to proximal
direction until its flared base is reached; this is the styloid
process, into which the peroneus brevis muscle inserts (Fig. 12-69).
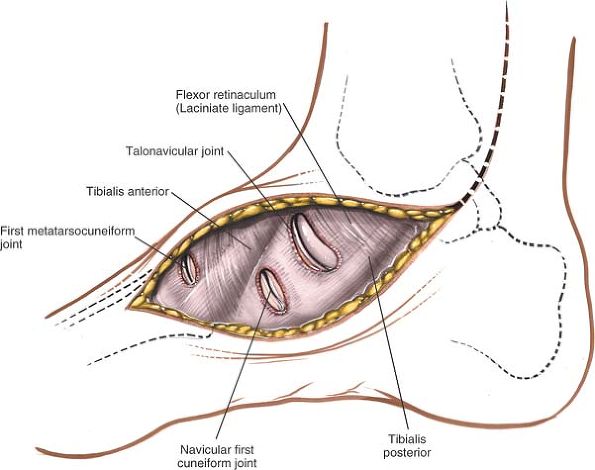
incision to expose the talonavicular joint, the navicular-medial
cuneiform joint, and the first metatarsocuneiform joint, and to reveal
the insertions of the tendons of the tibialis anterior and tibialis
posterior muscles (see Fig. 12-67). Use a dorsolateral incision to expose the calcaneocuboid joint and the base of the fifth metatarsal (see Figs. 12-63 and 12-69).
 |
|
Figure 12-68
Develop the skin flaps. Note the insertions of the tibialis anterior and posterior muscles. Incise the joint capsules of the talonavicular joint, the navicular-medial cuneiform joint, and the first metatarsocuneiform joint according to the demands of the surgery. |
 |
|
Figure 12-69 A dorsolateral incision exposes the calcaneocuboid joint and the base of the fifth metatarsal.
|
tarsus is required, it is better to make two separate longitudinal
incisions centered over the structures to be explored. Separate
incisions nearly always are required for the open reduction of
fractures of Lisfranc’s joint.
Longitudinal incisions avoid damaging cutaneous nerves. Certain major
reconstructive operations, such as wedge tarsectomy, necessarily cut
cutaneous nerves, leaving portions of the dorsum of the foot partially
anesthetic.
 |
|
Figure 12-70
Develop the skin flaps on the lateral side of the middle part of the foot. Note the tendon of the peroneus brevis as it inserts into the base of the fifth metatarsal. The joint capsule of the calcaneocuboid joint can be incised, if necessary. |
exposed, taking care to avoid any cutaneous nerves that can be
identified. Try to make sure that skin flaps are as thick as possible;
minimize retraction as much as possible. The structures of the dorsum
of the foot nearly all are subcutaneous. Take care to avoid damaging
the insertions of the four powerful invertors and evertors of the foot (Figs. 12-68 and 12-70).
malleolus; this exposes not only the lateral side of the ankle joint,
but also the posterior part of the subtalar joint and the
calcaneocuboid joint. (See sections describing the posterolateral approach to the ankle and lateral approach to the hindpart of the foot.)
the incision up behind the medial malleolus, curving it to a point
midway between the medial malleolus and the Achilles tendon. This
extension exposes those structures that pass around the back of the
medial malleolus. It is used commonly in the treatment of clubfoot, but
its safety is controversial; the neurovascular bundle must be
protected. (See the section regarding the posteromedial approach to the
ankle.)
surgery on the metatarsophalangeal joint of the great toe for the
treatment of bunions or hallux rigidus. Their uses include the
following:
-
Excision of the metatarsal head6
-
Excision of the proximal part of the proximal phalanx7
-
Excision of metatarsal exostosis (bunionectomy)
-
Distal metatarsal osteotomy8,9
-
Soft-tissue correction of hallux valgus, including reefing procedures, tenotomies, and muscle reattachments10
-
Arthrodesis of the metatarsophalangeal joint11
-
Insertion of joint replacements
-
Dorsal wedge osteotomy of the proximal phalanx in cases of hallux rigidus12
exsanguination, use a tourniquet placed on the middle of the thigh.
Alternatively, use a soft rubber bandage to exsanguinate the foot, and
then wrap the leg tightly just above the ankle (see Fig. 12-1).
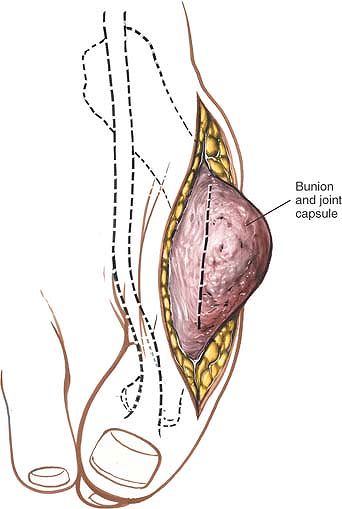
dorsomedial skin incision provides access to the exostosis on the
metatarsal head without much skin retraction; it is by far the most
commonly performed incision. It does have drawbacks, however. The bursa
covering the exostosis may have become inflamed, complicating the
surgery, and the skin on the medial aspect of the metatarsophalangeal
joint is thinner than on the dorsum of the joint and may not heal as
well.
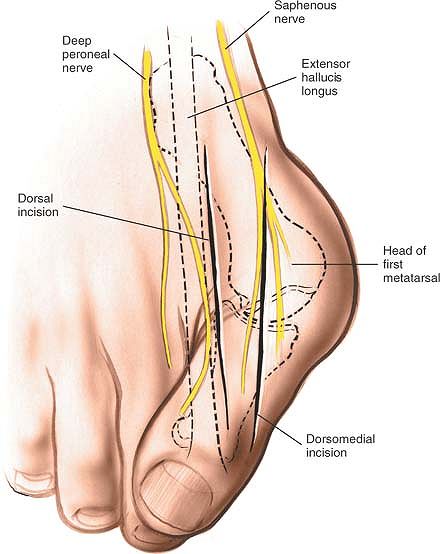
interphalangeal joint on the dorsomedial aspect of the great toe. Curve
it over the dorsal aspect of the metatarsophalangeal joint, remaining
medial to the tendon of the extensor hallucis longus muscle. Then,
curve the incision back by cutting along the medial aspect of the shaft
of the first metatarsal, finishing some 2 to 3 cm from the
metatarsophalangeal joint (Fig. 12-71).
dorsal incision just proximal to the interphalangeal joint and just
medial to the tendon of the extensor hallucis longus muscle. Extend the
incision proximally, parallel, and just medial to the tendon of the
extensor hallucis longus. Finish about 2 to 3 cm proximal to the
metatarsophalangeal joint. Note that the final incision is straight (Fig. 12-74).
subcutaneous; the two tendons close to the dissection, the extensor
hallucis longus and the abductor hallucis, receive their nerve supplies
proximal to this approach and cannot be denervated by it.
 |
|
Figure 12-71
Dorsomedial skin incision for the medial approach to the metatarsophalangeal joint of the great toe. Note the proximity of the dorsal digital nerve to the incision. |
 |
|
Figure 12-72 Incise the deep fascia. Develop a joint capsule flap. Protect the dorsal digital branch of the medial cutaneous nerve.
|
 |
|
Figure 12-73 Make a U-shaped incision into the joint capsule, leaving the capsule attached to the proximal end of the proximal phalanx.
|
 |
|
Figure 12-74
Dorsal incision for the approach to the metatarsophalangeal joint of the great toe. Note that the tendon of the extensor hallucis longus is displaced laterally and that the sensory nerve to the medial aspect of the great toe runs parallel to the incision. Note that the great toe is framed by branches of the saphenous nerve medially and the deep peroneal nerve laterally. |
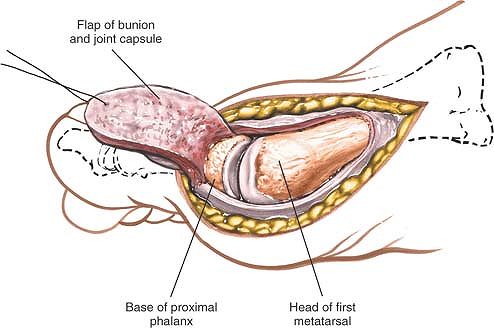
cut down to the dorsomedial aspect of the metatarsophalangeal joint.
The dorsal digital branch of the medial cutaneous nerve, which often is
visible, is retracted laterally with the skin flap on the lateral edge
of the wound. Make a U-shaped incision into the joint capsule, leaving
the capsule attached to the proximal end of the proximal phalanx (Figs. 12-72 and 12-73).
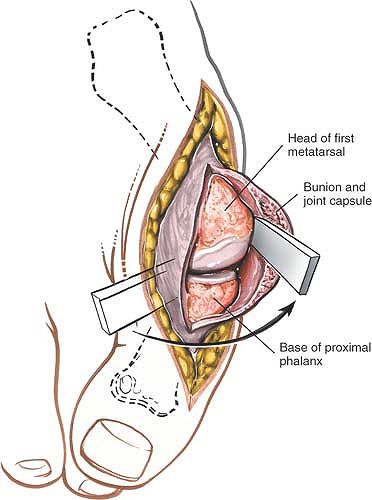
retract the tendon of the extensor hallucis longus muscle laterally. To
enter the joint, incise the dorsal aspect of the joint capsule. Note
that the type and position of the capsulotomy depend on the procedure
to be performed (Figs. 12-75 and 12-76).
proximal phalanx and first metatarsal bones longitudinally. Using blunt
instruments, strip the coverings off the bones, taking care not to
damage the tendon of the flexor hallucis longus muscle, which lies in a
fibro-osseous tunnel on the plantar surface of the proximal phalanx,
between the sesamoid bones. The extent of the deep dissection depends
on the procedure to be carried out. Strip only a minimum of periosteum
off the bone. Do not strip all the soft-tissue attachments off the
metatarsus if a distal osteotomy of that bone is to be performed,
because the metatarsal head is rendered avascular by stripping.
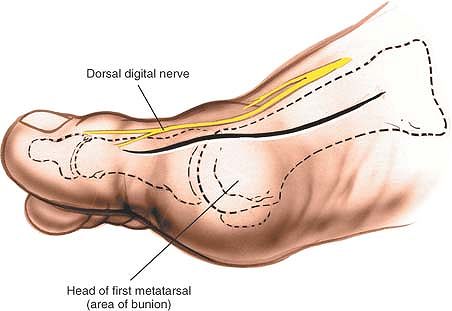
should not be cut during the approach. Indeed, in cases of bunion, the
tendon bowstrings laterally across the metatarsophalangeal joint and is
even more lateral to the incision than usual. Protect the dorsal
digital nerve if it can be seen along the line of the incision (see Figs. 12-71 and 12-74).
 |
|
Figure 12-75
Develop the skin flaps. Divide the deep fascia in line with the skin incision, and retract the tendon of the extensor hallucis longus laterally. |
muscle is vulnerable as the base of the proximal phalanx is stripped.
The tendon lies in a groove on the plantar surface of the proximal
phalanx so close to the periosteum that, if care is not taken, it may
be damaged during stripping. The tendon often is displaced laterally in
patients with hallux valgus (see Fig. 12-54).
 |
|
Figure 12-76 Incise the joint capsule dorsally, and remove as much of the capsule as necessary depending on the procedure to be performed.
|
the bones provides an adequate view of the joint. The approach cannot
be extended usefully to other joints in the foot, but may be extended
proximally for access to the shaft of the metatarsus.
metatarsophalangeal joints of the second, third, fourth, and fifth
toes, avoids incision of the plantar skin of the foot. Most plantar
approaches scar the weight-bearing skin, violating a basic surgical
principle.
-
Excision of metatarsal heads
-
Distal metatarsal osteotomy
-
Partial proximal phalangectomy
-
Fusion of metatarsophalangeal joints (rare)
-
Capsulotomy of metatarsophalangeal joints
-
Muscle tenotomy
-
Neurectomy
 |
|
Figure 12-77 Position of the patient for approaches to the toes.
|
Position a bolster under the thigh to flex the knee and allow the foot
to lie with its plantar surface on the table (Fig. 12-77).
place a thumb on the plantar surface and an index finger on the dorsal
surface of the foot. Skin callosities under the heads indicate that the
area concerned is bearing an
unaccustomed amount of weight, indicating pathology in the weight distribution around the foot.
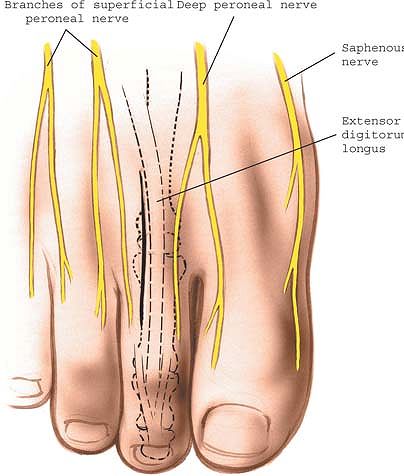 |
|
Figure 12-78 Make a 2- to 3-cm longitudinal incision over the dorsolateral aspect of the affected metatarsophalangeal joint.
|
dorsolateral aspect of the affected metatarsophalangeal joint. The
incision should run parallel with, but just lateral to, the long
extensor tendon (Fig. 12-78). If two adjacent
joints need to be exposed, make the incision between them.
Alternatively, a transverse dorsal incision may be made over the joints.
metatarsophalangeal approaches. The approaches are well dorsal to the
plantar nerves and vessels, the key neurovascular structures in this
area. Take care to avoid cutting the dorsal digital nerves, branches of
which may cross the operative field.
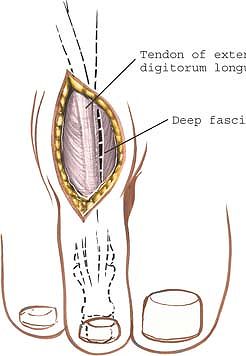 |
|
Figure 12-79 Incise the deep fascia in line with the incision on the medial side of the long extensor tendon.
|
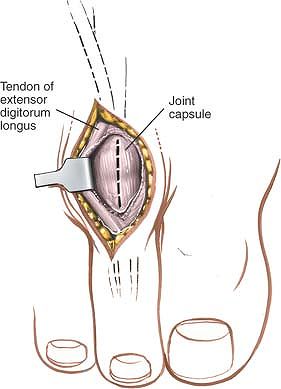 |
|
Figure 12-80 Expose the dorsal capsule of the metatarsophalangeal joint. Make a longitudinal incision into the capsule.
|
retract the long extensor tendon to reveal the dorsal aspect of the
metatarsophalangeal joint (Fig. 12-79). Often,
an extensor tenotomy or lengthening is performed at the same time as
the operation on the joint. In this case, divide the extensor tendon in
a “Z” fashion rather than retracting it. If two joints are being
exposed, retract the tendon laterally to gain access to the adjacent
joint.
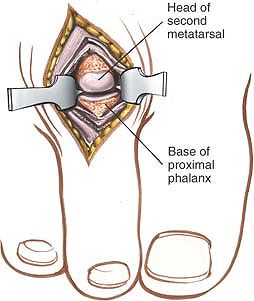 |
|
Figure 12-81 Retract the joint capsule to expose the metatarsophalangeal joint.
|
lie between the metatarsal heads, beneath the deep transverse
metatarsal ligament. As long as the dissection remains on the dorsal
aspect of the ligaments, the nerves are safe. Dissection around the
metatarsal heads and proximal phalanges must be carried out so as to
avoid damage to the nerves and vessel that supply the weight-bearing
skin of the toes (see Fig. 12-58).
of the web space to be explored, especially in cases of Morton’s
metatarsalgia, when it can be used to excise an interdigital “neuroma.”13
Other uses include drainage of web space infections, which, curiously,
are much rarer in the foot than in the hand. The approach is used most
often for exploration of the cleft between the third and fourth toes.
Dissection of the first web space exposes the sesamoid bones and is
used for adductor tenotomy.
tourniquet either at the midpoint of the thigh or just above the ankle
after the leg has been
exsanguinated.
Alternatively, use a soft rubber bandage to exsanguinate the foot, then
use the bandage as a tourniquet at the ankle (see Fig. 12-77). Place a pillow under the patient’s thigh to flex the knee, so that the sole of the foot lies flat on the operating table.
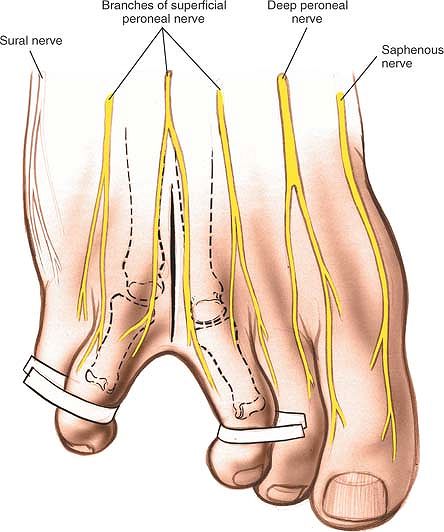 |
|
Figure 12-82 Make a longitudinal incision, centering it over the web space.
|
dorsal longitudinal incision over the center of the web space, starting
at the distal end of the web and extending proximally some 2 to 3 cm (Fig. 12-82).
with the skin incision by blunt dissection, opening a pair of scissors
with the blades in a longitudinal plane,
to expose the neurovascular bundle (Figs. 12-83 and 12-84).
The neuroma, if one is present, often bulges into the wound. It becomes
more prominent if digital pressure is applied to the space between the
metatarsal head on the plantar surface of the foot (see Fig. 12-84).
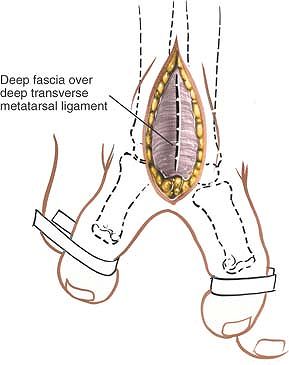 |
|
Figure 12-83 Incise the fascia in line with the skin incision.
|
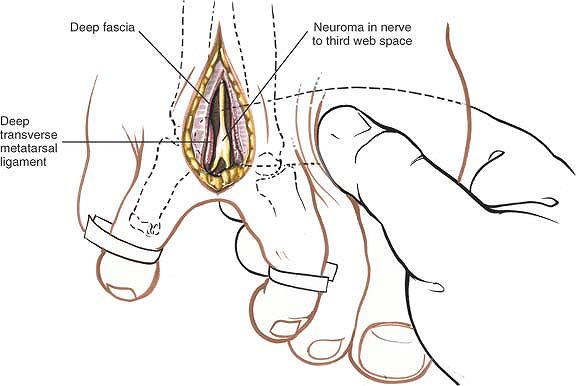 |
|
Figure 12-84 Incise the deep transverse metatarsal ligament in line with the skin and fascial incision to reveal the neurovascular bundle.
|
the digital nerve and vessel that usually are the target of the
approach. Take care, however, to avoid cutting any dorsal cutaneous
nerves that run under the incision. If more clefts must be explored,
avoid disrupting the arterial supply to the toes. Accidental incision
of one digital artery does not render a toe ischemic, but if the second
digital artery to the same toe is incised in the next web space,
ischemia may result (see Fig. 12-58).
weight-bearing surface of the affected toes at least partially
anesthetic, but trophic changes do not occur.
abnormalities. All the bones of the foot can be approached dorsally;
dorsal approaches usually are better than plantar approaches for two
major reasons:
-
The critical neurovascular structures in
the forepart of the foot all are on the plantar side of the metatarsal
bones, so they remain protected. -
Dorsal incisions avoid cutting through the specialized weight-bearing skin of the sole of the foot.
over bones that protrude (e.g., metatarsalgia), a plantar approach may
have to be used and the abnormal skin excised.
anatomy of the foot, the plantar anatomy includes its key neurovascular
structures. Knowledge of the latter allows the surgeon to explore
wounds in the sole of the foot, which do not mimic any described
surgical approach. For these reasons, the anatomy of the sole of the
foot also is described in this section.
and loose. Distally, the lines of cleavage run roughly transversely.
The loose skin, which facilitates retraction, accounts for the enormous
amount of dorsal swelling that can occur after foot trauma.
skin of the dorsum of the foot: the medial side houses the branches of
the saphenous nerve; most of the dorsum of the foot is supplied by the
dorsal cutaneous branches of the superficial peroneal nerve; and the
lateral side of the foot is supplied by the sural nerve.
peroneal nerve. Numbness in the first web space is the earliest sign of
a deep peroneal nerve lesion in the anterior compartment of the leg
(see Figs. 12-58, 12-71, 12-74, 12-78, and 12-82).
medial side drains into the long saphenous vein; the lateral side
drains into the short saphenous vein. Superficial veins, of course,
must be on the dorsum of the foot, because they would collapse under
the force of ordinary weight bearing if they were on the sole.
cutaneous nerves: those of the extensor digitorum longus and extensor
digitorum brevis muscles, and those of the extensor hallucis longus and
extensor hallucis brevis muscles. The extensor digitorum tendons insert
into the dorsal extensor expansion of the lateral four toes, an
arrangement that is identical to that in the fingers. Frequently, these
tendons cross-communicate in the forepart of the foot. The great toe,
similar to the thumb, has no dorsal extensor expansion (see Fig. 12-58).
artery, runs forward beneath the tendon of the extensor hallucis brevis
muscle before disappearing into the first intermetatarsal space (see Fig. 12-59).
tough, and resilient. It responds to abnormal stresses by
hypertrophying in the keratinized layer, forming callosities. In cases
of severe metatarsalgia, the skin over the protruding metatarsal heads
becomes thin and attenuated. In Fowler’s procedure (a transverse
incision), the lips of pathologic skin are removed, and the thicker,
normal skin is sutured back into its correct position.14,15 The skin also may atrophy in patients with ischemic or neuropathic conditions.
palmar fascia of the hand; it also may suffer Dupuytren’s contracture.
The fascia is much thicker in its central parts and thinner where it
covers the intrinsic muscles of the hallux and little toe. Its central
part, the plantar aponeurosis, originates from the medial tubercle of
the calcaneus and runs forward to attach to the proximal phalanges of
each of the toes.
tubercle of the calcaneus often is a site for the inflammatory
degeneration that produces a painful heel. The point of maximal
tenderness in this condition corresponds to the anatomic insertion of
the plantar aponeurosis. On rare occasions, this condition, which is
known as plantar fasciitis (“policeman’s heel”), may necessitate
surgical detachment of the origin of the fascia.
medial and lateral borders of the plantar fascia to attach to the first
and fifth metatarsal bones. These septa divide the foot into three
compartments, much as the septa do in the hand. The compartments may
limit areas of infection within the foot.
plantar aponeurosis and partly from the medial calcaneal tubercle. It
divides into four tendons that insert into the middle phalanx of the
lateral four toes and flexes the toes independent of the position of
the ankle.
tubercle of the calcaneus, inserts into the medial side of the proximal
phalanx of the great toe, and abducts the great toe. It is the only
muscle whose action tends to oppose the deformity of hallux valgus (see
Fig. 12-54).
between the first and second layers of muscle. They are relatively
superficial, but, as in the hand, rarely are injured, because of the
toughness of the overlying plantar fascia.
tendons (the flexor hallucis longus, flexor digitorum longus, and
flexor accessorius), which are critical in maintaining the longitudinal
arch of the foot (see Figs. 12-55 and 12-56).
Helping these muscles are the lumbricals, which arise from the tendons
of the flexor digitorum longus. As they do in the hand, the lumbricals
flex the metatarsophalangeal joints while they keep the interphalangeal
joint extended. Weakness results in clawing of the toes, producing the
equivalent in the foot of the intrinsic minus hand. A persistent
extension deformity of the metatarsophalangeal joint eventually causes
this joint to undergo subluxation, and the metatarsal head has to bear
weight that no longer is distributed to the displaced toe during
toe-off in walking. Pain (metatarsalgia) is the result.
proximal phalanx of the great toe via medial and lateral sesamoid
bones. The medial sesamoid also receives slips from the abductor
hallucis, and the lateral sesamoid from the adductor hallucis (see Fig. 12-56).
The sesamoid bones may be displaced in cases of hallux valgus, with the
lateral sesamoid moving to a position between the first and second
metatarsal bones. If that happens, the lateral sesamoid can block
mechanically the realignment of the first ray. The joint between the
sesamoid bones and the metatarsal head may degenerate and become
painful.
phalanx via the lateral sesamoid bone, is the most important deforming
force in hallux valgus. Many operations for this condition involve
detaching the muscle from its insertion and reinserting it into the
head of the metatarsal so that it can act as a dynamic corrector of
metatarsus varus.
interosseus muscles attached to the metatarsal bones, and two tendons,
those of the peroneus longus and tibialis posterior muscles, which are
major supports of the longitudinal arch of the foot.
F, Schaefer P: Osteoplastic surgical exposure of the ankle joint: 41st
report of progress in orthopaedic surgery. Chir 215:196, 1929
G: Mitchell osteotomy: bunionectomy for hallux valgus and metatarsus
primus varus in America’s Academy of Orthopaedic Surgeons. Instr Course
Lect 21:1, 1972
DC: Arthrodesis of the first metatarso-phalangeal joint for hallux
valgus, hallux rigidus and metatarsus primus varus. J Bone Joint Surg
[Am] 34:129, 1952