
-
Open reduction and internal fixation of sacral fractures.
-
Open reduction and internal fixation of sacroiliac fracture-dislocations.
-
Open reduction and internal fixation of sacroiliac dislocations.
-
Open reduction and internal fixation of sacroiliac dislocations with iliac fractures (crescent fracture).
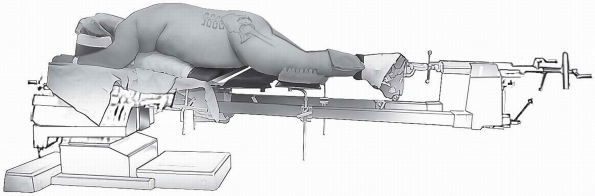
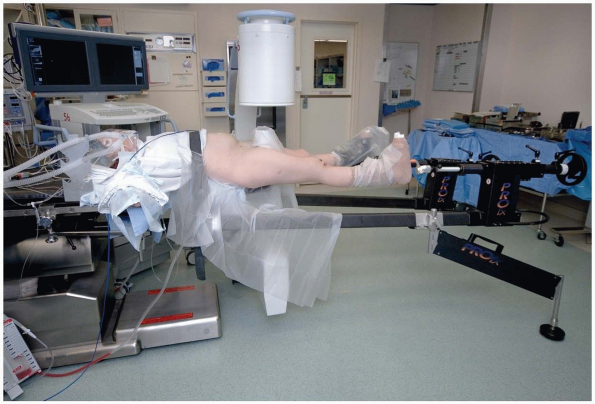
A completely radiolucent table is utilized to allow imaging in multiple
planes including Judet views and inlet and outlet views. The chest roll
should be placed proximal enough so that the pelvis actually hangs
free, as this is helpful in assisting in obtaining reduction of these
fractures. By supporting the patient’s thorax rather than directly on
the anterior pelvis, the axial skeleton will be stabilized proximally,
allowing the hemipelvis to hang free and reduce anteriorly.
iliac crest should be palpated. The spinous processes of the sacrum and
lumbar vertebrae should be identified.
-
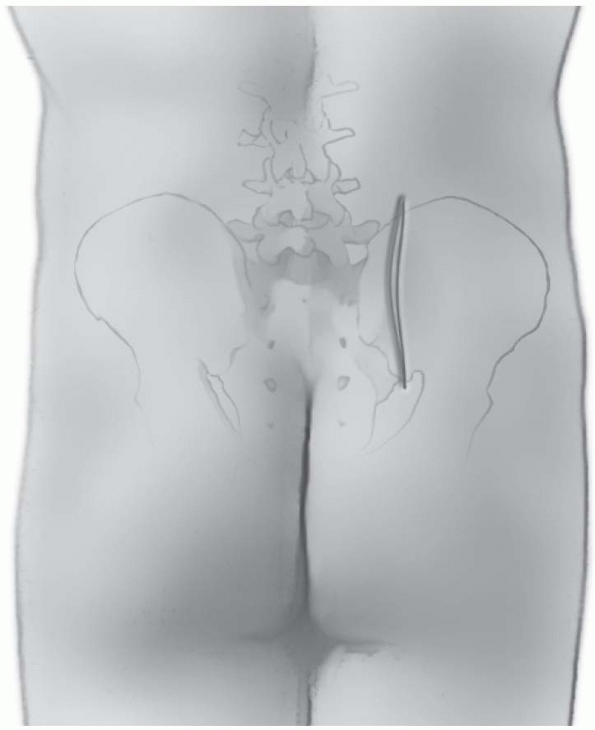
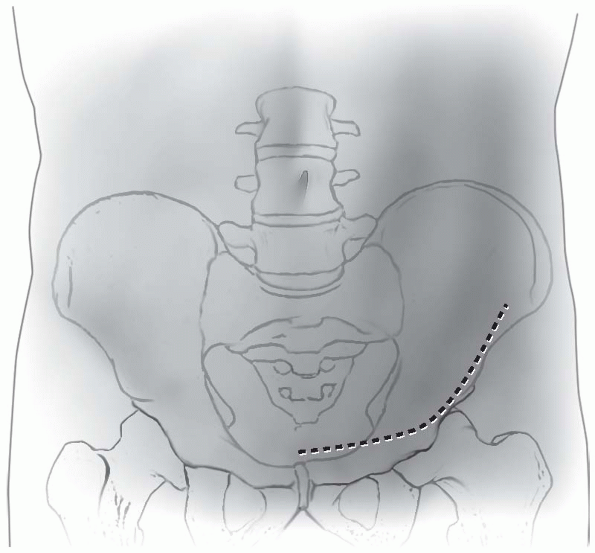
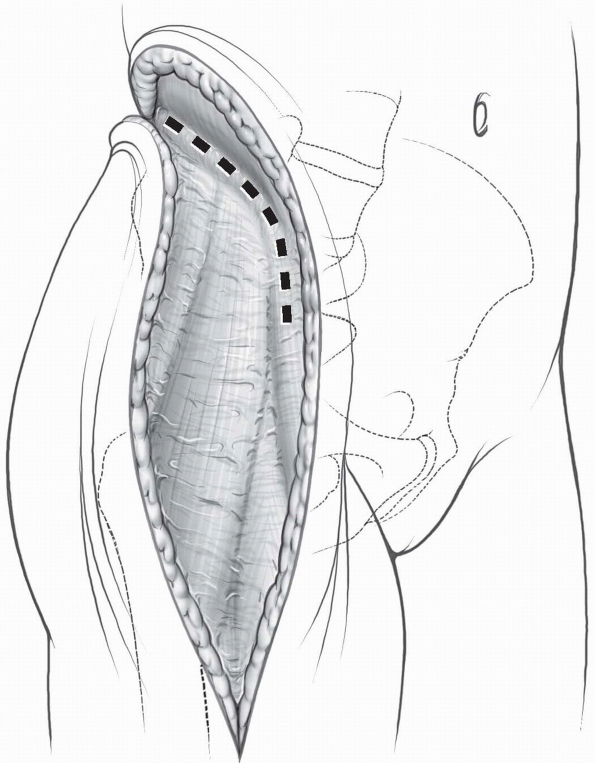
Incision: the incision is longitudinal in direction (Fig. 6-2).
It can be translated medially or laterally as appropriate for the
particular type of fracture. For sacral fractures, a more medially
based incision is appropriate, whereas for crescent type fractures or
pure sacroiliac dislocations, the incision can be made based more
laterally. For a crescent fracture or sacroiliac dislocation, the
incision
P.124
should
be just lateral to the posterior-superior iliac spine. It may be curved
laterally as it can fall in line with the iliac crest as it travels
anteriorly and laterally. However, a vertical incision also can be
useful to gain full exposure. In thinner patients, an incision directly
over the posterior-superior iliac spine should be avoided, as the
subcutaneous location of the bony prominence may cause difficulty with
wound healing and breakdown.-
Note:
Injection of lidocaine and epinephrine mixtures into the surgical site
before making the skin incision can assist in controlling bleeding in
the area. There is often a large amount of subcutaneous adipose in this
region with significant vascularity that can bleed throughout the case
and cause exposure and visualization to be difficult, so careful
attention to gaining hemostasis throughout the subcutaneous dissection
is important.
-
-
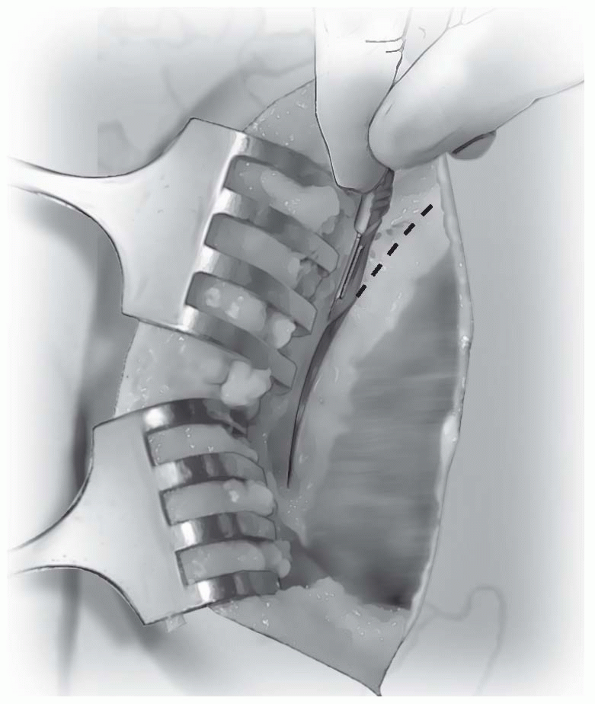
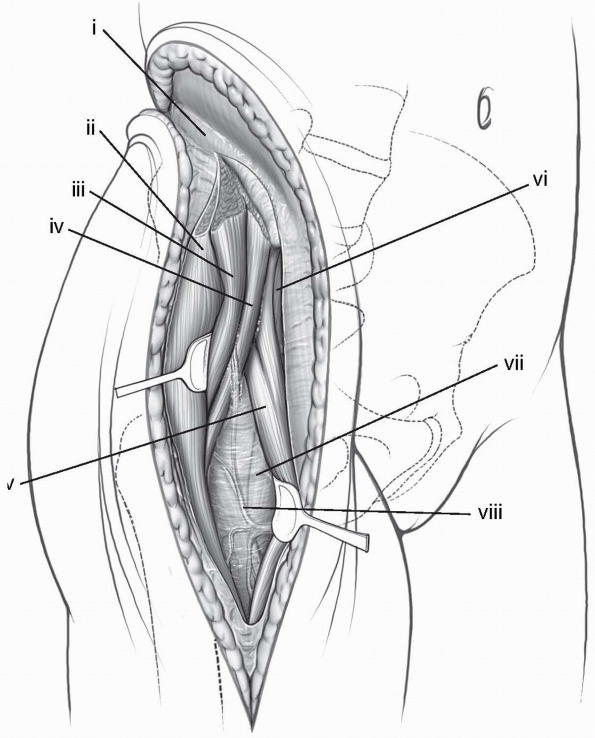
The gluteus maximus is identified as it
inserts onto the posterior-superior iliac spine and iliac crest. It is
incised in the tendinous portion along the posterior-superior iliac
spine, leaving a cuff of tissue on the posterior-superior iliac spine
for later repair (Fig. 6-3). -
As the dissection extends posteriorly,
the gluteal tendon is incised toward the midline over the sacrum. This
allows complete retraction of the gluteus maximus and exposure of the
posterior-superior iliac spine as well as the posterior aspect of the
ilium. Care should be taken to not disturb the underlying paraspinal
muscles, particularly the multifidus, unless dissection onto the sacrum
is necessary. For most sacroiliac dislocations and crescent fractures,
these paraspinal muscles can be left undisturbed. For sacral fractures,
the injury and initial displacement of the
P.125
fracture
has often caused severe injury to the paraspinal muscles and some local
debridement during the approach may be all that is necessary in order
to fully visualize the fracture. -
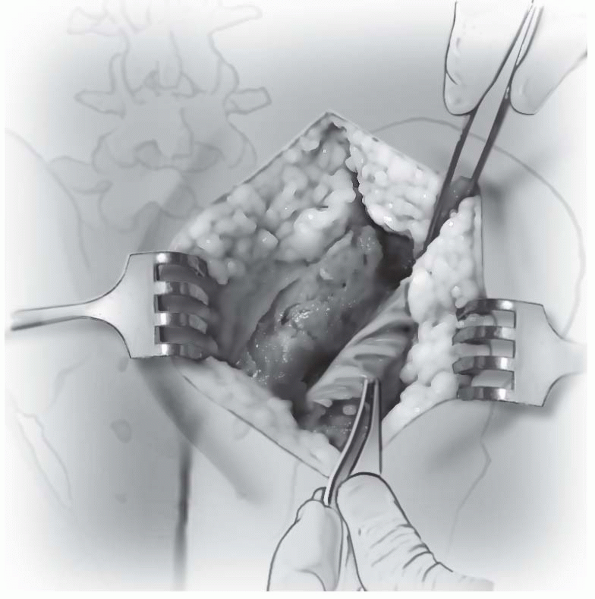
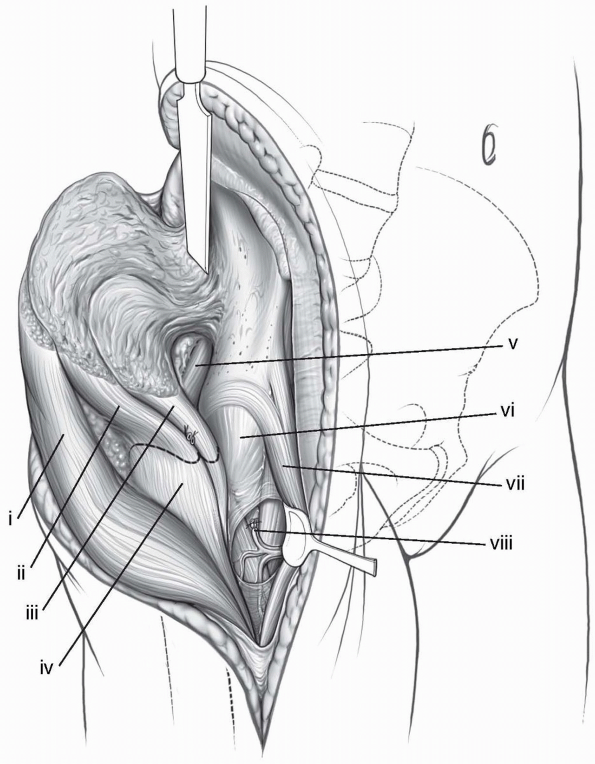
The gluteus maximus is elevated
subperiosteally along the posterior aspect of the ilium distally to the
greater sciatic notch, giving access to the entire crescent fracture
and sacroiliac joint (Fig. 6-4). -
Finger palpation beneath the greater
sciatic notch can be utilized to assess anterior reduction of a
sacroiliac dislocation. Exposure of the greater sciatic notch will
allow placement of a reduction clamp to correct the vertical
displacement of the hemipelvis that occurs in posterior pelvic ring
injuries. Care should be taken during dissection into the greater
sciatic notch to protect the sciatic nerve as well as the superior
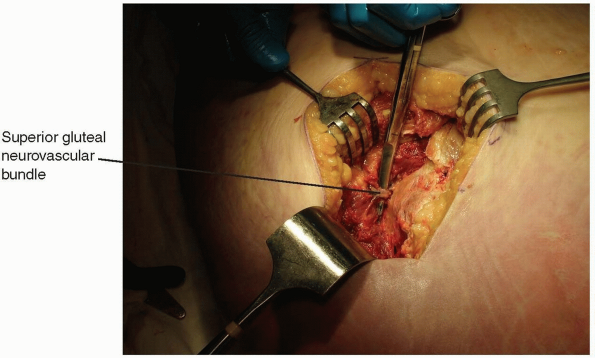
gluteal vessels and nerve (Fig. 6-5). -
Once reduction and fixation of the
posterior ring is completed, care should be taken to repair the gluteus
maximus insertion in its tendinous portion using a heavy permanent
suture such as 0-Ethibon. Subcutaneous tissue should be closed in
multiple layers as well, and drain placement is recommended depending
on the amount of hemorrhage encountered.
 |
|
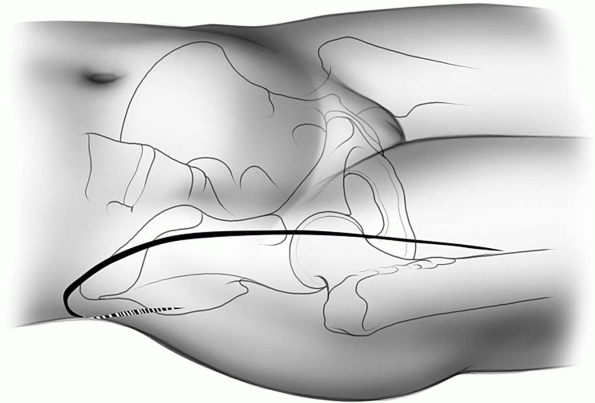
FIGURE 6-1 The prone position allows gravity to assist in reduction of the fracture and hemipelvis.
|
 |
|
FIGURE 6-2 The posterior incision can be either curved or vertical in nature depending on the exact location of the fracture.
|
 |
|
FIGURE
6-3 The gluteus maximus tendon is identified as it inserts on the posterior-superior iliac spine and as it inserts towards the midline distal to the posterior-superior iliac spine. The tendon is incised leaving a cuff of tendon medially for later repair. |
 |
|
FIGURE
6-4 The gluteus maximus is retracted laterally away from the sacroiliac joint and can be retracted as far as the greater sciatic notch. |
 |
|
FIGURE 6-5 The superior gluteal neurovascular bundle prevents further lateral retraction of the gluteus maximus.
|
-
Avoid making an incision directly over
the most prominent portion of the posterior-superior iliac spine,
particularly in thinner patients as this may be very prominent and may
break down as the patient lies on their back recovering. -
Subperiosteal dissection along the
lateral aspect of the ilium can identify the proximal extent of
crescent fractures. Blunt retractors or malleable retractors along the
lateral aspect of the ilium can be utilized to visualize these
fractures and gain anatomic reduction. Additionally, sacroiliac screws
may provide a large amount of stability to a fixation construct for
sacroiliac dislocations and crescent fractures. These screws should be
placed away from the iliac fracture line so they will not fail by
breaking through into the fracture site, and this can be visualized
through this approach. However, percutaneous incisions will need to be
made over the lateral aspect of the gluteal region in order to place
the screws, as the necessary trajectory cannot be obtained through the
posterior approach to the sacroiliac joint.
-
Both column fractures of the acetabulum.
-
Anterior column posterior hemi-transverse fractures of the acetabulum.
-
Anterior column fractures.
-
In conjunction with the Kocher-Langenbeck approach for treatment and fixation of transverse, and T-type acetabular fractures.
Traction is often utilized before reduction of these cases and a table
such as a Judet-Tasserit table or Pro FX fracture table which is
radiolucent and allows the use of traction in multiple directions is
optimal.
paying attention to the anterior-superior iliac spine. The pubic
tubercles and symphysis should be identified.
-
Incision: the incision follows the
contour of the iliac crest from posterior to anterior, and then is
directed over the inguinal ligament to a point approximately 2 cm
proximal to the pubic symphysis (Fig. 6-7). -
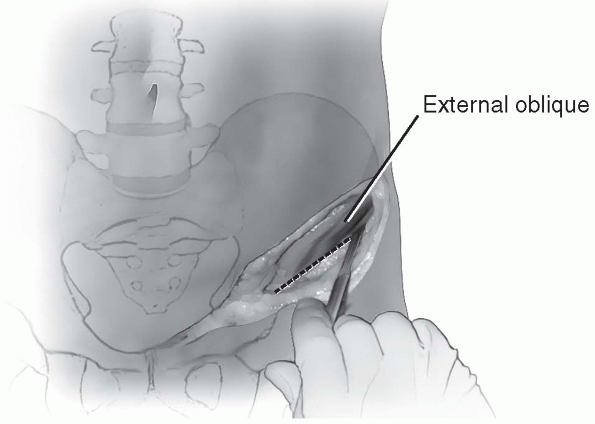
The abdominal musculature is identified
as it inserts on the iliac crest. The aponeurosis of the abdominal
muscles terminates just proximal to an avascular zone between the hip
abductors and abdominal musculature. This zone is identified and this
interval should be split directly down to the iliac crest (Fig. 6-8). -
Subperiosteal dissection along the iliac
crest with elevation of the abdominal musculature insertion is
performed to gain access to the inner table of the pelvis, exposing the
lateral window. Once the lateral window has been exposed and the
iliopsoas has been elevated off the inner fossa, this area of the wound
should be packed with lap sponges and the exposure should continue
distally. -
The skin incision is then extended from
the anterior-superior iliac spine to an area approximately 2 cm
proximal to the pubic symphysis. -
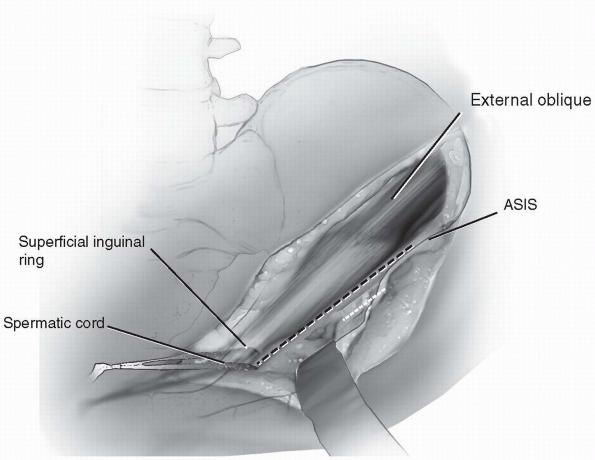
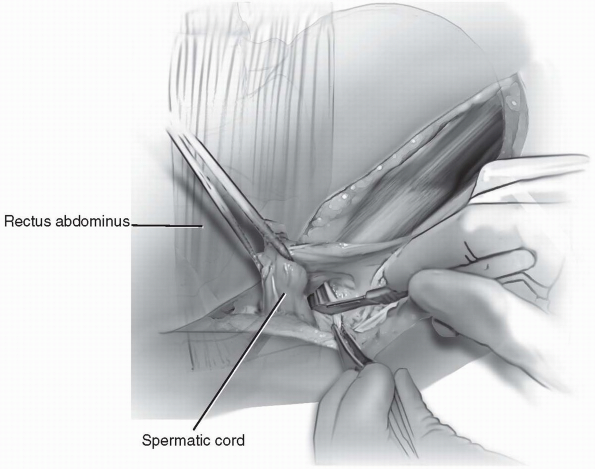
The external abdominal oblique
musculature and fascia is identified as the fibers course in a
direction from superolateral to inferomedial towards the superficial
inguinal ring. The spermatic cord should be identified and a Penrose
drain should be placed around it to protect it and allow retraction
medially and laterally (Fig. 6-9). -
The external abdominal oblique is split in line with its fibers just proximal to its insertion on the inguinal ligament (Fig. 6-10).
Dissection should be continued down towards the inferior aspect of the
superficial inguinal ring. If possible the superficial ring should be
kept in place so that a later repair is not necessary. -
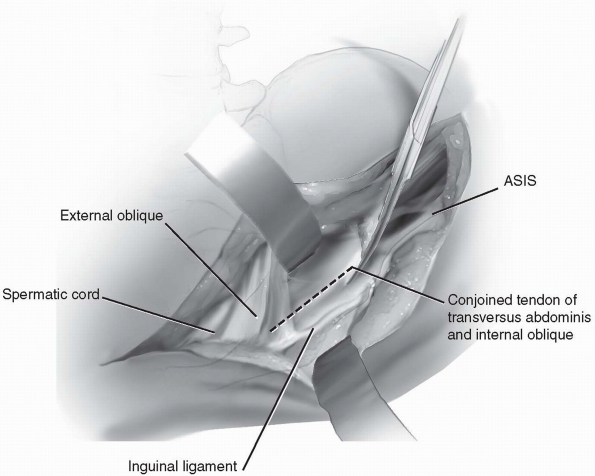
At this point the combined tendon of the
internal abdominal oblique and transverse abdominus muscle is
identified as it inserts on the inguinal ligament. This conjoined
tendon should be incised in line with its fibers near its insertion on
the inguinal ligament giving ample amount of tendon on both sides of
the incision to repair at the end of the case (Fig. 6-11). -
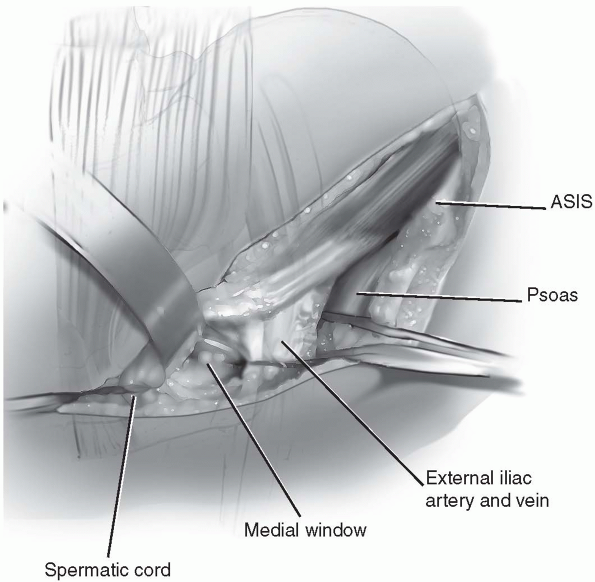
The lateral femoral cutaneous nerve is
identified crossing over the psoas muscle near the anterior-superior
iliac spine. This nerve may need to be sacrificed for complete exposure
of the acetabulum; however, initial attempts should be made to protect
and save this nerve. -
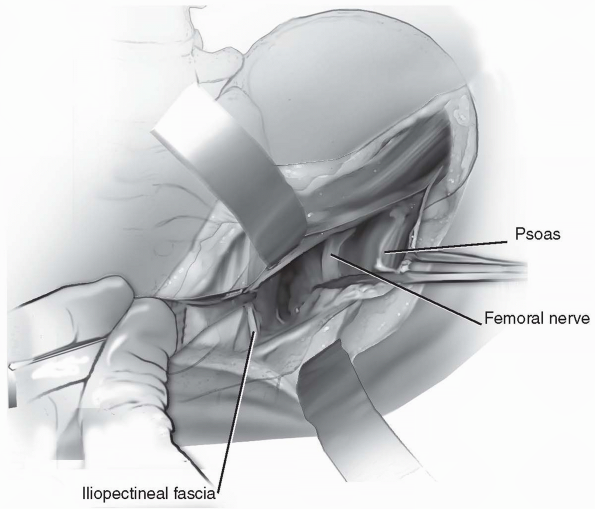
The psoas muscle and femoral nerve should
be identified. These structures should be kept together and a Penrose
drain should be placed around them in their entirety (Fig. 6-12).
Care should be taken to elevate the psoas off of the internal fossa of
the ilium in its entirety so that trauma to the muscle is minimized. -
Once the entire psoas muscle and femoral
nerve are protected with a Penrose drain, they can be retracted
laterally. The iliopectineal fascia is identified and very careful
dissection just medial
P.129
to
this should be performed to separate it from the external iliac
vessels. Once the iliopectineal fascia is separated from the external
iliac vessels, a finger should be placed between the fascia and the
vessels to palpate the pulse and confirm the vessels are medial to the
finger. -
Once the external iliac vessels are
confirmed to be medial and the fascia is isolated, scissors are used to
split the iliopectineal fascia all the way to the pelvic brim (Fig. 6-13). -
With the combined tendon of the
transversalis abdominus and internal abdominal oblique incised near its
insertion, dissection should now proceed medially. A small portion of
the rectus abdominus muscle will need to be incised transversely as it
inserts on the pubic tubercle just medial to the spermatic cord or
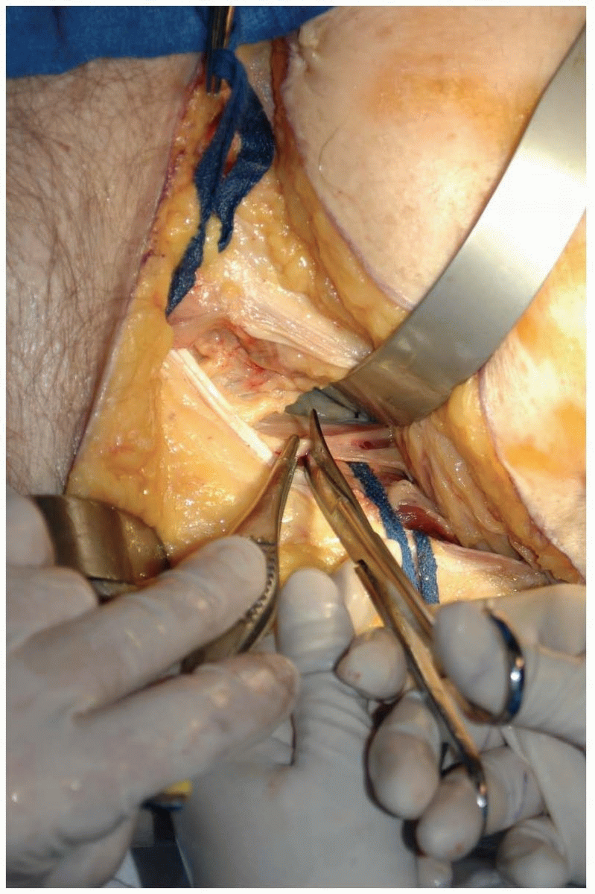
round ligament (Fig. 6-14). This will allow for exposure of the medial side of the external iliac vessels. -
Circumferential access to the external
iliac vessels can now be gained by placing a Penrose drain around the
bundle and it can now be retracted medially and laterally (Fig. 6-15). -
Once this is performed, all three windows
of the ilioinguinal approach have been exposed and reduction and
fixation of the acetabular fracture can be performed. -
Following fixation, care should be taken
to tightly repair the structures in the inguinal region to prevent
postoperative hernia development. After thorough irritation of the
wound, the portion of the transected rectus abdominus is reapproximated
using interrupted 0-Ethibon sutures. Next, the internal abdominal
oblique and transversalis abdominus conjoined tendon is repaired back
to the inguinal ligament using multiple 0-Ethibon sutures.-
Note: Multiple single sutures are preferred in case one should break or rupture, the remainder of the repair will stay intact.
-
-
A layered closure is preferred and the
external abdominal oblique is then closed using 0-Ethibon sutures. If
care has been taken during the dissection to preserve the superficial
inguinal ring, the fascia can typically be closed just below this and
the ring will be intact. -
A drain can be placed in the lateral
aspect of the wound, resting in the internal iliac fossa. The abdominal
aponeurosis can then be reapproximated using multiple 0-Ethibon
sutures. The subcutaneous tissue is closed in layers and the skin is
closed with either a nonabsorbable monofilament suture or a staple.
 |
|
FIGURE
6-6 Patient is positioned supine on a radiolucent fracture table allowing bilateral skin traction with a perineal post in place. |
 |
|
FIGURE 6-7 Incision is made over the iliac crest, anterior-superior iliac spine, and pubic symphysis.
|
 |
|
FIGURE 6-8 The abdominal muscles are incised at their aponeurosis and elevated from the iliac crest.
|
 |
|
FIGURE
6-9 The external abdominal oblique and spermatic cord are identified and circumferential control of the spermatic cord is gained. |
 |
|
FIGURE
6-10 The external abdominal oblique fascia is identified and split in line with its fibers proximal to the inguinal ligament. |
 |
|
FIGURE
6-11 The combined tendon of the internal abdominal oblique and tranversalis abdominus is identified and incised near its insertion on the inguinal ligament. |
 |
|
FIGURE
6-12 Circumferential control of the psoas muscle and femoral nerve are obtained with a Penrose drain placed around the structures. |
-
Exposure can be very difficult in obese
patients and consideration should be given to adjusting the incision
slightly proximal in order to gain the appropriate trajectory for screw
and hardware placement. By moving the incision just proximal a few
centimeters this amount of soft tissue will not need to be retracted as
much during the case and appropriate trajectory of the screw can be
obtained. -
The femoral nerve should be clearly
identified as it sits on the psoas muscle prior to placing a Penrose
drain around this neuromuscular group. The femoral nerve may
occasionally have multiple branches and care should be taken not to
divide them or retract ones without having control of all of them. -
Retraction of the external iliac vessel
should be performed carefully. Malleable retractors can be placed in
the middle window to retract the vessels medially; however, care should
be taken so that the sharp edges of the malleable retractors do not
impinge on the external vessels. In patients who are older or who have
known atherosclerotic disease, care should be taken to avoid excessive
or aggressive retraction of these vessels as plaques may dislodge or
intimal damage may occur.
 |
|
FIGURE 6-13 The iliopectineal fascia is identified and split down to the pelvic rim.
|
 |
|
FIGURE 6-14 The rectus abdominus is transected just medial to the spermatic cord.
|
 |
|
FIGURE 6-15 Circumferential control of external iliac neurovascular bundle is obtained.
|
-
Open reduction and internal fixation of pubic symphyseal diastasis.
-
Open reduction and internal fixation of pubic rami fractures and parasymphyseal pubic fractures.
-
Open reduction and internal fixation of the quadrilateral surface of the acetabulum and low anterior column fractures.
-
Anterior plate fixation of pelvic discontinuity for total hip reconstruction.
table. Skeletal traction is generally not necessary for this approach
and the perineal posts may actually get in the way of exposure and
manipulative procedures.
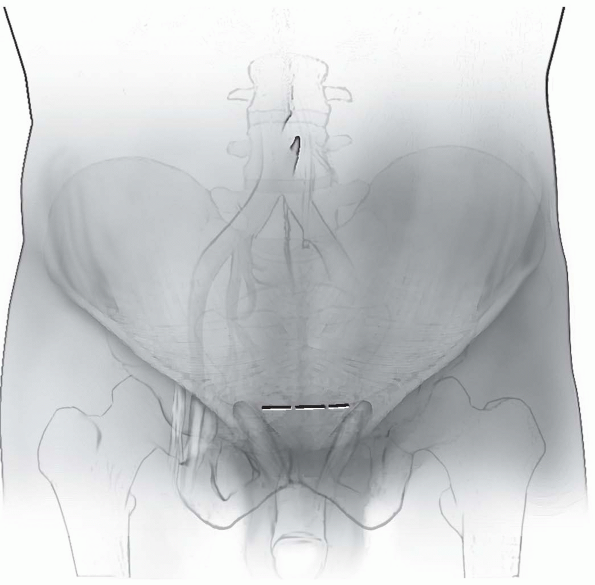
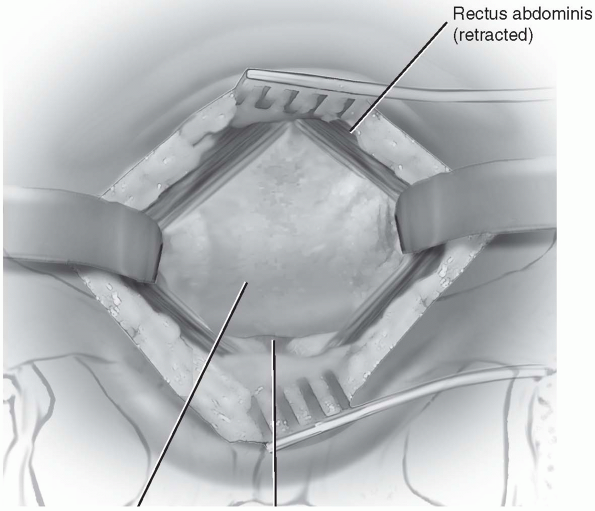
the pubic symphysis, and make a transverse Pfannenstiel type incision
which is in-line with the skin creases in the suprasymphyseal region (Fig. 6-16).
The incision is made 1 to 2 cm proximal to the pubic symphysis. This
incision may move further proximal in patients who are more obese to
allow appropriate trajectory of screw plates into the pubic bodies.
subcutaneous tissues gaining hemostasis along the way. The rectus
abdominus muscles are identified. They need to be split in the midline
and then elevated off the pubic tubercles leaving a distally based
insertion. The pyramidalis muscle may be identified inferiorly in the
wound, and oblique fibers of the rectus fascia will tend to point to
the midline and can be found crossing in the raphe of the rectus
abdominus.
identified, a small vertical incision is made just over the pubic
symphysis. This incision should go through the rectus fascia and be
approximately 5 mm in length, just long enough to allow placement of
the right angle clamp through this incision aimed proximally.
 |
|
FIGURE 6-16 The incision is based just proximal to the superior aspect of the pubic body and superior pubic rami.
|
the rectus is lifted off of the underlying bladder and prevesicular
fat. The fascia can then be incised directly onto the right angle clamp
as it is translated proximally as the fascia and muscle are split (Fig. 6-17).
access to the space of Retzius is obtained. The rectus should be
elevated directly off the tubercles by retracting the rectus
anteriorly. The distal insertion of the rectus should be maintained and
transection of the rectus abdominus should be avoided for this approach.
pointed Holman retractors can be placed over the tubercles to retract
the rectus laterally and gain access to the symphysis and anterior
aspect of the pubic bodies.
 |
|
FIGURE 6-17 The rectus abdominus is split in line with its fibers and elevated off the pubic tubercles.
|
incision by dissection along the pubic ramus to the quadrilateral
surface of the acetabulum. Often a headlamp is utilized because of the
relatively deep nature of this wound.
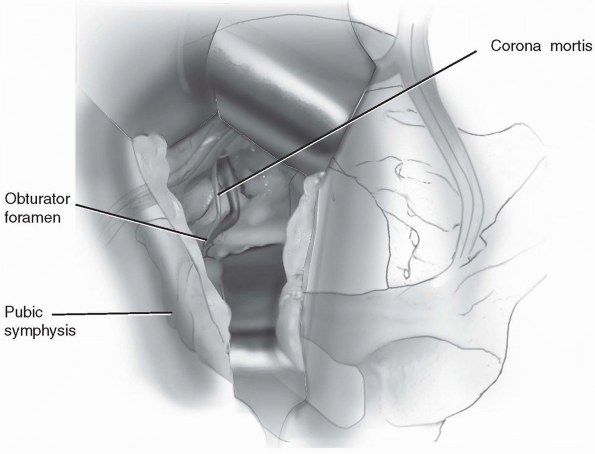
towards the quadrilateral surface. Great care should be taken to
observe the corona mortis as it anastomoses between the external iliac
vessels and the obturator vessels, crossing the superior pubic ramus 4
to 6 cm lateral to the pubic symphysis (Fig. 6-18).
carefully dissected out, and then ligated prior to full exposure of the
quadrilateral surface and pelvic brim. As long as dissection is
maintained along the pelvic brim and quadrilateral surface, the soft
tissues can be retracted superiorly and inferiorly and access to the
spaces can be obtained. Malleable retractors can be utilized to retract
the peritoneal cavity medially.
pelvic ring, the rectus abdominus is closed with 0-Ethibon sutures. The
subcutaneous tissue is then closed in multiple layers and the skin is
closed with either nylon or staples. Care should be taken during
closure of the rectus to avoid injury to the bladder and prevesicular
fat.
-
The incision may be translated proximally
in obese patients in order to gain appropriate trajectory for hardware
placement. Often the abdominal fat will need to be retracted proximally
and compressed in order to be able to place screws down the pubic
bodies and into the inferior pubic rami. -
Transection of the rectus should be
avoided if at all possible. Dissection can be carried over the pubic
tubercles to elevate the rectus abdominus leaving a distally based
insertion. -
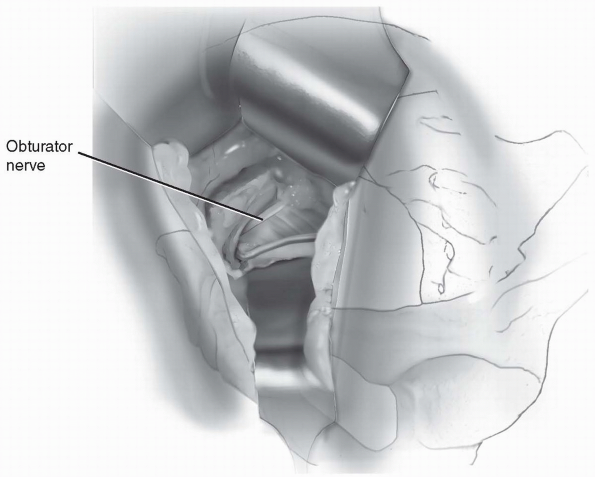
Retractors can be placed over the pubic
tubercles but should not be placed so far laterally as they enter into
the obturator foramen due to potential injury to the neurovascular
structures in the region.
 |
|
FIGURE
6-18 The exposure is extended along the superior pubic ramus to the quadrilateral surface. The corona mortis is identified and ligated as it crosses the pelvic brim. |
 |
|
FIGURE
6-19 Access to the entire quadrilateral surface and pelvic brim. The obturator nerve passes across the inferior aspect of the operative field. |
-
Open reduction and internal fixation of acetabular fractures.
-
Posterior Wall
-
Posterior Column
-
Transverse Posterior Wall
-
Posterior Column-Posterior Wall
-
T-type
-
Transverse
-
-
Open irrigation and debridement of the hip joint.
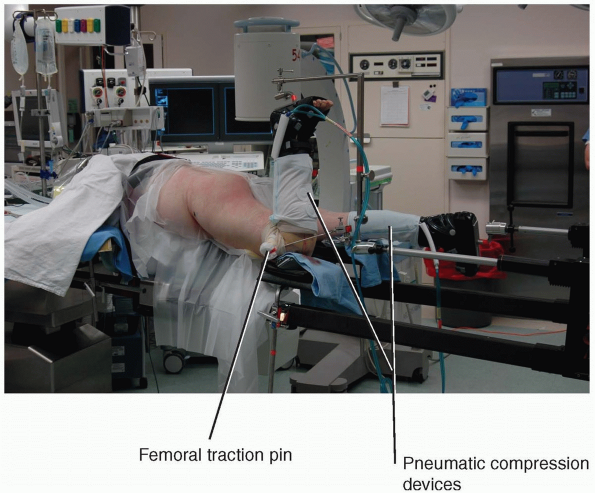
in a lateral or prone position. The patient should be kept with the
operative knee flexed 90 degrees at all times to remove tension from
the sciatic nerve and to allow for intraoperative retraction. By
placing the patient in a prone position on a specialized fracture
table, knee flexion can be maintained by a special apparatus holding
the traction boot on the operative leg vertically (Fig. 6-20).
A distal femoral traction pin can be attached to the traction device to
allow precise control of the amount of hip joint distraction.
Intraoperative sequential compression devices can also be placed when
the patient is in the prone position to help with the deep vein
thrombosis (DVT) prophylaxis.
-
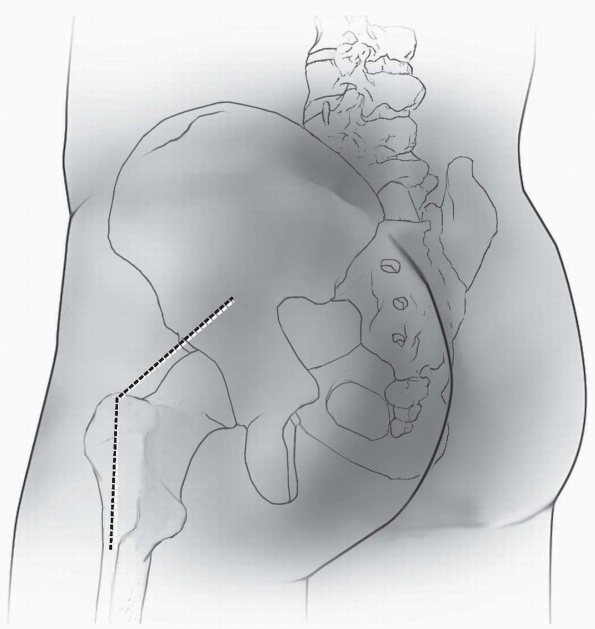
Incision: the incision is in a line from
the posterior superior iliac spine toward the center of the greater
trochanter and then extended distally on the lateral aspect of the
femur (Fig. 6-21). The incision can be gently curved at the corner or it can be kept at a sharp angle. -
The posterior incision over the gluteal
region is made first and dissection is carried through the skin and
subcutaneous tissue gaining hemostasis through the dissection. The
fascia over the gluteus maximus and gluteal muscle fibers are
identified.-
Note: In
more obese patients, following this portion of the incision, further
palpation can be performed to determine the exact location of the
greater trochanter. If necessary, the incision can then be extended
more anteriorly to reach the center of the greater trochanter.
-
-
Once the incision has been made to the center of the greater trochanter, it is extended distally along the line of the femur.
-
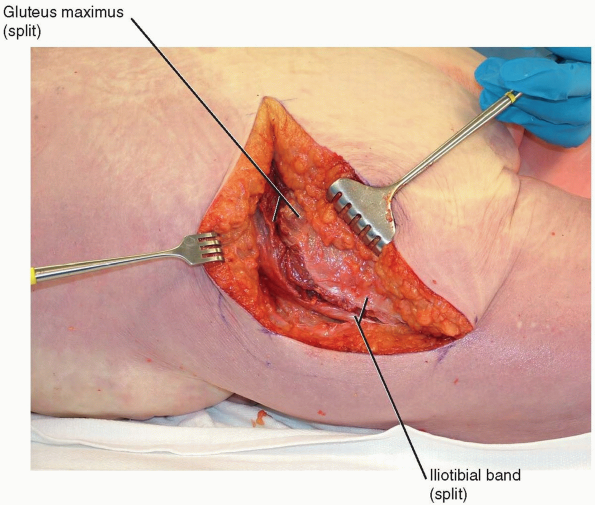
The iliotibial band and lateral thigh
fascia are split in line with their fibers on the lateral aspect of the
femur. The fascial incision begins distally at a level equal to the
inferior gluteal fold of the skin, as this is the location of the
gluteus maximus tendinous sling. This tendon may need to be incised as
it inserts on the femur to allow sufficient posterior retraction of the
flap. -
Once this incision reaches the center of
the greater trochanter the fascia over gluteus maximus is then split in
line with the underlying muscle fibers. The muscle fibers of the
gluteus maximus are then split by blunt finger dissection (Fig. 6-22). -
Once the gluteus maximus and iliotibial
band have been split, and the posterior flap is created, it can be held
in place with large no. 5 Ethibond sutures tacked to the posterior
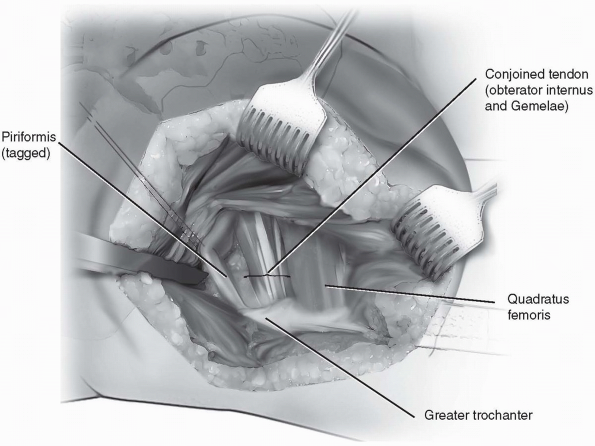
skin. The short external rotators are then identified. The piriformis
muscle is tagged approximately 1 cm from its insertion onto the femur
and retracted posteriorly. -
The combined tendon of the gemellae and
obturator internus are then identified and tagged, again 1 cm from
their insertion on the femur (Fig. 6-23).-
Note: Care
should be taken not to incise these muscles closer than 1 cm from the
insertion on the femur in order to protect the blood supply to the
femoral head.
-
-
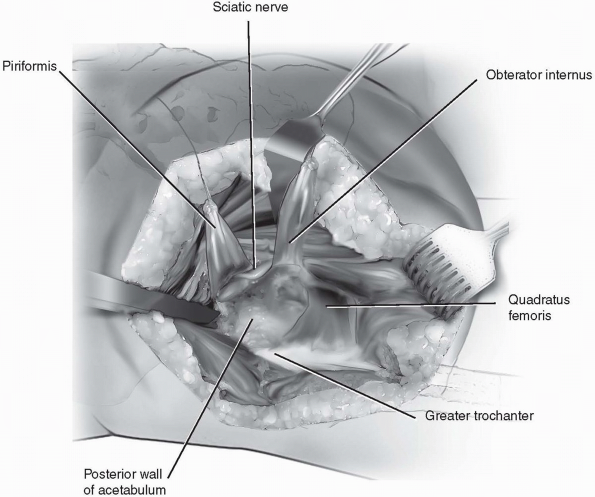
Dissection should not be carried into the
quadratus femoris as the risk of damage to the femoral head blood
supply is encountered. Once the short external rotators are tagged and
retracted, subperiosteal dissection along the retroacetabular surface
is performed. -
The piriformis muscle is elevated back to
the greater sciatic notch and the obturator internus and gemellae
muscles are elevated back to their insertions near the lesser sciatic
notch (Fig. 6-24). -
Posterior retraction of the obturator internus will provide a sling around the sciatic nerve and protect it during retraction.
-
Once the lesser sciatic notch is then
exposed, a retractor may be safely placed into this notch as long as
tension is kept on the obturator internus to protect the sciatic nerve
at all times. -
Dissection can be performed beneath the gluteus minimus and the remainder of hip abductor muscle anteriorly.
-
A Homan retractor can be placed beneath
the hip abductors to gain access to the superior aspect of the
acetabulum and more anteriorly for placement of hardware in this region. -
Following reduction and fixation of the
acetabular fracture, the short external rotators are reapproximated to
the greater trochanter. If the patient is in a prone position and the
fracture table allows for it, the leg may be externally rotated to
allow for a tension-free repair of the short external rotators. -
Ethibond sutures are utilized through
either a drill hole in the trochanter or by suturing them into the
tendinous portion of the hip abductors as they insert on the greater
trochanter. The posterior flap is then closed using 0-Ethibon sutures
both laterally and posteriorly over the gluteus maximus. The
subcutaneous tissue is closed in multiple layers and the skin is then
closed with either sutures or staples.
 |
|
FIGURE
6-20 Prone position of the patient on the fracture table with the distal femoral traction pin, knee flexed in 90 degrees, and sequential compression device on the calf to assist in DVT prophylaxis. |
 |
|
FIGURE
6-21 The incision is based on line from the posterior-superior iliac spine to the center of the greater trochanter and then extending distally in line with the femur. |
 |
|
FIGURE
6-22 The posterior muscular flap is made by incising the iliotibial band fascia in line with its fibers and the gluteus maximus in line with its fibers. The gluteus maximus tendon insertion on the femur may need to be incised for further posterior retraction of the flap. |
-
If performed in the prone position,
initial internal rotation of the leg during exposure will place the
short external rotators in a stretched position and allow easier
identification and exposure of the tendinous portions of these muscles. -
Incision of a portion of the gluteus
maximus tendinous sling that inserts on the femur may be required if in
extremely muscular patients or obese patients in which further
posterior retraction of the muscle flap is necessary. -
Placing the patient in a prone position
with distal femoral traction pin and peroneal post-traction may
facilitate exposure of the hip. Traction can be applied using the
table’s traction mechanism and the hip joint can be distracted to allow
debridement any intra-articular fragments and to assess the femoral
head for articular cartilage injuries.
 |
|
FIGURE
6-23 The piriformis and obturator internus muscles are identified and tagged and incised 1 cm away from their insertion into the femur. |
 |
|
FIGURE
6-24 Dissection underneath the piriformis and obturator internus to the greater and lesser sciatic notches, respectively, with continual traction on the obturator internus to protect the sciatic nerve. |
the routine treatment of acetabular fractures. The majority of complex
fractures can be managed through combined ilioinguinal and
Kocher-Langenbeck approaches before an iliofemoral approach would be
necessary. However, certain transtectal transverse or T-type acetabular
fractures with impaction of the acetabular dome or associated posterior
wall fractures are still best treated through the extended iliofemoral
approach. This approach may also be useful for treatment of older or
malunited fractures.
to be placed in the lateral position in order to gain access to the
entire outer aspect of the ilium.
to the anterior-superior iliac spine should be identified, as well as
the location of the lateral edge of the patella.
-
Incision: a curvilinear incision from the
posterior-superior iliac spine to the anterior-superior iliac spine is
the continued in a line towards the lateral border of the patella. The
incision will need to be carried to the proximal mid-thigh in order to
provide adequate exposure (Fig. 6-25). -
The tendinous interval between the
abdominal and gluteal musculature is identified along the iliac crest
and the origins of the gluteal muscles are released and elevated
subperiostally to the greater sciatic notch (Fig. 6-26). Continue this elevation anteriorly along the crest to release the tensor fascia lata from its origin on the ilium. -
Next, identify the fascia of the anterior thigh and incise it longitudinally on the lateral border of the sartorius (Fig. 6-27). Develop the interval between the sartorius and tensor fascia lata with blunt dissection.
-
Ascending branches of the lateral femoral
circumflex artery may be encountered in this interval and can safely be
ligated to allow further exposure (Fig. 6-28). -
With the tensor fascia lata retracted
laterally and the Sartorius retracted medially, dissection is continued
between the rectus femoris medially and gluteus medius laterally. The
reflected head of rectus femoris tendon can be released from its origin
on the supraacetabular ilium. -
The gluteus minimus is elevated from the
ilium and hip capsule, and its tendon is incised near the insertion on
the greater trochanter, leaving a tendinous cuff for later repair.
Next, the gluteus medius tendon is incised near its insertion on the
greater trochanter, taking care to leave a tendinous cuff on the
greater trochanter for later repair (Fig. 6-29). -
Dissection is now carried posteriorly on
the greater trochanter to release the insertion of the piriformis,
gemellae, and obturator internus. -
These tendons should be released at least
1 cm from their insertions on the femur in order to protect the
remaining blood supply to the femoral head. The external rotators can
now be elevated off the posterior capsule and retroacetabular surface
of the ilium to the greater and lesser sciatic notches (Fig. 6-30). -
Continuous retraction of the obturator
internus posteriorly will provide a protective sling in front of the
sciatic nerve and retractors may be placed in the greater or lesser
sciatic notches. -
If further exposure of the anterior
column is necessary, the origin of the Sartorius and inguinal ligament
may be released from the anterior superior iliac spine. The aponeurotic
insertion of the abdominal muscles can be released posteriorly along
the iliac crest in a similar fashion to the exposure of the lateral
window of the ilioinguinal approach. -
Superiosteal dissection along the inner table of the ilium will elevate the iliopsoas to the pelvic brim.
-
Note: An
alternative to complete release of all structures from the
anterior-superior iliac spine and iliac crest is to osteotomize the
iliac crest while maintaining the inguinal ligament, Sartorius, and
abdominal musculature insertions and origins on the ilium. Predrilling
the osteotomy will allow easier reduction and fixation during closure.
-
-
Following fracture reduction and
fixation, close attention must be paid to repair of the multiple
tendons that have been released from their origins and insertions.
Closure begins at the posterior inferior aspect of the greater
trochanter. The obturator internus and gemellae common tendon is
repaired with a permanent suture, size 0 or larger. The piriformis is
repaired next in the same fashion. Working anteriorly on the greater
trochanter, the gluteus medius tendon and gluteus minimus tendons are
repaired next, respectively. Again, large permanent suture is preferred
for this repair, using size 1 suture or larger. Repair of the reflected
head of the rectus femoris follows the gluteal tendon repairs. -
The hip abductors are repaired back to
the abdominal aponeurosis and lumbodorsal fascia using multiple
interrupted sutures with the hip held in an abducted position. The
fascia over the Sartorius is repaired to complete the deep closure.
Layered closure of the subcutaneous tissues and skin follows to
complete the procedure. -
Due to the necessary elevation of the hip
abductors from both the ilium and greater trochanter, postoperative
protection of the hip is required. -
After surgery patients should be
maintained in a hip abduction pillow in the initial postoperative
period and should be restricted from active abduction for 6 weeks or
more.-
Note: This
exposure has been associated with a high incidence of heterotopic
ossification, so consideration of prophylaxis with radiation or
indomethacin should be given.
-
 |
|
FIGURE
6-25 Patient is placed in the lateral position with the entire iliac crest and thigh prepped into the surgical field. The incision follows the contour of the iliac crest from the posterior superior iliac spine to the anterior superior iliac spine and then down the anterior thigh in a line toward the lateral border of the patella. |
 |
|
FIGURE
6-26 The gluteal muscles are released at their origin near the aponeurosis of the abdominal musculature and subperiosteal dissection is carried out towards the greater sciatic notch. |
 |
|
FIGURE
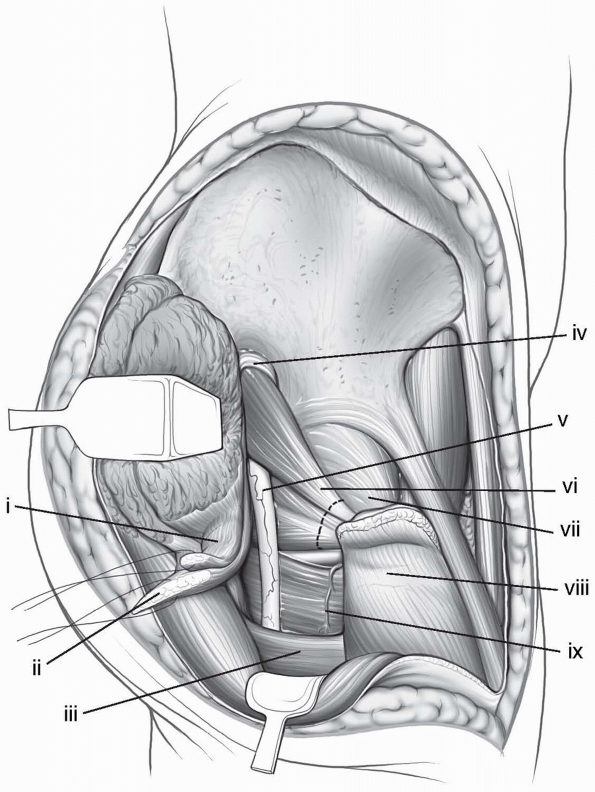
6-27 The fascia over the thigh is split in line with the femur and the interval between the sartorius (medially) and tensor fascia lata (laterally) is developed. (i) Avascular white line. (ii) Tensor fascia-lata muscle. (iii) Gluteus medius muscle. (iv) Gluteus minimus muscle. (v) Rectus femoris muscle. (vi) Sartorius muscle. (vii) No-name fascia covering vastus lateralis. (viii) Ascending branch of the lateral, femoral, circumflex artery. |
 |
|
FIGURE
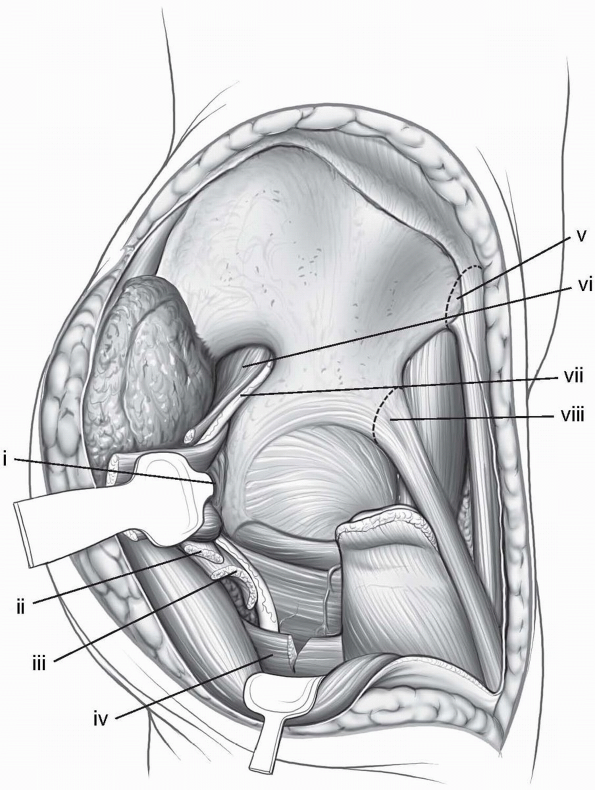
6-28 The ascending branches of the lateral circumflex femoral artery are identified in the interval between the Sartorius and tensor fascia lata and ligated. (i) Tensor fascia-lata muscle. (ii) Gluteus medius muscle. (iii) Gluteus minimus muscle. (iv) Greater trochanter. (v) Piriformis muscle. (vi) Hip joint capsule. (vii) Two heads of the rectus muscle. (vii) Ligated ascending branch of the lateral, femoral, circumflex artery. |
 |
|
FIGURE
6-29 The tendons of the gluteus minimus and medius are tagged and transected, leaving a cuff of tendon to repair back to the greater trochanter. (i) Gluteus minimus tendon. (ii) Gluteus medius tendon, (iii) Gluteus maximus tendon. (iv) Superior-gluteal neurovascular bundle. (v) Sciatic nerve. (vi) Piriformis and conjoint tendons. (vii) Hip-joint capsule. (viii) Greater trochanter. (ix) Quadratus femoris. |
 |
|
FIGURE 6-30 Retractors can be placed in the greater and lesser sciatic notches to complete the exposure. (i) Blunt Homan in lesser sciatic notch. The conjoint tendons have been positioned between the retractor and the sciatic nerve. (ii) Gluteus minimus tendon. (iii) Gluteus medius tendon. (iv) Partial release of gluteus maximus tendon. (v) Anterior-superior iliac spine and sartorius muscle origin. (vi) Piriformis muscle. (vii) Sciatic nerve. (viii) Anterior-inferior iliac spine and relected head of rectus femoris muscle.
|
-
Multiple tendons need to be released in
order to perform this approach appropriately. In order to repair the
tendons to the correct place, the tendon cuffs should be tagged as well
as the mobile end so the tendons can be put back to the matching
location. -
Begin the dissection posteriorly along
the ilium and work anteriorly to release the gluteus medius. The
interval between the Sartorius and tensor fascia lata can be difficult
to determine if the anterior superior iliac spine has not already been
identified and exposed. If the interval cannot be determined, follow
the Sartorius from the anterior superior iliac spine distally to
develop this interval. -
Predrilling the iliac crest osteotomy will allow easier and more accurate reduction and fixation at the end of the case.
JD, Bolhofner BR. Acetabular fracture fixation via a modified Stoppa
limited intrapelvic approach. Description of operative technique and
preliminary treatment results. Clin Orthop Relat Res 1994;305:112-123.
DB, Beaule PE, Matta JM. Safety and efficacy of the extended
iliofemoral approach in the treatment of complex fractures of the
acetabulum. J Bone Joint Surg Br 2005;87(10):1391-1396.
JM. Fractures of the acetabulum: accuracy of reduction and clinical
results in patients managed operatively within three weeks after the
injury. J Bone Joint Surg Am 1996;78(11):1632-1645.
AA, Archdeacon MT, Jenkins MA, et al. Infrapectineal plating for
acetabular fractures: a technical adjunct to internal fixation. J Orthop Trauma 2004;18(3):175-178.