
Editors: Morrey, Bernard F.; Morrey, Matthew C.
Title: Master Techniques in Orthopaedic Surgery: Relevant Surgical Exposures, 1st Edition
Copyright ©2008 Lippincott Williams & Wilkins
> Table of Contents > Section I – Upper Extremity > 5 – Shoulder
5
Shoulder
John William Sperling
ANTERIOR SUPERIOR APPROACH FOR ROTATOR CUFF REPAIR
Indications
-
Acromioplasty
-
Rotator cuff repair
Position
The patient is carefully positioned in the beach chair
position. The waist should be in approximately 45 degrees of flexion
and the knees in 30 degrees of flexion. The table may be slightly
rolled away from the surgical shoulder.
position. The waist should be in approximately 45 degrees of flexion
and the knees in 30 degrees of flexion. The table may be slightly
rolled away from the surgical shoulder.
Landmarks
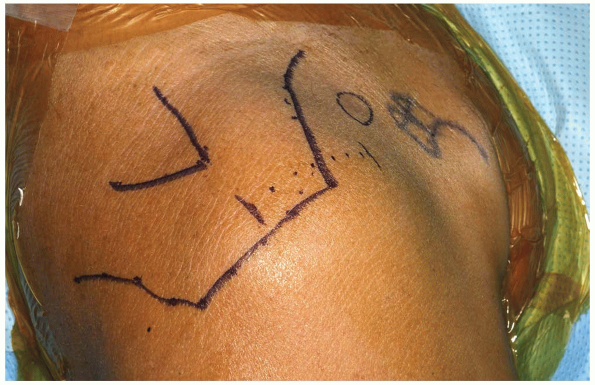
One should palpate the posterior scapular spine, the
lateral border of the acromion, the anterior border of the acromion,
and the anterior portion of the clavicle and coracoid. These should be
marked out with a marking pen (Fig. 5-1).
If one is performing arthroscopy prior to an open procedure, one may
wish to mark out the standard anterior incision and attempt to place
the anterior portal in line with this future incision.
 |
|
FIGURE
5-1 The landmarks on the shoulder are carefully identified and outlined. A 4 to 5 cm incision is marked out on the shoulder parallel to the lateral border of the acromion. |
P.106
TECHNIQUE
-
Incision: there is significant
variability in the skin incision used for an anterior superior approach
to the shoulder including oblique incisions, horizontal incisions, as
well as vertical incisions. It is based on the individual preference of
the surgeon which incision to use. -
An incision is made over the superior
aspect of the shoulder parallel with the lateral border of the acromion
in line with Langer’s lines. The length of the skin incision is
typically about 4 to 5 cm in length. The skin is incised as well as the
fat. Skin flaps are carefully created and mobilized. -
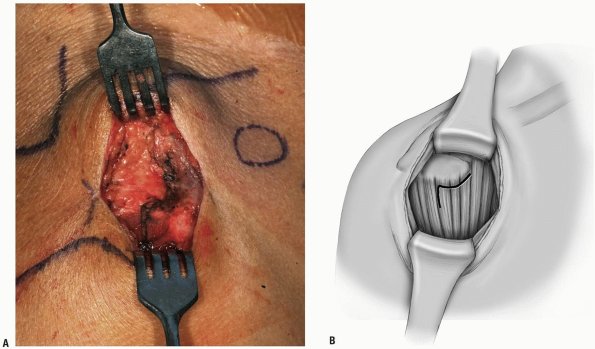
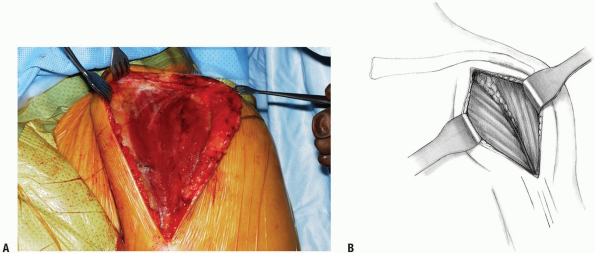
The deltoid muscle is clearly identified.
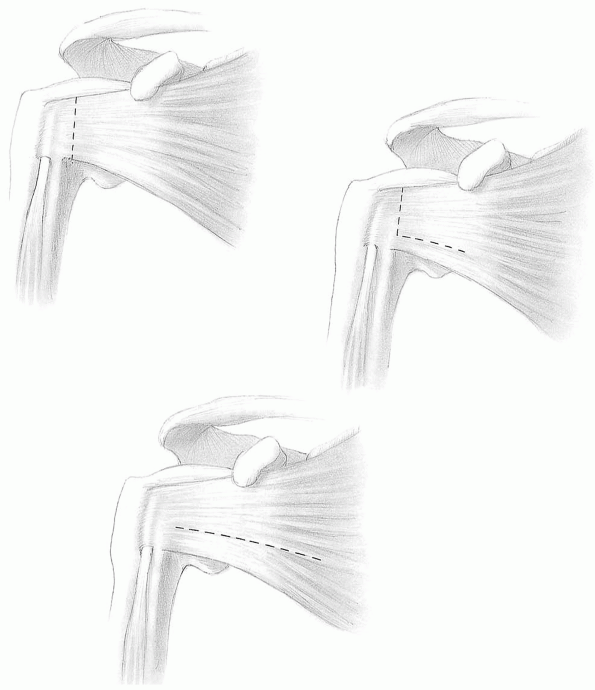
There is significant variability among surgeons in regard to the manner
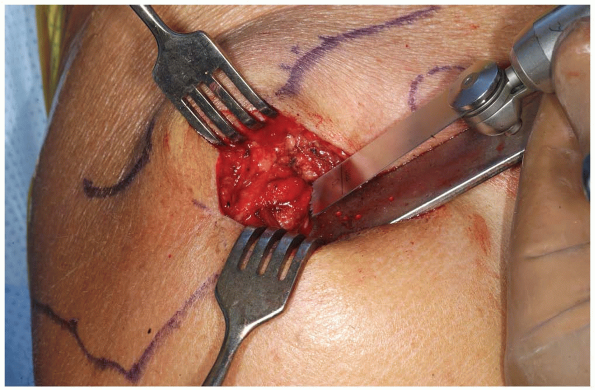
with which they prefer to take down the deltoid (Fig. 5-2). In this example, the deltoid is taken down off the anterior aspect of the acromion with full thickness sleeves (Fig. 5-3).
It is critical to carefully include both the deep and superficial
fascia of the deltoid when this is performed. The surgeon then has the
option of splitting the deltoid in line with the fibers starting from
the acromioclavicular (AC) joint anteriorly for approximately 3 to 4
cm, or the surgeon has the option of extending the deltoid detachment
posteriorly over the lateral border of the acromion. The extent of the
deltoid detachment over the lateral border of the acromion can be
modified based on the size of the rotator cuff tear. One must be
careful to avoid splitting the deltoid more than several centimeters
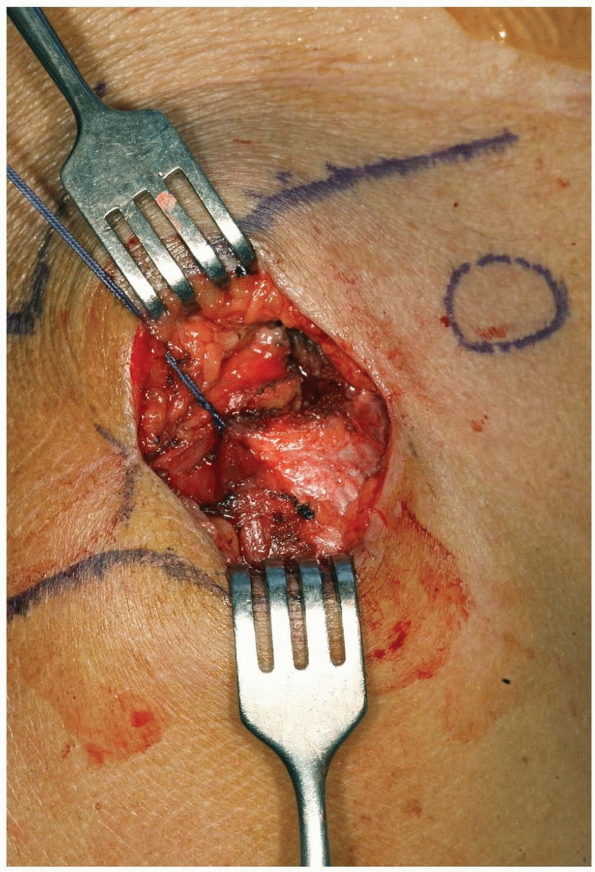
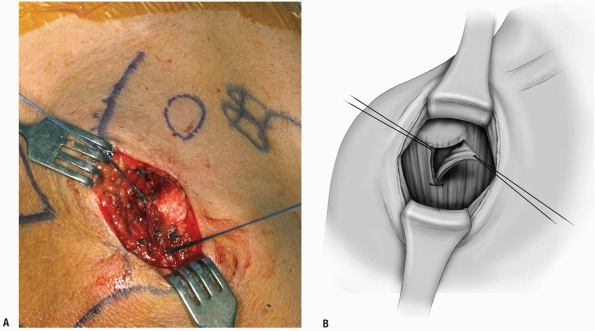
from the acromial border to protect the axillary nerve. The area where
the proximal deltoid split is made can be marked with a retention
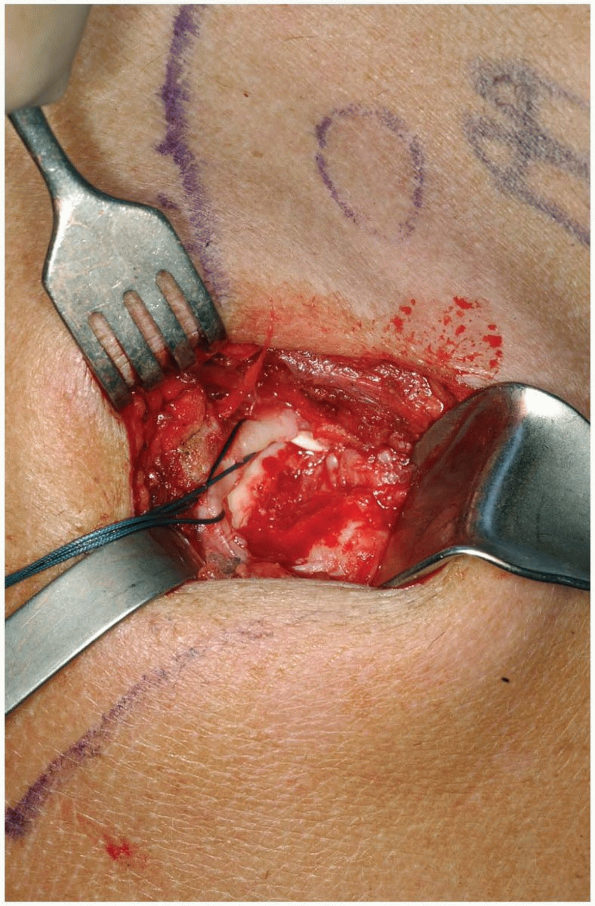
stitch (Fig. 5-4). An additional stitch is placed distally in the deltoid split to prevent propagation (Fig. 5-5). -
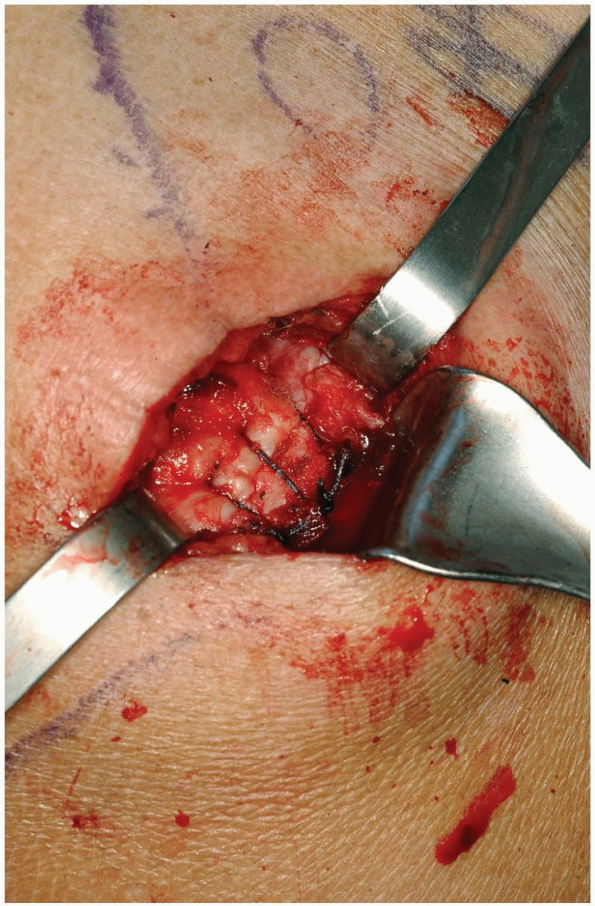
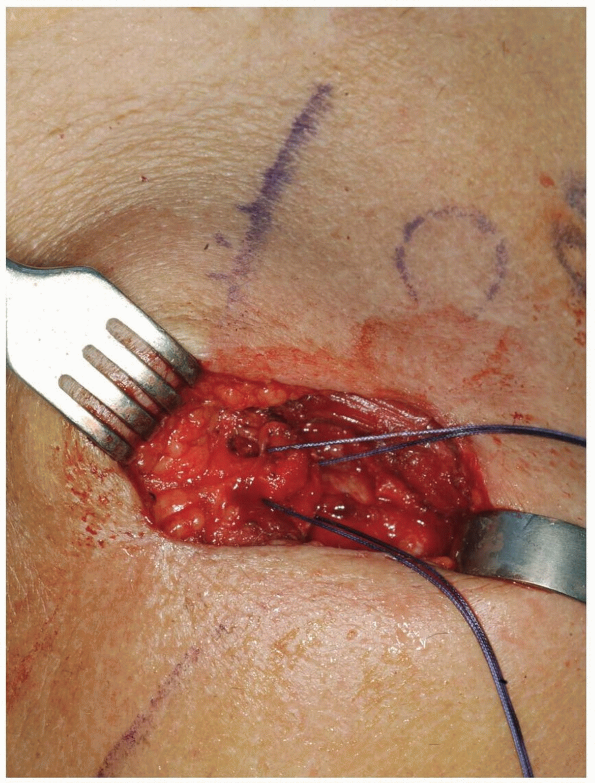
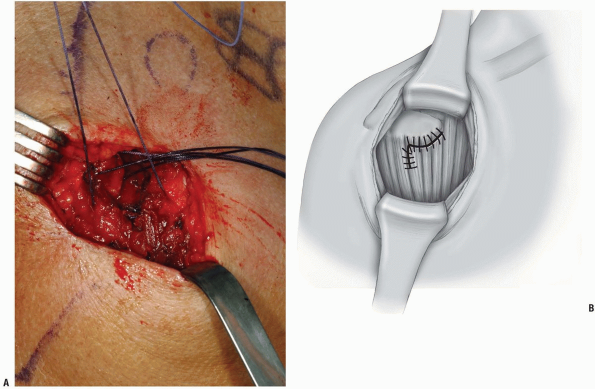
An acromioplasty may then be performed based on surgeon preference (Fig. 5-6). Retention stitches are then placed in the rotator cuff tear (Fig. 5-7). The rotator cuff repair can then be performed (Fig. 5-8).
-
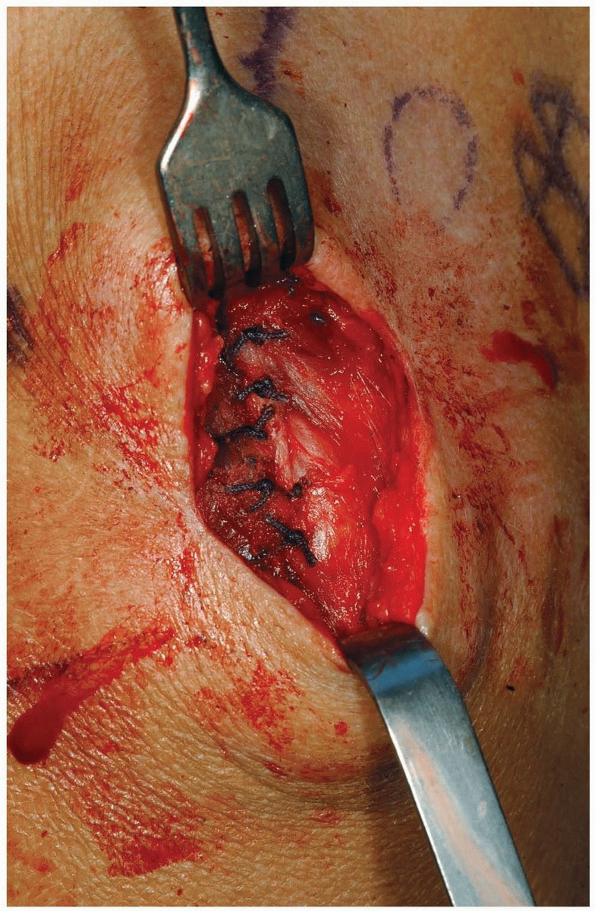
For closure, a meticulous repair of the
deltoid is required. At the end of the procedure, the deltoid is
repaired back in a tendon-to-tendon as well as a tendon-to-bone manner (Figs. 5-9, 5-10 and 5-11).
Drill holes are placed through the acromion with tendon-to-bone
stitches. Additionally, the split within the deltoid itself is repaired
with side-to-side stitches. Complications in this approach may be
related to deltoid dehiscence postoperatively.-
Pearls/Pitfalls:
A meticulous and strong repair of the deltoid is essential to avoid
postoperative dehiscence. It is critical to carefully identify both the
deep and superficial deltoid fascia layers during the exposure and
repair.
-
P.107
 |
|
FIGURE 5-2 A,B: The area of deltoid to be taken off of the acromion is outlined.
|
 |
|
FIGURE 5-3 Full thickness flaps of the deltoid are taken down.
|
P.108
 |
|
FIGURE
5-4 A marking stitch is placed in the corner of the deltoid to assist in later repair and ensure proper alignment of the deltoid at the time of repair. |
 |
|
FIGURE 5-5 A stitch is placed in the deltoid split distally to prevent propagation.
|
P.109
 |
|
FIGURE 5-6 An acromioplasty may be performed.
|
 |
|
FIGURE 5-7 The rotator cuff tear is identified and retention stitches are placed.
|
 |
|
FIGURE 5-8 Rotator cuff repair is performed.
|
P.110
 |
|
FIGURE 5-9 Drill holes can be placed in the acromion for deltoid repair.
|
 |
|
FIGURE 5-10 The corner of the deltoid is sutured back to its anatomic location.
|
P.111
 |
|
FIGURE 5-11 Final deltoid repair.
|
HORIZONTAL INCISION FOR CLAVICLE FRACTURES AND NONUNIONS
Indication
Clavicle fracture or nonunion.
Positioning
The patient is placed on the operating room table in the
beach chair position. The entire upper extremity is sterilely prepped
and draped in the usual manner. The endotracheal tube is positioned to
the opposite corner of the mouth. A rolled up towel may also be placed
at the medial border of the scapula to make the clavicle more readily
accessible.
beach chair position. The entire upper extremity is sterilely prepped
and draped in the usual manner. The endotracheal tube is positioned to
the opposite corner of the mouth. A rolled up towel may also be placed
at the medial border of the scapula to make the clavicle more readily
accessible.
Technique
-
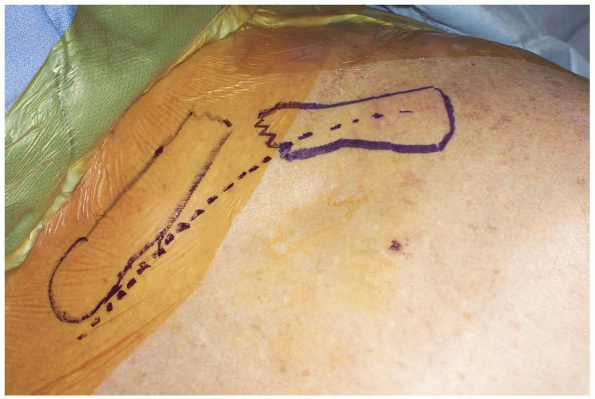
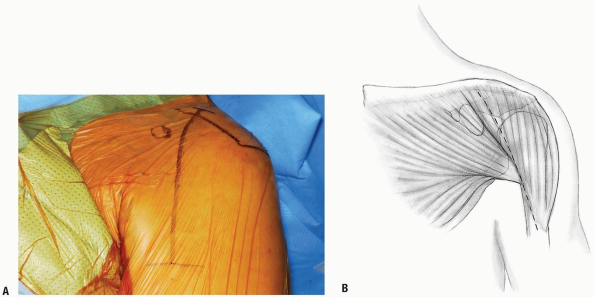
Incision: the incision runs parallel to Langer’s line along the inferior border of the clavicle overlying the fracture nonunion (Fig. 5-12).
The incision is placed inferiorly so that the scar will not lie
directly on top of the instrumentation. The skin is incised as well as
the fat. It should be done with great care and caution to carefully
identify any supraclavicular nerves (Fig. 5-13).
These should be carefully preserved. The fascia of the overlying
trapezius and the deltoid is carefully identified and incised. Sutures
are placed on the fascial ends for later reattachment. -
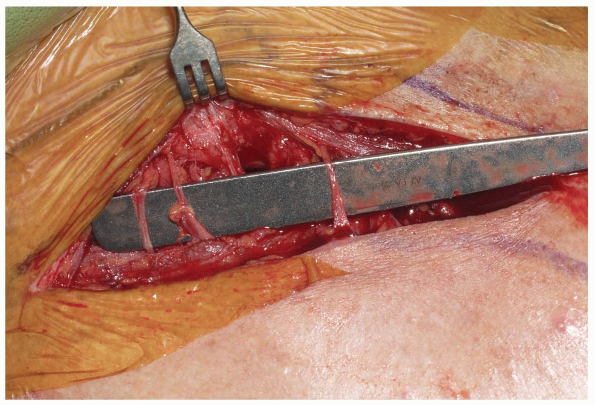
Additionally during the course of the
procedure, one must be very diligent that the neurovascular structures
are present on the undersurface of the clavicle. -
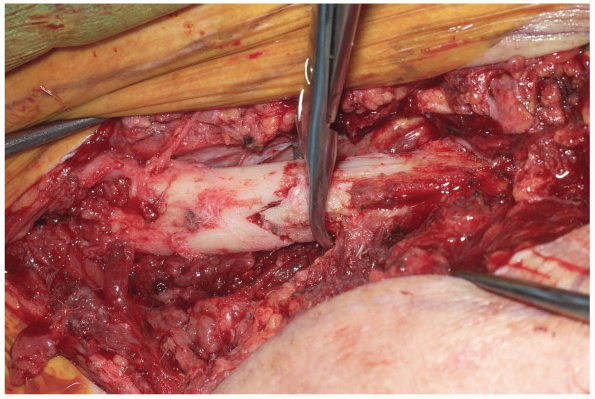
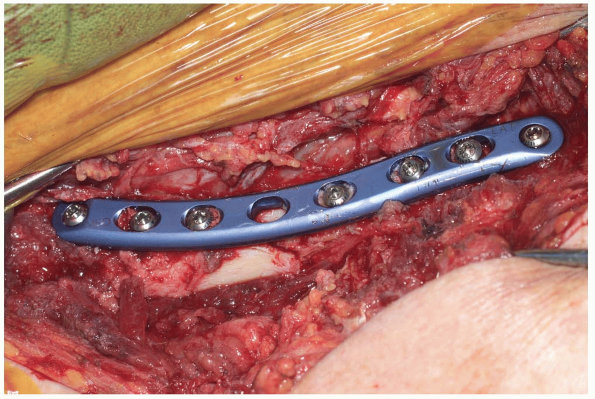
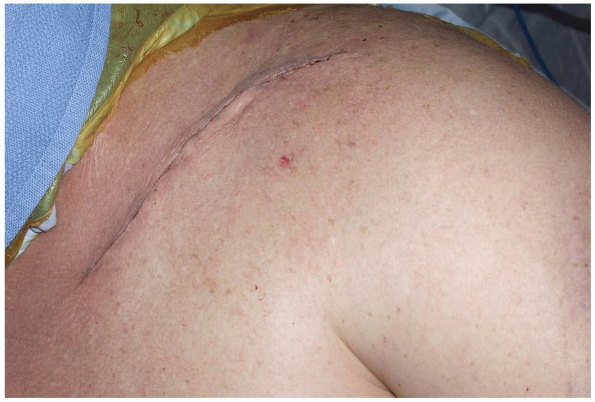
The fracture is then identified and reduced (Fig. 5-14). Internal fixation may be performed based on surgeon preference (Fig. 5-15). Closure of the wound is performed (Fig. 5-16).
-
Pearls/Pitfalls:
Attention should be made to the identification and preservation of the
supraclavicular nerves to avoid potential creation of a neuroma.
-
P.112
 |
|
FIGURE 5-12 The skin incision is carefully outlined.
|
 |
|
FIGURE 5-13 Great care is taken to preserve the supraclavicular nerves.
|
 |
|
FIGURE 5-14 The fracture ends are reduced and held in place.
|
 |
|
FIGURE 5-15 Open reduction, internal fixation can be performed.
|
 |
|
FIGURE 5-16 Closure of the wound.
|
P.113
DELTOPECTORAL APPROACH FOR FRACTURES AND ARTHROPLASTY
Indications
-
Total shoulder or hemiarthroplasty
-
Open reduction, internal fixation of proximal humerus fractures
Positioning
The patient is carefully padded and positioned in the
beach chair position. The waist is flexed approximately 45 degrees and
the knees are placed in 30 degrees of flexion. The table may be
slightly rolled away from the surgical shoulder. In addition, a rolled
up towel under the medial border of the scapula may help with exposure
of the shoulder region. It is critically important to have the medial
border of the scapula on the operative side free to allow adequate
exposure of the upper extremity.
Landmarks
The landmarks of the shoulder are carefully palpated and
marked with a marking pen including the posterior spine of the scapula,
lateral border of the acromion, anterior border of the acromion,
anterior portion of the clavicle, and the coracoid.
marked with a marking pen including the posterior spine of the scapula,
lateral border of the acromion, anterior border of the acromion,
anterior portion of the clavicle, and the coracoid.
Technique
-
Incision: the incision begins at the
anterior portion of the clavicle and passes approximately 1 cm lateral
to the coracoid and intersects at the arm at the intersection of the
medial 40% and the lateral 60% (Fig. 5-17). The incision is approximately 15 cm in length. There may be a gentle lateral curve to the incision proximally. -
The skin is incised as well as the fat. Skin flaps are created medially and laterally.
-
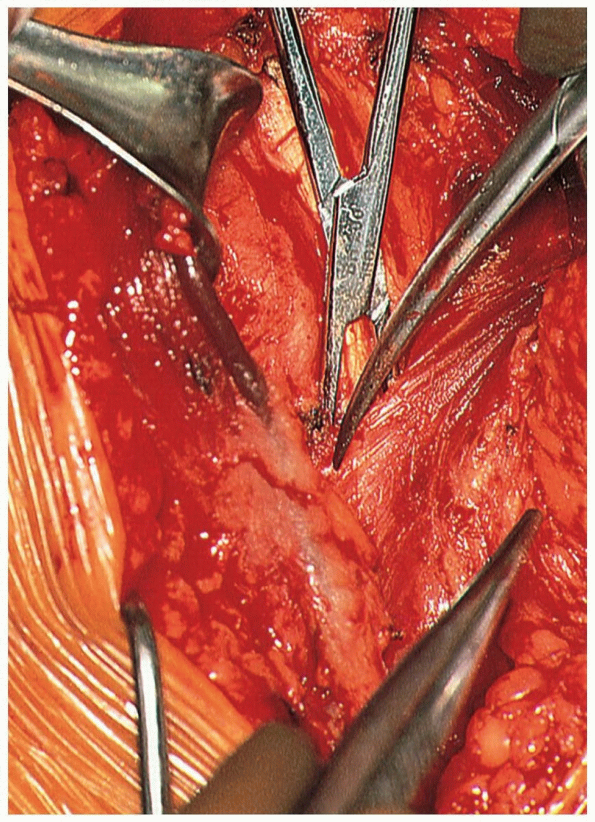
It is easiest for one to find the
deltopectoral interval proximally. A small triangle of fat is usually
present between the deltoid and the pectoralis major proximally (Fig. 5-18).
Once the interval is found, one follows the deltopectoral interval
distally, usually leaving the cephalic vein medially within its bed (Fig. 5-19).
It may be advantageous to place the arm on a Mayo stand and abduct the
arm approximately 30 degrees to help dissect out the deltopectoral
interval. There are multiple crossing branches that are typically
present that do need to be cauterized. A retractor is placed under the
deltoid and the deltopectoral interval is developed distally. -
After this, the clavipectoral fascia
which lies on the anterior aspect of the subscapularis and conjoined
group is carefully incised. One can then place a finger to spread the
interval between the conjoint and subscapularis, and a retractor may be
placed in this area. -
One then carefully feels for the axillary
nerve. It is felt by using an index finger sweeping under the inferior
border of the subscapularis. One may then confirm its presence by
performing a “tug test” feeling for the nerve under the undersurface of
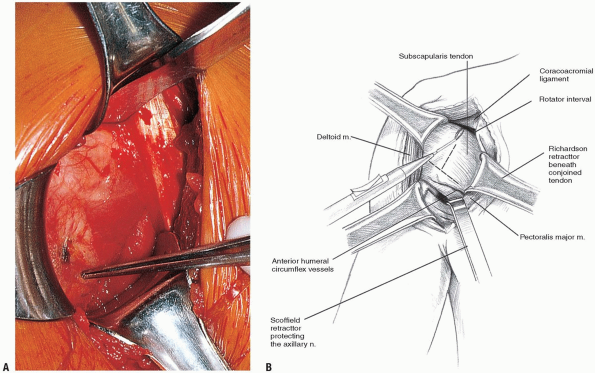
the deltoid more laterally. -
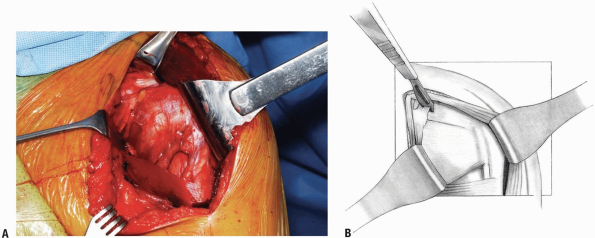
The subacromial subdeltoid space is then
carefully incised and cleared to allow mobilization of the deltoid and
a place for the deltoid retractor. This is started first superiorly
under the undersurface of the acromion sweeping the bursa away, then
laterally, and then finally anteriorly. A retractor is then placed in
the deltoid (Fig. 5-20).
One may on occasion need to release the upper 1 cm of the pectoralis
major muscle to improve exposure. Next, the overlying bursa of the
rotator cuff is carefully débrided and one then clearly identifies the
underlying rotator cuff.-
Note: The coracoacromial ligament may be excised for better exposure (see Fig. 5-20B). However, if the cuff is deficient, ligament should be left intact.
-
-
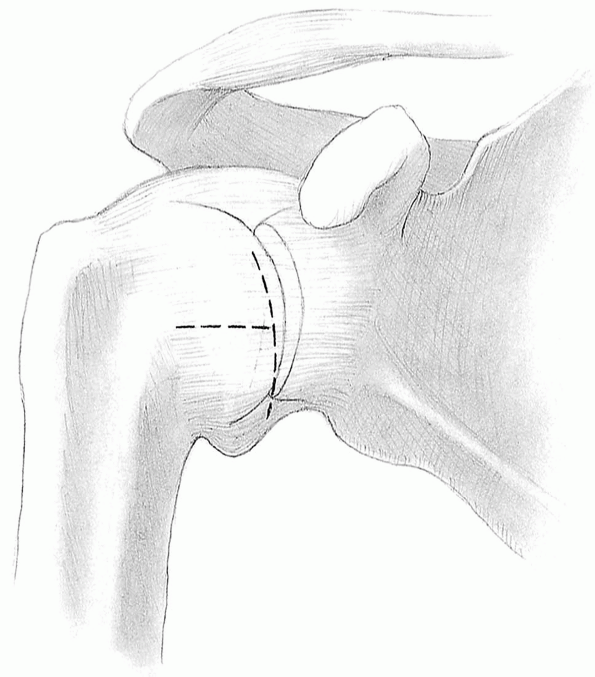
In cases of shoulder arthroplasty, one
then determines how the subscapularis should be taken down. There is
significant variability among surgeons in regards to management of the
subscapularis in routine shoulder arthroplasty work. There are several
options available including incising through the subscapularis tendon
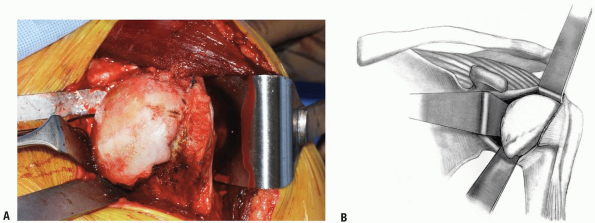
for later tendon repair (Fig 5-21).
The second option is taking down the subscapularis off of bone. Lastly,
there is the option of performing a lesser tuberosity osteotomy. -
The arm is externally rotated and the head is dislocated (Fig. 5-22).
P.114
 |
|
FIGURE 5-17 The landmarks are outlined and the incision is planned.
|
 |
|
FIGURE 5-18 The medial border of the deltoid is identified. A triangle of fat is usually present in this location.
|
 |
|
FIGURE 5-19 The superior aspect of the pectoralis major is detached. The cephalic vein is left within its bed medially.
|
P.115
 |
|
FIGURE
5-20 A retractor is placed medially beneath the pectoralis and laterally under the deltoid. The landmarks are outlined and the incision is planned. |
 |
|
FIGURE 5-21
|
 |
|
FIGURE
5-22 In this case, the rotator interval and subscapularis were incised and the humeral head was dislocated for a total shoulder arthroplasty. |
P.116
Pearls and Pitfalls
-
Careful deltoid mobilization is critical to exposure for both internal fixation of fractures as well as shoulder arthroplasty.
-
One should clearly identify and protect
the axillary nerve during the course of all shoulder procedures
performed through the deltopectoral interval. The “tug test” is a
simple and reproducible manner to clearly confirm the location of the
nerve.
POSTERIOR EXPOSURE FOR RECURRENT POSTERIOR SHOULDER INSTABILITY
Indication
The indication for posterior approach to the shoulder is
usually treatment of posterior instability that has been refractory to
nonoperative treatment.
usually treatment of posterior instability that has been refractory to
nonoperative treatment.
Positioning
The patient is carefully padded and positioned in the
lateral decubitus position with the operative shoulder placed
superiorly. Additionally, there are some surgeons that prefer to
perform a posterior approach to the shoulder with the patient in the
beach chair position. In the beach chair position, however, the patient
needs to be sitting at a near 90 degree angle or leaning slightly
forward. In the more traditional lateral position, great care is taken
to adequately pad the patient including padding the lower extremities
to prevent a peroneal nerve palsy.
Landmarks
After the patient is prepped and draped in the usual
sterile manner, the anatomical landmarks of the shoulder are carefully
palpated and marked including the spine at the scapula, the acromion,
clavicle, and coracoid.
sterile manner, the anatomical landmarks of the shoulder are carefully
palpated and marked including the spine at the scapula, the acromion,
clavicle, and coracoid.
Technique
-
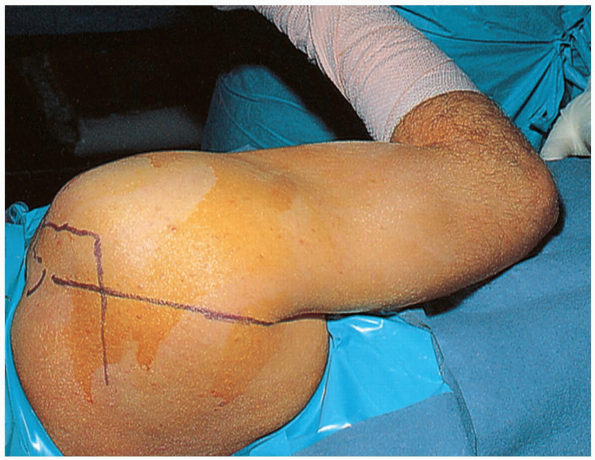
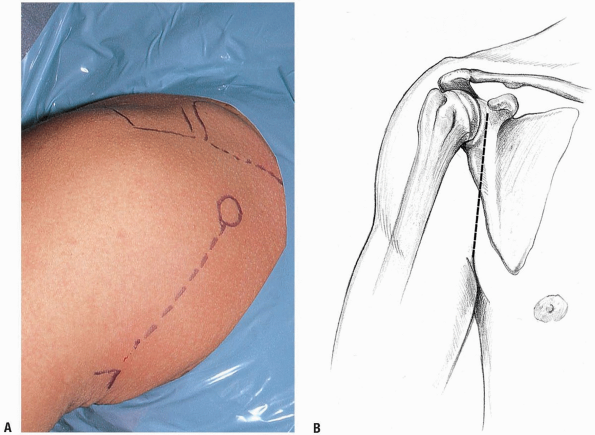
Incision: the standard incision for
posterior approach of shoulder begins posterior to the
acromioclavicular joint and approximately 1 to 2 cm medial to the
lateral border of the acromion and extending distally in line with the
posterior axillary skin fold (Fig. 5-23).
An approximately 6 to 8 cm incision is made. The skin is incised as
well as the fat. Skin flaps are mobilized medially, laterally,
superiorly, and inferiorly. Once the superficial dissection is
performed, one visualizes the underlying deltoid muscle. -
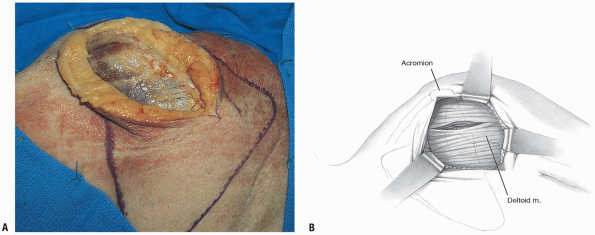
The deltoid muscle is split in line with
its fibers approximately 2.5 cm medial to the posterior corner of the
acromion. This split should not extend greater than 4 to 5 cm to avoid
injury to the underlying axillary nerve (Fig. 5-24).
The posterior repair itself can be performed without removal of any
deltoid from the scapular spine or the underlying acromion. The deltoid
flaps are carefully created. A self-retaining retractor may be used to
retract the deltoid from the underlying rotator cuff muscles. -
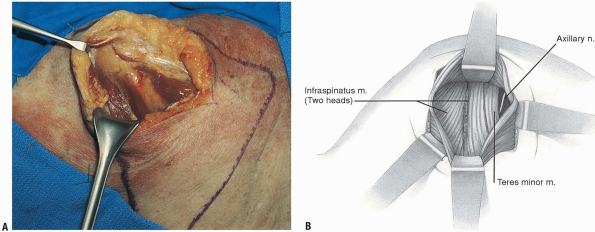
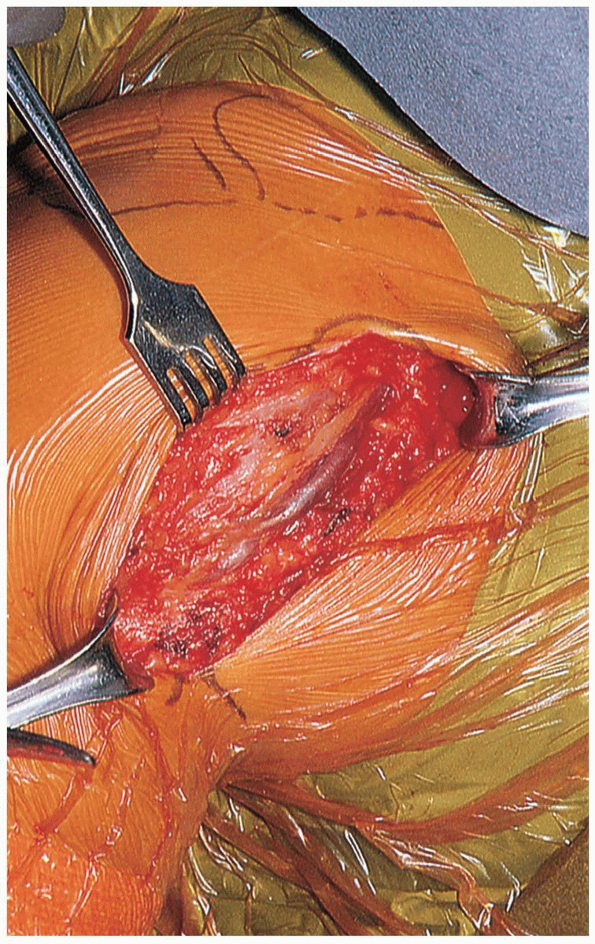
Once the deltoid is mobilized, one can
then expose the underlying infraspinatus and teres minor. Frequently,
it is difficult to specifically see the interval between the teres
minor and underlying infraspinatus. Therefore, many surgeons have
advocated splitting between the two heads in the infraspinatus rather
than going through the interval between the teres minor and
infraspinatus (Fig. 5-25).
The infraspinatus does have a specific fat stripe between the two
heads. This is a convenient plane to use for the dissection. One,
however, needs to take great care that the dissection between the two
heads does not proceed more than 1.5 cm medial to the glenoid to avoid
injury to the suprascapular nerve. -
The infraspinatus is carefully freed from
the underlying capsule. The capsule is typically more adhered laterally
compared to medially. It is critical to obtain full mobility of the
plane between the infraspinatus and capsule to allow mobilization of
the capsule for later repair. An additional set of self-retaining
retractors may be helpful to place between the two heads of the
infraspinatus to clearly expose the underlying capsule. -
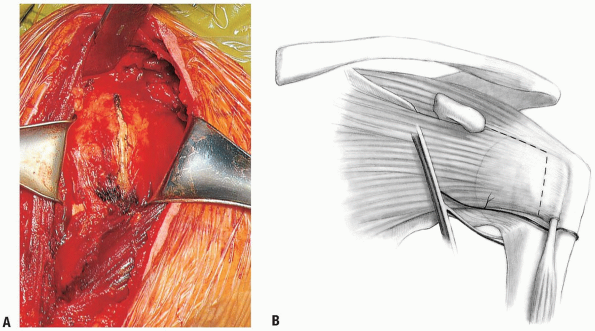
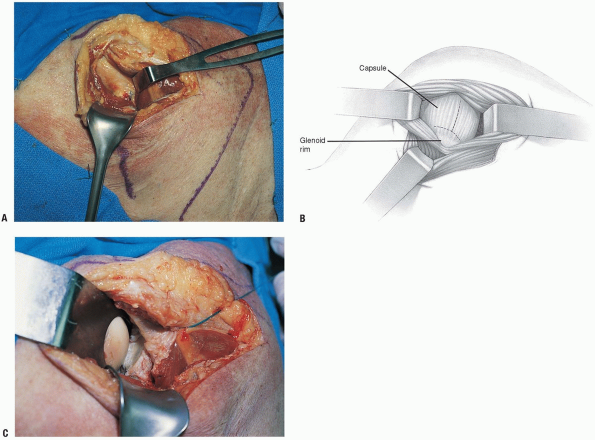
In regard to the specific capsular
repair, there is significant variability in regard to the type of
capsular repair that is preferred by the surgeon. Specifically, some
surgeons prefer to perform a laterally based capsular repair versus a
medially based capsular repair. The procedure then proceeds with
performing a capsular application with either a laterally or medially
based T-type of split as well as addressing any labral pathology (Fig. 5-26).
P.117
 |
|
FIGURE
5-23 The patient is positioned in the lateral position and an incision is made 1 to 2 cm medial to the lateral border of the acromion. |
 |
|
FIGURE 5-24 A,B:
A split in the deltoid is made approximately 2 to 3 cm medial to the posterior corner of the acromion. The split should not extend more than 4 to 5 cm. |
 |
|
FIGURE 5-25 A,B: A split is made between the two heads of the infraspinatus.
|
P.118
Pearls and Pitfalls
-
One can perform the posterior exposure
through the interval between the infraspinatus and teres minor or
between the two heads of the infraspinatus. The fatty stripe between
the heads of the infraspinatus is a more readily identifiable landmark
and may be the easier interval to use for the procedure.
 |
|
FIGURE 5-26 A,B:
The infraspinatus is carefully freed from the underlying capsule. A lateral or medial based repair is based on labral pathology and surgeon preference. |
P.119
ANTERIOR INFERIOR APPROACH FOR SHOULDER INSTABILITY
Indication
Treatment of shoulder instability.
Positioning
The patient is carefully padded and positioned in the
beach chair position. The affected upper extremity is sterilely prepped
and draped in the usual manner.
beach chair position. The affected upper extremity is sterilely prepped
and draped in the usual manner.
Technique
-
Incision: the standard axillary incision
begins just inferior to the coracoid process and extends into the
axilla in line with the skin folds. This is determined by adducting the
arm and seeing the line of the skin fold (Fig. 5-27).
One may wish to make a more inferior incision in the axilla for
improved cosmesis. The more inferior incision, however, does
necessitate more extensive subcutaneous dissection. -
The skin is incised, then the fat, and
the deltopectoral interval is identified. It is typically easier to
identify the interval more proximally. There is typically a fatty
triangle at the most proximal aspect of the deltopectoral interval. The
deltopectoral interval is identified and then dissection is continued
distally. The cephalic vein is typically retracted laterally (Fig. 5-28).
The upper 1 cm of the pectoralis major insertion may be released to
improve visualization. The deltoid insertion does not need to be
detached either from the clavicle or on the humerus. One must take
great care when releasing the upper 1 cm of the pectoralis not to
injure the long head of the biceps. -
A Richardson type retractor can be placed
laterally under the deltoid. Next, the clavipectoral fascia which
overlies the conjoined tendon and subscapularis is carefully incised
lateral to the conjoined group. The conjoined group is then freed and
mobilized. A retractor can then be placed medially (Fig. 5-29).
Next, the axillary nerve is carefully identified and can be readily
identified by placing a finger along the inferior border of the
subscapularis. -
One carefully identifies the borders of
the subscapularis. The superior border of the subscapularis is marked
by the rotator interval. This is classically a “soft area” present just
superior to the subscapularis. This is typically widened in patients
with multi-directional instability or may be frankly open. The inferior
aspect of the subscapularis is defined by the “three sisters.” The
three sisters are the anterior humeral circumflex artery and the two
accompanying veins.-
Note: There is significant variability in regards to techniques for incising the subscapularis tendon including (Fig. 5-30):
-
Incising the subscapularis approximately
1 to 2 cm medial to its insertion off the lesser tuberosity and then
elevating this carefully off the underlying capsule. -
The second is popularized by Rockwood.
The lower one-third to one-quarter of the subscapularis may be left
intact. Detaching alone the upper portion of the subscapularis. -
Lastly, the subscapularis muscle may be split horizontally to expose the underlying capsule.
-
-
Once the underlying capsule is carefully
identified, tagging stitches are placed in the subscapularis, and the
muscle again is carefully swept off of the underlying capsule. There is
significant variability in management of the capsule in regard to
either a laterally or medially based split. This is based primarily on
the presence of a labral tear as well as surgeon preference (Fig. 5-31).
 |
|
FIGURE 5-27 Langer skin lines are outlined in the axillary skin crease.
|
P.120
 |
|
FIGURE 5-28 The cephalic vein is identified and retracted laterally.
|
 |
|
FIGURE 5-29 The deltoid is retracted laterally and the conjoint group is retracted medially.
|
P.121
 |
|
FIGURE 5-30 There are several ways to dissect the subscapularis from the underlying capsule including: (A) the entire subscapularis may be reflected off the capsule, (B) the lower 25% of the subscapularis may be left intact, and (C) the subscapularis may be split horizontally.
|
 |
|
FIGURE 5-31 A medial or laterally based T split may be performed. In this example, a medially based shift will be performed.
|
Pearls and Pitfalls
-
Careful mobilization of all tissue planes
from the deltopectoral interval to the release of the subscapularis off
of the capsule is critical to obtain adequate exposure especially when
performed through a small incision. -
One must carefully identify and protect
the axillary nerve throughout the course of this procedure. The “tug
test” is a reproducible way to confirm the exact location of the
axillary nerve.
P.122
RECOMMENDED READING
Cetik O, Uslu M, Acar HI, et al. Is there a safe area for the axillary nerve in the deltoid muscle? A cadaveric study. J Bone Joint Surg Am 2006;88(11):2395-2399.
Cleeman E, Brunelli M, Gothelf T, et al. Releases of subscapularis contracture: an anatomic and clinical study. J Shoulder Elbow Surg 2003;12(3):231-236.
Gill DR, Cofield RH, Rowland C. The anteromedial approach for shoulder arthroplasty: the importance of the anterior deltoid. J Shoulder Elbow Surg 2004;13(5):532-537.
Gray H. The Anatomy of the Human Body, 29th ed. Philadelphia: Lea & Febiger, 1975.
Henry AK. Extensile Exposure, 2nd ed. New York: Churchill-Livingstone, Inc., 1963.
Hollinshead WH. Anatomy for Surgeons: The Back and Limbs, 3rd ed. Philadelphia: Harper & Row, 1982.
Hoppenfeld S, deBoer P. Surgical Exposures in Orthopaedics: The Anatomical Approach, 1st ed. Philadelphia: JB Lippincott Co., 1984.
Reckling FW, Reckling JB, Mohr MC. Orthopedic Anatomy and Surgical Approaches. St. Louis: Mosby Year-book, 1990.
Thompson JE. Anatomical methods of approach in operations on the long bones of the extremities. Ann Surg 1918;68:309-329.
Tubiana R, McCullough CJ, Masquelet AC. An Atlas of Surgical Exposures of the Upper Extremity. London: Martin Dunitz Publisher, 1990.
Uz A, Apaydin N, Bozkurt M, et al. The anatomic branch pattern of the axillary nerve. J Shoulder Elbow Surg 2007;16(2):240-244 [Epub Nov 9 2006].
Zlotolow DA, Catalano LW 3rd, Barron OA, et al. Surgical exposures of the humerus. J Am Acad Orthop Surg 2006;14(13):754-765.