
Authors: Doyle, James R.
Title: Hand and Wrist, 1st Edition
Copyright ©2006 Lippincott Williams & Wilkins
> Table of Contents > Section III – Emergency Department > 12 – Tendon Injuries > 12.1 – Flexor Tendon
12.1
Flexor Tendon
The results of flexor tendon surgery have improved
significantly over the last 40 years, based on an improved
understanding of the anatomy and biology of the flexor tendon system,
improved sutures and suture techniques, and the development of
rehabilitation protocols that facilitated early recovery and improved
functional results. Currently accepted general principles of treatment
include primary repair of recent clean injuries in the operating room,
with repair of both flexor tendons using suture techniques at the
repair site that minimally distort the anatomy of the tendons and that
are strong enough to allow early protected movement. Additional factors
in a successful outcome relate to preservation of the critical portions
of the pulley system.
Pertinent Anatomy
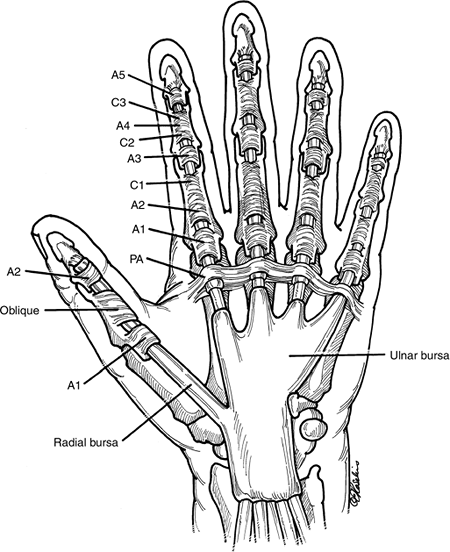
Figure 12.1-1 depicts the most common anatomical arrangement of the synovial sheaths and flexor tendon pulleys in the thumb and fingers.
Digital Flexor Sheath
The digital flexor tendon sheath is composed of synovial (membranous) and retinacular
(pulley) tissue components. It is a system that allows a tendon to
“turn a corner” and maximize the available tendon excursion to produce
a significant arc of flexion. Loss of this pulley system results in
“bowstringing” of the tendon and loss of flexion.
(pulley) tissue components. It is a system that allows a tendon to
“turn a corner” and maximize the available tendon excursion to produce
a significant arc of flexion. Loss of this pulley system results in
“bowstringing” of the tendon and loss of flexion.
Membranous Portion
The membranous portion is a synovial tube sealed at both
ends. The floor or dorsal aspect of this tunnel is composed of the
transverse metacarpal ligament, the palmar plates of the
metacarpophalangeal (MCP), proximal interphalangeal (PIP), and distal
interphalangeal (DIP) joints, and the palmar surfaces of the proximal
and middle phalanges. In the index, long, and ring fingers, the
membranous portion of the sheath begins at the neck of the metacarpals
and continues distally to end at the DIP joint. In most instances, the
small finger synovial sheath continues proximally to the wrist.
Visceral and parietal synovial layers are present, and a
prominent synovial pouch is present proximally that represents the
confluence of the visceral and parietal layers. A visceral layer
reflection or pouch is also noted between the two flexors at the neck
of the metacarpal, but is 4 to 5 mm distal to the more visible proximal
and superficial portions of the synovial sheath. The membranous or
synovial portions of the sheath are most noticeable in the spaces
between the pulleys, where they form plicae and pouches to accommodate
flexion and extension of the digits.
Retinacular Portion
The retinacular (pulley) portion is a series of
transverse (the palmar aponeurosis pulley), annular, and cruciform
fibrous tissue condensations, which begin in the distal palm and end at
the DIP joint.
transverse (the palmar aponeurosis pulley), annular, and cruciform
fibrous tissue condensations, which begin in the distal palm and end at
the DIP joint.
With the exception of the third annular pulley, the
pulleys are located between joints; this fact, along with some element
of compressibility, allows a large arc of flexion without impingement.
The finger pulley system consists of the palmar aponeurosis pulley,
five annular, and three cruciform pulleys. The second and fourth
annular pulleys are the most important to preserve or reconstruct in
flexor tendon surgery. In the thumb, two annular and one oblique pulley
are present, and it is the oblique pulley that is most important from a
functional perspective.
The reader is referred to the Suggested Reading list at
the end of this chapter for references that detail additional anatomic
features of the flexor tendon sheath and the biomechanical principles
of muscle/tendon excursion, moment arms, radians, work of flexion,
lubrication factors, tendon nutrition and healing.
the end of this chapter for references that detail additional anatomic
features of the flexor tendon sheath and the biomechanical principles
of muscle/tendon excursion, moment arms, radians, work of flexion,
lubrication factors, tendon nutrition and healing.
P.180
 |
|
Figure 12.1-1 Composite view of the synovial sheaths and pulleys system of the thumb and fingers (see text for details).
|
Vascular Supply of the Flexor Tendons
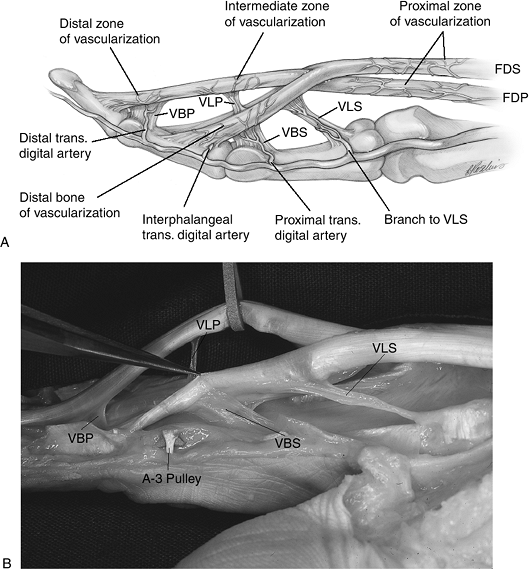
Sources of vascular supply to the flexor tendons are
from intrinsic longitudinal vessels that continue from the palm,
synovial attachments to the enclosed flexor tendons in the proximal
sheath, and specialized forms of mesotendon called the vincula, located
inside the sheath (Figure 12.1-2).
from intrinsic longitudinal vessels that continue from the palm,
synovial attachments to the enclosed flexor tendons in the proximal
sheath, and specialized forms of mesotendon called the vincula, located
inside the sheath (Figure 12.1-2).
Clinical Significance
Removal of the flexor digitorum superficialis (FDS) for
a tendon transfer is best performed proximal to or at the proximal edge
of Camper’s chiasma, since this will preserve the vinculum breve
superficialis (VBS) and vinculum longum profundus (VLP). This may have
the incidental side benefit of avoiding the potential for
hyperextension at the PIP joint, as well as preserving the blood supply
of the FDS and flexor digitorum profundus (FDP). See Figure 12.1-3. Core intratendinous sutures are ideally placed in the relatively avascular palmar
aspect of the profundus tendon, when practical. The comparative role of
synovial nutrition and the vascular supply in tendon healing will not
be debated here except to put into context the value of avoiding damage
to the vascularity of the tendons in the sheath.
Zones of Flexor Tendon Injury
Finger Zones
The naming of five zones of injury in the fingers has
aided in comparison of results, and to some extent is of prognostic
value. The zones are depicted in Figure 12.1-4.
aided in comparison of results, and to some extent is of prognostic
value. The zones are depicted in Figure 12.1-4.
-
Zone I is just beyond the insertion of the FDS to the insertion of the FDP. This zone is occupied only by the FDP.
-
Zone II is from the distal palmar crease
to the distal insertion of the FDS, and injuries in this zone more
likely than not involve both flexor tendons. -
Zone III begins just distal to the distal
edge of the transverse carpal ligament (at the origin of the lumbrical
muscles) and ends at the distal palmar crease. -
Zone IV is the region of the carpal tunnel.
-
Zone V is at the wrist and distal forearm.
Thumb Zones
The thumb zones of injury are depicted in Figure 12.1-4.
P.181
 |
|
Figure 12.1-2 A. Artist’s depiction of the blood supply of the finger flexor tendons. B.
Fresh cadaver dissection of the flexor tendons showing the vincula. VBP, vinculum breve profundus; VLP, vinculum longum profundus; VLS, vinculum longum superficialis; VBS, vinculum breve superficialis. |
Diagnosis
Physical Examination
The Finger Cascade
-
Many flexor tendon injuries may be diagnosed by noting the posture of the injured hand/digit, and comparing it to that in the opposite hand or adjacent digits.
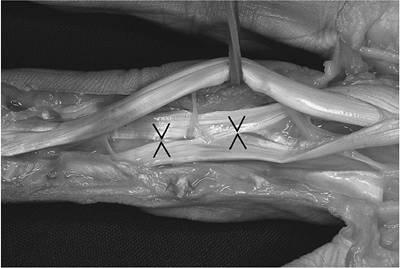 Figure 12.1-3 Fresh cadaver dissection showing Camper’s chiasma (opposing arrows) in the FDS tendon in the region of the PIP joint (see text for details).
 -
The normal posture of the fingers reveals a progressive flexion posture, or cascade, with the little finger being the most flexed, and the index being the least flexed.
-
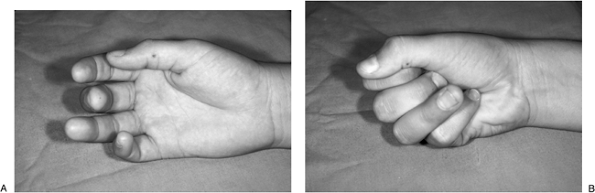
Figure 12.1-5
demonstrates the loss of the normal finger cascade in this young male
with a laceration to the medial side of the left ring finger.-
Findings at surgery confirmed complete laceration of the FDS and FDP in this zone II injury.
P.182![]() Figure 12.1-4 The zones of flexor tendon injury (see text for details).
Figure 12.1-4 The zones of flexor tendon injury (see text for details). -
-
Figure 12.1-6
demonstrates a more subtle loss of the normal finger cascade associated
with a rupture of the insertion of the FDP (zone I injury) in this
teenage flag ball player.-
There is a comparative lack of flexion in
the ring finger (loss of cascade) compared with the adjacent fingers,
and a lack of flexion at the DIP joint when making a fist. -
This is an avulsion of the insertion of the FDP of the ring finger.
-

Direct Testing of FDS and FDP
-
Figure 12.1-7 demonstrates the techniques used to demonstrate the function of the FDS and FDP.
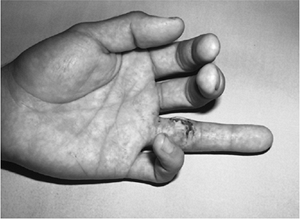 Figure 12.1-5
Note the loss of the normal finger cascade in this young male with a
laceration of the proximal phalanx. The preoperative diagnosis of
laceration of both flexor tendons was confirmed at surgery.![]() Figure 12.1-6 FDP tendon rupture in a flagball player. A. Note the loss of normal finger cascade and the increased extension posture of the right ring finger. B. Note the loss of flexion in the DIP joint while making a complete fist.
Figure 12.1-6 FDP tendon rupture in a flagball player. A. Note the loss of normal finger cascade and the increased extension posture of the right ring finger. B. Note the loss of flexion in the DIP joint while making a complete fist. -
Trapping the adjacent fingers in extension permits only the FDS to flex the PIP joint.
-
This maneuver works because the FDS is functionally characterized as four independent muscle bellies with four separate tendons.
-
The FDP is easily isolated by blocking motion at the PIP joint.
Treatment
-
Laceration of the flexor tendons represents a significant and serious injury.
-
Surgical repair is best performed by experienced surgeons who have suitable facilities and instruments available for repair.
-
Flexor tendon injuries are not considered to be true emergencies, and best results are obtained when such
P.183surgeries are performed in a timely fashion but on an elective basis.
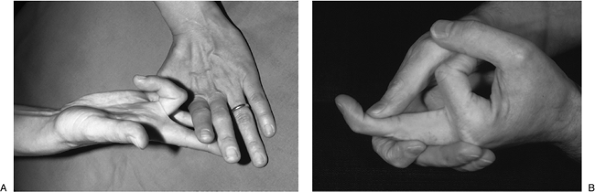 Figure 12.1-7 Testing for function of the FDS and FDP tendons. A. Holding the adjacent fingers in extension permits only the FDS to act on the PIP joint of this middle finger. B. Holding the PIP joint in extension permits isolation of the FDP tendon function.
 -
If both tendons are lacerated, both tendons are repaired.
-
Zone II injuries are the most likely to result in adhesions and loss of function.
-
The post-operative management of these injuries is very important, and should be considered a part of the surgical protocol.
Surgical Exposures
-
Most flexor tendon injuries are due to lacerations of the palmar surface of the digits or palm.
-
These lacerations are more often than not transverse in orientation.
-
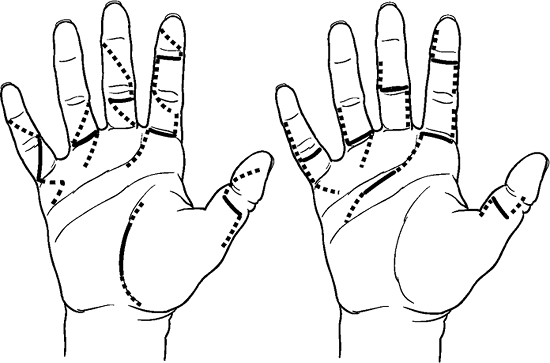
Figure 12.1-8
demonstrates how these traumatic incisions may be appropriately
extended to achieve surgical exposure and at the same time avoid a
pernicious scar that might produce a contracture. -
These elective extensions of the
transverse wounds are positioned to utilize the fact that midaxial
incisions do not contract and allow the elevation of a thick and
well-vascularized flap for exposure.-
The wounds may also be extended by using oblique limbs of extension that also meet the same needs.
-
Suture Materials
-
Tendon sutures have been fabricated from various materials, including stainless steel, nylon, polypropylene, and polyester.
-
Because of its ease of use, strength, and
minimal elasticity, 3-0 and 4-0 braided polyester sutures are commonly
used for flexor tendon repairs.
Suture Techniques
-
Many techniques have been developed for
reapproximation of the lacerated flexor tendons since Bunnell developed
his well-known tendon-grasping suture more than 50 years ago. -
Although there may not be an ideal suture
technique, there are some underlying principles in all suture
techniques: ease of suture placement, secure knots that will not slip
or stretch out, a smooth suture junction without gapping or bunching,
and sufficient strength to allow early supervised motion programs (see
the section on rehabilitation that follows). -
A suture technique developed by Strickland is depicted in Figure 12.1-9.
It begins as a two-strand, core-grasping technique supplemented by a
second-core suture and a running and locking epitendinous suture. -
The strength of a given suture repair is
nearly directly proportional to the number of strands of suture
material that cross the repair site, and to the size of the suture
material. -
A four-strand repair is stronger that a two-strand repair.
-
The addition of a peripheral epitendinous
suture to the core sutures has been found to increase the strength of
the repair site in a significant fashion. This helps prevent gap
formation that may lead to adhesions and failure to recover useful
motion in the digit. -
The epitendinous suture may also “tidy
up,” reconform, and “debulk” the repair site to permit easy passage of
the repair site through the critical pulleys.
Some Points of Intraoperative Technique
-
Atraumatic technique
is a useful descriptive term to note that careful meticulous dissection
and gentle handling of all tissues is very important in the management
of flexor tendon injuries. -
After extending the wound and opening the sheath at the anticipated repair site, it is necessary to retrieve the two tendon ends. The distal end is usually retrieved by flexing the digit.
-
The proximal end retracts due to the physiologic tension of the muscle, and if not retracted too far proximally by
P.184P.185intact vincula, may be grasped with fine tooth forceps and brought distally.
![]() Figure 12.1-8
Figure 12.1-8
Useful skin incisions for the extension of traumatic wounds associated
with flexor tendon injuries. The solid lines represent the traumatic
wound, and the dotted lines represent the safe extensions of these
wounds for exposure and repair.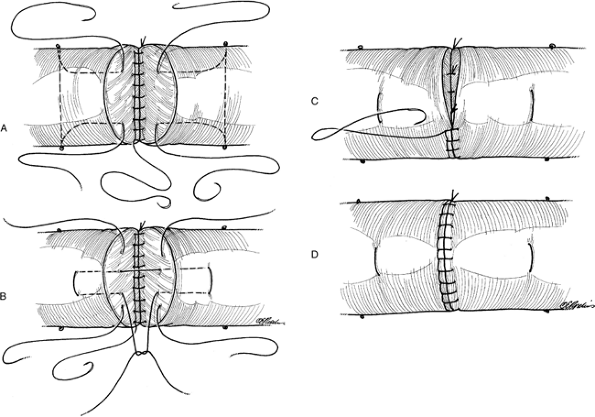 Figure 12.1-9 A useful four-strand, core-grasping suture developed by Strickland.
 -
Blind repeated probing up the proximal sheath with a grasping instrument is to be avoided.
If the proximal end cannot be easily grasped or “milked down” by
digital massage, then a small and moistened feeding tube catheter is
passed proximally (usually into the palm), and the retracted tendon is
sutured to the catheter at this level. The catheter is then brought
distally into the repair site, carrying with it the proximal tendon
stump. When the two stumps are adjacent, a 22-gauge hypodermic needle
is passed transversely through the sheath to impale and fix the
proximal tendon. -
A repair of the surgeon’s choice and experience is performed.
-
Indiscriminant excision of the membranous
or retinacular portions of the sheath is to be avoided, but portions of
the sheath may be incised or excised to promote placement of the
sutures. -
Repair of the incised sheath has been
advocated by some surgeons, but such repair should not compromise the
gliding movement of the repaired tendons in the sheath.
Rehabilitation
Rationale
-
Early passive motion is designed to
change an unfavorable scar to a favorable one by altering the biologic
process of collagen synthesis and degradation.-
Early passive motion by applying small
but frequent forces in opposite directions modifies and elongates
restrictive tendon adhesions.
-
-
Studies have shown that early motion
stress to repaired flexor tendons results in more rapid recovery of
tensile strength, less adhesions, better tendon excursion, and minimal
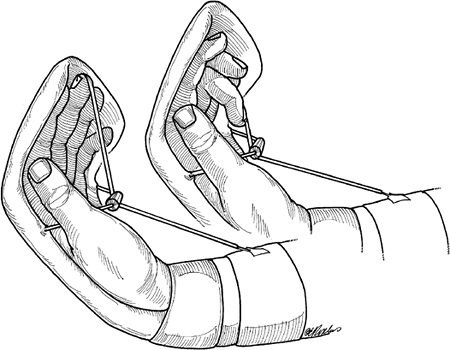
repair site deformation.![]() Figure 12.1-10 Active extension-elastic band flexion rehabilitation method for flexor tendon repairs.
Figure 12.1-10 Active extension-elastic band flexion rehabilitation method for flexor tendon repairs. -
Load at failure of mobilized tendons tested at 3 weeks was twice that of immobilized tendons, and the favorable differences continued at all intervals through 12 weeks.
-
Studies have revealed that passive MCP
joint movement results in little or no motion of the flexor tendons,
whereas DIP joint motion results in FDP excursion of 1 to 2 mm/10
degrees of joint flexion.-
Each 10 degrees of PIP flexion results in FDP and the FDS excursion of about 1.5 mm.
-
Some Practical Applications of These Principles
-
These and other studies and experience
have led to the progressive evolution and development of tendon
mobilization protocols and techniques that focus on promoting motion at
the PIP joint.
Active Extension-Elastic Band Flexion Method
-
The first technique is the most widely
used at this time. An orthotic device maintains the wrist and MCP
joints in slight flexion. -
An elastic band is attached to the
fingernail of the involved digit, this elastic band is passed beneath a
midpalmar bar and is anchored proximally on a portion of the orthotic
device. -
Figure 12.1-10 demonstrates an example of a currently used method.
Controlled Passive Motion Method
-
Those that use this method state that it
is less likely to result in flexion contracture when compared to the
elastic band traction method.
Controlled Active Motion Method
-
The introduction and use of 4-6 strand
tendon repair methods has made it possible to use this method with a
certain level of safety in terms of its major complication of tendon
rupture. -
In any splinting program, it is best to
maintain the interdigital joints in extension to minimize the
likelihood of flexion contractures. -
The specific details of these three
methods are beyond the scope of this text and will no doubt evolve and
change. Also, completely new methods may be developed in response to
the need for better final results.
Caveats
-
Utilization of any of these methods requires a team approach with a surgeon and therapist.
-
A cooperative patient is mandatory for success when using any of these methods.
Investigative Methods to Limit Peritendinous Adhesions
-
The methods of early excursion of the tendon repair site just reviewed are a form of extrinsic mechanical means to limit adhesions.
-
Investigative methods have included the insertion of polyvinyl alcohol shields (PVA) as an intrinsic mechanical shield to limit peritendinous adhesions following flexor tendon repair.
-
The material is semipermeable, allowing
passage of synovial fluid nutrients to the tendon repair site—but
unfortunately, the method was associated with an increased rupture rate
and a diminished strength of site repair.
-
-
Hyaluronic acid is a glycosaminoglycan normally found in the synovial fluid of the sheath.
-
Studies have suggested that hyaluronic
acid (HA) may limit the formation of adhesions following zone II flexor
tendon repair, and a recent study found that an HA membrane applied
circumferentially around the tendon repair site inhibited the formation
of restrictive adhesions. -
Histologic examination of the tendon repair sites did not demonstrate any interference with intrinsic tendon repair.
-
-
The application of 5-fluorouracil to the
repair site has been reported to result in diminished adhesions,
without an increased risk of rupture.
Late Reconstruction
Tenolysis
-
Not all tendon repairs result in useful recovery of function; lysis of adhesions may be required in selected cases.
-
The indications for this procedure are when the patient has reached a plateau in their progress from splinting and therapy.
-
The needs of the patients, as well as their age, occupation, and the digit involved, may aid in the decision-making process.
-
The wise surgeon will recognize that a
tenolysis operation may sometimes reveal a disrupted tendon and a
severely compromised bed that only a staged tendon reconstruction can
solve. Both the surgeon and patient must be prepared for this
eventuality. -
Surgeons vary in their opinion regarding
the timing of tenolysis. Most would wait several months after primary
repair or tendon grafting before considering this option.
Technique
-
Active participation of the patient is
critical to the success of the operation and local anesthesia with
intravenous sedation as needed is used. -
A generous zigzag incision is laid out from the fingertip to the proximal palm, and is used as needed.
-
All adhesions are excised, and the critical portions of the pulley system are preserved.
-
-
A staged tendon reconstruction should be considered when an adequate pulley system cannot be preserved.
-
During the procedure, the active pull-through of the tendon is noted by having the patient actively flex the digit.
-
The procedure ends when an adequate level of flexion is achieved.
-
-
Aftercare includes a splint that permits immediate and continued flexion of the digit.
-
In selected patients, an indwelling
catheter may be left in place for 4 to 5 days for the instillation of
small amounts of local anesthetic during exercise periods. -
Any concomitant surgical procedures, such as capsulotomy, increase the risk for a poor result.
Two-Stage Tendon Reconstruction
Indications and Contraindications
-
Primary tendon repairs that have failed
after repair and tenolysis are associated with joint contracture, have
a known loss of critical pulleys, and, in patients in whom conventional
tendon grafting is likely to fail, are candidates for two-stage tendon
reconstruction. -
The insertion of a silastic Hunter-tendon
prosthesis permits the formation of a scar-free bed and sheath for
subsequent insertion of a free tendon graft. -
Contraindications include those digits
with marginal circulation and sensibility, and patients unwilling or
unable to engage in a prolonged, often tedious, and difficult
rehabilitation process.
First Stage
-
The first stage consists of wide exposure of the flexor sheath and pulley system through a zigzag incision.
-
All useful portions of the pulley system
are preserved, the flexor tendons excised, and a 1 cm stump of
profundus tendon is left distally.P.187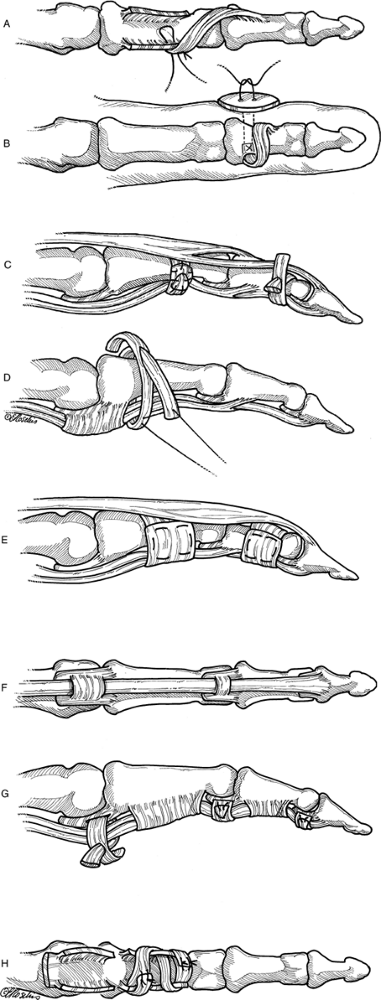 Figure 12.1-11 Methods of digital pulley reconstruction. A, B. Hemi-FDS to pulley remnant and to bone. C, D. Pulleys formed by single loop or loop and a half around phalanges, using tendon remnants of free tendon grafts. E. Pulley formed by using extensor retinaculum. F, G. Pulleys formed in palmar plate (Karev pulley) and using free graft tunneled through palmar plate. H. Pulley formed by graft interweave through remnants of tendon.
 -
The excised tendon material is kept moist for possible use as material to reconstruct pulleys.
-
If available, one or two slips of the superficialis are left attached to use in pulley reconstruction.
-
If any joint contractures are present and
not corrected by excision of the flexor tendons, then joint release is
performed by a palmar plate release and a collateral ligament incision. -
Dissection in the palm is carried to the level of the lumbrical origin.
-
A second incision is made at the flexor aspect of the wrist to accept the proximal end of the silastic Hunter-tendon prosthesis.
-
A suitably sized prosthesis (3 to 6 mm in width) is inserted from the fingertip to the wrist.
-
The end of the Hunter tendon is sutured beneath the distal stump of the profundus.
-
Pulleys are reconstructed to obtain a
minimum of two pulleys (in the A2 and A4 positions) but more than two
pulleys are desirable if possible.-
Some methods of pulley reconstruction are illustrated in Figure 12.1-11.
-
-
Prior to closure the tendon is pulled at its proximal end to note that it glides freely and does not bowstring.
-
The tendon should also glide freely when the digit is extended. It should not buckle or bulge.
-
-
Aftercare includes a bulky dressing, followed by a supervised passive exercise program.
Second Stage
-
This stage is performed when satisfactory passive motion has been obtained. It usually takes 3 or more months.
-
A suitable tendon graft (usually the
plantaris, or, if not available, one of the long toe extensors) is
attached to the proximal end of the Hunter tendon. The distal end of
the Hunter tendon is detached and pulled distally to atraumatically
insert the tendon graft into the new flexor sheath. -
The distal anastomosis (first) is made
into the stump of the profundus at the DIP joint, and the proximal
anastomosis (at the wrist) made by joining the graft to a suitable
donor—such as the profundus—to one of the central digits. An interweave
technique is used to place the graft in the substance of the donor
motor. -
Tension is adjusted prior to insertion of the proximal sutures to match the normal finger cascade.
-
Appropriate tension may be verified by noting extension of the operated digit when the wrist is flexed and flexion of the digit when the wrist is extended.
-
-
Rehabilitation following the second stage
reconstruction is via an active extension-elastic band flexion method,
as previously described. -
Figure 12.1-12 demonstrates a two-stage Hunter tendon reconstruction sequence.
P.188
Special Situations
Partial Tendon Lacerations
-
Although adequate tendon strength and
function may be maintained after partial tendon lacerations, some
partial lacerations may result in entrapment and triggering of the
tendon against an adjacent pulley. -
Current recommendations are for repair of
lacerations greater than 50% of the tendon, and debridement of the
tendon edges in those less than 50%. -
Under no circumstances should the tendon
ends be excised or “squared-up” to make the repair technically easier
or more “tidy.” Any shortening of a flexor tendon may result in the
loss of extension of the digit.
P.189
 |
|
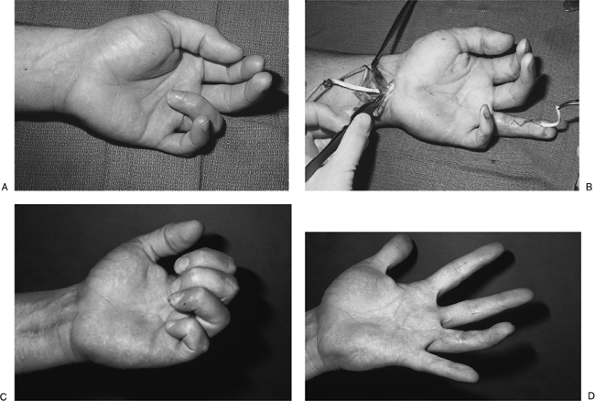
Figure 12.1-12
Two-stage Hunter tendon reconstruction for a fixed-flexion contracture of the ring finger following a failed flexor tendon repair. A. Note the fixed flexion contracture of the ring finger; passive extension was not possible. B. Insertion of a free tendon graft using the plantaris tendon. The plantaris tendon graft (left) is being drawn into the new flexor sheath by the Hunter tendon (right), following joint release, pulley reconstruction, and insertion of a Hunter tendon 4 months prior. C, D. Note the active flexion and nearly complete extension of the reconstructed finger. |
Profundus Tendon Avulsion
-
This injury is likely to occur in certain
sports such as flag or regular football, in which forceful grasping is
used to grab a flag or jersey of an opponent. -
The FDP of the ring finger is most often injured, and may be misdiagnosed by coaches and others as a “sprained finger.” Radiographs are often negative.
-
Figure 12.1-6 shows a classic clinical case that was diagnosed and treated a few days after injury. Function was restored.
-
The avulsion may occur with a small or
substantial bone fragment. The prognosis is based on the level to which
the FDP retracts, the remaining blood supply of the tendon, the length
of time between the injury and treatment, and the presence and size of
the bone fragment. -
There are three types.
-
Type I is characterized by retraction of the profundus tendon into the palm.
-
If seen early, it may be threaded back down the flexor sheath and reattached, followed by routine mobilization.
-
If not, the treatment choices include
leaving it alone (or trimming the tendon stump in the palm if it is
symptomatic and interferes with function), performing an arthrodesis of
the DIP joint, or performing a tendon graft. -
The latter choice carries with it the risk of compromise to the intact FDS, and may not always be a suitable alternative.
-
-
Type II is
characterized by retraction of the tendon to the region of the PIP
joint, and a small bone chip may be present in the distal tendon stump.-
These injuries may be reattached as late as 6 weeks after the injury, with satisfactory results.
-
-
Type III
injuries present with a large bone fragment that becomes trapped at the
distal edge of the A4 pulley, and are comparatively easy to reattach
due to the lack of significant retraction, as well as a sizeable bone
fragment.
-
-
The key to a successful outcome in this injury is early diagnosis and treatment.