
shoulder pain and dysfunction. This condition is typically caused by
mechanical encroachment of the bursal surface of the rotator cuff
resulting from a narrowed coracoacromial arch. This disorder has been
classified into three progressive stages based on the degree of rotator
cuff disease: inflammation and edema, fibrosis and tendinitis, and
finally partial- or full-thickness tears. Arthroscopic acromioplasty
has become the procedure of choice for the treatment of impingement
syndrome in those cases refractory to nonoperative care. This procedure
allows for a thorough inspection of the glenohumeral joint; complete
decompression of the subacromial space; and early, aggressive
rehabilitation. When a tear is present it can be combined with a
mini-open rotator cuff repair through a deltoid-splitting approach.
This approach allows for adequate tendon mobilization and secure
repair, while preserving the anterior deltoid attachment.
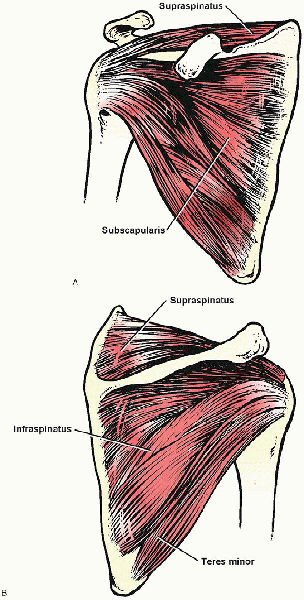
These insert onto the lesser and greater tuberosities as a conjoined
tendon. The interval between the supraspinatus and subscapularis is
occupied by the biceps tendon and coracohumeral ligament. The latter
structure functions as a suspensory ligament for the humeral head and
may require release during mobilization of a rotator cuff tear. The
biceps tendon is an intraarticular, intrasynovial structure, which
originates on the supraglenoid tubercle and is intimately related to
the rotator cuff. It exits the joint through the rotator interval
before entering the intertubercular groove.
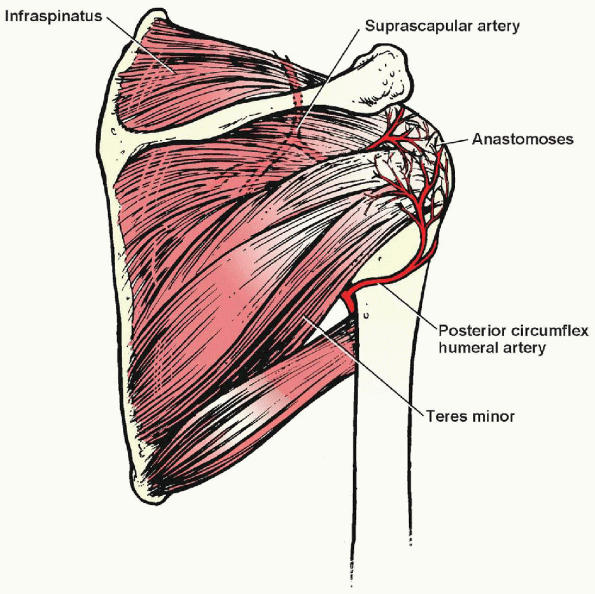
cuff and biceps tendon arises from branches of the axillary artery,
with the most important contribution coming from the suprascapular and
anterior and posterior humeral circumflex vessels (Fig. 2-2).
An anastomotic area known as the “critical zone” is found in the region
of the supraspinatus tendon just proximal to its insertion. It is in
this region that most rotator cuff tears occur.
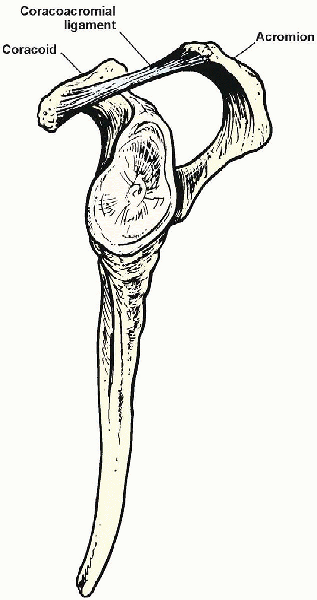
The acromion forms the osseous roof of the arch. The coracoacromial
ligament, which extends from the lateral edge of the coracoid and
inserts onto the undersurface of the acromion, forms the anterior
extent of the arch. The subacromial bursa is a filmy synovium-lined sac
that separates the rotator cuff tendons from the overlying
coracoacromial arch and thus serves to enhance the biomechanics of the
shoulder by allowing for relatively frictionless motion. Recent studies
suggest that acromial morphology may be related to rotator cuff
disease. Individuals with a downward sloping or hooked acromion may be
more likely to develop subacromial impingement and rotator cuff tears.
These studies, however, are based primarily on cadaveric specimens and
the impact of acromion slope and shape on cuff degeneration remains
unclear.
compression of the rotator cuff against the undersurface of the
anterior one third of the acromion, the coracoacromial ligament, and,
in some instances, the inferior aspect of the acromioclavicular joint.
Three progressive stages of subacromial impingement have been
described: stage I, edema and hemorrhage in patients younger than 25
years; stage II, fibrosis and tendinitis in patients 25 to 40 years
old; stage III, osteophytes and tendon ruptures typically in patients
older than 40 years.
been described. This refers to impingement or injury of the rotator
cuff by factors other than a narrowed or compromised coracoacromial
arch. Such pathology includes glenohumeral instability, neurologic
injury such as axillary or suprascapular nerve palsy, overuse or
fatigue of the scapular stabilizers, eccentric overload of the rotator
cuff tendons, or acute trauma to the rotator cuff. Successful treatment
of secondary impingement depends on recognition and correction of the
underlying cause.
activities, stiffness, and weakness. Night pain, particularly when
rolling onto the affected side is commonly found in patients with
rotator cuff disease. From a functional standpoint patients often
report having difficulty with those activities that require reaching
overhead or behind the back. Women for example often describe an
inability to fasten their brassiere. Physical examination findings may
include tenderness along the anterior acromion or supraspinatus
insertion, a painful arc of shoulder motion, and pain with provocative
impingement maneuvers (Fig. 2-4). A
selective lidocaine injection into the subacromial space followed by
reassessment of the patient’s response to these impingement maneuvers
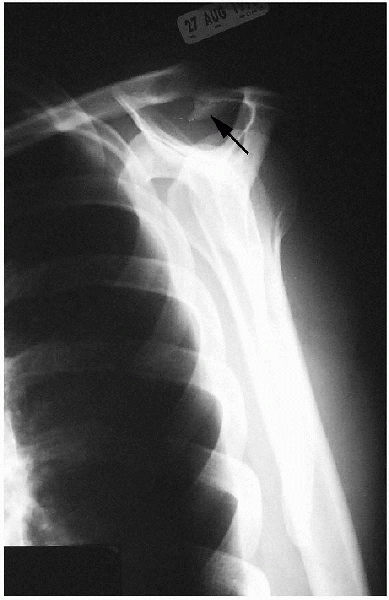
provides valuable diagnostic information. A standard radiographic assessment includes anteroposterior, axillary, supraspinatus outlet (Fig. 2-5),
and acromioclavicular joint views. The presence of a rotator cuff tear
is confirmed by magnetic resonance imaging or arthrography.
 |
|
FIGURE 2-1. The rotator cuff is composed of the supraspinatus, infraspinatus, teres minor, and subscapularis muscles. A: Anterior view. B: Posterior view.
|
 |
|
FIGURE 2-2.
Arteries of the shoulder muscles. The “critical zone” is in the vascular anastomotic area just proximal to the insertion of the supraspinatus. |
 |
|
FIGURE 2-3. Coracoacromial arch.
|
 |
|
FIGURE 2-4. A:
The classic impingement sign occurs as the shoulder is placed in the position of maximum forward elevation, reproducing the patient’s pain. B: Impingement of the greater tuberosity on the coracoacromial ligament occurs when the shoulder is forward-flexed to 90 degrees and internally rotated, reproducing the patient’s pain. |
Nonoperative treatment involves rest from those activities that
exacerbate the symptoms, stretching and strengthening exercises,
nonsteroidal antiinflammatory medications, and the judicious use of
cortisone injections. Indications for surgery include chronic stage II
impingement and acute or chronic, symptomatic full-thickness or large
partial-thickness (>50%) tears. The mini-open deltoid-splitting
approach can be used successfully to treat most tears, regardless of
size provided that adequate tendon mobilization can be achieved.
 |
|
FIGURE 2-5. A supraspinatus outlet view demonstrating large subacromial spur (arrow).
|
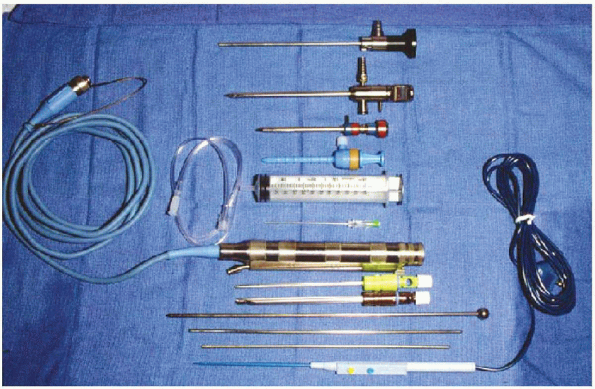
-
Arthroscopic video camera/monitor
-
4.5-mm, 30-degree angled arthroscope/sheath/trocar
-
Arthroscopic instrument cannulas of various sizes
-
Wissinger rod and switching sticks
-
Motorized arthroscopic shaver system/shaver and burr blades
-
Arthroscopic electrocautery or radiofrequency system
-
Arthroscopic infusion pump
-
Several 3-L bags of normal saline with 1 to 3 ampules of epinephrine per bag
-
Angled/offset awls
-
Suture anchors
-
Self-retaining retractor
-
No. 2 nonabsorbable braided sutures
-
Shoulder traction system with weights and bean bag or beach chair table attachment
or a combination of general and regional anesthesia. The advantages of
regional anesthesia include better postoperative pain control, the
ability to immediately begin range of motion exercises, and the
tendency for greater patient acceptance. Ideally,
shoulder arthroscopy should be performed under controlled hypotensive
anesthesia. The systolic blood pressure should be kept less than 100 mm
Hg whenever possible to control bleeding. This is especially critical
during the subacromial decompression portion of the procedure when
visualization can be compromised when bleeding is encountered.
 |
|
FIGURE 2-6. Instruments (from top to bottom):
4.5-mm 30-degree angled arthroscope, arthroscope sheath/trocar, arthroscopic cannulas, 60-cc syringe and tubing, spinal needle, motorized arthroscopic shaver system, 4.5-mm shaver, 5.0-mm acromionizer, Wissinger rod and switching sticks, and electrofrequency device. |
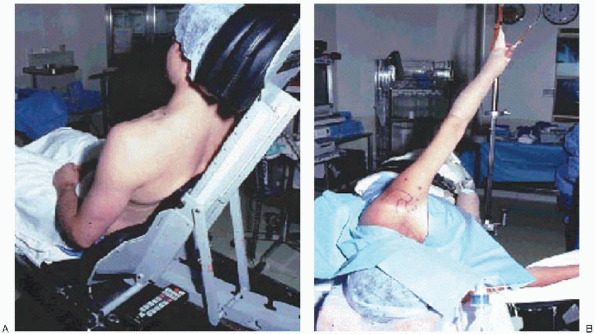
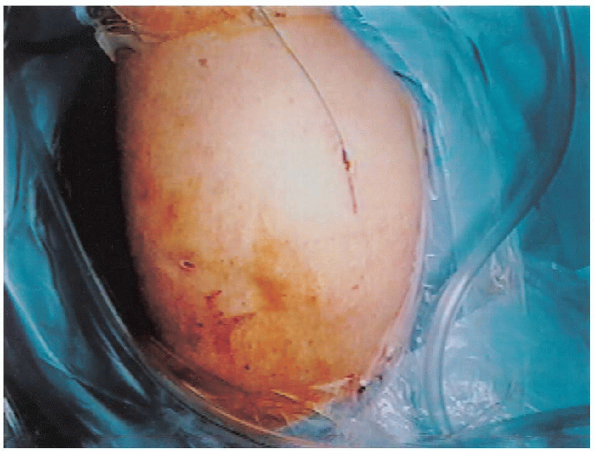
Advantages of the beach chair position are relative ease of patient
positioning, normal anatomic orientation of the shoulder, the ability
to manipulate the arm during the procedure, and a lower risk of
neuropraxia that is associated with excessive traction used with the
lateral decubitus position. Many surgeons, however, prefer the lateral
decubitus position, because it is more familiar to them and allows for
distraction, which facilitates work in the subacromial space. With the patient in the lateral
decubitus position, careful attention must be paid
to protecting the dependant bony prominences as well as the brachial
plexus, ulnar, and peroneal nerves with appropriate padding.
 |
|
FIGURE 2-7. The arthroscopic procedure may be performed in the beach chair (A) or lateral decubitus (B) position.
|
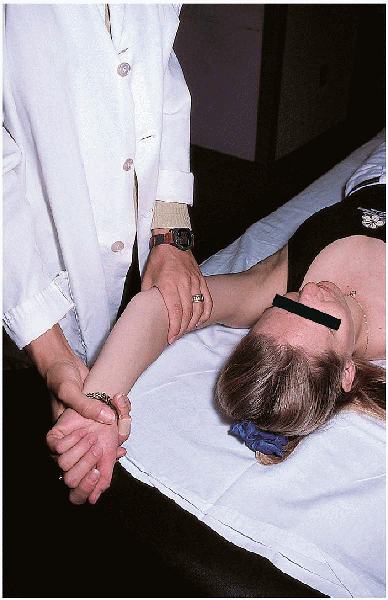
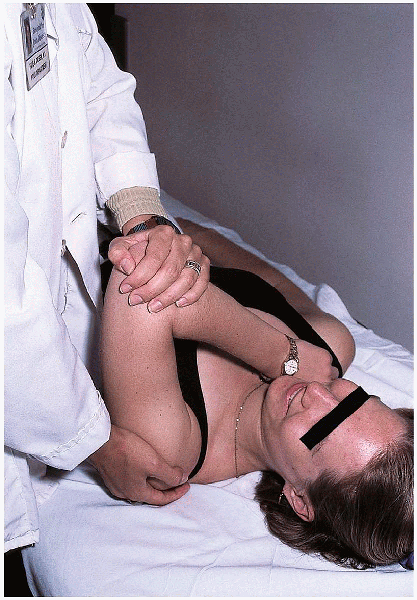
Range of motion in all planes is assessed first. Stability is then
tested in the anterior, posterior, and inferior directions. If a
manipulation under anesthesia is required to address any preoperative
stiffness, this should be performed in a controlled, systematic
fashion, always maintaining a short lever arm by grasping the humerus
close to the axilla to avoid iatrogenic fracture. The shoulder is then
gently manipulated in a slow, gradual fashion assessing for audible,
and/or palpable lysis of adhesions. Manipulation is performed in all
planes—elevation, abduction, adduction, internal, and external
rotation—with the goal of achieving range of motion that is symmetrical
with the contralateral side.
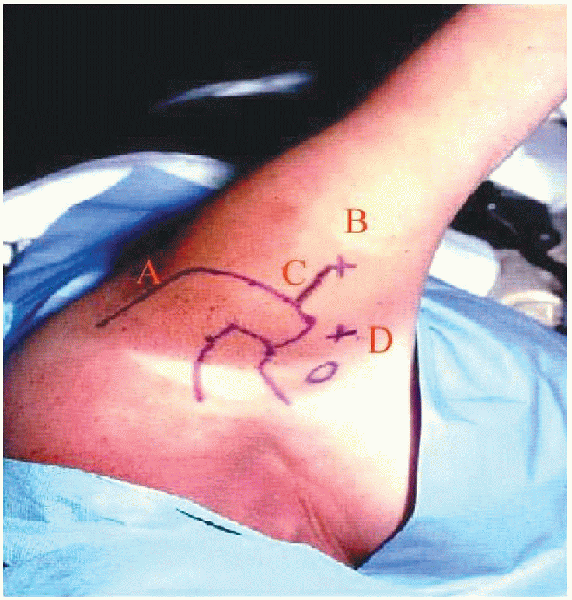
skin incision are carefully identified before beginning the procedure,
because this becomes difficult once fluid extravasation occurs (Fig. 2-9).
Three basic arthroscopic portals are used for this procedure. The
posterior portal is located approximately 2 cm inferior and 1 cm medial
to the posterolateral corner of the acromion. This portal allows
adequate visualization of most of the glenohumeral joint and
facilitates placement of other portals. When establishing this portal,
one hand is placed on top of the shoulder with the thumb palpating the
“soft spot.” The index finger of that same hand is used to palpate the
coracoid process. Using a number 11 scalpel blade, a puncture is made
through the skin only. The arthroscopic sheath and blunt tipped trocar
are then passed through the posterior deltoid and directed toward the
coracoid process. The tip of the trocar is then used to palpate the
“step-off” between the posterior glenoid rim and capsule. The sheath
and trocar are then advanced between the humeral head and glenoid
through the capsule. Precise placement of this
portal is critical because if it is too medial or inferior the
suprascapular and axillary nerves, respectively, are at risk for injury.
 |
|
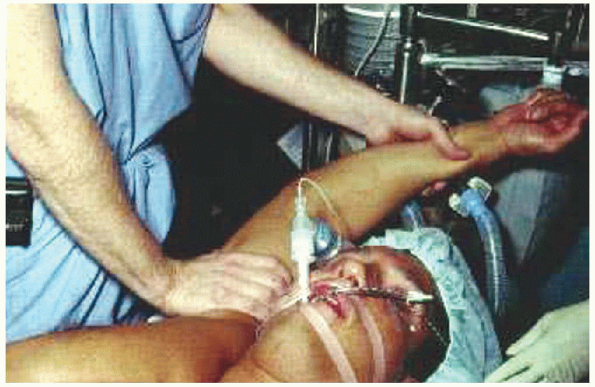
FIGURE 2-8. Examination under anesthesia.
|
 |
|
FIGURE 2-9. Bony landmarks, portal placement, and planned incision. A: Posterior portal. B: Lateral portal. C: Mini-open incision. D: Anterosuperior portal.
|
instrumentation. It is also used for better visualization of the
posterior and anteroinferior portions of the joint when this is
necessary. It is located approximately 1 cm inferior and medial to the
anterolateral corner of the acromion, lateral to the coracoid process. When
a distal clavicle excision is planned, it is helpful to place this
portal more medial in line with the acromioclavicular joint. The
portal can be created either with an “inside-out” technique using a
Wissinger rod or with an “outside-in” technique in which an 18-gauge
spinal needle is used to confirm portal placement and direction.
glenohumeral inspection can also be used for initial visualization of
the subacromial space. The arthroscopic sheath and trocar are simply
redirected beneath the acromion. A lateral portal located 2 to 3 cm
distal and parallel to the anterior margin of the acromion is used
initially for instrumentation and then for visualization because it
provides an “outlet” view of the subacromial space. Excessive
distal placement of this portal risks injury to the axillary nerve
which lies approximately 5 cm distal to the acromion.
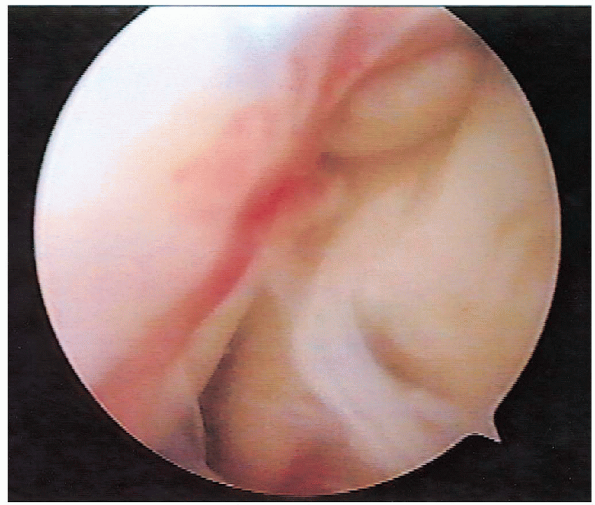
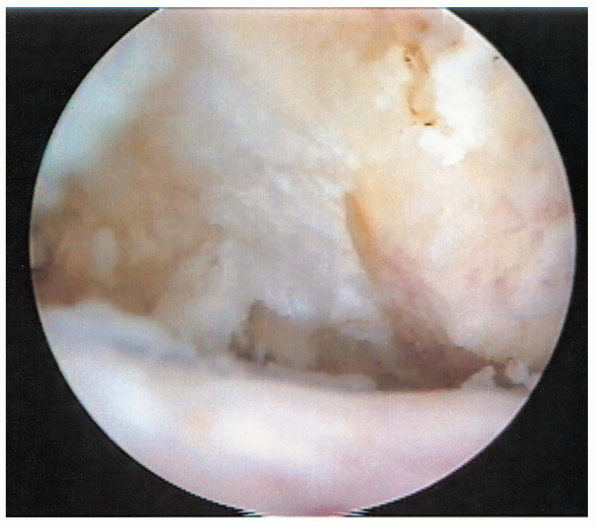
procedure begins with a thorough, systematic arthroscopic evaluation of
the glenohumeral joint. The articular surface of the rotator cuff is
carefully inspected and partialor full-thickness tears are identified (Fig. 2-10). A
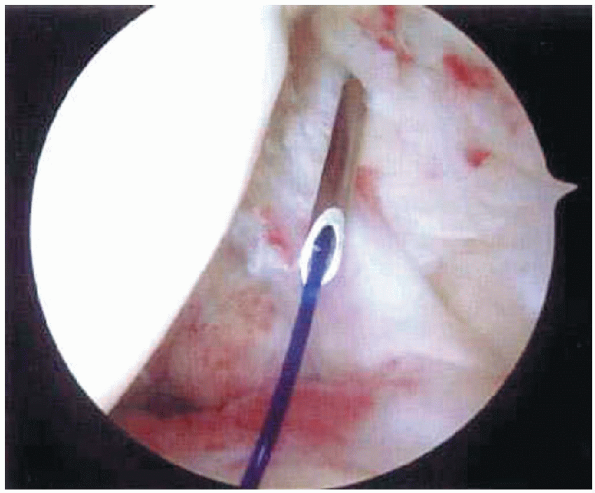
suture marker can be used to better assess the extent of a tear. A
monofilament suture is placed through a spinal needle passed
percutaneously across the area in question (Fig. 2-11).
The end of the suture is then brought out through the anterosuperior
portal using an arthroscopic grasping device. The suture is
subsequently identified on the bursal surface of the rotator cuff and
the questionable region is closely inspected (Fig. 2-12).

associated intraarticular pathology is addressed, attention is directed
toward the subacromial space. The angle of traction is adjusted so as
to maximize the acromiohumeral interval. Typically, 10 lb of traction
is sufficient. The arthroscopic sheath and trocar are directed beneath
the acromion and swept laterally to clear bursal tissue and lyse
adhesions. To prevent excessive bleeding, the fat pad located medially beneath the acromioclavicular joint should be avoided.
portal is created. This portal is typically placed 2 to 3 cm distal and
parallel to the anterior margin of the acromion (Fig. 2-9).
Placement of this portal slightly more posterior may allow for better
access to larger size tears. A self-sealing arthroscopic cannula is
used through this portal and a motorized shaver or radiofrequency soft
tissue ablation device is introduced to perform a partial bursectomy
and to remove periosteum from the undersurface of the acromion.
 |
|
FIGURE 2-10.
Arthroscopic view of the rotator cuff tear. This tear is located just posterior to the biceps tendon at the insertion of the supraspinatus. |
 |
|
FIGURE 2-11.
Suture marker technique. A monofilament suture is passed through spinal needle placed through area of suspected rotator cuff tear. The end of the suture is then brought out through the anterior portal. The suture is subsequently identified on the bursal surface of the rotator cuff. |
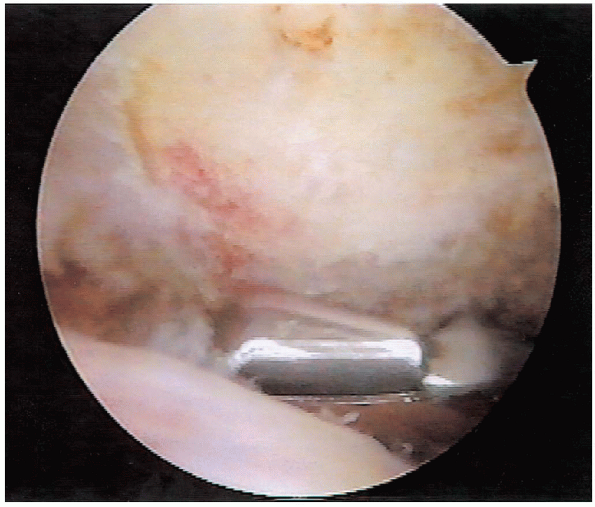
identified along with the coracoacromial ligament. The ligament is then
released from medial to lateral using either an electrocautery or
radiofrequency device (Fig. 2-13). The ligament
is released from the undersurface of the acromion until the subdeltoid
fascia is seen, avoiding injury to the overlying muscle. If the
acromial branch of the thoracoacromial artery, which is located along
the superomedial aspect of the coracoacromial ligament, is encountered,
it should be cauterized to avoid excessive bleeding.
 |
|
FIGURE 2-12. Rotator cuff tear with the PDS suture marker as viewed arthroscopically on the bursal side of the tear.
|
 |
|
FIGURE 2-13. Release of the coracoacromial ligament using a radiofrequency device.
|
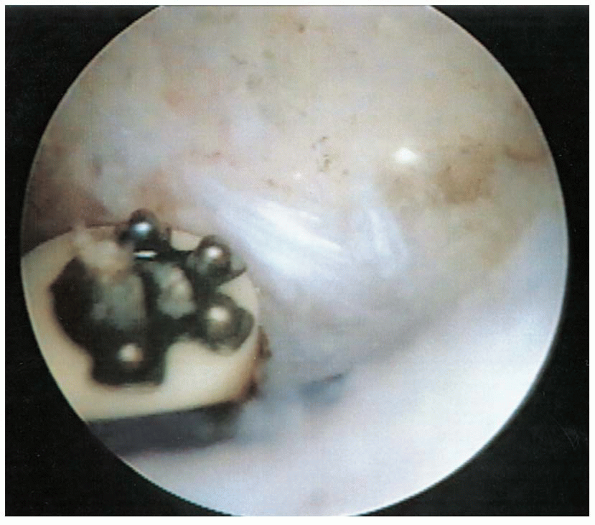
acromioplasty is then performed using an arthroscopic burr. The
anterior inferior acromion is approached first. While viewing from the
posterior portal, the burr is used to remove 5 to 8 mm of the inferior
surface of the acromion, beginning at the anterolateral corner and
proceeding medially. In addition the acromial osteophyte projecting
anterior to the leading edge of the clavicle is removed (Fig. 2-14).
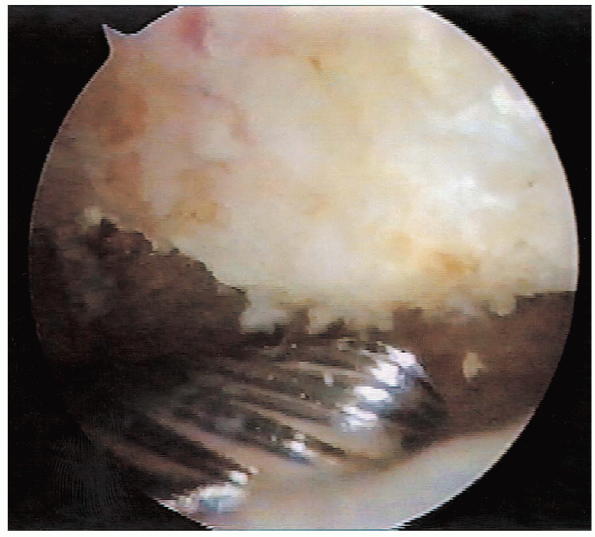
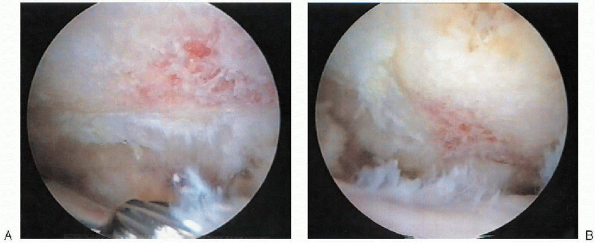
arthroscope and burr are then interchanged to perform the posterior
acromion resection. While viewing from the lateral portal, the
resection of the anterior spur (Fig. 2-15) and the thickness and shape of the acromial arch are assessed. It is important to place the burr just underneath and parallel to the undersurface of the acromion.
The spine of the scapula is then used as a cutting block, as the burr
is used to plane the undersurface of the acromion. Beginning at the low
point of the acromion posteriorly, the burr is swept from medial to
lateral proceeding to the anterior resection (Fig. 2-16).
This technique allows for the reproducible creation of a smooth, flat
acromion. The final resection should be assessed by viewing from both
the lateral and posterior portals. Final smoothing can be performed
with an arthroscopic rasp if desired. The final resection should be
checked from the posterior and lateral portals (Fig. 2-17).
 |
|
FIGURE 2-14.
Anterior acromion resection. While viewing from the posterior portal, the burr is used to resect the anteroinferior aspect of the acromion. |
 |
|
FIGURE 2-15.
Appearance after the anterior acromial spur is resected as viewed from the lateral portal before using the “cutting block technique” to smooth off the posterior acromion. |
symptomatic acromioclavicular joint arthritis and inferior projecting
osteophytes that contribute to impingement. Resecting the inferior
capsule exposes the acromioclavicular joint. The burr is then used to
resect osteophytes emanating from the distal clavicle and medial
acromion. The distal 7 to 10 mm of distal clavicle can then be resected
if clinically indicated. This is best accomplished with the arthroscope
laterally and the burr anterior through an ancillary portal created in
line with the acromioclavicular joint.
 |
|
FIGURE 2-16.
Posterior acromion resection. While viewing from the lateral portal, the burr is used to plane the undersurface of the acromion, using the spine of the scapula as a cutting block. |
 |
|
FIGURE 2-17. Final resection viewed from (A) posterior and (B) lateral portals.
|
rotator cuff tear is inspected. Tear size, morphology, and mobility is
assessed through both the posterior and anterior portals. A traction
suture or arthroscopic grasper can be used to assess the mobility of
the tear (Fig. 2-18). If desired, a soft tissue elevator can be used to release articular and bursalsided adhesions.
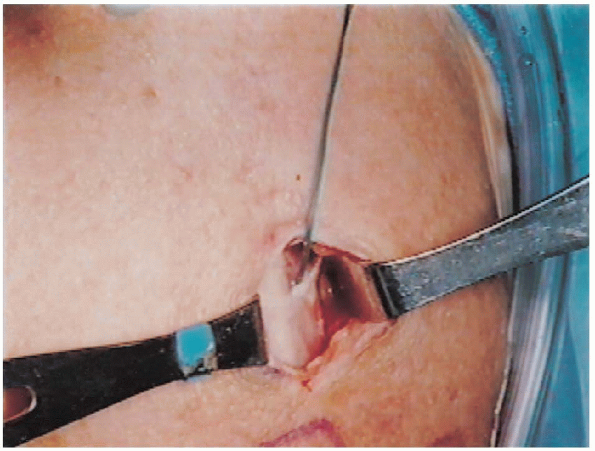
traction and a 4 cm incision is made from the anterolateral corner of
the acromion and extended distally, incorporating the lateral
subacromial portal (Fig. 2-19). Generous
subcutaneous flaps are raised in all directions and the deltoid is
split from the acromion proximally and extended distally for the length
of the incision (Fig. 2-20). A
suture can be placed at the distal aspect of the deltoid split to
prevent inadvertent extension and possible injury to the axillary nerve.
Subdeltoid adhesions are released manually. There should be no
detachment of the deltoid from the acromion with this muscle-splitting
approach. The adequacy of the subacromial decompression can be assessed
by palpating the undersurface of the acromion. A rasp may be used to
address any rough areas or remaining osteophytes if necessary.
 |
|
FIGURE 2-18. Arthroscopic assessment of tear mobility using a traction suture.
|
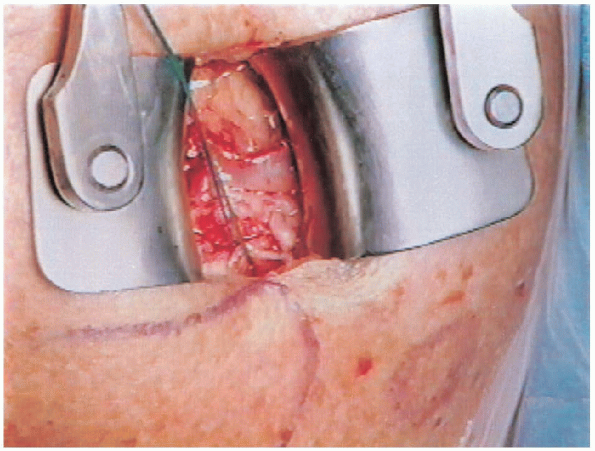
self-retaining retractor is now placed for retraction of the deltoid.
Additional bursectomy is performed as needed to completely expose the
rotator cuff tear (Fig. 2-21). Soft
tissue elevators and dissecting scissors are then used to release any remaining adhesions that may restrict cuff mobility. If
additional mobilization is required this may be accomplished through
releasing the coracohumeral ligament; dissecting the articular side of
the cuff from the superior margin of the glenoid; or, in cases of very
large, retracted tears, performing a rotator interval release and
advancement.
 |
|
FIGURE 2-19. Skin incision for the mini-open approach incorporates the lateral subacromial portal.
|
 |
|
FIGURE 2-20.
Deltoid split is made after raising subcutaneous flaps. Care is taken not to extend distally more than 5 cm from the edge of the acromion. |
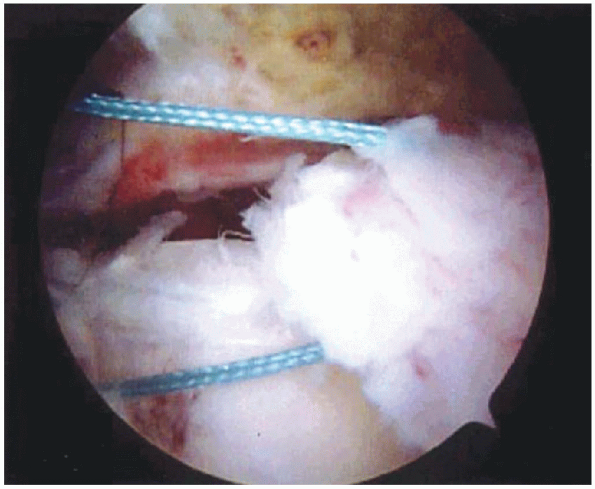
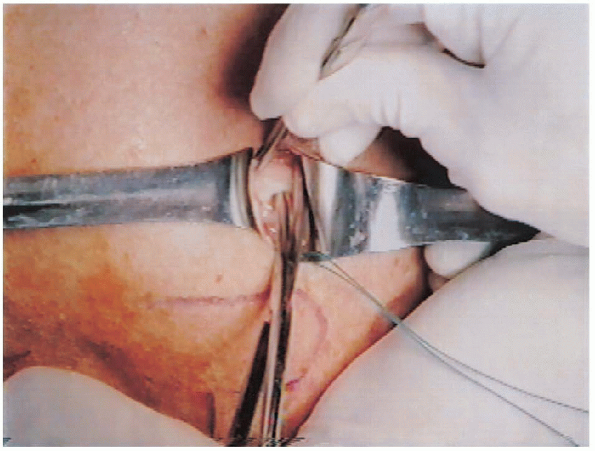
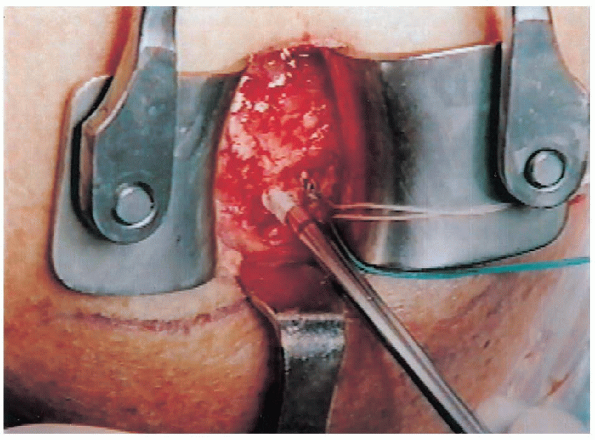
The tendon is then repaired to bone using no. 2 nonabsorbable sutures
either through transosseous tunnels or with suture anchors (Fig. 2-23).
In cases of poor bone quality, transosseous tunnels are preferred over
suture anchors. Several commercially available angled awls and suture
passing devices are available to assist in the transosseous tunnel
technique. Often, however, the sutures can be passed directly through
the bone bed and out through the lateral cortex using a trocar-tipped
needle.
 |
|
FIGURE 2-21. Bursectomy is performed to expose the rotator cuff tear.
|
 |
|
FIGURE 2-22.
Exposure of rotator cuff tear. Traction sutures are placed through the torn edge of the tear and a rongeur is used to create a bleeding bone bed adjacent to the articular surface of the humeral head. |
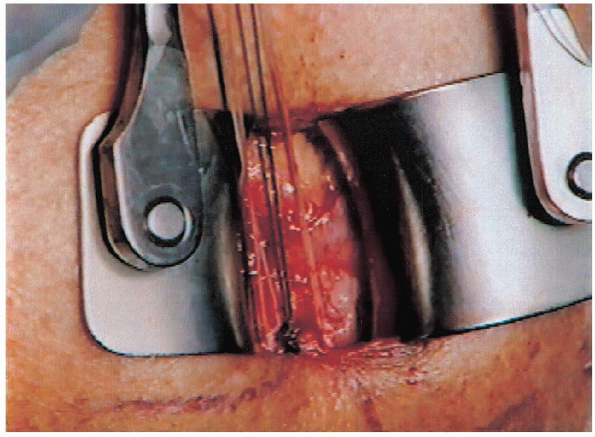
are evenly spaced through the torn edge of the rotator cuff in a
simple, horizontal mattress, or modified Mason-Allen configuration. For
U-shaped tears, side-toside sutures are placed beginning at the apex
proceeding laterally. The converged margins are then repaired to bone. If
suture anchors are used, these are placed adjacent to the articular
surface into the prepared bone bed at a 45-degree angle with respect to
the pull of the rotator cuff. Insertion of the anchor at this angle has
been shown to reduce
tension within the suture and increase anchor pullout strength.
Each anchor is tested for security after being placed by pulling on the
sutures. Either simple or horizontal mattress sutures are then used to
establish a stable rotator cuff margin (Fig. 2-24).
Regardless of the technique used, the rotator cuff should be repaired
with traction released without excessive tension. With large U-shaped
tears it is often impossible to reapproximate the central portion to
bone. In such cases it is preferable to repair the anterior and
posterior leaflets while leaving the central portion of the cuff open
rather than overtightening the repair, which would be prone to failure.
 |
|
FIGURE 2-23. Suture anchors are placed to allow distribution of forces across the repair.
|
 |
|
FIGURE 2-24. Simple sutures are spaced evenly throughout the tear.
|
fascia with interrupted absorbable sutures. The subcutaneous tissue and
skin are then closed in routine fashion, and an arm sling is applied.
Most patients are discharged from the hospital on the day of surgery.
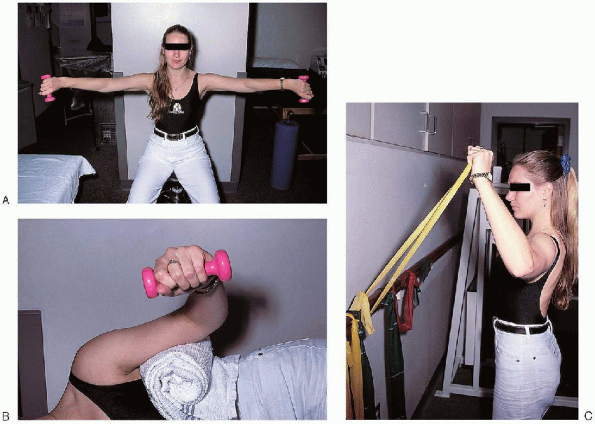
attempting to achieve full range of motion within the first 6 to 8
weeks following surgery. Active range of motion exercises are begun
once the rotator cuff is presumed healed at 6 weeks. Rotator cuff
strengthening exercises are delayed until approximately 12 weeks (Fig. 2-26). Stretching exercises are continued throughout the strengthening phase of rehabilitation (Fig. 2-27). Patients are usually able to resume heavy manual labor and sports at approximately 9 to 12 months following surgery.
 |
|
FIGURE 2-25. Passive range of motion exercises.
|
 |
|
FIGURE 2-26. Rotator cuff strengthening exercises. A: Supraspinatus strengthening exercises. B: External rotator strengthening exercises. C: Tubing exercises.
|
 |
|
FIGURE 2-27. Posterior capsule stretching exercises.
|