
common procedure in orthopaedic surgery. Up until the early 1990s, it
was performed primarily as an open procedure consisting of anterior
acromioplasty and repair of the full-thickness tear. Today, there are
alternative procedures including arthroscopic subacromial decompression
and mini-open repair or arthroscopic subacromial decompression combined
with arthroscopic rotator cuff repair. The outcomes of these
arthroscopic procedures have been promising when compared with the
results of open procedures. However, the role of open acromioplasty and
rotator cuff repair continues to be important in the treatment of these
injuries. In our practice, this approach is used primarily for large,
retracted full-thickness tears that require extensive mobilization
techniques to obtain closure and as an option when arthroscopic or
mini-open techniques are not possible or have been unsuccessful. In
these latter situations, an open approach will continue to have an
important role in the treatment of full-thickness rotator cuff tears.
In this chapter we describe the technique that we have found successful.
rotator cuff repair, it is important to understand the anatomy of the
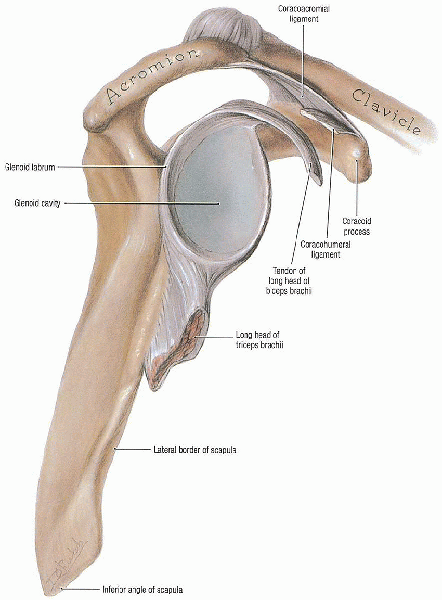
coracoacromial arch and the supraspinatus outlet (Fig. 3-1).
The coracoacromial arch is formed by the anterior one third of the
acromion and the coracoacromial ligament with its insertion into the
coracoid process. The humeral head is located within the coracoacromial
arch and the rotator cuff tendons pass underneath the arch to insert
into the proximal humerus. The passage through this coracoacromial arch
has been described as the “supraspinatus outlet.” Any anatomic variant
that decreases the size of the outlet can result in impingement on the
rotator cuff. The supraspinatus outlet can be decreased by several
mechanisms: osteophytes from the anterior inferior acromion, a downward
sloping acromion, an acromion with significant concavity, and
osteophytes about the inferior aspect of the acromioclavicular (AC)
joint. Neer has introduced the concept of impingement as a critical
factor in the etiology of rotator cuff tears. He postulated that with
forward elevation of the arm, the supraspinatus tendon was impinged by
structures of the coracoacromial arch. Repetitive overhead activities
have the potential to cause repetitive impingement that leads to wear
of the tendons. Over time, this can result in disruption of tendon
fibers, partial tearing, and eventually full-thickness tears. When
injury is superimposed on an already weakened rotator cuff, a
full-thickness tear can result or a previously existing small
full-thickness tear can be extended into a larger tear.
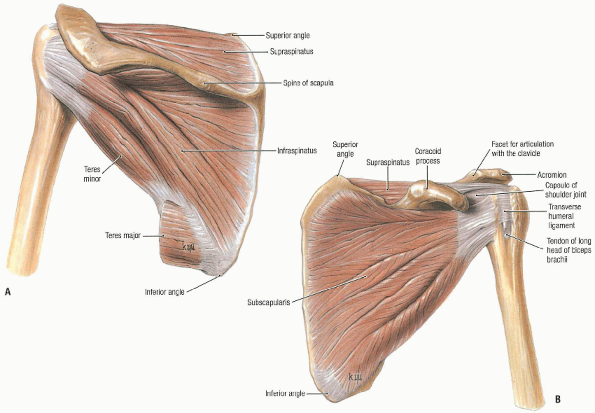
supraspinatus, infraspinatus, and teres minor (which insert on the
great tuberosity superiorly and posteriorly) and the subscapularis
(which inserts on the lesser tuberosity anteriorly) (Fig. 3-2).
The rotator interval is the area of capsular tissue that joins the
anterior edge of the supraspinatus tendon with the superior edge of the
subscapularis tendon. The most important function of the rotator cuff
is to stabilize the humeral head against the glenoid as the arm is
elevated. The rotator cuff tendons form half of the “force couple” with
the deltoid and together they allow elevation of the arm overhead. If
the stabilizing function of the rotator cuff is compromised (as in a
full-thickness rotator cuff tear) there will be an unopposed pull of
the deltoid, which displaces the humeral head upward toward the
acromion. Elevation is generally limited to 30 or 40 degrees. This is a
classical finding in some patients with large full-thickness rotator
cuff tears. Most rotator cuff tears—particularly those secondary to
impingement—involve the supraspinatus tendon near its insertion into
the greater tuberosity. As a tear enlarges, more of the supraspinatus
insertion becomes involved, often with an intratendinous extension into
the infraspinatus. When a traumatic event is superimposed onto a
rotator cuff with chronic degeneration, there may be a more significant
avulsion component that includes the infraspinatus tendon. As rotator
cuff degeneration progresses, there can also be involvement of the
subscapularis tendon, particularly its superior one-third. Traumatic,
complete subscapularis ruptures can also occur. These often represent
an isolated injury and are not included in this chapter.
relation to its etiology and size are important considerations. Most
full-thickness rotator cuff tears are associated with an underlying
impingement syndrome. Exceptions include full-thickness tears that
occur in younger patients as a result of significant trauma. Most
rotator cuff tears that occur in older patients represent acute
extensions in areas of preexisting rotator cuff degeneration. This
“acute-onchronic” category is applicable to most full-thickness tears
in older patients.
 |
|
FIGURE 3-1.
Glenoid cavity, lateral view. The coracoacromial arch is formed by the acromion, coracoacromial ligament, and the tip of the coracoid process. The supraspinatus passes under it and inserts onto the greater tuberosity. Compromise of the space within the coracoacromial arch results in “outlet impingement.” |
 |
|
FIGURE 3-2. Rotator cuff. A: Posterior view. B:
Anterior view. The rotator cuff consists of the supraspinatus, infraspinatus, and teres minor muscles inserting on the greater tuberosity and the subscapularis inserting on the lesser tuberosity. |
important consideration and is determined by direct observation of the
rotator cuff at the time of surgery. As such, full-thickness tears can
be grouped by and are often classified on the basis of the largest
linear dimension of the tear: less than 1 cm is a small tear, 1 to 3 cm
is medium, 3 to 5 cm is large, and greater than 5 cm is a massive tear.
Although this is a generally accepted classification system, it has
significant limitations when attempting to compare tears within the
same size category. Although the “resting” size of the tear is an
important consideration, its significance has to be considered in the
context of mobility of the tissues and tissue quality. A 5-cm tear that
occurs in mobile tissue of good quality may be much easier to repair
than a 2-cm tear in immobile, degenerative tissue that does not hold
suture material. The most important consideration relating to the size
of the tear is whether there is a tissue defect present after all
mobilization techniques have been performed. The goal of surgery is to
obtain a secure repair that brings the tendon tissue back to its
insertion onto the tuberosity and restores the integrity of the cuff.
The ease or difficulty in achieving this result is certainly affected
by the size of the tear but is also significantly impacted by tissue
mobility and tissue quality.
with a wide range of symptoms and findings. Symptoms can range from
constant pain that interferes with sleep to little or no pain. The
effect of the rotator cuff tear on active range of motion of the
shoulder is quite variable. Some patients will be able to maintain full
range of motion, although it will be painful, particularly through the
midrange of elevation and at the extremes of motion. Other patients
will have significant loss of active motion that can be representative
of a “true” loss of active motion resulting from the disruption of the
musculotendinous unit or, for many patients, a loss of active motion
secondary to pain. In these latter patients, a subacromial lidocaine
injection test can be helpful in determining the true active range of
motion. There are also some patients who have a limitation of passive
range of motion. This probably develops over time as a result of
decreased use of the painful shoulder and inflammation associated with
the tendon tear. When significant limitation of passive range of motion
is present preoperatively, a therapy program directed at regaining
range of motion is important. In patients who cannot regain range of
motion, manipulation and possibly arthroscopic releases at the time of
rotator cuff repair should be performed.
The secondary indication is immobility and dysfunction in patients with
significant loss of active range of motion. Although these indications
are described as primary and secondary, clinically it is important to
integrate them to identify patients who are candidates for surgery.
Successful resolution of pain following rotator cuff repair can be
achieved in more than 90% of patients. The ability to restore active
range of motion is more variable and depends on many factors including
the size of the tear, the ability to achieve a secure repair, the
degree of preoperative stiffness and muscular atrophy, and compliance
with the postoperative rehabilitation program. Although most patients
who undergo rotator cuff repair have significant associated symptoms,
there is a small group of patients in whom rotator cuff repair is
indicated primarily because of the loss of active motion and the loss
of function. These patients have generally sustained an acute injury
resulting in a large or massive rotator cuff tear. Although
the degree of pain and discomfort may not be substantial, the
precipitous loss of active range of motion and function in the context
of an acute injury is a clear indication for surgical repair. We emphasize that this latter group represents a very small percentage of patients undergoing surgery for rotator cuff repair.
important part of preoperative planning. In addition to the history and
physical examination, appropriate imaging studies are necessary:
standard radiographs of the right shoulder consisting of
anteroposterior (AP) views with internal and external rotation,
scapular lateral outlet view, and an axillary view. These views provide
important information about the bony architecture of the coracoacromial
arch, particularly with respect to the presence of significant anterior
and inferior acromial spurs and osteophytes about the inferior aspect
of the AC joint, as well as the presence of an os acromiale. The
presence of degenerative arthritis of the AC and glenohumeral joints is
an important consideration in ascertaining that the source of pain is
indeed the rotator cuff tear and not degenerative arthritis. A
preoperative magnetic resonance imaging (MRI) provides important
information about the size and location of the tear. It also provides
information about the amount of retraction of the tear and which
tendons are involved. An estimation of the chronicity of the tear can
also be obtained, based on the presence of atrophic changes in the
rotator cuff muscles that may make tissue mobilization and repair more
difficult. An MRI also provides additional information about acromial
morphology. One of the most important aspects of
the preoperative evaluation is to confirm that all other potential
causes of shoulder pain other than rotator cuff tear have been excluded.
The coexistence of rotator cuff tears with other conditions that can
cause shoulder pain—including cervical spondylosis, cervical
radiculopathy, scapulothoracic bursitis, AC arthritis, glenohumeral
arthritis, and pulmonary tumors—is well-recognized.
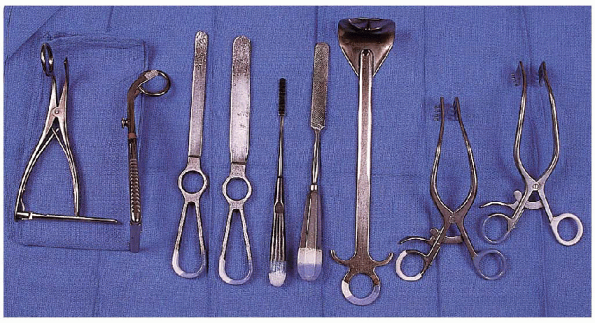
personal choice involved in equipment and instruments, there are
specific retractors and instruments that make it easier to perform the
procedure (Fig. 3-3). Specific retractors that
can be beneficial include (a) angled self-retaining retractors used to
retract the skin edges, (b) right-angled Richardson
retractors
to facilitate retraction of the deltoid muscle, (c) a “deltoid
retractor” specifically designed to retract the lateral and posterior
deltoid and to expose the humeral head, and (d) specific humeral head
“ring” retractors to enhance exposure of the retracted rotator cuff by
displacing the humeral head downward as counterforce is placed on the
underside of the acromion.
 |
|
FIGURE 3-3. Instruments used to facilitate open rotator cuff tear include (left to right):
angled self-retaining retractors, deltoid retractor, large rasp, small rasp, flat Darrach elevators (two), and humeral head “ring” retractors (two). |
varying width to perform the acromioplasty. The final contouring of the
acromioplasty can be accomplished easily with small rasps to smooth the
undersurface of the acromion.
There are different techniques that can be used for this approach. We
describe the technique that uses bone tunnels and the passing and
placement of horizontal mattress sutures. We accomplish this using an
awl to prepare the bone tunnels and a large cutting needle to pass the
sutures through the tunnels. There are a variety of bone anchors
currently available that can also be used for the tendon-to-bone
reattachment. Bone tunnels have a long track record of use and an
established record of success. Anchors have been used more recently and
early results indicate that they can be used successfully. The choice
of bone tunnels versus anchors is based on surgeon preference. We
perform the tendon-to-bone reattachment with no. 2 braided
nonabsorbable suture. The tendon-to-tendon component of the repairs is
performed with no. 1 braided nonabsorbable suture. Only
noncutting or round needles are used for passing sutures through the
rotator cuff. This decreases the potential for the needles to “cut out”
as they are passed.
performed under regional anesthesia using an interscalene block. After
the induction of anesthesia, passive range of motion of the shoulder
should be assessed. This includes forward elevation, external rotation
with the arm at the side, and abduction in the coronal plane. If
there is significant stiffness present, a gentle manipulation should be
performed focusing on forward elevation and abduction. In most
cases, this gentle manipulation results in full forward elevation and
improvement in abduction and external and internal rotation. If range
of motion cannot be easily obtained, then a capsular release should be
performed during the arthroscopic evaluation. In addition, the releases
performed for tendon mobilization during the rotator cuff repair also
facilitates recovery of range of motion.
positioning device that secures the head and neck in a stable position
and allows complete access to the entire shoulder region. The sitting
position should be approximately 80- to 90-degrees upright. Preparation
and draping is performed in a standard fashion. It is important to have
adequate exposure of the entire shoulder and upper extremity. The
exposed area should allow an extension of the incision anteriorly and
posteriorly if this is found to be necessary during the procedure. The
procedure begins with an arthroscopic evaluation of the glenohumeral
joint and subacromial space. This provides an opportunity to identify
and treat intraarticular findings and perform capsular releases if
necessary. The location and size of the rotator cuff tear can then be
confirmed, and the tissue quality and mobility can be assessed. Based
on this assessment, we decide whether an open repair is indicated or
whether the repair should be performed arthroscopically or with a
mini-open technique. The arthroscopic assessment is discussed in Chapters 1 and 2.
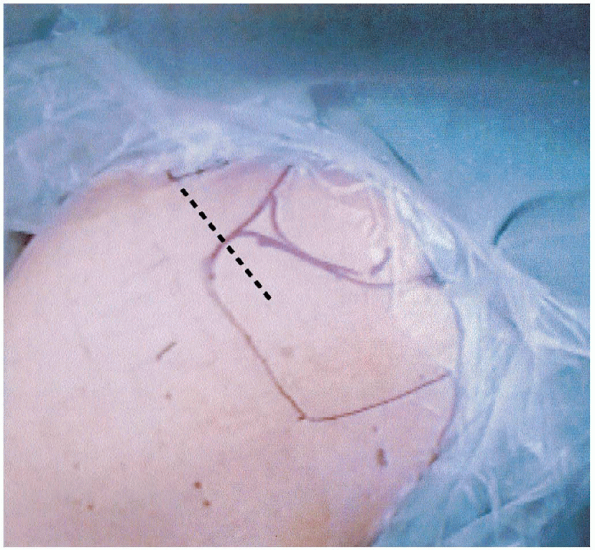
The incision is centered between the lateral edge of the acromion and
the AC joint. It begins over the midportion of the acromion and extends
anteriorly, approximately 3 to 4 cm beyond the anterior edge of the
acromion. The incision should be oriented so that an anterior extension
is located in the anterior axillary line and a posterior extension is
in line with the posterior axillary line. The potential for an
“extensile” exposure can be important if additional procedures are
found to be necessary. For example, when a significant subscapularis
tear occurs in association with a supraspinatus and infraspinatus tear,
a repair
is
indicated. The superior incision can be extended anteriorly for a
deltopectoral approach to the proximal portion of the humerus. This
approach is necessary for complete subscapularis ruptures. Tears that
involve the most superior portion of the subscapularis tendon can
generally be repaired through a standard superior approach. Although
very uncommon, the superior incision may be extended posteriorly to
allow a posterior approach to the shoulder. This can be helpful when
the posterior portion of the rotator cuff tear is retracted and cannot
be mobilized through the superior incision.
 |
|
FIGURE 3-4.
Superior aspect of the shoulder showing the skin incision based over the anterior one third of the acromion and extending anteriorly in the anterior axillary line. |
subcutaneous dissection performed to allow mobilization of the soft
tissue flaps (Fig. 3-5). The bony landmarks
should be palpated including the anterior and lateral portions of the
acromion, the lateral clavicle, and the AC. We have found it helpful to insert a needle into the AC joint to identify this landmark throughout the exposure.
interval between the anterior and middle portions of the deltoid is
identified. This raphe can be seen originating at the anterolateral
corner of the acromion.

A relatively avascular interval, it is then divided from a point 3 cm
distal to the anterolateral portion of the acromion and over the top of
the anterior acromion to the AC joint. Care should be taken to avoid
violation of the AC joint. The attachment of the anterior deltoid to
the anterior acromion is elevated subperiosteally exposing the entire
anterior acromion. In this manner, the coracoacromial ligament is
released from the anterior/inferior acromion. The ligament should be allowed to remain contiguous with the fascia of the underside of the deltoid.
Although previously, we felt that a resection of a portion of the
ligament was necessary, we no longer use this approach. Instead, by
allowing the coracoacromial ligament to maintain its continuity with
the deltoid fascia when the deltoid is reattached to the anterior
acromion, there is the potential that the coracoacromial ligament will
continue to function as a restraint to superior migration of the
humeral head. As noted, the elevation and release of the anterior
deltoid should extend to the AC joint but should not compromise the
joint itself. The anterior deltoid is then retracted anteriorly to
expose the subacromial space in preparation for performing the
procedure.
 |
|
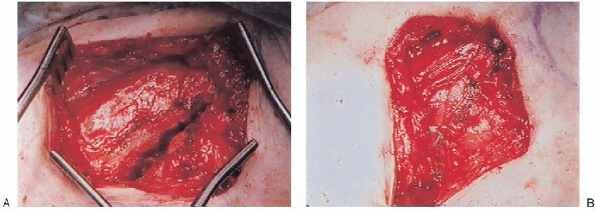
FIGURE 3-5. The use of two angled self-retaining retractors oriented perpendicularly provides excellent exposure of the deeper tissue.
|
completing the approach, the anterior acromion is exposed and there is
access to the subacromial space. The anatomy of the anterior acromion,
with respect to the presence of an anterior acromial spur and the
concavity of the underside of the acromion, should next be assessed. An
acromioplasty is performed with the goals of (a) converting the
concavity of the underside of the acromion to a flat surface and (b)
recessing the anterior edge of the acromion to the same level as the
anterior edge of the lateral clavicle (Figs. 3-6 and 3-7).
The acromioplasty can be performed using a variety of techniques. We
prefer to use a microsagittal saw and to perform the resection in one
step. The saw blade should be wide enough to accomplish the resection
with one pass. It should be angled posteriorly and inferiorly to exit
the inferior surface at a point that converts the concavity to a flat
surface. This can be determined by careful palpation of the underside
of the acromion. If the angle of the saw is too
vertical, an inadequate resection will be performed. However, if the
angle of the saw is too horizontal, there is a risk of an excessive
resection and compromise of its structural integrity. Therefore,
the angle of the resection must be carefully determined. The resected
portion of the anterior and inferior acromion is then removed. The
underside of the acromion should be palpated to confirm
that a smooth surface is present. Often, there is some irregularity that remains, which can be corrected with a rasp (Fig. 3-8).
The inferior aspect of the AC joint should also be palpated.
Osteophytes in this area may be prominent and should be removed using a
rongeur and/or rasp.
 |
|
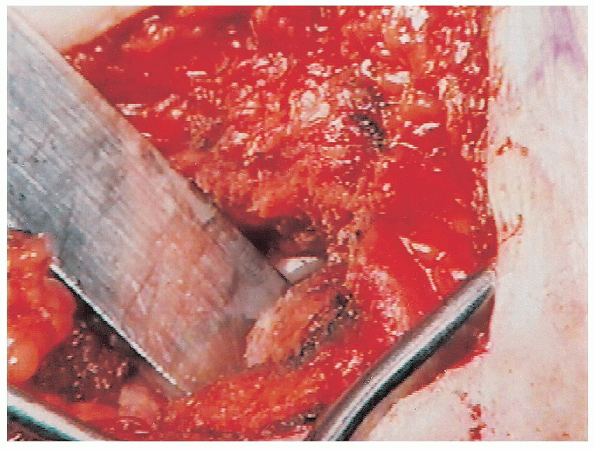
FIGURE 3-6.
After exposure of the anterior acromion an elevator is placed in the subacromial space prior to acromioplasty with a micro sagittal saw. |
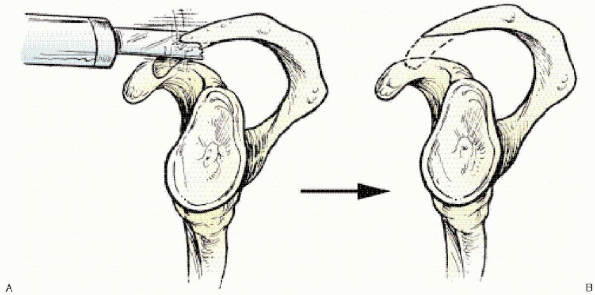 |
|
FIGURE 3-7. The acromioplasty is performed with a microsagittal saw (A) that recesses the anterior edge and converts the concave underside to a flat surface (B).
|
At this point, visualization of the rotator cuff tear should be
obtained and generally requires resection of a portion of the overlying
bursa. The bursal resection should be done carefully. Often, the bursa
is adherent to the superior aspect of the rotator cuff and should be
elevated until the edge of the rotator cuff tear can be visualized. As
long as an adequate edge of the rotator cuff tendons is visualized,
bursa that remains attached to the superior aspect of the rotator cuff
posteriorly and medially will not be problematic.
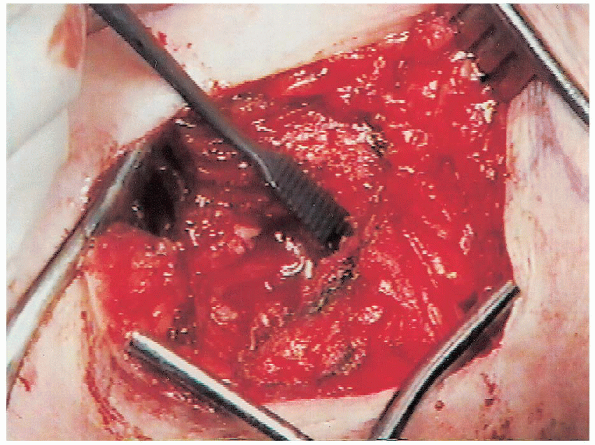 |
|
FIGURE 3-8. After the acromioplasty is completed, a small rasp is used for contouring of the undersurface of the acromion.
|
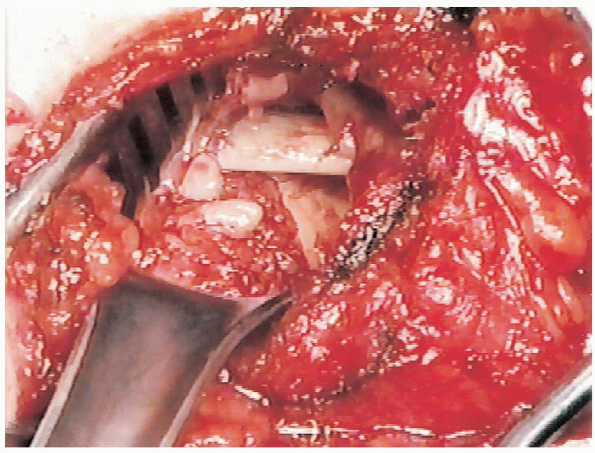
Most tears begin atthe anterior edge of the greater tuberosity, just posterior to the
bicipital groove. The biceps tendon can often be visualized within the
area of the tear as it passes into the bicipital groove (Fig. 3-9).
Based on tear size, the edge of the tear extends to a variable degree
posteriorly along the insertion into the greater tuberosity. The
anterior edge of the tear is often located in the rotator interval
area. With elevation of the arm, the superior aspect of the
subscapularis can be visualized. This marks the anterior edge of the
rotator interval area. The mobility of the glenohumeral joint is an
important factor in allowing proper visualization of the rotator cuff
tear. The anterior aspect of the tear is more
easily visualized with elevation and external rotation of the humerus.
The posterior aspect of the tear can be visualized more easily with
extension and internal rotation (Fig. 3-10).
Adduction can facilitate visualization of the medial extent of the
tear. However, identification of the most medial portion of the tear,
particularly in large tears, is generally more difficult and requires
traction on the humerus and visualization of the posteromedial aspect
of the subacromial space.
 |
|
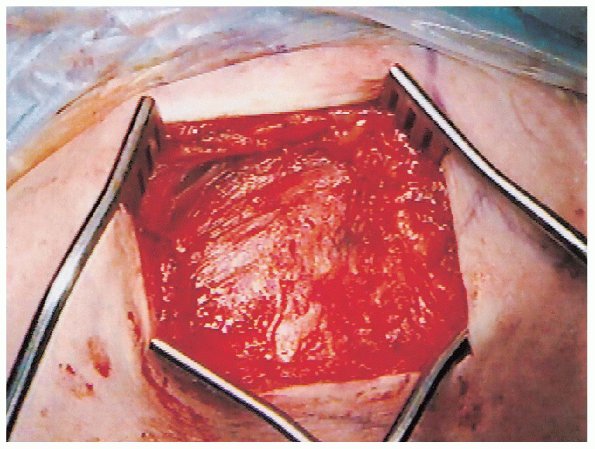
FIGURE 3-9.
With the anterior deltoid retracted anteriorly and the acromioplasty completed, the subacromial space and the rotator cuff tear are well visualized. |
the noncutting needle is passed through the edge of the tendon, tension
is applied to assess the quality of the tissue by its ability to
support suture material. These traction sutures are passed 3 to
4 mm from the edge of the tear or farther if necessary to achieve
secure passage. Noncutting needles are used to avoid damage to the
tendon. Sutures are passed through the anterior and the posterior edges
of the tear. With the sutures in place, initial assessment of tendon
mobility can be performed. Traction of the posterior portion of the
tendon in an anterior and lateral direction will determine tissue
mobility. In a similar manner, traction of the anterior portion in a
posterior and lateral direction will determine its mobility. Laterally
directed traction on the sutures placed in the anterior and posterior
tendon allow visualization of the most medial extent of the tear or its
“apex.”
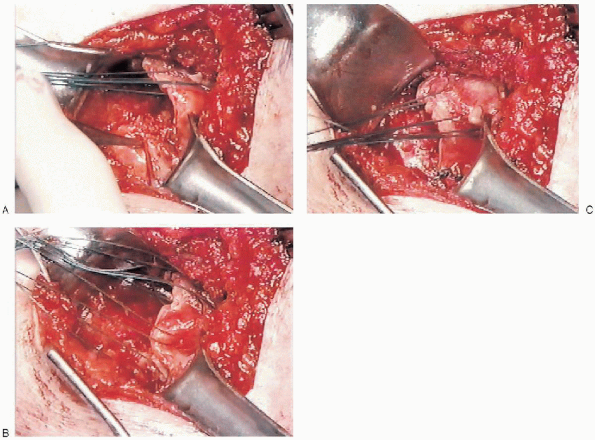 |
|
FIGURE 3-10. With internal rotation and extension of the humerus, the intratendinous posterior extension of the tear can be visualized (A). This allows placement of sutures for the tendon-to-tendon repair (B). These sutures are tied to complete this portion of the repair before performing the tendon-to-bone repair (C).
|
on the mobility of the tear, further mobilization techniques may or may
not be necessary. This is performed in a step-by-step sequence. The
first steps in mobilization are extramuscular releases.
A Darrach elevator is placed over the supraspinatus tendon and advanced
medially into the supraspinatus fossa. This is a relatively avascular
plane.
Passing
the elevator releases adhesions within the coracoacromial arch. As the
elevator is passed medially, lateral countertraction is placed on the
tendon sutures. In a similar manner, an elevator is passed over the
infraspinatus tendon into the infraspinatus fossa. When this
extramuscular mobilization is completed, the mobility of the tendon is
once again assessed to determine if additional mobilization is
necessary. At this point, preliminary decisions can be made about the
repair. Most repairs consist of a tendon-to-tendon repair combined with
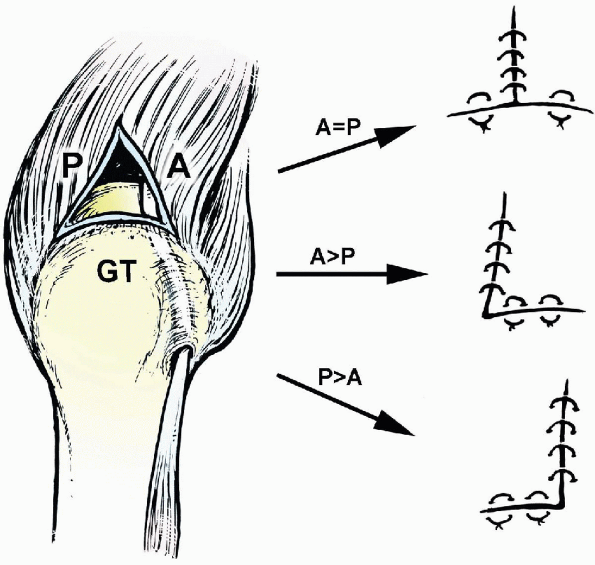
a tendon-to-bone repair. The shape of the tear and the mobility of the
edges determine how this is performed. Because most tears are
triangular, the tendon-totendon portion of the repair brings the
anterior and posterior portions together in a medial to lateral
direction. This allows the lateral edge to be brought into contact with
its insertion into the greater tuberosity. If the anterior or posterior
edge of the tear is relatively more mobile, an “L” or “reverse L”
repair can be performed, respectively. When the anterior and posterior
aspects of the tear are equally mobile, a “T” repair is performed (Fig. 3-12).
 |
|
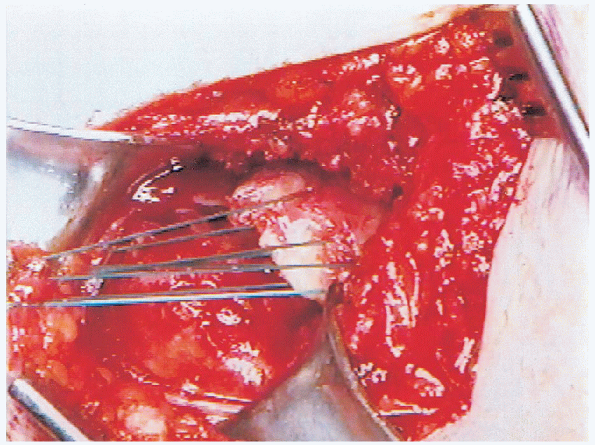
FIGURE 3-11.
The retracted edge of the rotator cuff has been tagged with traction sutures. After mobilization, it can be advanced laterally to its insertion and into the greater tuberosity. |
tendons cannot be adequately mobilized to allow repair, additional
mobilization techniques will be necessary. With external rotation, the
adhesions at the base of the coracoid can be assessed. This area is
often referred to as the “coracohumeral ligament.” With external
rotation of the humerus, palpation in the area of the base of the
coracoid and the rotator interval may indicate the presence of dense
adhesions. These can be released with scissors starting at the lateral
base of the coracoid and should be done with the humerus in maximum
external rotation. This release often provides additional mobility of
the anterior portion of the tendon to facilitate lateral advancement of
the tendon. If tendon mobilization is still not adequate to allow
anatomic repair, a capsular release should be performed. This consists
of release of the capsular attachment at the superior and posterior
edge of the glenoid. The rotator cuff tissue is contiguous with the
capsule superiorly and posteriorly. By releasing the capsular
attachments to the edge of the glenoid, the rotator cuff can be
advanced laterally. With inferior traction placed on the humerus, a
scalpel is used to release the capsular attachments beginning
superiorly above the biceps tendon insertion and progressing
posteriorly to the posterosuperior edge of the glenoid. Additional
releases can be performed along the posterior superior aspect of the
glenoid. The scalpel edge should not be passed
more than 5 mm beyond the edge of the glenoid margin to prevent
potential injury to the neurovascular bundle. Capsular releases further enhance the mobility of the tendon in a medial to lateral direction and facilitate the repair.
mobilization is completed, the repair can be performed. Any bony
excrescences or irregularities about the greater tuberosity should be
removed and the area converted to a flat surface. A cancellous bed
should be prepared. A deep trough should be avoided because it
compromises bone quality for holding sutures used in the repair. In
addition, a deep trough requires a greater degree of tendon advancement
to achieve bony contact. The tendon reattachment should begin at the
edge of the articular surface. The tendon-to-tendon portion of the
repair should be planned and these sutures should be placed (Fig. 3-10).
We use no. 1 or no. 2 nonabsorbable braided sutures for this purpose.
These sutures are passed and usually tied to facilitate the
tendon-to-bone portion of the repair. Placement of the tendon-to-tendon
sutures should be performed up to the apex. When these sutures are
tied, the triangular-shaped tear is essentially converted to a linear
tear. We often leave the tendon-to-tendon sutures uncut so that they
can be used for traction during the tendon-to-bone repair. The
tendon-to-bone repair can be performed using a variety of techniques.
We have used bone tunnels for placement of horizontal mattress sutures
in many cases. More recently, we have used bone anchors in patients
with appropriate bone quality in which anchor fixation is secure. In
this chapter, we use bone tunnels for the tendon-to-bone repair.
length of the tendon-to-bone repair determines the number of bone
tunnels to be used. In our technique, which uses horizontal mattress
sutures, the number of horizontal mattress sutures used in the repair
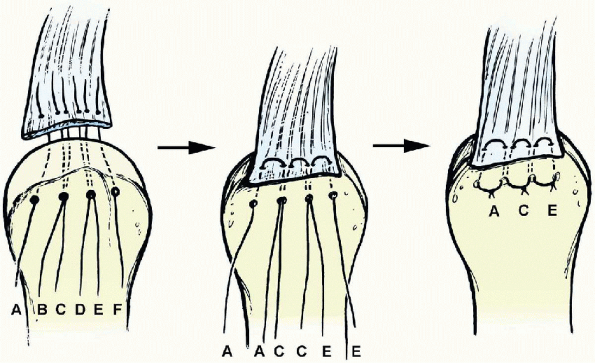
is equal to the number of tunnels minus one (Fig. 3-13).
For example, when four bone tunnels are used, three horizontal mattress
sutures can be passed; if five bone tunnels are used, four horizontal
mattress sutures can be passed.
A curved awl can be used to prepare a bone tunnel through the lateral
humeral cortex. This should be placed approximately 1.5 to 2 cm below
the most superior aspect of the greater tuberosity. The awl is driven
directly into the metaphyseal bone. In most patients, a large cutting
needle can then be passed through the lateral humeral cortex and up
through the greater tuberosity just lateral to the edge of the
articular surface. If bone quality prevents easy passage, the awl can
be used to prepare the exit portal in the cancellous bed.
 |
|
FIGURE 3-12.
Triangular-shaped rotator cuff repairs consist of tendon-to-tendon and tendon-to-bone components. Based on the mobility of the tissues, the repair will resemble a “T” (when the anterior and posterior edges are equally mobile), “L” (when the anterior edge is more mobile), or “reverse L” (when the posterior edge is more mobile). A, anterior; GT, greater tuberosity; P, posterior. |
The sutures to be used for the repair are then passed through each bone
tunnel. We use no. 2 braided nonabsorbable suture. Single sutures are
passed through the peripheral bone tunnels; double sutures are passed
through the inferior bone tunnels (Figs. 3-13 and 3-14).
The second suture through the interior bone tunnels is used as a
passing suture after placement of the horizontal mattress suture
through the tendon. This avoids the need for passing needles through
the bone tunnels a second time when sutures are already in place. It
also allows overlap of the horizontal mattress sutures with two sutures
in each inferior bone tunnel being used for two adjacent horizontal
mattress sutures.
noncutting needle is used to pass the suture through the edge of the
rotator cuff tendon. These sutures are passed in a horizontal mattress
fashion and then passed through the bone tunnel to be tied over the
lateral humeral cortex (Fig. 3-15). When all
sutures have been passed, the tendon-to-bone repair can be completed.
Traction is placed on the tendon-to-tendon sutures so that the tendon
can be advanced laterally. The humerus can be maintained in abduction
of 20 to 30 degrees to facilitate the repair. The order of suture tying
is based on the mobility of the tissue with the more mobile (less
tension) areas tied first. This allows gradual advancement of the less
mobile portion of the repair. As these sutures are tied, it is
essential that the edge of the rotator cuff tendon be brought into
direct and secure contact with the prepared bone of the greater
tuberosity (Fig. 3-16).
The movements consist of forward elevation, abduction, and internal and
external rotation. The amount of external rotation obtained
intraoperatively should be documented because this determines the
amount of passive external rotation that can be performed during
postoperative rehabilitation. The repair should be secure with the arm
at the side. We do not use adduction pillows
or
similar devices to decrease tension on the repair. These have not
proven to be successful; in our experience, we have found them to
result in greater postoperative stiffness.
 |
|
FIGURE 3-13.
Following preparation of four bone tunnels, the sutures are passed. The interior bone tunnels contain double sutures, and the peripheral bone tunnels contain single sutures. This allows easier passage of the sutures and results in three horizontal mattress sutures tied over the lateral humeral cortex. With this technique, the number of horizontal mattress sutures is equal to the number of bone tunnels minus one. |
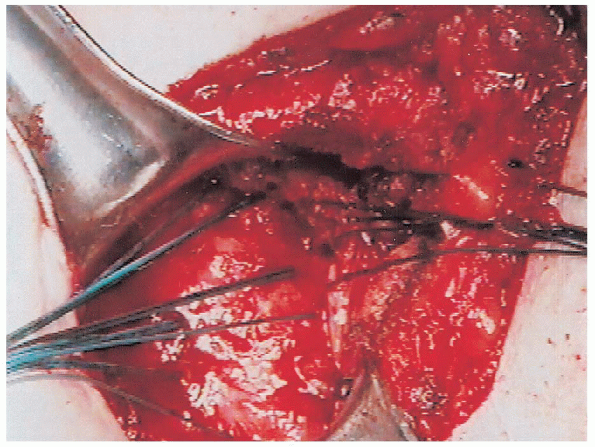 |
|
FIGURE 3-14. The sutures have been passed and three horizontal mattress sutures are in place and ready to be tied.
|
 |
|
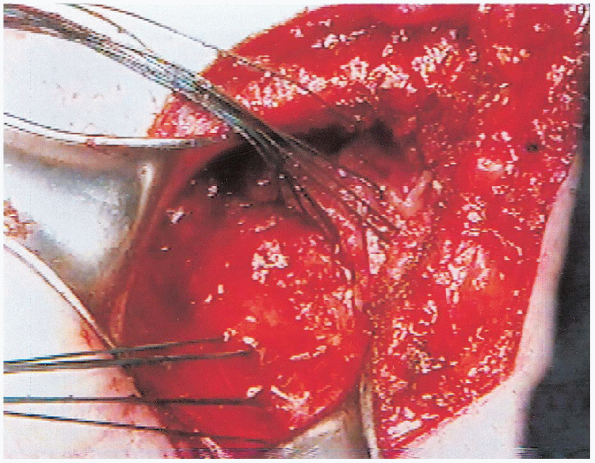
FIGURE 3-15.
Passage of the sutures results in three horizontal mattress sutures. Traction on these sutures brings the tendon into contact with the previously prepared cancellous bed. |
 |
|
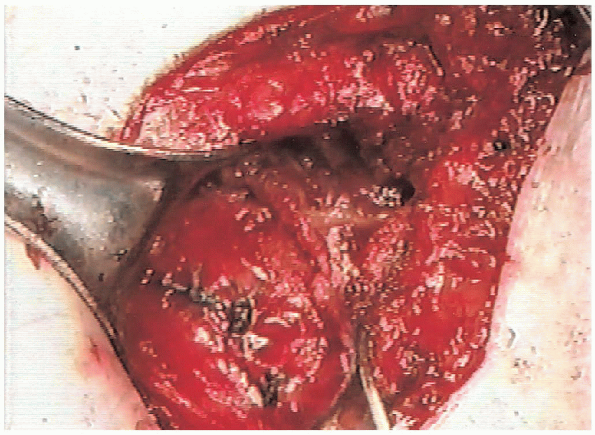
FIGURE 3-16. After the sutures are tied, the tendon-to-bone repair is completed.
|
A tenaculum is used to prepare bone tunnels through the anterior
acromion, approximately 5 mm from the edge. Sutures are passed through
the full thickness of the anterior deltoid tendon and through the bone
tunnels to allow the anterior deltoid to be reattached anatomically.
Additional no. 2 nonabsorbable sutures are passed through the deltoid
tendon and the capsule of the AC joint, medially and through the
lateral deltoid tendon, laterally. The interval between the anterior
and middle portions of the deltoid is closed with no. 1 absorbable
suture. When the anterior deltoid repair is completed, it is
reevaluated to confirm that it is secure. The subcutaneous tissue is
then closed with nonabsorbable sutures, and the skin is closed with a
running subcuticular closure using a nonabsorbable monofilament suture.
Steri-Strips and a sterile dressing are applied. The upper extremity is
then placed in a sling.
 |
|
FIGURE 3-17. The anterior deltoid is brought back into anatomic position (A) and repaired to the acromion with nonabsorbable sutures passed through bone (B).
|
regional anesthesia, we begin exercises immediately in the recovery
room. The patient is seen by our occupational therapist who starts a
program of passive range of motion of the shoulder, including forward
elevation, abduction, and external rotation to a limit determined
intraoperatively. This is an important component of the rehabilitation.
It allows the patient to observe the range of motion that can be
achieved and establishes goals as he or she begins a more formal
rehabilitation program the following day. Patients are instructed in a
passive range of motion exercise program and are allowed to perform
active and active-assisted range of motion for the elbow, wrist, and
hand. Most patients are discharged the day following open rotator cuff
repair, and the remainder is able to go home the same day.
exercise program for approximately 6 weeks following surgery. This may
be extended to 7 or 8 weeks based on the size of the tear, the quality
of the tissue, and the security of the repair. During this time, the
patients are reevaluated approximately 10 days postoperatively for
suture removal and then
again
2 to 3 weeks later. Six to 8 weeks following surgery, the sling
immobilization is discontinued and the patients are progressed to an
active range of motion program. Active range of motion is initially
performed in a supine position. As patients improve, they are
progressed to a sitting position. Active range of motion in the sitting
position is true antigravity movement and can be considered the first
step in a strengthening program. Isometric strengthening is begun 2 to
3 weeks after initiation of the active range of motion program.
Stretching exercises are continued, even as active range of motion is
initiated, until full range of motion is regained. Resistive
strengthening (with weights or Thera-Band) is performed at
approximately 3 months following the surgery when the patient has
regained near full active range of motion. It can begin sooner if the
patient has made faster progress regaining active range of motion.
Patients are maintained on a maintenance program for range of motion
and stretching and strengthening for 6 months following the surgery. We
encourage patients to continue a strengthening program for the first
year following the surgery. Our previous research has indicated that
recovery of strength following rotator cuff repair, particularly after
repair of large or massive tears, requires at least 1 year
postoperatively.
Prospective longitudinal analysis of postoperative shoulder function: a
ten-year follow-up study of full-thickness rotator cuff tears. J Bone Joint Surg Am 2001; 83A: 1052-1056.