
The Treatment of Distal Tibia Peri-articular Fractures with Circular Ring Fixators
II – Lower Extremity > 32 – The Treatment of Distal Tibia
Peri-articular Fractures with Circular Ring Fixators
that provide the surgeon with the ability to fabricate a customized
external fixator to treat complex, distal tibia, peri-articular
fractures. The fixators are constructed based on the position and
quality of the fracture fragments and the severity of injury to the
soft tissues. Basic principles are applied in sequence resulting in
alignment and fixation of the fractures.
maintaining length and are ideal for buttress plating with low profile
plates and fibula fixation. Type A and C fractures with moderate
soft-tissue injury are treated with internal fixation or half-pin
bridging frames with limited internal fixation. As soft-tissue damage
and bone comminution worsen, the indication to use circular tensioned
wires to treat these complex injuries increases (1).
Extension of the fracture pattern proximally to the midshaft
compromises the ability to use limited plating, but the stiffness of
circular fixators allows fixation using the entire shaft of the tibia
with fixation pins and wires to treat these extensile fractures. Pilon
fractures combined with complex foot injuries are an indication for
circular tensioned-wire fixation.
would have difficulty healing wounds over plates and screws or who are
not candidates for local and free flaps are well treated with
tensioned-wire fixation. Open wounds can be treated with local
wound-healing methods, resulting in closure by secondary intention, or
delayed split-thickness skin grafting. The local wound-healing
modalities include hyperbaric oxygen treatment, saline wet-to-dry
dressing changes, and vacuum sponge dressings. A relative indication is
the need for early ambulation. Patients treated with circular fixators
can apply partial weight early after fixation, whereas limited
low-profile plating must be protected for 3 or more months. The patient
with multiple extremity fractures or morbid obesity will be able to use
his or her externally stabilized pilon fracture for transfer assistance
or partial weight gait, reducing their dependency on a wheel-chair.
patients with multiple trauma. The patient is evaluated for
life-threatening injuries. Once stable, the extremity is evaluated, and
the dorsalis pedis and posterior tibial pulse are palpated. If
undetectable, a Doppler evaluation is conducted. The lower leg and foot
is evaluated for compartment syndrome. The extremity is stabilized and
a careful physical examination is performed. A detailed neurologic exam
with specific testing of deep and superficial peroneal, medial, lateral
and calcaneal plantar, saphenous, and sural nerve function is recorded.
Open wounds are observed for size and location. Intravenous
cephalosporin antibiotics are started immediately in patients with open
fractures. With sterile gloves, the wound may be lavaged with normal
saline and a sterile dressing applied. Exploration of the wound in the
emergency room should be avoided. The lower extremity is splinted with
a bulky dressing and plaster splints.
anteroposterior (AP), lateral, and mortise views of the ankle should be
obtained.
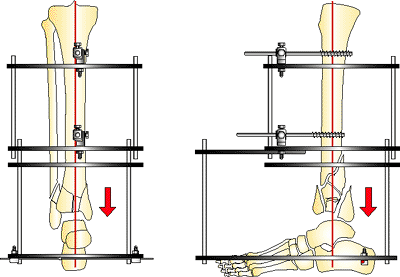
Open fractures and fractures with compartment syndrome require emergent
operative intervention. Following debridement and compartment release,
the fracture is temporarily stabilized with bridging half-pin fixation
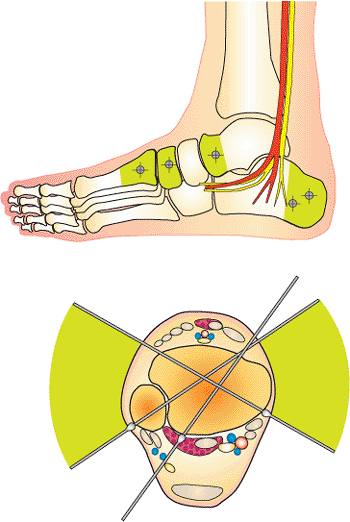
and a transverse calcaneal pin (Fig. 32.1).
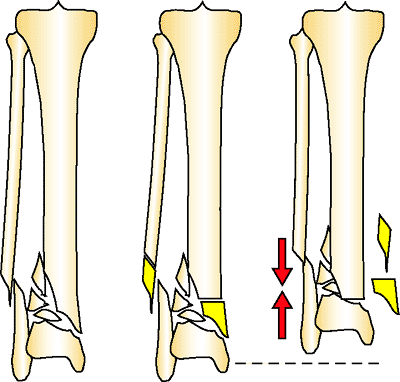
Closed fractures with comminution and displacement also are stabilized
with bridging half-pin fixation. If these comminuted fractures are not
stabilized and reduced, massive edema and fracture blisters will occur.
Calcaneal traction on a Bohler-Braun frame, or traveling traction, is
an alternative if the patient cannot be taken to surgery (Fig. 32.2).
 |
|
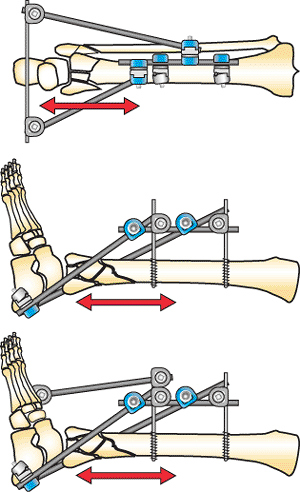
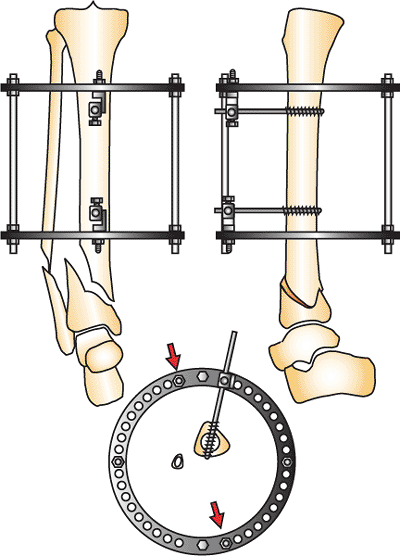
Figure 32.1.
Basic distraction frame. A horizontal half pin is distracted by two connecting rods to a two-pin fixation block. The foot is controlled with a pin to the first metatarsal to prevent equinus. This frame in lower-energy fractures is combined with limited internal fixation for definitive treatment. It is removed if circular fixation will be used as definitive treatment. (Copyright © James J. Hutson, Jr., MD.) |
 |
|
Figure 32.2.
Traveling traction described by Tracy Watson. A horizontal pin is placed through the proximal tibial metaphysis and calcaneus. Distraction is placed with connecting rods. The pilon can displace posteriorly if the heel is not supported. (Copyright © James J. Hutson, Jr., MD.) |
fracture out to anatomic length and to align the dome of the talus with
the central axis of the tibial shaft on the AP and lateral view. The
second toe of the foot must be aligned with tibial tubercle at the knee
for the surgeon to align correctly the rotation of the extremity. The
forefoot is controlled with a first metatarsal pin and the foot is
aligned in plantar neutral position. It is essential that excellent
alignment be established with this initial trauma resuscitation frame.
Failure to achieve these goals will compromise subsequent
reconstruction. Repeat debridement and antibiotic bead pouches are
indicated for severe open fractures with gross contamination.
week is critical. A small number of patients will have further
soft-tissue compromise requiring a return to the operating room for
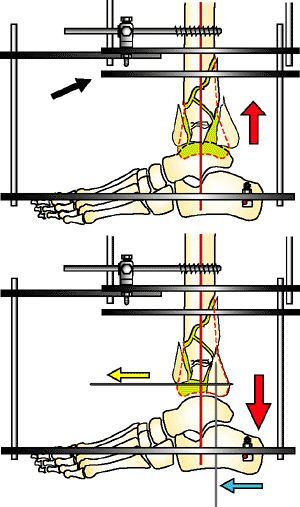
further debridement. A small subset of patients will have a fragment of
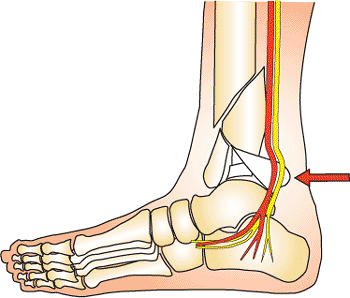
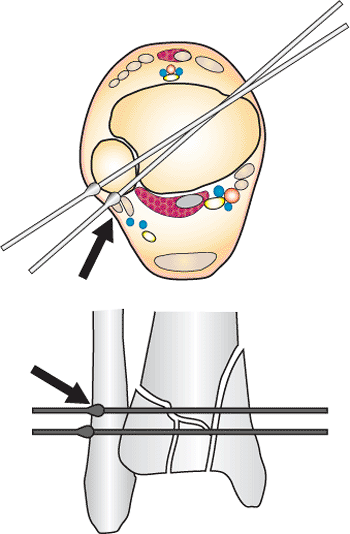
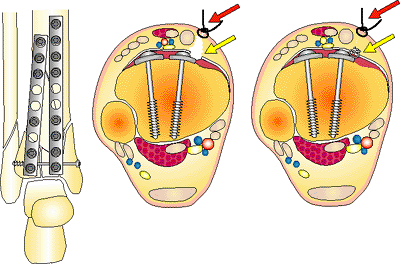
the posterior plafond rotated and displaced against the tibial nerve (Fig. 32.3).
These patients have paresthesia or anesthesia of the plantar surface of
their foot. Reduction of this fragment is indicated urgently, even if
the soft-tissue envelope is not in ideal condition. In a small subset
of patients with grade IIIB or grade IIIC fractures, early amputation
may be indicated (2).
show improvement in the soft-tissue envelope during the first 7 to 14
days. The skin condition determines the timing of the reconstruction of
the pilon fracture. When the edema has resolved and the fracture
blisters healed, definitive fixation of the pilon fracture can be
performed.
carefully evaluated. The fibula fracture is observed for level of
fracture, comminution, and separation of the fibula from the tibia. The
proximal extension of the tibia fracture and comminution of the plafond
is evaluated. The CT scan helps the surgeon plan the location of
incisions when an open approach is needed. Pilon fractures can be
approached through the anterior medial, anterior lateral, or posterior
medial exposures. The condition of the soft tissues will be compared to
the fracture pattern to avoid dissection through soft tissues with
extensive damage. At this time, the decision will be made about the
treatment approach: (a) open reduction and internal fixation (ORIF),
(b) bridging fixation with limited internal fixation, or (c) circular
tensioned-wire fixation. The following sections will describe the
treatment strategies for tensioned wire fixation.
fracture axially with correct rotation, reduce the joint surface to
match the contour of the dome of the talus, reconstruct the mortise,
and reconstruct metaphyseal bone loss and comminution. These goals are
approached with cautious handling of the soft tissues. Distraction is
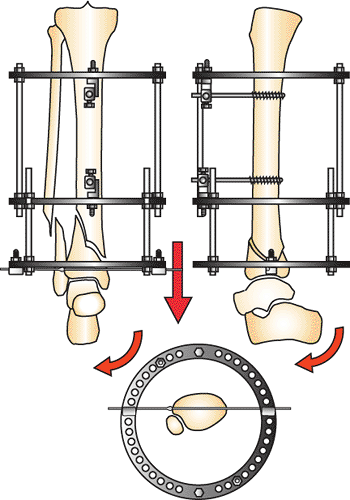
the key to reduction. Because of the terminal location of pilon
fractures, the mid tibial shaft is used as a fixation base to reduce
the fracture. When circular fixators are used, a fixation block is
applied with two half
pins
in the AP plane in an orthogonal position. This fixation block is used
as a base to support the distal fixation rings, which are placed at the
level of the plafond or calcaneus to distract the fracture. If the
plafond or calcaneus (hind foot) is distracted axially with correct
rotation, the distal tibia fracture will be spatially reduced with
correct rotation, alignment, and length. This initial reduction will
facilitate the local alignment of the joint surface and the metaphysis
by percutaneous or open techniques. The better the alignment gained by
accurate distraction, the easier the reduction of the joint and
metaphysis. It is almost impossible in complex pilon fractures to
reduce the plafond if the dome of the talus is mal-aligned, shortened,
and rotated. This fact pertains to any type of external fixator used to
treat pilon fractures (monolateral, clamp and rods, and circular
tensioned fixators). The dome of the talus must be aligned correctly in
distraction before beginning the reduction of the fracture fragments.
 |
|
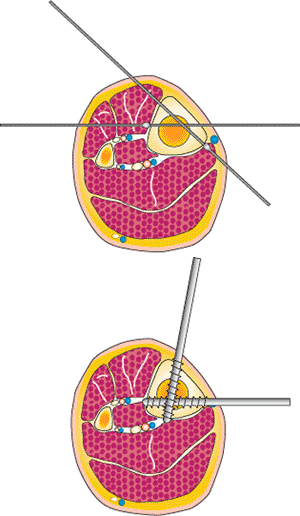
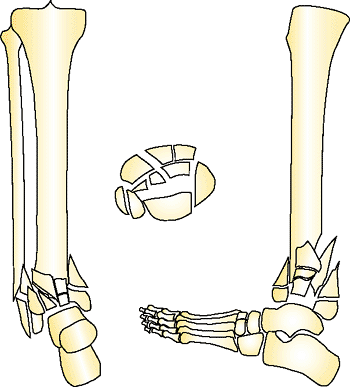
Figure 32.3.
A posterior fragment can be forced into the neurovascular bundle compromising blood flow and plantar sensation. This fragment requires early reduction to prevent permanent damage to these essential structures. (Copyright © James J. Hutson, Jr., MD.) |
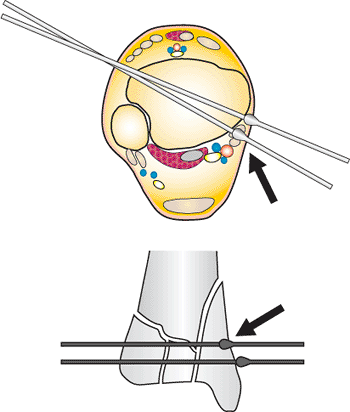
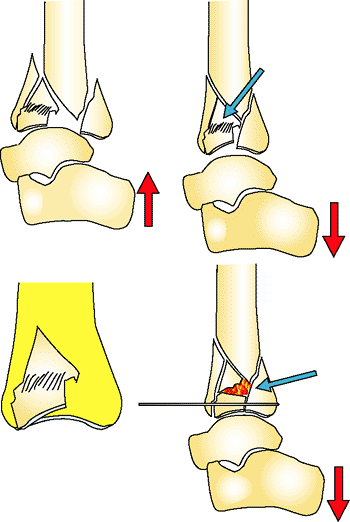
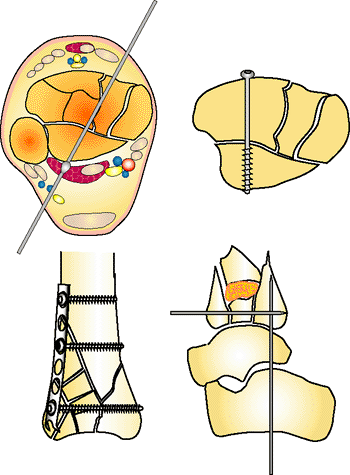
determined by the fracture pattern being treated. In type A distal
tibia fractures, the joint surface is intact. In C1 and C2 fracture
patterns of the joint, there is a simple fracture plane with two large
fragments. A limited open reduction and fixation with subchondral lag
screws will reduce the joint surface anatomically creating a unified
bone block. This reconstructed metaphysis can be treated as a type A
fracture (Fig. 32.4).
with two anterior posterior 5- or 6-mm half pins. The half pins should
be spread apart 10 cm or more to increase stiffness of the fixator.
Mounting these pins with universal fixation cubes facilitates alignment
of the frame. The distal half pin is placed 3 cm above the proximal
extent of the fracture. Placing the half pins far superior to the
fracture increases the working length and thus leads to frame
instability. It is important to align the fixation block in an
orthogonal position. The frame should be parallel to the tibia on the
AP and lateral views, and the tibia should be placed
into
the rings to provide clearance for the soft tissues. The ring over the
plafond must clear the anterior soft tissues of the ankle, and the
superior ring of the fixator block must not impinge on the posterior
leg where the gastrocnemius and soleus muscles bulge posteriorly. See Figures 32.5 and 32.6.
 |
|
Figure 32.4.
Type A distal tibia fracture. Reduction is gained by distraction to length, correction of rotation, and axial alignment of the plafond with the proximal shaft. (Copyright © James J. Hutson, Jr., MD.) |
the joint surface of the plafond will be in anatomic alignment when the
joint forms a 90-degree angle with the axis of the shaft and
orthogonal, ring, stable base. The plafond on the AP view forms an
angle of 90 degrees to the axis of the tibia. This anatomic fact allows
the surgeon to align distal tibia fractures accurately by placing a
horizontal reference wire parallel to the joint surface. The plane of
the carbon-fiber fracture-reduction ring, which is connected to the
orthogonal stable base, is 90 degrees to the shaft. The horizontal
reference wire in the plafond is placed onto the distal surface of the
carbon-fiber fracture ring and manipulated with fluoroscopic guidance
so that the plafond aligns axially and with correct rotation. The
horizontal reference wire may need to be loosened and repositioned
several times until excellent alignment is obtained. Small angular
corrections are done with washers on one side of the ring to improve
alignment if needed. Once the wire is tensioned, distraction is placed
across the fracture to reduce the metaphysis. See Figures 32.7 to 32.9.
foot can be manipulated into dorsi flexion to rotate the plafond around
the horizontal reference wire. Arc wire technique and manipulation with
half pins are used to correct apex anterior and posterior
mal-alignment. Occasionally, during this phase of the reduction, it
will become obvious that the
horizontal
reference wire needs to be adjusted anterior or posterior on the ring
to align the plafond anatomically. Once the plafond is aligned, at
least two additional divergent olive wires are placed across the
fracture in the 60-degree safe zone of wire pathways. A fourth wire is
placed if space is available. Two wires are never adequate fixation. At
least three olive wires should be placed. A medial-face half pin is
added to the stable base. A minimum of two AP half pins and a
medial-face half pin are necessary on the stable base. A fourth medial
face pin is placed in large patients. See Figures 32.10, 32.11, 32.12, 32.13, 32.14, 32.15, 32.16, 32.17, 32.18 and 32.19.
 |
|
Figure 32.5.
The stable-base fixation block is placed proximal to the fracture by 2 to 3 cm. The fixation block is orthogonal to the tibia. Accurate alignment of the stable base facilitates fracture reduction. (Copyright © James J. Hutson, Jr., MD.) |
 |
|
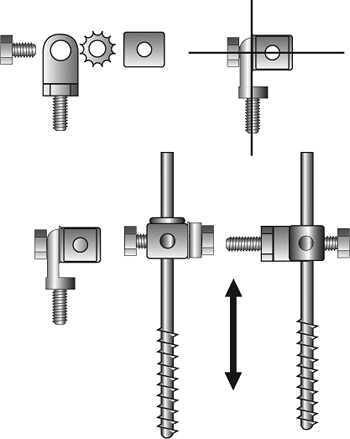
Figure 32.6.
The half pins are connected to the rings on the stable base with universal fixation cubes. An 8-mm bolt connects the Rancho Cube (Smith-Nephew) to a male hinge or post. These universal attachments allow fine-tuning of the stable base and small corrections of the tibial shaft alignment with the plafond. (Copyright © James J. Hutson, Jr., MD.) |
 |
|
Figure 32.7.
Half pins are placed with 90-degree divergence at the mid tibia. Over drilling the half pins can damage the anterior and posterior nerves and arteries. Olive wires are used if half pins are not available. (Copyright © James J. Hutson, Jr., MD.) |
 |
|
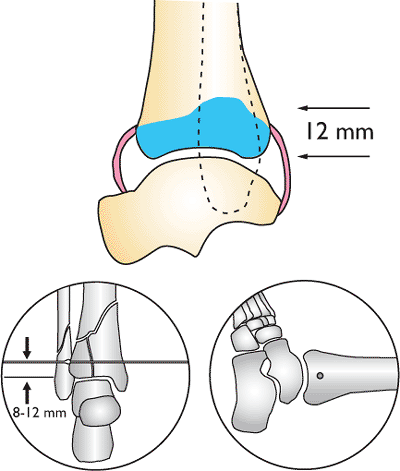
Figure 32.8.
A horizontal reference wire is placed parallel to the anterior joint. The wire is placed approximately 8 to 12 mm above the joint. (Copyright © James J. Hutson, Jr., MD.) |
 |
|
Figure 32.9.
The joint may extend superior adjacent to the fibula. Fibular fixation is always placed on the superior side of the ring to avoid this area of the joint. (Copyright © James J. Hutson, Jr., MD.) |
-
The simple fracture of the C1-2 fracture is reduced and fixated with a 3.5- or 4.5-mm subchondral screw.
-
A stable base is fixated to the mid tibia
with the rings aligned orthogonal on the tibia with two AP half pins on
universal mountings. -
A horizontal reference wire is placed 8-
to 12-mm above the plafond, and the plafond bone block is adjusted and
aligned on the carbon fracture ring; thus the fracture axially aligned
and with correct rotation (3,4). -
The fracture is aligned in the lateral
view with apex anterior and posterior mal-alignment corrected using
manipulation of the foot and reduction techniques to reduce the
fracture. -
The plafond is fixated with three or four
divergent olive wires in the 60-degree arc of safe wire placement. A
third medial-face half pin is added to the fixation block. -
The fracture is compressed.
 |
|
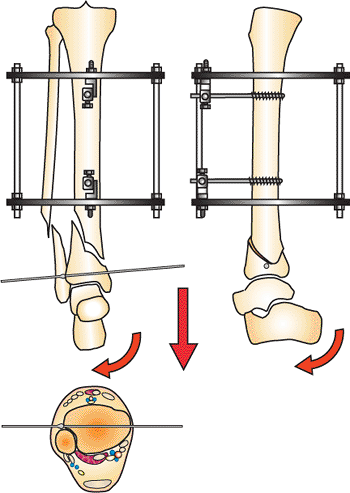
Figure 32.10.
The plafond is centered in the distal ring in alignment with the tibia shaft. Once the ring is aligned, the wire is tensioned and the distal ring distracted. Rotating the foot into dorsiflexion will align the lateral fluoroscopic image. (Copyright © James J. Hutson, Jr., MD.) |
 |
|
Figure 32.11.
The plafond and horizontal reference wire is manipulated to correct rotation and translation. The second toe is aligned with the tibial tubercle. (Copyright © James J. Hutson, Jr., MD.) |
 |
|
Figure 32.12.
At least two additional, divergent, olive wires are added to the ring. Oblique fractures are fixated with olive wires placed to improve fixation (orange arrow). The fracture is compressed. A third medial-face half pin is added to the stable base. (Copyright © James J. Hutson, Jr., MD.) |
 |
|
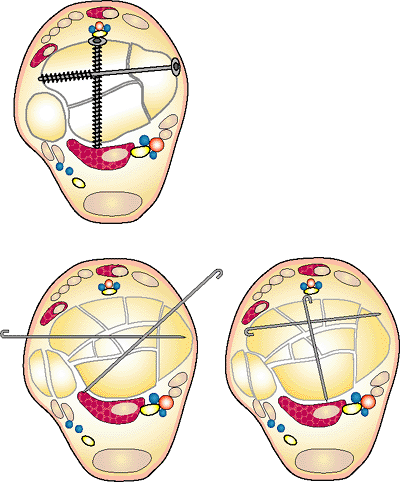
Figure 32.13.
Safe wire pathways. Wires may be placed in the posterior calcaneus, talar head, or cuneiform and metatarsal bases. Green 60-degree arc of safe wire placement at level of plafond. The wire posterior lateral to anterior medial can be used to secure posterior malleolar fragment. (Copyright © James J. Hutson, Jr., MD.) |
 |
|
Figure 32.14.
Posterior lateral wire placed too far around the lateral malleolus (black arrow) will penetrate the peroneal tendons. In the fluoroscopic view, the olive is behind the lateral malleolus. (Copyright © James J. Hutson, Jr., MD.) |
 |
|
Figure 32.15.
Posterior medial wire placed too far around plafond will penetrate the posterior tibial and long flexor tendons. The AP fluoroscopic view will show the olive behind the plafond (black arrow). (Copyright © James J. Hutson, Jr., MD.) |
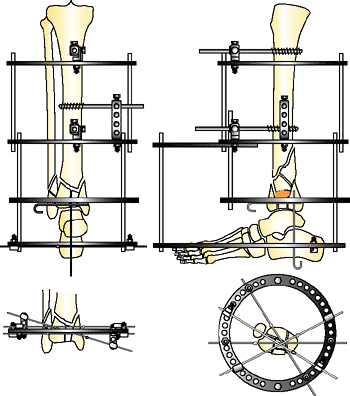
fractures is the application of universal connecting rods between a
fixation block on the tibia and plafond (Fig. 32.20).
Orthogonal rings are placed on the tibia and plafond. The tibial block
has two AP half pins and medial face pin. The plafond has at least
three divergent olive wires on the ring and the ring is placed
orthogonal to the joint. The fixation blocks are connected by universal
rods. The fracture is manipulated manually and the rods tightened. This
technique appears to be simple, but often results in poor reduction
because the surgeon cannot generate enough leverage to distract and
reduce the fracture. This technique has been greatly improved by the
concept of the Spatial Frame (Smith-Nephew, Andover, MA). This
technique uses the concept of slow reduction. The fracture is reduced
by defining fracture parameters on x-rays and generating a computer
print-out to reduce the tibial-shaft fixation block to the plafond
fixation block in small incremental steps by adjusting six connecting
rods. The technique is especially indicated when a late reduction of a
distal tibia fracture is required 3 or more weeks after the injury. The
early callus can be slowly distracted and the fracture reduced over 2
to 3 weeks avoiding the risk of aggressive reduction maneuvers.
 |
|
Figure 32.16.
Draw wire technique to reduce sagittal plane fracture. The olive wire bolt is not tightened. The tensioner tool pulls the olive toward the tensioner. The bolt is tightened and the wire tensioned. (Copyright © James J. Hutson, Jr., MD.) |
 |
|
Figure 32.17.
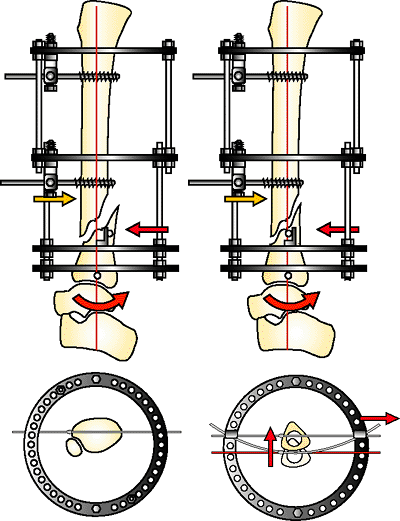
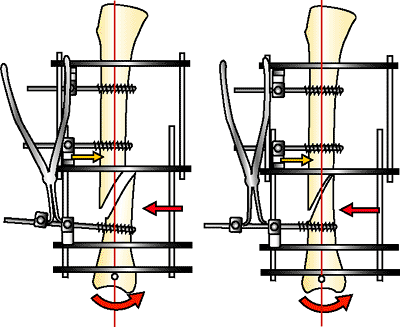
Arc wire technique. A wire is arced to the fixation bolt on either side of the ring. When tensioned, the arc flattens, reducing the posterior fragment. The AP half pin resists the force of the reduction (orange arrow). The metaphyseal bone block rotates around the tensioned, horizontal, reference wire (red arrow). (Copyright © James J. Hutson, Jr., MD.) |
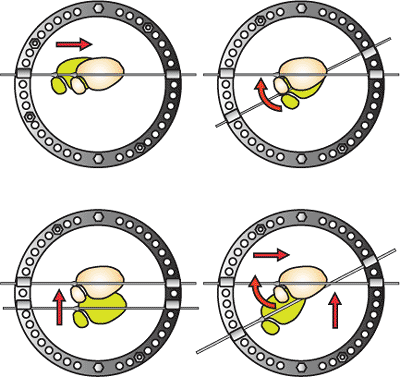
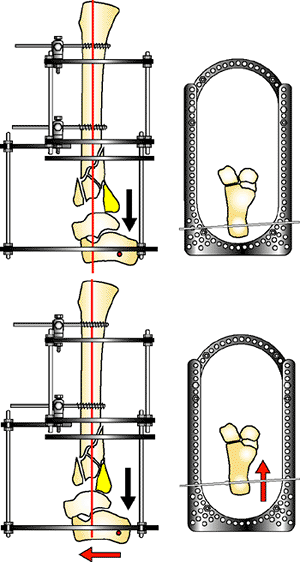
distraction between a stable orthogonal base and a horizontal reference
wire placed into the calcaneus and tensioned on a foot plate. The dome
of the talus must be distracted and aligned anatomically to reduce the
joint surface. If the limb is shortened, the talus will physically
occupy the space where the joint fragments need to be positioned to
reduce the plafond. If the talus is malpositioned posterior or
anterior, the soft-tissue attachment across the joint will tether the
fragments and prevent reduction. The posterior fragment that is
attached to the talus by the posterior capsule is impossible to reduce
unless the talus is axially aligned with the shaft (Figs. 32-22 to 32-24).
 |
|
Figure 32.18.
Laminar spreader technique. A second cube is added to the half pin and tightened. The ring cube is loosened. The laminar spreader is opened, powerfully reducing the oblique fragment of a longer type-A fragment. (Orange arrow shows resisting-fixation half pin.) The metaphysis rotates around the horizontal reference wire. (Copyright © James J. Hutson, Jr., MD.) |
 |
|
Figure 32.19.
C2 distal tibia fracture. A lag screw and fibula plate convert this to a type A fracture. Depending on the soft-tissue condition, the fracture is treated with internal or external fixation. (Copyright © James J. Hutson, Jr., MD.) |
 |
|
Figure 32.20.
Universal connecting rods. The surgeon uses physical manipulation to reduce the two fragments connected by universal connecting rods. This technique often leads to less than satisfactory reduction. (Copyright © James J. Hutson, Jr., MD.) |
 |
|
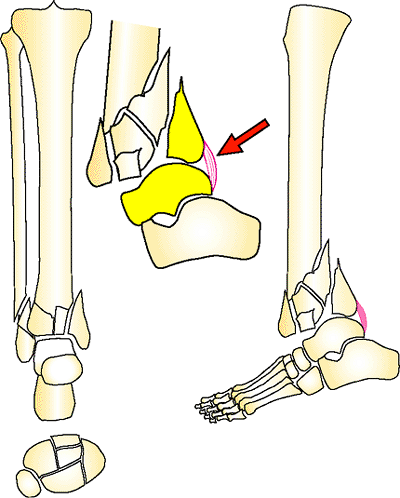
Figure 32.21.
C3 distal tibia pilon fracture. There is comminution of the joint, and the plafond is dissociated from the shaft. Observe the dense posterior capsule that controls the position of the posterior malleolar fragment. Wherever the talus resides, the posterior fragment displaces. The talar dome must be aligned to reduce this essential fragment. (Copyright © James J. Hutson, Jr., MD.) |
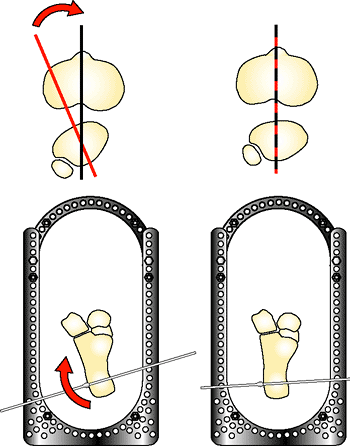
through a calcaneal, horizontal, reference wire to align the talus
axially with correct rotation (Figs. 32-25 and 32-26).
The talar dome is used as template to align the crushed fragments of
the plafond. Reduction of the posterior fragment is the key to
reduction. Distraction will reduce the fragment in many fractures. Some
fractures will have persistent posterior displacement or the posterior
malleolus will be rotated and incarcerated in the posterior capsule.
The fragment is gently freed with a smooth edged elevator. A threaded
Steinman pin is placed into the fragment. The fragment is rotated and
pulled anteriorly over the dome until it is in anatomic position. It is
pinned in place and used as a guide to reduce the mid and anterior
joint fragments. In low-energy fractures, there will be large fragments
to assemble with small screws and wires. In high-energy fractures there
will be fragments of crushed cartilage, morselized subchondral bone,
and deformation of larger joint fragments from crushing of the
cancellous bone. These fragments will not have anatomic contours. It is
possible to have the cortex reduced anatomically, but the joint is
angulated because of the crushing of the subchondral bone. These
fragments may require small osteotomies and local bone grafting to
regain alignment matching the talar dome. A level of joint crushing
will be encountered in which there are not fragments that can be
reassembled, and small Steinman pins are used to corral the fragments
into a salvage joint, which will provide support to the talus but ankle
joint motion will be lost. See Figures 32.27, 32.28, 32.29, 32.30.
superior to the joint fragment occurs, there will be a void that needs
to be filled with cancellous bone graft or a bone graft substitute. The
graft is placed as a spacer to prevent the joint fragments from
displacing superior into the metaphysis.
anterior fragments that are difficult to control with tensioned wires.
The combined use of Steinman pins, small screws, bone graft, and local
plates reduces the plafond. The fixation only needs to align the joint
surface. The bridging external fixation maintains axial alignment. This
is the essential strategy difference
with
plating and tensioned wire fixation. Plating technique requires that
the axial alignment is maintained by the plates and screws and the
plates must traverse the comminuted metaphysis to the shaft. Circular
tensioned wire technique requires that the internal fixation only align
the joint. Axial stability and alignment is maintained by the external
fixator and no hardware traverses the comminuted metaphyseal zone of
injury. This strategy is valuable in treating patients with compromised
soft tissues (1,5). See Figures 32.31, Figures 32.32, Figures 32.33, Figures 32.34, 32.35.
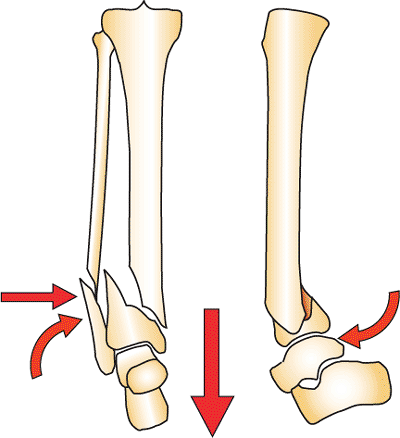
 |
|
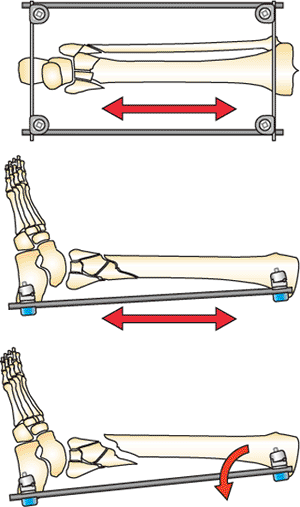
Figure 32.22.
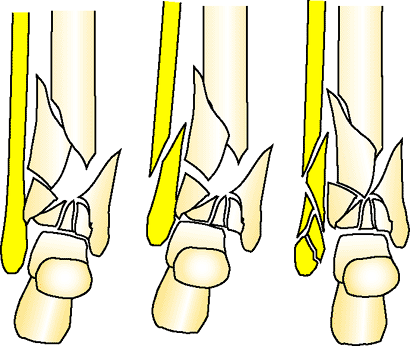
The three possible lateral malleolus fracture patterns: intact, simple, and comminuted. The fracture pattern of the fibula will influence the strategy for plafond reduction. (Copyright © James J. Hutson, Jr., MD.) |
 |
|
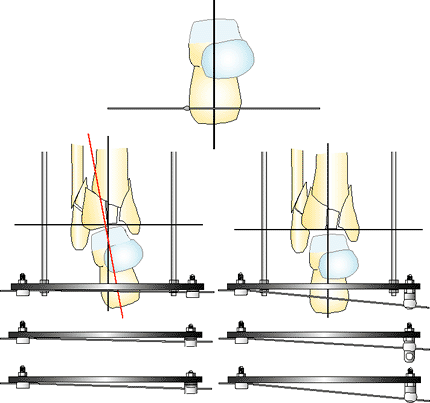
Figure 32.23.
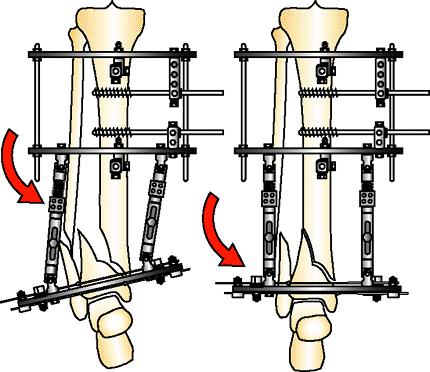
A stable orthogonal base is applied to the tibia. Two, posterior, threaded rods are connected to the foot plate. The fracture reduction ring is placed into the frame in a proximal position to be used later in the reduction. A horizontal reference wire is placed in the calcaneus. The foot is positioned to align the dome of the talus with the shaft. The posterior displacement of the foot must be corrected to reduce the joint fragments. Notice how the posterior malleolus (yellow) is reduced by moving the foot anterior. (Copyright © James J. Hutson, Jr., MD.) |
 |
|
Figure 32.24.
The foot is rotated on the foot plate until the second toe aligns with the tibial tubercle. Rotational alignment must be established at this point of the reduction. (Copyright © James J. Hutson, Jr., MD.) |
 |
|
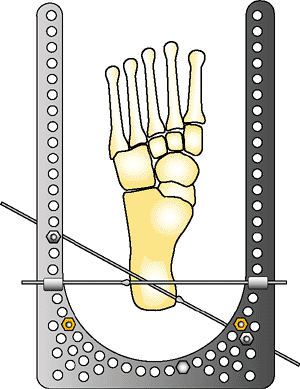
Figure 32.25.
The horizontal reference wire in the calcaneus is placed 90 degrees to the axis of the ankle joint. If the wire is placed in valgus or varus, or the talus does note reduce with traction, the wire can be adjusted away from the foot plate on washers, hinges, and post. Rarely, distraction will reveal an occult hind foot dislocation. The joint is reduced and pinned, and the reduction continues. (Copyright © James J. Hutson, Jr., MD.) |
 |
|
Figure 32.26.
The foot is positioned in plantar neutral position. A second, opposed, olive wire is placed superior to the foot plate from posterior medial to anterior lateral. The threaded rods are placed posteriorly, connecting the stable base to the foot plate (orange nuts). Notice that the medial calcaneus has no wires placed anteriorly where they could injure the posterior tibial nerve branches or artery. (Copyright © James J. Hutson, Jr., MD.) |
 |
|
Figure 32.27.
With the two AP pins tightened, the foot plate is distracted until the dome of the talus pulls away from the impacted plafond. Distraction of 10 to 15 mm is applied by moving the nuts connecting the foot plate rods to the stable base. (Copyright © James J. Hutson, Jr., MD.) |
 |
|
Figure 32.28.
Over distraction is the key to reduction. Without distraction, the dome of the talus occupies the space (green), which the plafond joint fragments occupy when reduced. If the posterior malleolar fragment does not reduce with distraction, a threaded Steinman pin (yellow arrow), small bone hook, or pulling device is used to pull the fragment anteriorly over the dome of the talus. The posterior malleolus is pinned in place (blue arrow) and the anterior fragments reduced. The fracture reduction ring is positioned superior and will be moved inferior after the joint reduction (black arrow). (Copyright © James J. Hutson, Jr., MD.) |
 |
|
Figure 32.29.
High-energy pilon fractures have impaction of the osteocartilagenous fragments. Dense white areas on the lateral view of the x-ray indicate crushed trabecular bone. The cortical fragments can be aligned anatomically (yellow outline), but the joint fragments are still not reduced and are crushed into the metaphysis (blue arrow). These fragments are dislodged and reduced onto the dome of the talus and held in place with local bone graft and small wire or screw fixation. (Copyright © James J. Hutson, Jr., MD.) |
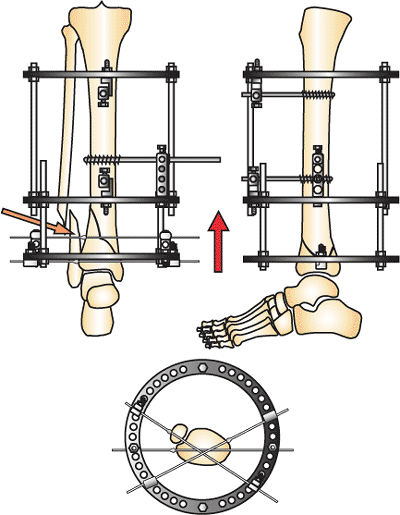
of metaphyseal comminution. If there are larger fragments, the
metaphysis is fixated with a cluster of three to four divergent olive
wires after closure of the approach for the open reduction. The
fracture reduction ring is initially placed in the frame but located
superior to the ankle. After open reduction, the ring is moved over the
plafond to fixate the fracture. If there is severe comminution of the
plafond and local fixation would have few intact bone fragments to
purchase, the fracture fixation ring is not moved down over the
plafond. The frame is used as a bypass bridging frame and maintained
until the fracture heals. The downside to this
technique
is that the fracture in this frame configuration requires 4 to 6 months
to heal. Subtalar joint stiffness will occur and require prolonged
physical therapy. Patients can walk with 50% weight with this frame in
place. This is not possible with half pin cantilever frames. See Figures 32.36 and 32.37.
 |
|
Figure 32.30.
Small screws and wires are used to fixate the fragments. Free wires protrude through the skin and are removed at 6 weeks in patients with bridging distraction. Brad wires are bent over 180 degrees and tamped into the bone. This prevents the pin from migrating. The anterior-to-posterior lag screw is used to control the posterior malleolus when the anterior plafond is not crushed. (Copyright © James J. Hutson, Jr., MD.) |
 |
|
Figure 32.31.
Spring plates are useful to control unstable anterior fragments. In some fracture patterns, a plate or multiple plates can be extended to the joint, and the circular fixator can be used as a bridging frame for 3 to 4 months (tensioned-wire fixation converted to external fixation with limited internal fixation). (Copyright © James J. Hutson, Jr., MD.) |
 |
|
Figure 32.32.
Internal fixation must be low profile. The retinaculum and capsule of the joint need to be closed (yellow arrow). If there is swelling and large plates, the skin will be closed over a hematoma, which will lead directly to the hardware and fracture. Early wound dehiscence and infection may result from this tenuous closure. (Copyright © James J. Hutson, Jr., MD.) |
 |
|
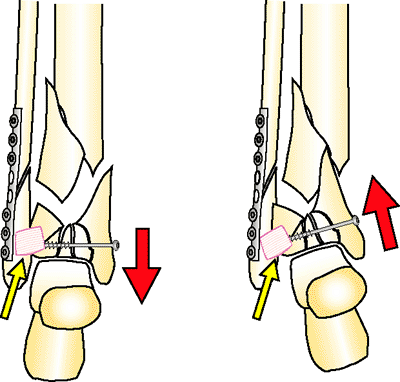
Figure 32.33.
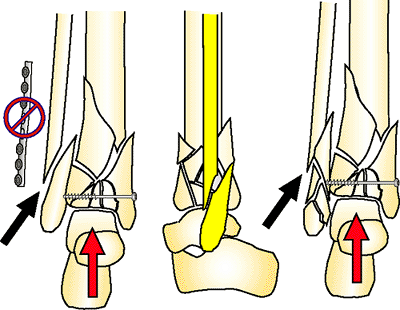
The posterior malleolus can be fixated with the following techniques: An olive wire is placed though the interval between the peroneal and Achilles tendon; an anterior to posterior screw is placed if the cortex is not comminuted anteriorly; an anterior buttress plate is placed and the posterior malleolus is lagged into the comminution; or a Steinman pin (0.062 or 0.094 in) can be drilled through the calcaneus and talus to pin the fragment to the dome and left in place for 6 weeks with the hind foot fixated by a distraction foot plate. The talar calcaneal pin is very useful to hold the initial reduction during limited open reduction. It is removed after screw fixation. (Copyright © James J. Hutson, Jr., MD.) |
 |
|
Figure 32.34.
After the open reduction with limited internal fixation (the fixation only maintains the alignment of the joint), the carbon-fiber fracture-reduction ring is moved down the threaded rods and three to four olive wires are placed. The olive wires are positioned to reinforce the limited internal fixation. Two threaded rods are added anteriorly between the stable base and fracture reduction ring. A medial-face half pin is added to the stable base. (Copyright © James J. Hutson, Jr., MD.) |
Axial length on the lateral side of the pilon is reestablished.
Fixation of the fibula to anatomic length requires that the plafond
also must be reconstructed to anatomic length (Figs. 32.39 and 32.40).
Slight shortening of the medial column will result in varus or a fibula
plus mortise. If there is metaphyseal comminution, bone grafting is
indicated to reconstruct the gap (Fig. 32.41).
When using circular tensioned-wire fixation, the fixator distracts the
fracture to length and fixation of the fibula becomes elective. Pilon
fractures with moderate comminution are reconstructed to anatomic
length, and the fibula should be aligned and fixated with a plate or an
intramedullary pin (Fig. 32.42). If there is
severe crushing, the surgeon has the option to shorten through the zone
of comminution and compressing the fragments to encourage union (see Fig. 32.42).
Patients with ischemic vascular disease, osteopenic bone, or diabetes
can have salvage reconstruction with acute shortening. The tibial shaft
can be compressed into the soft mushy bone, which is molded
over the dome of the talus. Distortion of the lateral malleolus will occur with 2- to 3-cm of shortening (Fig. 32.43).
This can be improved by removing a small segment of the fibula shaft to
recreate a new mortise. This technique also improves soft-tissue
coverage when patients have open wounds and are not candidates for free
flaps. A proximal lengthening to equalize leg length is combined with
shortening when patients have appropriate physiologic status (Fig. 32.44).
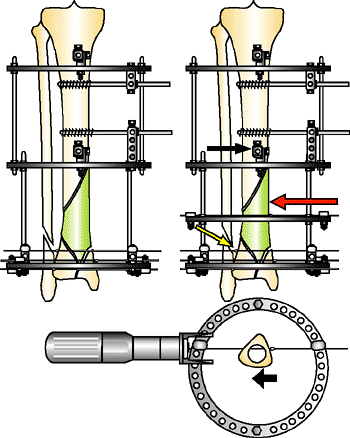 |
|
Figure 32.35.
Working length ring. Pilon fractures can have proximal extension. A ring is placed in the fixator to place proximal wires or pins. The placement of this ring is determined during preoperative planning. In this example, a draw wire technique is used to compress (red arrow) the shaft. A half pin proximal (black arrow) and olive wire distal (yellow arrow) are placed to resist the force of the reduction. (Copyright © James J. Hutson, Jr., MD.) |
 |
|
Figure 32.36.
C3 pilon fractures that have severe comminution will be encountered. The fragments are not amendable to tensioned wire or internal plating. (Copyright © James J. Hutson, Jr., MD.) |
 |
|
Figure 32.37.
The circular fixator is applied as a distraction frame aligning the joint. A medial to lateral olive wire is placed through the talar neck to stabilize the hind foot in neutral plantar flexion. Small brad and free wires are used to align the crushed joint with the dome of the talus used as a mold. Once the joint is aligned, the talus is mildly shortened to improve bone contact of the fragments. (Copyright © James J. Hutson, Jr., MD.) |
 |
|
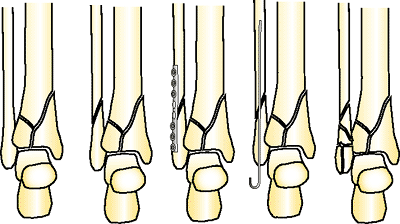
Figure 32.38.
The lateral malleolus will have five possible configurations when pilon fractures are treated: intact, no fixation, plate fixation, intramedullary fixation, and comminuted. (Copyright © James J. Hutson, Jr., MD.) |
 |
|
Figure 32.39.
By plating the fibula to length, the surgeon must also reconstruct the plafond to length. If the plafond is not reconstructed and held distracted, a nonunion will occur. If the tibia-fibula ligaments (yellow arrow) are intact, the classic varus collapse will occur after frame removal. (Copyright © James J. Hutson, Jr., MD.) |
 |
|
Figure 32.40.
If the fibula is plated and the tibia-fibula ligaments are disrupted (yellow arrow), the entire plafond can shorten, creating a fibula plus outcome where the lateral malleolus impinges on the calcaneus (green arrow). Both columns must always be reconstructed to the same length. (Copyright © James J. Hutson, Jr., MD.) |
 |
|
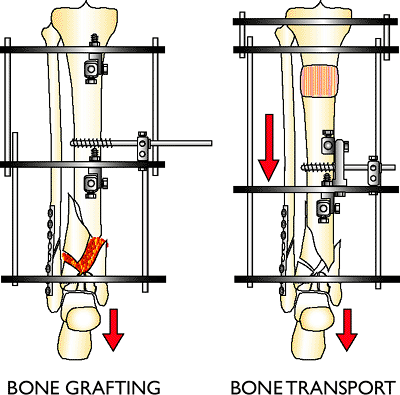
Figure 32.41.
If the soft-tissue envelope is stable, metaphyseal bone loss and crushing is reconstructed with local bone graft. When soft tissue is compromised, bone loss is reconstructed with an intercalary bone transport. Living bone is transported into the zone of injury and new bone is created proximally away from the injury. (Copyright © James J. Hutson, Jr., MD.) |
 |
|
Figure 32.42.
Acute bone shortening is a salvage technique to gain bone-on-bone contact in distal tibia fractures with bone loss and poor soft-tissue condition. The fracture ends are cut back as needed to allow stable bone-on-bone contact. The fibula also will have a bone resection so the columns are equal length. Acute shortening should not be greater than 2 to 3 cm. (Copyright © James J. Hutson, Jr., MD.) |
 |
|
Figure 32.43.
Oblique fractures without fixation can shorten but tend to displace (yellow). A lateral malleolus with comminution may shorten with less displacement. If the plafond is comminuted and mild shortening will be accepted, then oblique, lateral, malleolus fractures will need to have a section removed to allow shortening without fibular malalignment. (Copyright © James J. Hutson, Jr., MD.) |
-
The stable base is applied to the midshaft with two AP half pins or universal mounting cubes. The base is orthogonal.
-
A horizontal reference wire is placed in
the calcaneus. The hind foot is aligned on the foot plate to center the
dome of the talus with the axis of the tibia on AP and lateral
fluoroscopic images.![]() Figure 32.44.
Figure 32.44.
Acute shortening is accepted as leg length in patients who are not
candidates for lengthening. An elevated shoe is prescribed. A proximal
corticotomy with lengthening is used to regain length in patients who
are physiologically capable of bone transport. (Copyright © James J.
Hutson, Jr., MD.) -
The fracture is distracted. If the
fracture can be reconstructed to length, the fibula is fixated with a
plate or pin. When shortening of the comminuted metaphysis will be used
to facilitate healing, the fibula is not fixated. -
Distraction may produce anatomic
alignment of the joint surface. Percutaneous screws and pins are placed
to fixate the plafond. Percutaneous screws are also used to align
proximal metaphyseal and shaft fragments. -
If distraction does not produce
acceptable reduction, the fracture is approached through the anterior
medial or anterior lateral interval. The joint fragments are reduced
and fixated with small screws, wires, and plates. Bone graft is used to
support crushed fragments. The deep fascia and reticulum is closed over
the ankle joint. The skin is closed with interrupted 3-0 or 2-0 nylon
sutures. Staples are never used for pilon fractures. Surgical wounds
after open reduction of pilon fractures can require 3 to 4 weeks before
the sutures can be removed. -
The carbon-fiber fracture ring is moved
over the metaphysis, and at least three opposed divergent olive wires
are placed. An opposed olive wire is added to the foot fixation. -
Olive wires will not be placed at the
metaphysis when one of two fracture patterns are presented: (a) The
comminution is so severe that there are literally no fragments large
enough for fixation, or (b) the technique of bridging distraction with
limited internal fixation will be accepted as the definitive technique.
The foot fixation will add a second opposed olive wire in the calcaneus
and a medial to lateral talar-neck wire. -
A medial-face half pin is placed on the stable base.
-
A bulky compressive dressing is placed around the ankle.

essential to reduce inflammation and subsequent pin/wire infections.
Once the surgical wounds are healed, the leg is washed in the shower
with soap, removing all blood and secretions where the pin/wire enters
the skin. Skin that is tenting over wires is released under local
anesthesia. Gauze sponges are applied to skin that is over wires and
develops inflammation. Oral antibiotics (cephalexin, tetracycline,
ciprofloxacin hydrochloride, and trimethoprim-sulfa methoxazole) are
prescribed if inflammation worsens. Rarely, a patient will have
purulent drainage and require wire removal and intravenous antibiotics.
range of motion of the ankle and hind foot, or/and forefoot and toe
therapy is started. The patients are encouraged to place partial weight
on the leg using a sandal and increase weight as tolerated. Patients
should be placing 50% weight by the sixth week and some will be on
their full weight before frame removal.
fixation through the plafond/metaphysis, the foot plate and calcaneal
wires are removed in clinic 4 to 6 weeks after surgery. If the patient
had bridging distraction without wire fixation, the frame has to be
maintained for at least 4 to 6 months (the significant drawback of this
technique).
multiple fragments and the patient can place 50% or more of his/her
weight on the extremity. If the patient is not bearing weight at 3 to 4
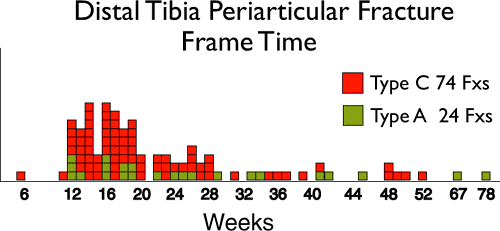
months, the fracture is not united. Average frame time is 4 to 6 months
for pilon fractures (Fig. 32.45). A local bone
graft is indicated if there is no callus formation after 3 to 4 months.
Outpatient frame removal with deep monitored sedation or general
anesthesia is recommended. The ankle is casted for 2 weeks and the
patient is encouraged to bear full weight in the cast. The cast is
removed in the office and a hinged ankle orthosis is placed,
which
the patient uses until mature callus is observed at the fracture site.
Physical therapy continues for an additional 6 months if funds are
available. The functional result at 1 year postinjury will be the
extent of recovery.
 |
|
Figure 32.45.
Frame removal time on 98 distal tibia type A and C fractures (F × s). Most fractures heal between 3 and 6 months. More complex fractures may need additional reconstructive procedures and may require many more months in the fixator. (Copyright © James J. Hutson, Jr., MD.) |
Coster TA, Stevens MS, Robinson B. Safe extracapsular placement of
proximal and distal tibial external fixation pins. Poster Presented at:
The Annual Meeting of The Orthopedic Trauma Association; 1997.