
Of these, reimplantation with a semiconstrained device provides the
most predictable result and is clearly the treatment of choice in the
authors’ experience. The results of this option are, however, dependent
upon technique and implant design (3,4,13).
-
A painful loose elbow prosthesis should be revised.
-
Those with a painless but
radiographically loose total elbow arthroplasty of either the humeral
or ulnar component should be followed carefully. Many of these patients
may not have pain, but progressive resorption due to particulate debris
or mechanical resorption can be extreme, may weaken the bone, and may
predispose the bone to fracture. Intervention and revision are
obviously indicated before this occurs. -
Evidence of joint sepsis demands
immediate surgical attention. Resection is recommended if the organism
is gram negative, the organism is antibiotic resistant, and/or the
process is chronic. Debridement may be offered for the acute infection
with a less virulent organism (15). -
Periprosthetic fracture with a loose implant.
-
Gross instability of the articulation.
-
Progressive ulnar neuropathy due to
changes associated with failure of the previous surgery justifies
reoperation to correct both conditions.
-
A loose implant but with minimal pain and
no evidence of progression and no radiographic evidence of osseous
resorption. Care must be taken, however, to follow patients
P.344
with
loose implants carefully to ensure that progression is not occurring.
If a patient is lost to follow-up, significant resorption can occur,
leading to pathologic fracture and making revision very difficult. -
Acute or subacute sepsis is an absolute
contraindication to reimplantation. Reoperation for debridement and
resection is the treatment of choice (15). -
Chronic, severe, debilitating comorbidity may be reason not to revise the loose implant.
However, from a technical perspective it is important to be aware of
the location of the tip of the implant referable to the intramedullary
canal and cortex, as this predicts cortex penetration and possible
fracture. Simple anterior-posterior and lateral views of the humerus
and ulna, usually attainable on the same film, are adequate to provide
this information. The precaution is to visualize sufficient proximal
and distal bone in both planes.
complicated custom implants have not been necessary to replace the
humeral component in our practice. Since 1981, the implant used at the
Mayo Clinic is the Coonrad-Morrey (Zimmer, Warsaw, ID) with an anterior
flange that allows fixation to the anterior osseous cortex. When the
bone graft matures, the flange decreases the likelihood of posterior
forces and rotatory torque from loosening the device. A larger flanged
device is now available for the specific purpose of providing greater
humeral fixation in the patient with compromised distal humeral bone.
The longer flange also allows greater flexibility when revising those
with more significant distal humeral bone deficiency. This technique
may be used with strut grafting in conditions that warrant it and is
discussed later.
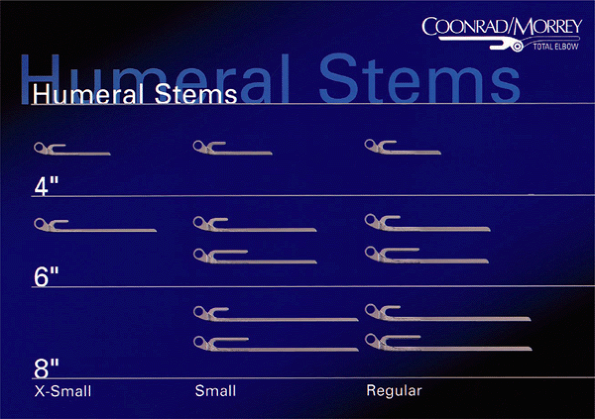
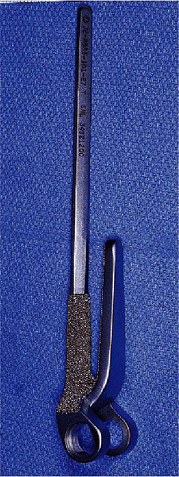
degrees of laxity. The device is available in 100-, 150-, and 200-cm
lengths with small and standard humeral component options. An
extra-small 100-cm implant is also now available (Fig. 19-1). The 200-cm implant has been of sufficient length for every condition encountered to date.
Extremely small canals require an extra-small implant. The
small-diameter implant is also available in an extended length to
bypass olecranon fractures, areas of avascular change, or lytic
segments caused by loosening or wear (Fig. 19-2).
Careful assessment of the radiographs before the surgery to determine
the need for any of the special devices is critical, so these are
available to the surgeon if needed.
preoperative planning is the availability of adequate bone graft. In
the primary procedure there is sufficient local bone to place behind
the flange. However, in revision procedures this is not the case. There
are three types of bone graft that may be needed in the revision
procedure:
-
A 1.5- з 2-cm corticocancellous graft.
This is sufficient to place behind the flange if reimplantation is
possible with a standard flanged device and if the bone quality allows. -
Cancellous impaction. As used at the hip (5,13)
for lytic defects, autologous cancellous bone is used in an impaction
mode. The volume required necessitates access to allograft material. -
Strut graft.
For periprosthetic fracture and extreme bone deficiency, allograft
struts are used. These features of the reconstruction are discussed
with the patient before surgery as appropriate.
 |
|
Figure 19-1.
The standard system includes humeral implants 100, 150, and 200 cm in length with small and standard sizes available. Extended flanges are available in 150- and 200-cm lengths. |
 |
|
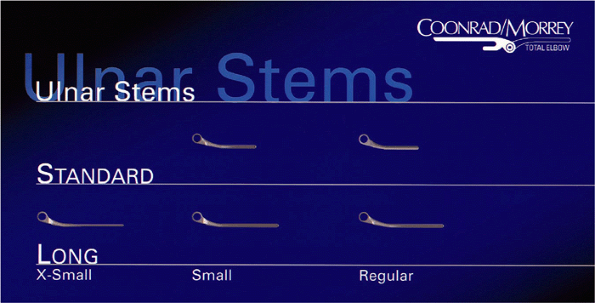
Figure 19-2.
The small and standard-sized ulnar components are available for routine ulnar component revisions. If the previous implant has been associated with a fracture or the tip of the implant must be bypassed, several longer components are available. |
system. If a long-stem device is to be used, an injection system to
deliver the cement throughout the course of the 200-cm device is
required. In most circumstances the cement must be mixed rapidly and
injected in the less viscous stage to attain adequate flow through the
nozzle into the humeral canal. If a cancellous impaction technique is
performed, the availability of the appropriately sized tubes and
nozzles is required (see later).
procedures or those with neurologic deficiencies, anticipation of a
nerve exploration requires the availability of a nerve stimulator and
magnification. A careful history and physical examination to ascertain
whether it has been transferred in the past and the current status of
the ulnar nerve is essential before the revision. Specifically,
palpation should try to elicit whether the problem is proximal at or
distal to the joint.
removal of cement, which may still be rigidly fixed. The availability
of a long-stemmed high-speed bone bur and an ultrasonic cement removal
system have been extremely helpful. It is important to either expose
the radial nerve and protect this nerve during the removal of humeral
cement or at least to palpate and protect against laceration or injury
during surgery.
of the articulation or contact the manufacturer for determination of
the method by which the implant may be removed. In some designs a
specific instrument is required to disarticulate the device.
components have failed. If one component is solidly fixed,
consideration of whether or not the well-fixed component can be left
intact is appropriate. This is often determined at surgery, but the
availability of the matching humeral or ulnar component must be
assessed before the procedure.
revision surgery has become more clearly understood, if no less easily
managed. There are three basic revision strategies that are applied as
a function of the specific pathology (Table 19-1).
In this chapter we will detail revision management by
removal/reimplantation, the salient features of strut graft management,
and impaction cancellous grafting.
We usually use a sterile Esmarch tourniquet to ensure the maximum
proximal exposure of the arm should this become necessary. The incision
is carried proximally as far as needed or as far as the drape and
tourniquet allow. The dissection is carried down to the triceps. In
reoperations we prefer to grasp the skin to ensure that the medial and
lateral subcutaneous flaps are as thick as possible and to avoid a
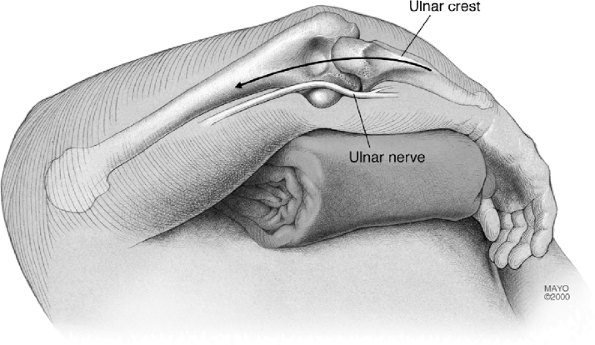
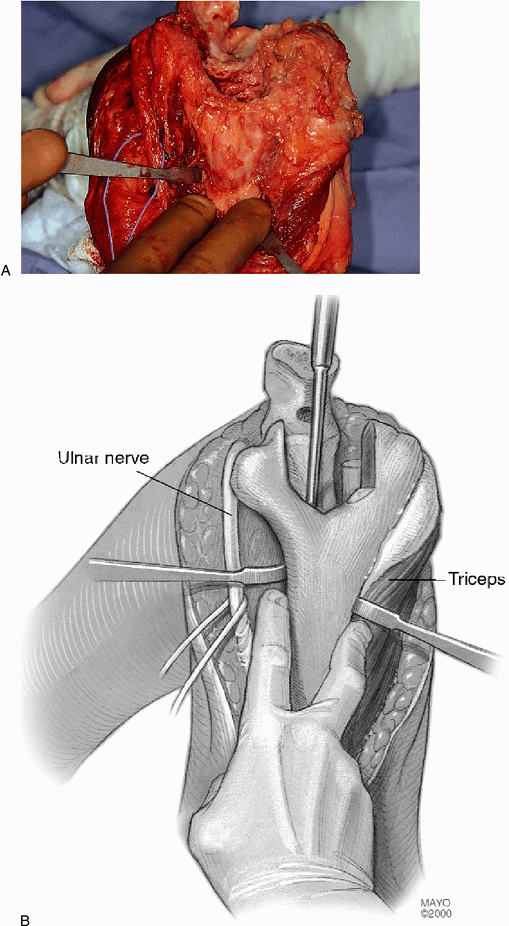
“button-hole” in the skin. The ulnar nerve is identified at the medial
aspect of the triceps as far proximal as necessary (Fig. 19-4).
Even if the nerve has been moved we do identify the structure
proximally and ensure ourselves of the position and location of the
translocated nerve. If it has not been
translocated
we isolate the nerve and dissect it free to its first motor branch.
Sometimes this can be rather difficult. If dense scarring or deformity
is present, magnification loops and possibly a nerve stimulator are
used.
|
TABLE 19-1. Complication After 40 revision procedures
|
||||||||||||||||||
|---|---|---|---|---|---|---|---|---|---|---|---|---|---|---|---|---|---|---|
|
 |
|
Figure 19-3.
As for primary cases the patient is placed in the supine position with the arm draped free and brought across the chest. The tip of the olecranon and medial epicondyle are marked. |
 |
|
Figure 19-4.
The medial aspect of the triceps is identified and the ulnar nerve is isolated. This may be rather easy or it can be extremely difficult, depending upon the previous surgery. |
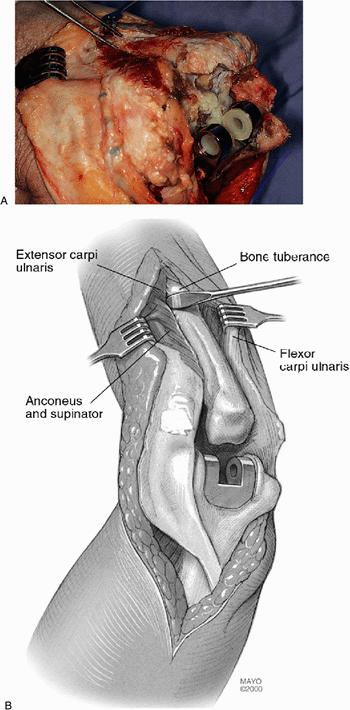
for most ulnar revisions, we reflect the triceps from the tip of the
olecranon in continuity with the forearm fascia as for a primary
procedure (Fig. 19-5) (1).
After the triceps has been adequately removed to expose the ulnar and
the medial and lateral aspect of the humerus, in virtually every
instance of ulnar revision we perform an extensive subperiosteal
exposure of the ulna past the tip of the implant to be revised. The
anterior condylar bone is removed if this is required for
disarticulation of the components. This is the case for the
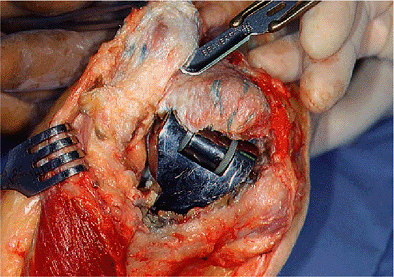
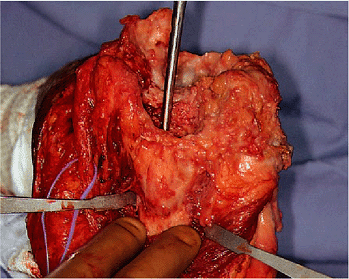
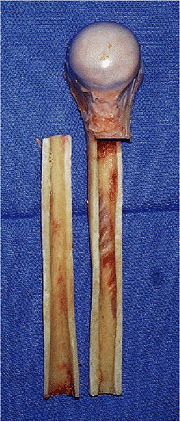
Coonrad-Morrey implant (Fig. 19-6). The device is disarticulated, and if the ulna is being revised, the component is usually loose and easily removed (Fig. 19-7).
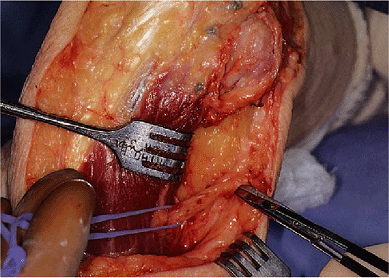
Exposure of the subcutaneous border of the ulna allows palpation of the
very thin cortex, which helps minimize the likelihood of penetration or
fracture at the time of preparation for the revision (Fig. 19-8).
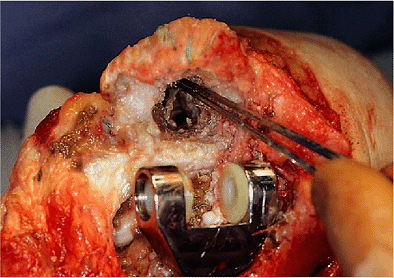
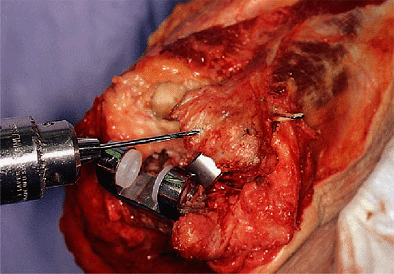
Meticulous cleansing of the medullary canal is required. If a
foreign-body reaction has occurred, osteolysis is common. The
debris-containing
membrane is thoroughly removed (Fig. 19-9).
The cement is removed with an osteotome. The ultrasound probe may also
be used to cleanse the canal; if the cement remains well fixed, it is
left intact and the canal is expanded to allow the reinsertion of
another component. This expansion is typically done with a simple
long-stemmed bone bur (Fig. 19-10).
 |
|
Figure 19-5.
The extensor mechanism is again reflected from the tip of the olecranon. The remnants of previous nonabsorbable suture are noted. The mechanism is reflected past the lateral column for adequate exposure. |
 |
|
Figure 19-6. The medial and lateral epicondyle may be left intact (A).
If a Coonrad-Morrey implant is being revised a small amount of bone removed from the anterior aspect of the trochlea or capitellum is all that is necessary to allow disarticulation of the device (B). |
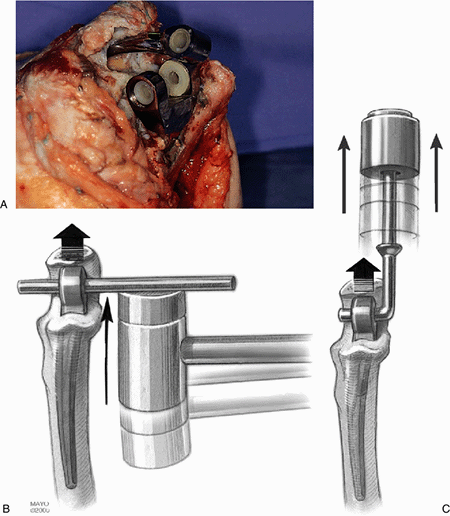 |
|
Figure 19-7. The ulnar component may be very loose and is easily removed (A). If not, a straight impacter is placed across the articulation and the implant is disengaged with direct blows (B), or a modified femoral component system is used (C).
|
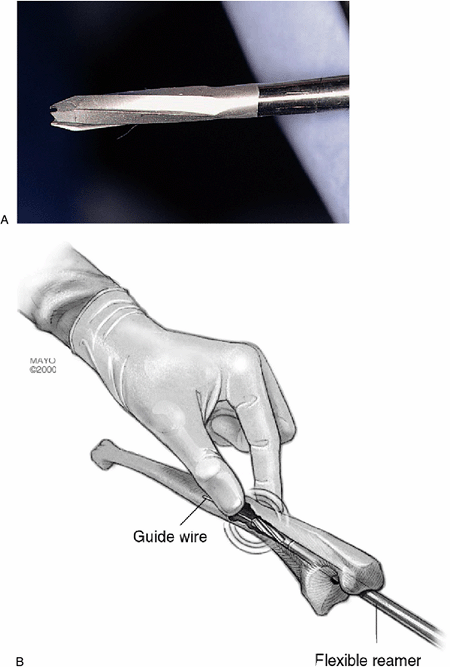
with a flexible reamer. Special 4.5- to 7-mm cannulated flexible
reamers are available for this purpose (Fig. 19-11).
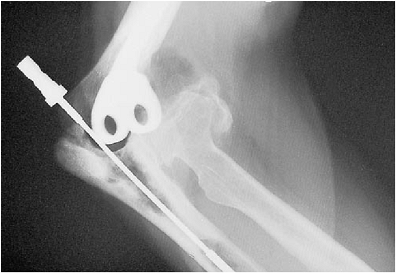
If the canal has undergone extensive thinning or if there is concern
about the likelihood of penetration of the canal, a radiograph taken
with the instrument down the medullary canal may be obtained to ensure
containment within the canal. Penetration allows extravasation of the
cement, causes loss of effective compression, increases the possibility
of stress fracture, and may cause mechanical or thermal damage to the
nerve (Fig. 19-12). If moderate osseous
compromise has occurred, the longer-stemmed component is used to bypass
the poor-quality bone of the proximal ulna. If the bone is of
insufficient quality to “hold” the cement, an impaction grafting
technique is done (see later). After a trial insertion the canal is
filled with cement and the implant is inserted to the correct depth (Fig. 19-13).
The depth of insertion is as recommended for the primary implant; that
is, the center of rotation is in the middle of the greater sigmoid
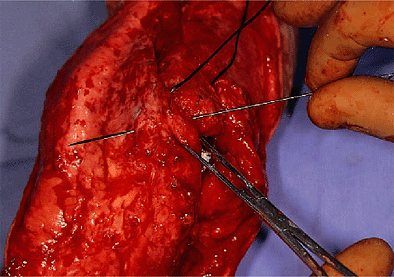
notch. The triceps is then reattached, as with a primary procedure.
Cruciate
drill holes and a transverse drill hole are placed in the proximal ulna (Fig. 19-14).
Nonabsorbable suture is used to reattach the triceps. The needle enters
the ulna from distal to proximal, starting on the side of the
reflection, in this instance, from the medial side. The triceps is
brought to its anatomic position, and the first suture passes into the
tendon (Fig. 19-15). The suture then
crisscrosses in the triceps tendon and is brought back through the
opposite cruciate drill hole. A transverse suture is then placed across
the triceps to further secure the repair. This is tied with the elbow
in 90 degrees of flexion (Fig. 19-16).
 |
|
Figure 19-8. A,B: The proximal subcutaneous border of the ulna is identified to avoid cortical penetration.
|
 |
|
Figure 19-10.
A small, 2-mm head on an extended bone bur shaft is effective to remove cement from an intact implant. A larger 5-mm “olive” is effective to expand the canal. |
 |
|
Figure 19-9. Any debris or soft tissue and membrane is identified and carefully removed. Loose cement is removed with an osteotome.
|
 |
|
Figure 19-11. A flexible 4.5- to 7-mm intramedullary reamer (A) is used to bypass defects and to safely prepare the medullary canal (B).
|
 |
|
Figure 19-12.
A lateral and an anteroposterior (AP) radiograph are obtained to ensure that the medullary canal has been safely identified and the cortex has not been violated. |
 |
|
Figure 19-13.
The implant has been inserted to the optimum depth, leaving the center of rotation of the ulnar component at the level of the center of rotation of the proximal ulna. |
 |
|
Figure 19-14. Cruciate drill holes are placed in the proximal ulna to reattach the triceps.
|
 |
|
Figure 19-15.
Triceps reattachment begins from the side of reflection. Thus the first move is medially across the olecranon and into the triceps tendon. |
 |
|
Figure 19-16. The transverse suture is also inserted and these sutures are tied with the elbow in 90 degrees of flexion.
|
triceps may be left attached to the ulna. The extensor mechanism is
identified and Kocher’s interval is entered. Often the anconeus will
not be evident or will have been replaced by scar tissue because of
previous dissections. In any event, the lateral column of the humerus
is identified and the triceps is elevated from its posterior aspect.
 |
|
Figure 19-17. A,B:
The medial and lateral shaft of the distal humerus is identified and palpated to ensure proper orientation of the cement removal instruments. |
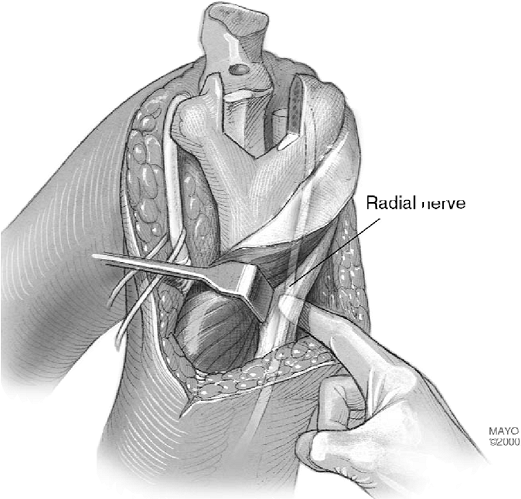
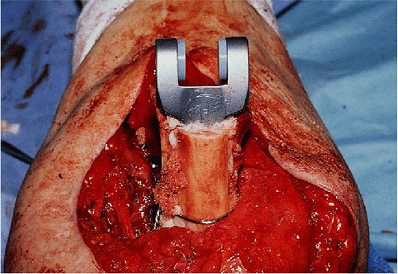
triceps margin is elevated from the humerus and the pseudocapsule is
entered. The articulation is then identified and the components are
separated. This allows the ulna to displace from the humerus. We then
“buttonhole” the humerus across the medial or lateral margin of the
triceps. Usually, the distal humerus emerges from the lateral aspect of
the triceps protecting the ulnar nerve. Sufficient release of soft
tissue allows the humeral component to be adequately exposed.
is not the case, a modest effort to disimpact the component is carried
out. If the implant remains well fixed, a long-stemmed, small bone bur
or similar device may be required to free the cement from the distal
humerus. Some form of disimpaction device is necessary to remove the
well-fixed implant. For loose implants this is not an issue.
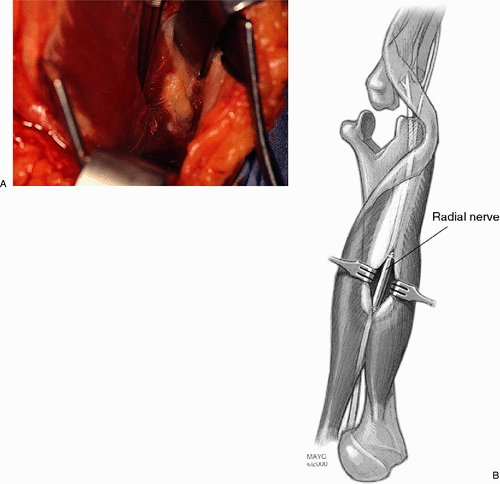
Great care should be used to avoid penetration of the cortex,
especially in the vicinity of the radial nerve. We are perfectly
content to leave a well-fixed bone
cement
interface intact and simply create an adequate space to receive the new
implant. The basic technique of cement removal is similar to that used
for femoral cement removal.
 |
|
Figure 19-18. A,B:
The skin incision is extended proximally if cement removal in the midshaft is anticipated. The radial nerve is exposed and is protected. |
 |
|
Figure 19-19. In some instances it is acceptable to expose and just palpate the nerve during cement removal.
|
 |
|
Figure 19-20.
Thin osteotomes are used to remove the cement in most instances. An ultrasonic device is the safest way to remove the cement that remains well fixed to the bone. |
fracture with a long-stem implant. In this setting a cortical strut
graft is also used as discussed later.
been adequately prepared, the ulnar component is identified; if it is
intact, the humeral component is matched to it. If it is loose this
component must also be revised according to the technique described
earlier.
tourniquet and obtain hemostasis, after which the tourniquet is
reapplied. We drain only those in which the bleeding
has
not been well controlled. If both components are being revised, the
ulnar component is first inserted and the cement is allowed to harden.
The humeral canal is then filled with the injection system to deliver
the cement to the desired level of the medullary canal. In most
instances the 15-cm or occasionally the 20-cm humeral stem will be
used. If possible, a canal plug of cancellous bone should be used to
improve bone/cement intrusion. If it has been released, the triceps is
reattached with nonabsorbable sutures in a crisscross fashion described
earlier.
an absorbable 0 suture. The deep structures around the ulnar nerve are
brought anterior to the medial epicondyle to isolate the nerve in a
subcutaneous pocket. The remainder of the closure is routine. If
flexion contracture or wound healing is a concern, we place the patient
in full extension with an anterior splint.
extremity as tolerated if there are no wound problems. Discharge from
the hospital occurs at about 3 to 5 days with instructions to use the
extremity as dictated by functional demands. Rechecking at 3 weeks
allows removal of the stitches and inspection of the wound. If all is
going well, the patient may increase activity as tolerated. No formal
physical rehabilitation is needed or prescribed. The postoperative
recommendation is for the patient not to lift more than 4 or 5 kg as a
single event or more than 1 kg on a repetitive basis. Whether at the
humerus or ulna the basic technique is the same.
-
The ulnar nerve must be identified as the initial step in the exposure.
-
The shaft of the component to be revised,
either the humerus or the ulna, is exposed in the region of osseous
deficiency or potential neural injury. For the humerus this requires
exposure of the radial nerve. For the ulna this requires exposure to
the level of the tip of the implant, to the fracture, or to the
pathology of concern. -
Trial reduction is essential to ensure
adequate soft-tissue release and to be certain that the articulation
can be completed without difficulty. -
If an extensive dissection has been carried out, the tourniquet should be released and hemostasis obtained before cementation.
-
If a fracture has occurred or if osseous
integration is required, then a period of immobilization is
appropriate. Rigid immobilization for 3 weeks is typically used.
Flexion-extension splints may then be used if needed. -
Be sure that an adequate array of implants and options are available in unpredictable cases.
is desirable to augment the length of the humerus, cortical strut
allografts are employed (Fig. 19-21). The
brachialis is safely elevated subperiosteally for the entire length of
the anterior humerus as needed and the strut graft is slid in place.
Because the host bone is usually of poor quality, a second graft is
used to keep the wire from cutting through the host cortex. For bone
deficiency the posterior strut is extended distally to compensate for
bone loss (Fig. 19-22). For instances where
struts are used, the radial nerve is exposed and protected during the
placement of the wire or during passage of the strut itself. We avoid
cables and usually employ 18-gauge wire for fixation of the struts. At
least three wires are necessary for fractures and at least two for
simple augmentation.
augment lost distal humeral bone, the long flange of the device should
attain the depth of insertion to overlap the host bone for at least 2
cm (Fig. 19-23).
 |
|
Figure 19-21.
A cortical strut allograft is harvested from a humeral allograft. The proximal portion of this graft can be harvested if cancellous bone is needed. |
 |
|
Figure 19-22. In instances of complete distal humeral deficiency (A), a posterior strut is added (B).
|
 |
|
Figure 19-23. The flange should engage at least 2 cm of native bone.
|
osteolytic lesions of the distal humerus or proximal ulna is carried
out as follows (Fig. 19-24).
-
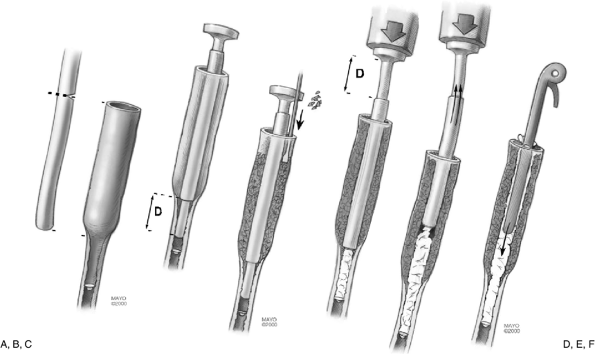
All endosteal soft tissue is carefully removed and the canal is plugged with a Silastic device or with cancellous bone.
![]() Figure 19-24. A: The outer tube or nozzle for impaction grafting is cut to the length that corresponds to the extent of the lytic process. B: The elbow injector tube is then inserted through the outer tube extending distally for a distance D required to securely fix the component into normal host bone. C: Cancellous bone graft is tightly packed around the outer tube. D:
Figure 19-24. A: The outer tube or nozzle for impaction grafting is cut to the length that corresponds to the extent of the lytic process. B: The elbow injector tube is then inserted through the outer tube extending distally for a distance D required to securely fix the component into normal host bone. C: Cancellous bone graft is tightly packed around the outer tube. D:
The cement is then mixed in the canister of the elbow injector system
and inserted on the inner nozzle. Cement is injected through the nozzle
while withdrawing to the level of the outer tube. E:
At this point both tubes are simultaneously withdrawn while injecting
cement into the void created by the impacted graft sleeve. F: The implant is carefully inserted to the desired length. The implant is left undisturbed until the cement is fully cured. -
The nozzle of tubing used for femoral cementation is cut to the length that corresponds to the extent of the lytic process (Fig. 19-24A). This is the outside tube.
-
The elbow injector tube is then inserted
within the femoral tube extending distally into normal host bone to the
depth necessary to fix the selected length of the ulnar component (Fig. 19-24B). -
Cancellous bone graft or graft substitute is tightly packed around the outer tube (Fig. 19-24C). Take care to keep the tubes from being bent.
-
The cement is then mixed in the canister of the smaller elbow injector system and inserted on the nozzle in situ. Cement is injected through the nozzle while withdrawing to the level of the outer tube (Fig. 19-24D).
-
At this point both inner and outer tubes
are simultaneously withdrawn while injecting cement into the void
created by the larger tube (Fig. 19-24E). -
The implant is carefully inserted to the desired length (Fig. 19-24F) and is left undisturbed until the cement is fully cured.
review literature with regard to revision of total elbow arthroplasty.
Posttraumatic conditions accounted for the greatest incidence of
failures in the early experience with elbow replacement (8).
Our experience with 40 cases done over the last 11 years has been
rather gratifying but has been associated with the anticipated problems
of revision surgery. The mean arc of motion is 25 to 130 degrees. The
ulnar nerve is vulnerable with such procedures, as is the possibility
of fracturing one of the epicondyles (see later). Nonetheless the
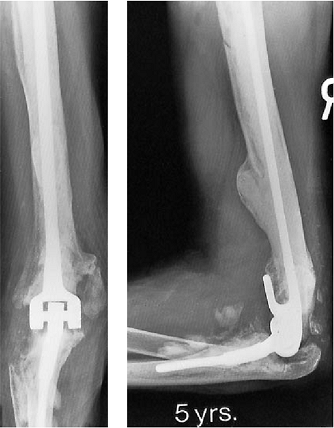
overall results in our experience with 40 procedures is 88%
satisfactory, with an average follow-up of 5 years (4). Surprisingly, there has been no revision for mechanical loosening in this sample to date (Fig. 19-25). These results are considerably better than our early experience (10). One case report of cancellous impaction
grafting has been reported (7).
The outcome of 12 of our cases of impaction grafting is currently under
review. Preliminary assessment reveals 10 of 12 (88%) are satisfactory
between 2 and 6 years after surgery. The results of 14 strut graft
augmentations are currently under review. There are no firm data on
this experience at this time (12).
 |
|
Figure 19-25.
A typical 5-year result from simple reimplantation. Note stable bone cement interface and evidence of prior implant, which had eroded into the anterior humeral cortex. |
those of the primary operation but less than those for treatment of the
stiff elbow (Table 19-1) (6).
Surprisingly, we have only a 20% complication rate over the last 8
years. For reasons not clear and in spite of all of the risk factors,
we had no infection in the first review. A subsequent assessment by
King et al. also revealed no infections after 41 reimplantation
revisions. There has been one (8%) infected after the impaction
grafting procedure. If infection occurs with revisions, removal of the
implant is usually required. Although the patient is left with a flail
elbow, I am not very enthusiastic about another revision procedure at a
later date.
due to stretch of the ulnar nerve and is typically a sensory
deficiency. I have not reexplored any of these patients. One radial
nerve was transected with a Midas Rex in a patient who had extremely
thin bone. It is this experience that has prompted the preceding
recommendation to always expose the radial nerve if cement is being
removed from the midshaft of the humerus. We have had one instance of
triceps disruption and two wound-healing problems. To date, there have
been no mechanical loosenings requiring revision.
ulnar component 3 years after a custom implant was inserted, at which
time the ulna was fractured. This device had a rigid hinge with no
laxity or freedom at the articulation. The radiograph demonstrated
loosening of the ulnar component, but the humeral side looked solidly
fixed. Nevertheless the patient had pain with internal and external
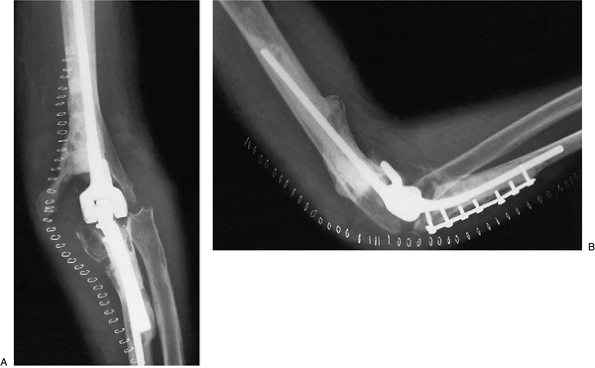
rotation of the humerus (Fig. 19-26). At the
time of revision the humeral component was in fact loose, as was the
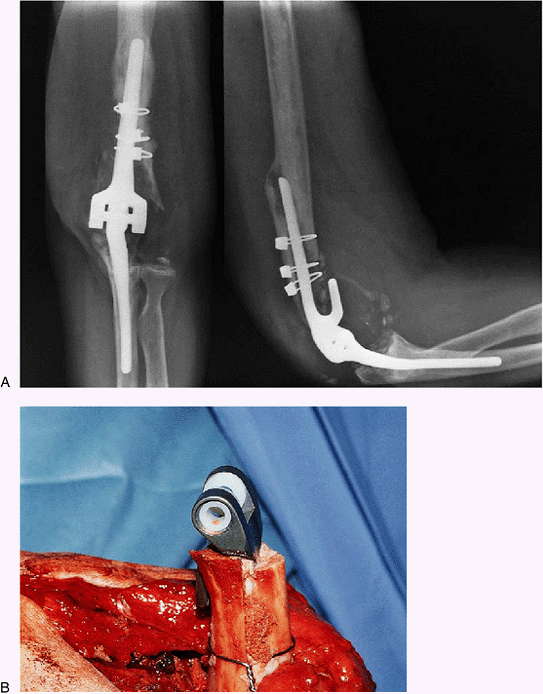
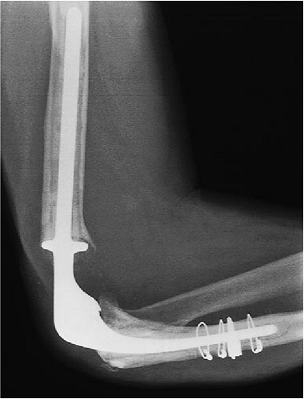
proximal ulna. A long-flanged humeral component was used (Fig. 19-27).
The ulna fracture had not healed, requiring a long ulnar implant with
strut grafting. Excellent motion from 20 to 135 degrees and minimal
pain were present as found (Fig. 19-28).
underwent joint replacement arthroplasty in 1980, but the replacement
loosened and was revised in 1988. This implant also loosened, migrating
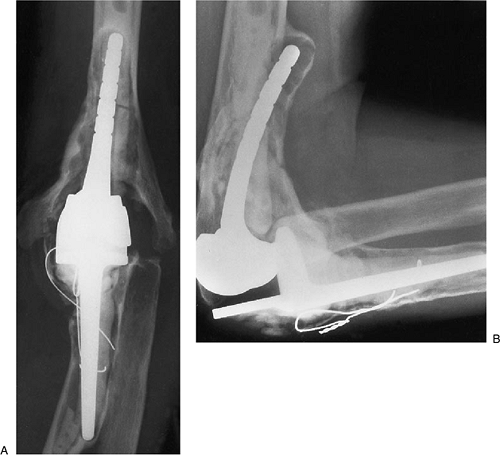
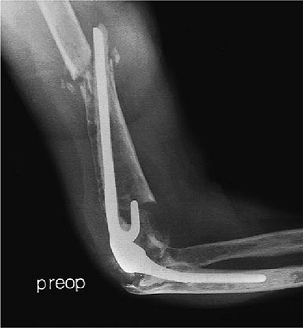
proximally and the tip eroding anterior (Fig. 19-29). With the technique described earlier, an allograft was used to replace the proximal ulna (Fig. 19-30). Bone graft was placed behind the anterior flange and a 150-cm humeral component was inserted down the humeral canal (Fig. 19-31). The patient has excellent motion 1 week after surgery. The radiograph shows a well-fixed implant (Fig. 19-32).
sustained a periprosthetic fracture of the humerus and extensive
erosion of the posterior distal one-third of the humerus (Fig. 19-33).
At surgery the ulnar component was intact. Strut grafts were placed
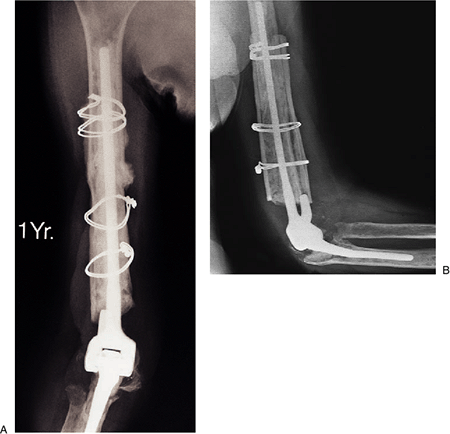
anterior and posterior, both extending past the fracture (Fig. 19-34). At 1 year the implant is solid, the fracture has healed, and the patient has minimal pain (Fig. 19-35A,B).
 |
|
Figure 19-26.
The preoperative radiograph showing absence of distal humerus and a prior fracture of ulna treated by cerclage wiring. The ulnar component was loose and the humeral bone deficient. |
 |
|
Figure 19-27. A long-flanged implant was used.
|
 |
|
Figure 19-28. The long flange and humeral and ulnar strut grafts were used.
|
 |
|
Figure 19-29. AP (A) and lateral radiographs (B)
of a patient after two failed revision procedures showing the resurfacing implant eroding through the anterior proximal portion of the midhumerus. The lateral view also shows that the proximal ulna is completely eroded and that both the components are loose. |
 |
|
Figure 19-30.
An allograft has been used to replace the proximal ulna. The allograft has been secured with a semitubular plate with single cortical screws. The screws are stabilized with cement. |
 |
|
Figure 19-31. A,B: The humeral component is inserted and stabilized with a bone graft behind the flange of the prosthesis.
|
 |
|
Figure 19-32. A,B:
Five days after surgery the patient has very good early motion. The radiograph shows a well-fixed implant with a range of motion between 40 and 110 degrees at 5 days. |
 |
|
Figure 19-34. This was treated by anterior and posterior strut bone graft extending to the level of the articulation.
|
 |
|
Figure 19-33.
A periprosthetic fracture at the midhumerus associated with grossly loose humeral component and marked distal humeral bone loss. |
 |
|
Figure 19-35. A,B: The fracture has healed and the graft has been incorporated at 1 year.
|
 |
|
Figure 19-36.
Extensive osteolysis of ulnar component 6 years after elbow replacement. The humeral component is also involved in this 58-year-old patient. |
 |
|
Figure 19-37. An anterior and posterior strut graft was placed along with impaction grafting.
|
At surgery structural deficiency required anterior and posterior strut
grafting as well as impaction grafting of the proximal ulna (Fig. 19-37). At 2 years the reconstruction was stable and pain was minimal.
HE, Inglis AE, Ranawat CS, et al. Results of total elbow arthroplasty
as a salvage procedure for failed elbow reconstructive operations. Clin Orthop 1987;219:185.