
mobile and stable elbow joint. The elbow allows the hand to be
positioned in space, it provides power for lifting, and it helps to
stabilize the upper extremity. Distal humerus fractures comprise a
small portion of upper extremity fractures but are often difficult to
treat. The treatment of choice for displaced distal humerus fractures
in adults is open reduction and internal fixation using plates and
screws. This chapter illustrates open reduction and internal fixation
of distal humerus fractures.
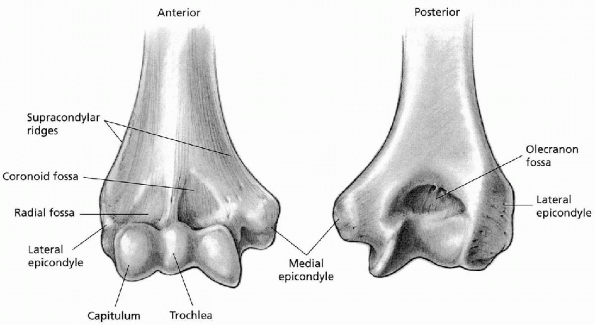
Each of these columns is roughly triangular and is bound on its outer
border by a supracondylar ridge. The distal aspect of each column is
defined as a condyle, each containing an articulating portion (trochlea
or capitellum) and a nonarticulating portion (medial or lateral
epicondyle). The forearm extensor muscles originate from the lateral
epicondyle, and the flexor muscles originate from the medial
epicondyle. The capitellum is hemispherical and projects anteriorly; it
articulates with the radial head. The trochlea is cylindrical in shape
and articulates with the proximal ulna. The articular cartilage surface
of the capitellum and trochlea projects downward and forward from the
end of the humerus at an angle of approximately 30 degrees. The
carrying angle for the elbow (trochlea-olecranon relationship) is
approximately 4 to 8 degrees of valgus.
 |
|
FIGURE 10-1. Anterior and posterior views of the distal humerus.
|
the articular surface on the anterior surface of the humerus; these
fossae receive the coronoid process and radial head, respectively.
Posteriorly, the olecranon fossa receives the tip of the olecranon,
making it possible for the elbow to go into full extension.
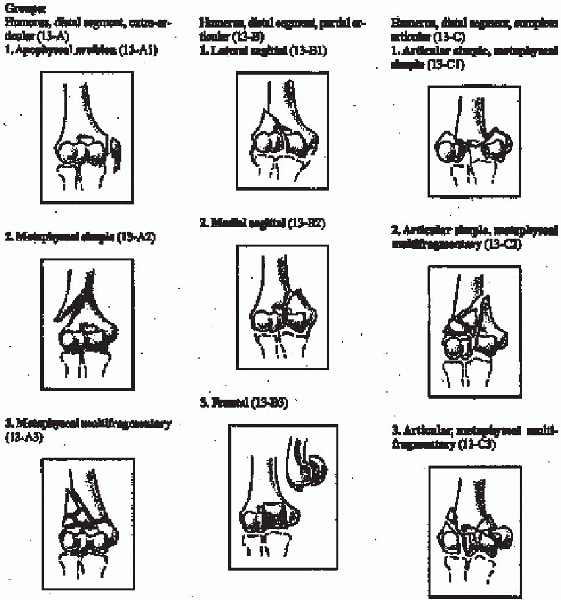
humerus fractures based on the amount of fracture displacement and comminution (Fig. 10-2):
 |
|
FIGURE 10-2.
The Riseborough and Radin classification of intraarticular distal humerus fractures. (From DeLee JC, Green DP, Wilkins KE. Fractures and dislocations of the elbow. In: Rockwood CA, Green DP, eds. Fractures in adults, 2nd ed. Philadelphia: Lippincott, 1984:559-652. Copyright 1980, Rochester, MN. By permission of Mayo Foundation for Medical Education and Research. All rights reserved.) |
distal humerus fractures are divided into three main categories. Type A
fractures are extraarticular, Type B fractures are partial articular,
and Type C fractures are complete articular fractures. These categories
are then subdivided into subtypes:
-
Type A: extraarticular fracture
-
A1: apophyseal avulsion
-
A2: metaphyseal simple
-
A3: metaphyseal multifragmentary
-
-
Type B: partial articular
-
B1: lateral sagittal
-
B2: medial sagittal
-
B3: frontal
-
-
Type C: complete articular
-
C1: articular simple, metaphyseal simple
-
C2: articular simple, metaphyseal multifragmentary
-
C3: articular, metaphyseal multifragmentary
-
best treated by open reduction and internal fixation. The favorable
results of operative treatment compared with those associated with
skeletal traction or cast immobilization have been well documented.
Operative reduction affords the opportunity to accurately reduce the
articular surface and restore its congruous relation to the olecranon,
thereby ensuring the intrinsic stability of the humeroulnar relation.
However, when determining the optimal management for fractures of the
distal humerus, several factors must be taken into account. These
include the amount of displacement and comminution, the presence of
osteoporosis, the functional demands and expectations of the patients,
the presence or absence of associated injury, the patient’s overall
medical condition, and finally the surgeon’s experience.
Oblique radiographs may also be obtained for further fracture
definition. Traction radiographs may better delineate the fracture
pattern and may be useful for preoperative planning. Because
intercondylar fractures are much more common than supracondylar
fractures in adults, the radiographs should be scrutinized for evidence
of intraarticular fracture extension. Comparison radiographs of the
contralateral extremity are useful for preoperative planning.
before one attempts any form of surgical intervention. Although useful
for simpler fractures, preoperative planning is critical for more
complex injuries. This forces the surgeon to understand the
“personality of the fracture” and mentally prepare an operative plan.
All aspects of the reduction and fixation should be drawn out to help
avoid technical pitfalls and ensure that all the needed equipment is
available.
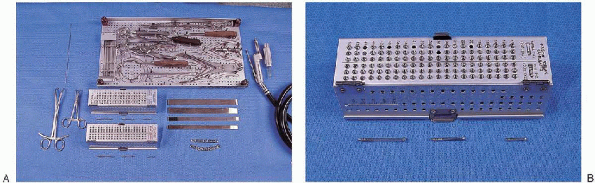
fixation of a distal humerus fracture include the following (Fig. 10-5):
 |
|
FIGURE 10-3. The OTA classification of distal humerus fractures. (From Orthopaedic Trauma/Committe for Coding and Classification. Journal of Orthopaedic Trauma 1996; 10 (Suppl 1).
|
 |
|
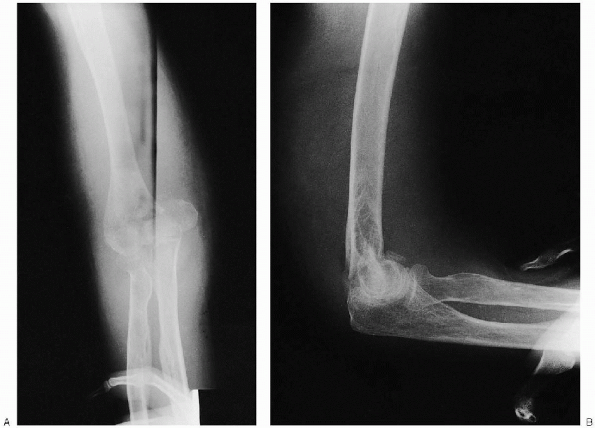
FIGURE 10-4. Anteroposterior (A) and lateral (B) radiographs demonstrating a displaced intraarticular distal humerus fracture.
|
 |
|
FIGURE 10-5. Instruments for ORIF of distal humerus fracture: Kirschner wire (top left); cerclage wire set (top tray); (bottom row, left to right)
large- and small-pointed reduction clamps (2), small-diameter cannulated screws, osteotomes, 3.5-mm pelvic recon plates (from set), oscillating saw (A). Small diameter cannulated screw set (close-up) (B). (continued) |
 |
|
FIGURE 10-5. (Continued) Recon plates (close-up) (C).
|
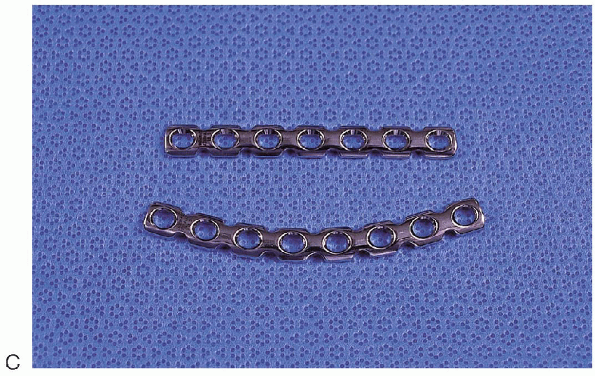
-
Small fragment plate and screws
-
Large fragment plate and screws
-
Pelvic instrument and implant sets
-
Kirschner wires
-
Small-diameter cannulated screws
-
Large- and small-pointed reduction clamps
-
Cerclage wire set
-
Osteotomes
-
Oscillating saw
-
Herbert or Acutrac screw set (for small articular fragments)
-
Mini fragment set (for small articular fragments)
 |
|
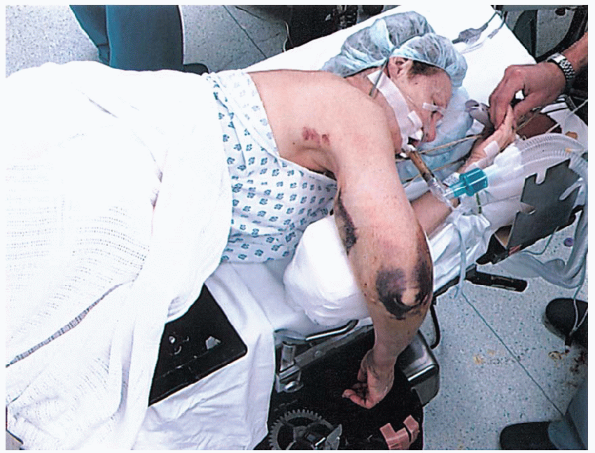
FIGURE 10-6. Placement of the patient in a lateral decubitus position with the elbow supported on pad attached to the table.
|
I prefer to place the patient in a lateral decubitus position. The arm
is held outright and the elbow supported on blankets or on a
well-padded attachment to the operating table. The iliac crest is
prepped and draped if bone grafting is anticipated. Surgery is
performed under tourniquet control; a sterile tourniquet is used to
provide a wider sterile field and the ability to reapply the tourniquet
as needed.
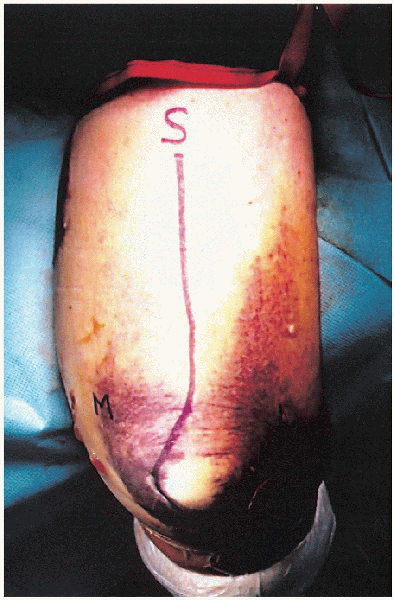
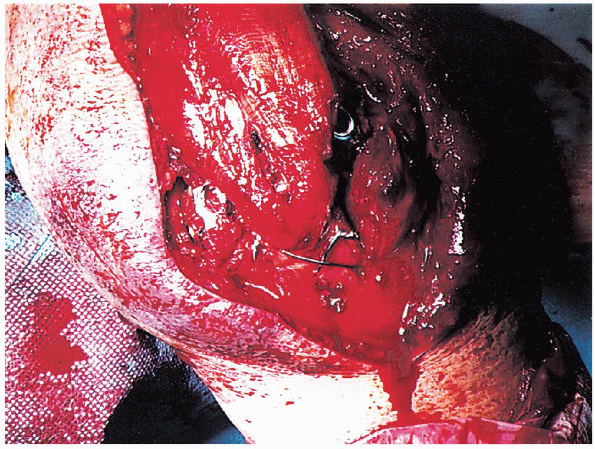
midline skin incision is made on the posterior aspect of the distal
arm, curving medially around the tip of the olecranon and extending to
the subcutaneous border of the proximal ulna (Fig. 10-7). The incision is carried to the triceps retinaculum, and deep medial and lateral soft tissue flaps raised (Fig. 10-8).
 The ulnar nerve is identified proximally and tagged with a Penrose drain or vessel loop (Fig. 10-9).
 The ulnar nerve is mobilized proximally to the medial intramuscular
septum and distally through the fascia of the flexor carpi ulnaris. One
must be careful to maintain the motor branches that arise at the level
of the distal humerus and enter into the flexor carpi ulnaris. By
mobilizing the nerve proximally and distally, traction on the nerve
during the postoperative rehabilitation is prevented and the nerve is
kept in the soft tissues out of the way of the internal fixation. I
prefer to find the nerve proximally after it pierces the intermuscular
septum; it is easier to palpate and mobilize. The Penrose drain is held
together with a suture, not a clamp, to avoid placing extra tension on
the nerve by the weight of the clamp.
 |
|
FIGURE 10-7.
A midline skin incision is made on the posterior aspect of the distal arm, curving medially around the tip of the olecranon and extending to the subcutaneous border of the proximal ulna. |
 |
|
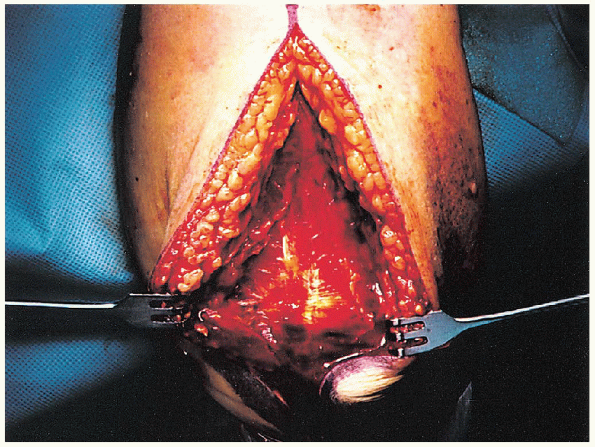
FIGURE 10-8. Exposure of the triceps retinaculum.
|
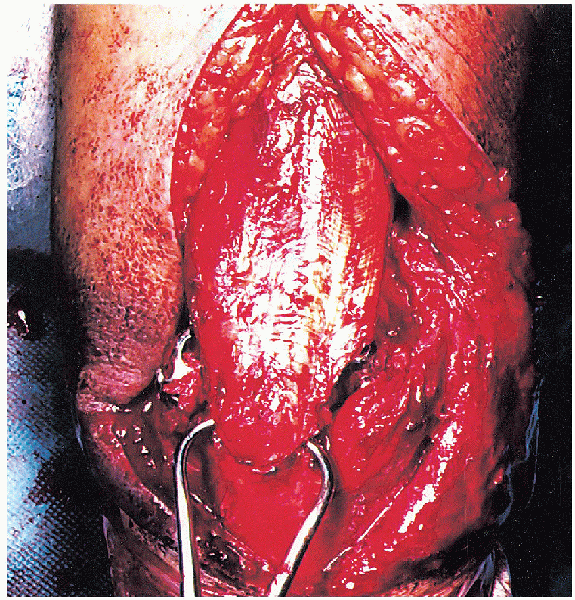
described, my preference has been to use a transolecranon approach
using a chevron osteotomy for intraarticular distal humerus fractures.
After isolating and mobilizing the ulnar nerve, the medial and lateral
border of the triceps tendon and olecranon are identified. Laterally,
the anconeus muscle is elevated off the olecranon to directly visualize
the articular surface. The periosteum over the proximal ulna is
elevated for 1 to 2 cm distal to the planned osteotomy for later
reattachment.
 |
|
FIGURE 10-9. Identification of the ulnar nerve.
|
 |
|
FIGURE 10-10.
Before making the olecranon osteotomy, a pilot hole is made down the medullary canal from the tip of the olecranon, using a 3.2-mm drill. |
making the chevron osteotomy, the proximal ulna is drilled and tapped
to facilitate later reattachment. A pilot hole is made from the tip of
the olecranon down the medullary canal, using a 3.2-mm drill (Fig. 10-10); one should take care to remain within the medullary canal. The length of this drill tract is then measured and tapped (Fig. 10-11).
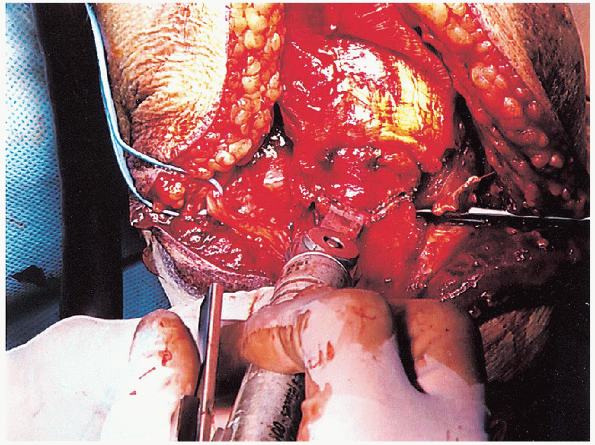
The osteotomy is made in the center of the sigmoid notch of the
olecranon sulcus; this central area can be determined by placing a
clamp from lateral to media (Fig. 10-12).
The chevron osteotomy is made with the V facingupright to maximize the size of the proximal fragment. If the apex is pointed proximally toward the tip of the olecranon process, there is a risk of splitting of the olecranon.
 |
|
FIGURE 10-11. Tapping of the pilot hole using a 6.5-mm tap.
|
 |
|
FIGURE 10-12. Use of a clamp to determine the center of the olecranon sulcus. The planned olecranon osteotomy is demonstrated.
|
of the osteotomy with the osteotome results in irregularity of the
articular surface, which is a guide to later reduction of the osteotomy.
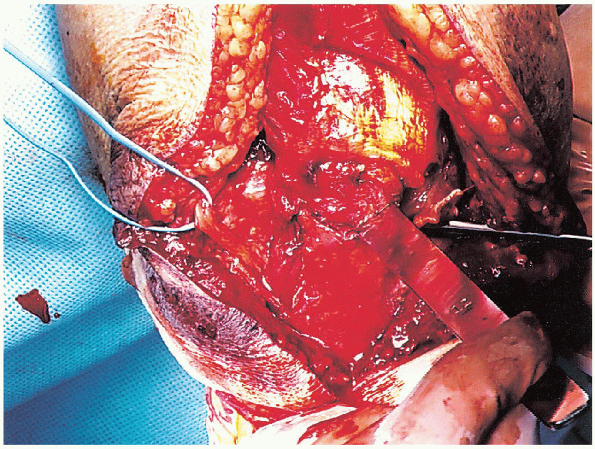
The tip of the olecranon and triceps tendon and muscle are then elevated proximally and protected within a moist sponge (Fig. 10-15). Itis usually not necessary to identify and mobilize the radial nerve;
however, if the fracture has humeral shaft extension that would require
excessive triceps mobilization, one should isolate the radial nerve to
minimize the risk of traction injury.
 |
|
FIGURE 10-13. Use of an oscillating saw to create the osteotomy.
|
 |
|
FIGURE 10-14. A thin osteotome is used to complete the osteotomy.
|
 |
|
FIGURE 10-15. Retraction of the tip of the olecranon and triceps tendon proximally.
|
 |
|
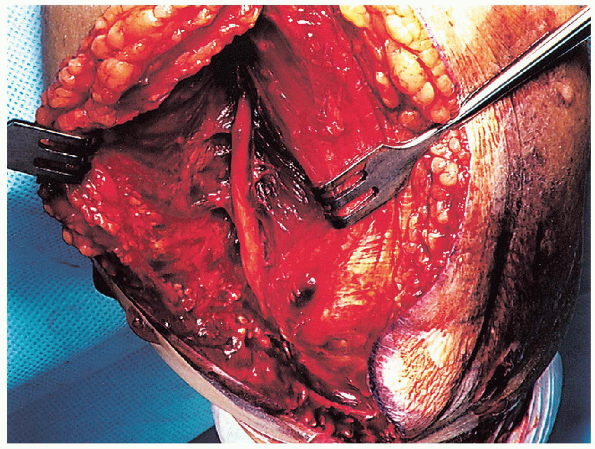
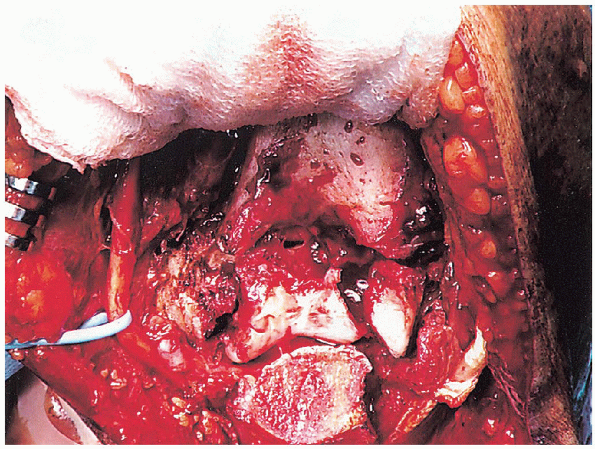
FIGURE 10-16. Exposure of the intraarticular fracture pattern.
|
 |
|
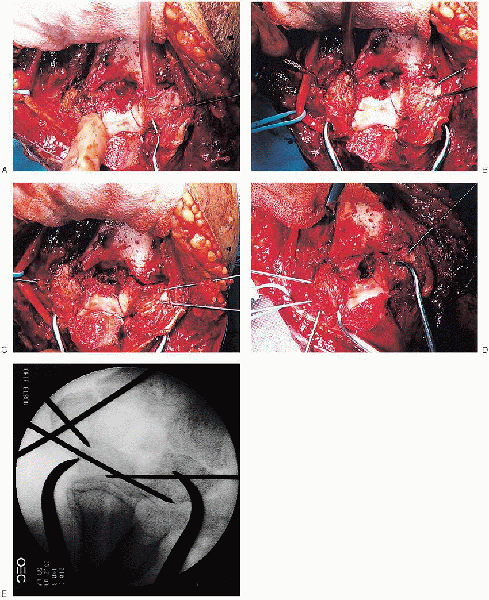
FIGURE 10-17. Intraarticular fracture reduction and provisional Kirschner wire fixation (A to E).
|
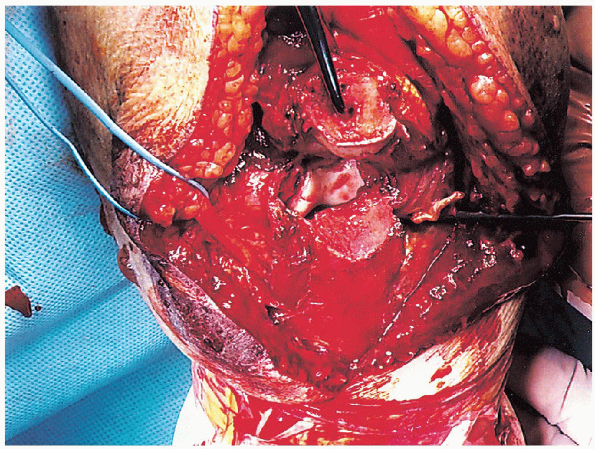
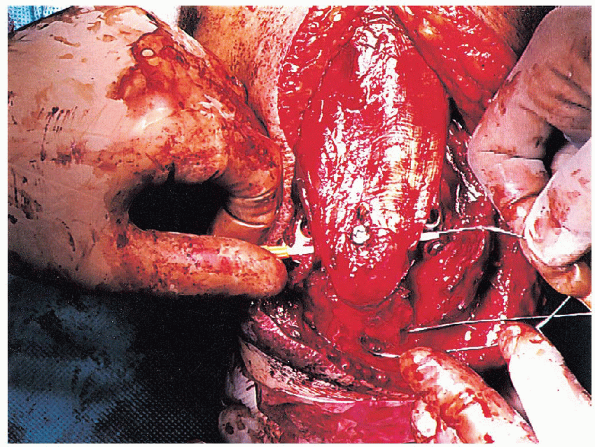
The fracture hematoma is removed using a dental pick and irrigation.
One should take care to avoid loss of small articular fragments devoid
of soft tissue attachments. Once the fracture anatomy is confirmed,
attention is turned toward reducing and provisionally stabilizing the
intraarticular fracture component (Fig. 10-17).
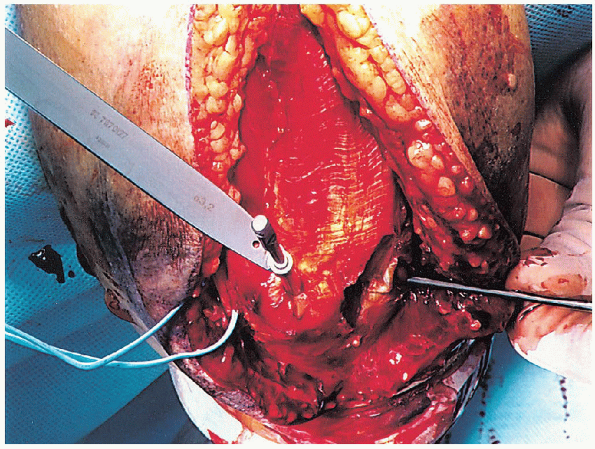
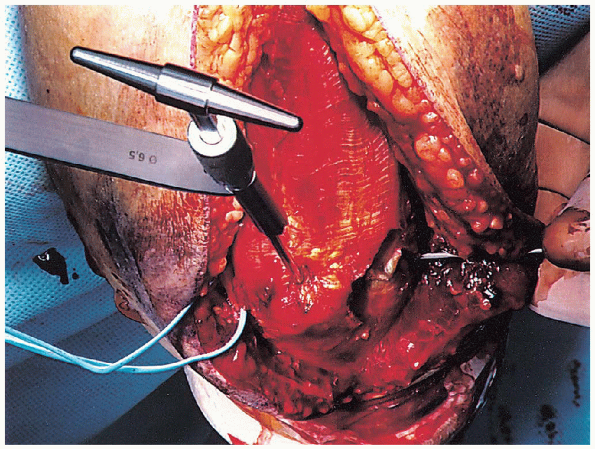
Kirschner wires can be placed into the medial and lateral condyles; they are used as “joysticks” to help fracture reduction. Once reduced, Kirschner wires are placed across the fracture for provisional fixation. component involves use of lag screws. One or two 3.5-mm cortical or
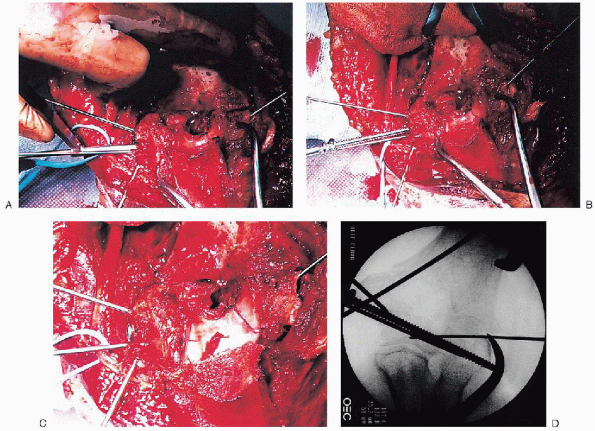
4.0-mm cancellous screws are placed across the fracture surface (Fig. 10-18). I usually place the screws from medial to lateral to direct the drill bit away from the ulnar nerve.
If there is intraarticular fracture comminution, these screws should be
inserted as holding screws not lag screws to prevent narrowing the
articular surface. If there are coronal fracture lines, it may be
necessary to use minifragment screws, threaded Kirschner wires, or
headless screws (Herbert, Acutrac screws) placed from posterior to
anterior, to provide fracture fixation. Occasionally,
one may find that the articular reconstruction may be facilitated by
securing one of the articular components directly to one of the bony
columns of the distal humerus. This would be followed by restoration of
the remaining articular element to this stable skeletal and articular
unit.
 |
|
FIGURE 10-18. Placement of a lag screw across the intraarticular fracture component (A to D).
|
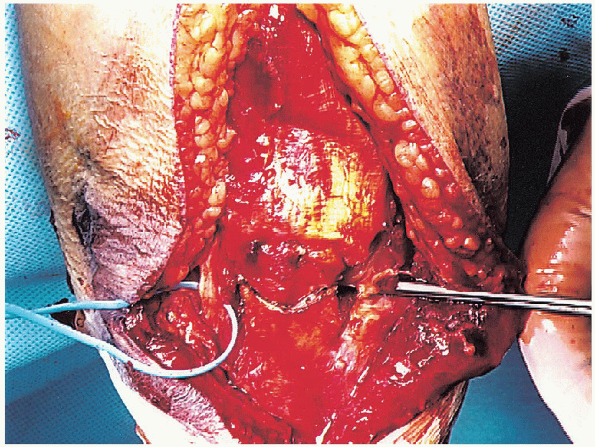
should verify that the distal articularhumeral shaft relationship has
been restored: (a) the valgus carrying angle and (b) the capitellum and
trochlea project
downward and forward from the end of the humerus at an angle of approximately 30 degrees.
 |
|
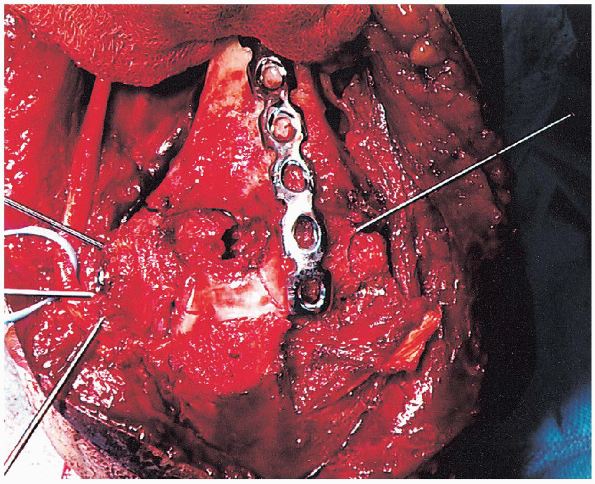
FIGURE 10-19. The lateral plate is placed posteriorly along the lateral column.
|
 |
|
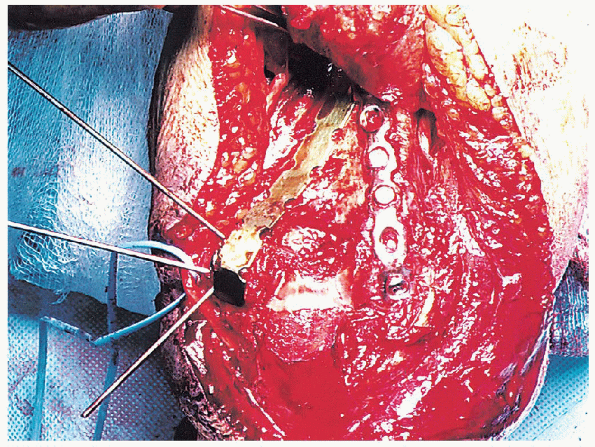
FIGURE 10-20. Placement of the medial plate posteromedially with contouring around the tip of the medial epicondyle.
|
 |
|
FIGURE 10-21. Insertion of the plate holding screws into the medial and lateral plates (A and B).
|
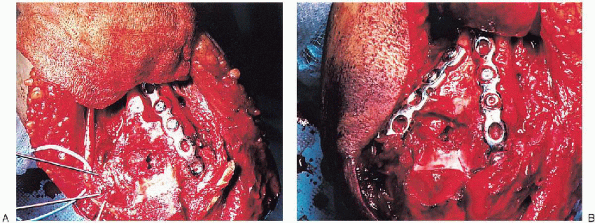
fixation of the articular segment to the humeral shaft involves use of
two plates, one along each column. Although the most stable mechanical
construct has the two plates 90 degrees to each other, it is
technically easier to place both plates posteriorly. The lateral plate
(3.5 dynamic compression plate [DCP] or reconstruction plate) is placed
posteriorly along the column and needs minimal contouring (Fig. 10-19).
The distal aspect of the plate can extend to the articular surface of
the capitellum. The medial plate (3.5 reconstruction or 1/3 tubular
plate) is placed medial or posteromedial and usually must be contoured
around the tip of the medial epicondyle (Fig. 10-20).
Wrappingthe plates around the posterior aspect of the capitellum and the medial
epicondyle allows placement of “homerun” screws through the plate and
up the columns. These long screws, which traverse the columns and exit
the cortex proximally, are useful when the fracture line is distal
(transcondylar) because they provide bicortical fixation. One
must verify that the plates do not impinge on the olecranon fossa to
prevent loss of elbow extension secondary to mechanical block.
I generally attach the lateral plate before the medial plate, because
it is technically easier to apply. If the fracture pattern permits,
screws should inserted as lag screws. The medial plate is then applied.
Bone graft is applied if there is comminution in the supracondylar or
humeral shaft region.
fracture stability and verify full range of elbow motion without
hardware encroachment in the olecranon fossa. The proximal ulna is then
prepared for reattachment of the olecranon osteotomy. A 2-mm hole is
drilled perpendicular to
the
long axis of the ulna approximately 3 to 4 cm distal to the osteotomy.
This drill hole is approximately halfway between the volar and dorsal
surfaces of the ulna. I generally make the distance from the osteotomy to this drill hole similar to that from the osteotomy to the olecranon tip. Placement
of this drill hole in an excessively dorsal location increases the risk
for drill hole fracture when the tension band wire is tightened. An 18- or 20-gauge wire is then passed through this drill hole.
 |
|
FIGURE 10-22. Reduction of the olecranon osteotomy.
|
 |
|
FIGURE 10-23.
Passage of a 14-gauge angiocatheter deep to the triceps tendon and washer, anterior to the 6.5-mm screw. The tension band wire is crossed over the posterior surface of the olecranon, threaded through the tip of the angiocatheter, and pulled out through the opposite side of the triceps tendon. |
A 6.5-mm cancellous lag screw with washer is inserted from the tip of
the olecranon into the ulnar shaft through the previously drilled hole.
One should verify fracture reduction during lag screw insertion because
there is a tendency for the osteotomy to translate and rotate as the
screw is advanced into the distal fragment.
angiocatheter is passed deep to the triceps tendon and washer, anterior
to the 6.5-mm screw (Fig. 10-23). The tension
band wire is crossed over the posterior surface of the olecranon,
threaded through the tip of the angiocatheter, and pulled out through
the opposite side of the triceps tendon. Two loops are made in this
wire, one knot on each side of the ulna.
elbow in extension. This provides more uniform tension to the
bone-implant construct. The knots are cut to a length of 3 to 4 mm,
bent down, and buried in the soft tissue (Fig. 10-24).
A slit is made in the triceps tendon, in line with its fibers, and the
6.5-mm lag screw and washer are seated under the triceps tendon.
transposition is assessed. I do not routinely transpose the ulnar nerve
unless there is impingement of the ulnar nerve within the cubital
tunnel. If I feel transposition is necessary, I perform a subcutaneous
transposition with the ulnar nerve protected by a facial sling.
One should confirm that the tension band wire passes anterior to the
lag screw and deep to the washer. The fracture is examined through a
full range of elbow motion to verify fracture stability and ascertain
that there is no tension on the ulnar
nerve
with elbow flexion and extension. The wound is irrigated and closed in
layers. The arm is placed into a posterior plaster splint with the
elbow in extension. The
elbow is splinted in extension because I have found that the most
common deformity after distal humerus fracture is residual flexion
contracture.
 |
|
FIGURE 10-24. Clinical photograph after the wire knots have been tightened and the lag screw seated.
|
 |
|
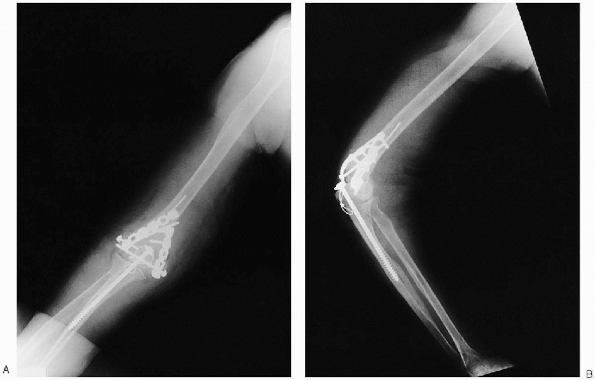
FIGURE 10-25. Final anteroposterior (A) and lateral (B) radiographs.
|
day. The patient is instructed to lie supine and forward flex the
involved shoulder to bring the elbow overhead. With the uninjured arm
supporting the involved forearm, gravity is used to assist elbow
flexion. A similar approach is used for elbowextension exercises, but,
in this case, the patient sits upright and gently assists the forearm
into extension. Two splints are fabricated by the occupational therapy
department—one in full extension and the other in 90 degrees of
flexion. Use of these splints is alternated by the patient,
particularly at night, to help minimize the risk of flexion and
extension contractures.
are continued throughout the first 3 to 4 weeks. At 6 weeks
postoperatively, if radiographic union is progressing satisfactorily,
the patient is allowed light resisted exercises.