
has expanded rapidly in the last decade. Arthroscopic subacromial
decompressions, instability procedures, and rotator cuff repairs are
now all common interventions. However, diagnostic arthroscopy remains
the foundation on which all of these procedures are built. The
competent surgeon must be familiar with normal arthroscopic anatomy
before pathology can be identified. The surgeon should be able to
visualize all of the structures within the glenohumeral joint and
subacromial before undertaking any reconstructive procedures. This
chapter describes the steps necessary to perform a complete diagnostic
arthroscopy of the glenohumeral joint, including positioning, setup,
instruments, and technical advice to assist with full visualization.
intraarticular anatomy of the glenohumeral joint and the subacromial
space are prerequisites for successful arthroscopic surgery of the
shoulder. Proper portal placement can allow the surgeon to routinely
visualize the entire glenohumeral joint and subacromial space. A
complete understanding of normal anatomy, including its normal variants
allows the surgeon to quickly recognize the presence of pathologic
conditions.
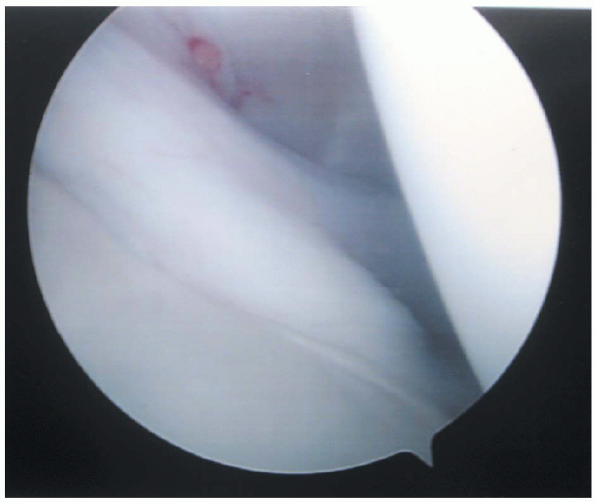
is the first major structure that should be identified within the
glenohumeral joint, because it acts as a major landmark for orientation
within the joint. When the patient is in the lateral decubitus position
the biceps tendon is seen approximately 10 degrees to 15 degrees from
an imaginary vertical line. In the beachchair position, the tendon runs
quite parallel to floor before it enters the bicipital groove. The
tendon originates from the supraglenoid tubercle at the superior rim of
the glenoid and from the superior, usually posterior, glenoid labrum (Fig. 1-1).
However, it is important to note that the sites of origin are variable.
Studies have documented that 20% of normal biceps tendons attach only
to the supraglenoid tubercle; 48% only to the superior, posterior
glenoid labrum; and 28% originating from both points. To facilitate
visualization of the tendon as it courses anterolaterally through the
joint, the arm should be externally rotated. The tendon can be observed
as it exits into the bicipital groove, between the tendons of the
subscapularis and supraspinatus muscles. In the anatomic position, the
intraarticular portion of the biceps tendon courses below the
coracohumeral ligament, which strengthens the rotator interval, a space
between the tendons of the subscapularis and supraspinatus muscles. The
coracohumeral ligament and superior glenohumeral ligament aid in the
support of the biceps tendon in the rotator interval.
glistening; and free of any adhesions, fraying, or partial tears. The
arthroscope can be used to diagnose any dislocation or subluxation of
the tendon out of the bicipital groove in addition to partial tears or
detachment of the biceps anchor. Superior labrum anterior and posterior
(SLAP) lesions of the biceps origin can also be identified and treated.
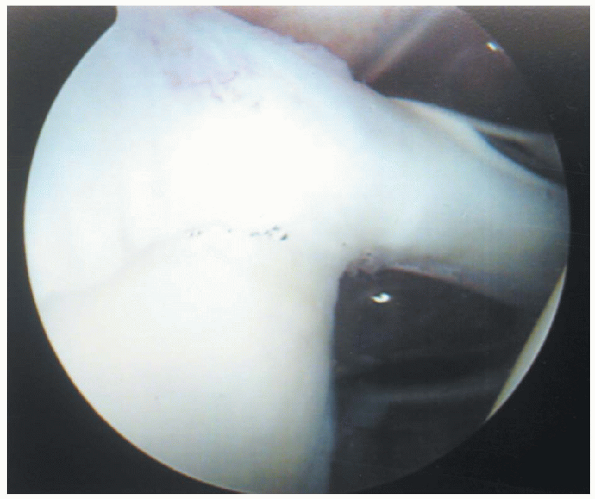
of the glenoid and the humeral head must be fully evaluated during
arthroscopy. The glenoid is an ovoid or pear-shaped cavity that is
approximately one fourth the size of the humeral head. Its surface is
covered by articular cartilage. However, there is a normal central area
with little or no cartilage present. At the anterior glenoid margin a
notch or indentation is present, which should not be mistaken for an
anterior lip or Bankart lesion related to anterior instability. The
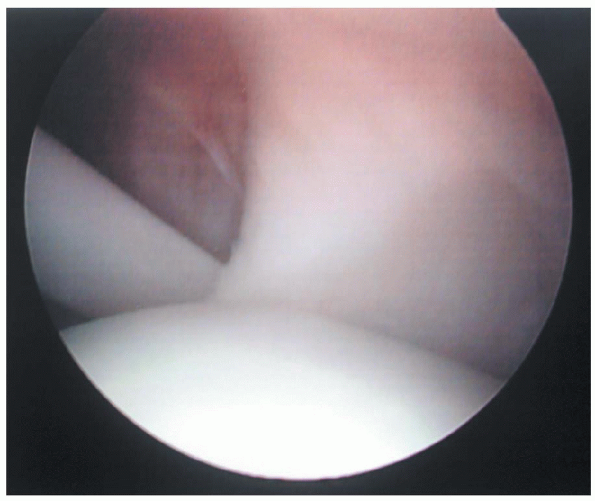
humeral head is typically round and covered with smooth articular
cartilage. Posteriorly, it has a normal “bare area” or sulcus, which is
a region of bare bone present between the edge of the articular surface
and the insertion of the posterior
capsule (Fig. 1-2).
This bare area should not be confused with a Hill Sachs lesion, a
posterior humeral head compression fracture associated with anterior
dislocations of the glenohumeral joint. A Hill Sachs lesion typically
is found posterosuperiorly on the humeral head and has no vascular
channels, whereas the bare area has normally appearing vascular
channels. A reverse Hill Sachs lesion, associated with posterior
dislocations is an extremely rare pathologic finding during
arthroscopy. It appears as a wedge-shaped defect toward the lateral
insertion of the subscapularis tendon on the lesser tuberosity. In all
cases, the cartilage should be scanned for any traumatic lesions,
inflammatory or degenerative conditions, or chondromalacia. In
osteoarthritis, significant osteophyte formation tends to occur along
the edges of the articular surface, particularly along the
anteroinferior surface of the joint. In the presence of full-thickness
rotator cuff tears, the edge of the articular surface near the cuff
insertion often becomes roughened with small spurs and osteophytes.
 |
|
FIGURE 1-1.
The long head of the biceps tendon acts as a major landmark for orientation within the joint. When the patient is in the lateral decubitus position the biceps tendon is seen approximately 10 to 15 degrees from an imaginary vertical line. In the beachchair position, the tendon runs quite parallel to floor before it enters the bicipital groove. The tendon originates from the supraglenoid tubercle at the superior rim of the glenoid and from the superior, usually posterior, glenoid labrum. Variable sites of origin include the supraglenoid tubercle and either or both of the anterior and posterior labrum. |
 |
|
FIGURE 1-2.
The humeral head is typically round and covered with smooth articular cartilage. A normal “bare area” of bare bone is present between the edge of the articular surface and the insertion of the posterior capsule. This bare area should not be confused with a traumatic Hill Sachs lesion. A Hill Sachs lesion typically is found posterosuperiorly on the humeral head and has no vascular channels, whereas the bare area has normally appearing vascular channels. |
labrum serves to provide substantial stability to the glenohumeral
joint and extends its arc of stable rotation. The labrum consists of
hyaline cartilage, fibrocartilage, and fibrous tissue. Its capsular
surface blends with the joint capsule, whereas the glenoid surface is
directly continuous with the hyaline cartilage of the glenoid fossa.
The labrum varies greatly in its anatomy, ranging in width from 1 to 5
mm and in shape from ovoid to meniscoid. Five normal labral anatomic
variations have been described. A wedge labrum located only at the
superior glenoid margin, a wedge labrum at the posterior glenoid
margin, a wedge labrum at the anterior glenoid margin, a wedge labrum
extending from the superior to the anterior glenoid margin, and a
meniscoid labrum extending around the circumference of the glenoid
margin. In addition, a subcoracoid labral sulcus or foramen, present
superoanteriorly on the glenoid margin and characterized by smooth
borders, is a normal anatomic variant. This sulcus is far more superior
than the pathologic “Bankart” lesion described later. The “Buford
complex” described by Snyder is a normal anatomic variant in which the
cordlike middle glenohumeral ligament inserts directly into the biceps
tendon, creating an area on the glenoid with no labrum superiorly,
appearing as a sublabral hole. These normal variations need to be
recognized and differentiated from pathologic conditions.
the procedure and should appear smooth, without fraying or partial
tearing and should not be hypermobile (see Fig. 4-1).
three distinct thickenings of the anterior capsule can be recognized as
the superior, middle, and inferior glenohumeral ligaments. They are
named for their origins on the humeral head rather than for their
scapular attachments and function to stabilize the anterior and
inferior portions of the joint capsule. When viewed arthroscopically,
the insertions may
appear to be labral rather than the more typical capsular or glenoid insertions.
the three glenohumeral ligaments. It combines with the coracohumeral
ligament and rotator interval to form the superior glenohumeral
ligamentous complex. This functions to stabilize the shoulder joint
when the arm is in the adducted dependent position and to prevent
inferior instability. The superior glenohumeral ligament courses
laterally across the joint from its points of origin to insert into the
anterior aspect of the anatomic neck of the humerus, just superior to
the lesser tuberosity. Arthroscopically it may be difficult to find
because its position may be hidden by the biceps tendon. Insufflation
of the joint also blurs the margins of the ligament when the entire
capsule is placed under tension.
glenohumeral joint when the shoulder is abducted to 45 degrees. It
attaches to the superior aspect of the labrum, just caudal to the
superior glenohumeral ligament, and to the scapular neck. Running
laterally, it crosses just posterior to the subscapularis tendon at an
approximate angle of 60 degrees and inserts on the anterior anatomic
humeral neck just medial to the lesser tuberosity. A cordlike or very
thin appearance of the ligament are both normal variants.
glenohumeral ligament is typically the most conspicuous of the capsular
ligaments. The sling-like ligament consists of anterior and posterior
band and an intervening “axillary pouch.” When the arm is abducted to
approximately 90 degrees, the inferior glenohumeral ligament acts to
stabilize the glenohumeral joint. The ligament originates from the
medial aspect of the surgical neck of the humerus and attaches to the
anteroinferior and posteroinferior aspects of the glenoid labrum.
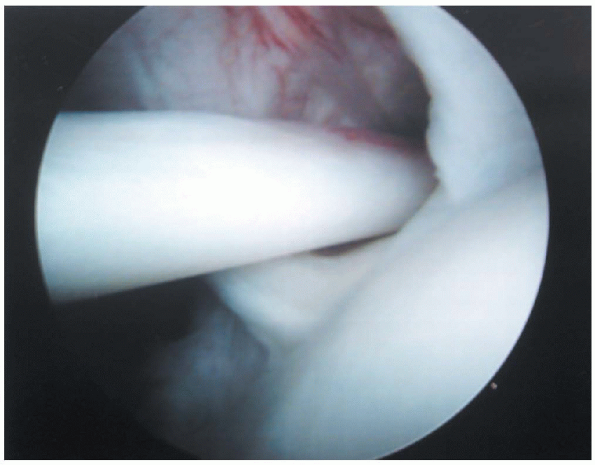
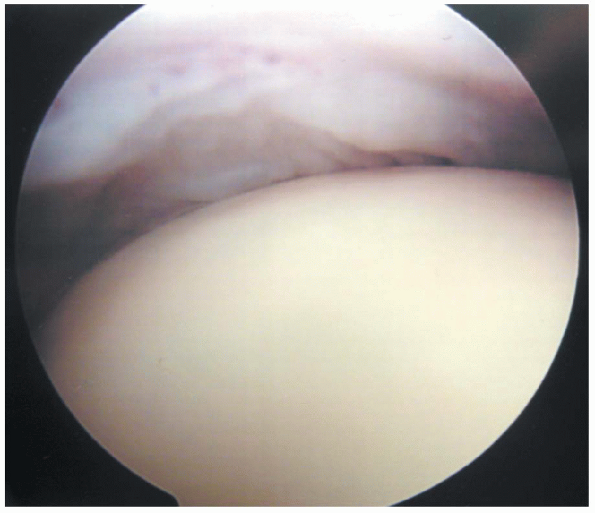
visualization of the rotator interval, the intraarticular portion of
the subscapularis tendon, and the insertion of the rotator cuff on the
humeral head.
It contains both the superior glenohumeral and the coracohumeral
ligaments, the latter overlying the biceps tendon. The rotator interval
serves as an important landmark for anterior portal placement. The
tissue appears less dense than the tendons that border it. A healthy,
normal interval should appear almost empty. Copious amounts of scar can
present in this area when significant preoperative restrictions in
range of motion, particularly external rotation, are present.
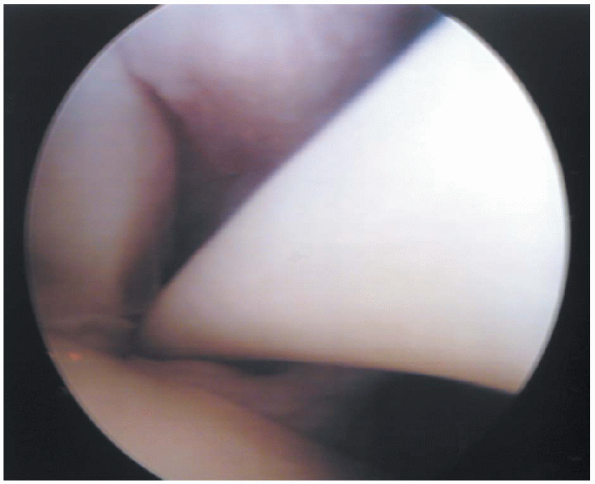
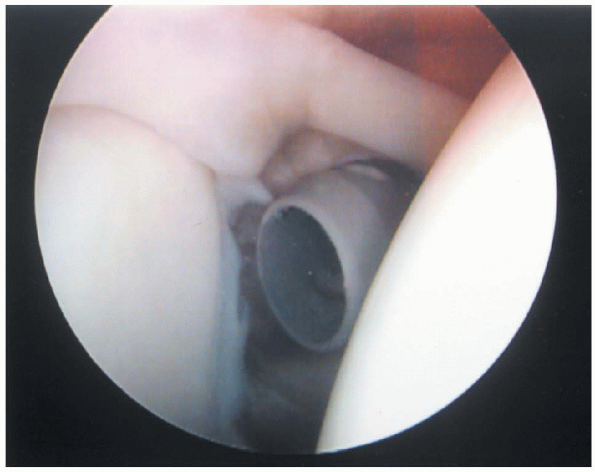
can be examined during glenohumeral arthroscopy. This region of the
tendon, commonly referred to as the “rolled edge” of the tendon because
of its thickness in this region can be observed in the anterior aspect
of the shoulder (Fig. 1-4). The tendon can be
seen entering the glenohumeral joint through the subscapular recess or
bursa. The bursa lies between the superior and middle glenohumeral
ligaments. Occasionally, the middle glenohumeral ligament may obscure
vision of the subscapularis tendon or even appear to blend with it,
because the ligament lies posterior to the tendon. Differentiation is
based on the tendon’s fibers running perpendicular to the
long
axis of the glenoid, and the ligament runs more obliquely. A healthy
tendon should be free of any fraying or adhesions to surrounding
capsular tissues and translate freely with internal and external
rotation of the humeral head.
 |
|
FIGURE 1-3.
The rotator interval is a triangular space between supraspinatus and subscapularis tendons. It contains both the superior glenohumeral and the coracohumeral ligaments, the latter overlying the biceps tendon. The anterior portal is placed through the rotator interval. The tissue appears less dense than the tendons that border it. A healthy, normal interval should appear almost empty. |
 |
|
FIGURE 1-4.
The most superior aspects of the subscapularis tendon can be examined during glenohumeral arthroscopy. This “rolled edge” of the tendon can be observed in the anterior aspect of the shoulder. The tendon’s lateral margin can be seen entering the glenohumeral joint through the subscapular recess or bursa. Occasionally, the middle glenohumeral ligament may obscure vision of the subscapularis tendon. A healthy tendon should be free of any fraying or adhesions to surrounding capsular tissues and translate freely with internal and external rotation of the humeral head. |
cuff allows for examination of the tendons of the supraspinatus,
infraspinatus, and most of the teres minor as they course together
toward their insertion on the greater tuberosity of the humerus. The
anterior edge of the supraspinatus tendon can be observed just superior
to the biceps tendon as it enters the bicipital groove. The
supraspinatus originates from the supraspinatus fossa on the posterior
scapula and inserts on the superior aspect of the greater tuberosity of
the humerus. The infraspinatus inserts on the posterolateral aspect of
the greater tuberosity, whereas the teres minor inserts on its lower
portion. Closer to the insertion points the three tendons appear to
fuse. A thin layer of synovium and joint capsule, with a smooth
appearance, should cover the surface of these tendons.
examination of the superior surface of the rotator cuff, the
undersurface of the coracoacromial arch including the coracoacromial
ligament, the acromioclavicular joint, and the subacromial bursa. The
superior surface of the rotator cuff should be smooth and homogenous,
without any tears, fraying, or calcifications. A layer of periosteum
covers the undersurface of the acromion and should also appear smooth
without spurring. Acromial shape may be characterized according to the
curvature of their undersurface, ranging from flat to hooked. The
superior aspect of the coracoacromial ligament should be visualized as
it courses obliquely from its origin on the anterior undersurface and
tip of the acromion toward its insertion on the lateral aspect of the
coracoid process. Medially, the acromioclavicular joint can be seen and
any spurs or prominences noted. Finally, the bursa itself should be
evaluated. It extends from the deltoid muscle laterally to the
coracoacromial ligament medially. Anteriorly, the bursa stretches from
the coracoacromial ligament and the deltoid to approximately one third
of the way back under the acromion. The roof of the bursa is limited by
the undersurface of the coracoacromial ligament and acromion and the
floor by the rotator cuff.
that characterize structures observed during diagnostic arthroscopy and
allow for determination of proper treatment. Snyder and his coauthors
have described and classified tears of the superior labrum and biceps
anchor (Fig. 1-5). SLAP lesions are categorized
into four types. In type I lesions there is fraying and degeneration of
the superior labrum but there is no tearing present. The biceps tendon
is healthy and intact. A type II lesion also exhibits fraying of the
superior labrum, but there is pathologic detachment of the labrum and
biceps anchor from the underlying superior glenoid. A type III SLAP
lesion is a bucket-handle type tear strictly of the superior labrum,
with no involvement of the biceps tendon. Type IV lesions involve a
bucket handle tear of the superior labrum that extends up into the
biceps tendon, with both displaced into the joint. Most SLAP lesions
are type II (55%) or type I (21%).
Bigliani and Morrison into three types. The shape of the acromion seems
to correlate with the risk of impingement pathologies. Type I
acromions, with the least associated with rotator cuff pathology, are
characterized by a flat undersurface. The undersurfaces of type II
acromions are curved. Finally, a type III acromion has a hooked or beak
shaped undersurface, which narrows the outlet pathway of the
supraspinatus muscle and tendon. Patients with type III acromions are
most at risk for impingement syndrome and its resulting complications.
acute, subacute, or chronic. Imaging and arthroscopy allow for
characterization based on size, shape, and tendon quality. Cuff tears
can be described as either partial- or full-thickness tears.
Partial-thickness tears are characterized by fraying of the cuff and
may be located on either the intraarticular or bursal side of the
rotator cuff. Grade I partial thickness tears are less than one fourth
of the thickness of the tendon, Grade II are less than 1/2 of the
thickness, and Grade III are greater than 1/2 of the thickness of the
tendon. Full-thickness tears can be characterized as small (<1cm)
medium (1 to 3 cm), large (>3 to 5 cm), or massive (>5 cm). In
some cases of massive, retracted full-thickness tears the rotator cuff
may appear to be completely absent. The shape of the tear should also
be characterized. A transverse linear tear exists at the insertion.
L-shaped tears extend from the transverse linear in between the
supraspinatus and infraspinatus tendons. A reverse L-shaped tear
extends into the rotator interval. Massive tears include all of the
supraspinatus and infraspinatus tendons and extend into the teres minor
as well.
arthroscopic equipment. Typically, a 30-degree arthroscope, between 4
to 5 mm, allows for observation of the entire joint. The size and
degree of visualization of the arthroscope are more significant than
its specific designer. To allow for easy and clear visualization of the
joint a video camera and monitor are necessary. A set of spinal needles
should be present to allow for an accurate assessment of portal
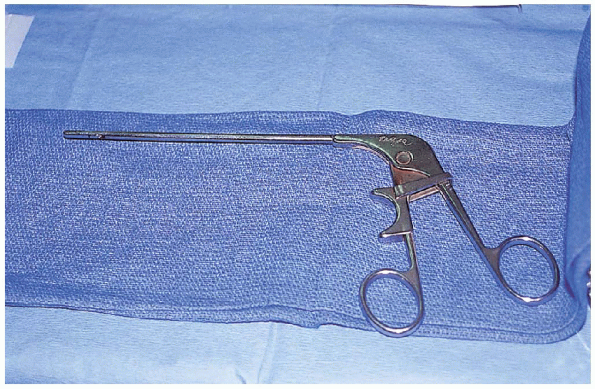
position before their placement. Basic arthroscopic instruments,
including probes, hooks, and grabbers (Fig. 1-6) should be present and are often critical for a complete diagnostic assessment of intraarticular structures.
 |
|
FIGURE 1-5.
The classification of superior labrum anterior and posterior (SLAP) lesions. Type I lesions have fraying and degeneration of the superior labrum, but there is no tearing present. A type II lesion also exhibits fraying of the superior labrum, but there is pathologic detachment of the labrum and biceps anchor from the underlying superior glenoid. A type III SLAP lesion is a bucket-handle type tear strictly of the superior labrum, with no involvement of the biceps tendon. Type IV lesions involve a bucket handle tear of the superior labrum that extends up into the biceps tendon, with both easily displaced into the joint. (From Park SS, Loebenberg MI, Rokito AS, Zuckerman JD: The shoulder in baseball pitching: biomechanics and related injuries-Part 2. Bull Hosp Jt Dis 2002-2003;61 (1-2):80-8, with permission.) |
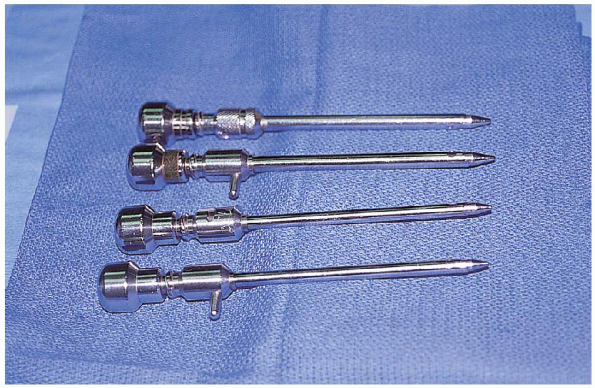
should be used to act both as a conduit for the arthroscope and other
instruments and as an irrigation tool. Diaphragm inserts for the
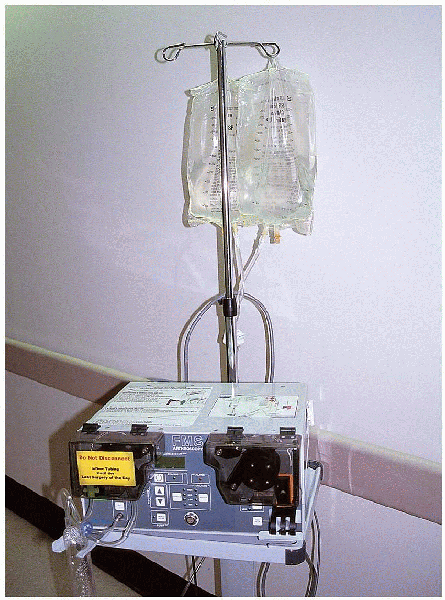
cannulas are helpful in maintaining joint distension. An arthroscopy
pump, with a pressure sensor, and tubing should be used to create joint
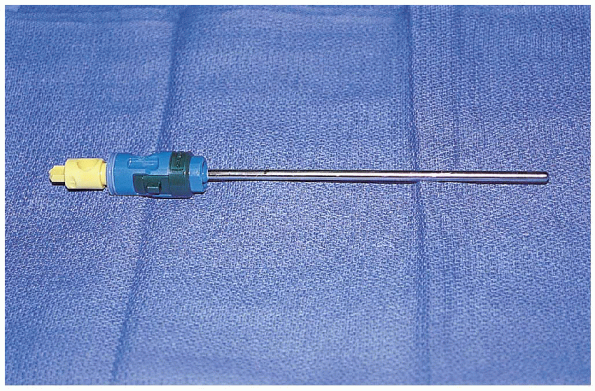
distension and introduce a constant flow of clear fluid (Fig. 1-8). In addition, a suction-equipped system of shavers of various sizes and shapes should be available (Fig. 1-9). Radiofrequency ablation devices can be a great assistance
for intraoperative hemostasis and the removal of soft tissues when appropriate.
 |
|
FIGURE 1-6. Arthroscopic graspers.
|
 |
|
FIGURE 1-7. Arthroscopic cannulas.
|
 |
|
FIGURE 1-8. Infusion pump.
|
of pathology before operative intervention. Most patients who undergo
diagnostic arthroscopy should have had a definitive diagnosis made
through a complete history, physical examination, and the appropriate
radiographic imaging. In addition to a proper examination under
anesthesia, diagnostic arthroscopy should confirm the diagnosis for
which surgery was scheduled, assist in the discovery of secondary
diagnoses, and allow for proper planning with regard to the placement
of additional operative arthroscopy portals or open incisions.
 |
|
FIGURE 1-9. Arthroscopic shaver.
|
diagnosis that resulted in a surgical indication. Plain radiographs
should be obtained before any surgical procedure. Anteroposterior views
in both external and internal rotation, supraspinatus outlet views, and
an axillary view should be obtained to allow for proper orthogonal
assessment of the glenohumeral and acromioclavicular joints in addition
to the subacromial space. Advanced imaging studies such as
arthrography, ultrasonography, and magnetic resonance imaging should be
obtained when appropriate. These studies can provide valuable
preoperative assessment of the integrity and quality of the rotator
cuff and the presence and absence of Bankart or SLAP lesions. A full
preoperative understanding of the extent of the pathology not only
allows for adequate planning on the part of the surgeon but also allows
the patient to be fully cognizant of the extent of his or her
pathology. This information can serve as a valuable aid in the
establishment of reasonable outcome expectations.
be necessary. If the beachchair sitting position is used, it is
valuable to use a special operative table addition that allows the
patient to be placed in a seated upright position without the table
resting against the posterior aspect of the operative shoulder. It
is critical to have access to almost the entire scapula when
positioning the patient. If the table rests too close to the posterior
portal site, visualization of the lateral aspect of the glenohumeral
joint, including the rotator cuff insertion may be significantly
restricted (Fig. 1-10). A disposable
cervical collar can be used to stabilize the neck during the procedure.
The head is placed in a stable head rest and gently secured in place
with an elastic bandage, taking care to protect the patients’ eyes. The
bed should be flexed slightly and the legs elevated on several pillows
to prevent the patient from sliding into a more supine position during
the procedure. Surgical preparation of the entire operative extremity
should be undertaken to allow for full access to the surface anatomy of
the entire shoulder (Fig. 1-11). The monitor
should be positioned in such a manner to allow the surgeon to stand
behind the shoulder and look easily toward both the shoulder and the
monitor (Fig. 1-12).
 |
|
FIGURE 1-10.
The beach chair position after the extremity has been prepped and draped. It is critical to have access to almost the entire scapula when positioning the patient. If the table rests too close to the posterior portal site, visualization of the lateral aspect of the glenohumeral joint, including the rotator cuff insertion may be significantly restricted. |
 |
|
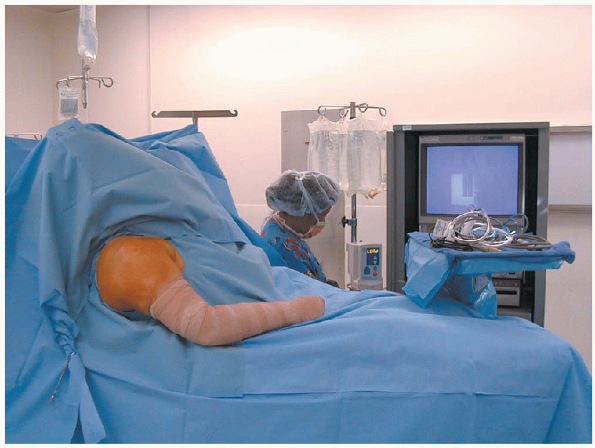
FIGURE 1-11.
The beach chair position. It is critical that the entire arm is draped free to allow the surgeon to move the limb at will. The patient should be in a semireclined position to allow the surgeon access to both the anterior and posterior surfaces of the shoulder. |
 |
|
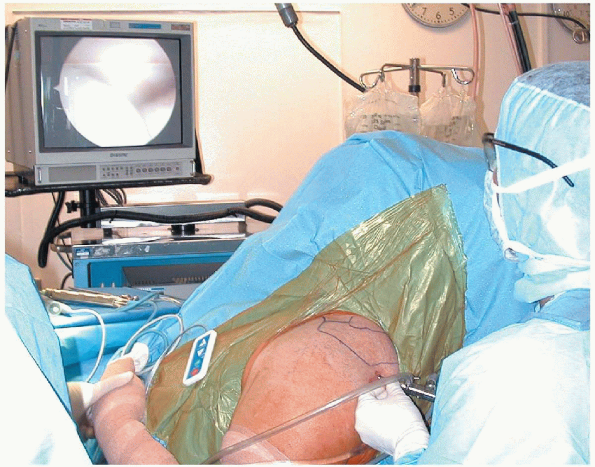
FIGURE 1-12.
The beach chair position. The monitor should be positioned in such a manner to allow the surgeon to stand behind the shoulder and look easily toward both the shoulder and the monitor. An elevated Mayo stand can serve as a convenient shelf for arthroscopic instruments when placed above the patients midportion. |
 |
|
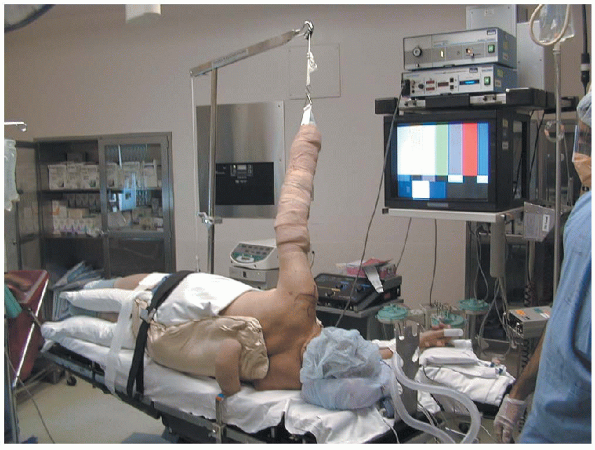
FIGURE 1-13.
The lateral position. This position requires that the patient be secured in a direct lateral position with the operative extremity placed in a traction apparatus with the arm elevated roughly 45 degrees in the plane of the scapular. Lateral positioning affords the option of easier glenohumeral joint distraction when desired. |
arthroscopy. This position requires that the patient be secured in a
direct lateral position with the operative extremity placed in a
traction apparatus with the arm elevated roughly 45 degrees in the
plane of the scapular. An inflatable bean bag and kidney rest
attachments help secure the patient in a stable position. An axillary
roll should be placed to protect the dependent extremity and all bony
prominences should be carefully padded. The operative extremity can
then be prepared and draped up to the edge of the forearm traction
device (Fig. 1-13).
 |
|
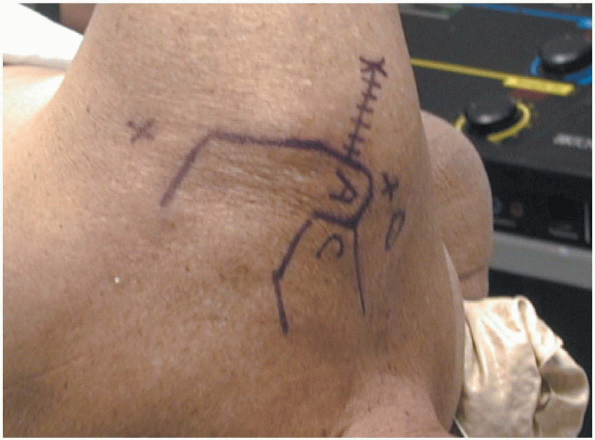
FIGURE 1-14.
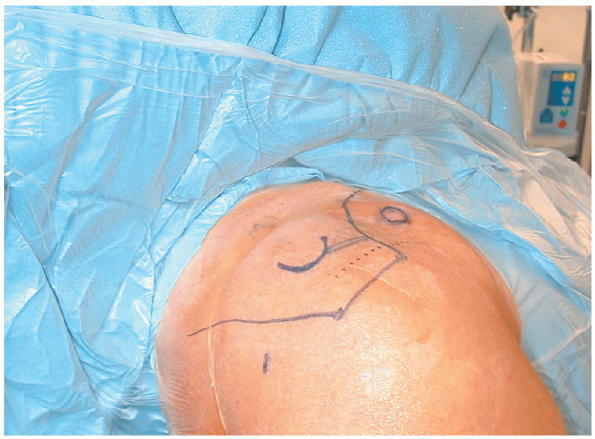
The landmarks are the anterior, lateral, and posterior borders of the acromion (A), the distal clavicle (C) and the acromioclavicular joint, the scapular spine, and the coracoid. The three most common portals are marked with an X as well as the incision necessary for a mini-open type rotator cuff repair. |
the shoulder is properly prepared and draped with sterile towels and
adhesive drapes, the major bony anatomic landmarks are identified and
marked with a skin marking pen. The demarcation of these structures
allows for the site of the primary portals to be reproducibly located (Fig. 1-14).
The landmarks are the anterior, lateral, and posterior borders of the
acromion, the distal clavicle and the acromioclavicular joint, the
scapular spine, and the coracoid process.

The posterior portal is the first portal to be established. This
approach is preferred because the posterior portal allows for almost
complete observation of the glenohumeral joint and aids in placing
subsequent portals. The posterior portal is located approximately 2 to
3 cm inferior and 1 to 2 cm medial to the posterolateral tip of the
acromion. This allows the portal to pass through the “soft spot” of the
posterior shoulder, representing the interval between the infraspinatus
and the teres minor muscle. By placing an index finger on the coracoid
process, the thumb can be used to feel for the direction of the
glenohumeral joint. Neither the posterior circumflex arteries nor the
axillary nerve, the nearest neurovascular
structures, are at risk with proper portal placement. It
is important that this portal is established directly in line with the
glenohumeral joint. A portal that is too lateral or too medial may
allow for entry into the joint but prevent full visualization of the
joint, particularly of the anteroinferior joint and the insertions of
the rotator cuff muscles.
anterior portal is used to visualize the posterior capsule and the
anterior aspects of the glenohumeral ligaments and the subscapularis
tendon. It is placed approximately 2 cm inferior and 1 cm medial to the
anterior edge of the acromion, that is one half of the distance between
the anterolateral margin of the acromion and the coracoid process. With
accurate placement, the anterior portal should pass through the rotator
interval.
By establishing the portal lateral to the coracoid process the risk to
the musculocutaneous nerve is minimized. This portal should be
established with the camera already placed through the posterior portal
and in the glenohumeral joint. The anterior portal can then be
accurately placed with either an inside out or outside in technique
depending on the surgeon’s preference. An inside-out technique involves
placing the camera itself in the rotator interval and then replacing
the arthroscope with its trocar sheath and then advancing the
instrument until the skin is tented anteriorly. A skin incision is then
made over the palpable instrument that is advanced to allow the
anterior cannula to be placed over the trocar. The entire construct is
then retracted back into the glenohumeral joint and disassembled under
direct visualization (Fig. 1-15).
lateral border of the acromion and 1 cm posterior to its anterior
margin. This portal is not necessary usually necessary for diagnostic
arthroscopy but is used during acromioplasty and rotator cuff repair.
During diagnostic arthroscopy, this portal may be helpful to aid in the
palpation of the rotator cuff insertion, to assess the mobility and
quality of the rotator cuff in the presence of complete tears. It
is important that this portal not be placed too close to the lateral
edge of the acromion. A portal that is too superior can result in
significant interference between the instruments and the edge of
cannula when working in the lateral aspects of the subacromial space. Other accessory portals are not used in diagnostic arthroscopy.
 |
|
FIGURE 1-15.
Placement of the rotator interval portal. An inside-out technique involves placing the camera itself in the rotator interval and then replacing the arthroscope with its trocar sheath and then advancing the instrument until the skin is tented anteriorly. A skin incision is then made over the palpable instrument, which is advanced to allow the anterior cannula to be placed over the trocar. The entire construct is then retracted back into the glenohumeral joint and disassembled under direct visualization. |
patients who are indicated for surgery of the shoulder should have a
complete examination under anesthesia before any incision.
If general anesthesia is used, this examination can be undertaken
immediately after intubation. If regional anesthesia is used, it is
critical that the block is allowed to set in with a complete motor and
sensory block so that the examination and any indicated manipulation
can be performed with complete relaxation and without pain. With the
patient in the supine position, the operative extremity is taken
through a complete gentle passive range of motion that is compared with
the uninvolved extremity. If a passive deficit remains, a closed,
gentle manipulation can be performed. Closed manipulations should also
be avoided in those patients with questionable bone quality. The
patient with marked osteopenia is at considerable risk for a fracture
during manipulation. The intraarticular and subacromial adhesions may
provide a greater resistance to manipulation than the bone itself. In
these patients, this step should be skipped, and a gentle complete
arthroscopic or open release undertaken if indicated.
patients and is performed in the supine position before the patient is
placed in the “beach chair” or lateral positions for the operative
procedure. A short lever arm is used for all stages of the manipulation
to prevent injury to the collateral ligaments of the elbow or fractures
within the humerus. The scapula is stabilized. Bringing the arm slowly
into full forward elevation, with flexion and traction in the plane of
the scapula first stretches the inferior capsule. A clear audible lysis
of adhesions is often heard along with an accompanying loss of
resistance. The arm is then stretched across the patient’s chest into
adduction to stretch the posterior capsule. In 90 degrees of scapular
plane abduction, external rotation is performed to stretch the
anteroinferior capsule. Any remaining anterior capsular adhesions are
released by slowly adducting the externally rotated arm toward the
patient’s side. With arm held in scapular plane abduction, internal
rotation is performed, further releasing the posterior capsular release.
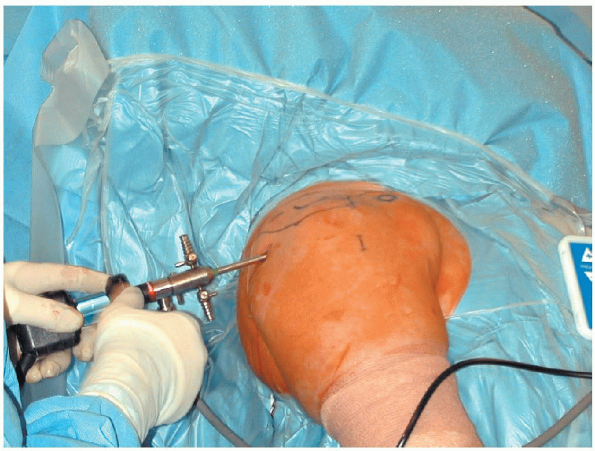
and all the arthroscopic equipment assembled and accessible, the
portals can be established. The glenohumeral joint is cannulated with a
spinal needle through the proposed posterior portal directed toward the
coracoid. The glenohumeral joint is then insufflated with 30 to 50 cc
of arthroscopy fluid. Epinephrine 1:100,000 dilution in the arthroscopy
fluid can aid in hemostasis. Hypotensive anesthesia, when appropriate,
can also help to diminish hemorrhage within the glenohumeral joint or
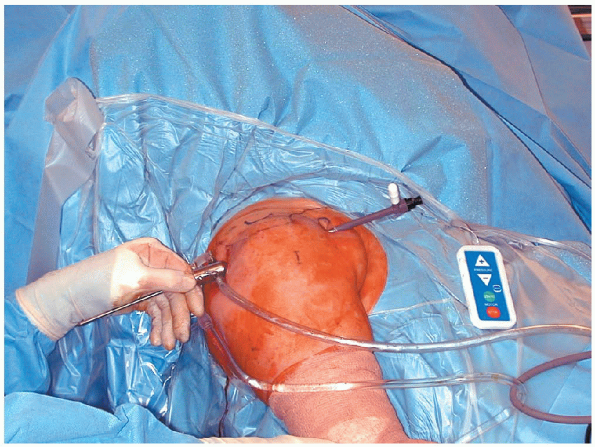
subacromial space. The
position of the spinal needle, when lying freely in the glenohumeral
joint can be used to adjust the placement of the proposed portal. If
the needle appears to be directed to medial or lateral to enter the
glenohumeral joint, the portal position can be adjusted appropriately.
The arthroscope can then be placed through the posterior portal and
into the glenohumeral joint. A semiblunt trocar tip should be used to
allow the arthroscope to penetrate the capsule without inflicting
iatrogenic trauma to the structures within the joint. The trocar should
be advanced gently until the space between the edge of the glenoid and
the humeral head can be felt (Fig. 1-16). The
trocar can then be safely advanced into the joint with gentle pressure,
if one is assured that the arthroscope is properly placed.
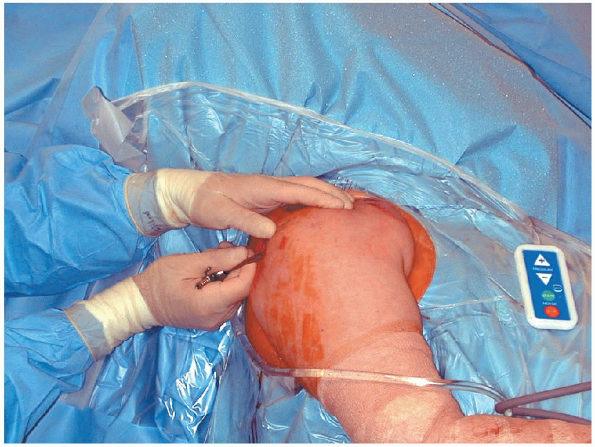
As the trocar is removed, a return of the arthroscopy fluid will
confirm proper placement. The camera is then attached to the
arthroscope and the flow of fluid opened into the joint (Fig. 1-17). At this point a routine diagnostic assessment of the glenohumeral joint is undertaken.
can occur before placement of an anterior portal. If hemorrhage from
manipulation is present, placement of the anterior portal for outflow
may aid in visualization.
 |
|
FIGURE 1-16.
Placement of posterior portal. A semiblunt trocar tip should be used to allow the arthroscope to penetrate the capsule without inflicting iatrogenic trauma to the structures within the joint. The trocar should be advanced gently until the space between the edge of the glenoid and the humeral head can be felt. The trocar can then be safely advanced into the joint with gentle pressure, if one is assured that the arthroscope is properly placed. |
 |
|
FIGURE 1-17.
Placement of posterior portal. As the trocar is removed, a return of the arthroscopy fluid will confirm proper placement. The camera is then attached to the arthroscope and the flow of fluid opened into the joint. At this point a routine diagnostic assessment of the glenohumeral joint is undertaken. |
consistent step-wise assessment of the glenohumeral will ensure that
all necessary structures are visualized. The biceps tendon is
identified initially and the joint oriented appropriately on the
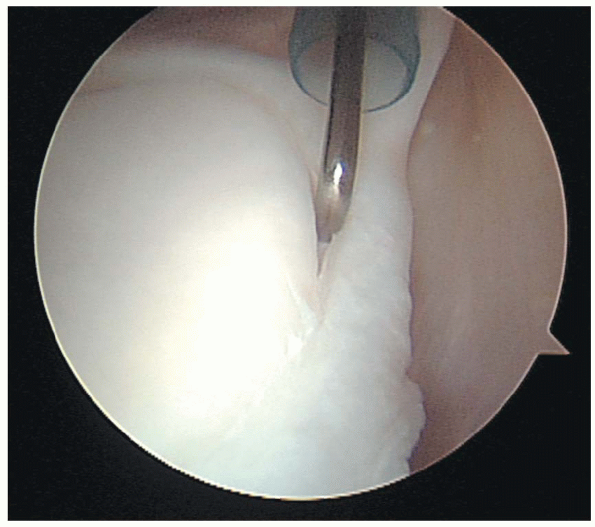
monitor (Fig. 1-18). The biceps origin is
carefully inspected for the presence of a SLAP lesion and should be
palpated with a nerve hook through the anterior portal to document its
integrity and stability.
Aprobe can be used to place tension on the biceps tendon and assess
whether any origin lesions result in instability of the tendon. The biceps tendon should be followed along its course to
document any fraying or instability. Abduction of the arm, accompanied
by rotation of the arthroscope should allow for visualization of the
tendon into the bicipital groove (Fig. 1-19).
The arm can be further abducted allowing the arthroscope to visualize
the tendon as it exits from the shoulder into the arm through the
bicipital groove (Fig. 1-20). The arthroscope is then rotated anteriorly and the subscapularis tendon is examined (Fig. 1-21). The arm can be rotated to gain further visualization of the lateral subscapularis tendon. The rotator interval should be examined for the presence of adhesions or insufficiencies.
 |
|
FIGURE 1-18.
View from the posterior portal. The biceps tendon is identified initially and the joint oriented appropriately on the monitor. The biceps origin must be carefully inspected for the presence of a superior labrum anterior and posterior (SLAP) lesion and should be palpated with a nerve hook through the anterior portal to document its integrity and stability. |
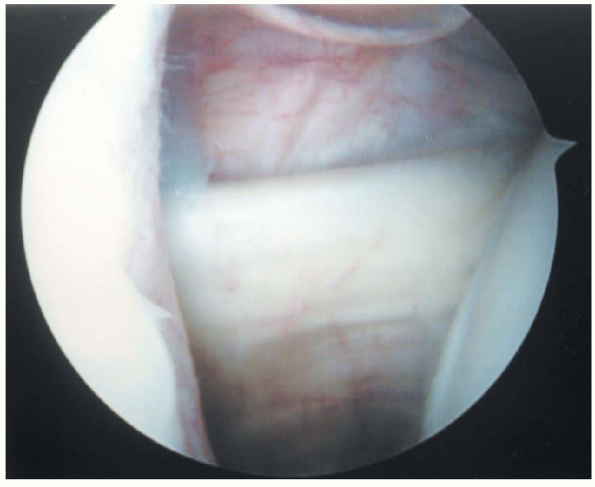
arthroscope is then directed in an anterior and inferior direction to
assess the size of the inferior capsular pouch and the anterior
inferior glenohumeral ligament. This ligament can be seen as a distinct
band within the anterior capsule that merges into the glenoid position
at the anterior inferior edge of the glenoid (Fig. 1-22)
This ligament should tighten with external rotation of the arm. The
arthroscope should be directed further inferior to visualize in the
inferior capsular recess and then directed superiorly to follow the
margin of the posterior glenoid to allow circumferential visualization
of the labrum until the arthroscope is returned to its position just
posterior to the origin of the long head of the biceps. It
is important to remember to keep the posterior aspect of the glenoid in
view at all times when inspecting the posterior aspect of the
glenohumeral joint. This will minimize inadvertent loss of the portal
and minimize soft tissue swelling which can occur after multiple
cannulations of the joint.
this point the articular surfaces of the humeral head and glenoid
should be examined for any signs of degeneration or injury. The camera
should then be directed just posterior to the biceps tendon at its
entry into the bicipital groove. This is a good starting position to
visualize the insertion of the rotator cuff.
The supraspinatus insertion can be identified just posterior to the
bicipital groove and followed posteriorly by abducting the arm while
rotating the arthroscope posteriorly (Fig. 1-23). This can allow for complete visualization of the insertions of the infraspinatus and teres minor (Fig. 1-24).
The posterosuperior aspect of the humeral head should be examined in
this position to document the presence or absence of a Hill Sachs
lesion.
 |
|
FIGURE 1-19.
View of the biceps tendon from the posterior portal. The long head of the biceps tendon should be followed along its course to document any fraying or instability. Abduction of the arm, accompanied by rotation of the arthroscope should allow for visualization of the tendon as it enters into the bicipital groove. |
 |
|
FIGURE 1-20.
View of the long head of the biceps from the posterior portal. The arm can be further abducted allowing the arthroscope to visualize the tendon as it exits from the shoulder into the arm through the bicipital groove. This is a common site for loose bodies to lodge. |
photographs taken to document the findings, the anterior rotator
interval portal should be established as necessary to allow for proper
palpation and assessment of any noted pathology (Fig. 1-25).
Rotator cuff tears can be marked with the placement of a suture through
a spinal needle to allow for its easier localization in the subacromial
space. Arthroscopic grabbers can be used to assess tendon quality and
mobility.
 |
|
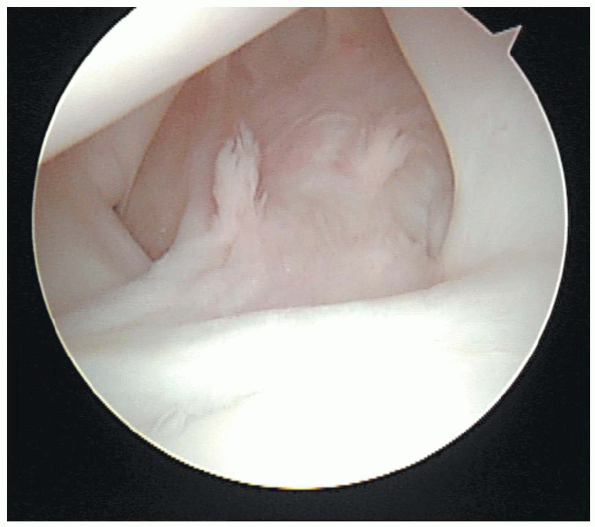
FIGURE 1-21.
View from the posterior portal. The superior rolled edge of the subscapularis tendon can be clearly visualized in the anterior portion of the joint. Abduction and external rotation aid in the visualization of the superior insertion of the tendon at the bicipital groove. |
 |
|
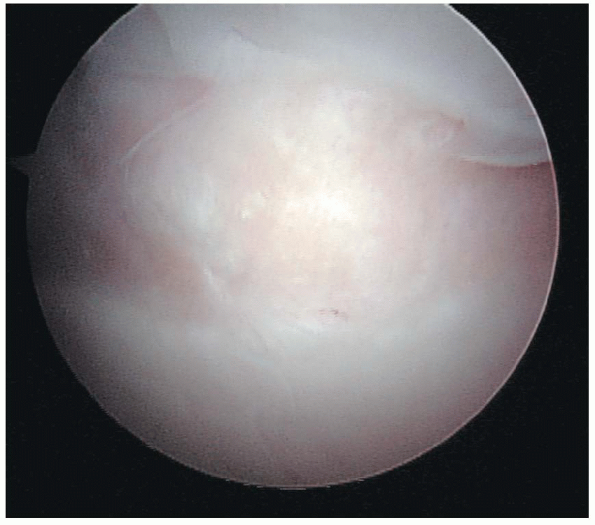
FIGURE 1-22.
View from the posterior portal. The arthroscope can be directed in an anterior and inferior direction to assess the size of the inferior capsular pouch and the integrity of the anterior inferior glenohumeral ligament. This ligament can be seen as a distinct band within the anterior capsule, which merges into the glenoid at the anterior inferior edge of the glenoid. This ligament should tighten with external rotation of the arm. |
arthroscopy of the glenohumeral joint, the subacromial space should be
visualized. The arthroscope cannula is removed from the glenohumeral
and the camera replaced with the semiblunt trocar. The cannula is then
placed in the subacromial space through the posterior portal by sliding
directly under the posterior edge of the acromion. Use
a sliding-type motion to direct the cannula off the lateral edge of the
acromion, sweeping the bursa off the undersurface of the acromion. It
can be an effective way to quickly improve visualization in the
subacromial space.
The camera is then placed within the subacromial space. Assessment of
the thickness of the bursa, the degree of inflammation, and the
presence of fraying or erythema on the bursal surface of the rotator
cuff should be undertaken.
This often requires the establishment of the lateral portal and
débridement of bursal tissue with a shaver or radiofrequency ablater to
enhance visualization. It is important that the insertion of the
rotator cuff is thoroughly inspected in the subacromial space.
Significant bursal sided tears that mandate repair can often appear
quite benign from the articular surface. Arthroscopic photographs
should be taken to document the condition of the subacromial space both
before and after any operative procedures.
 |
|
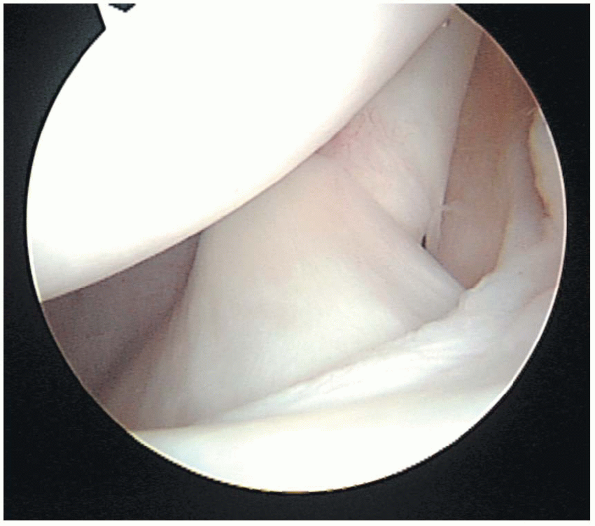
FIGURE 1-23.
View from the posterior portal. The anterior insertion of the supraspinatus tendon can be seen here as it begins just posterior to bicipital groove. The rotator cuff insertion should appear as a continuous tendinous veil as it meets the lateral articular margin of the humerus along the greater tuberosity. |
 |
|
FIGURE 1-24.
View from the posterior portal. Abduction and internal rotation of the arm while the camera is directed posteriorly can allow for full visualization of the insertions of all of the rotator cuff tendons. It is important to be able to visualize the entire insertion to adequately assess the extent of any evident tears. |
 |
|
FIGURE 1-25.
View from posterior portal. Placement of a cannula in the rotator interval portal. Cannulae should be used in all open portals to ease exchange of instruments and to prevent the leakage of excess arthroscopy fluid into the surrounding soft tissue. The rotator interval portal should be used during every diagnostic arthroscopy to allow for palpation of intraarticular structures. |
documented, operative interventions can be undertaken to address
specific pathology. Additional portals may be necessary for further
arthroscopic interventions and are detailed in the appropriate
chapters. After adequate hemostasis is obtained within the joint and
subacromial space, the portals are closed with interrupted skin sutures
that can be removed in the office 7 to 10 days after the procedure. A
sterile waterproof dressing is applied to the portal sites and a sling
is usually provided for comfort.
encountered and the treatment rendered. If only a diagnostic
arthroscopy is undertaken, a sling may only be necessary for comfort
for a couple of days after the surgery. It should removed early to
enhance the recovery of postoperative ranges of motion. The procedure
usually occurs on an outpatient basis and the patient should follow-up
for routine examination and suture removal within 7 to 10 days.