
Editors: Morrey, Bernard F.; Morrey, Matthew C.
Title: Master Techniques in Orthopaedic Surgery: Relevant Surgical Exposures, 1st Edition
Copyright ©2008 Lippincott Williams & Wilkins
> Table of Contents > Section II – Lower Extremity > 7 – Hip and Acetabulum
7
Hip and Acetabulum
Bernard F. Morrey
Matthew C. Morrey
The basis of the development of this chapter deals
principally with the surgical exposures that I and my partners have
found useful to manage the majority of the pathology encountered at the
hip. Exposures of the acetabulum and pelvis are treated in a separate
chapter. Herein we discuss the more functional extensile exposures of
the hip generally described as anterolateral, lateral (trochanteric),
and posterolateral. Variations exist in each of these which are readily
made and modified according to personal preferences once the principals
of the exposures are known. In addition to these, three additional
limited or minimally invasive exposures are presented. This chapter
makes no effort to review every surgical exposure that has been
described but those which are useful and relevant for managing the
majority of hip problems.
I personally reject the term and even the concept of
“minimally invasive” exposures and prefer the term “limited invasive”
surgery. The reason is that this conveys to me the reasonable position
to limit exposure as able and avoid unnecessary tissue damage but not
minimize it at all cost. The three exposures detailed here all have
value in that they are effective, have a low complication rate, and are
relatively easy to perform. The criteria for the use of any of these
exposures are:
-
Abbreviated learning curve
-
No increased complication rate
-
Minimal muscle injury
-
Facilitated rehabilitation
ANTERIOR-LATERAL EXPOSURE (HARDINGE) (1,2)
Indications
Hip joint replacement. Value of anterior exposures: typically more stable than posterior exposures.
Disadvantages
Strength of abduction is regained slower after an anterior compared to a posterior exposure (3).
-
Note: The
Hardinge exposure is an example of the family of anterior lateral
approaches and has some similarity to several other anterior lateral
exposures including the Mayo limited approach discussed below. In
general the anterior lateral exposures vary principally in the manner
and effect of releasing the insertion of the gluteus medius while
taking care to avoid the superior gluteal nerve which typically runs 3
to 5 cm proximal to the tip of the greater trochanter (Fig. 7-1).
P.144
 |
|
FIGURE 7-1
|
P.145
 |
|
FIGURE 7-2
|
 |
|
FIGURE 7-3
|
 |
|
FIGURE 7-4
|
Position
The patient is placed and supported in the lateral decubitus position; however, the supine position is also acceptable (Fig. 7-2).
Technique
-
Skin incision: the 14 to 16 cm skin
incision is centered over the greater trochanter and extends
approximately 6 to 8 cm distally along the anterior aspect of the
trochanter and down the anterior lateral aspect of the femoral shaft.
Proximally, the skin incision extends 6 to 8 cm in line with the fibers
of the gluteus maximus muscle (Fig. 7-3). -
The iliotibial band is entered and split
distally and the gluteus maximus muscle is split proximally. The
gluteus maximus is retracted posteriorly and the tensor fascia lata
retracted anteriorly (Fig. 7-4).P.146-
Note: If
the gluteus is separated from the tensor fascia lata muscle at the site
of their interface, the iliotibial band may need to be further released
posteriorly to dislocate the hip.
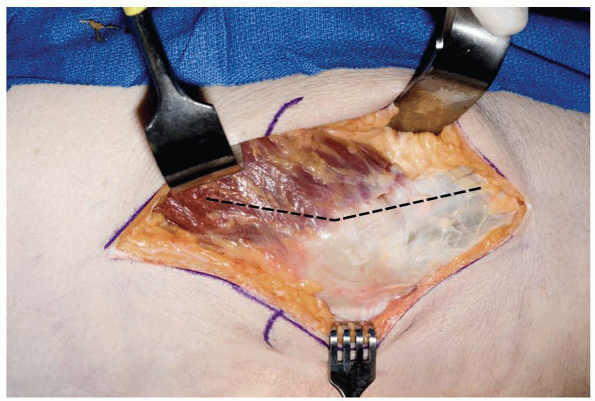
-
-
The deep exposure begins at the anterior
margin of the trochanter and extends distally to include the anterior
third of the vastus lateralis muscle (Fig. 7-5).
Proximally, the incision extends about 4 to 5 cm past the trochanteric
tip and splits the gluteus medius musculature in line with its fibers
separating its anterior one third from the posterior two thirds.-
Note:
Effort is made to maintain continuity of the anterior sleeve of muscle
comprising the gluteus medius and anterior portion of the vastus
lateralis. -
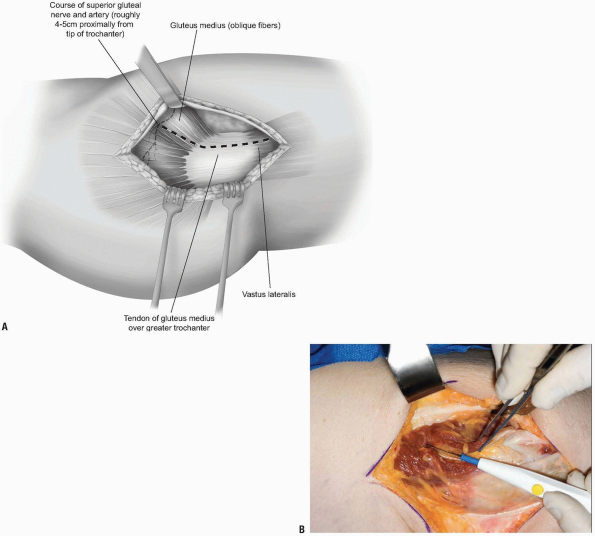
Pitfall: To
avoid injury to the superior gluteal nerve, do not split the gluteus
medius more than about 4 to 5 cm proximal to the tip of the trochanter (Fig. 7-6)(4).
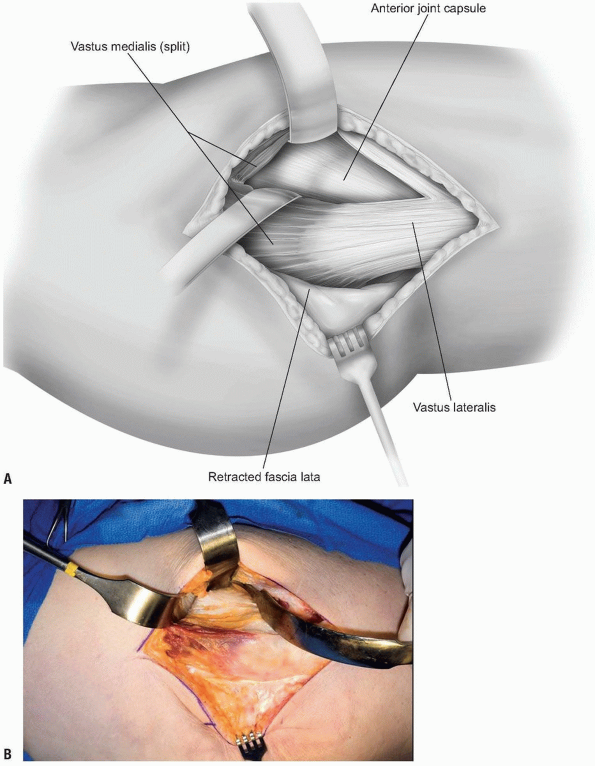
-
-
The interval is developed by
subperiosteally releasing the antero-oblique fibers of the gluteus
medius from the trochanter in line with the remaining anterior fibers
of the more proximally fanshaped portion of the medius musculature. -
The anterior third of the vastus
lateralis muscle is elevated from the trochanter and proximal femur for
a distance of about 5 to 7 cm. The sleeve of tissue containing this
portion of the abductors and the vastus lateralis is then reflected
anteriorly and retracted with a narrow Hohlman retractor (Fig. 7-7A). This allows ready access to the anterior capsule (Fig. 7-7B). -
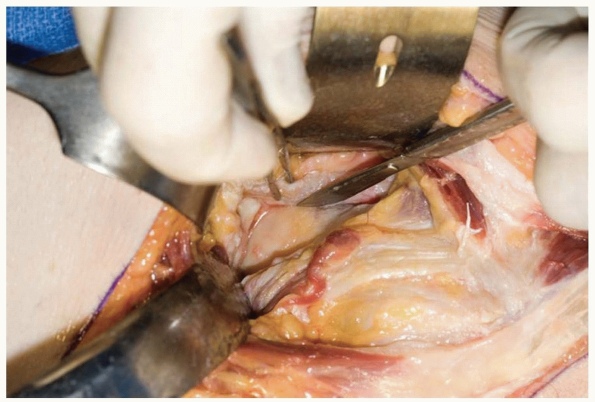
The gluteus minimus muscle is detached
from the trochanter beginning anteriorly and separated from the capsule
to the extent needed for adequate exposure. A curved Hohlman retractor
placed over the femoral neck facilitates retraction of the medius and
minimus musculature. -
The capsule is excised anteriorly, placed
over the femoral neck, and further release of the lateral and inferior
aspect of the capsule is performed as needed (Fig. 7-8). -
The hip is dislocated by external
rotation and flexion. For this exposure the leg may be placed in a
sterile pocket anteriorly to prepare the femoral canal (Fig. 7-9). -
Closure: After the procedure the musculature is closed with side-to-side running nonabsorbable sutures.
 |
|
FIGURE 7-5
|
 |
|
FIGURE 7-6
|
P.147
 |
|
FIGURE 7-7
|
P.148
 |
|
FIGURE 7-8
|
 |
|
FIGURE 7-9
|
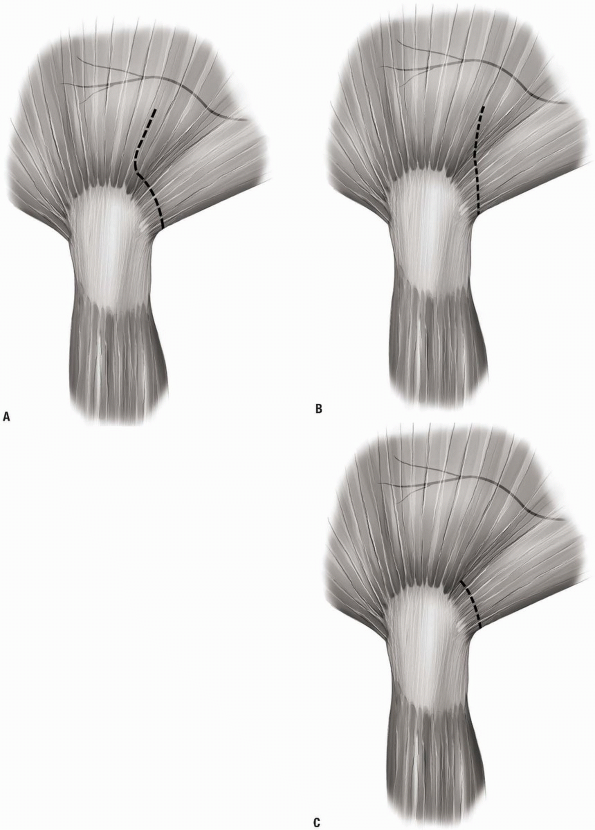
THE MAYO LIMITED (MINIMAL) ANTERIOR
This exposure was developed by the author in 1995. The
goal was to preserve as much of the gluteus medius attachment as
possible (Fig. 7-10).
It is still preferred over the “minimally invasive” approaches
currently being popularized as it satisfied the criteria noted at the
beginning of the chapter.
goal was to preserve as much of the gluteus medius attachment as
possible (Fig. 7-10).
It is still preferred over the “minimally invasive” approaches
currently being popularized as it satisfied the criteria noted at the
beginning of the chapter.
 |
|
FIGURE 7-10
|
P.149
Indications
Anterior exposure to the hip joint: Incision and
drainage; hip joint replacement, typically more stable than posterior
exposures.
drainage; hip joint replacement, typically more stable than posterior
exposures.
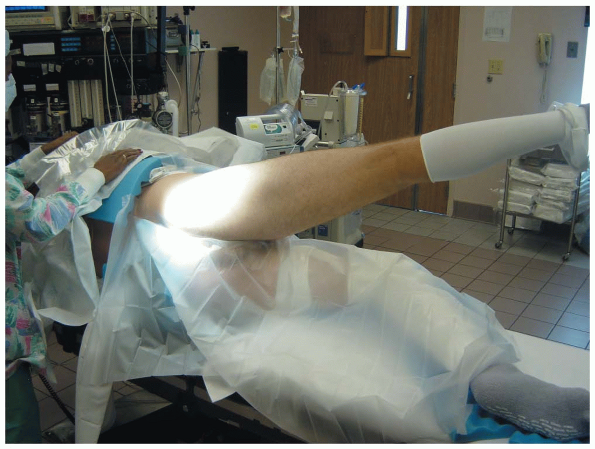
Position
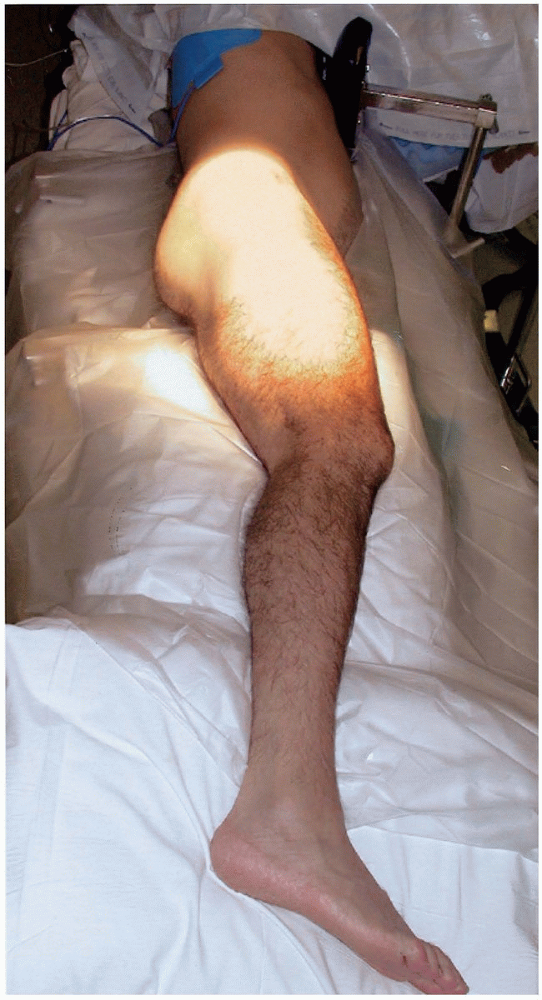
The patient is placed in the lateral decubitus position.
The pelvis is stabilized with method of choice, but should be well
fixed vertical to the floor for hip joint replacement (Fig. 7-11).
The pelvis is stabilized with method of choice, but should be well
fixed vertical to the floor for hip joint replacement (Fig. 7-11).
Technique
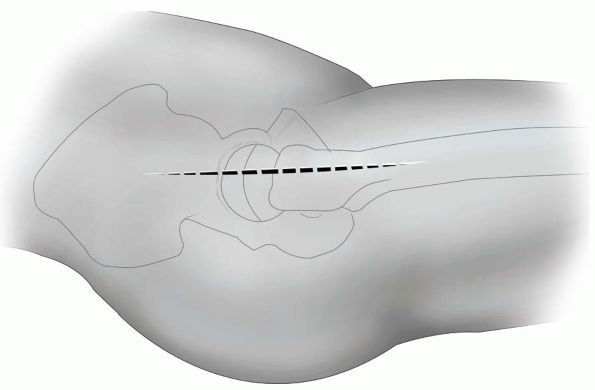
-
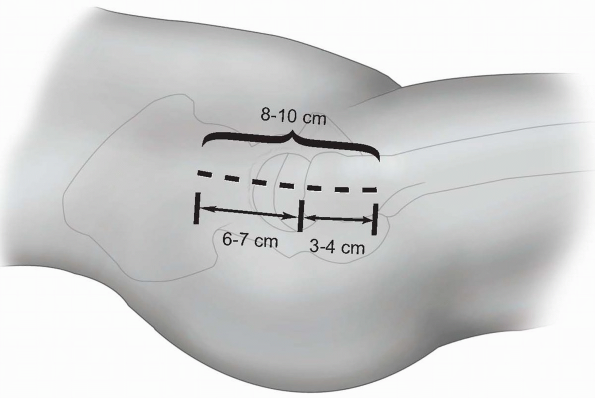
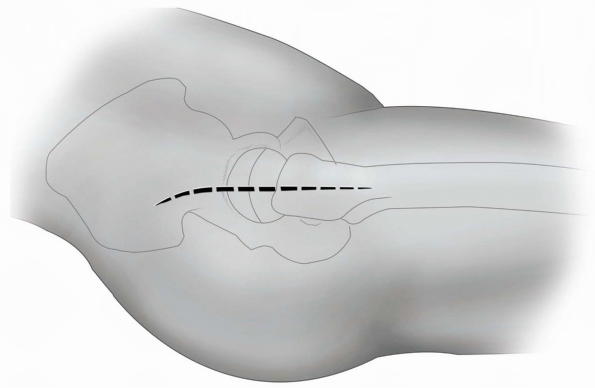
Skin incision: an 8 to 10 cm skin
incision is made just anterior to the midline of the trochanter with
the distal one-third distal to the tip of the trochanter and the
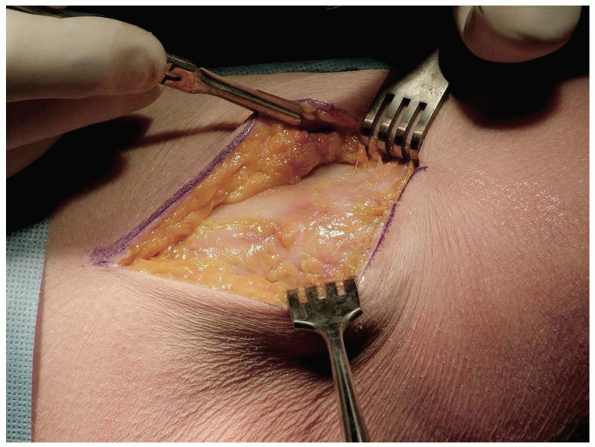
proximal two-thirds over the gluteus medius (Fig. 7-12). -
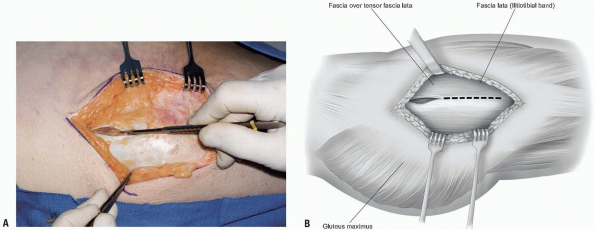
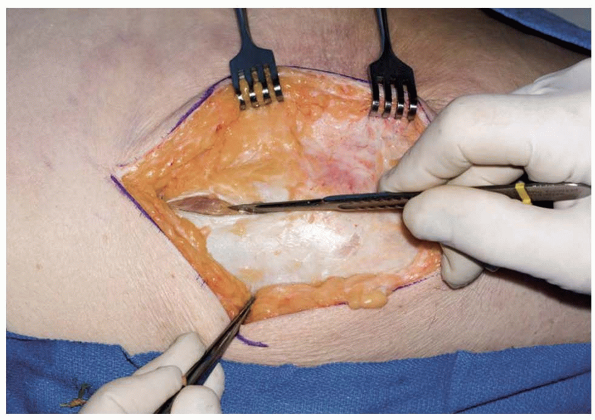
Through this skin incision the tensor fascia lata is identified (Fig. 7-13)
and split in the midline from the trochanter distally for a distance of
approximately 7 cm. Proximally the muscle of the gluteus maximus is
split or alternatively the interval between the gluteus maximus and the
tensor fascia lata is identified and split for a distance of
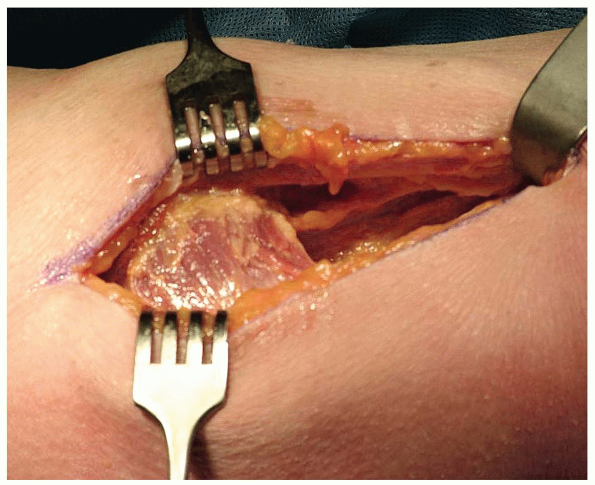
approximately an additional 6 cm (Fig. 7-14). -
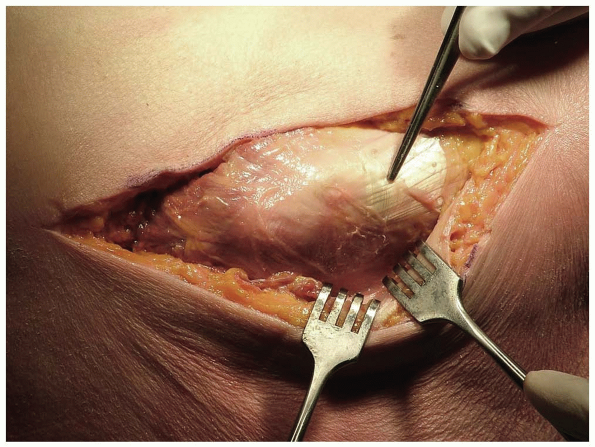
The fascia of the gluteus maximus is reflected posteriorly and the tensor fascia lata is retracted anteriorly.
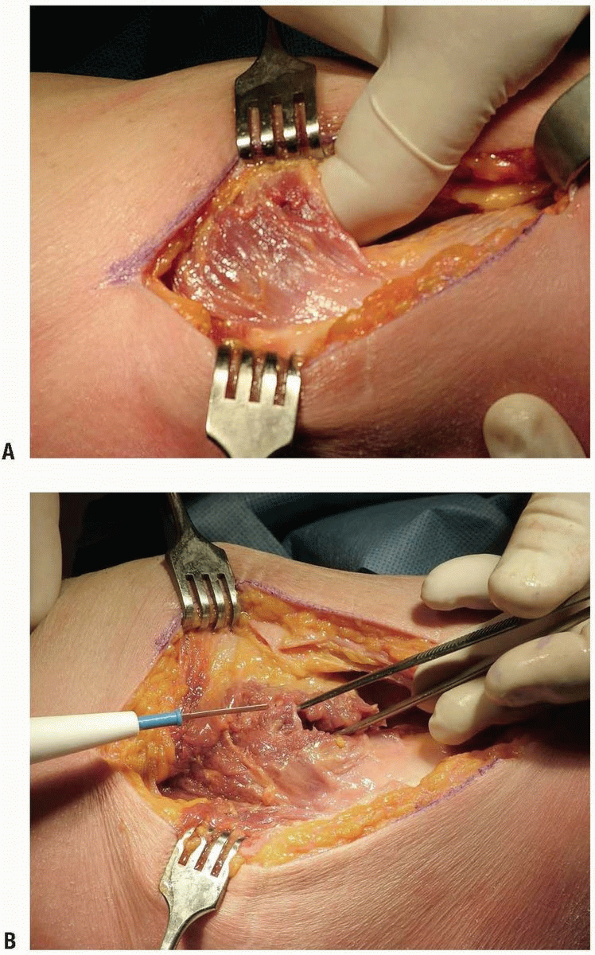
-
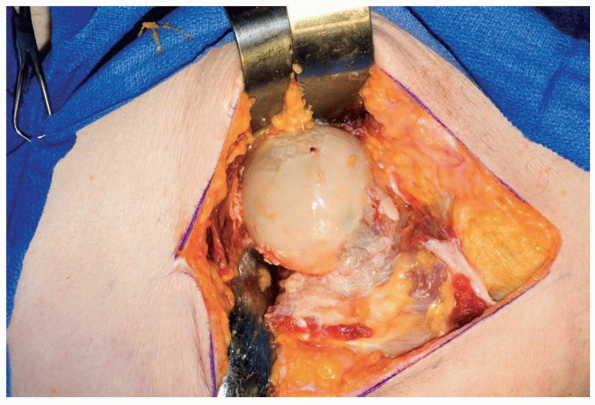
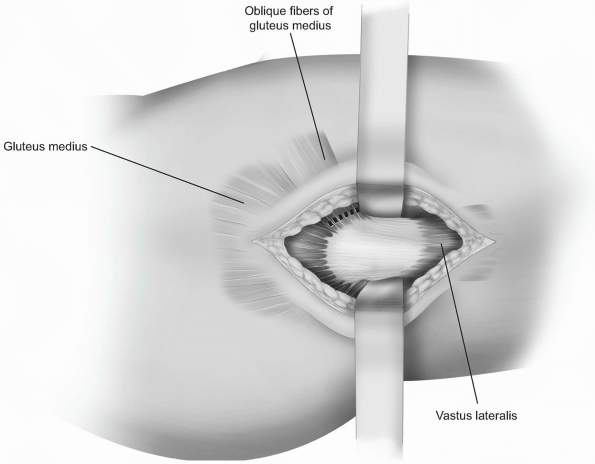
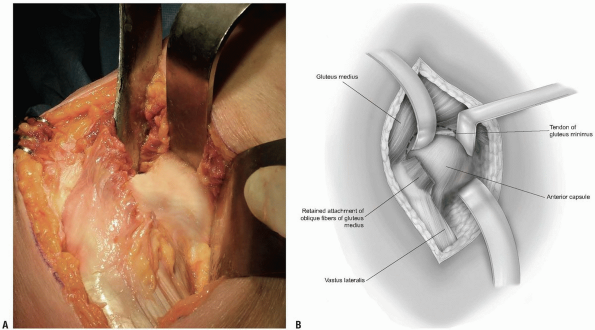
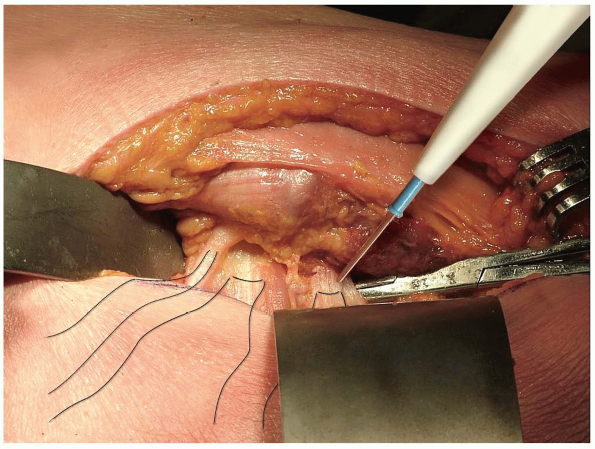
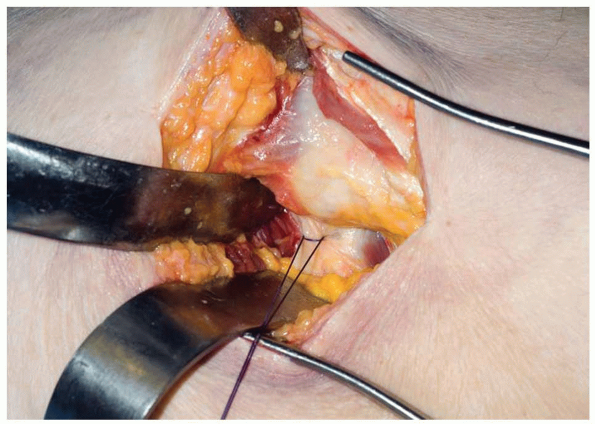
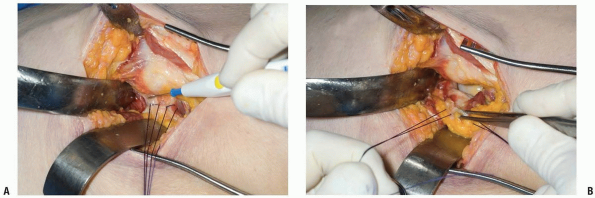
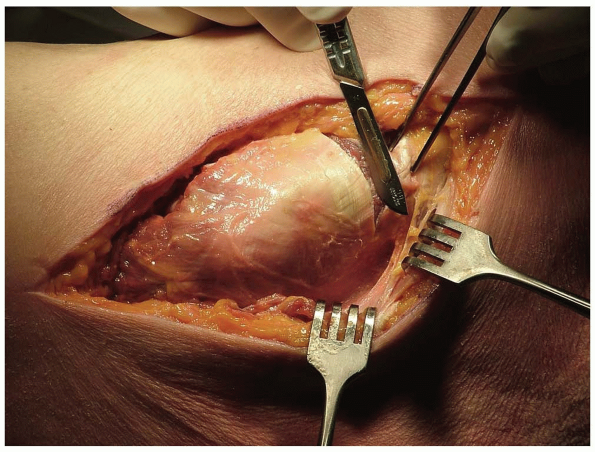
The anterior inferior muscle fibers of the gluteus medius insert almost perpendicular to the long axis of the trochanter (Fig. 7-15). These “anterior-oblique” fibers of the gluteus medius are isolated (Fig. 7-16) and released with a cutting cautery leaving a cuff of attachment remaining on the trochanter.
-
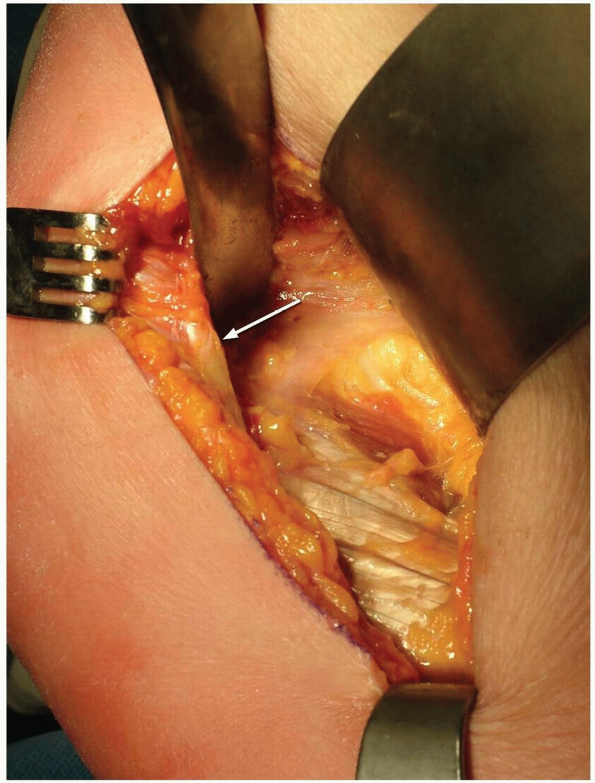
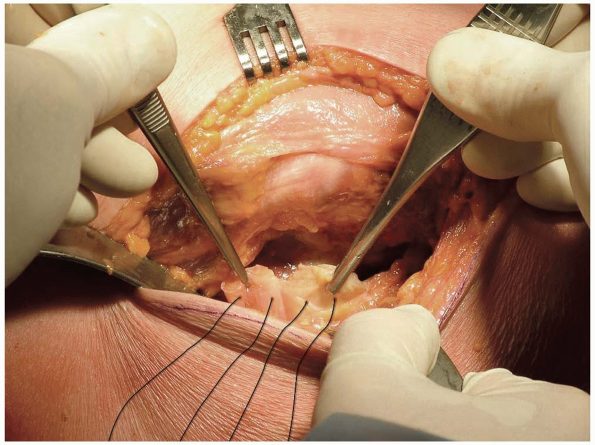
The release proceeds proximally to the
level of the tendinous portion of the gluteus medius and to the leading
edge of the gluteus minimis (arrow) (Fig. 7-17).-
Note: In
tight hips a centimeter of the tendinous attachment of the gluteus at
the anterior-superior corner of the trochanter may need to be released.
-
-
The released anterior-oblique fibers of
the gluteus medius are reflected proximally and medially. The capsule
is identified and is cleaned of soft tissue.-
Note: The
key to this exposure resides in the poorly documented or appreciated
anatomic feature of the ability to expose the anterior capsule by
releasing just those few anterior-oblique fibers.
-
-
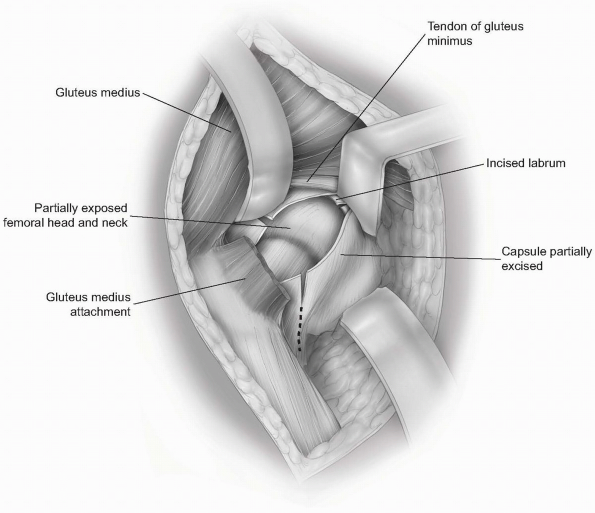
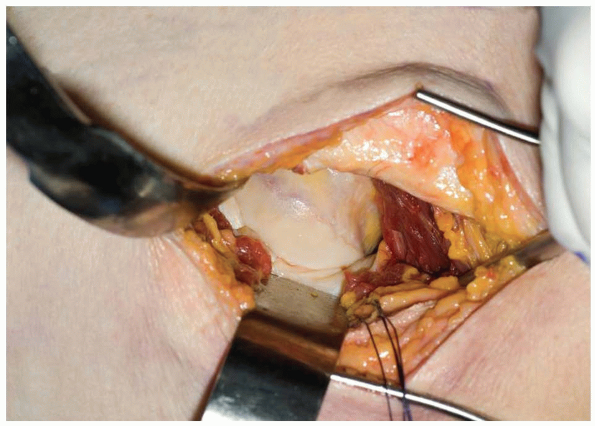
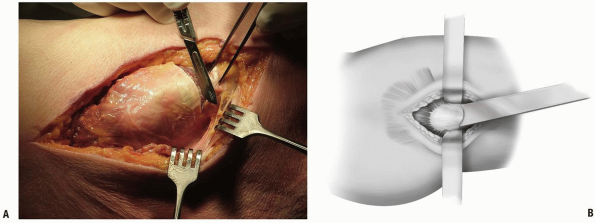
A curved self-retaining retractor is
placed between the gluteus minimus and the capsule. A wide
self-retaining retractor is placed anteriorly over the rim of the
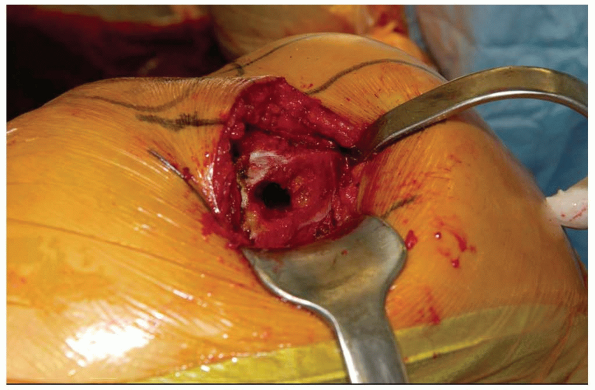
acetabulum allowing ready access to the anterior capsule (Fig. 7-18). -
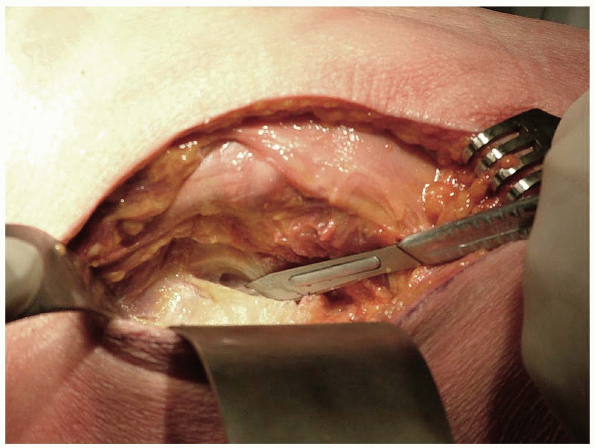
The hip joint is entered in line with the
femoral neck. The anterior portion of the capsule is excised. The
inferior capsule is released. The knife is passed blindly over the
lateral neck of the femur releasing the lateral capsule. The labrum is
incised in several areas radial to its circumference (Fig. 7-19). -
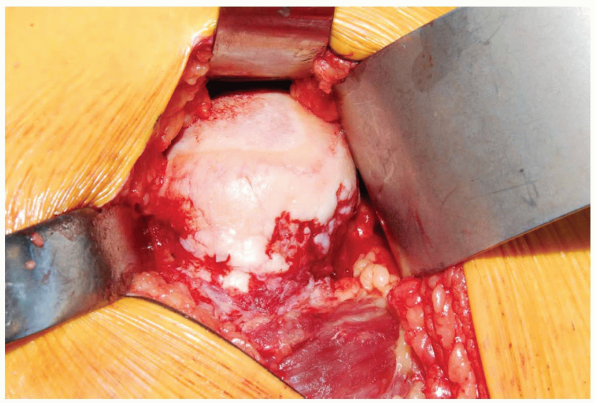
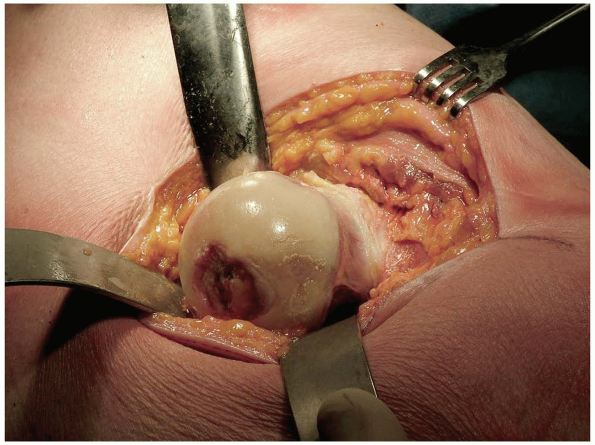
A bone hook is placed around the femoral neck. The hip is externally rotated and the femoral head is delivered into the wound (Fig. 7-20). For hip replacement the leg is placed on the table and externally rotated to expose the acetabulum.
-
Note: If
difficulty of dislocation is encountered, the iliotibial band is
released and allowed to slip posterior to the greater trochanter at the
time of hip dislocation.
-
-
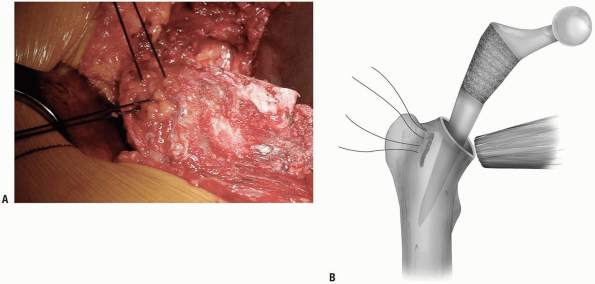
Closure: The author prefers to place
sutures through the prepared femoral canal and at the margin of the
greater trochanter for a transosseous purchase of the nonabsorbable no.
5 suture (Fig. 7-21). After reduction of the hip, these sutures are used to repair the antero-oblique fibers of the gluteus medius.-
Note: Of
significance is that the majority of the abductors has been left intact
with this exposure and generally is not too damaged by femoral canal
reaming.
-
-
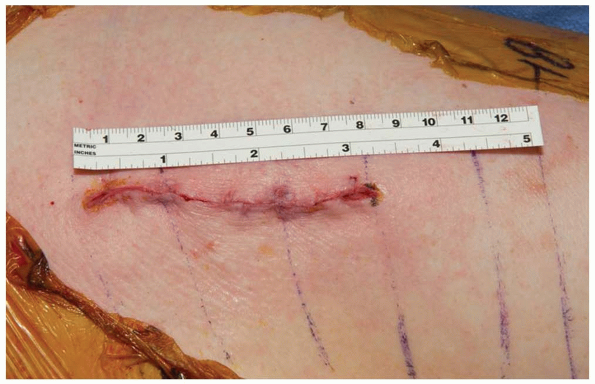
Skin closure is routine (Fig. 7-22).
P.150
 |
|
FIGURE 7-11
|
 |
|
FIGURE 7-12
|
 |
|
FIGURE 7-13
|
 |
|
FIGURE 7-14
|
 |
|
FIGURE 7-15
|
 |
|
FIGURE 7-16
|
P.151
 |
|
FIGURE 7-17
|
P.152
 |
|
FIGURE 7-18
|
 |
|
FIGURE 7-19
|
P.153
 |
|
FIGURE 7-20
|
 |
|
FIGURE 7-21
|
 |
|
FIGURE 7-22
|
P.154
LIMITED ANTERIOR HIP JOINT EXPOSURE (LIMITED SMITH-PETERSON) (5)
Indications
One of the minimally invasive muscle sparing techniques for hip joint replacement, or for any anterior joint arthrotomy.
Position
The patient is placed supine on the operating table.
Technique
-
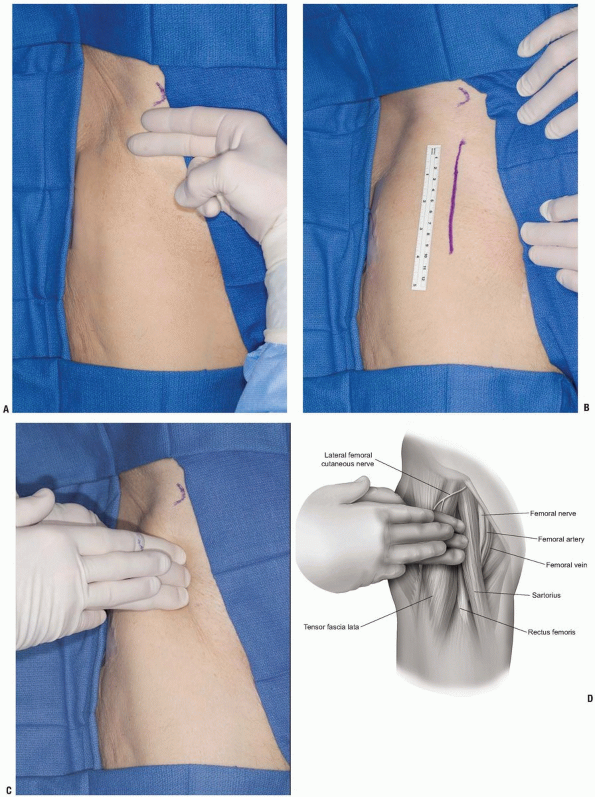
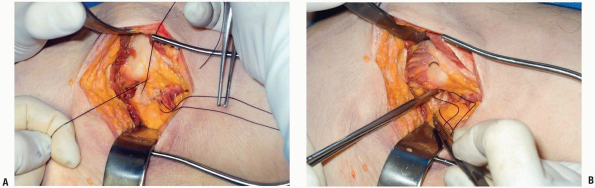
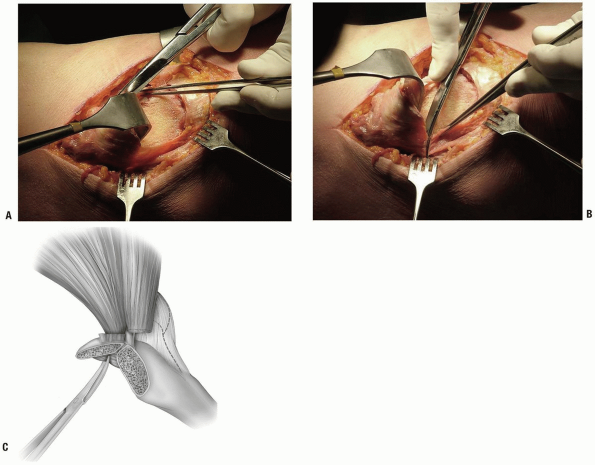
The skin incision begins two finger-breadths below the anterior-superior iliac spine (Fig. 7-23A) and extends distally for approximately 8 cm in a linear fashion between the tensor fascia lata and the sartorius (Fig. 7-23B). This interval can be identified by palpation (Fig 7-23C).
-
Note: The
major disadvantage of this incision is injury to the lateral femoral
cutaneous nerve. Although quite variable, this nerve typically exits
approximately two finger-breadths below the anterior superior iliac
spine and just medial to the sartorius. The lateral branches are
variable and can be injured when making the incision in the anterior
fascia.
-
-
The subcutaneous tissue is reflected to
the level of the fascia. The sartorius and tensor fascia lata muscles
are identified and the fascia investing these two muscles is split
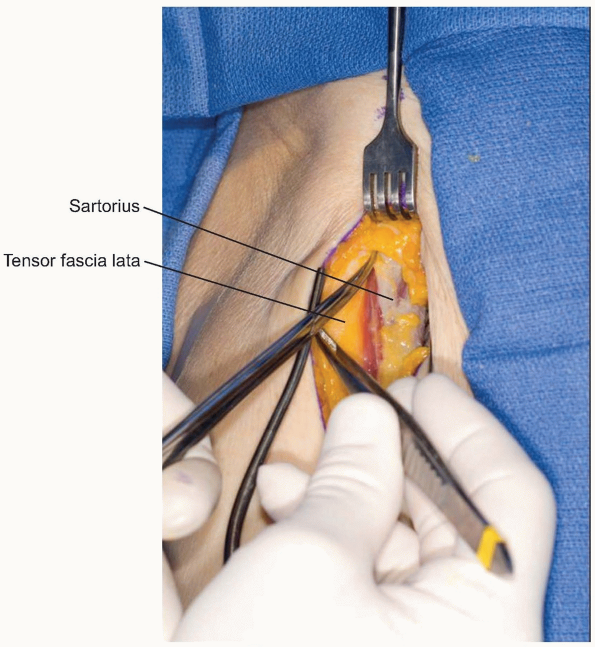
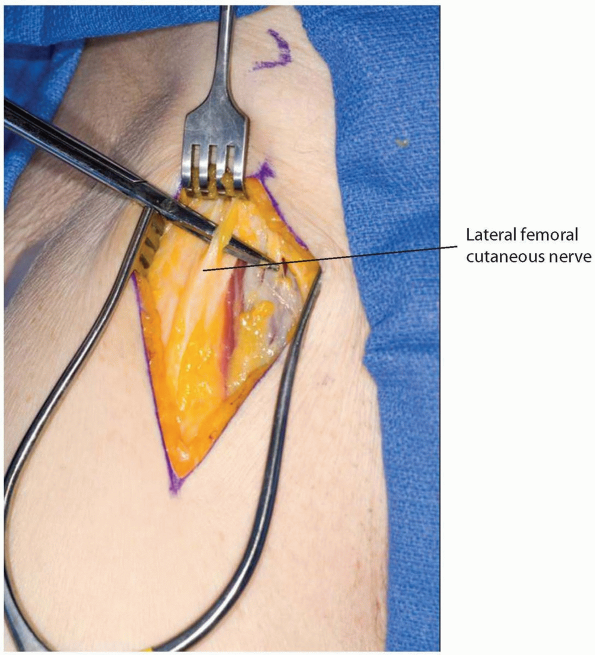
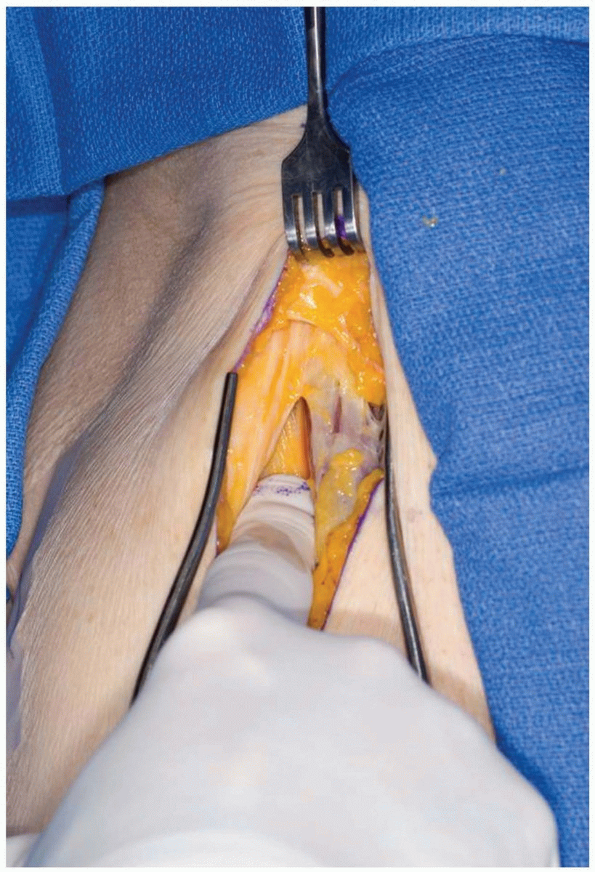
longitudinally (Fig. 7-24). Splitting the anterior fibers of tensor muscle helps protect against injury to the lateral femoral cutaneous nerve (Fig. 7-25) (2). -
The tensor is separated from the sartorius by sharp and blunt dissection (Fig. 7-26). The sartorius is reflected medially, the tensor laterally.
-
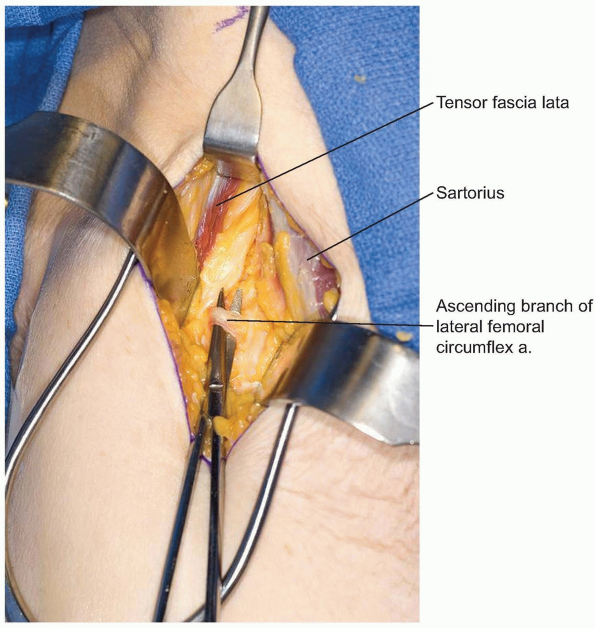
Further exposure is straight forward and
is usually done by palpating the femoral head and exposing the capsule
by blunt dissection.-
Note: The ascending branch of the lateral circumflex artery and vein do cross the field and must be ligated or cauterized (Fig. 7-27).
-
-
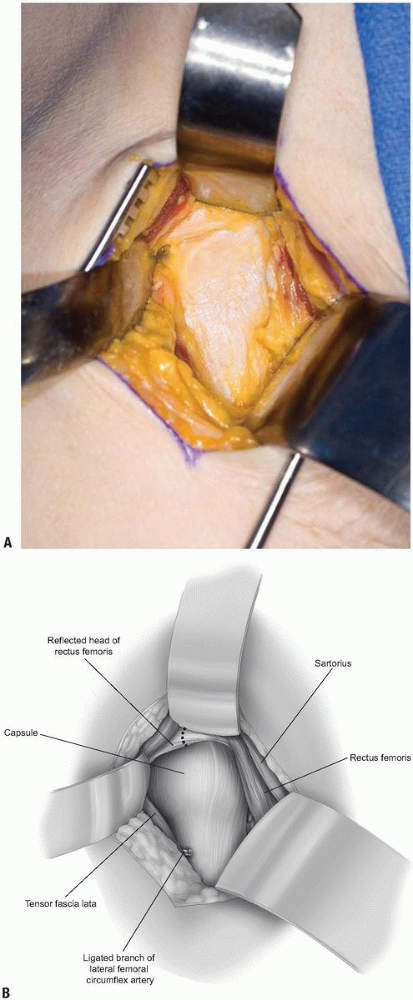
At the level of the hip joint the gluteus
medius and tensor fascia are further reflected laterally. The
attachment of the reflected head of the rectus femoris is observed at
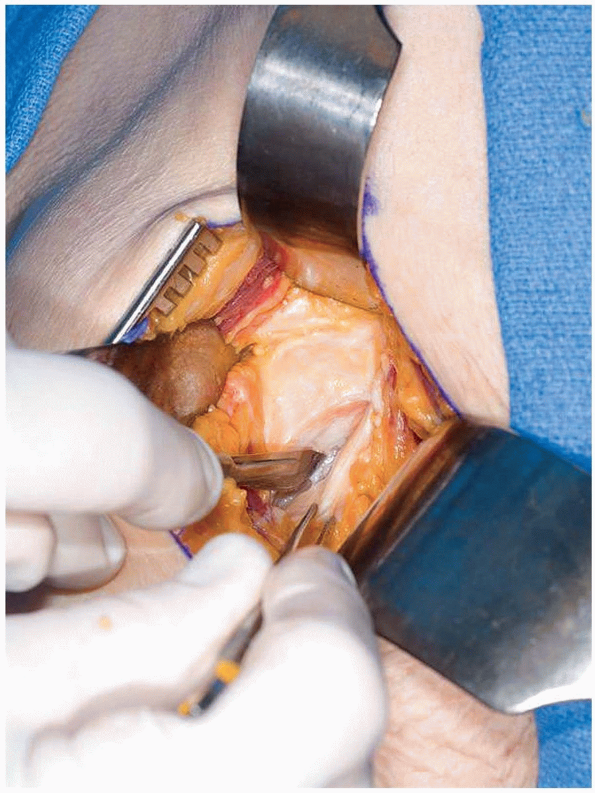
the superior aspect of the acetabulum and must be incised (Fig. 7-28). -
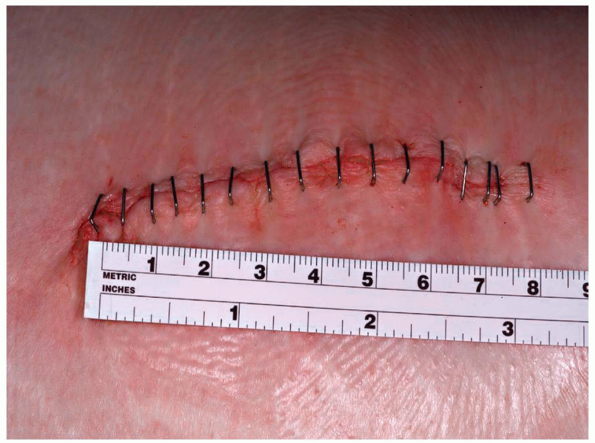
The hip joint is then entered by excising the anterior capsule (Fig. 7-29). Dislocation occurs with extension and external rotation (Fig. 7-30).
-
Closure: the closure only requires suture of the skin and subcutaneous tissue.
P.155
 |
|
FIGURE 7-23
|
P.156
 |
|
FIGURE 7-24
|
 |
|
FIGURE 7-25
|
 |
|
FIGURE 7-26
|
 |
|
FIGURE 7-27
|
P.157
 |
|
FIGURE 7-28
|
P.158
 |
|
FIGURE 7-29
|
 |
|
FIGURE 7-30
|
POSTERIOR APPROACH TO THE HIP (6)
The common feature of posterior exposures is release of
the short rotators. Variation is introduced by the manner of developing
the exposure dealing with the gluteus maximus muscle and the iliotibial
track. The repair of the rotators with capsule is also variably
described.
the short rotators. Variation is introduced by the manner of developing
the exposure dealing with the gluteus maximus muscle and the iliotibial
track. The repair of the rotators with capsule is also variably
described.
Traditional Exposure
-
Skin incision: variable skin incisions
may be used. Typically these are centered over the trochanter just
posterior to the midline. The incision is 12 to 14 cm in length and may
be straight or follows the fibers of the gluteus maximus and then
curves slightly posterior (Fig. 7-31). -
The dissection exposes the iliotibial band and the proximal gluteus maximus is divided along its fibers posteriorly (Fig. 7-32).
The iliotibial band is split and the posterior portion of the gluteus
maximus is retracted posteriorly, the anterior fibers of the gluteus
maximus and tensor fascia are retracted anteriorly, often with
self-retaining retractors. -
The attachment of the gluteus medius is
identified posteriorly and released from the posterior crest of the
trochanter with a cutting cautery (Fig. 7-33). -
The gluteus medius is retracted
proximally with a curved retractor placed over the neck of the femur,
and the short rotators are exposed. Distally, the quadratus femoris is
observed and may or may not be released from the femur. The superior
and inferior gemeli; the obturator internus and externus are tagged
with two sutures and released more proximally (Fig. 7-34). The piriformis is identified proximally and detached from the styloid process of the greater trochanter. -
The entire sleeve of short rotator
muscles are elevated from the capsule as it is released with a cutting
cautery just at its insertion at the posterior margin of the greater
trochanter.-
Pearl: To facilitate the all important subsequent reattachment, these muscles and capsule should be tagged before release.
-
-
The posterior capsule is entered and is excised as needed (Fig. 7-35).
-
The labrum is incised and with internal rotation of the thigh, the femoral head dislocates posteriorly (Fig. 7-36).
-
Closure: the closure is extremely
important with the posterior exposure to lessen the possibility of
dislocation. The short rotators are retrieved and are then reattached
through bone holes in the posterior margin of the trochanter in the
region of their anatomic attachment (Fig. 7-37).-
Note: The
formal and secure reattachment of these muscles with capsular remnants
has dramatically decreased the incidence of hip dislocation (7).
Several options for reattachment have been described. An alternative to
that is illustrated with the minimally invasive exposure (see Fig. 7-48).
-
P.159
 |
|
FIGURE 7-31
|
 |
|
FIGURE 7-32
|
 |
|
FIGURE 7-33
|
P.160
 |
|
FIGURE 7-34
|
 |
|
FIGURE 7-35
|
 |
|
FIGURE 7-36
|
 |
|
FIGURE 7-37
|
P.161
LIMITED POSTERIOR EXPOSURE (8)
-
As with other limited exposures, special retractors have been developed and modified to facilitate this technique (Fig. 7-38). A limited 7 to 10 cm posterior skin incision is employed.
-
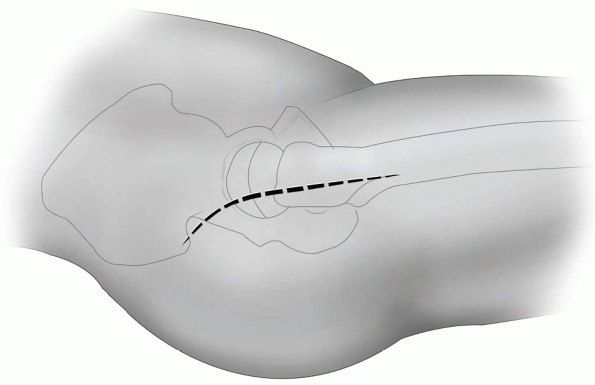
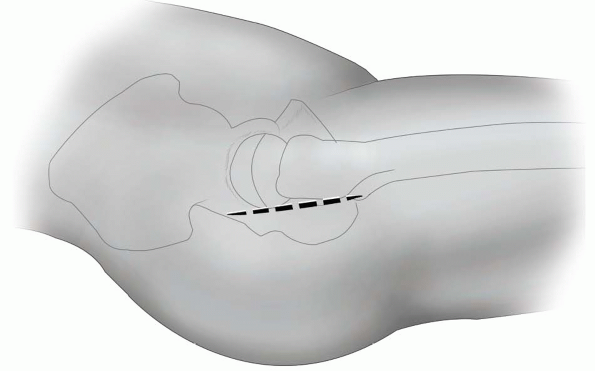
Pearl: The
key to limited posterior skin incision is the precise placement of the
skin incision itself. Typically this parallels the posterior border of
the greater trochanter and extends from the tip of the greater
trochanter to the tubercle of the vastus lateralis ridge (Fig. 7-39).
-
-
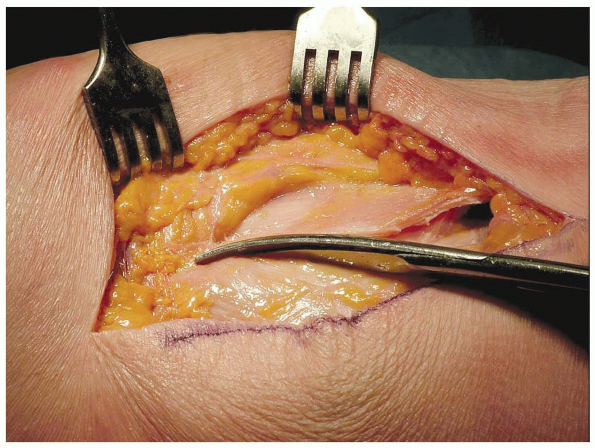
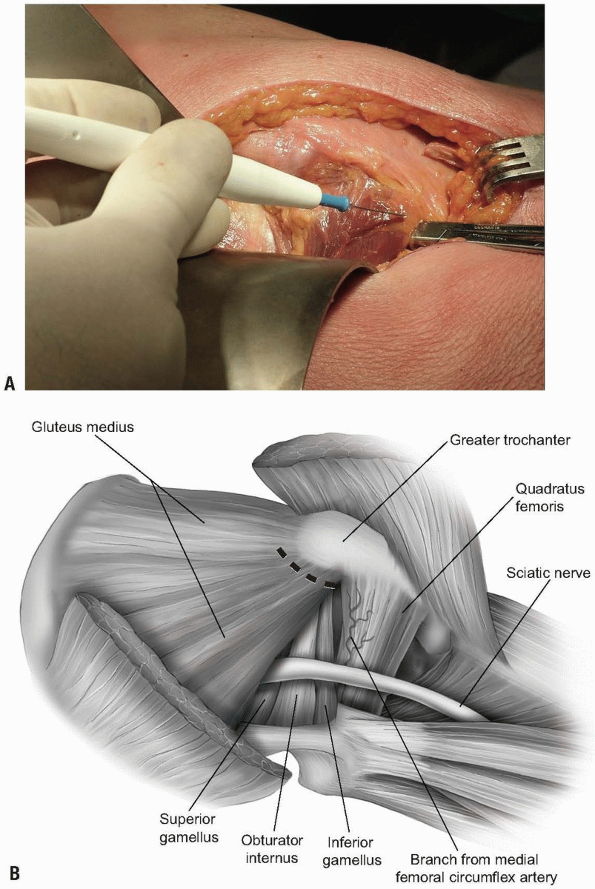
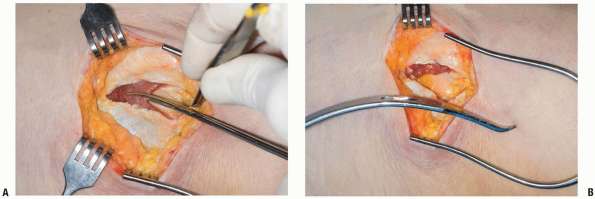
Deep to the skin, an incision is made
through the fibers of the gluteus maximus parallel to the posterior
border of the greater trochanter (Fig. 7-40).
A retractor is placed anterior to the greater trochanter allowing
visualization of the gluteus medius and piriformis tendon posteriorly (Fig. 7-41).-
Note: With
this exposure the iliotibial band is not split, the exposure is
posterior to this structure through the distal fibers of the gluteus
maximus.
-
-
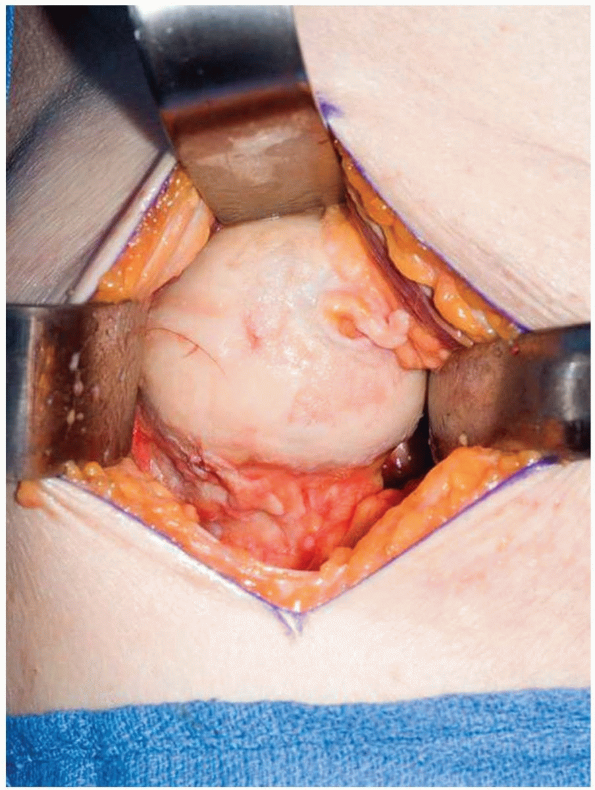
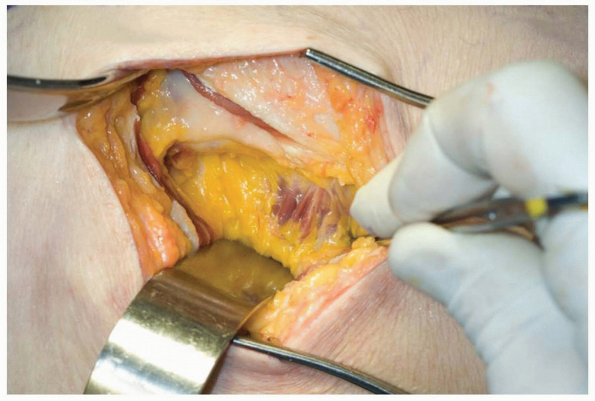
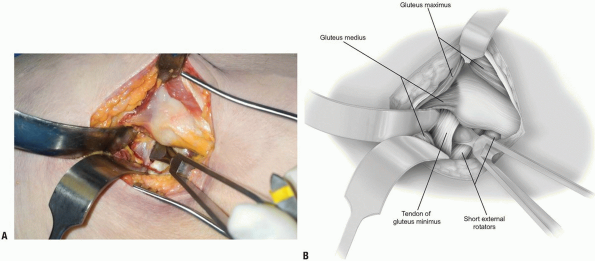
The gluteus medius is retracted anteriorly exposing the underlying gluteus minimus which is separated from the capsule (Fig. 7-42).
The subsequent incision of the hip capsule and external rotators starts
from the posterior edge of the gluteus minimus and ends at but does not
include the quadratus femoris muscle. Sutures are placed in the short
rotators prior to release (Fig. 7-43). -
The hip capsule and external rotators are
incised together from the greater trochanter and these structures are
preserved as one layer for later repair (Fig. 7-44). -
With internal rotation the hip is dislocated posteriorly (Fig. 7-45). The femoral neck cut is carried out in accordance with the preoperative plan regarding neck length.
-
The acetabulum is exposed with a narrow
cobra placed at the anterior-inferior iliac spine to retract the femur
anteriorly. A specialized sharp-pointed angled retractor is driven into
the posterior wall to retract the capsule and external rotators. A
broad cobra retractor is placed inferiorly at the level of the
transverse ligament to facilitate insertion of acetabular reamers (Fig. 7-46). -
The femur is exposed with one narrow
retractor anteriorly to retract the gluteus maximus and subcutaneous
fat. A second narrow angled retractor is placed along the medial neck
to retract the preserved
P.162
quadratus
femoris muscle. The third retractor is placed beneath the anterior part
of the cut femoral neck to retract the skin and posterior edge of
gluteus maximus muscle posteriorly (Fig. 7-47). -
Closure: The short rotators are reattached through bone holes as with any posterior hip exposure (Fig. 7-48A).
Alternatively, the cut edge of gluteus minimus and underlying anterior
capsule can be sutured directly to the posterior capsule and overlying
external rotators as one layer (Fig. 7-48B). This eliminates any dead space between the capsular repair and the prosthetic femoral head. -
Skin closure is of choice (Fig. 7-49).
 |
|
FIGURE 7-38
|
 |
|
FIGURE 7-39
|
 |
|
FIGURE 7-40
|
 |
|
FIGURE 7-41
|
 |
|
FIGURE 7-42
|
P.163
 |
|
FIGURE 7-43
|
 |
|
FIGURE 7-44
|
 |
|
FIGURE 7-45
|
 |
|
FIGURE 7-46
|
P.164
 |
|
FIGURE 7-47
|
 |
|
FIGURE 7-48
|
 |
|
FIGURE 7-49
|
P.165
TROCHANTERIC OSTEOTOMY
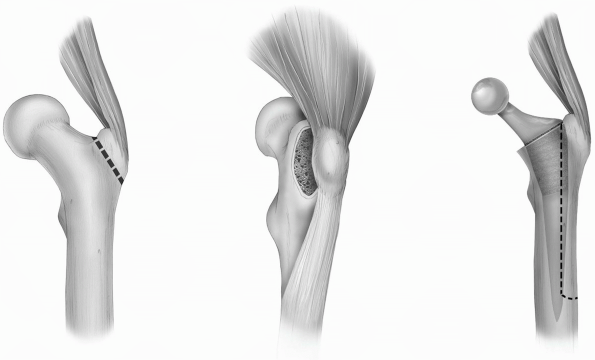
Today we would recognize three variations of trochanteric osteotomy to have practical utility (Fig. 7-50). Two are useful for primary and one for revision hip replacement (9).
The first, used by Charnley, simply detaches the trochanter in a way to
allow proximal retraction of the gluteus medius and minimus. The second
is an osteotomy in continuity leaving the attachment of the gluteus
medius proximally and of the vastus lateralis distally. The extended
osteotomy is the third version and is reserved for revision procedures
and includes the trochanter with the gluteus attachments but also
extends distally to maintain the attachment of the vastus lateralis.
The osteotomy is initiated posteriorly just anterior to the
intermuscular septum and is hinged anteriorly. This exposure has
realized great popularity in recent years to facilitate removal of
well-fixed femoral components.
 |
|
FIGURE 7-50
|
 |
|
FIGURE 7-51
|
P.166
“Simple” Trochanteric Osteotomy (Charnley)
Proximal reflection: this osteotomy was used and
popularized by Sir John Charnley during the development of the total
hip (low friction arthroplasty) era (10).
popularized by Sir John Charnley during the development of the total
hip (low friction arthroplasty) era (10).
Position
Typically the patient is in the lateral decubitus position although the osteotomy can be performed in a supine position as well.
Technique
-
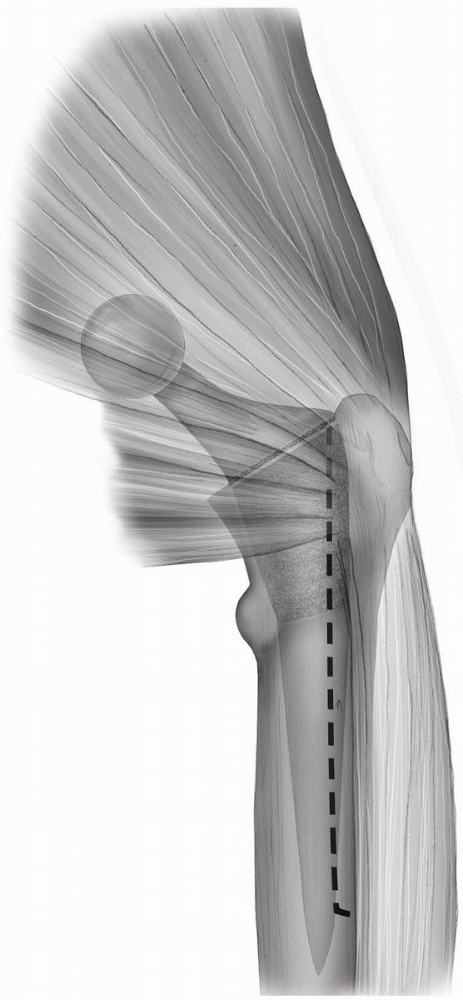
Incision: the incision is of choice. A
straight or slightly posterior curved skin incision measuring 14 to 16
cm is usually adequate since the trochanter is to be reflected
proximally so the incision will be centered somewhat more proximally
referable to the trochanter (Fig. 7-51). -
The fascia is split distally for
approximately 4 to 6 cm and proximally the gluteus maximus is either
split from the tensor fascia lata or simply split the gluteus maximus
muscle in line with its fibers (Fig. 7-52). -
The iliotibial band is separated with a
self-retaining retractor. The trochanteric bursa is resected to allow
clear identity of the origin of the vastus lateralis at the crest of
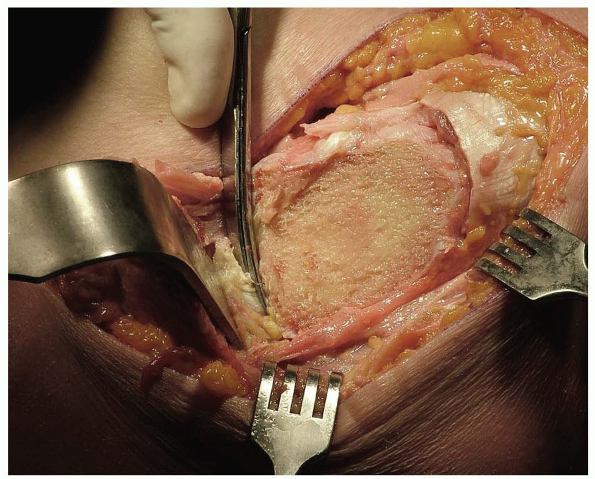
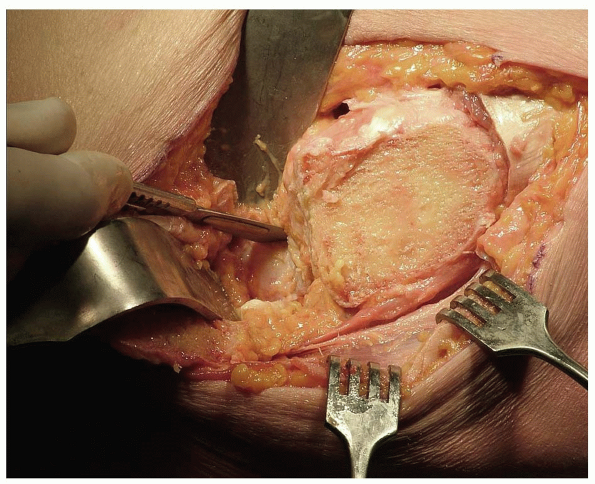
the greater trochanter (Fig. 7-53). The vastus lateralis is then released distally from its attachment at the crest of the greater trochanter (Fig. 7-54). -
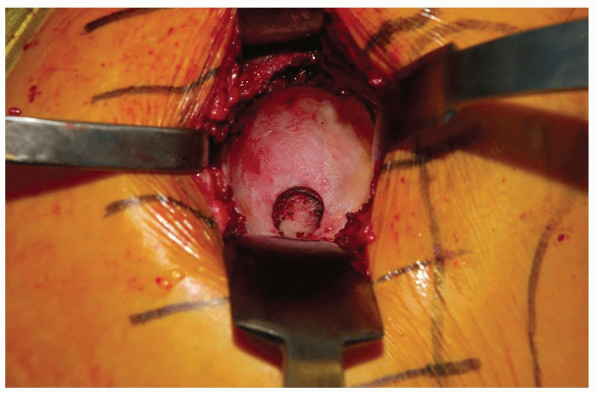
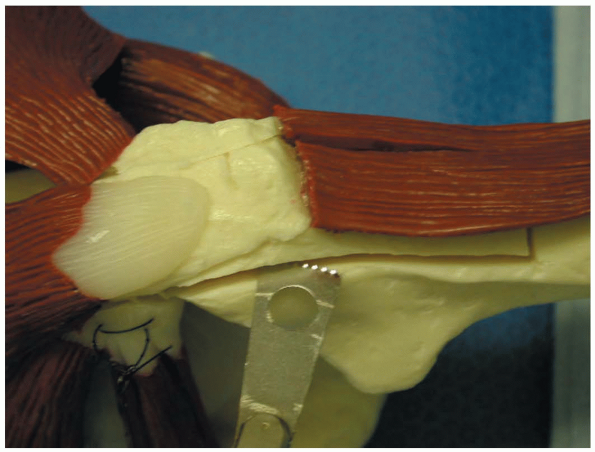
Posteriorly the styloid to which the
periformis attaches is identified. A wide 40 to 50 mm osteotome is
driven under the trochanter originating at the trochanteric crest and
proceeds to and through the styloid process. The depth of the osteotomy
can be accurately facilitated by placing a periosteal retractor under
the styloid process (Fig. 7-55).P.167-
Pearl: Care
should be taken not to make this osteotomy too thick since, with an
implant in place, the osteomized bed may be compromised exposing the
implant and nonhealing may ensue.
-
-
The trochanter is retracted proximally and the anterior fibers of the gluteus medius are released both anteriorly (Fig. 7-56A) and posteriorly (Fig. 7-56B,C).
-
On further retraction of the trochanter proximally, the gluteus minimus is separated from the capsule with scissors (Fig. 7-57).
-
The capsule is excised (Fig. 7-58) and the femoral head is dislocated anteriorly by external rotation of the thigh.
-
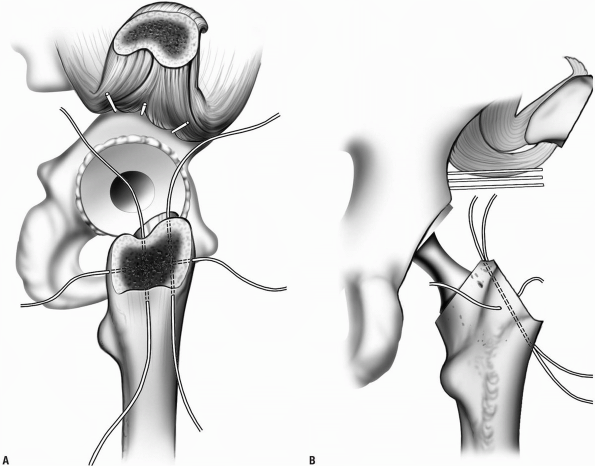
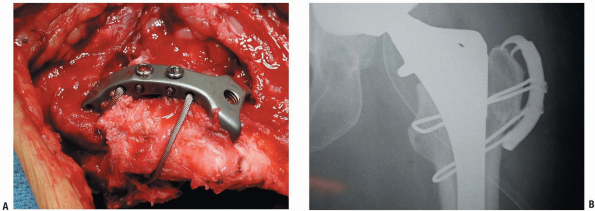
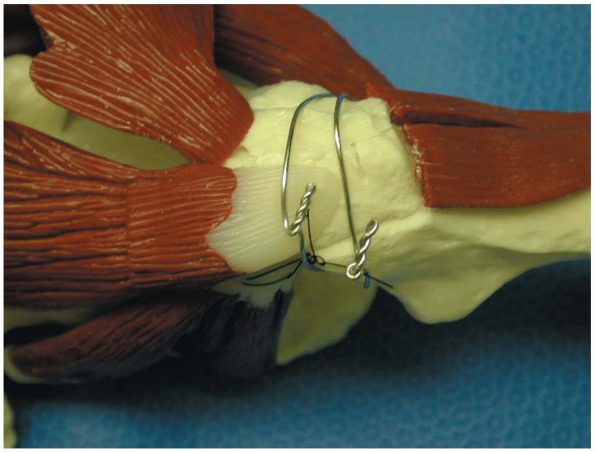
Reattachment: Several options have been
successfully used. Monofilament no. 14 wire is effective if placed
through bone and distributed both vertically and transversely (Fig. 7-59) (11,12). Alternatively, specially designed “claws” have been designed just for this purpose (Fig. 7-60).P.169-
Pearl: I
prefer the monofilament wire rather than cables or special constraints
as it is effective, less expensive, and less likely to cause
trochanteric bursitis than is the “claw” or braided wire.
-
P.168
 |
|
FIGURE 7-52
|
 |
|
FIGURE 7-53
|
 |
|
FIGURE 7-54
|
 |
|
FIGURE 7-55
|
 |
|
FIGURE 7-56
|
 |
|
FIGURE 7-57
|
 |
|
FIGURE 7-58
|
 |
|
FIGURE 7-59
|
 |
|
FIGURE 7-60
|
The Trochanteric Osteotomy in Continuity (8,13,14)
Rationale
The attachment of the vastus lateralis helps compress the osteotomy and assure healing of the osteotomy.
Technique
-
Incision: an exposure is used similar to that which was used for simple osteotomy with proximal retraction (see Fig. 7-51).
-
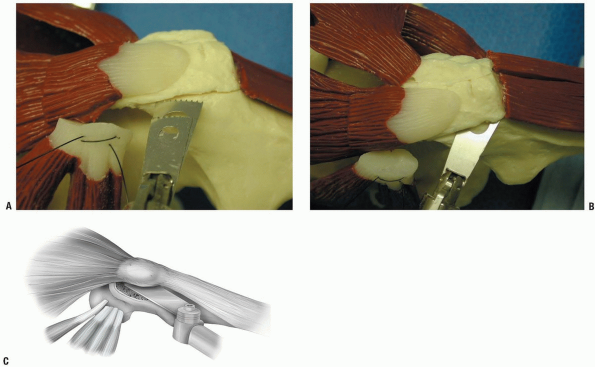
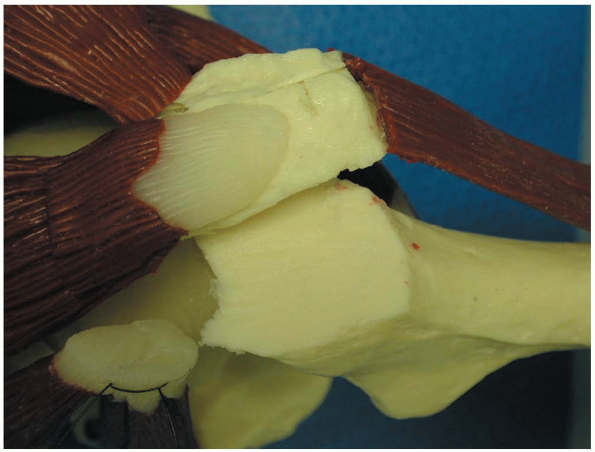
The trochanter is freed of its soft
tissue posteriorly and the short rotators are released. An oscillating
saw separates the trochanter with the attachments of the gluteus medius
and minimus proximally and the vastus lateralis distally (Fig. 7-61). The fragment is mobilized from posterior to anterior.-
Note: The depth of the trochanteric osteotomy can be variable but detaching the short rotators is required in all instances (Fig. 7-62).
-
-
The capsule is exposed and excised posteriorly and laterally (Fig. 7-63).
-
The hip dislocates posteriorly with internal rotation of the thigh.
-
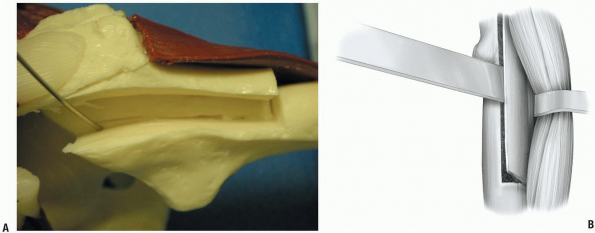
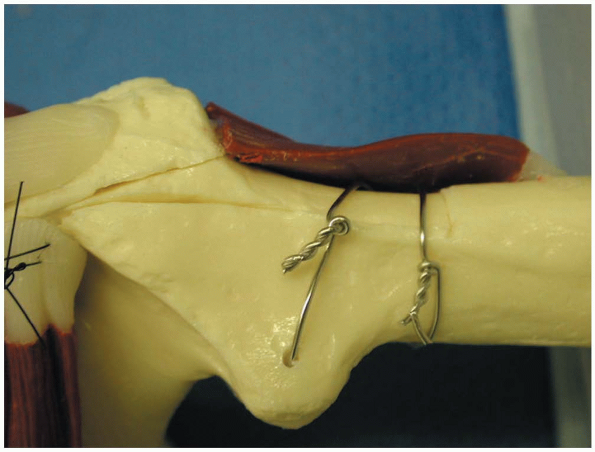
Reattachment. For this osteotomy two circumferential monofilament wires are effective and easy to apply (Fig. 7-64).
-
Note: The
osteotomy in continuity does allow compression of the osteotomy site
with proximal and distal muscle contracture which is the reason that
this osteotomy is preferred by some.
-
P.170
 |
|
FIGURE 7-61
|
 |
|
FIGURE 7-62
|
 |
|
FIGURE 7-63
|
Extended Trochanteric Osteotomy
This osteotomy involves the posterior-lateral one third of the circumference of the femur (9,15, 16, 17) (see Fig. 7-51). This osteotomy is used for revision of the femoral component and involves the posterior-lateral one third.
 |
|
FIGURE 7-64
|
P.171
 |
|
FIGURE 7-65
|
Technique
-
The exposure is similar as described
above. Posteriorly the gluteus musculature is identified and the
trochanter is osteotomized from its posterior border distally along the
linea aspira to a length necessary for adequate exposure of the
proximal or fixed portion of the femoral stem (Fig. 7-65). -
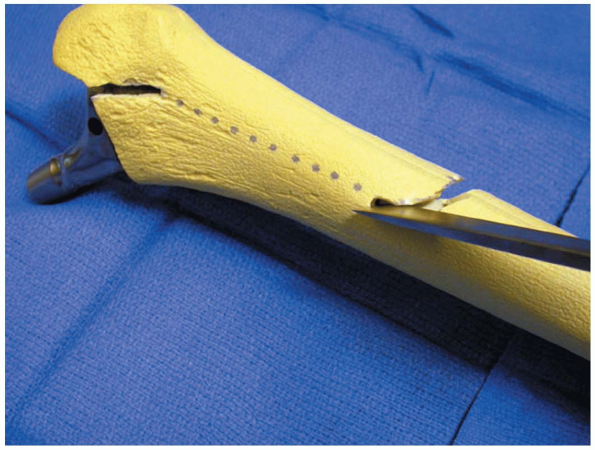
Anteriorly, a series of drill holes are used to allow the osteotomy to hinge anteriorly (Fig. 7-66).
-
An osteotomy is performed with an
oscillating saw, and usually a drill hole is placed in the posterior
distal corner to avoid a stress riser effect (Fig. 7-67). -
The transverse cut is then made distally to the level of the anterior drill holes.
-
The osteotomized segment is elevated
anteriorly with one or several osteotomes and the retraction of this
extended trochanteric osteotomy is from posterior to anterior (Fig. 7-68). The vastus lateralis muscle remains attached to the fragment. -
The hip is dislocated posteriorly with internal rotation.
-
At completion, the trochanter is
“reduced” to its original bed and secured with at least three
circumferential monofilament wires (Fig. 7-69).-
Note: While
healing rates are high in excess of 90%, care should be taken to attain
as accurate a reduction as is possible. This may be difficult if the
revised implant has different dimensions than the one removed.
-
P.172
 |
|
FIGURE 7-66
|
 |
|
FIGURE 7-67
|
 |
|
FIGURE 7-68
|
 |
|
FIGURE 7-69
|
P.173
REFERENCES
1. Glassman AH, Engh CA, Bobyn JD. A technique of extensile exposure for total hip arthroplasty. J Arthroplasty 1987;2:11-21.
2. Jensen
NF, Harris WH. A system for trochanteric osteotomy and reattachment for
total hip arthroplasty with a ninety-nine percent union rate. Clin Orthop 1986;(208):174-181.
NF, Harris WH. A system for trochanteric osteotomy and reattachment for
total hip arthroplasty with a ninety-nine percent union rate. Clin Orthop 1986;(208):174-181.
3. Lindgren U, Svenson O. A new transtrochanteric approach to the hip. Int’l Orthopaedics 1988;12(1):37-41.
4. Hardinge K. The direct lateral approach to the hip. J Bone Joint Surg 1982;64B:17-19.
5. Pellici PM, Bostrom M, Poss R. Posterior approach to total hip replacement using enhanced posterior soft tissue repair. Clin Orthop 1998;355:224-228.
6. Fulkerson JP, Crelin ES, Keggi KJ. Anatomy and osteotomy of the greater trochanter. Archives of Surg 1979;114(1):19-21.
7. Chiu
FY, Chen CM, Chung TY, et al. The effect of posterior capsulorrhaphy in
primary total hip arthroplasty: A prospective randomized study. J Arthroplasty 2000;15:194-199.
FY, Chen CM, Chung TY, et al. The effect of posterior capsulorrhaphy in
primary total hip arthroplasty: A prospective randomized study. J Arthroplasty 2000;15:194-199.
8. Dorr LD. Hip Arthroplasty: Minimally Invasive Techniques and Computer Navigation. Philadelphia: Elsevier Health Sciences, 2006.
9. McGrory
BJ, Morrey BF, Cahalan TD, et al. Effect of femoral offset on range of
motion and abductor muscle strength after total hip arthroplasty. J Bone Joint Surg 1995;77B(6):865-869.
BJ, Morrey BF, Cahalan TD, et al. Effect of femoral offset on range of
motion and abductor muscle strength after total hip arthroplasty. J Bone Joint Surg 1995;77B(6):865-869.
10. Charnley J, Ferreira A, De SD. Transplantation of the greater trochanter in arthroplasty of the hip. J Bone Joint Surg 1964;46B:191.
11. Jacobs LG, Buxton RA. The course of the superior gluteal nerve in the lateral approach to the hip. J Bone Joint Surg 1989;71A:1239-1243.
12. Smith-Peterson MN. Approach to and exposure of the hip joint for mold arthroplasty. J Bone Joint Surg 1949;31A:40.
13. English TA. The trochanteric approach to the hip for prosthetic replacement. J Bone Joint Surg 1975;57A:1128-1133.
14. Light TR, Keggi KJ. Anterior approach to hip arthroplasty. Clin Orthop 1980;152:255-260.
15. Chen WM, McAuley JP, Engh CA Jr, et al. Extended slide trochanteric osteotomy for revision total hip arthroplasty. J Bone Joint Surg 2000;82A:1215-1219.
16. Gibson A. Posterior exposure of the hip joint. J Bone Joint Surg 1950;32B:183.
17. Wroblewski BM, Shelley P. Reattachment of the greater trochanter after hip replacement. J Bone Joint Surg 1985;67B(5):736-740.
18. McGrory J, Bal BS, Harris WH: Trochanteric osteotomy for total hip arthroplasty: Variations and indications for their use. JAAOS 1996;4:258-267.
19. Younger
TI, Bradford MS, Magnus RE, et al: Extended proximal femoral osteotomy:
A new technique for femoral revision arthroplasty. J Arthroplasty 1995;10:329-338.
TI, Bradford MS, Magnus RE, et al: Extended proximal femoral osteotomy:
A new technique for femoral revision arthroplasty. J Arthroplasty 1995;10:329-338.