
widespread acceptance with the introduction of nails with locking
capabilities. A large body of literature supports the use of
intramedullary nailing in both closed and open fractures. Nevertheless,
controversies abound with regard to the role of reaming in high-energy
and open fractures, the timing of surgery, and its application in very
proximal and distal fractures. Because the spectrum of injuries to the
tibia is so broad, no single method of treatment is applicable to all
fractures.
minimizing the risk of infection, often results in unacceptable
shortening, malrotation, or angulation in high-energy injuries.
Although the better choice for improving alignment and function,
operative treatment is associated with increased risks of infection and
nonunion. Recent advantages in plate osteosynthesis with peri-articular
and locked plating have lowered complication rates but are less
applicable for diaphyseal tibial fractures. Another alternative,
stabilization with an external fixator, while decreasing risk of
infection, is associated with poor patient acceptance, repeated
surgeries, and angulation after fixator removal. To improve overall
outcome, locked intramedullary nailing for unstable, displaced, closed
and open, tibial fractures is a useful treatment alternative.
while mechanically sound, may be biologically less attractive. Studies
on reamed intramedullary nails have shown substantial endosteal
vascular damage incurred by multiple passes of the reamer, thermal
necrosis of bone, impaction of the haversian canals with the products
of reaming, and an increased risk of infection. Nevertheless, the
advantages of intramedullary reaming
include
placement of a larger nail and screws, which improves alignment and
reduces hardware failure. Despite the risks of reaming, the literature
strongly supports the use of a reamed intramedullary nail as the
implant of choice for most unstable, closed, tibial-shaft fractures.
However, multiple studies also support the use of both reamed and
nonreamed nails for Gustillo grade I, II, and IIIA open tibial
fractures. For grade IIIB and IIIC fractures, we favor temporary or
definitive external fixation or on occasion a nonreamed,
small-diameter, statically locked nail.
in patients with multiple injuries; an ipsilateral fracture of the
femur, ankle, or foot; a vascular injury; compartment syndrome; and
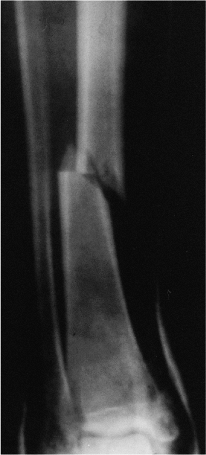
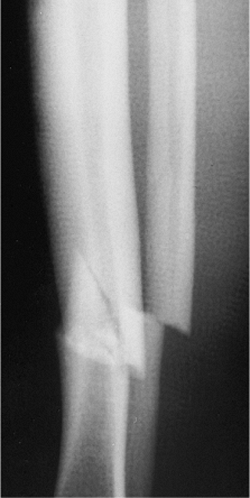
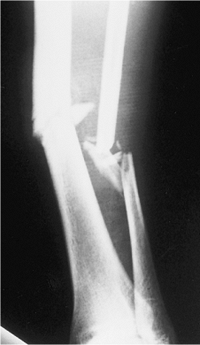
bilateral fractures. Fractures located in the middle two thirds of the
tibia that are amenable to nailing include transverse, short oblique,
spiral, comminuted, and segmental fractures (Figs. 29.1,29.2,29.3,29.4).
Indications for nailing may extend proximally or distally, particularly
in segmental fractures. Unstable fractures with high-grade soft-tissue
injury, whether closed or open, require operative stabilization.
Unacceptable fracture position after closed reduction and casting is
also an indication for nailing. Those with shortening more than 1.5 to
2.0 cm and angulation in excess of 5 degrees of varus or valgus or 10
degrees of anterior or posterior angulation may be candidates for
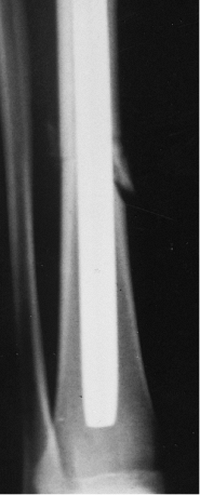
intramedullary nailing. Tibial fractures with an intact fibula should
only be stabilized if the tibial fracture is displaced or in angulation
(Figs. 29.5 and 29.6).
For a minimally or nondisplaced oblique or spiral fracture,
nonoperative treatment is satisfactory. Nearly all open fractures
require stabilization to allow improved management of the soft tissue.
with open epiphyses and a tibial tubercle apophysis. Patients with
damage to the apophysis may experience hyperextension. A lateral
radiograph should be carefully inspected because very small medullary
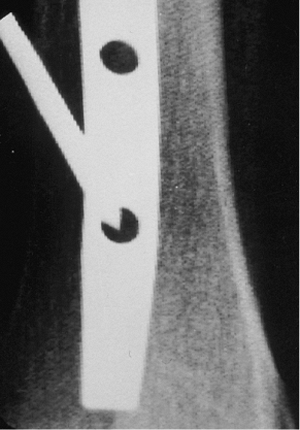
canals may present a hazard during nailing (Fig. 29.7).
If the surgeon elects to proceed with nailing in patients with small
canals, a small-diameter Ender nail can be placed, or 5-mm-diameter
reamers must be used to start a careful reaming process that will not
burn the bone. A tourniquet should not be used for reaming in any
patient during tibial nailing.
 |
|
Figure 29.1. AP radiograph of grade I, open, distal-tibial fracture and ankle fracture.
|
 |
|
Figure 29.2. Lateral radiograph showing posterior malleolar fracture.
|
 |
|
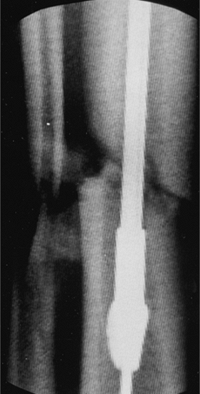
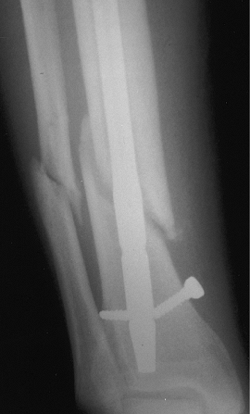
Figure 29.3. Postoperative AP radiograph showing lag screws for ankle fracture and interlocking nail for tibial fracture.
|
 |
|
Figure 29.4. Lateral radiograph showing reduction of posterior malleolus.
|
 |
|
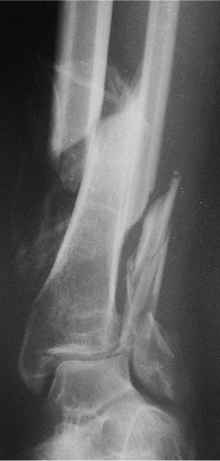
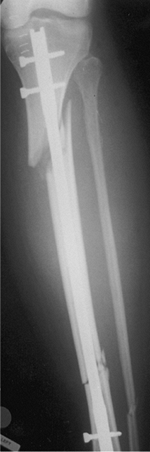
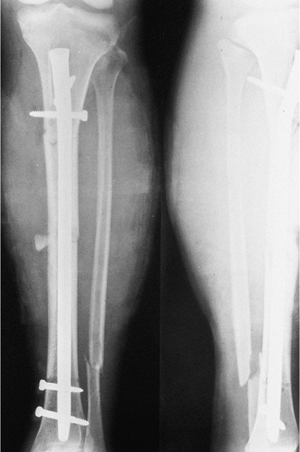
Figure 29.5. Tibial fracture with intact fibula. Varus angulation and translation indicate operative treatment.
|
 |
|
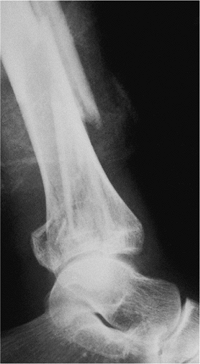
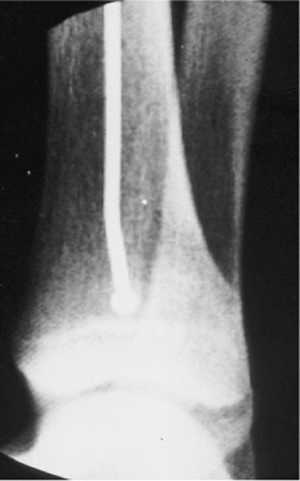
Figure 29.6. Postoperative AP radiograph with nonlocked intramedullary nail in a stable fracture.
|
 |
|
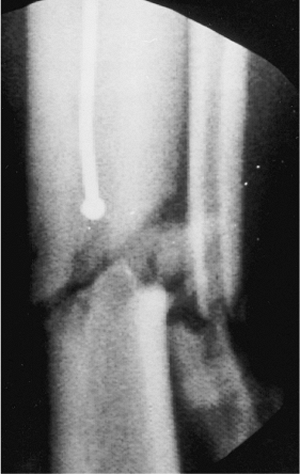
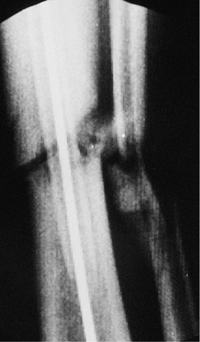
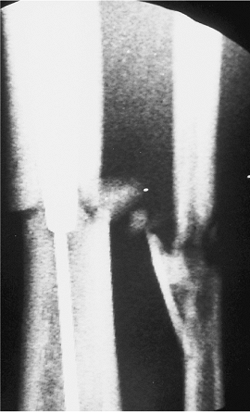
Figure 29.7.
Lateral radiograph demonstrating an extremely small medullary canal. Reaming should be avoided or carried out with very small reamers (starting at 5 mm). |
area of infection carries a high risk for chronic osteomyelitis and
decreased union. Infected injuries are best handled with debridement
and external fixators.
physician should look for other injuries. Examination for neurovascular
compromise is important. The degree of swelling and any fracture
blisters, whether serous or sanguineous, should be recorded. Palpation
of the compartment at the fracture site is an important means of
determining the tightness of the compartment. Active motion of the
toes, pain on passive stretch, and hypesthesia should be noted. If
compartment syndrome is suspected, then pressure measurements are
valuable. With careful monitoring, any patient who develops a
preoperative or postoperative compartment syndrome requires release of
the compartments and stabilization with a nail. Open fractures should
be carefully evaluated and the fracture wound classified according to
Gustillo and Anderson. Patients with both closed and open fractures
should be placed in a long-leg splint during the interval between
injury and intramedullary nailing.
cephalosporin one hour before and 24 hours after the nailing procedure.
Patients with open fractures should also be treated with cephalosporin
for 48 to 72 hours, and if the fractures are contaminated, they should
also concomitantly receive aminoglycosides.
radiograph of the fractured extremity, including both the knee and the
ankle, is critical for defining the fracture and geometry of the tibia
and the injury. The lateral radiograph should be carefully inspected,
and the size of the intramedullary canal should be measured. An
ossimeter is used to measure the tibia so that the length and diameter
of the nail can be established. Positive nail-design features include
static and dynamic interlocking holes, oblique holes for proximal
fractures, clustered distal holes for distal fractures, and cannulation
for ease of placement over a guide wire as well as for removal of any
broken nail.
spinal is used, it should be very short-acting because evaluation of
the neurologic status and pain level is very important after surgery. A
continuous epidural should be avoided in the treatment of tibial
fractures: Although it may provide pain relief for the patient, it
makes clinical compartment monitoring difficult.
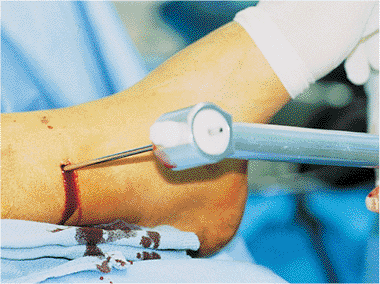
The entire limb is prepped and draped. If the fracture is open, the
traumatic wounds are irrigated and débrided. The traumatic wound is
commonly extended to improve exposure and visualization. All nonviable
cortical fragments are removed as are foreign bodies or necrotic
tissue. The debridement must be orderly, sequential, and complete to
render the wound surgically sterile in preparation for the nailing. The
fracture ends are carefully inspected and cleaned to ensure that the
proximal and distal intramedullary canal is free from debris. If the
degree of contamination is high and the wound cannot be reliably
rendered clean and sterile, external fixation may be preferable to
nailing. The traumatic wound is irrigated, via pulsed lavage, with 9 to
12 L of normal saline.
attention is turned to skeletal stabilization. All instruments used for
the washout are removed from the field. The surgeon, assistants, and
nurse change into clean gowns and gloves. Then clean, dry, sterile
drapes are applied to the patient.
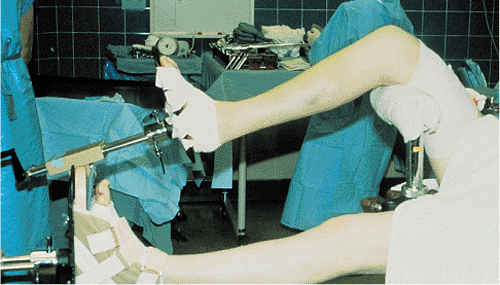
surgeon’s use of a fracture table, a sterile bolster or triangle under
the knee, or a distractor. A sterile radiolucent triangle under the
knee is the simplest technique and is particularly useful in the
treatment of open fractures that require debridement and re-prep before
nailing (Figs. 29.8 and 29.9).
The knee is flexed over the triangle, which permits access to the proximal tibia as well as visualization of the starting point.
 |
|
Figure 29.8. AP radiograph of a grade II open fracture with tibial and fibular fracture at same level.
|
 |
|
Figure 29.9. Foam shoulder immobilizer used for a bolster under the knee.
|
 |
|
Figure 29.10. Fracture table. Knee is flexed 90 degrees and peroneal post is against distal thigh rather than popliteal fossa.
|
and maintaining fracture length as well as for controlling angulation
and rotation. The assistant also will have difficulty holding the leg
perfectly still during distal interlocking. This technique works best
with stable fracture patterns.
effective in maintaining leg length and rotation during the procedure.
It is particularly helpful in nonteaching hospitals where a scrubbed
assistant may not be available. With the fracture table, the knee is
flexed 90 degrees over a post, which is placed proximal to the
popliteal fossa to prevent compression of the vessels or peroneal nerve
(Fig. 29.10). Tape is placed around the leg to
prevent external rotation of the extremity. A fracture table works best
in treating patients with isolated closed injuries of the tibia and is
more difficult to use for patients with multiple trauma or open
fractures.
the posterior tibia and distally just above the ankle joint. In acute
fractures, a unilateral frame is usually adequate. After 10 to 14 days,
length is more difficult to restore, and a unilateral frame may lead to
angulation. Therefore, through-and-through proximal and distal tibial
pins are used with a bilateral frame in conjunction with simultaneous
medial and lateral distraction. Compared with a bolster or triangle,
this method takes longer and is more complex, but it provides good
alignment and stability during nailing and interlocking.
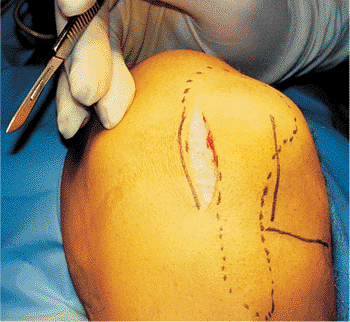
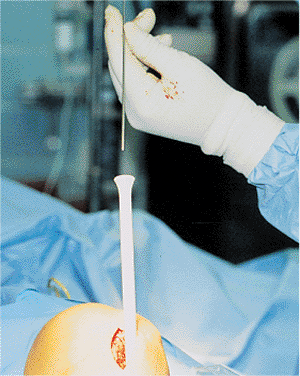
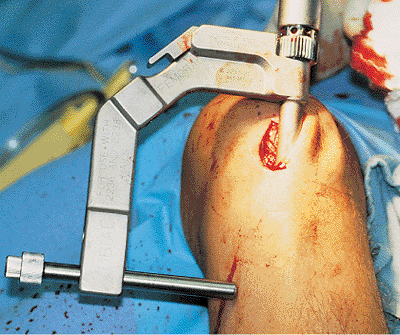
The incision need not go distally down to the tibial tubercle. For
fractures of the midshaft or below, the incision and starting point is
just medial to the patellar tendon. The joint is palpated, and the awl
is inserted where the anterior tibia reaches the joint (Fig. 29.12).
The surgeon must stay in the extra-articular area because back out of
the nail may impinge on the femoral condyle. He/she must not enter
distally at the tibial tubercle, as this leads to a more oblique
anterior-to-posterior starting angle, which causes greater risk of nail
penetration into the posterior cortex. In proximal third fractures, the
incision and starting point is just lateral to the patellar tendon (Figs. 29.13 and 29.14).
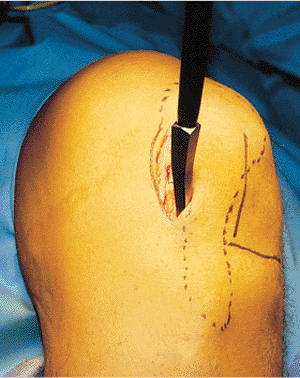
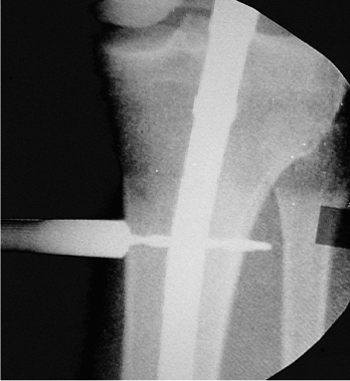
A sharp, curved, tibial awl is used, and its position is checked in
both the AP and lateral planes with an image intensifier before portal
placement. On the lateral radiograph, the point of the awl should be on
top of the bone (Fig. 29.15). On the AP view, it should be in line with the long axis of the tibia (Fig. 29.16).
When treating proximal fractures, the surgeon may find that staying
more lateral helps prevent both translation and angulation. The Synthes
(Synthes, Paoli, PA) unreamed nail has been a particular problem in
proximal tibial
fractures because of its long and distal curve, which can lead to both translation and angulation of the fracture site (Fig. 29.17).
In proximal fractures, temporary stabilization with a clamp or small
plate is sometimes necessary. To prevent angulation or translation,
blocking screws are another option in proximal fracture treatment.
 |
|
Figure 29.11.
Skin marking with patella and patellar tendon outlined. The horizontal mark is on the lateral joint line, and a longitudinal mark is on the lateral border of the patellar tendon. A medial incision is seen over the medial border of the patellar tendon. The incision is started at the joint line and is continued proximally. |
 |
|
Figure 29.12. Sharp awl inserted in the incision.
|
 |
|
Figure 29.13. A,B. Segmental tibial fracture.
|
 |
|
Figure 29.14. Mal-alignment of the proximal component of a segmental fracture with surgical starting point too far medial.
|
 |
|
Figure 29.15. Lateral radiograph with awl slightly inferior to correct starting point.
|
 |
|
Figure 29.16. AP radiograph showing that the awl is slightly medial.
|
small bend in the guide wire made 2 cm from the tip can be helpful
because it can facilitate passage of the wire across the fracture site.
A T handle, which is used to control the bulb-tip guide, is placed in
the midportion of the guide. The bulb tip is initially aimed
posteriorly, and after it has entered the tibia, it is immediately
turned anteriorly and passed down to the fracture site; the surgeon
must avoid penetration of the posterior cortex proximally and exiting
through the fracture site posteriorly. The guide wire is advanced to
the fracture site, and under bi-planar image intensification, is passed
into the distal fragment (Fig. 29.18). It is impacted into the subchondral bone above the ankle to stabilize the bulb tip and to aid in determining length (Fig. 29.19).
A second bulb tip, of identical length to the first, is placed at the
joint line, and a long ruler is used to determine nail length. In
another method of determining nail length, the tibia is measured
externally with a long ruler, hatch marks are made, and the
measurements are confirmed with an image intensifier. Many
manufacturers provide a cannulated depth guide that allows a direct
measurement of nail length.
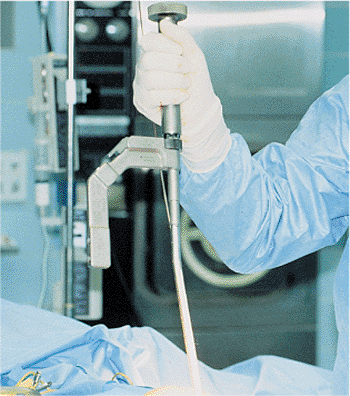
the fracture, the surgeon determines whether to use a reamed or
nonreamed technique. If reaming is selected, it must be done properly
so that complications are avoided (Figs. 29.20 and 29.21).
Because the risk of heat necrosis increases during reaming, it should
be carried out at a low torque with sharp reamers that dissipate heat
and pressure (Fig. 29.22). A tourniquet should
be avoided. To prevent soft-tissue damage around the incision, a skin
protector should be used. The surgeon should start with a
small-diameter reamer and increase in one-half millimeter increments
until cortical contact is reached. For closed fractures, reaming one
additional millimeter is usually sufficient. The fracture must be
reduced as the reamer passes (aided by the bulb-tip guide).
 |
|
Figure 29.17. A,B.
Postoperative radiograph of comminuted proximal-tibial fracture with AO nail. The long Herzog curve with some external rotation of the nail has created a deformity. |
 |
|
Figure 29.18. Bulb tip approaching fracture site.
|
 |
|
Figure 29.19. Bulb tip down to subchondral bone.
|
 |
|
Figure 29.20. Reamer inserted over bulb tip.
|
 |
|
Figure 29.21. Reamer passed across fracture to metaphyseal flare. Minimal reaming in grade I open fracture.
|
 |
|
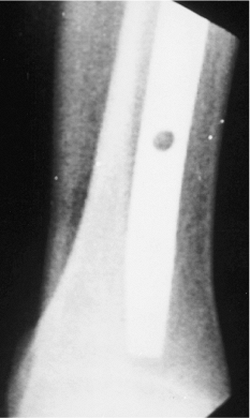
Figure 29.22. Heat necrosis of tibia.
|
mm or greater diameter is mechanically beneficial. Excessive reaming
should not be done to achieve this, particularly in open fractures. If
necessary, an 8- or 9-mm nail may be used. However, with smaller nails,
the patient’s postoperative management must be modified. The patient
should be kept from weight bearing until healing is evident, and if
healing is slow, the surgeon should consider dynamization or nail
exchange.
increase the possibility of a compartment syndrome. At the conclusion
of nailing, the compartments should be palpated, and if any concern
exists, the compartment pressure can be measured.
Once the bulb tip is removed, a nail-driving guide without bulb tip is
inserted, and the plastic tube is removed. The nail is driven over this
guide wire. Because the reduction can be maintained with this guide,
cannulated nails should be used. Rarely does the fracture site need to
be opened to pass the nail. Solid nails offer no mechanical advantage
nor do they decrease the risk of infection more than do cannulated
nails. Furthermore, in our experience, solid nails make the passage of
the nail less predictable and the removal of a broken nail extremely
difficult.
surgeon pushing posteriorly on the proximal end of the nail to minimize
penetration of the posterior cortex (Fig. 29.25). A lateral
image should be used while driving the nail in the upper third of the
tibia. As the nail approaches the fracture site, the fracture must be
aligned in two planes (Fig. 29.26).
The nail must be inserted in slight external rotation. If the nail is
allowed to rotate internally, interlocking will take place on the
posteromedial cortex proximally and distally, which is much more
difficult to complete than is interlocking carried out on the flat
surface of the tibia. Therefore, to make targeting an easier process,
the nail should be externally rotated approximately 10 degrees in
relation to the long axis of the tibia.
 |
|
Figure 29.23. Exchange tube with nail-driving guide.
|
 |
|
Figure 29.24. Exchange tube on radiograph seen crossing the fracture site.
|
 |
|
Figure 29.25. Nail inserted into the proximal tibia with hand pulling the nail posteriorly to push the tip of the nail anteriorly.
|
 |
|
Figure 29.26. Fracture must be aligned prior to passage of the nail.
|
avoid distraction. Overreaming by 1 mm is helpful. In stable fracture
patterns, traction should be released when the tip of the nail is 1 cm
past the fracture. This should then allow impaction and avoid
distraction. To prevent distraction, the surgeon may need to apply
distal counterpressure as the nail crosses the fracture. Because tibial
nails are small and the screw diameters are similarly small, the
application of a distal screw with the back-slap technique carries a
risk of early fatigue of the distal locking screws. As the nail is
driven down the tibia, the surgeon should reassess the accuracy of its
length. The tibia should be inspected proximally and distally. If the
nail is too short or too long, then it should be removed and replaced
with another nail. In distal fractures, the nail should reach the
subchondral bone. The nail should not be countersunk into the proximal
tibia for greater than 2 to 3 mm or later extraction will be difficult.
Several manufacturers have nail extenders, which can be beneficial for
making small adjustments in length.
Use of anterior-to-posterior screws introduce a slight risk of injury
to vascular structures and should be avoided if possible (Fig. 29.28).
Oblique screws for proximal fractures are safer. Only one proximal
screw is necessary for fractures in the midshaft and below (Fig. 29.29).
For proximal fractures, two or three screws are necessary in the
proximal end of the nail. Blocking screws can also be helpful to
control angulation or translation. For stable transverse or short,
oblique, tibial fractures, the use of the dynamic slot at the proximal
end of the nail allows for impaction of the fracture. If comminution or
a spiral component is found in conjunction with the fracture, the nail
should be statically locked.
 |
|
Figure 29.28. Use of anterior-to-posterior screw increases risk of vascular injury.
|
 |
|
Figure 29.27. Proximal targeting jig.
|
 |
|
Figure 29.29. Depth gauge used to measure screw length.
|
 |
|
Figure 29.30. Sharp trocar to mark skin incision.
|
insertion because none of the external guides is consistently helpful.
For length-stable fractures in the middle to the proximal half of the
tibia, only a single distal screw is necessary, whereas in distal
fractures, two or three screws should be used with or without blocking
screws. A medial-to-lateral screw and an anterior-to-posterior screw
can be used, but if using the latter, the surgeon must pay close
attention to both the anterior tibial tendon and posterior vascular
structures.
allow targeting on a flat surface. Via the freehand technique, the
first step is targeting of the skin incision. The image intensifier is
lined up with the nail and tilted and rotated until a perfectly round
hole is visualized. An image intensifier that can magnify the hole
twice its normal size is the best choice. Also, the C-arm head should
be moved away from the tibia to increase the working space and aid in
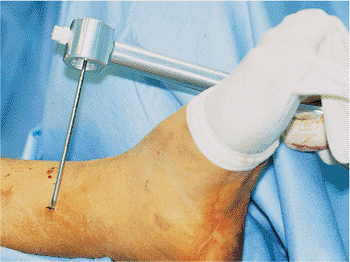
magnification of the hole. The sharp point of the trocar-tipped pin is
placed on the skin until it is centered in the hole (Fig. 29.30).
A 1-cm stab wound is made directly over the hole on the medial aspect
of the tibia. Because the saphenous vein is very close to the targeted
area, laceration is possible. The sharp point guide is again placed on
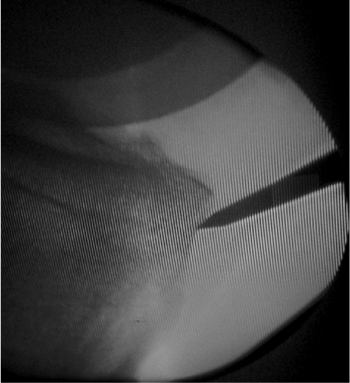
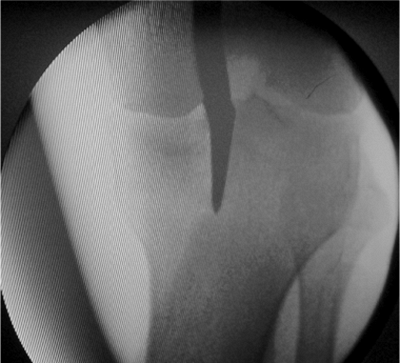
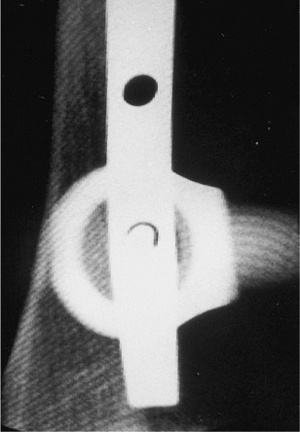
the bone until it is centered in the hole (Fig. 29.31). It is brought into the longitudinal axis and checked with fluoroscopy to ensure that it is centered in all planes (Fig. 29.32); a halo should be evident around the guide (Fig. 29.33).
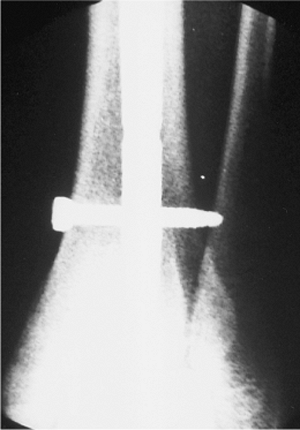
The sharp point is then passed into the tibia with a mallet and then
removed. The drill bit is then placed freehand through the hole and
through the nail. The AP view is checked, and the lateral tibia is
drilled and measured for placement of the screw. The screw should be 5
mm longer than the measurement so it will be easier to remove if it
breaks (Fig. 29.34). The screw should protrude
through the cortex; if the screw is not prominent, then it will be very
difficult to retrieve if breakage occurs (Fig. 29.35).
A lateral radiograph should be checked again to be absolutely certain
the screw is in the nail and that it has not moved anteriorly or
posteriorly (Fig. 29.36).
wounds. The wounds are then irrigated and closed. If necessary, the
patient is checked for increased compartmental pressure. Most grade I
and II open wounds and some grade IIIA fractures are closed primarily,
while
contaminated
IIIA fractures are left open and closed after a delay. Grade IIIB
fractures are scheduled for return to the operating room for repeated
debridements and early flap coverage.
 |
|
Figure 29.31. Trocar in center of interlocking hole.
|
 |
|
Figure 29.32. Trocar brought in axis of the hole.
|
ankle neutral or in slight dorsiflexion to prevent an equinus
deformity. The patient remains in a splint until the swelling
decreases.
This
may take as little as 1 week or as long as 6 weeks. If the cast is
removed too early, the patient tends to be more uncomfortable, and the
foot drops into equinus. In a reliable patient with a stable fracture
pattern and a dynamic locking construct, partial weight bearing is
desirable with progressive weight bearing over the first 4 weeks. In an
unstable pattern or an unreliable patient, weight bearing is not
recommended for at least 6 to 8 weeks. Mild swelling of the leg can be
controlled by use of a thick elastic stocking.
 |
|
Figure 29.33. Fluoroscopy is used to ensure that trocar is centered.
|
 |
|
Figure 29.34. The screw tip should extend 5 mm past the cortex to allow for removal if the screw breaks.
|
 |
|
Figure 29.35. Broken screw. Inadequate fixation in a distal one-third fracture.
|
 |
|
Figure 29.36. Lateral radiograph is used to ensure that distal screw is centered in the hole.
|
necessary, and the frequency is dictated by the severity of the wound.
The first postoperative office visit is in 1 to 2 postoperative weeks
for a change of the splint and inspection of all wounds. After that,
patients are followed at 4 to 6 week intervals, with AP and lateral
radiographs obtained until the fracture is healed. If after 2 to 4
months the healing is questionable, oblique radiographs may be
necessary to ascertain fracture healing. Weight bearing is usually
started at 2 months if callus is forming.
for broken screws, which signify instability and a possible change in
treatment. If a screw is broken in a fairly stable fracture pattern,
healing may continue and no further treatment will be necessary. If
screw breakage occurs in an unstable fracture pattern, shortening will
result and the risk of a nonunion is increased.
informed of the length of the process. Patients rarely have realistic
expectations because of lack of knowledge. Postoperative knee pain is
almost universal and calms down over 4 to 6 months. Physical therapy is
required for gait training, and quad sets with straight-leg lifts and
active range of motion of the ankle are necessary postoperative
treatments. Passive range of motion exercises of the knee or ankle do
not appear to be beneficial, and resistive range of motion of the knee
only increases the patellofemoral pain.
Walking without support gradually increases over 4 to 6 months after
injury with a very gradual loss of limp. Patients usually return to
running after 6 to 12 months. Full recovery often takes 1.5 to 2.0
years. Patients may return to activity according to their comfort
levels. Bicycling and swimming are gentle forms of exercise to build up
muscle and strength before moving into more active sports.
complications of intramedullary nailing. A nonoptimal outcome is
related to the poor soft-tissue envelope around the tibia, which is
further compromised by the injury. Implant failure is common. Therefore
careful postoperative monitoring is important, and further surgical
procedures are expected in comminuted high-energy fractures.
stable-pattern fractures that are slow to heal at 2 or 3 months and
will not be excessively shortened or rotated. If callus is not evident
at 2 to 3 months in this group, then removal of screws at the end of
the nail farthest from the fracture is beneficial. Bone grafting is
used in patients with a skeletal defect. This treatment is most
effective when delayed: a 6 to 8 week interval appears to be
appropriate. Because these are unstable fractures and will shorten, a
static nail should be left in place.
fractures. It is ideal for patients who were initially stabilized with
small-diameter nails and screws. Two to 3 months after injury, when the
soft tissues are well healed, a larger nail is placed; the fracture
pattern will dictate whether it is to be statically locked.
tibial nails. Weaker screws include those with small diameters and
those made of titanium. If screw failure occurs in a stable fracture
pattern, then surgery is not required, and the fracture will usually
heal. In unstable fracture patterns, including distal fractures, screw
breakage is frequently a precursor to a nonunion. In these patients,
the broken screws should be removed, and larger nails should be
inserted with larger screws in either a static or dynamic mode.
after 4 to 6 months. Broken nails should be exchanged. For cannulated
nails with a large diameter, a hook can be used for removal. For
small-diameter cannulated nails, a bulb-tip guide with a smooth guide
rod alongside it can be used to remove the distal fragment. Removal of
the distal fragment is extremely difficult when solid nails are
employed, and we advise against using them.
chronic. In acute infections found within a week of surgery,
debridement and drainage is the treatment of choice. The nail can be
left in place, and for 6 weeks parenteral antibiotics are used. If the
infection resolves, the nail is left in place, and the patient is
followed until healing. If healing is slow, a posterolateral bone graft
may be necessary.
sequestrum. In these patients, the nail and a segment of tibia must be
removed to eradicate the infection. These patients are then placed in
external fixators and require cancellous bone grafting for small
defects and segmental transport for large defects. Intravenous
antibiotics are necessary and should be administered for at least 6
weeks.
generally occur within the first 24 to 48 hours after injury but can be
seen as late as 5 days following fracture. Frequent physical
examinations in an awake patient constitute the most reliable
diagnostic
technique,
and pressure measurements in the comatose or uncooperative patient are
the safest diagnostic techniques. Multiple pressure measurements are
particularly beneficial to determine a trend. In institutions with
frequent monitoring capabilities, the compartment pressure can increase
to within 30 mm Hg of diastolic pressure before a compartment release
is done. In situations in which monitoring is not optimal at night or
on the weekends, release of compartment at lower pressure and with
suggestive signs is advised. A four compartment fasciotomy can be
performed through either a single lateral incision or a lateral and
posteromedial incision. The posteromedial incision is the best choice
for distal injuries.
suffered a high, proximal, oblique, metaphyseal-tibial fracture and an
oblique, distal-tibial fracture at the junction of the middle and
distal thirds (Fig. 29.37). The distal fracture
was classified as a Gustillo grade IIIA open, which did not require a
flap. The patient was treated with primary debridement of the open
fracture with temporary stabilization via use of an external fixator
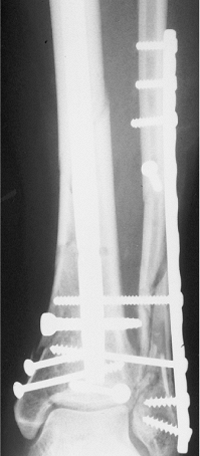
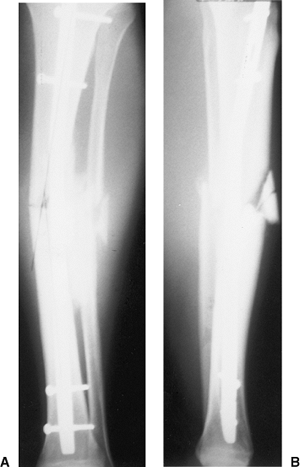
and a primary plate and screw fixation of the proximal tibial fracture (Fig. 29.38). The wound was allowed to heal and the soft-tissue swelling decreased.
removed, and after a week (to minimize the risk of infection) the tibia
was nailed. The proximal plate was then removed, and both
the
proximal and distal fractures were fixed by using a
metaphyseal-diaphyseal (MD) nail without distal interlocking. At the
time of plate removal, shortening and rotation was not considered to be
a future problem. The proximal fracture, however, was stabilized with
two oblique proximal screws that fit high in the tibia and are ideal
for this fracture (Fig. 29.39).
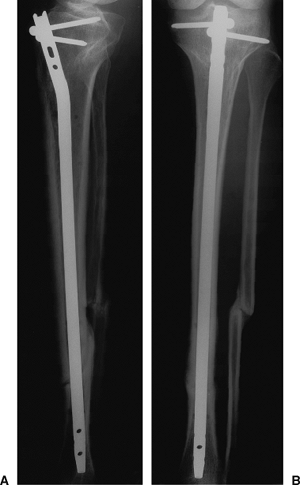
Both fractures healed excellently without infection, and the patient
has a full range of motion of the ankle and knee with only minimal
aching in the tibia.
 |
|
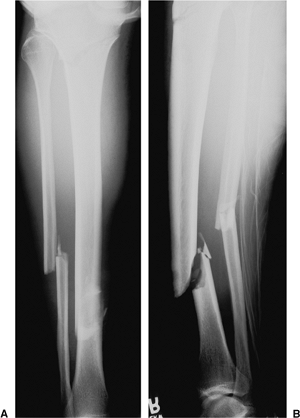
Figure 29.37. A,B.
AP and lateral radiographs of the tibia on the day of the injury. These images show displacement of the distal fracture with distinct soft-tissue injury and a very high, slightly oblique, proximal fracture. |
 |
|
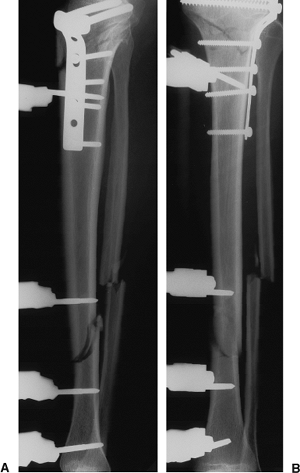
Figure 29.38. A,B.
Postoperative AP and lateral radiographs on the day of injury. A proximal tibial T-plate is in position with an external fixator for the distal open fracture. |
 |
|
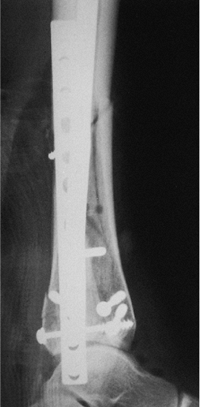
Figure 29.39. A,B.
Six months after injury, the AP radiograph shows complete healing and the lateral radiograph shows partial healing. The nail has stabilized both fractures. |
nailing on the day of the injury. Proper reduction of the proximal
fracture is always difficult, and reamed versus unreamed nailing of the
distal-tibial open fracture remains controversial.
RB, Mendoza RM, Williams DN. Problems in the management of type III
(severe) open fractures: a new classification of type III open
fractures. J Trauma 1984;24:742.
MB, Champman JR, Agel J, et al. Treatment of type II, IIIA and IIIB
open fractures of the tibial shaft: a randomized prospective comparison
of unreamed interlocking nails and half-pin external fixators. J Orthop Trauma 1998;12:1–7.
C, Mclff T, Rahn BA, et al. Intramedullary pressure strain on the
diaphysis and increase in cortical temperature when reaming. Injury 1993;3[suppl]:31.
AP, Russell TA, Taylor JC, et al. Treatment of open fractures of the
tibial shaft with the use of interlocking nailing without reaming. J Bone Joint Surg Am 1992;74(8):1162–1171.