
acquired during childhood. Before starting a treatment program for
congenital foot deformity, search for associated deformities that may
also need treatment (e.g., congenital hip dysplasia, torticollis) and
associated conditions that may require further evaluation and that
might affect the prognosis of the foot deformity (e.g., arthrogryposis,
spinal dysraphism, bone dysplasia). Deformities that develop during
childhood are often manifestations of underlying neuromuscular disease
that must be evaluated before intelligent treatment of the foot can be
planned.
begins the first day of life and generally should be concluded by the
time the child begins walking. Secondary treatment and treatment of
recurrence are often necessary, because mild muscular imbalance and
incomplete correction of deformities are common. The foot may require
long-term bracing or repeated surgery to maintain adequate function.
For these reasons, experience and judgment are as important as surgical
skill in the long-term management of foot deformities. The surgeon with
only occasional exposure to these problems should not undertake
treatment.
often than females and may be unilateral or bilateral. It is often
associated with other conditions, such as myelodysplasia,
arthrogryposis, and congenital hip dysplasia. Pathologic changes seen
in clubfoot include bony deformity, particularly of the talus (short
neck, medial deviation of the neck, abnormal articular surface of the
head) and soft-tissue contracture (muscle, tendon sheath, capsule,
ligament, skin) (14).
Externally, the clubfoot is smaller than the normal foot. There is
equinus of the ankle, varus and internal rotation of the heel,
accompanied by adduction, supination, and cavus of the midfoot. The
calf is atrophic and smaller in circumference than the opposite calf.
The leg lengths are generally equal. Internally, the deformity is most
clearly defined as a rotational subluxation of the
talocalcaneonavicular joint complex, with the talus in plantar flexion
and the talocalcaneonavicular (subtalar) complex in medial rotation and
inversion (20). There is controversy over
whether the soft tissue or bony changes are the primary cause of the
disorder, although nonoperative and surgical treatment both address the
soft-tissue portion of the deformity with the expectation that at least
some of the bony abnormalities will remodel. Regardless of the form of
treatment, the resultant foot will be smaller and less mobile, and the
calf relatively atrophic, when compared with a normal limb.
nonoperative and, if possible, should begin on the first day of life.
Serial manipulation of clubfoot and maintenance of correction with
casting is a skill that all orthopaedic surgeons dealing with children
should develop (15,26).
It is essential to correct the midfoot adductus and hindfoot varus in
the casts before you make any attempt to address the equinus. We have
concern that overly aggressive attempts at dorsiflexion may damage the
talus, and we often abandon casting once progression of the correction
into dorsiflexion stops.
need for and the exact timing of the surgery depends on the severity of
the clubfoot. We normally make a decision to treat surgically by 3–4
months of age. Surgery, however, can be timed so that the postoperative
casting is completed at about the time the child begins to bear weight
on the foot. Some surgeons prefer operative treatment at a much younger
age, but there is also literature support for postponing surgery up to
1 year of age or beyond, if the surgeon feels technically more able to
operate on a larger foot (33). In children with syndromes, delay of surgery until a year of age or beyond is often desirable or necessary.
incompletely corrected clubfoot reveal inadequate dorsiflexion of the
os calcis or parallelism of the talar and calcaneal axes.
Anteroposterior (AP) views show medial deviation of the first
metatarsal axis relative to the talar axis, a function of subluxation
of the talonavicular joint (the navicular ossification center itself
does not appear for several years, and its position must be inferred);
the axes of the talus and calcaneus likewise become parallel because
the external rotation of the subtalar joint is lost. Most of the angles
described for evaluation of clubfoot are based on radiographs of older
children, and they date from an era when treatment was nonoperative and
involved prolonged casting. We have not found radiographs to be helpful
in determining which children should have early surgery; the decision
is made more easily on clinical grounds.
restraints on proper positioning of the tarsal bones. The exact
surgical procedure can be tailored to the residual deformity of the
foot at the completion of casting. The usual surgical release always
includes posterior structures (tendo Achillis, posterior tibial tendon,
calcaneofibular ligament, posterior ankle, subtalar capsulotomy, and,
sometimes, long toe flexors). If significant midfoot deformity remains
(medial talonavicular subluxation), release the medial talonavicular
joint and the tendon sheaths of posterior tibial, flexor digitorum
longus (FDL), and flexor hallucis longus (FHL) muscles. Some clubfeet
have significant medial subluxation of the calcaneocuboid joint,
requiring capsular release (2,21).
The medial subtalar capsule can be partially or completely released to
correct hindfoot varus. These releases allow the talus to be
dorsiflexed into neutral position, the navicular to be abducted and
rotated onto the true axial head of the talus, and the os calcis to be
brought out of varus and into lateral rotation under the talus to
reduce the subtalar joint. Hold the reduction with pin fixation in a
cast until the soft tissues heal.
posterior and medial releases are necessary to correct clubfoot, recent
attention to the posterolateral ankle structures (fibulocalcaneal
ligament and peroneal sheaths) has emphasized the importance of
correction of internal rotation of the subtalar joint if full correction of the clubfoot is to be achieved (20,21,22,28,29,32).
The exact incision used may not be important, but it must provide
adequate exposure of these structures or the correction is incomplete.
We prefer the Cincinnati circumferential subtalar incision (or portions
of it), because it gives the fullest visualization of the entire
midfoot and hindfoot, including the posterolateral region; you can use
portions of this incision for more limited releases (8).
Because tarsal bones are largely cartilaginous in the small child, they
are inevitably deformed at the time of reorientation, and the
correction must be maintained for at least 3–4 months to allow
remodeling. Many children require further bracing for a year or more to
maintain position during walking.
releases performed are overly aggressive, the result may be an
overcorrected clubfoot when the child becomes older. There are good
methods that have been developed to later
improve
undercorrected feet or relapsed feet, but there are no good secondary
procedures that adequately deal with the overcorrected clubfoot.
Although our initial feeling was that complete correction of a clubfoot
was necessary in most cases, the long-term follow-up of many of our
earlier patients with clubfoot has led us to temper these beliefs. In
the mild and moderate clubfoot, we now favor a more limited release of
posterior structures, which generally leads to better foot function as
the child matures.
-
Perform clubfoot release with the patient prone or supine, using a pneumatic tourniquet.
-
Make a full Cincinnati skin incision,
extending it from the navicular tuberosity under the medial malleolus,
arching slightly over the os calcis posteriorly, and extending
obliquely around to the calcaneocuboid joint laterally (Fig. 167.1A). Portions of the incision may be used for less extensive releases.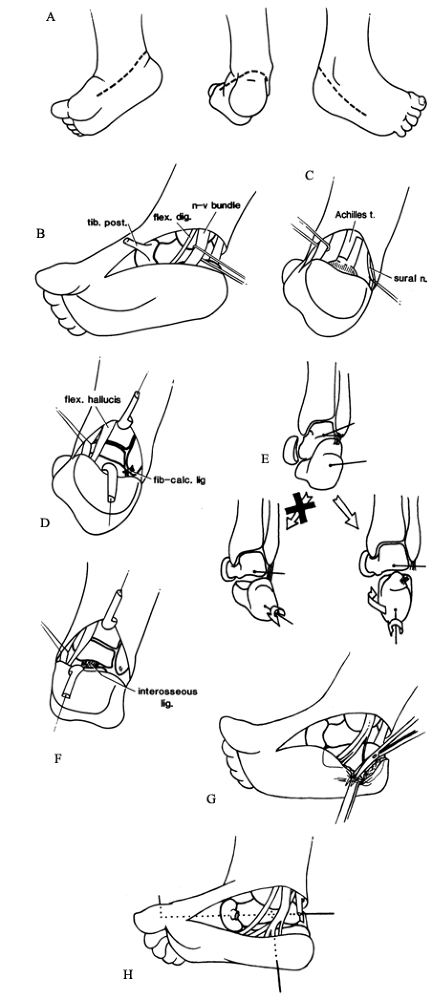 Figure 167.1. A: The Cincinnati incision used for standard clubfoot release. B:
Isolation of the neurovascular bundle and posterior tibial tendon. The
flexor digitorum longus (in its sheath) is visible medially. C: Preferred Z-plasty technique for the Achilles tendon. D: Incision of the fibulocalcaneal ligament and peroneal tendon sheaths. E: External rotation of the os calcis during dorsiflexion. F: The interosseous ligament, seen from the posterior incision. G: Release of the plantar fascia in the presence of cavus. H: Use of two pins to fix the talonavicular joint and subtalar joint. See text for details. -
Keep the knife at a 90° angle to the
skin, and carry the incision sharply through the subcutaneous tissue
with minimal retraction. Use caution as the knife crosses the Achilles
tendon, which is deep in the subcutaneous tissue of the posterior wound. -
Use a fine scissors for the remaining dissection.
-
Identify and mobilize the neurovascular
bundle in the posteromedial wound both proximally and distally (to the
point where the nerve branches into the calcaneal branch and medial and
lateral plantar nerves); retract it with a Silastic tape. -
Posterolaterally, identify the sural
nerve running with the lesser saphenous vein; mobilize and protect
these structures with a Silastic tape.
-
Protecting the neurovascular bundle and
the sural nerve, perform a Z-lengthening of the Achilles tendon, making
the distal transverse cut in the medial half of the tendon (the lateral
half is left attached to the calcaneus). Tag each end with #0
absorbable suture (Fig. 167.1C). -
Just posterior and lateral to the
neurovascular bundle lies the FHL tendon; incise its sheath, identify
it, and protect it during the next stage with a Silastic tape, because
it is easy to sever inadvertently. -
Excise the entire posterior capsule of
the tibiotalar and subtalar joints and identify the joint lines; the
subtalar joint will still be unyielding. -
If the midfoot deformity has been
corrected by casting, the dissection just described may be enough to
correct the deformity; in this case, the posterior tibial tendon
usually requires Z-lengthening, as may the FHL and FDL tendons. -
If you are satisfied with the correction
obtained after posterior release alone, manipulate the forefoot into
corrected position and blindly pin it from back (talus) to front,
bringing the pin out the dorsum of the foot; bend the tip to prevent
migration (Fig. 167.1H). -
Close the wound as will be described later.
-
In the posterolateral portion of the wound, identify and transect the heavy fibulocalcaneal ligament (Fig. 167.1D); this allows external rotation of the os calcis as it is dorsiflexed (Fig. 167.1E).
Use a pair of scissors to cut the sheaths of the peroneal tendons
circumferentially, taking care not to injure the tendons. Slide the
scissors along the posterolateral subtalar joint capsule to incise it.
-
Incise the posterior tibial tendon sheath
and perform a Z-lengthening of the tendon, grasping the distal tendon
stump with a small Kocher clamp. -
Follow the tendon stump as it inserts
into the navicular, and transversely incise the deep posterior tibial
sheath and the medial, dorsal, and plantar talonavicular capsules. -
Blending with the inferior capsule are
the spring ligament (connecting the navicular with the sustentaculum
tali) and Henry’s knot (where the flexor hallucis and flexor digitorum
cross). While appearing in textbooks as discrete structures, these
usually are difficult to separate and are released as the capsule is
incised (Fig. 167.1B). One of us (GTR)
separates the intact knot of Henry from the navicular, and one of us
(PBS) incises it longitudinally, freeing the flexor tendons. -
Incise the anterior subtalar joint with
scissors just above the sustentaculum. If the talus still does not
mobilize, incise the remaining medial subtalar capsule. It is usually
easiest to start from the posterior exposure of the subtalar joint at
the site of the previous capsulectomy. Retract the FHL and the
neurovascular bundle to cut the firm medial capsule, staying right at
the joint level. It is very easy to inadvertently cut the FHL during
this portion of the dissection. -
Incise the FDL tendon sheath transversely
as you encounter it. Take care not to drift superiorly out of the
subtalar joint, or injury to the deep deltoid ligament may occur. -
Once the subtalar capsule has been
circumferentially incised to the anterior end of the os calcis, open
the joint by everting the os calcis. This exposes the subtalar
interosseous ligament, which can be seen through either
P.4262P.4263
the medial or the posterior portions of the wound as a thick, ribbonlike band (Fig. 167.1F).
You should not divide this ligament except in the most severe cases
(usually arthrogryposis), because this can lead to significant
overcorrection. -
If the lateral border of the foot is
still convex, or if preoperative radiographs demonstrate significant
medial subluxation of the calcaneocuboid joint, release that joint. We
prefer to dissect the medial wound distal to the anterior os calcis,
which is now well exposed. Cut the long plantar ligament and identify
the medial calcaneocuboid capsule; incise its entire medial surface and
use a fine scissors to incise the superior and inferior capsule as
well. If that does not free the joint sufficiently, expose the
calcaneocuboid joint in the distal part of the lateral incision and
release the capsule there. -
If significant cavus is present, you may
release the plantar fascia through the posteromedial wound. Identify
the interval between the calcaneal sensory branch and the lateral
plantar branch of the posterior tibial nerve, and gently retract the
lateral branch anteriorly while dissecting down the medial and inferior
side of the os calcis with scissors (Fig. 167.1G).
Stay right on the bone, taking great care not to injure the
neurovascular bundle, because after a Cincinnati incision it supplies
the major vascularity to the heel pad. With a blunt scissors, cut the
plantar fascia where it originates from the inferior os calcis; you
will feel a palpable relaxation of the cavus. -
Reduce the talonavicular joint, being
careful not to overreduce it or allow it to subluxate dorsally (the
most common malreduction), and hold it with an 0.035 Kirschner wire
(K-wire), inserted from the posterior talus through the joint and out
the skin of the dorsum of the foot (Fig. 167.1H). Pull the pin flush with the posterior talus, and cut and bend it superficial to the dorsal skin to prevent migration. -
If you desire, insert a second pin
through the heel pad longitudinally across the subtalar joint after it
has been reduced into neutral varus–valgus and slight subtalar external
rotation (Fig. 167.1H). Move the ankle to ensure that this pin stops before entering the ankle joint. Cut and bend the pin outside the heel skin. -
Hold the ankle at 90° and use the two
suture tags coming from the ends of the Achilles tendon to hold tension
on the tendon so that the structure is snug at a neutral ankle
position. Repair the tendon in this position. Be careful not to
overlengthen the Achilles tendon, or calcaneus gait can result. Small
gaps in the tendon fill in spontaneously in a child under 4–6 months of
age. -
Repair the Z-lengthened posterior tibial
tendon, and perform sliding Z-lengthenings of the FDL (in the medial
wound) and the FHL (in the posterior wound), if they are snug and
prevent correction of the deformity. -
Arrange the tendons properly in the
wound, and close the skin with 4-0 absorbable sutures. We prefer deep,
loose, through-and-through simple sutures, although subcutaneous and
subcuticular suture may be used if there is minimal skin tension. If
the wound seems too tight to close safely, allow the ankle to fall into
slight plantar flexion and close the wound; the foot can easily be
brought up in 3 weeks by changing the cast in the office, without risk
to the skin. -
Apply a well-padded, long-leg cast
extending beyond the flexed toes, with the knee bent 90°; take care to
gently externally rotate the heel. (If you used two subtalar pins, you
can apply a short-leg cast at this point, because the hindfoot will not
rotate.)
when the pins are removed. Apply a second cast for an additional 6
weeks. If the child is of walking age, the first 6–8 weeks of
immobilization should be in a long-leg cast with a 90° bend to control
subtalar rotation and prevent ambulation, but the last 6 weeks may be
in a short-leg cast with a walking heel. Some surgeons use orthotic
devices for the first 12–24 months following clubfoot release, but we
have generally found them unnecessary. An exception may be made if a
mild clubfoot has required only posterior release; in these cases,
maintaining alignment with an ankle–foot orthosis (AFO) while postural
muscles develop seems to lessen the flexible midfoot deformity.
15% of operated clubfeet. The most common residual finding is adduction
and supination of the forefoot so that the first metatarsal does not
touch the ground during walking, and callosities develop on the lateral
border of the foot. This can be associated with hindfoot varus and
internal rotation. When noted early, it may be treated with an AFO, or
a Perlstein brace (straight-last shoe, medial upright, lateral T-strap,
and 90° plantarflexion stop). If the deformity persists, however, the
treatment is surgical.
recurrence by repeating the posterior medial release. In our
experience, however, this is usually not enough, especially when
adequate initial surgery was performed. Lateral column shortening is
often extremely helpful to accomplish secondary correction (cuboid
decancellation, Evans procedure, or Lichtblau osteotomy with a medial
release). We use the Lichtblau procedure because it produces
predictably good results.
sufficiently formed that it is better to accept the malposition of the
joints and perform secondary bony procedures to reorient the foot.
Metatarsal or midfoot osteotomies (1) can be used to correct forefoot adduction, but they are of
limited use since they do nothing for the main deformity in the
hindfoot and midfoot. The soft-tissue alternative, mobilization of the
tarsometatarsal joint by capsulotomies (Heyman-Herndon procedure), has
been abandoned because it has been found to cause pain and midtarsal
stiffness in an already stiff foot. The double tarsal osteotomy
(opening wedge osteotomy of the medial cuneiform, accompanied by
shortening of the lateral column of the foot) and a combination of a
closing lateral column shortening procedure (cuboid osteotomy or
Lichtblau procedure) and an opening wedge osteotomy of the medial
cuneiform are excellent alternatives (19,23). Osteotomy of the os calcis can be used to correct the hindfoot inversion and varus (11).
Regardless of the success of treatment, the clubfoot patient has an
atrophic calf and a small foot on the affected side. Weakness of the
peroneals or the peroneus tertius appears to contribute to the late
tendency toward hindfoot varus, forefoot supination, and adductus. This
can be improved with either lateral or split transfer of the anterior
tibial tendon. The posterior tibial tendon transfer and FHL transfer
have been described for residual anterior tibial muscle weakness in the
clubfoot, but we have no personal experience with either procedure (22,34). Skeletal deformities should be corrected before the tendon transfers.
-
Perform lateral column shortening procedures (10,17)
under pneumatic tourniquet control. Use the medial and lateral arms of
the Cincinnati incision described for congenital clubfoot; leave the
posterior portion of the skin intact. -
On the medial side, expose the posterior tibial tendon sheath and incise it, exposing the tendon.
-
Perform a Z-lengthening of the tendon and tag both free ends.
-
Use a fine curved scissors to dissect
deep to the distal posterior tibial tendon stump, and identify the
talonavicular joint; incise its capsule superiorly, medially, and
inferiorly. -
In the lateral wound, expose the calcaneocuboid joint and incise its capsule sufficiently to mobilize it.
-
If performing a Lichtblau osteotomy (Fig. 167.2A) (17),
resect the distal portion of the os calcis to cancellous bone, using a
small osteotome. This shortens the calcaneus at the same level as the
talonavicular joint, allowing the midtarsal joint to translate easily
to a corrected position.![]() Figure 167.2. Lateral column shortening options for residual adduction deformity in clubfoot. A: Lichtblau osteotomy (resection distal os calcis). B: Cuboid decancellation. C: Evans procedure (calcaneocuboid fusion).
Figure 167.2. Lateral column shortening options for residual adduction deformity in clubfoot. A: Lichtblau osteotomy (resection distal os calcis). B: Cuboid decancellation. C: Evans procedure (calcaneocuboid fusion). -
Abduct the midfoot to check correction.
If the medial release has been performed fully and enough os calcis has
been resected, the foot should appear corrected. If it does not, resect
more of the os calcis or release the medial foot more until the
correction is adequate. Although the articular surface has been removed
from the calcaneus, the cuboid articular cartilage remains, and a
painless synchondrosis will develop. -
If performing a cuboid decancellation (Fig. 167.2B), incise only enough of the capsule to identify the joint surface plane (10).
Use either a small osteotome or a curet to remove a wedge of bone from
the middle portion of the cuboid. In younger children, it is usually
easiest to simply curet out the ossific nucleus, leaving a shell of the
cartilaginous anlage. -
Compress the cuboid closed as the
released talonavicular joint is reduced. Check correction as for the
Lichtblau osteotomy, and adjust the medial release and bone resection
accordingly. -
If performing a calcaneocuboid fusion (Evans procedure) (Fig. 167.2C),
curet or resect with an osteotome the articular surfaces of both
joints. Excessive resection is unnecessary, since the fusion reduces
lateral column growth potential and the midfoot will gradually abduct (10). -
Insert an 0.062 K-wire longitudinally across the corrected calcaneocuboid articulation. For the Evans and
P.4265
Lichtblau procedures, this is done most easily by adducting the
forefoot and placing the pin retrograde from the distal os calcis to
the heel, correcting the lateral column, and advancing the pin
antegrade into the forefoot, where it is withdrawn into the heel and
left protruding on the dorsum of the foot. -
Carefully check forefoot
pronation–supination, and reduce and pin the talonavicular joint with a
second pin introduced from the dorsum of the foot. Bend the pins
externally to prevent migration. -
Release the tourniquet, obtain
hemostasis, and repair the posterior tibial tendon. Close the skin and
subcutaneous layer loosely with a single layer of 4-0 interrupted
absorbable sutures. -
Pad the pins and apply a long-leg cast
with the foot in corrected position. Change the cast at 4–6 weeks, at
which time you may remove the pins. Apply a second short-leg walking
cast for an additional 4 weeks.

-
Begin the double tarsal osteotomy (19,23) with an oblique or longitudinal incision over the cuboid.
-
Identify the peroneal tendons, open the
sheath, and retract these tendons in a plantar direction. Incise the
periosteum of the cuboid bone. -
Using an oscillating saw, remove a
laterally based trapezoidal fragment of bone from the cuboid. It is
important to go through the medial cortex of the bone so that the
osteotomy can be mobilized. Guide wires and image intensification
facilitate these cuts and help prevent injury to the articular
surfaces. Attempt to remove the trapezoid in a single piece. -
Make a second incision over the medial cuneiform. Protect the anterior tibial tendon and retract it dorsally and distally.
-
Dissect the medial cuneiform
subperiosteally and expose its plantar and dorsal aspects. Use an image
intensifier at this point to identify the midportion of the bone. -
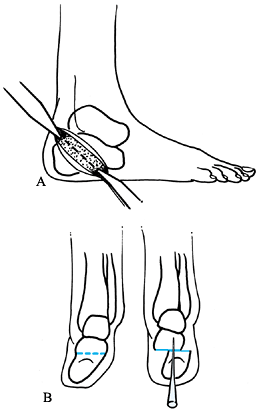
Make a single osteotomy cut transversely in the cuneiform (Fig. 167.3A). After you complete this osteotomy, place an instrument such as a small lamina spreader across the osteotomy and open it.
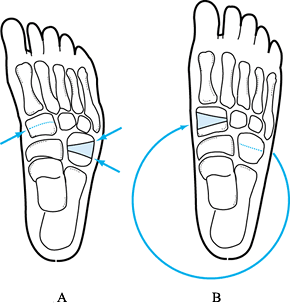 Figure 167.3. Double tarsal osteotomy for residual adductus deformity. Wedge resected from cuboid (A) is inserted into opening osteotomy of medial cuneiform (B).
 -
Insert the bone graft that was taken from the cuboid into the osteotomy of the medial cuneiform (Fig. 167.3B).
Usually the bone graft is quite stable, but a small K-wire can be used
to secure the graft in place. Place it through the base of the first
metatarsal and across the two fragments of the cuneiform, securing the
bone graft. -
Close the cuboid osteotomy and hold it with K-wires. Close the wounds with 4-0 absorbable suture.
-
Place the patient in a long-leg,
bent-knee cast to prevent weight bearing. At 6 weeks, exchange the cast
for a weight-bearing short-leg cast, to be worn for an additional 4
weeks (19,23).
-
When performing an os calcis osteotomy to
correct hindfoot varus, make a curved lateral incision just inferior
and parallel to the peroneal tendon sheaths, and dissect down to the os
calcis (Fig. 167.4A).![]() Figure 167.4. A: The lateral approach for osteotomy of the os calcis. B: Fixation with a small Steinmann pin inserted at a 45° upward angle from the tip of the os calcis.
Figure 167.4. A: The lateral approach for osteotomy of the os calcis. B: Fixation with a small Steinmann pin inserted at a 45° upward angle from the tip of the os calcis. -
Incise the periosteum parallel with the
skin wound. Perform limited subperiosteal dissection to allow passage
of a metatarsal (Hayes or Blount) retractor posteriorly between the
Achilles tendon and bone, and inferiorly between the plantar structures
and the calcaneus. -
After locating the site for the osteotomy, confirm the position with an image intensifier.
-
With an osteotome or oscillating saw, cut
an oblique osteotomy through the lateral cortex and medullary bone of
the os calcis. Carefully complete the cut through the medial cortex
with controlled use of an osteotome and varus manipulation of the heel
(to crack the medial cortex). The neurovascular bundle lies on the
medial side and must not be injured. -
Manipulate the heel to loosen the
periosteum on the medial side, and slide the tuberosity of the os
calcis laterally until the heel pad is positioned in the appropriate
position. -
Hold the osteotomy with an oblique 0.065 K-wire or a small Steinmann pin inserted through the heel (Fig. 167.4B) and bent to prevent migration. Close the wound with subcuticular 4-0 synthetic absorbable suture.
-
Apply a long-leg cast with the knee bent 90° to prevent weight bearing. Change the cast at 4 weeks and remove
P.4266
the pin. Then use a weight-bearing short-leg cast until clinical and
radiographic union is achieved, usually 6 weeks after surgery. An
alternative method is to do a closing wedge osteotomy in the same
location. This is generally recommended in the older child.
-
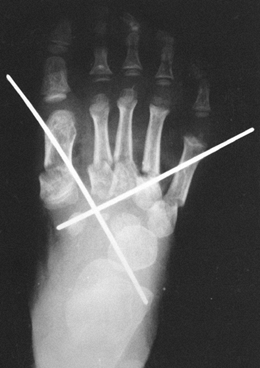
The procedure for metatarsal osteotomies
begins with three longitudinal incisions on the dorsum of the foot; the
first is on the dorsomedial aspect of the proximal first metatarsal,
and the remaining two are between the second and third metatarsals and
the fourth and fifth metatarsals (Fig. 167.5).
(An alternative is to use a curved transverse incision at the level of
the tarsometatarsal joints.) Take care to protect the small dorsal
veins, the superficial nerves, and the dorsalis pedis artery.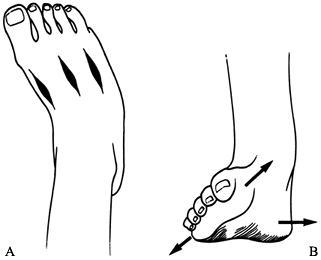 Figure 167.5. A: Preferred longitudinal incisions for metatarsal osteotomies. B: Supination of the forefoot relative to the heel must be corrected with the metatarsal osteotomies.
 -
Expose the proximal shaft of the first
metatarsal by medial longitudinal subperiosteal dissection. The
periosteum is adherent proximally, where the physis of the first
metatarsal is located. The physis must not be injured: Use a Keith
needle or intraoperative radiograph, if necessary, to locate and
protect it. -
Use a small oscillating saw to perform a
transverse osteotomy 1 cm distal to the physis, starting from the
medial side. If possible, do not quite complete the cut through the
dorsolateral cortex, but instead create a greenstick-type fracture to
act as a hinge, or leave an intact sleeve of periosteum laterally. -
Perform similar osteotomies of the
remaining proximal four metatarsals using the saw; the physes of these
bones are distal, so there is no risk of injury to them. Try not to
injure the lateral periosteal sleeves. -
Manipulate the metatarsals into corrected
position. Hold them in place with two K-wires inserted obliquely
through the first and fifth metatarsal shafts into the midtarsus. Be
sure to correct any forefoot supination (Fig. 167.5B)
and cavus that are present. These must be evaluated clinically because
axial deformity in particular will not be evident on radiographs. The
foot should appear fully corrected externally when lying relaxed on the
table, and the entire sole should be plantargrade from heel to
metatarsals. -
Cut the wires outside the skin and bend them to prevent migration.
-
Check the position of the wires on a
radiograph. Minor displacement of the middle metatarsals remodels
easily if the lateral periosteum has not been violated (Fig. 167.6).
Gross displacement of lesser metatarsals can lead to nonunion, which,
although not always painful, should be corrected. If the hindfoot is in
rigid varus, perform an os calcis osteotomy, or perform any desired
tendon transfers at this time.![]() Figure 167.6. Radiograph of internal fixation used for metatarsal osteotomies.
Figure 167.6. Radiograph of internal fixation used for metatarsal osteotomies. -
Close the wounds with subcuticular 4-0 absorbable synthetic suture.
-
Apply a well-padded short-leg cast. At
3–4 weeks, change the cast and remove the wires. Apply a new
well-molded cast in the corrected position and allow weight bearing.
Remove the cast 6–8 weeks after surgery.
described anterior tibial tendon transfer to the cuboid, we have found
that a less lateral position, to the third cuneiform, is more
appropriate, especially when correction of fixed deformity is performed
prior to the tendon transfer.
-
Make a small dorsal medial incision (Fig. 167.7).
Detach the insertion of the anterior tibial tendon close to bone
through the wound, leaving the tendon as long as possible. Place a
Bunnell suture of #1 or #0 synthetic absorbable suture in the tendon.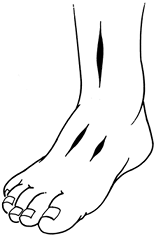 Figure 167.7. Preferred incisions for anterior tibial tendon transfer to the third cuneiform.
 -
Make a second, longitudinal incision over
the anterior tibial muscle belly above the ankle, identify the muscle
by pulling on the tendon, and pull the tendon into this incision. -
Make a third incision over the third
cuneiform bone. Pull on the periosteum in line with the selected
transfer insertion site to dorsiflex the foot, observing
inversion–eversion. Modify the insertion site to obtain balanced
dorsiflexion. -
Make a drill hole through the third
cuneiform to the plantar surface. Pass the tendon through the
subcutaneous tissue from the proximal wound to the third cuneiform (not
beneath the ankle retinaculum). Thread the suture in the tendon into
two Keith needles and pull it through the hole in the cuneiform. Bring
the Keith needles out the plantar surface, tying the suture over a
button or dental roll on the plantar aspect of the foot. -
Close the wounds with fine absorbable synthetic subcuticular suture.
-
Apply a short-leg cast, which is worn for 6 weeks. Allow weight bearing after 4 weeks.
-
For a split anterior tibial tendon transfer (13), make a small medial incision (Fig. 167.8).
Isolate the insertion of the anterior tibial tendon through the wound.
There is usually a natural longitudinal division of the tendon. Split
the tendon from proximal to distal. Do not attempt to split the tendon
from below, because it is easy to rupture it. If rupture occurs,
abandon the procedure and proceed with a standard anterior tibial
transfer as described previously, using the remaining tendon stump.
Free up the lateral half of the insertion into the navicular at this
split, and place a suture of #1 or #0 synthetic absorbable suture in it
using a crisscross Bunnell technique.![]() Figure 167.8. The concept of split anterior tibial tendon transfer to cuboid. Incisions are shown.
Figure 167.8. The concept of split anterior tibial tendon transfer to cuboid. Incisions are shown. -
Make a second, longitudinal incision
anteriorly above the ankle. Identify the anterior tibial muscle by
pulling on the split tendon end, and pass a tendon passer from the
proximal wound to distalward along the tendon, taking care to remain in
the tendon sheath. -
Grasp the Bunnell stitch, pull it back
into the second wound, and deliver the lateral half of the split tendon
up into the proximal wound. -
Transfer the split portion of the tendon
to the cuboid bone by the technique described previously for anterior
tibial transfer. Adjust the tension so that the lateral arm of the
transfer is just slightly tighter than the medial arm (observed through
the superior wound). Anchor the transfer as described previously, or
bring it through a hole in the cuboid and sew it back on itself. -
Closure and postoperative care are the same as for anterior tibial tendon transfer.
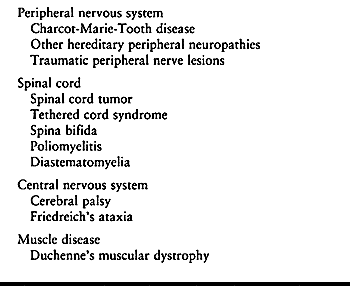
Cavus is a common component or residuum of clubfoot. However, isolated
cavus or cavovarus deformity usually develops insidiously with growth
and is a sign of occult neuromuscular disease. Some of the more common
associated disorders are listed in Table 167.1.
 |
|
Table 167.1. Common Conditions Associated with Cavus or Cavovarus Feet
|
physician to recognize the deformity, it is important to do a careful
neurologic examination and initiate necessary ancillary studies (e.g.,
electromyography, muscle enzyme studies, spine radiographs, and spine
magnetic resonance imaging) and obtain appropriate consultation before
attempting treatment.
Orthotic management is never successful; the deformity is either
accepted or treated surgically. The mainstay of treatment is triple
arthrodesis (see Chapter 115), but dorsal
wedge osteotomy may be appropriate in selected cases. There is usually
associated hindfoot varus. Determine whether hindfoot varus is fixed by
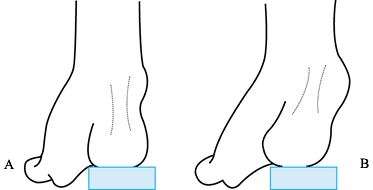
the Coleman block test (Fig. 167.9). This test
differentiates between rigid varus, which must be surgically treated by
triple arthrodesis, and varus secondary to first metatarsal depression,
which is flexible and corrects once the medial column cavus has been
corrected using midfoot dorsal wedge osteotomy.
 |
|
Figure 167.9. Coleman block test. A block is placed beneath the heel and the fifth metatarsal head while the patient stands. A: The heel varus corrects, indicating hindfoot flexibility. B: Heel varus persists, indicating hindfoot rigidity.
|
plantar release and metatarsal osteotomies can successfully temporize
while the foot matures. However, bony procedures at maturity (after age
11 or 12 years) almost always are required, even after earlier
soft-tissue release.
only if the hindfoot varus is flexible and fully correctable;
otherwise, perform triple arthrodesis with appropriate wedge resection
(see Chapter 115). Plan the osteotomy on a
lateral radiographs of the foot so that the correction will bring the
forefoot plantigrade when the hindfoot is in the weight-bearing
position.
-
Make a longitudinal midline dorsal incision from the mid talus to the base of the third metatarsal.
-
Identify and protect the dorsal is pedis vessels, and incise the periosteum from the navicular to the cuneiform bones.
-
Strip the periosteal and capsular
structures medially and laterally to expose the cuneiforms dorsally, as
far as the cuboid laterally and to the navicular medially. -
Under image intensification, insert two
guide pins at the osteotomy edges, avoiding the talonavicular and
cuneiform–metatarsal joints; converge the pins so that their tips meet
at the plantar surface of the bones, producing a wedge large enough to
correct the deformity (Fig. 167.10).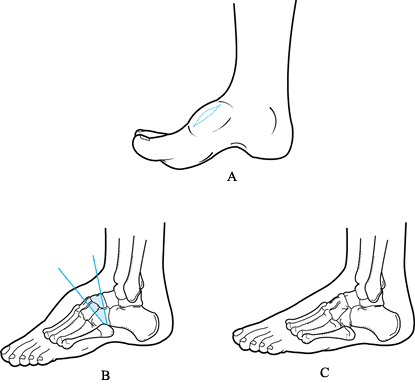 Figure 167.10. Dorsal wedge osteotomy for cavus foot. A: Dorsal skin incision. B: Bone resection is guided by K-wires. Talonavicular, calcaneocuboid, and tarsometatarsal joints are preserved. C: Closure of osteotomy corrects cavus. Residual pronation must be corrected as the osteotomy is closed.
 -
Use an oscillating saw to cut the two
faces of the wedge just inside the guide pins. Make the cut slowly, all
in one pass, since the small bones shift and it is easy to lose the
plane of the cut. Remove the wedge with an osteotome and a small
rongeur. -
Close the wedge, correct for supination
deformity, and carefully align the rotation of the forefoot with the
hindfoot. Fix the osteotomy with dorsal staples, or crossed smooth
Steinmann pins or K-wires inserted from medially and laterally through
the metatarsal bases. -
Close the wound with absorbable sutures.
-
Apply a padded splint or a short-leg cast in neutral dorsiflexion. It is usually necessary to split the cast.
the foot resolves. Allow, but do not force, weight bearing as
tolerated. Continue casting until union occurs, which is usually 6–8
weeks.
with an autosomal dominant pattern. The most common form is postaxial
duplication of the fifth digit. Less common is preaxial duplication of
the great toe. Rarest is middle toe duplication. Both preaxial and
postaxial polydactyly may be associated with syndromes, which you
should look for. The hand is often involved as well; when this is the
case, the foot deformities are usually more severe than the hand
deformities in that the duplications are more proximal. Generally, it
is desirable to treat polydactyly of the toes because untreated
patients experience difficulty with fitting shoes. In addition, extra
digits, even though asymptomatic, can subject a child to ridicule from
peers (9,25,35).
generally easiest and most effective to remove the peripheral (lateral)
toes. The metatarsal is nearly always abnormal, ranging from a widened
lateral metatarsal, through Y- or T-shaped distal metatarsals, to
duplication of the entire bone. You must shave a widened or prominent
metatarsal to reduce the width of the foot, or a bunionette will
result. Preoperative radiographs are important for planning, because
occasionally there is an obvious internal (central) duplication that
requires more complex reconstruction. In such a case, it is desirable
to preserve the toe that is more functional and has the best axial
alignment. A risk of removing the intercalary digit may be the
development of an angular deformity of the lateral toe. It may
therefore be necessary to create a partial syndactyly between the
remaining lateral toe and the fourth toe to prevent this from
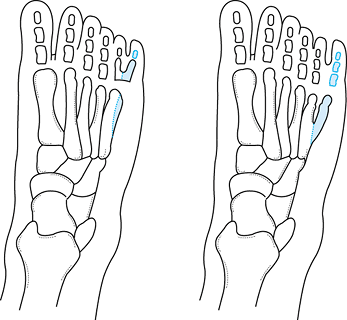
occurring. If the metatarsal is duplicated, you must remove this as
well (Fig. 167.11).
 |
|
Figure 167.11. Examples of resection required (shaded area) for postaxial toe duplication correction. Trim the metatarsal so there is no lateral prominence.
|
-
To resect a sixth toe, make a dorsal curvilinear incision over the base of the toe (Fig. 167.12). Make a longitudinal dorsal cut down the middle of the digit to be excised, and fillet it out.
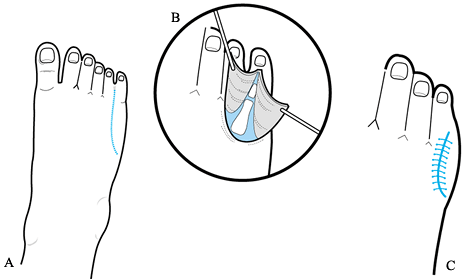 Figure 167.12. Excision of sixth digit. A: Curved dorsal incision and longitudinal sixth toe incision. B: Dorsal exposure of sixth toe allows complete excision and any necessary metatarsal trimming. C: Filleted skin flap is pulled dorsally, shaped, and closed. The resulting scar is dorsal and does not rub against shoewear.
 -
If the proximal phalanges of toes five
and six are joined, cut the cartilaginous portion cleanly with a
scalpel. Trim the metatarsal head to the size of a normal bone, using a
sharp scalpel and osteotome; growth arrest will not occur. Wrap up the
plantar flap dorsally, trim it, and stitch it with fine absorbable
suture. -
Resect a fifth toe as a wedge, including the digit and any rudimentary metatarsal.
-
Bring the fourth and sixth digits together, closing this wedge.
-
Perform syndactylization if appropriate when drifting of the remaining toes is likely.
-
A short-leg cast can be used for 3 or 4 weeks to allow the wounds to heal and the toes to stabilize.
the principles of reconstruction remain the same. Preserve the most
functional digits. A duplication of the nail frequently exists. It is
important to carefully resect the nail and its matrix with the digit to
be sacrificed to prevent recurrence of an abnormal nail. Plan skin
flaps carefully.
problem in reconstruction than postaxial duplications. Each of these
reconstructions must be planned individually. The first metatarsal may
be shortened and have a longitudinal epiphyseal bracket epiphysis that
has an L or a C shape and acts as a medial tether to the growth of the
toe (Fig. 167.13) (18,24). The hallux itself may be in varus. If a
longitudinal epiphyseal bracket is present, central physeal lysis has
been reported to be successful. The results of reconstruction of
preaxial polydactyly can be disappointing. Residual or recurrent hallux
varus occurs frequently and difficulties with shoe wear are common
complications. Consider syndactylization of the first and second toes
in the more difficult cases, especially if there is a recurrent
deformity.
 |
|
Figure 167.13.
Duplicated first toe is frequently associated with a short, rounded first metatarsal with an epiphysis that surrounds both ends and the medial side of the bone—a longitudinal epiphyseal bracket. Excision (shaded area) at the time of toe removal may allow more normal longitudinal growth of the first metatarsal; failure to recognize this may lead to a very short first ray at maturity. |
and remaining toes to assume the most normal contour. In most cases,
this is the most medial or tibial toe in patients with duplication of
the hallux. Sometimes it is appropriate to excise the tibial toe even
if the second toe is more hypoplastic, since the risk of hallux varus
is less. If a longitudinal epiphyseal bracket is present, excise the
central portion of the bracket epiphysis. Because hallux varus has been
the most common and most symptomatic long-term problem following
surgery on duplicated great toes, make an effort to reinsert the
adductor hallucis muscle into the proximal phalanx of the great toe. In
addition, consider a partial syndactyly of the great and second toes.
Syndactylization may be necessary at a separate procedure if extensive
dissection would be necessary on both sides of the toe, resulting in an
endangered blood supply. This combination of reconstructive procedures
leads to an acceptable result for shoe wear. The cosmetic result is
often less than satisfactory.
The incidence is unknown. It occurs much more commonly in girls than
boys. Ill-fitting shoes have been implicated as a causative factor in
adult hallux valgus, but the association of shoe wear with juvenile
hallux valgus is unclear. There is often a positive family history. The
deformity is usually bilateral. The age of onset may be as young as 10
years of age.
problems with shoe wear and dissatisfaction with the cosmetic
appearance of the foot. Despite the fact that surgical intervention is
noted to have a high failure rate, most reports on the correction of
juvenile hallux valgus have presented the results of a single, specific
technique of surgical reconstruction. We agree with Coughlin (6)
that the operative procedure to correct juvenile hallux valgus must be
customized to the specific deformities in the foot. Surgical correction
prior to epiphyseal closure is controversial. Whereas there is rarely a
rush to perform surgery to correct the deformities of juvenile hallux
valgus, the notion that surgery performed on a patient with an open
epiphysis is contraindicated has not been substantiated.
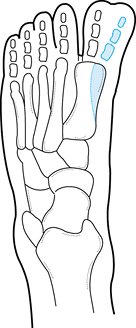
obtain an AP weight-bearing radiograph of the foot. Measure the
following: (a) the hallux valgus angle, (b) the first-to-second
intermetatarsal angle, (c) the distal metatarsal articular angle, and
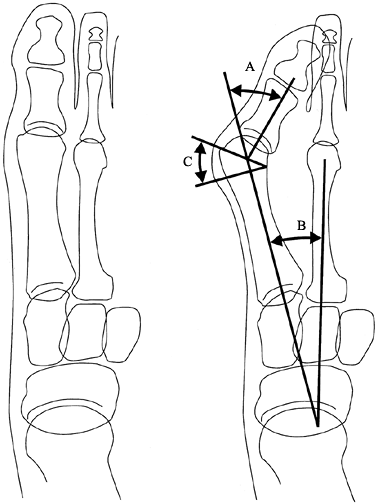
(d) the first metatarsophalangeal joint congruency (the relationship of
the articular surface of the base of the proximal phalanx to the
articular surface of the 1st metatarsal) (Fig. 167.14, Fig. 167.15).
 |
|
Figure 167.14. Lines used for assessing patient with juvenile hallux valgus. Normal values are in parentheses. A: Hallux valgus angle (<15°). B: First-to-second intermetatarsal angle (<9°). C: Distal metatarsal articular angle (useful for assessing subluxation and congruency).
|
 |
|
Figure 167.15. The first metatarsal phalangeal joint may be incongruent (A) with lateral subluxation of the joint, or congruent (B) with a tilted distal metatarsal articular surface.
|
-
Distal soft-tissue procedures, such as
the McBride operation. In most series, this has been associated with a
high recurrence rate. -
Distal metatarsal osteotomies, such as a
chevron osteotomy or a Mitchell osteotomy. These procedures have a
relatively high rate of patient satisfaction. They should be used for
patients with less severe deformities
P.4272
and
a relatively normal distal metatarsal articular angle. These procedures
can be modified if the distal metatarsal articular angle is abnormal
(see the fourth category). -
A proximal metatarsal osteotomy with a
distal soft-tissue procedure. These procedures can be used successfully
in moderate hallux valgus deformities with fibular valgus subluxation
of the metatarsophalangeal joint but are less successful in correcting
a patient with a congruent joint and an increased distal metatarsal
articular angle. -
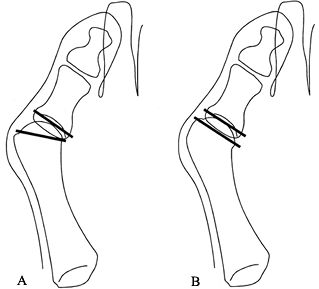
Double metatarsal osteotomies. We believe
that this is the best method of correction in a patient with an
increased first-to-second intermetatarsal angle and an increased distal
metatarsal articular angle with a congruent joint. The proximal
osteotomy corrects the first-to-second intermetatarsal angle (Fig. 167.16A), and the distal osteotomy corrects the hallux valgus and the increased distal metatarsal articular angle (Fig. 167.16B).
The distal osteotomy can be a chevron or Mitchell type, with more bone
resected on the tibial side of the osteotomy than on the fibular side.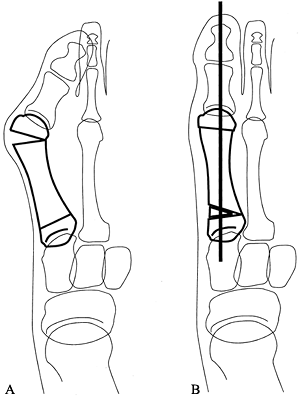 Figure 167.16.
Double metatarsal osteotomy is used when a patient with hallux valgus
has an increase of both the first-to-second intermetatarsal angle and
the distal metatarsal angle. The proximal cut can be as shown or
crescentic. The distal cut may also be a chevron type, with more
resection on the tibial side of the osteotomy. A: The osteotomies. B: Completion of osteotomies and fixation with a longitudinal Kirschner wire.
No one standard operation is suited for all juvenile patients with
hallux valgus. Versatility is the surgeon’s most important asset when
treating the juvenile bunion. It is important not to stretch the
indications for a particular technique to correct the deformity.
is a congenital fusion between two or more of the tarsal bones. The
coalition can be a true bony fusion, or a cartilaginous or fibrous
connection. The overall incidence of tarsal coalitions is unknown, but
many are inherited with an autosomal dominant pattern. Many tarsal
coalitions are not symptomatic and therefore go unrecognized. The most
common symptomatic tarsal coalitions occur between the calcaneus and
the talus, and between the calcaneus and the navicular. Complex
coalitions also accompany fibular hemimelia and proximal femoral focal
deficiency, but these rarely require treatment.
the coalition or bar begins to ossify. The usual age of onset is the
second decade of life. The most common clinical finding is restriction
of subtalar motion. The hindfoot
is
in valgus, and the patient may experience peroneal muscle spasm
exhibiting in a rigid flatfoot. An attempt to invert the hindfoot,
especially as a rapid maneuver, causes an increase in pain.
oblique radiographs of the foot. The best radiographic view to detect a
calcaneonavicular bar is the 45° oblique view (Fig. 167.17A).
A lateral radiograph of the foot or of the ankle will usually
demonstrate the so-called anteater nose sign, which is elongation of
the anterosuperior aspect of the calcaneus as it is directed toward the
navicular.
 |
|
Figure 167.17. Tarsal coalition. A: Calcaneonavicular coalition is best visualized on a 45° oblique radiograph. B: Incision used to resect calcaneonavicular coalition.
|
demonstrate on plain radiographs. Oblique subtalar (Harris) views can
be helpful, but often the best study to demonstrate a medial subtalar
coalition is a computerized tomographic examination. When done in the
coronal plane, this study usually successfully demonstrates
talocalcaneal coalition.
initially conservative. Start with 4–6 weeks of immobilization in a
short-leg walking cast. If this and other conservative measures fail,
consider resection of the tarsal coalition if the child is still young,
particularly when some subtalar motion is present. Results are
generally favorable with resection of calcaneonavicular tarsal
coalitions. The results are less predictable with tarsal coalitions
between the talus and calcaneus. The presence of symptoms for many
years and advanced degenerative changes on midfoot radiographs are
contraindications for resection of the coalition. In such cases, triple
arthrodesis may be appropriate.
-
Using a thigh tourniquet, make an oblique
incision across the sinus tarsi from near the heel to the head of the
talus, or use a horizontal incision (Fig. 167.17B). Protect the branches of the sural nerve. -
Identify the fat of the sinus tarsi and
the extensor digitorum brevis muscle, and reflect them distally from
their origins on the calcaneus, exposing the sinus tarsi. Leave these
tissues attached distally. -
Identify the calcaneonavicular coalition.
Remove the coalition as a large rectangle of bone, using an osteotome
and a rongeur. The removed bone is larger than one would expect when
looking at the radiograph, and it must be rectangular in shape so that
there is no bony impingement in the depths of the resection. -
Demonstrate motion between the calcaneus
and the navicular, and between the talus and the calcaneus after the
resection is complete. Apply bone wax to the cut bony surfaces. -
Place a Bunnell suture through the origin
of the extensor digitorum brevis muscle. Pass the sutures through the
coalition with Keith needles, and bring them out on the medial aspect
of the midfoot. -
Pull the distally based pedicle flap of
fat and the extensor digitorum brevis into the space created by
resection of the coalition, and tie the sutures on the medial aspect of
the foot over a dental roll. -
Close the wound with absorbable sutures.
-
Place the patient in a non-weight-bearing
cast for 3–4 weeks until soft tissues are healed. Generally, motion is
regained over the following 6 weeks.
more controversial. In our opinion, it seems reasonable to attempt
resection of the subtalar coalition when there are no associated
degenerative changes in the joints of the
foot.
It has been observed that resection of even the more sizable subtalar
tarsal coalitions can be successful. If the operation fails, a subtalar
or triple arthrodesis can be a satisfactory salvage procedure. The
technique involves a medial approach to the medial facet of the
subtalar joint. Determine the exact location and size of the coalition
preoperatively with coronal plane computerized tomography.
-
Under pneumatic tourniquet, make a horizontal incision over the sustentaculum tali.
-
Retract the muscle fibers of the abductor hallucis longus plantarward and divide the flexor retinaculum over the sustentaculum.
-
Retract the FDL and neurovascular bundle plantarward.
-
Identify the FHL (which is just beneath the sustentaculum tali) and retract it plantarward.
-
Retract the posterior tibial tendon, above the sustentaculum, dorsally.
-
Reflect the periosteum off the
sustentaculum tali. Do this with care so that you can later approximate
it to hold a fat graft in place. -
Identify the anterior and posterior
boundaries of the coalition. We excise the coalition using a high-speed
burr, gradually taking away bone until we identify the normal posterior
facet of the subtalar joint. You must visualize the joint cartilage
anteriorly, posteriorly, and laterally through the site of the
excision. Once the excision is completed, subtalar motion should
improve. -
The final step is to interpose fat
between the two bony surfaces. You can obtain the fat locally, through
a small incision at the ankle, or from a separate incision made in the
suprapubic area, which gives a cosmetically invisible scar when the
patient becomes more mature. Seal the resected bony surfaces with bone
wax, and carefully push the fat graft into the defect created by the
excision. Hold it in place by approximating the periosteum with sutures. -
Close the wound.
-
Place the patient in a short-leg, non-weight-bearing cast for 4 weeks, and then allow progressive weight bearing as tolerated.
the patient’s symptoms, triple arthrodesis is a successful salvage
procedure. You can use it as a secondary procedure after a failed
attempt at coalition resection, or as a primary procedure when the
coalition is extremely large, symptoms have extended for years, or
degenerative changes are present. This procedure is generally
successful in relieving the pain associated with tarsal coalition.
Techniques of triple arthrodesis are described in Chapter 115.
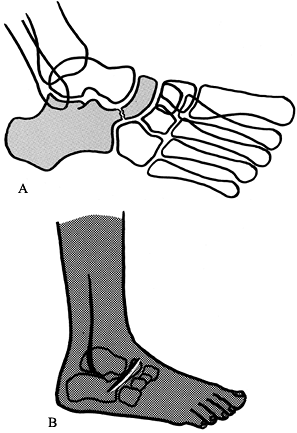
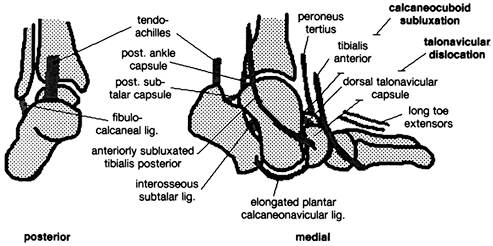
convex pes valgus, is a complex, rare, foot deformity that is resistant
to conservative treatment. There is a continuum from a relatively mild,
flexible form (oblique talus) to a rigid, severe deformity
characterized by a plantar-flexed talus, hindfoot equinus, and dorsal
dislocations of the talonavicular and calcaneocuboid joints. The heel
is always in rigid valgus. There are contractures of the Achilles
tendon, peroneus tertius, long-toe extensors, and tibialis anterior
muscle (Fig. 167.18). Lateral roentgenographs
taken in full dorsi- and plantarflexion differentiate the more flexible
oblique talus from the severe variety; oblique talus exhibits severe
deformity in dorsiflexion but a relatively normal relation between the
talus and calcaneus in full plantar flexion (16).
 |
|
Figure 167.18. Contractures involved in severe congenital vertical talus.
|
anomalies and syndromes (Marfan’s syndrome, arthrogryposis, multiple
pterygium syndrome), genetic abnormalities (trisomy 13–15, trisomy 18),
or neuromuscular defects (myelomeningocele) (16).
Unless the cause of the anomaly is clear, perform a thorough
neuromuscular and genetic workup. Many children with CVT who would
otherwise be candidates for surgery are wheelchair bound and can be
treated by protecting the foot with a soft tennis shoe.
surgical. Most experts recommend preliminary casting to mobilize the
skin, but casting does not correct the bony deformity. Single-stage
correction usually involves mobilization and reduction of all subluxed
joints, internal fixation, and appropriate soft-tissue repair with
transfer of the anterior tibial tendon to the neck of the talus to
maintain dorsiflexion of the talus and minimize heel valgus (16,30).
In this approach, first reduce the dorsally dislocated midfoot through
an anterior incision, and lengthen contracted toe extensors and
anterior tibialis muscles. Stabilize the subtalar joint in appropriate
position with a subtalar bone block. Six weeks later, release the
posterior ankle and subtalar joints, lengthen the heel cord, and
reconstruct the anteriorly displaced posterior tibial muscle to support
the talar head and neck. Whereas many surgeons attempt correction by
soft-tissue means, this approach (using a subtalar fusion) can be
highly effective in difficult cases.
correction of deformities in CVT with a single dorsolateral
longitudinal incision and a percutaneous posterior release. This
procedure has been used with excellent success in patients under the
age of 2 years.
to age 1 year or later. After the age of 2 to 5 years, reduction is
difficult unless the foot is decompressed by navicular excision (3).
Partial talectomy and decancellation of the tarsal bones may be
required. Triple arthrodesis may be necessary in neglected or severe
cases, and it may be necessary in maturity even when surgery early in
life has corrected the gross deformity. This is especially true when
tarsal bones are excised, leading to late degenerative arthritis.
-
Approach the dorsolateral aspect of the
foot with either an oblique incision or a longitudinal incision over
the mid-dorsum of the foot (27). -
Lengthen the extensor digitorum longus
and peroneus tertius tendons. Accomplish digital extensor lengthening
by dividing a portion of the tendons proximally and a portion distally,
and suturing the long proximal stumps to the long distal stumps in the
elongated position. -
Identify the neurovascular bundle. Retract the tibialis anterior and extensor hallucis longus tendons medially.
-
Generally, the peroneal tendons are contracted and lengthening is necessary.
-
Divide the dorsal and lateral
talonavicular joint capsule. This allows the navicular to be readily
reduced onto the head of the talus. The dorsal and lateral
calcaneocuboid capsule may require release as well. You can elongate
the tibialis anterior and extensor hallucis longus tendons if they are
obstacles to an easy reduction. -
Transfix the talonavicular joint with a
smooth K-wire. If the calcaneocuboid joint is released (or subluxated),
transfix it as well. Take care to correct midfoot supination when
fixing these joints. -
Lengthen the Achilles tendon percutaneously.
-
You may perform posterior capsulotomies of the ankle and subtalar joint to come to equinus, but usually this is not required.
-
Once the hindfoot has been corrected,
pass a second K-wire from the plantar aspect of the heel through the
calcaneus and talus into the tibia. -
Apply an above-knee cast to be worn for 6
weeks. After 6 weeks, remove the two K-wires and apply a below-knee
cast to be worn for a further 6 weeks.
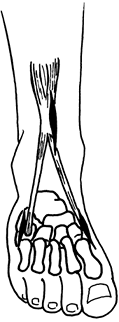
-
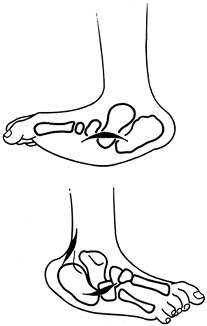
Make three incisions (Fig. 167.19):
The first is concave downward over the medial talonavicular joint; the
second is oblique over the sinus tarsi to expose the calcaneocuboid
P.4276
joint
and peroneal and extensor tendons; the third is along the lateral
border of the Achilles tendon to allow posterior release.![]() Figure 167.19. Preferred incisions for single-stage repair of congenital vertical talus (medial and lateral views).
Figure 167.19. Preferred incisions for single-stage repair of congenital vertical talus (medial and lateral views). -
Begin laterally and make the dorsolateral
approach already described. Inspect the calcaneocuboid joint, and
release its capsule as necessary to correct lateral column alignment. -
In the medial wound, divide the dorsal
talonavicular (deltoid) ligament and open the capsule of the
dorsolateral talonavicular joint. -
Subluxate the posterior tibial tendon superiorly; divide it and tag it for later repair.
-
The navicular is riding on the anterior
talar neck; continue mobilizing the joint capsules dorsally through
both incisions until the midfoot can be brought into plantar flexion,
with reduction of the talonavicular and calcaneocuboid joints. -
Through the posterior incision, perform
Z-lengthening of the Achilles tendon with the distal transverse cut
directed laterally; tag the ends with #0 absorbable synthetic suture. -
Incise or excise the posterior capsules
of the ankle and subtalar joints, and release the contracted
fibulocalcaneal ligament and tendon sheaths of the peroneals by cutting
circumferentially with small scissors. In severe cases, the
interosseous subtalar ligament may require full or partial release. -
Reduce the talonavicular joint and pin it
with a K-wire directed from the posterior tuberosity of the talus
through the center of the joint. Bring the pin out anteriorly and bend
it to prevent migration. -
Check the ankle to be sure there is
adequate dorsiflexion and slight heel varus. Obtain an intraoperative
lateral radiograph. The first metatarsal axis should line up exactly
with the long axis of the talus; if it does not, repeat the preceding
steps until it is correct. -
Repair the talonavicular joint capsule by
reefing the elongated plantar calcaneonavicular ligament and remaining
capsule, and repair the posterior tibial tendon, sewing it beneath the
talar head and neck to assist in support. -
Release the origin of the anterior tibial
tendon and transfer it to the midtalar neck, using a drill hole and
sewing it to itself, to prevent abnormal plantar flexion of the talus;
in the young child, make a small gutter in the medial cartilage of the
talar neck and sew the tendon over this and into the soft tissues below
the neck (Fig. 167.20).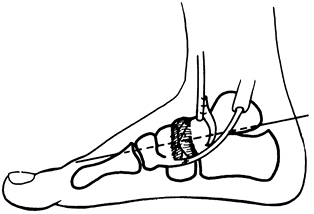 Figure 167.20. A completed repair of congenital vertical talus. See text for details.
 -
Repair the Achilles tendon with the heel in neutral position.
-
Close the skin with fine interrupted absorbable synthetic suture.
-
Apply a long-leg cast, molded in the
arch. Change the cast at 3-week intervals; it is worn for 4 months.
Often a reverse Perlstein brace or AFO is necessary for 1–2 years.
surgery; a normal foot never can be obtained. Persevere to obtain a
plantigrade foot that fits easily into normal shoes and that has no
pain or pressure sores. Late subtalar or triple arthrodesis may be
required. The vertical talus associated with myelomeningocele or
cerebral palsy may require modifications of the surgical treatment and
individualized tendon transfer to achieve a balanced foot.
Misdiagnosis can lead to a poor outcome or, worse, a serious
complication when there is serious associated systemic disease or other
disorders.
avoid neuromas from inadvertently cutting superficial sensory nerves,
more serious injury to the main neurovascular bundles and tendons, and
skin sloughs. In small feet, magnifying loupes are quite helpful.
particularly the latter as it is more difficult to correct, by careful
preoperative planning.
scheme: *, classic article; #, review article; !, basic research
article; and +, clinical results/outcome study.
AH, Marxen JL, Osterfield DL. The Cincinnati Incision: A Comprehensive
Approach for Surgical Procedures of the Foot and Ankle in Childhood. J Bone Joint Surg Am 1982;64:1355.
MM, Reiswig JA, Garrett AM, Perry J. The Split Anterior Tibial Tendon
Transfer in the Treatment of Spastic Varus Hindfoot of Childhood. Orthop Clin North Am 1974;5:31.
KA, Lenhart MK. Treatment of Residual Clubfoot Deformity—The
“Bean-Shaped” Foot—By Opening Wedge Medial Cuneiform Osteotomy and
Closing Wedge Cuboid Osteotomy. J Pediatr Orthop 1991;11:374.