
III – THE HAND > Conditions of Tendons > CHAPTER 48 – FLEXOR
TENDON INJURIES: ACUTE REPAIR AND LATE RECONSTRUCTION
Department of Orthopaedic Surgery, University of Virginia, and Alabama
Sports Medicine and Orthopaedic Center, Health South Medical Center,
Birmingham, Alabama 35205.
biomechanics of human flexor tendons are beyond the scope of this
chapter, the recent works of Gelberman and Manske (17,18), Manske and Lesker (19), and Brand (3)
form the basis of present approaches to flexor tendon repair technique.
Within the past 20 years, this knowledge has changed most of the
principles and techniques of flexor tendon surgery and—with the
enthusiasm for replantation—the timing as well. The importance that
each surgeon attributes to the blood supply will determine the
following:
-
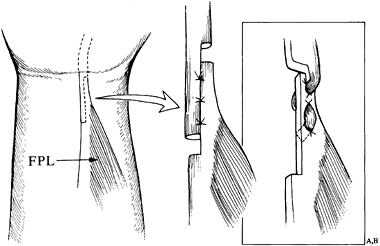
Whether a midlateral incision is used for exposure, which to some extent decreases blood supply to the tendon from that side (Fig. 48.1).
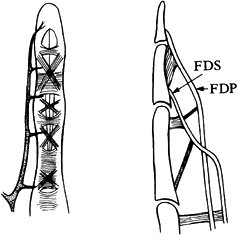 Figure 48.1.
Segmental blood supply to digital theca. FDS, flexor digitorum
superficialis; FDP, flexor digitorum profundus. (Modified from Leddy
JP. Flexor Tendons—Acute Injuries. In: Green DP, ed. Operative Hand Surgery. New York: Churchill-Livingstone, 1982;1350.) -
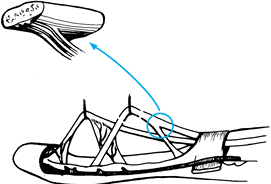
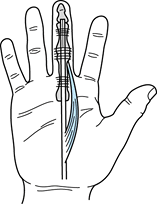
Whether a superficialis tendon, which has vascular interconnections with the profundus, is excised (Fig. 48.2).
![]() Figure 48.2. Vinculae to digital flexors.
Figure 48.2. Vinculae to digital flexors. -
Whether “strangulating” criss-cross
suture techniques (e.g., Bunnell) are used or sutures are placed more
palmarward to avoid disrupting the blood supply entering from and
residing in the dorsal aspect of the tendon. -
Whether closure or reconstruction of the sheath is necessary to enhance intrinsic healing and the synovial fluid environment.
-
Whether the effects of motion on tendon healing and strength determine the rehabilitation plan (8).Acknowledged important principles include:
-
A clean surgical wound is essential.
-
One wound and one scar enhance outcomes.
-
A poorer prognosis for function occurs with more damaged structures.
-
A mature wound is better for tendon repair and reconstruction (2,22).
-
Meticulous repair of all structures with stable bone fixation techniques permits immediate motion.
-
In repair of the periosteum or the dorsal
portion of the flexor sheath or pulley system, an interposing tissue
minimizes adhesions. -
Repair of vessels is important to nerve regeneration.
-
Repair of nerves is ideal for rehabilitation.
-
Repair of tendons is necessary to prevent
myostatic contracture and to allow rapid restoration of function, using
a controlled rehabilitation plan.
a tendon when the wound is initially debrided—during the “golden
period” of the first 6 hours after injury, when it can be assumed that
the wound has not been sufficiently colonized with bacteria to prevent
closure. However, some fresh wounds are so grossly contaminated
primarily that there is no golden period.
might be deferred in favor of initial debridement only. If a digit is
revascularized or replanted 6 hours after injury, and tendon repair is
also carried out, this is also considered a primary repair.
occurs when the initial wound is washed and debrided but tendon repair
is delayed for 2 to 14 days when the wound is not yet fully healed.
because myostatic contracture is not well enough established to prevent
“primary” end-to-end repair of the flexor tendon without having to
resort to secondary reconstruction (i.e., grafting) (25).
admonitions about problems with flexor tendon repairs in the pulley
area of the digital theca (the “zone of the pulleys” or Bunnell’s
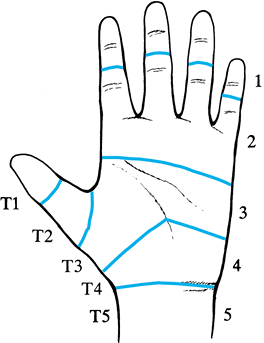
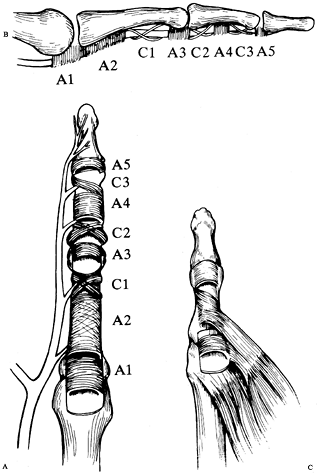
“no-man’s land”), Verdan (32,33 and 34) classified flexor tendon injury sites into five zones, each with its peculiar anatomy and prognosis (Fig. 48.3). Doyle redefined the pulley zones of the digit and thumb (Fig. 48.4); this classification is now generally accepted (5,6).
 |
|
Figure 48.3. Verdan’s thumb and digital zones (modified).
|
 |
|
Figure 48.4. Digital and thumb pulley systems as described by Doyle and Strauch. A,B: Digital. C:
Thumb (note annular pulleys at the metacarpophalangeal and just proximal to the interphalangeal joint with oblique pulley over proximal phalanx). (C modified from Doyle JR, Blythe WF. Anatomy of the Flexor Tendon Sheath and Pulleys of the Thumb. J Hand Surg 1977;2:150.) |
or forearm proximal to the carpal tunnel, which begins at the distal
palmar wrist crease (surface marking) or the proximal edge of the deep
transverse carpal ligament, extending from the trapezium to the hook of
the hamate. The site of the tendon injury is what defines the zone, not
the
site of the skin lacerations. The tendon injury site is the position of
the tendon with the wrist in neutral and the fingers in full extension,
although more properly the fingers should be in their resting position
of normal muscle tension or digital stance. As the fingers and wrist
move into flexion, as the flexor muscles contract, the tendon moves
proximally. Therefore, if the injury occurred at the wrist level but
the finger or wrist or both were flexed, the tendon injury occurs more
distally on the tendon (possibly in the carpal tunnel) when it resumes
its neutral or more extended position.
Verdan’s zone 5. The musculotendinous junction area may be involved.
Injuries can occur to the two wrist flexors, the palmaris longus, the
median and ulnar nerves (and branches), the radial and ulnar arteries,
and the nine flexor tendons of the digits and thumb. Multiple tendons
and muscles may be injured. The prognosis for function, including
individual function, in this area is good. Repairs need not be as
meticulous as in other areas, but they still must be done well.
distal palmar wrist crease or the proximal end of the deep transverse
carpal ligament to its distal margin, as noted by the crossing of the
proximal superficial palmar arch, formed from the ulnar side by the
ulnar artery leaving the canal of Guyon. The surface determination of
the distal extent of the tunnel is made by extending a line across the
base of the palm from the palmar surface of the maximally extended
thumb. In this zone, the nine flexors are tightly packed with the
median nerve. Repairs must be meticulous, and results, especially for
independent function, are more problematic than in any other area
except the zone of the pulleys.
proximal end of the pulleys, which begin at the metacarpophalangeal
(MP) joints. Surface markings in the palm are the proximal palmar
crease for the index, about midway between the proximal and distal
crease for the long finger, and the distal palmar crease for the ring
and little fingers. In this zone, both the flexor digitorum
superficialis (FDS) and the flexor digitorum profundus (FDP) are oval
tendons, and the lumbrical muscle originates from the FDP. The
lumbrical tendon runs in its own sheath or tunnel radial to the long
flexor. Although repairs in zone 3 generally have a good prognosis,
secondary reconstructive
procedures originating here should allow for problems with intrinsic imbalance and excessive lumbrical action.
concern and debate regarding aspects of tendon nutrition, healing,
repair methods, and rehabilitation. Even the extent of the zone is
argued. Investigators agree that the zone begins at the MP level
[Bunnell’s first pulley, Doyle’s first annular (A1)], but the distal
extent is not defined. For prognostic purposes, the zone ends at the
mid–middle phalanx, the site of Doyle’s C3 (third cruciate) pulley but
also the most distal extent of the superficialis slips’ insertion (Fig. 48.4).
Distal to this point only a one-tendon system, the profundus, exists,
but Strauch has described the A5 (fifth annular) pulley at the distal
interphalangeal (DIP) joint level (29). Zone 2
is peculiar in that actually three tendons (profundus and two slips of
the superficialis) exist here in very close proximity; they are
surrounded by the dense unyielding cover of a floor (dorsally) of bone,
periosteum, and fibrous sheath and by sides and a roof (palmarly) of
dense fibrous tissue, thicker even in the condensations of the annular
and cruciate pulleys and dorsally at the palmar plates. Within the
sheath and pulleys the tendons have an intrinsic blood supply as well
as that from the parietal tenosynovium surrounding the tendons.
the MP level to allow the profundus to pass through it. It then becomes
two flat, slightly concave tendons that lie dorsal to the profundus and
hug its sides and then join just proximal to the proximal
interphalangeal joint to form the chiasm of Camper. The flat united
tendinous structure then divides after the proximal interphalangeal
(PIP) joint to form two flat slips, which insert along the middle
phalanx to almost its midpoint.
many of the surgical and rehabilitation techniques discussed in this
chapter and are by no means routine.
edge of C3 pulley) and the insertion of the profundus. Excellent
technique is also required here, but with good conventional techniques
the prognosis for function is good.
occur less often here with only one tendon of relatively uniform size
and no intrinsics. These thumb flexor zones are listed below:
ligament at the MP joint and a long oblique pulley over three quarters
of the proximal phalanx with a second annular pulley distally.
interphalangeal joint, to the insertion of the flexor pollicis longus
(FPL) just distal to the interphalangeal joint.
flexor tendons. This implies a thorough wash and debridement of the
wound initially, with tendon repair at 48 to 96 hours. Initial care is
done on an outpatient basis in an adequate facility (usually the
operating room, but possibly an emergency department suite where
tourniquet control, anesthesia, and good sterility are available). The
patient is placed on the elective surgical schedule in a few days.
socially dictated, preempt this approach. An unreliable patient is
likely to be admitted and operated on at the next available elective
operating time after initial wound care. If the patient has been
referred from out of town with a day-old injury, surgery is done at the
next elective opportunity. Medical conditions indicating acute repair
include a zone 5 injury requiring the repair of multiple damaged
structures and the repair of muscle and tendons before muscle
retraction makes the surgery technically more difficult. Digits with
vascular impairment requiring revascularization or replantation are
also repaired acutely, as delay may endanger the viability of the digit
(see Chapter 34).
-
Begin by increasing the exposure
proximally and distally, converting the original laceration into part
of the zigzag Bruner approach (Fig. 48.5) (4). The history of the injury suggests whether the actual site of tendon laceration will be at the skin level or more distally.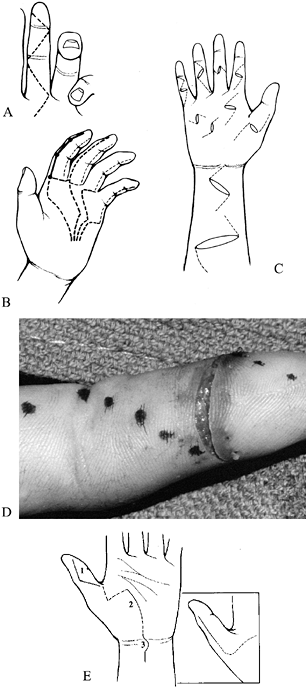 Figure 48.5. Incision options. A: The zigzag Bruner incision. B: Midlateral incisions. C: Extensions of lacerations. D: Extension of incision in clinical photo. E: Incision options for the thumb. (A,B modified from Schneider LH, Hunter JM. Flexor Tendons—Late Reconstruction. In: Green DP, ed. Operative Hand Surgery. New York: Churchill-Livingstone, 1982;1379. E modified from Urbaniak JR. Flexor Pollicis Longus Repair. Hand Clin 1985;1:72.)
 -
Open the carpal tunnel area following the
thenar crease, but 1 to 2 cm distal to the wrist crease, direct the
incision ulnarly to the wrist crease, then change the direction sharply
and curve the incision proximally back to the midline. From here, each
zone is managed somewhat differently (see Chapter 37).
-
After extending the exposure, check each structure to verify the findings at physical examination. Check each
P.1475
structure for continuity and function. The profundi are aligned at the
same level just palmar to the pronator quadratus, with the index
profundus frequently independent. The flexor pollicis is more radial
yet and, although deeper, is just radial to the radial artery. The four
superficialis tendons line up, with the long and ring finger tendons
lying somewhat more superficially than the index and little finger
tendons, which lie to either side and more dorsal. The little finger
superficialis is closely associated with the ring finger tendon,
although slightly more dorsal. -
If the profundi and flexor pollicis
longus are intact, place an umbilical tape around them to avoid having
to recheck their identity repeatedly. Similarly, mark the intact
superficialis tendons and identify the more superficial wrist
flexors—the flexor carpi radialis (FCR) and ulnaris (FCU)—and tag the
median nerve with a vessel loop. Although any flexor motor can power
any distal tendon, it is best to match the lacerated components because
their lengths when repaired end to end should provide the appropriate
tension. This is particularly important for the profundi. Because of
their intimate interconnection, restoring tendon length is important to
prevent the short tether syndrome (quadriga).
location, and appearance—that is, it does what it is supposed to do,
lies where it is supposed to lie, and looks the way it is supposed to
look. The preferred end-to-end tendon repair is the Tajima modification
of the four-corner grabbing stitch of Kessler (Fig. 48.6) (30).
Use two double-armed 3-0 or 4-0 monofilament polypropylene sutures with
pointed tendon needles. (For a discussion of recently advocated
multistrand techniques, see Chapter 47 by
Manske, particularly zone 2 repairs.) The multistrand repairs, although
more technically demanding, have experimentally demonstrated greater
strength, allowing more
active motion in postoperative rehabilitation, and may supersede the Kessler modifications in common usage (10,24,26,27,29,35,36 and 37).
 |
|
Figure 48.6. The Tajima modification of the Kessler suture technique.
|
-
Pass the suture transversely through the
tendon about 1 cm behind the cut edge, which is minimally trimmed with
curved Stephen scissors. Then reinsert each needle just behind the
transverse suture and direct it on its side to the open end. Hold the
tendon at its cut end with a Beasley-Babcock forceps. This technique is
preferred to the conventional or modified Kessler, as the needles are
not directed into the cut tendon ends, which seems to create fraying. -
Use a separate double-ended suture for
each end. Once the sutures have been placed, cut the needles off, have
the assistant hold tension on the two strands on that side, and tie the
sutures on your side with a square knot, with a few additional ties. -
While the assistant holds the tied
suture, take up the slack on the untied side, just bringing the ends
together, and tie the second side. In zone 5, additional tidying
sutures are usually not necessary. Occasionally, a horizontal mattress
stitch with 6-0 nylon or polypropylene might be used to tuck in an
irregular edge. -
Use a combination of horizontal mattress
and locking horizontal mattress sutures for muscle repair. In the
locking stitch, instead of tying the two ends of the suture in the
conventional manner, make one or two throws on the needle end of the
suture, then place the needle-holder tip through the loop end of the
stitch, grasping the loose end on the far side and pulling it through
the loop (Fig. 48.7). This maneuver not only
creates the stitch tension away from the wound edge and everts the
edges but also approximates the edges and prevents excessive eversion.
This technique is also applicable in all tendon repairs where a
horizontal mattress suture might be used (e.g., superficialis slips,
chiasm of Camper), but excessive eversion is undesirable.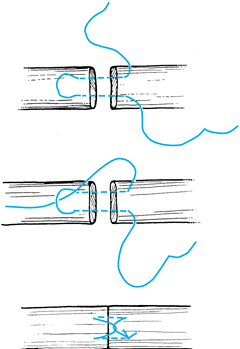 Figure 48.7. The locking horizontal mattress stitch for “flat” tendons.
-
After tying the Tajima sutures, do not
cut the two tied suture ends. Leave them inside the tendon initially.
Have the assistant hold the long ends and place a horizontal mattress
or locking horizontal mattress stitch with 6-0 nylon in the outer layer
of the tendon. -
Begin the circumferential running stitch
away from your side with the tendon flipped over (i.e., on the dorsal
or back side). Take the stitches toward yourself, return the tendon to
the palmar side, and complete the suturing, tying finally to the
initial stitch end. -
Although simple bites (1 mm or so from
the cut edge) are often satisfactory, invert these edges or at least
make them even. To invert, take each stitch just behind the cut edge (Fig. 48.8), which rolls in the edge, leaving a repair without pouting edges. Healing is not adversely affected.![]() Figure 48.8. Running stitch options at cut edge. The technique, depicted in the lower picture, slightly inverts the ends.
Figure 48.8. Running stitch options at cut edge. The technique, depicted in the lower picture, slightly inverts the ends. -
After the repair of the structures in the
carpal tunnel, begin rehabilitation, either with the wrist in neutral
or dorsiflexion to prevent palmar subluxation of the contents of the
tunnel. -
Because it is preferable to flex the
wrist up to 30°, we prefer to repair the transverse carpal ligament.
Direct suture is not usually feasible; zigzag cuts on opening the
carpal ligament risk damage to the palmar cutaneous branch of the
median nerve, which may run through the ligament, or to the motor
branch of the median nerve. Consequently, we close the tunnel somewhat
P.1477
more
loosely than its original ligament width by lacing it with a strip of
tendon like a shoelace (usually using palmaris longus, but occasionally
with a sagittal strip of FCR or an accessory tendon).

lumbrical may be repaired, but if it is damaged in its muscle
substance, it is probably better to excise it rather than to risk an
imbalance caused by intrinsic contracture. Repair both the
superficialis and profundus if they are lacerated, and also repair a
single tendon laceration. Restoration of digital strength and total
function requires both tendons.
-
Extend the wound into a zigzag or Bruner incision (Fig. 48.5). Expose the sheath and open it along the side to create a funnel, as described by Lister (Fig. 48.9) (15).
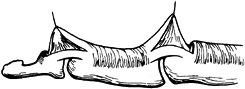 Figure 48.9. Lister’s technique of opening the sheath to form a funnel.
 -
The side cut joins the transverse wound
in the sheath. If the tendon is sited proximally, make a second
incision more proximally, a mirror image of the first. The distal
tendon can usually be easily exposed in this manner, assisted by
flexion of the distal joints. If the proximal end is not held by a
vincula, or if the profundus alone is cut and not trapped at the MP
level where it passes through the superficialis, it is in the palm,
held by the lumbrical. Fishing for the proximal end with grasping-type
instruments is dangerous to the tendon, the bed, and proximally to
blood vessels and nerves. If the proximal end cannot be kneaded and
milked into the wound and then grasped with a mosquito hemostat in its
cut end, make a proximal incision and find it. -
Pass a pediatric rubber feeding tube or a
silicone-dacron tendon rod distally to proximally through the sheath,
suture the tendon with a single nylon suture through the cut end to the
eyelet in the tubing or to the rod, and draw it back into the distal
wound. -
When both tendons are cut, bring them
together distally. Bring the profundus through the superficialis, in
the normal anatomic position. If a problem arises passing it through
the sheath, open the intervening skin bridge and create another sheath
incision. -
Once the tendon (or tendons) is returned to the distal area, close the sheath opening with 6-0 nylon.
-
When the tendons are brought into the
distal wound, hold them in that position by skewering them with a
milliner’s needle that passes through the sheath and the tendons
proximally. Avoid the neurovascular bundles by placing the needle more
palmarly. Keith needles have a cutting edge and are less desirable than
the pointed milliner’s variety. -
Except at the open end, where the tendon
may be handled with the Beasley-Babcock forceps, handle the tendon with
the thumb and index fingers with an interposed moist sponge. -
Repair the superficialis slips or chiasm
with horizontal mattress sutures or locking stitches, using 4-0 nylon.
Collagen suture creates more reaction and is not advocated.
Polypropylene is satisfactory; braided polyester sutures do not slide
well and are no longer preferred by us. Braided nylon has also been
satisfactory, but monofilament nylon and polypropylene are preferred. -
Repair the profundus tendon with the
Tajima technique with 3-0 or 4-0 nylon or polypropylene, with the cut
edge repaired with a running stitch. If there has been damage to the
periosteum under the tendons, repair it with 6-0 nylon. If it cannot be
repaired, a graft of antebrachial fascia may be sutured in place as an
interposing membrane. Fractures are repaired before tendons, of course,
but if neurovascular repairs are indicated, particularly with an intact
skeleton, it may be technically easier to retrieve tendons into the
wound and place the Tajima sutures into the tendon but not tie them so
that the neurovascular repair under the microscope can be done on a
flat (unflexed) digit. -
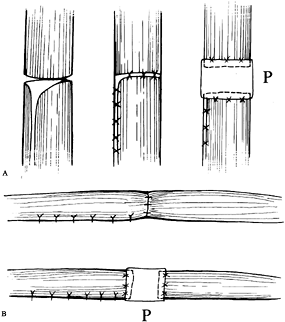
After the tendons are repaired, repair the sheath with 6-0 nylon (Fig. 48.10).
Leaving a gap in the sheath may result in sagging of the edge of the
sheath as the tendon attempts to pass through it, decreasing the
vertical diameter and trapping the tendon (Fig. 48.11).
Use simple or horizontal mattress sutures to repair the sheath. If a
gap remains, fill it by sewing antebrachial fascia to and over the
underlying sheath (Fig. 48.10). If a pulley is missing, reconstruct it, as described below.![]() Figure 48.10. Closure and reconstruction of the tendon sheath. A: Anteroposterior view of the sheath demonstrating direct repair and antebrachial fascial graft (P). B: Lateral view of repair and graft (P).
Figure 48.10. Closure and reconstruction of the tendon sheath. A: Anteroposterior view of the sheath demonstrating direct repair and antebrachial fascial graft (P). B: Lateral view of repair and graft (P).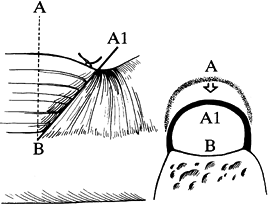 Figure 48.11. Buckling of the unrepaired sheath as the tendon attempts to pass through. Note loss of height of pulley (A–B to A1–B).
Also reconstruct the sheath. Full flexion of the digit to the distal
palmar crease usually requires A5 pulley preservation or
reconstruction. When the sheath is cut away, a sagging effect occurs as
the tendon moves proximally into the sheath, blocking full motion.
Advancement of the profundus tendon under the distal stump for a
reinsertion into bone rather than a tendon repair is not recommended:
the short-tether or quadriga effect may occur with this
maneuver, with loss of full flexion of the adjacent digits (33).
This technique can generally be used safely with the index finger
because of its usual independence from the other profundi. Advancement
still creates slack in the lumbrical, however, which may weaken or
unbalance its action.
-
If the distal stump is short, take the
Tajima stitch proximally, then pass needles longitudinally through the
stump, then adjacent to the sides of the distal phalanx or through
drill holes (with a 0.045-in. pin) in the phalanx from palmar to
dorsal, emerging proximal to the germinal matrix of the nail bed. -
Tie the sutures over a dorsal button.
-
Place horizontal mattress sutures at the cut edge.
-
We have used small (or mini) suture
anchors for avulsions and short stumps in preference to dorsal buttons
in the last 3 years; 2-0 suture is used. We have had satisfactory
results, but the series is too small to advocate their use as yet.
 |
|
Figure 48.12. A 90% partial tendon laceration.
|
-
The tendon may rupture if it is not repaired.
-
The tendon will be weakened if sutures are placed in it.
-
The unrepaired portion may not fully heal and cause triggering [catching on the edge of the fibrous sheath system (A1)].
less of the tendon’s cross-sectional area in zones 3 and 5 are best
left unrepaired. Repair lacerations of 50% with horizontal mattress or
locking-type stitches; lacerations of 75% or greater require full
repair. In zone 4, tidy up lacerations of 25% with debridement. In
zones 1 and 2, repair all partial lacerations; lacerations of 25% are
repaired with simple sutures. Use the “frayed tendon” rehabilitation
protocol postoperatively.
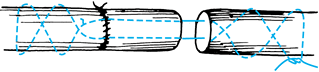
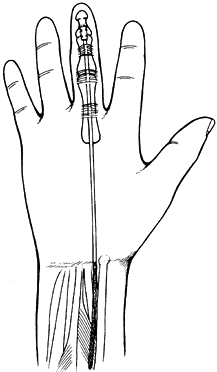
is missing, replace it with a segmental tendon graft (Fig. 48.13), using palmaris or a segment of flexor carpi radialis.
 |
|
Figure 48.13. An intercalary graft repaired with a modified Bunnell suture technique.
|
-
Determine the length of graft needed by
applying traction on the distal segment to place the digit in its
normal stance position (Fig. 48.14). Then apply
traction to the proximal end. Maximum traction determines the extent of
the muscle’s elasticity; no traction is the zero-tension position. Some
50% to 60% of the maximal elasticity is close to the resting tension of
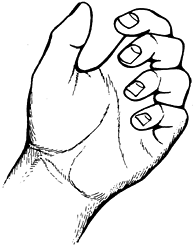
the muscle, which is the desired position.![]() Figure 48.14. The normal digital cascade or stance position.
Figure 48.14. The normal digital cascade or stance position. -
Take the amount of tendon graft and then
a bit more, to achieve the normal stance position, suture it in
tentatively, shorten it accordingly, and complete the suturing. -
This segmental interpositional graft
technique, frequently used for extensor tendons, is most applicable in
zone 5, is applicable with longer grafts in zone 4, and is possibly
applicable in zone 3. In zones 1 and 2, grafting of the entire distal
segment is more appropriate, as discussed below.
adequate for the minimally frayed tendon that is for the most part
intact. For severely “chewed-up” tendons, replacement is indicated. Use
segmental grafts in zones 3, 4, and 5. In zones 1 and 2, if the tendon
is badly damaged and hence irreparable but the bed is unharmed (not a
common occurrence), perform a one-stage graft, either primarily or as a
delayed procedure. Options are discussed in the section on grafting. If
the bed and tendon are damaged, perform two-stage grafting. Placement
of a tendon rod in the acute injury is questionable; we prefer to do
this in the clean wound at 10 to 14 days.
tendon transfer using the long or ring superficialis. When a lone
superficialis muscle is injured and is irreparable, we perform no
reconstruction. For multiple or massive injuries of the flexor tendons,
a transfer from the extensors may be indicated.
suture, advancement, or grafting, depending on the zone and surgeon’s
preference (see Fig. 48.5) (31).
Direct suture is used more often than not, but the usual independence
of the muscle/tendon unit (it is occasionally associated with the
profundus of the index) and the lack of lumbrical allow more repair
options.
bone insertion when the laceration has occurred within 1.2 cm from the
insertion (31). Between the MP joint and this
point, he advocates advancement with equivalent Z-lengthening at the
wrist, with and without reinforcing tendon grafting at the wrist (Fig. 48.15). Within the thenar zone, he prefers grafting. We have used these methods
successfully but usually prefer direct suture methods (30).
The technique and sheath repair methods are the same as in the digits.
While access to the thenar zone is difficult, the injury that exposed
and cut the tendon usually makes the access quite easy. If not, the
pediatric feeding-tube method to retrieve the proximal end and grafting
may be necessary. The carpal tunnel often must be opened to retrieve
the proximal end of the flexor pollicis longus. Direct suture methods
have been most successful in achieving full active motion, which is
represented by full extension of the thumb into the plane of the digits
and full flexion to the distal palmar crease of the little finger.
 |
|
Figure 48.15.
Lengthening of the flexor pollicis longus at the wrist associated with distal advancement in thumb zone 2. Two methods of repair of the lengthening are depicted. (Modified from Urbaniak JR. Flexor Pollicis Longus Repair. Hand Clin 1985;1:73.) |
procedure, advocated for all injuries in zone 2, today it has only
occasional indications (2,34).
It is indicated when the damage to the tendons in zone 1 or 2 is
irreparable but the tendon bed is uninjured or minimally injured (Fig. 48.16). Prerequisites include a soft, pliable hand and digit with full passive motion of the joints.
 |
|
Figure 48.16.
One-stage tendon grafting from the palm. More extensive pulley preservation is more common than the minimal number depicted. These three (with the proximal one somewhat closer to the metacarpophalangeal joint) are the most critical. |
-
Expose from the profundus insertion to
the palm, using a Bruner or midlateral incision, and extend into the
palm as a zigzag or sequential transverse incision (Fig. 48.5B). -
Classically, the tendon sheath is
partially excised, leaving only the three pulleys advocated by Bunnell.
Today, however, most of the pulley and tendon sheath system is
preserved, removing only enough to gain access to the remaining
portions of tendon. Proximally, leave the profundus in the palm short
enough so that it will not be drawn into the digital sheath when the
digits are in full extension. Leave the lumbrical origin, along with an
additional 1 to 2 cm. -
Distally, preserve a short stump of
profundus. Leave the distal portion of the superficialis (the chiasm of
Camper) and, if it is not already adhered, suture it to the sheath
proximally as a tenodesis to prevent hyperextension of the PIP joint. -
The usual source of tendon graft is the
palmaris longus. Take it through multiple transverse incisions in the
forearm, starting just proximal to the distal palmar wrist crease, and
remove it retrograde by passing a small hemostat from the proximal to
the distal wound. Alternately, we use the short forearm Brand tendon
stripper. Place it around the tendon distally and advance it into the
forearm while tension is maintained with a hemostat on the distal
divided tendon. The device then avulses the tendon at the
musculotendinous junction. Whether to remove paratenon or not is a moot
question. We remove all muscle and the bulk of the paratenon but do not
compulsively remove all of it. -
Distally, just under the profundus stump and distal to the insertion of the palmar plate of the DIP joint, drill a hole with a 5/64-in. bit just through the palmar cortex of the distal phalanx. This is distal to the epiphyseal plate in children.
-
Make two drill holes with an 0.045-in.
pin through the dorsal cortex on either side within the palmar cortical
hole. Pull the tendon through the digit from the tip to the palm, after
suturing it to either a reusable tendon rod or a pediatric feeding tube. -
Make a Bunnell-type weave through the end of the tendon with 3-0 polypropylene on milliner’s needles (Fig. 48.17).
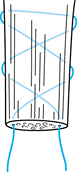 Figure 48.17. The modified Bunnell suture, similar to that advocated by Kleinert.
 -
Pass the two needles through the bone and
through dorsal skin proximal to the germinal matrix of the nail bed,
through a rubber button pad (made from medicine-jar stoppers or the
disposable irrigating syringe rubber bulb), and through the button.
Pull the tendon end into the hole in the distal phalanx and tie the
suture over the button (Fig. 48.18). When using a suture anchor,
P.1481
insert the anchor within the drill hole, to the side. Draw the tendon
into the drill hole as described but secure it by the sutures from the
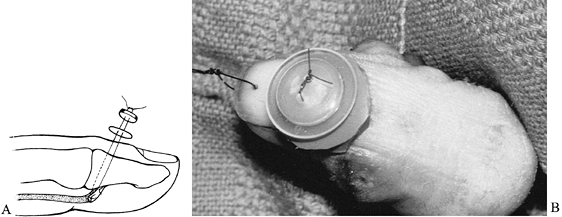
suture anchor. Pull the polypropylene suture out distally.![]() Figure 48.18.
Figure 48.18.
The tendon graft is drawn into the palmar cortex with the suture tied
over the dorsal button and button pad. Note that the button suture is
placed proximal to the nail and germinal matrix. The graft is sutured
to the profundus stump as well. A: Artist’s drawing, lateral view. B: Clinical photograph of dorsal button. The suture has been placed through the nail for postoperative therapy. -
Suture the distal profundus stump down to
the graft with two to four simple sutures using 4-0 braided polyester
suture. Test the integrity of the button by gently attempting to lift
it away from the skin, to ensure that the sutures to the profundus
stump did not cut the polypropylene. -
Traction on the proximal tendon graft
should flex the digit to the distal palmar crease. If bowstringing
occurs, a pulley may need reconstruction. Then close the skin on the
digit. -
Although each step is important, this
next one is especially critical—setting the proper tension. Make a slit
in the distal end of the profundus stump in preparation for a
Pulvertaft interweave suture (Fig. 48.19). Pull
the motor tendon distally to 60% of its maximum elasticity and pull the
distal tendon graft through until the finger assumes a position
slightly more flexed than its normal digital stance. Note that each
finger, from radial to ulnar, is slightly more flexed (Fig. 48.14). Figure 48.19. The Pulvertaft proximal interweave. A: The initial pass of the graft through the motor tendon. B:
The motor tendon end is split and sutured around the graft. Two
additional passes are usually made through the motor tendon with the
openings made 90° to each other. C:
Clinical photograph of the proximal interweave. The motor end has not
been sewn over. (Modified from Schneider LH, Hunter JM. Flexor
Tendons—Late Reconstruction. In: Green DP, ed. Operative Hand Surgery. New York: Churchill-Livingstone, 1982;1387.) -
Using 4-0 braided polyester, suture the
graft and motor tendon together with a simple or horizontal mattress
suture. Then withdraw all support, place the wrist in neutral, and
observe the stance of the digit. If it assumes the desired posture, a
tenodesis effect is noted by flexing and extending the wrist. If the
digit moves appropriately with the other fingers and returns to the
proper position, the tension is correct; otherwise, tighten or loosen
it. -
When properly adjusted, make two
additional slits at 90° from each other and from the first slit and
complete the weave and suturing. Fold the distal end of the stump
around the graft (Fig. 48.19B). Making the
slits can be facilitated with a “tendon-braiding” forceps. Otherwise,
use a #11 blade or a #64 Beaver blade with a small hemostat placed
through the slit to pull through the tendon. Some surgeons wrap the
lumbrical muscle around this connection; we prefer not to disturb the
lumbrical. -
Close the incisions in the palm. When the
finger is sutured before the tension has been set, the zigzag wound is
more easily closed, the corner stitches fit more readily, and you need
not assume a contorted position to achieve closure.
graft (the sagittal section of the FCR, the superficialis of the little
finger, the proximal superficialis of the involved digit, and from the
leg the plantaris or toe extensors). An interesting technique known as
tenoplasty involves suturing the cut ends of the proximal profundus and
superficialis together at the time of the initial injury (20).
After a month, when this connection is healed, the proximal
superficialis is divided in the wrist, drawn into the palm, threaded
through the pulley system, and attached distally, thus requiring only
one connection in the second stage. However, we prefer palmaris or
plantaris as grafts because of their usual ease of harvesting and lack
of bulk. When they are not present, the alternatives are considered.
through bone onto nail or fingertip. When the tendon is brought through
the tip of the finger, the tension may be readily set distally, with
increased traction until the desired position is achieved. We prefer
our method described above, which creates fewer problems with nail
growth disturbance or irregularity in the digital pad contour.
on the concept that the first stage reconstructs the bed and the pulley
system, and the second replaces the tendon (11,25).
-
Place a silicone tube (Carroll) (1) or a silicone or silicone-dacron rod (Hunter-Swanson or Hunter) (11),
shaped like a tendon, into the digit, permitting a pseudosheath to form
around the rod. Fix the rod distally and leave it unattached
proximally, either at the palm or wrist level. We prefer the
silicone-dacron Hunter rod and discuss this method below. The first
stage of the procedure is usually performed under brachial plexus block
anesthesia. -
Expose the digit through an extended
Bruner incision from the profundus insertion to the palm and through a
curvilinear incision in the wrist. The exposure in the hand is the same
as in one-stage grafting. -
Preserve the distal profundus stump of
about 1.5 cm as well as the tenodesis effect of the distal end of the
superficialis. Preserve or rebuild the pulleys and carry exposure to
the palm. -
Remove other residual bits of tendon by
sharp excision with a Beaver blade (#64). Local scar tissue may be used
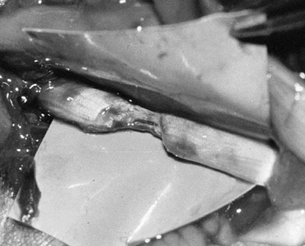
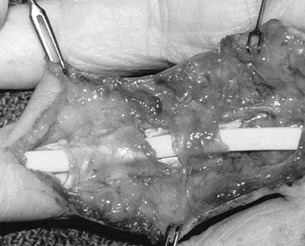
to fashion a tunnel where the old pulley system was once located (Fig. 48.20). Preserve or create pulleys at the base of the proximal phalanx, over the PIP joint, and in the mid–middle phalanx.![]() Figure 48.20.
Figure 48.20.
Clinical photograph of silicone-dacron tendon rod placed through
original tendon sheath and pulley system. Tunneling is also done
through healed scar. -
In the wrist, locate the profundus to the
involved digit, leave it attached distally to the lumbrical to maintain
its resting length, and tag it in the wrist with a colored suture. The
superficialis tendon is usually withdrawn into the wrist and excised;
sagittal strips of it may be used for pulley reconstruction. -
Apply distal traction to the profundus at
the wrist level to determine its elasticity, which should be equal to
that of the uninvolved adjacent profundus tendons. If it has lost its
elasticity because of severe myostatic contracture, the superficialis
is left adhered in the palm, tested, and, if adequate, tagged as the
future motor. If neither is adequate, choose and tag an adjacent
superficialis. -
Select a tendon rod of appropriate width;
usually a size 4 or 5 is correct for the digits, with the wider 5
needed for thumbs and the 3 for little fingers, smaller people, or
children. The rod should fill the proposed sheath but move easily
through it. It must also be large enough to create an adequate
pseudosheath for the future tendon graft. -
Maintain the rod under saline or
antibiotic solution in saline until usage to avoid lint accumulation.
Handle primarily with smooth instruments or wet gloves. Pass the
pointed end of the rod through the digital sheath from distal to
proximal to the palm level. Then pass a long hemostat or Kelly clamp
just palmar to the profundus and below the superficialis tendons
(dorsal to them) through the carpal tunnel (usually on the proposed
motor tendon) to the palm to the lumbrical level. -
Grasp the rod and draw it into the wrist.
Distally, place the end of the rod snugly under the profundus stump and
suture it securely with four simple or horizontal mattress stitches of
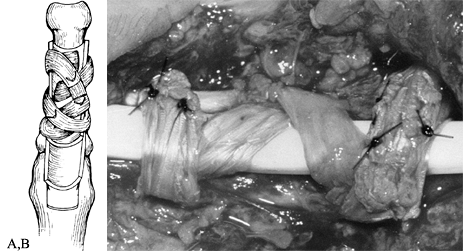
braided polyester (Fig. 48.21). If a profundus
stump is unavailable, alternatives include suture to periosteum or use
of a special rod that has a screw attached that can be fixed to the
distal phalanx.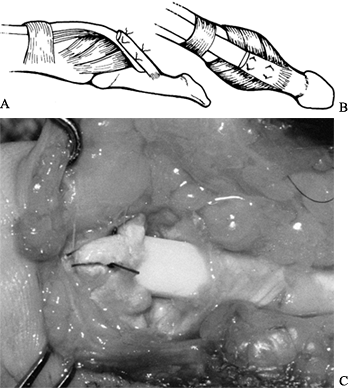 Figure 48.21. The tendon rod is sutured under the old profundus stump. A: Lateral view. B: Anteroposterior view. C: Clinical photograph.
 -
With traction applied to the rod, the
finger should flex to the distal palmar crease without bowstringing.
Using a large hemostat, open the space palmar to the profundi at the
distal forearm. The proximal end of the rod fits into this space (Fig. 48.22).![]() Figure 48.22.
Figure 48.22.
Tendon rod in first stage of two-stage tendon grafting. The tendon rod
is sewn under the profundus stump but lies free in the wrist, under the
superficialis and on the profundi. The proximal pulley is drawn
somewhat too distally. -
Test passive motion of the finger in full
flexion and extension to determine if there is any buckling in the
digit or the wrist. Extra length of rod in the wrist can be excised. In
the palm, a bridge or pulley can be loosened to prevent buckling or a
new pulley reconstructed. If buckling persists after skin closure,
erosion of the rod through the skin can occur.
during acute repair or one-stage grafting and in or after tenolysis.
Our preferred technique is that described by Kleinert and attributed to
Weilby (12). Other methods (for example, that of Lister) can also be used (14).
Use the residual base of the annular ligaments and underlying
periosteum, along with a long narrow strip of tendon. If superficialis
is used, create a sagittal strip about one-eighth the width of the
tendon, several inches long.
-
Make a slit through the remnant of the
annular ligament on either side of the rod using a #64 Beaver blade or
a #11 blade, and place the tips of a cardiovascular hemostat through
the slit to grasp the tendon. Draw the tendon over the rod and down
through the opposite slit. -
Make several more pairs of slits
distally. Criss-cross the tendon over the rod and through the slits,
like a shoelace through eyelets. -
Finally, cinch the lacing (pulley) tight
enough to eliminate bowstringing and yet loose enough to allow passage
of the rod during passive range of motion. -
Pass the tendon ends through themselves or through proximal criss-crosses and suture them.
through the slits (Fig. 48.23).
A simple pulley reconstruction, particularly applicable to the A3 area,
over the PIP joint, involves the use of one residual slip of
superficialis left attached distally, with the proximal end woven
through or sutured to the annular ligament remnant (Fig. 48.24).
 |
|
Figure 48.23.
Building the pulley using the remnant of the old annular ligament system and a strip of tendon; method described by Kleinert and attributed to Weilby. A: Artist’s rendition. B: Clinical photograph of pulley built over a tendon rod. |
 |
|
Figure 48.24.
Pulley built with remaining distal slip of superficialis, placed through and sutured to the remnant of the annular ligament. (Modified from Schneider LH, Hunter JM. Flexor Tendons—Late Reconstruction. In: Green DP, ed. Operative Hand Surgery. New York: Churchill-Livingstone, 1982;1425.) |
and forth with passive range of motion of the digit. This can be done
with passive range using the opposite hand to move the digit through
its range or by trapping the digit
using
adjacent fingers to draw it into flexion. The intact extensor mechanism
extends the digit. If a capsulectomy or use of an artificial joint
accompanied placement of the tendon rod, use dynamic splinting. This
may include a low-profile extensor-assist splint alternating with
flexor-assist rubber band or thread devices or individual spring-loaded
assistive joint extensors, flexors, and adjustable static devices. The
hand therapist plays a very significant role in helping the patient to
achieve a maximum range at this point. The maximum attainable range,
actively, after the second stage will be no more than that achieved
passively at this time.
to achieve a good pseudosheath, which is also soft, sheer, and
flexible. Do not maintain the rod in place beyond this time as it may
lead to a thicker, fibrous, less flexible pseudosheath with a poorer
result.
be certain that the distal end of the rod is in place, buckling is
absent, and the excursion of the rod is 1 cm or more. If these criteria
are not met, stage 1 may need to be revised. It is not unheard of for
the distal end of the rod to break loose and piston into the wrist (25).
Obtain anteroposterior and lateral views of the hand and forearm
(fingertips to midforearm) in full extension and full passive flexion
of the involved digit. To determine excursion, measure the proximal tip
of the rod from any fixed bony landmark. Assuming all is well, proceed
to stage 2.
range of motion. This is essential, however, so do not proceed without
it. Occasionally, an inflammatory reaction may occur because of the rod
or lint, and so on. Prescribe rest, immobilization, and antibiotics and
antiinflammatories for 10 to 14 days. If the problem resolves, resume
therapy. If not, consider reexploration, rod removal, and debridement.
If infection exists, use suction-irrigation and systemic antibiotics to
clear the digit and attempt rerodding later. Most attempts at repeat
tendon reconstruction are unsuccessful, however, and other approaches,
such as fusions or amputation, may be indicated. If only inflammation
occurs, it may be caused by lint contamination, and another attempt at
rodding is warranted.
straightforward for the experienced surgeon. Add the free tendon graft,
connecting it properly at either end. In fact, these steps are
identical to those used in one-stage grafting. Unfortunately, there are
pitfalls peculiar to this stage.
-
Perform the procedure under general
anesthesia with the arm and a leg prepped (usually the contralateral
leg, so a second team can take the plantaris tendon graft unencumbered). -
Locate the plantaris with a short
transverse incision made over the medial edge of the Achilles tendon,
about four fingerbreadths above the tip of the medial malleolus. If you
explore too distally, the tendon may have already fused with the
Achilles tendon or it may be located behind it. It is generally absent
or deficient about 14% of the time. Assuming it is present and not
hypoplastic, make a second, more distal incision, divide the tendon,
and withdraw it into the proximal wound. -
Split the fascia proximally and place the
ring of a Brand tendon stripper over the tendon, which is grasped
through the ring with a hemostat. -
With the leg straight and level (usually
resting on two folded towels), advance the stripper slowly with a
twisting motion of the fingertips while the tendon is held relatively
taut. There is one interval, as the stripper passes between the
gastrocnemius and the soleus, where progress is slow; be patient so
that you do not prematurely cut the tendon. -
Advance the stripper to the
musculotendinous junction, avulse the tendon, and deliver it. Debride
muscle and paratenon, but do not remove paratenon compulsively.
to use a toe extensor. If one is grafting for a little finger, only to
the superficialis insertion (see the discussion below on salvage), or
to a thumb, a palmaris may be long enough. It is easy enough, in the
absence of the plantaris, to take the palmaris, and measure it (on the
surface) before proceeding with the toe extensor, which is more
difficult to harvest and can result in more morbidity.
always present and are long enough. The extensor brevis substitutes for
the communis in the foot. The disadvantages are the interconnections
between the tendons under the extensor retinaculum and proximally,
which make it impossible to harvest a smooth, unblemished tendon, and
it takes time to deliver the specimen.
-
Begin with a transverse incision, just
proximal to the level of the metatarsophalangeal joint over the
prominent tendon. The fifth is not used, as there is no extensor
brevis. We find that the third and fourth usually are easiest to
harvest. -
Locate the extensor brevis tendon and
suture it to the longus, which is then divided proximally. With
traction on the cut end, identify the tendon proximally and make a
second transverse incision. -
With the fascia divided, pass a hemostat
distally over the exposed proximal tendon to the distal wound, where
the cut end is grasped and the tendon delivered retrograde into the
proximal wound. Continue proximally until an adequate length is
obtained. The maneuver is easy distally, but proximally the tendon must
be separated from its mates. This is done partly by peeling the tendon
from the others and partly by cutting with
P.1486
a scissors. Closer-interval incisions proximally will facilitate this activity. -
Apply a bulky elastic dressing to the leg and foot for about 2 weeks.
-
On the upper extremity, open the
curvilinear incision on the wrist, exposing the tagged motor tendon and
the proximal end of the rod. Again test the motor for elasticity;
another motor can still be used. -
Remove the pseudosheath from the end of
the rod and expose the incision over the distal end of the rod. We
prefer to open the old zigzag, as a midlateral in a scarred finger at
this point is more likely to injure digital nerve branches. Note the
sutures taken through the profundus stump; locate the proximal extent
of the stump and carefully lift the stump away from the underlying rod
as the sutures are cut. Do not damage the pseudosheath under the rod or
the palmar plate. -
A difference in the shade of the white
palmar plate and the more opalescent pseudosheath distally over the
bone should be apparent. Take the pseudosheath just distal to the plate
off the bone with a #64 Beaver blade and drill a hole with a 5/64-in.
bit through the palmar cortex (as with the one-stage graft). Make two
more holes on either side with 0.045-in. pins, from inside the hole
through the dorsal cortex, to emerge proximal to the nail and the
germinal matrix. -
Suture the tendon graft to the rod proximally and pull it through the pseudosheath (Fig. 48.25). If the tendon pulls free, simply reinsert the rod through the pseudosheath.
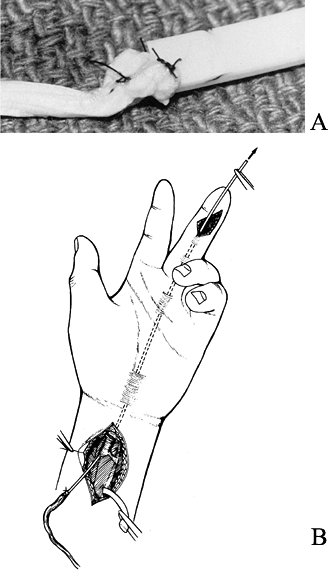 Figure 48.25.
Stage-2 tendon grafting. The tendon graft is attached to the rod, which
is then drawn out of the hand distally, pulling the tendon through the
pseudosheath. A: Clinical photograph of tendon graft sutured to the rod. B: Illustration of graft about to be drawn into the hand. -
Place a hemostat on the proximal tendon
and place a weave stitch (usually a Bunnell type) through the distal
end with 3-0 polypropylene on milliner’s needles, which are then placed
through the drill holes to be tied over the dorsal button and button
pad (Fig. 48.18). Draw the tendon snugly into the bone before tying the suture. -
Secure the graft to the residual
profundus stump with safety stitches of 4-0 braided polyester suture.
With traction on the proximal tendon, the digit should fully flex or do
so to the extent achieved with passive motion. -
Release the motor tendon from its distal attachment at the wrist crease level.
-
Close the incision on the digit and
attach the graft to the motor tendon at the proper tension, using the
Pulvertaft interweave stitch (see one-stage graft technique
above). Again, this is achieved by making a slit in the motor tendon,
which has been pulled up to 60% of its elastic length, and pulling the
graft through until the digit assumes a position of flexion slightly
greater than the normal stance position relative to the other digits. -
After the first trial stitch, test the
position with the tenodesis maneuver, flexing and extending the wrist.
If the digit moves with the other fingers and then, with the wrist in
neutral, achieves the proper digital stance, make two additional slits
in the motor tendon and complete the interweave. -
Rehabilitation is described below.
Immobilize in a bulky dressing with the wrist flexed 30°, the MP joints
in 75° to 90° of flexion, and the interphalangeals toward extension
(the intrinsic-plus position). Apply the bulky dressing with a
posterior plaster splint above the elbow initially, to enforce
elevation.
the injury is unrecognized or the repair has ruptured, the surgeon may
be faced with a finger that functions well with full mobility at the MP
and PIP joints, but the tip of which is flail. The dilemma is whether
to maintain this full functional PIP motion, sacrificing DIP motion,
stabilizing the tip in some way, or to risk the excellent motion; that
is, compromise the superficialis’ full function for the sake of some
DIP control. Nongrafting measures are tenodesis or arthrodesis of the
DIP joint.
-
The potential problems with this stage of
the procedure include detachment of the graft proximally or distally or
both, rupture of the graft, adherence of the graft to the sheath, and a
flexion contracture of the DIP joint. -
To avoid rupture of the graft or pulling
out of the suture distally, take an adequate graft; do not accept a
graft of too-small diameter or one with iatrogenic defects. If the
graft is damaged or hypoplastic, take the time to harvest the toe
extensor. It is not worth the grief that results if this point is not
heeded. -
To confirm the integrity of the distal
polypropylene suture, test that the safety stitches have not cut it by
gently lifting the button, making sure it is springy, and applying
traction to the proximal tendon. Starting the polypropylene weave
distally no more than 1.0 to 1.5 cm from the end of the graft is
usually safe. The proximal attachment is usually safe with a three-slit
interweave. Adhesion in the sheath should not be a problem if the motor
muscle–tendon unit is elastic and has good excursion, the pseudosheath
is not thick and fibrous, and rehabilitation is appropriate. If the
proximal attachment is in the forearm and not the carpal tunnel, the
adhesions at this site can be worked out with activity. -
A flexion contracture at the DIP joint
remains an enigma. Avoiding iatrogenic damage to the palmar plate and
attending to the problem with therapy are obvious. Pseudosheath
contracture may be a factor. Two additional controllable factors may be
preserving the A5 pulley and placing the tendon insertion just distal
to the palmar plate, not further distal on the distal phalanx. -
With attention to all these factors,
flexion contracture still occurs in some patients, and although the
digit is functional, its appearance is compromised. An arthrodesis of
the DIP joint is the solution in severe cases
the DIP joint during pinch or grasp. In some cases, a tenodesis may
already exist from adherence of the distal profundus across the DIP
joint. It may be accomplished surgically by suturing the profundus
stump down to the sheath, residual annular ligament, and periosteum.
Pin the joint for 1 month and then mobilize. The position of
immobilization is in 5° to 10° of flexion for the digits and in 0° or
neutral for the interphalangeal joint of the thumb. Theoretically, the
digital interphalangeal joints should be increasingly flexed across the
hand from radial to ulnar, allowing grip to the distal palmar crease.
In reality, this is unnecessary for strength if the joint is stable. A
flexed or a hooked finger is undesirable functionally and cosmetically.
and the further contraction of others. With these problems in mind, we
prefer arthrodesis, which can be done in a variety of ways.
digit, where the superficialis is often smaller than normal and may be
deficient. It may also rupture if sufficient stress is placed on it (we
once observed a rupture 30 years after the profundus injury).
Otherwise, the decision to graft is made after considerable discussion
with the patient concerning the potential benefits and risks. Grafting
is most applicable in young patients. If the digit is mobile, a
one-stage graft is a consideration. A two-stage procedure is more risky
for the superficialis, but it is indicated if there is distal bed
damage. Goldner has recommended that neither the graft nor the rod
should be placed through the split in the superficialis but rather
placed alongside in the sheath (9). Of course,
the sheath may have contracted around a single tendon if the profundus
has retracted significantly. It is reasonable to suggest to the patient
that you will attempt to graft, but if the attempt appears more
formidable once the finger is explored, then distal stabilization will
be done instead.
ruptured, options of one- or two-stage grafting may also be considered.
If the muscle has lost its elasticity, a tendon transfer may also be
performed, either as one stage, if the bed and pulley system are good,
or two stages, through a pseudosheath. The usual motor is the
superficialis to the ring finger, although the long finger tendon is
equally acceptable. If two stages are planned, a large rod, either size
5
or 6, is needed and should be matched for size with the potential motor
in the first stage. No graft supplement is needed, as the tendon
reaches the distal phalanx easily. Also, with the flexor pollicis
brevis, and the adductor and abductor pollicis all acting to flex the
MP joint, arthrodesis of the interphalangeal joint can be considered.
The strength and normal function of the thumb are significantly aided
by a functioning FPL. The function of the intrinsics is not at
significant risk with grafting or transfer as with an intact
superficialis to a digit, so that interphalangeal fusion of the thumbs
is far less indicated. It is, however, an option, particularly when
there are multiple injuries and transfers and grafts are more important
elsewhere.
the passive range and it is determined that this is caused by tendon
adhesion or block. The extent of full motion required for functional
status depends on the patient’s actual requirements and wishes and a
realistic expectation of the results of surgery. A thumb, for example,
that can pinch well to all the digits, particularly to the index and
long fingers but does not flex to the distal palmar crease proximal to
the little finger is not disabled by most criteria. However, a digit
that does not flex to the palm and defunctionalizes all the others as
well (quadriga) is very disabling. The musician, specifically a string
player such as a violinist or cellist, may be significantly more
disabled than a keyboard player with the same loss of range. Therefore,
the decision to perform a tenolysis must be individualized.
mobilize a digit and for the tendon to be revascularized. Two
complications of tenolysis are failure to maintain gliding and rupture
of the repair. Premature tenolysis may well be the cause of the latter.
At least 4 months should elapse after repair before tenolysis to allow
adequate revascularization of the tendon so that it can tolerate the
procedure. The contraindication to tenolysis—too-extensive adhesions—is
discussed below.
results are directly proportional to the extent of the adhesions. If
there is a small “spot weld,” subsequent full function (to the extent
of the passive motion) may be anticipated. If the adhesions are
extensive and there will be multiple healing or raw areas, the
likelihood of success is nil. The amount of the initial trauma,
particularly the number of tissues injured (bone, sheath, tendon,
vessels, etc.) and the extent proximally and distally of damaged
structures, determines the density of the adhesions in many cases.
However, a simple tendon laceration, with or without infection, may
result in multiple adhesions for a considerable distance.
or if there is a history of infection and to use two-stage tendon
grafting (rod insertion) if the adhesions are extensive from trauma.
preferring the patient to begin active mobilization immediately. We
prefer to do the procedure under regional block. Therapy may be
initiated with the block still in effect, and continuous passive motion
seems to be helpful, particularly in controlling discomfort. Continuous
passive motion is especially indicated if capsulectomy is also
performed. Leaving an indwelling catheter in the palm around the
digital nerves, or around the median or ulnar nerve (if this is
adequate), for the injection of a long-acting anesthetic is a valuable
adjunct postoperatively.
adherent scar through generous incisions, as needed. The more incisions
needed, the more postoperative scarring, of course. If pulleys need to
be removed, they must be rebuilt. Usually tenolysis is first performed,
the digit rehabilitated, and then the pulley rebuilt to eliminate the
unsightly, uncomfortable bowstringing in a later operation. Using the
surgical technique described earlier for constructing pulleys,
immediate construction can be undertaken.
-
Investigate the site of the initial
trauma or surgery, extending in either direction to open the sheath and
determine whether the tendon is free. Remove adherent sheath, using a
Beaver knife blade and Penfield elevators (usually #4) for the
dissection. -
If the release seems sufficient,
particularly if the digit only is involved, make an additional incision
in the palm at the lumbrical level and apply traction to pull the
tendons proximally. If motion is full with each tendon, apply traction
distally to ensure the tendons glide well through the carpal tunnel. -
At the completion of the procedure, place an indwelling catheter in the hand or wrist for postoperative local anesthesia.
tendon repair include the potential for rupture, adherence of the
tendon to surrounding tissues, and joint contractures. Philosophies of
postoperative management vary along a continuum from 3 to 4 weeks of
complete immobilization, with the intent of minimizing the risk of
rupture, to very early protected active mobilization, with emphasis on
minimizing tendon adherence and joint contracture. Although controlled
clinical studies are few, recent research
definitely lends support to the concept of at least early passive mobilization (Fig. 48.26) (7,8,16).
 |
|
Figure 48.26. Postoperative passive motion regimen described by Duran. A,B:
With the proximal interphalangeal joint maintained in a flexed position, the distal interphalangeal joint is flexed and fully extended. C,D: With the distal interphalangeal joint maintained in flexed position, the proximal interphalangeal joint is carefully exercised. Both activities create gentle passive motion of tendons, promoting both strong healing and gliding. |
best method of management for each patient. The degree of trauma and
surgical technique will influence the strength of the repair and the
degree of scarring. The experience and skill of the therapist are
critical factors in the delicate balance between protection and
mobilization during the early postoperative weeks. Consider the
patient’s behavior, attitude, and intelligence in terms of his or her
ability to comprehend and implement instructions, degree of motivation,
reliability, and availability for follow-up. Currently we use an early
protected motion program.
greater in zones 2 and 4, where there is less yielding adjacent tissue
and more confined space, early protected motion management is used for
all zones.
flexion and the MP joints in 70° to 90° flexion. Allow full active
interphalangeal extension. Elevate the extremity to control edema.
time of surgery and proximally about 8 cm proximal to the palmar wrist
crease. Tension should be adjusted to maintain the involved digits in a
flexed position at rest yet allow full active interphalangeal extension
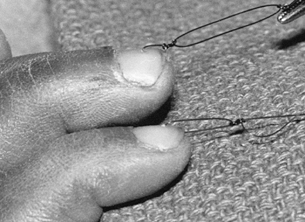
(Fig. 48.27).
 |
|
Figure 48.27. Suture loops through nails for postoperative controlled passive motion method of Kleinert.
|
interphalangeal joint fully 5 to 10 times every hour. If extension is
difficult or painful, the patient may need to pull the traction
distally with the other hand while extending to facilitate full active
extension, then release slowly to return the finger passively to the
flexed position.
-
No nail suture or loss of nail suture.
-
Pain or apprehension limiting full, active interphalangeal extension.
-
Inadequate fit of bulky dressing, allowing some MP extension as the patient attempts to extend the interphalangeals.
-
Swelling, relieved by elevation and use of a compression wrap.
-
Interphalangeal flexion contractures.
light dressing. Place it in a thermoplastic splint with dorsal
extension to the fingertips and joint positions maintained. Add a
palmar piece to contour the palmar arch, ensuring stable positioning of
the dorsum of the hand in the splint. Otherwise, the splint may tend to
slip, and as the patient extends the interphalangeal joints, the dorsum
of the hand may pull away from the splint, resulting in MP extension
rather than full interphalangeal extension. Use Velfoam straps (2-inch)
to the forearm and wrist, with a 1-inch
strap
across the palmar piece if necessary. Attach a pulley to the palmar
piece. Attach nylon cord to the nail suture, run it through the pulley,
and attach it to elastic traction. Attach the elastic to a safety pin
on the proximal splint strap. The nylon should be just long enough so
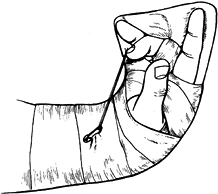
that the elastic does not catch on the pulley during active extension (Fig. 48.28).
 |
|
Figure 48.28.
Postoperative controlled passive motion thermoplastic splint with elastic traction. The splint maintains the metacarpophalangeal joint in flexion while allowing full extension of proximal interphalangeals against the elastic band. |
wraps for the hand and digits if necessary to control edema. Continue
the same exercises, with emphasis on full interphalangeal extension.
Manage early flexion contractures with careful, gentle assistive
extension of the involved joint with the proximal and distal joints
flexed. See the patient twice a week if possible to ensure maintenance
of positioning and good progress. This stage may be delayed at the
discretion of the surgeon if there is excessive trauma or a tenuous
repair.
Continue traction and the exercise program, adding an active flexion
hold after the digit is passively flexed fully five times per hour.
This step requires maximum tendon excursion without maximum tensile
loading that results with active flexion from the fully extended
position.
joints are noted, discontinue elastic traction at night and use a
static extension strap to the dorsal extension of the splint, extending
the PIP only. A static aluminum splint may be used for the PIP or DIP,
but it must be directed to one joint only to avoid tendon tension.
because of the level of injury, maintain the wrist at 30° flexion and
increase MP extension to 40° to 45°.
changes with the surgeon if any question exists about the status of the
patient. Very free joint mobility and tendon excursion may indicate
minimal scarring, but the tendon may be more vulnerable to rupture.
cuff. Allow full active wrist and digit motion, but with protection
from full tendon tension because of a tenodesis effect. Begin joint
blocking with the wrist and MP joints in neutral, along with full
active flexion from the extended position, 10 times per hour. Dynamic
flexion splinting can be added if necessary. Static individual joint
extension splinting with the adjacent joints neutral or flexed may be
indicated by lack of progress with active and assistive exercise alone.
presence of MP or interphalangeal flexion contractures, continue
neutral wrist splinting without traction. Remove the splint for
exercise.
weeks, but the wrist and digits may be extended simultaneously. Add
individual dynamic joint extension splinting, if indicated, with the
wrist neutral.
if necessary. Add graded resistive exercise and activity at 10 weeks.
By 12 weeks the patient may return to full activity.
repairs of the thumb is similar to that of the fingers, with the
following exceptions:
-
The wrist is flexed 30° to 35°.
-
The thumb carpometacarpal joint is held in palmar abduction.
-
The MP joint is in flexion, with elastic
traction attached to the nail via a nylon cord run through the same
type of palmar pulley as described for the fingers.
joint blocking and opposition exercises, full tendon excursion is
encouraged by full active extension of the carpometacarpal, MP, and
interphalangeal, followed by flexion of the thumb toward the base of
the little finger.
weeks against attempted use of the uninvolved digits, as contraction of
the FDS and FDP, particularly against resistance,
may
stress the repaired tendon. Close follow-up is essential for success.
If positioning is lost, exercise techniques are incorrect, or
adjustments are not made for impending contractures, the results will
not be optimal.
degree of excursion of the lysed tendon achieved at surgery. Consider
carefully all factors pertaining to each patient’s clinical situation,
including the patient’s history, previous surgery, and preoperative
status, the condition of the tendon, and the status of the pulley
system. Excessive edema or pain, diminished vascularity from previous
injury or surgery, previous infections, and poor tendon quality and
pulley reconstruction are all factors that may require modification of
postoperative care to achieve the maximum potential without
complications.
Xeroform (Sherwood Medical, St. Louis, MO) and 4-inch stretch gauze
bandages, using sterile technique. For pain control use TENS or an
indwelling catheter with a 0.5% bupivacaine (Marcaine) injection before
therapy. Control edema with elevation and a compression wrap if
necessary.
isolate the flexor digitorum profundus and flexor digitorum
superficialis 10 times each hour. Also with the wrist neutral,
passively flex the involved digits, then ask the patient to actively
maintain the position. Remove the passive force while the patient
continues to hold. This is followed with active extension, and the
patient repeats the exercise 10 times hourly. This requires maximum
flexor and extensor excursion while reducing tensile loading of the
lysed tendon.
encourage exercise despite pain, with the goal of an active range of
motion that is equal to the passive range. Achieving this goal within
the first 2 weeks is critical. Measure joint range of motion, total
active range of motion, and total passive motion twice weekly to
monitor progress objectively.
depending on the tendency toward joint stiffness or the difficulty the
patient has in initiating motion from either a flexed or extended
position. Dynamic or static flexion is indicated if there is difficulty
regaining preoperative passive flexion, or if active flexion is
difficult and active extension is easily achieved. Gentle static
individual joint extension splinting is helpful in the presence of
impending flexion contractures. Discomfort may be minimized by using a
static wrist support in neutral position. Delay full dynamic extension
splints that fully stress the lysed tendon until 2 to 6 weeks,
depending on tendon status.
lubrication and scar-remodeling techniques. Scar massage and elastomer
molds help soften and flatten dense elevated or adherent scars.
Continue to emphasize exercise, adding joint blocking and full flexion
and extension of the digits with the wrist in a dorsiflexed position.
additional protection may be required. Fit the patient with a dorsal
protective splint, maintaining the wrist and MP joints in flexion to
protect the lysed tendon. Elastic traction, as described, with primary
tendon repairs may be applied until 4 weeks postoperatively. Limit
active exercise to passively flexing the involved digits; then ask the
patient to actively maintain the position while the passive force is
removed. This may be followed with full active extension within the
protection of the splint, and will achieve the goal of maximum flexor
excursion while reducing the potential risk of rupture.
earlier, remain investigational. Their use following tenolysis,
particularly when capsulectomy was also required, appears beneficial,
but active motion with proximal blocking is also necessary, as with the
standard technique.
soft-tissue pliability during new sheath formation around the implant.
In stage 2, the goal is to restore passive mobility and achieve a
gliding graft within the pseudosheath for optimum active mobility.
postoperatively, as a result of implant surface contaminants, buckling
of the implant, or overzealous therapy. This can usually be avoided
with careful handling of the implant, appropriate pulley reconstruction
at surgery, and careful postoperative management. Synovitis is
characterized by discomfort in the operated digit and swelling with no
signs of systemic illness. It is treated with immediate rest and
immobilization. Concurrent procedures such as capsulectomy require
specific management, but in harmony with the overall plan. Immediate
postoperative dynamic splinting may be indicated if capsulectomies have
been performed.
the proximal attachment and rupture of the graft. If it is apparent
that adhesions are limiting motion during the first 5 weeks after the
second stage (as indicated by the absence of gradual improvement of
active motion in the protected position at serial evaluations), earlier
active motion and less protective splinting may be indicated.
with by gluing hook velcro or a dress hook to a nail or by constructing
a moleskin sling 3 in. long and ½ in. wide with an eyelet midway. Apply
tincture of benzoin to the lateral aspects of the finger to facilitate
adherence and attach the two ends of the sling to the dorsolateral
aspect of the distal phalanx. This is then attached to rubber-band
traction.
involved a passive gliding implant, there is no tension on the
reconstructed pulleys. Pulley reconstruction at the time of tendon
grafting may require protection of the pulleys for 6 weeks
postoperatively, with either ½-in. paper tape or Orthoplast rings over
the reconstructed pulley.
Kling bandages, using sterile technique. Splint the wrist in neutral if
needed for comfort at night and between exercises. Control edema.
Initiate active and assistive range-of-motion exercises for the
uninvolved joints. Begin passive range of motion for individual
involved joints and total flexion and extension with the wrist in
neutral. Use buddy taping as well as static splinting for joint
contractures.
management includes debridement, lubrication, and scar-remodeling
techniques. Begin more aggressive range of motion and trapping and add
dynamic or static splinting for joint or soft-tissue contractures. By 8
weeks the implant should glide without complication. Continue passive
mobility techniques as indicated. The patient may return to work until
stage 2 if the wrist is doing well.
followed by protected active and passive flexion and extension until 6
weeks. Allow dynamic extension at 6 to 8 weeks and resistive exercise
at 8 to 12 weeks. Early controlled passive motion can be initiated, as
for primary flexor tendon repair.
full range of motion. If, after injury and repair or reconstruction,
this basic function is not restored, the source of the problem must be
determined. Simply put, the muscle must function, the motor–tendon unit
must be intact, and the tendon must glide. At times, loss of the normal
mechanical advantage is a potential problem, as in the rheumatoid with
extensor tendon subluxation, or a pulley may be lost, lessening the
effective motion.
denervation at the time of injury or from loss of vascularity leading
to fibrosis and ischemic contracture. Myostatic contracture and atrophy
of disuse may also occur. Surface palpation of muscle contracture,
elasticity of the muscle–tendon unit, and electrical studies (EMG) will
help in these determinations.
results from adhesion formation, disruption of the repair, or both. The
intact gliding tendon can be demonstrated with the tenodesis effect
(flexing and extending the wrist, which produces the reciprocal motion
in the digits) or with the forearm squeeze test to demonstrate digital
flexion.
contraction is allowed during emergence from anesthesia or early in the
postoperative course. All methods of postoperative rehabilitation
attempt to avoid this. Even if the suture slips only a little, the
resultant gap in a repair may result in flexor lag (the muscle
contraction is used up before full motion is achieved, and active
motion does not equal passive) and in excessive adhesion formation.
This situation may be suspected if the resting posture or stance
position of the digit is more extended than appropriate (Fig. 48.29).
A complete rupture may actually be in continuity with pseudotendon in
the gap. Some active motion is seen, fooling the surgeon into thinking
that the problem is adhesion. At reexploration, an intact, even gliding
tendon can be seen. It is easy to fail to note the opalescent
appearance of the interposing pseudotendon and to appreciate that the
extended position of the digit represents an old partial rupture with
gap formation. In one-stage tendon grafting, gapping distal to the
lumbrical leads to an overly long distal tendon, overpull of the
lumbrical, and the “lumbrical syndrome” finger. In the latter, as the
digit is flexed at the MP joints, the interphalangeals extend.
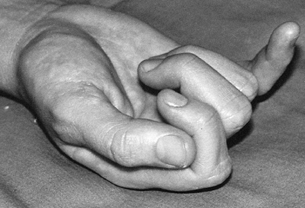 |
|
Figure 48.29.
Loss of normal digital stance (little finger) with a tendon repair rupture. Some active motion remained, but the repair was clearly attenuated. |
rapidly the problem is detected. With a repair, if the rupture is
quickly detected, it is entirely appropriate to
reenter
the digit and redo the repair. The same is true for the graft. Late
recognition of the ruptured tendon repair usually requires a graft,
often with two stages, as scarring may be extensive.
loose at either end. Proximal disruptions with the interweave are
relatively rare, and midsubstance ruptures (discussed under the section
on two-stage grafting) are often predictable,
although uncommon. Pulling out of the insertion is the usual problem.
Reinsertion is difficult, as there is no extra tendon to work with. If
the pulley-sheath system can be easily reopened or was never closed (as
demonstrated by passing a tendon rod), immediately repeat the second
stage with a new graft. A transfer motor or an entire transfer unit of
a superficialis for the thumb or little finger may now be appropriate.
If the sheath cannot be readily opened, return to the beginning of
stage 1. On one occasion, after a patient had suffered two successive
distal pullouts, a new insertion technique was devised by drilling
transversely across the distal phalanx and inserting the tendon through
the bone before suturing it back to itself. This was successful but is
not routinely needed.
tendon with insufficient active excursion. This problem was discussed
under tenolysis and two-stage grafting. It may be associated with
partial rupture, as noted. Adherence of a tendon graft, particularly in
two-stage grafting, seems to be more likely with thickened fibrous
pseudosheaths after prolonging stage 1 but may occur related to
inflammation or infection. Tenolysis of grafts, especially two-stage
ones, has not provided good results for us. Redoing the entire
two-stage procedure may be worth a try. Grafting only to the
superficialis insertion (crossing two digital joints rather than three)
has been a salvage maneuver used by Hunter and Schneider and by us and
has been successful in such two-stage failures. Apparently, the lesser
demands of moving only the PIP joint makes rehabilitation easier and
improves the result in these cases.
in zone 2, observed by us and explained by Gilbert, involved trapping
of the profundus dynamically in the superficialis division. When the
patient slowly flexed his digit, he could do so to the distal palmar
crease. When he attempted full flexion rapidly, the profundus was
trapped, and the digit fully flexed at the PIP with the DIP extended.
Removing one slip of the superficialis solved the problem.
one-stage graft or increased lumbrical activity with distal tendon
adherence, is resolved by excision of the lumbrical or more simply by a
Littler intrinsic release (removing the triangular area of the radial
shroud ligament where the condensation of the oblique fibers meets the
main portion of the extensor mechanism on the dorsoradial aspect of the
digit) (21). This simple maneuver can be done
under local anesthesia. If it does not resolve the problem, more
anesthesia may be given if needed and tenolysis undertaken.
tendon surgery. The infection may be cleared, but reconstructive
potential is extremely limited because after infection, scarring is
extensive. A tendon rod (two-stage reconstruction) is needed but is
contraindicated. Reflaring of the infection is all too common. Options
include tenolysis (we will extend the tolerable limits of the procedure
in this circumstance); one- and two-stage grafting; joint (PIP and DIP)
arthrodesis in functional positions; and amputation. The sequence of
attempted reconstructions is in the order cited.
scheme: *, classic article; #, review article; !, basic research
article; and +, clinical results/outcome study.
RH, Woo SL-Y, Lothringer K, et al. Effects of Early Intermittent
Passive Mobilization on Healing Canine Flexor Tendons. J Hand Surg 1982;7:170.
JL, Coonrad RW. Tendon Grafting of the Flexor Profundus in the Presence
of a Completely or Partially Intact Flexor Sublimus. J Bone Joint Surg 1969;51-A:527.
JM, Salisbury RE. Flexor Tendon Reconstruction in Severely Damaged
Hands: A Two-Stage Procedure Using a Silicone Dacron Reinforced Gliding
Prosthesis Prior to Tendon Grafting. J Bone Joint Surg 1971;53-A:829.
MJ, Hollstein SB, Fayazi AH, et al. The Effects of Multiple-Strand
Suture Techniques on the Tensile Properties of Repair of the Flexor
Digitorum Profundus Tendon to Bone. J Bone Joint Surg [Am] 1998;80:1507.
G, Ebramzadeh E, Jones NF, Meals R. Use of the Taguchi Method for
Biomechanical Comparison of Flexor-Tendon-Repair Techniques to Allow
Immediate Active Flexion. A New Method of Analysis and Optimization of
Technique to Improve the Quality of the Repair. J Bone Joint Surg [Am] 1998;80:1498.
JR, Goldner JL. Laceration of the Flexor Pollicis Longus Tendon:
Delayed Repair by Advancement, Free Graft or Direct Suture. A Clinical
and Experimental Study. J Bone Joint Surg 1973;55-A:1123.
SC, Gelberman RH, Woo SL, et al. The Effects of Multiple-Strand Suture
Methods on the Strength and Excursion of Repaired Intrasynovial Flexor
Tendons: A Biomechanical Study in Dogs. J Hand Surg [Am] 1998;23:97.
SC, Seiler JG 3rd, Woo SL, Gelberman RH. Suture Methods for Flexor
Tendon Repair. A Biomechanical Analysis During the First Six Weeks
Following Repair. Ann Chir Main Memb Super 1997;16:229.