
Authors: Hoppenfeld, Stanley; deBoer, Piet; Buckley, Richard
Title: Surgical Exposures in Orthopaedics: The Anatomic Approach, 4th Edition
Copyright ©2009 Lippincott Williams & Wilkins
> Table of Contents > Thirteen – Approaches for External Fixation
Thirteen
Approaches for External Fixation
P.696
Although a wide variety of external fixators can be
constructed, they all consist of only two elements. Pins are inserted
into the bone to anchor the external fixator to the skeleton. These
pins are then connected to provide stability. Pins may be inserted by
transfixing the limb (transfixion pins), or most commonly they may stop
just beyond the far cortex of the bone into which they are inserted
(half pins). Transfixion pins can be connected at both their ends;
therefore, external fixators that use these pins provide the greatest
stability. Because transfixion pins transfix the soft tissues on both
sides of the bone, they tether soft tissues more than half pins do.
This makes it difficult to mobilize joints above and below the external
fixator. Fixators using transfixation pins are only used in situations
that require the greatest stability.
Skeletal pins are inserted through small open incisions
in the skin in a “blind” fashion, with little dissection of the soft
tissues. Exceptions occur where nerves are close to pin placement, as
in the distal third of the radius. Studies of cross-sectional anatomy
in cadaveric material reveal a large number of possible pin placements
for any given bone in any given position. The most common indication
for the use of an external fixator is in open fractures. These injuries
usually are associated with fracture displacement, and the normal
anatomy frequently is distorted. When skeletal pins are used, nerves
and vessels may be damaged as they course down the limb. Distortion of
the normal anatomy or normal anatomic variation may make apparently
safe routes hazardous. For this reason, only a few of the safest pin
placements are discussed for each bone in this chapter. More specific
information should be obtained from other sources if an external
fixator is being used for a specialized procedure such as leg
lengthening/distraction osteogenesis.
The rigidity of an external fixator system can be
modified in many ways. As mentioned above, transfixion pins provide
more stability than do half pins. Spreading the pins widely and
increasing their number also adds to the rigidity of the system.
Stability is increased by utilizing larger pins as well as pins that
are slightly tapered (radial preload).
The number of bars used also increases stability; the
closer the bars are to the skin, the more stable the construct will be.
Placement of the pins is influenced not only by the underlying anatomy,
but also by the biomechanical requirements of the fixation system.
Finally, soft-tissue damage also may dictate pin position.
closer the bars are to the skin, the more stable the construct will be.
Placement of the pins is influenced not only by the underlying anatomy,
but also by the biomechanical requirements of the fixation system.
Finally, soft-tissue damage also may dictate pin position.
Skin incisions for pin insertion should be generous,
because tight skin around a pin inevitably leads to low-grade sepsis,
which in turn can cause pin loosening.
because tight skin around a pin inevitably leads to low-grade sepsis,
which in turn can cause pin loosening.
The Humerus
External fixation of the humerus has few indications but
is invaluable when severe soft-tissue injuries are associated with
fractures. External fixation is also used occasionally after infection,
especially in the initial treatment of infected nonunion.
is invaluable when severe soft-tissue injuries are associated with
fractures. External fixation is also used occasionally after infection,
especially in the initial treatment of infected nonunion.
Because of the intimate relationship of the
neurovascular bundles to the bone, the humerus is one of the most
difficult bones in which to apply external fixators safely.
neurovascular bundles to the bone, the humerus is one of the most
difficult bones in which to apply external fixators safely.
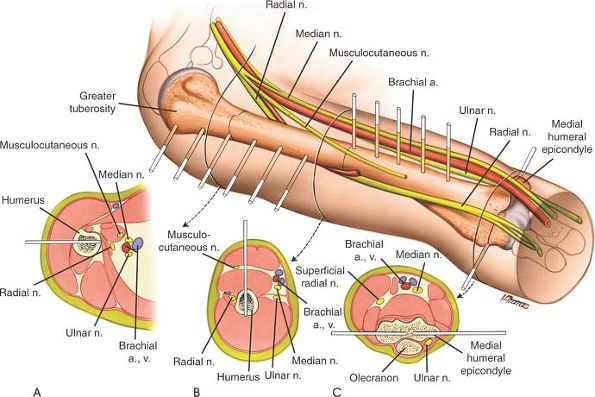
The median nerve runs with
the brachial artery. In the upper two thirds of the arm, it is almost
exactly medial to the humerus, but in the distal third of the humerus,
it crosses over laterally to lie anterior to the bone at the level of
the elbow joint.
the brachial artery. In the upper two thirds of the arm, it is almost
exactly medial to the humerus, but in the distal third of the humerus,
it crosses over laterally to lie anterior to the bone at the level of
the elbow joint.
The ulnar nerve runs with
the median nerve in the upper two thirds of the arm and then courses
posteriorly to run in direct relationship to the posteromedial aspect
of the humerus at the level of the elbow joint.
the median nerve in the upper two thirds of the arm and then courses
posteriorly to run in direct relationship to the posteromedial aspect
of the humerus at the level of the elbow joint.
The radial nerve crosses the
posterior aspect of the humerus in a medial to lateral direction
roughly in the middle third of the bone. At the level of the elbow
joint, it is anterolateral to the humerus.
posterior aspect of the humerus in a medial to lateral direction
roughly in the middle third of the bone. At the level of the elbow
joint, it is anterolateral to the humerus.
Proximal Third
In the proximal third of the bone, half pins may be
inserted via a lateral route. These pins should not protrude very far
beyond the medial cortex to avoid damage to the neurovascular bundle.
Anterior insertion of half pins also is possible, although the biceps
tendon may be damaged. Both anterior and laterally inserted half pins
may damage the axillary nerve as it courses around the bone on the deep surface of the deltoid muscle.
P.697
Middle Third
Anterior half pins may be inserted in the middle third of the humeral shaft. The radial nerve
runs across the back of the humerus in the middle third of the bone,
however, and its course is variable. Care should be taken that these
pins do not penetrate the far cortex too deeply.
runs across the back of the humerus in the middle third of the bone,
however, and its course is variable. Care should be taken that these
pins do not penetrate the far cortex too deeply.
 |
|
Figure 13-1
The placement of skeletal pins in the humerus varies with anatomic site. The variable relationship of the neurovascular bundles to the bone dictates different pin placement for the proximal, middle, and distal thirds. (A) Proximal third: Insert a half pin from the lateral side of the bone. Take care not to penetrate the medial cortex too far to avoid damage to the neurovascular bundle (brachial artery and median nerve). (B) Middle third: Place a half pin anteriorly. Take care not to penetrate the far cortex too deeply to avoid damage to the radial nerve, which courses in a medial to lateral direction on the posterior aspect of the middle third of the bone. (C) Distal third: Insert transfixion pins from the medial to the lateral point. Take care to avoid the ulnar nerve, as it runs in the groove on the back of the medial humeral epicondyle where the nerve is easily palpable. |
Distal Third-Elbow Joint
At the level of the elbow joint, half pins may be
inserted in a lateral to medial direction, avoiding the neurovascular
bundles that lie anterior and posterior to the epicondyles of the
humerus (Fig. 13-1).
inserted in a lateral to medial direction, avoiding the neurovascular
bundles that lie anterior and posterior to the epicondyles of the
humerus (Fig. 13-1).
P.698
The Radius, Ulna, and Wrist
The relationships of the radius and ulna to the
neurovascular structures are fundamentally different, and the pin
placement required in each bone is distinct.
neurovascular structures are fundamentally different, and the pin
placement required in each bone is distinct.
Ulna
The ulna has an easily palpable subcutaneous surface
throughout its entire length. The ulnar nerve enters the forearm on the
anteromedial aspect of the ulna, but passes rapidly into the anterior
compartment of the forearm to run down on the anterior aspect of the
bone together with the ulnar artery.
throughout its entire length. The ulnar nerve enters the forearm on the
anteromedial aspect of the ulna, but passes rapidly into the anterior
compartment of the forearm to run down on the anterior aspect of the
bone together with the ulnar artery.
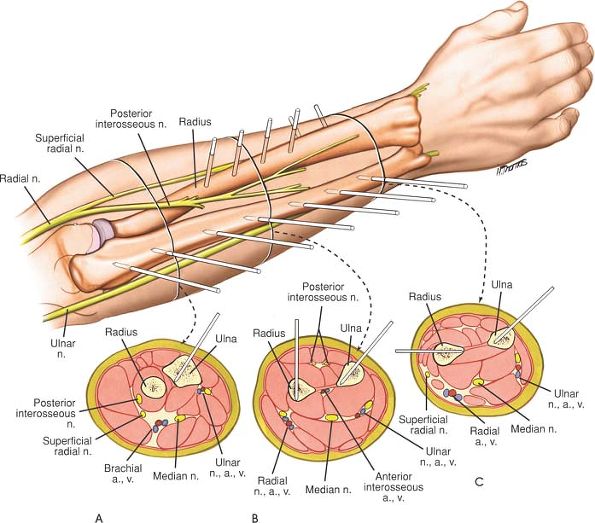
Half pins can be inserted throughout the entire length
of the ulna from either side of the subcutaneous surface of that bone.
In the proximal end of the ulna, the ulnar nerve
is at risk, but it can be palpated easily as it crosses the back of the
medial epicondyle of the humerus to allow safe pin placement in the
subcutaneous surface.
of the ulna from either side of the subcutaneous surface of that bone.
In the proximal end of the ulna, the ulnar nerve
is at risk, but it can be palpated easily as it crosses the back of the
medial epicondyle of the humerus to allow safe pin placement in the
subcutaneous surface.
Radius
The radial artery and sensory branch of the radial nerve run down the forearm roughly on the anterolateral aspect of the radius.
Proximal Third
The posterior interosseous nerve winds around the
proximal third of the radius in an anterolateral to posteromedial
direction and is very close to the bone. Because radial fractures
nearly always involve a rotational deformity of the bone, the exact
position of the posterior interosseous nerve
in the proximal third of the radius cannot be predicted safely. For
this reason, pin placement in the upper third of this bone is not
recommended unless it is performed as an open procedure.
Middle Third
In the middle third of the radius, dorsally inserted half pins can be used with a mini-open technique.
Distal Third
In the distal third of the radius, the lateral insertion
of half pins is safe. The radial artery passes anterior to these pins.
Because the branches of the superficial radial nerve
are variable in position, it is important to make a small incision and
dissect down to bone to avoid them, rather than inserting pins blindly (Fig. 13-2).
of half pins is safe. The radial artery passes anterior to these pins.
Because the branches of the superficial radial nerve
are variable in position, it is important to make a small incision and
dissect down to bone to avoid them, rather than inserting pins blindly (Fig. 13-2).
The Wrist
Percutaneous pinning is frequently used in the treatment
of distal radial fractures. Pins are commonly inserted through the
radial styloid or through the dorsal aspect of the distal radius.
Insertion of pins
of distal radial fractures. Pins are commonly inserted through the
radial styloid or through the dorsal aspect of the distal radius.
Insertion of pins
P.699
P.700
through
the fracture site (intrafocal pinning) is also a commonly used
technique. External fixation of the wrist is used in complex fractures
that are not amenable to internal fixation. External fixators commonly
span the carpus from the distal radius to the second metacarpal, with
half pins used in both bones. If the distal radial fragment is large
enough, however, nonspanning external fixators can be used.
 |
|
Figure 13-2
The position of pins in the radius and ulna is dictated by the presence of the neurovascular bundles in the forearm. Pin placements vary depending on the level of bone to be used. The degree of supination and pronation of the forearm will need to be varied to allow different pin placements in the radius. (A) Proximal third: Because the posterior interosseous nerve winds around the neck of the radius and has a variable relationship to the bone, it is not possible to insert pins safely in the proximal third of the radius except under direct vision. In the ulna, use half pins, taking care to avoid the ulna nerve in the region of the elbow joint. (B) Middle third: Place anterior half pins into the radius. Take care not to penetrate the bone too deeply to avoid damage to the posterior interosseous nerve. Place half pins through the subcutaneous surface of the ulna. (C) Distal third: Place laterally inserted half pins into the distal radius. Take care to avoid the superficial branches of the radial nerve. Place half pins through the ulna, using its subcutaneous surface. |
The Radius
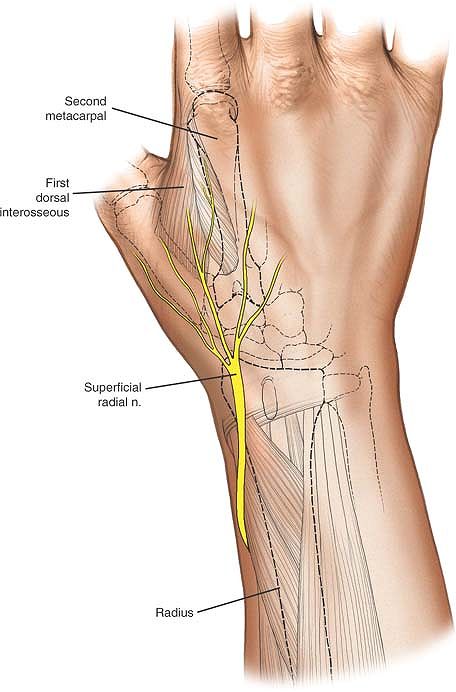
The superficial branch of the radial nerve always runs
very close to the insertion point of the pins. Damage to the
superficial branch of the radial nerve creates an area of anesthesia on
the dorsum of the wrist and thumb, but the most common complication
following damage to the nerve is the creation of a painful neuroma,
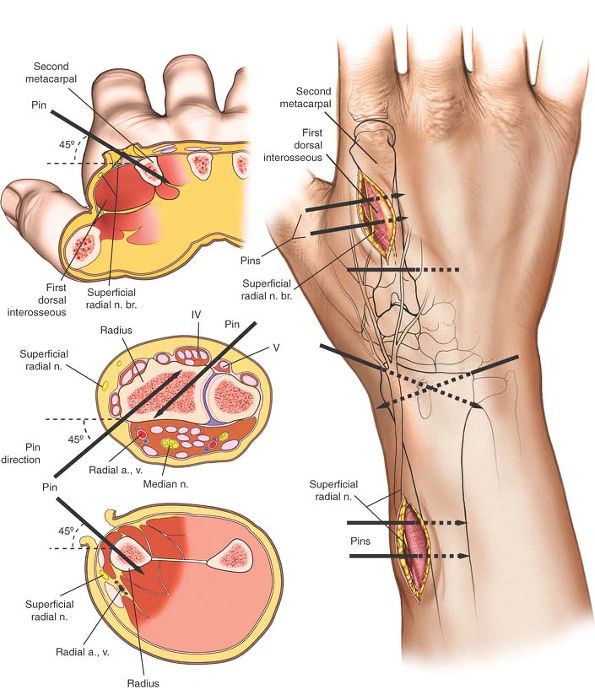
which can be very troublesome to the patient. Place distal radial pins,
using an open technique to avoid damage to the superficial branch of
the radial nerve. Make 1-cm skin incisions and carefully deepen the
incision down to the bone, using blunt dissection, taking care to
identify and preserve any branches of the nerve. Pins should be
inserted in the transverse plane at 45° to the frontal plane and 45° to
the sagittal plane; two pins are usually used (Fig. 13-3 and 13-4).
very close to the insertion point of the pins. Damage to the
superficial branch of the radial nerve creates an area of anesthesia on
the dorsum of the wrist and thumb, but the most common complication
following damage to the nerve is the creation of a painful neuroma,
which can be very troublesome to the patient. Place distal radial pins,
using an open technique to avoid damage to the superficial branch of
the radial nerve. Make 1-cm skin incisions and carefully deepen the
incision down to the bone, using blunt dissection, taking care to
identify and preserve any branches of the nerve. Pins should be
inserted in the transverse plane at 45° to the frontal plane and 45° to
the sagittal plane; two pins are usually used (Fig. 13-3 and 13-4).
 |
|
Figure 13-3
The superficial branch of the radial nerve is ever present along the distal third of the radius and branches over the anatomic snuff box and the second metacarpal. Dissections here for pin placements should be done with the mini-open technique. |
P.701
 |
|
Figure 13-4
The incisions used are big enough to enable the surgeon to see that any nerve branches are protected, but the pins are placed in the middle of the bone in a bicortical fashion. Pins should be perpendicular to the bone and at 45° to the frontal sagittal planes. |
P.702
Second Metacarpal Bone
The dorsal aspect of the second metacarpal bone is
subcutaneous. Pins should be spread widely in the bone to increase the
strength of the frame. Because the bone is relatively small,
fluoroscopy is useful to aid accurate pin placement. The inclination of
the pin should be identical to those of the radial pins. As with the
distal radius, a skin incision should be made, and the dissection
should be carried out in a blunt fashion down to the bone, taking care
to avoid damage to the extensor tendons and interosseous muscles.
The Pelvis
External fixation of the pelvis is used in
life-threatening situations to achieve hemodynamic stability. The
anterior pelvis is accessible in the supine trauma patient, and the
anterior superior iliac spine is the most useful landmark for pin
placement. Fluoroscopy should be used.
life-threatening situations to achieve hemodynamic stability. The
anterior pelvis is accessible in the supine trauma patient, and the
anterior superior iliac spine is the most useful landmark for pin
placement. Fluoroscopy should be used.
Two techniques are available for pin placement.
Iliac Crest
Place two external fixation pins immediately posterior
to the anterior superior iliac spine through the subcutaneous surface
of the iliac crest. Only drill the outer cortex and introduce the pins
by hand, allowing them to slide between the two tables of the iliac
wing. Be aware that the plane of the iliac wing is difficult to assess,
particularly when the bone is displaced by trauma. Introducing long
needles on either side of the iliac wing, keeping them in contact with
the bone, provides a useful guide to correct pin placement (Fig. 13-5 A-E).
The lateral femoral cutaneous nerve of the thigh is
vulnerable at the level of the anterior superior iliac spine;
therefore, pins should always be inserted under direct vision through
small incisions rather than through blind stab incisions.
vulnerable at the level of the anterior superior iliac spine;
therefore, pins should always be inserted under direct vision through
small incisions rather than through blind stab incisions.
P.703
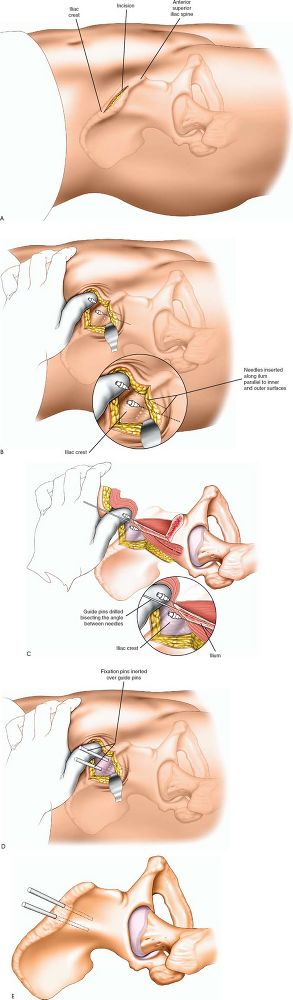 |
|
Figure 13-5 (A) Incision for iliac crest external fixation pins. (B) Two wires placed on either side of the iliac crest mark the dissection for the unicortical drill hole. (C) The pin will find its way between the inner and outer table of the ilium using this open technique. (D) The pins should be in the thick iliac tubercle. (E) Two pins in place in the iliac wing.
|
P.704
Anterior Inferior Iliac Spine External Fixation
Place one external fixation pin in the anterior inferior
iliac spine using fluoroscopy. A small stab wound is made about 3 cm
distal to the anterior superior iliac spine. Using blunt dissection
with a mini-open technique, drill the outer cortex using fluoroscopy
and introduce the pin by hand allowing it to slide into the
supra-acetabular region. This is a unicortical pin and should be
proximal to the hip joint capsule (Fig. 13-6 A-E).
P.705
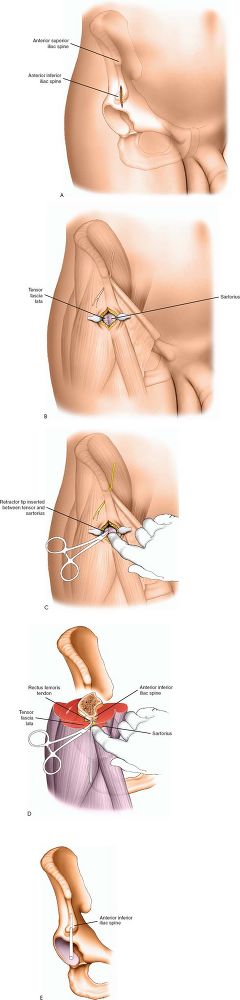 |
|
Figure 13-6 (A) A small stab 3 cm distal to the anterior superior iliac spine over the anterior inferior iliac spine. (B) Small open incision using fluoroscopy. (C) Blunt dissection finds the anterior inferior iliac spine. (D) Unicortical drilling establishes a portal for the pin above the hip joint in the supra-acetabular region. (E) Pin in place above the hip joint in the anterior inferior iliac spine.
|
P.706
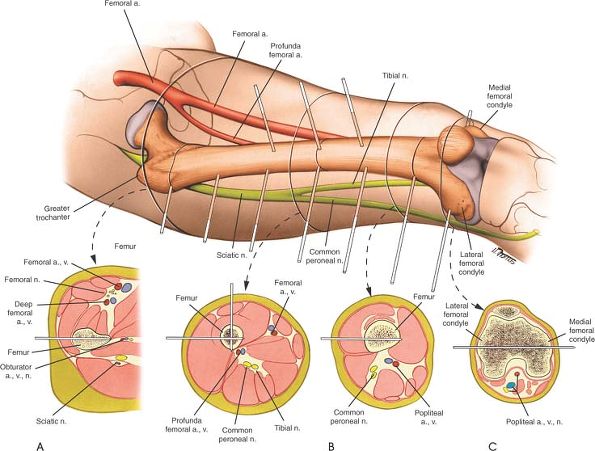 |
|
Figure 13-7
The variable relationship of the femoral artery to the femur dictates different pin positions depending on the level of pin placement. (A) Proximal third: Insert half pins from the lateral surface of the bone. Avoid penetrating the medial cortex too deeply to avoid damage to the profunda femoris artery and its tributaries. (B) Middle third: Place laterally inserted half pins. Avoid penetrating the medial cortex too far to avoid damage to the femoral artery. Alternatively, place anteriorly inserted half pins. Avoid penetrating the posterior cortex too deeply to prevent damage to the sciatic nerve. (C) Distal third: Place transfixion pins through the bone in a medial to lateral direction. Be aware that transcondylar pins will penetrate the knee joint synovium. |
P.707
The Femur
The femoral artery enters the thigh in direct anterior
relationship to the head of the femur (the femoral pulse). The artery
courses down the limb, passing to the medial side of the bone in its
middle third, and crosses the knee joint in direct posterior
relationship to the distal femur. The sciatic nerve enters the thigh
posterior to the femoral head and maintains this posterior relationship
as it runs distally. At a variable point in the thigh, the nerve splits
into its tibial and common peroneal components. The tibial nerve joins
the femoral artery in the back of the knee joint. The common peroneal
nerve runs with the tendon of the biceps muscle posterolateral to the
bone.
Half pins can be inserted laterally throughout the
entire length of the femur without damage to any of the neurovascular
structures. These pins do tether the fascia lata and vastus lateralis
muscles, however, and it often is not possible to mobilize the knee
successfully with them in position. In the distal third of the femur,
laterally inserted half pins can be extended medially to transfix the
limb. Be aware that these pins may penetrate the knee joint
occasionally, resulting in leakage of synovial fluid and possible
septic arthritis of the knee.
In the middle third of the bone, anteriorly inserted
half pins also are safe. Care should be taken not to penetrate the
posterior cortex too deeply, though, to avoid damage to the tibial
nerve (Fig. 13-7).
half pins also are safe. Care should be taken not to penetrate the
posterior cortex too deeply, though, to avoid damage to the tibial
nerve (Fig. 13-7).
P.708
The Tibia and Fibula
The anterior and posterior neurovascular bundles course
down the leg on either side of the interosseous membrane lying between
the tibia and fibula.
down the leg on either side of the interosseous membrane lying between
the tibia and fibula.
Fibula
The intimate relationship of the common peroneal nerve
to the neck of the fibula makes pin insertion into the upper third of
the fibula hazardous. Fortunately, this rarely is necessary.
to the neck of the fibula makes pin insertion into the upper third of
the fibula hazardous. Fortunately, this rarely is necessary.
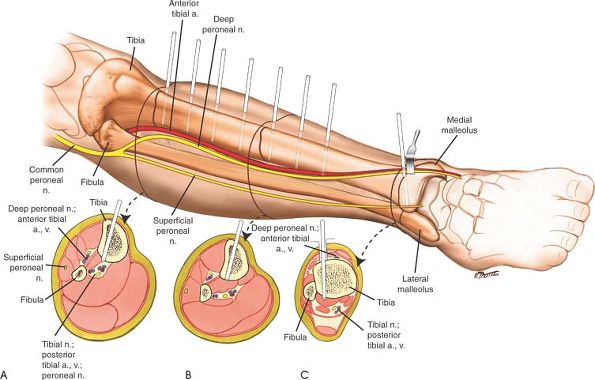
Tibia
The tibia has a broad subcutaneous surface throughout
its entire length. Because the bone is triangular in shape, the middle
of this surface lies anterior to both neurovascular bundles. The
subcutaneous surface of the bone can be used throughout its entire
length for the placement of half pins. This route allows good bony
anchoring without the risk of soft-tissue tethering (Fig. 13-8).
P.709
 |
|
Figure 13-8
Because the neurovascular bundles lie largely posterior to the tibia and it has a subcutaneous surface, pin placement is relatively straightforward. (A) Proximal third: Insert anterior half pins through the subcutaneous surface of the bone. If half pins are used, avoid penetrating the bone too far to protect the anterior neurovascular bundle, the anterior tibial artery, and the peroneal nerve. (B) Middle third: Insert anterior half pins through the subcutaneous surface. (C) Distal third: Insert anteriorly placed half pins. |
The Ankle
The bony prominences of the distal tibia, calcaneus, and
first metatarsal provide access for pin placement. The neurovascular
bundle running behind the medial malleolus should be avoided (Fig. 13-9).
Half pins should be used, except in the calcaneus, where transfixion
pins provide a very stable pin construct to be placed for
trauma-related problems.
first metatarsal provide access for pin placement. The neurovascular
bundle running behind the medial malleolus should be avoided (Fig. 13-9).
Half pins should be used, except in the calcaneus, where transfixion
pins provide a very stable pin construct to be placed for
trauma-related problems.
Half pins are placed in the distal tibia and in the
first metatarsal using a mini-open technique. The calcaneal pin is a
transfixion pin posterior and distal to the neurovascular bundle. The
calcaneal pin should be placed from medial to lateral to avoid injury
to the neurovascular bundle. The pin in the first metatarsal is placed
perpendicular to the long axis of the first ray but distal to the
tibialis anterior tendon.
P.710
 |
|
Figure 13-9 Pin placement for external fixation around the ankle.
|