
– SURGICAL PRINCIPLES AND TECHNIQUES > CHAPTER 3 – SURGICAL
APPROACHES TO THE LOWER EXTREMITY
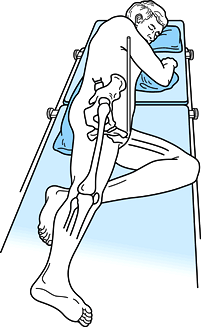
Hardinge described its use with the patient supine; however, most
surgeons today use the lateral/decubitus position because it provides
better access for two surgeons standing on opposite sides of the table.
It also allows for increased mobility of the operated extremity (Fig. 3.1).The
advantage of the supine position is that it makes orientation of the
components easier and facilitates comparison of leg lengths for
correction of discrepancy.
 |
|
Figure 3.1. With the patient in the lateral decubitus position, notice that anterior superior iliac spines are vertically aligned.
|
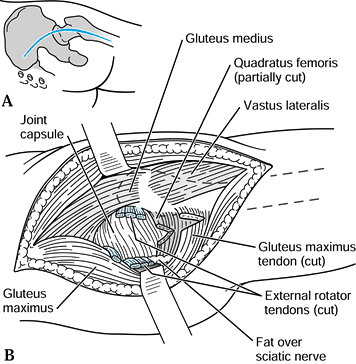
femoral neck fracture, as well as for total hip arthroplasty. It allows
the surgeon direct visualization of the acetabulum and excellent access
to the entire circumference. It avoids morbidity from osteotomy of the
greater trochanter and maintains the continuity of the abductor
mechanism. Because the posterior portion of the gluteus medius muscle,
with its thick tendon, is left intact, early rehabilitation is
possible. Partial weight bearing with crutches is usually possible
immediately after surgery.
-
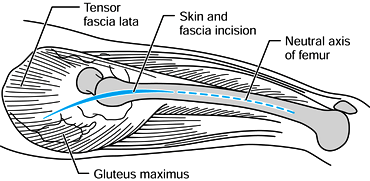
Begin the skin incision about 3–4 inches
(7 to 10 cm) distal to the prominence of the greater trochanter in the
midportion of the lateral aspect of the thigh, directly over the femur.
Extend it in line with the femur over the prominence of the trochanter,
inclining about 20° posteriorly in the proximal one-third of the wound.
The total incision length is usually 8–10 inches (20 to 25 cm); in
obese or muscular patients, a longer incision is necessary (Fig. 3.2).![]() Figure 3.2. Make the initial incision in line with the neutral axis of the femur.
Figure 3.2. Make the initial incision in line with the neutral axis of the femur. -
Incise sharply down to the deep fascia
with minimal undermining of the subcutaneous tissue. Divide the gluteal
fascia and iliotibial band in line with the skin incision. Retract the
tensor fascia lata anteriorly, separating it from its conjoined origin
with the gluteus medius. Avoid injury to the superior gluteal nerve and
artery by dissecting this interval with a relatively blunt instrument.
We prefer a large-key periosteal elevator (Fig. 3.3).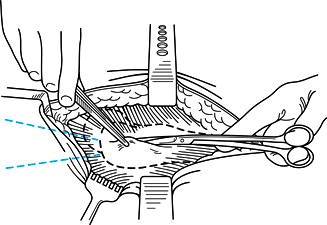 Figure 3.3. Charnley initial incision retractor in place.
 -
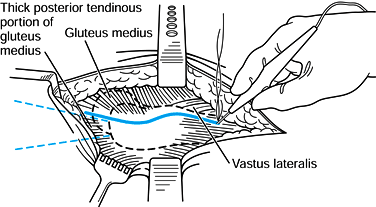
At the trochanteric ridge formed by the
origin of the vastus lateralis, at the mid-lateral point of the greater
trochanter, use an electrocautery knife set on “cutting” to incise the
gluteus medius longitudinally, extending distalward through the vastus
lateralis, curving slightly
P.31
anteriorly.
Control bleeding from the transverse branch of the lateral circumflex
artery in the vastus lateralis origin. Reflect the gluteus medius
insertion and vastus lateralis muscles in continuity anteriorly off the
greater trochanter, taking care to stay on bone to maintain the maximum
thickness of tendon. Do not cut across the muscle fibers of the gluteus
medius proximally; split them in line with the incision with a
large-key periosteal elevator. Do not split proximally more than 5 cm
above the trochanter to avoid injury to the superior gluteal nerve (Fig. 3.4).![]() Figure 3.4. Anterior insertion of the gluteus medius is mobilized.
Figure 3.4. Anterior insertion of the gluteus medius is mobilized. -
Retract the gluteus medius; in the supine
position, adduct the thigh to facilitate exposure of the gluteus
minimus, which is reflected off the hip joint capsule superiorly. In
his original description, Hardinge incises the capsule, does not excise
it, and repairs it following arthroplasty. To permit adequate access to
the acetabulum for noncemented cups, we prefer to isolate the hip joint
capsule, placing a cobra retractor anteroinferiorly and
superoposteriorly to expose the capsule. We then excise the anterior
two thirds of the capsule intact (Fig. 3.5).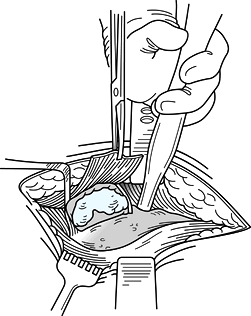 Figure 3.5. Expose the capsule.
 -
Dislocate the hip by flexing and
adducting it while levering the femoral head out of the acetabulum,
cutting the ligamentum teres. When using the lateral decubitus
position, drop the leg off the edge of the table into a sterile pocket
formed from a large drape sheet. Transect the femoral neck with an
oscillating saw (Fig. 3.6A).![]() Figure 3.6. A: Superior retractor is held in place by 1/8 in. Steinmann pins or drill bits. B: Place the tibia in a pouch positioned vertical to the floor.
Figure 3.6. A: Superior retractor is held in place by 1/8 in. Steinmann pins or drill bits. B: Place the tibia in a pouch positioned vertical to the floor. -
This position gives ideal exposure of the
femur for insertion of a prosthesis. Protect the insertion of the
posterior portion of the gluteus medius during preparation of the femur
with appropriate retractors, which also elevate the trochanter to
provide better exposure (Fig. 3.6B). -
When preparing and inserting the
acetabulum, keep the leg on the operating table in line with the torso,
using specially designed or sharp-tipped Hohmann retractors to
facilitate exposure of the acetabulum. -
For repair of the gluteus medius, place a
series of heavy (we prefer #5 Tevdek) sutures through the bone of the
greater trochanter. Then direct the suture in a horizontal mattress
fashion through the tendinous portion of the gluteus medius, securing
it firmly to bone. Make these holes and place the sutures prior to
insertion of the prosthesis using an awl, drill-point, or towel-clip.
Next, repair the longitudinal split in the gluteus medius and vastus
lateralis with #1 sutures. Close the split in the deep fascia and
iliotibial band in a similar fashion (Fig. 3.7).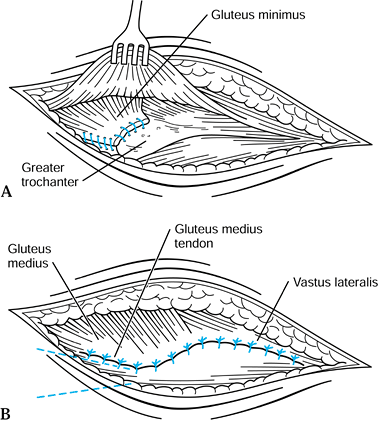 Figure 3.7. A: Reattachment of the gluteus minimus. B: Suturing of the gluteus medius and vastus lateralis.

femoral neck, and proximal femur is useful for capsular incisions,
reduction of femoral neck fractures, upper femoral osteotomies, and
internal fixation of proximal femoral fractures. One advantage of this
approach is that it exposes the femoral neck, thereby allowing the
surgeon to accurately identify femoral anteversion.
-
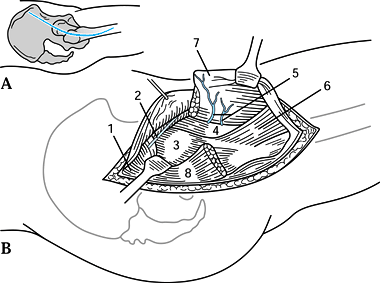
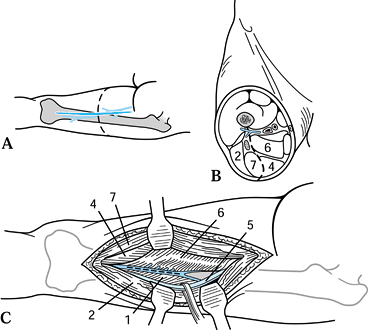
At a point 2–3 cm posterior to the
anterosuperior iliac spine, begin the incision directed toward the
midportion of the greater trochanter (Fig. 3.8A). Then angle the incision into a straight lateral orientation and proceed distally 10–15 cm.![]() Figure 3.8. Watson-Jones anterolateral approach to the hip. A: Skin incision. B: The vastus lateralis is retracted anteriorly, as is the tensor fascia, exposing the anterior hip capsule. 1, Gluteus medius; 2, nerve to tensor fasciae latae; 3, hip joint capsule; 4, iliopsoas; 5, lateral circumflex femoral vessels; 6, vastus intermedius; 7, vastus lateralis (reflected); 8, greater trochanter. (From Schlumpf R. Proximal Femur: Lateral Approach. In: Rüedi T, von Hochstetter AHC, Schlumpf R, eds. Surgical Approaches for Internal Fixation. Berlin: Springer-Verlag, 1984:115–121.)
Figure 3.8. Watson-Jones anterolateral approach to the hip. A: Skin incision. B: The vastus lateralis is retracted anteriorly, as is the tensor fascia, exposing the anterior hip capsule. 1, Gluteus medius; 2, nerve to tensor fasciae latae; 3, hip joint capsule; 4, iliopsoas; 5, lateral circumflex femoral vessels; 6, vastus intermedius; 7, vastus lateralis (reflected); 8, greater trochanter. (From Schlumpf R. Proximal Femur: Lateral Approach. In: Rüedi T, von Hochstetter AHC, Schlumpf R, eds. Surgical Approaches for Internal Fixation. Berlin: Springer-Verlag, 1984:115–121.) -
Identify the interval between the gluteus
medius and tensor fascia lata, best done at a point halfway between the
anterosuperior iliac spine and the greater trochanter. -
Place a pointed retractor posterior to
the tensor fascia lata with the point on the anterior rim of the
acetabulum. With posteriorly directed retraction of the gluteus medius,
expose the hip capsule (Fig. 3.1B). Chapman
(personal communication, 1993) facilitates this exposure by first
splitting the fascia lata distally. As the dissection is carried
proximally, the interval between the bellies of the tensor fascia lata
and gluteus medius muscles becomes more obvious. Thus it is easier to
identify the superior gluteal artery and nerve and avoid wandering in
the wrong interval. -
Incise the hip capsule in line with the
femoral neck in its midportion. To gain greater exposure to the femoral
neck and head, extend the capsular incision perpendicular to the plane
of the initial incision by dissecting the capsule off the
intertrochanteric ridge superiorly and inferiorly. -
For greater exposure of the proximal
femoral shaft, detach the vastus lateralis from the vastus tubercle
portion of the anterior intertrochanteric line. From this point
distally, split the vastus longitudinally or retract it anteriorly,
P.33
and detach it from the insertion on the most proximal portion of the linea aspera to gain access to the femoral shaft. -
For wider exposure to the intracapsular
femur, detach the anterior fibers of the gluteus medius from the
anterior one half of the tendinous insertion on the greater trochanter,
leaving a cuff of tendon on the trochanter for later repair.
exposure of the femoral neck and acetabulum call for the Harris
anterolateral approach to the hip joint. This approach is useful in
that the hip can be dislocated anteriorly or posteriorly.
-
Place the patient in the lateral position
with the unaffected hip facing down. Bean bags, kidney rests, or “hip
positioners” attached to the operating table help to maintain the true
lateral position. Abduct the affected limb 60° and keep the hip
extended and the knee flexed. A Mayo stand with a pillow and sterile
cover relieves the assistants of considerable burden in maintaining
this position. -
Make a lazy U–shaped skin incision
beginning 5 cm posterior and 2 cm proximal to the anterosuperior iliac
spine. Curve the incision distally toward the posterior greater
trochanter (Fig. 3.9A), and extend it distally and slightly anteriorly for a distance of 15 cm.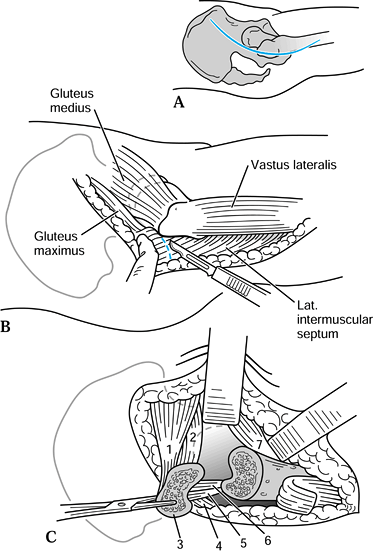 Figure 3.9. Harris anteriolateral approach to the hip. A: Skin incision. B:
The anterior aspect of the gluteus maximus insertion on the iliotibial
tract is incised 1.5 cm posteriorly to allow greater exposure of the
posterior aspect of the greater trochanter. C: The trochanter is osteotomized, exposing the external rotators and hip capsule. 1, Gluteus medius; 2, gluteus minimus; 3, greater trochanter (osteotomized); 4, piriformis; 5, obturator internus; 6, obturator externus; 7, iliopsoas. (From Rosenthal S. Surgical Approaches. In: Crenshaw AH, ed. Campbell’s Operative Orthopaedics, 6th ed. St. Louis: CV Mosby, 1980:70.) -
Working distally to proximally, divide
the iliotibial band in line with its fibers. At the level of the
trochanter, direct the fascia lata incision 1 cm anterior to the
insertion of the gluteus medius on the greater trochanter, and continue
the incision of this layer anteriorly in line with the incision. -
To provide posterior exposure, make an
oblique incision in the deep surface of the posteriorly reflected
fascia lata and into the substance of the gluteus medius for a distance
of 5 cm (Fig. 3.9B). Place a pointed Hohmann
retractor on the anterior acetabulum to retract the anterior part of
the tensor fascia lata and iliotibial band anteriorly. -
Sharply dissect the origin of the vastus
lateralis from the vastus tubercle portion of the intertrochanteric
line. Isolate the abductors from the joint capsule anteriorly by blunt
dissection. -
Elevate the periosteum from the proximal
femur transverse to the long axis of the femur at a distance of 3–3.5
cm from the tip of the trochanter. At this point, before osteotomizing
the greater trochanter, the surgeon may choose to predrill or measure
holes for later osteotomy screw or wire fixation. Direct the osteotomy
superiorly and medially toward a point 5 mm lateral to the superior hip
capsular attachment on the femoral neck (Fig. 3.9C). -
Free the superior part of the joint
capsule from the abductors. By virtue of the posterior fascia lata and
gluteus medius incision, posterior exposure is now possible. Divide the
piriformis and external rotators at their femoral insertions. For
arthroplasties, excise the posterior and anterior capsule, as necessary. -
Place a narrow Hohmann or Bennett
retractor deep to the rectus femoris on the anteroinferior iliac spine
to improve visualization anteriorly. To expose the iliopsoas tendon,
flex the hip and rotate it externally. This tendon can be divided and
sutured to a remnant of intact
P.34
anterior
capsule if desired to correct a flexion contracture. The hip can be
dislocated anteriorly to gain access to the entire femoral head and
neck by placing the greater trochanter into the acetabulum. For
exposure of the acetabulum, retract the greater trochanter superiorly
and dislocate the femoral head posteriorly. Maintain the abducted
position of the limb for trochanteric reattachment and wound closure.
access to the posterior femoral neck for bone graft procedures,
posterior drainage of septic joints, or reconstructive procedures of
the proximal femur.
-
Place the patient in the lateral position
with the unaffected side facing down. Bean bags, kidney rests, or “hip
positioners” attached to the operating table are excellent adjuncts for
maintaining the true lateral position. Alternatively, the procedure can
be done with the patient prone. The prone position may be recommended
for certain femoral neck bone grafting procedures. -
Begin the incision 10 cm distal to the
posterosuperior iliac spine, and extend it laterally and distally in
line with the gluteal fibers (Fig. 3.10A) to
the posterior margin of the greater trochanter. Then carry the incision
distally for a distance of 15–20 cm in line with the femoral shaft.![]() Figure 3.10. Moore posterior approach to the hip. A: Skin incision. B:
Figure 3.10. Moore posterior approach to the hip. A: Skin incision. B:
Detachment and retraction of the external rotators; incision of the hip
capsule. (From Thomas HA. The Hip. In: Hoppenfeld S, deBoer P, eds. Surgical Exposures in Orthopaedics: The Anatomic Approach. Philadelphia: JB Lippincott, 1984:342.) -
Divide the thick fascia lata distally and
the thin gluteal fascia proximally in line with the skin incision.
Divide the deep fibers of the gluteal musculature bluntly using a
finger-spreading technique, preserving the branches of the superior
gluteal nerve and vessels in the proximal dissection. Partially divide
the distal insertion of the fibers of the gluteal musculature from
their femoral insertion to allow distal retraction. Retract in a plane
perpendicular to the gluteal split, and expose the greater trochanter. -
Identify the sciatic nerve in the medial
portion of the wound and carefully protect it. Divide the external
rotators and the tendon of the piriformis at their femoral insertions,
and retract them medially, forming a protective sling over the sciatic
nerve (Fig. 3.10B). Expose the posterior part
of the hip capsule, and incise along the axis of the femoral neck. For
exposure of the femoral neck, dissect the distal insertion of the
capsule from the posterior intertrochanteric ridge. Protect the medial
femoral circumflex artery inferiorly; it supplies the femoral head in
its terminal branch, the lateral epiphyseal artery. For procedures that
require hip dislocation, flex the hip to 90°, keeping the knee flexed,
and externally rotate the thigh.
reduction of congenitally dislocated hips; for resection of small,
primary, benign bone tumors in the region of the lesser trochanter; and
for obturator neurectomies.
-
Position the patient supine, with the
affected hip flexed, abducted, and externally rotated. This position
brings the lesser trochanter closer to the skin surface. -
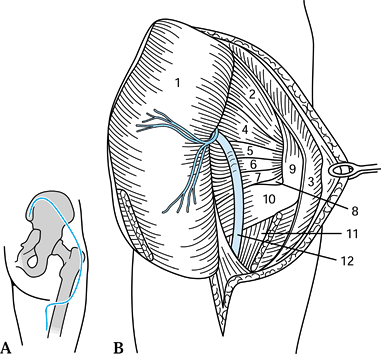
Make a longitudinal incision on the
medial thigh, starting 3 cm distal to the pubic tubercle in line with
the adductor longus, which is easily palpable (Fig. 3.11A).
Develop the plane between the adductor longus and brevis muscles
anteriorly and the adductor magnus and gracilis muscles posteriorly.
The posterior branch of the obturator nerve is visible on the belly of
the adductor magnus; protect it unless it is to be cut to relieve
muscular spasticity. The anterior branch lies on the anterior surface
of the adductor brevis and is protected by retraction of this muscle.
The lesser trochanter is visible in the base of the wound (Fig. 3.11B).
Isolate the iliopsoas tendon with blunt dissection. It is then easily
transected, allowing greater exposure of the medial hip capsule.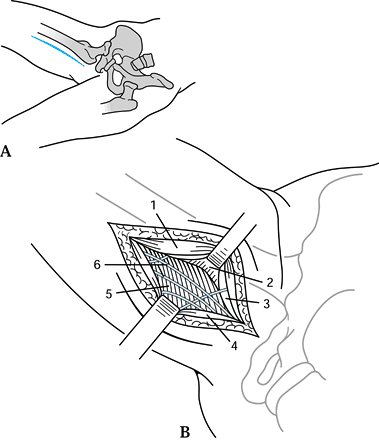 Figure 3.11. Ludloff medial approach to the hip. A: Skin incision; patient positioning. B:
The adductor longus is retracted anteriorly, exposing the lesser
trochanter, inferior hip capsule, and posterior branches of the
obturator nerve. 1, Adductor longus; 2, lesser trochanter; 3, adductor brevis; 4, gracilis; 5, adductor magnus; 6, obturator nerve, posterior branch. (From Thomas HA. In: Hoppenfeld S, deBoer P, eds. Surgical Exposures in Orthopaedics: The Anatomic Approach. Philadelphia: JB Lippincott, 1984:349, 351.)
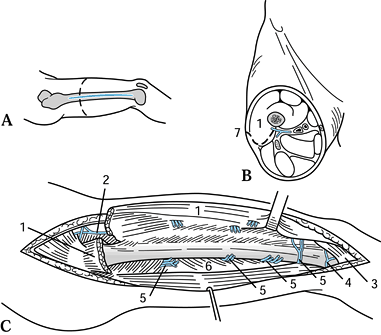
useful for tumor resection or internal fixation of shaft fractures. It
is the preferred approach to the femoral shaft for most situations.
-
Position the patient in the lateral or the supine position.Elevate the hindquarter 30° to 45° with a pad under the buttock.
-
Make an incision of the necessary length along a line between the greater trochanter and the lateral femoral condyle (Fig. 3.12A). Divide the superficial and deep fascia in line with the incision.
![]() Figure 3.12. Lateral approach to the femoral shaft. A: Skin incision and level of cross section. B: Plane of dissection shown in cross section. C: The vastus lateralis has been mobilized anteriorly and the perforating vessels ligated, exposing the entire femoral shaft. 1, Vastus lateralis; 2, lateral circumflex femoral vessels; 3, joint capsule (knee); 4, lateral superior genicular artery; 5, perforating arteries, posterior vastus branches; 6, lateral intermuscular septum; 7, incision. (From Schlumpf R. Femoral Shaft: Lateral Approach. In: Rüedi T, von Hochstetter AHC, Schlumpf R, eds. Surgical Approaches for Internal Fixation. Berlin: Springer-Verlag, 1984:125-127.)
Figure 3.12. Lateral approach to the femoral shaft. A: Skin incision and level of cross section. B: Plane of dissection shown in cross section. C: The vastus lateralis has been mobilized anteriorly and the perforating vessels ligated, exposing the entire femoral shaft. 1, Vastus lateralis; 2, lateral circumflex femoral vessels; 3, joint capsule (knee); 4, lateral superior genicular artery; 5, perforating arteries, posterior vastus branches; 6, lateral intermuscular septum; 7, incision. (From Schlumpf R. Femoral Shaft: Lateral Approach. In: Rüedi T, von Hochstetter AHC, Schlumpf R, eds. Surgical Approaches for Internal Fixation. Berlin: Springer-Verlag, 1984:125-127.) -
For the preferred posterolateral
approach, retract the vastus lateralis anteriorly, and dissect the
muscle off the lateral intermuscular septum where it attaches to the
linea aspera of the femur (Fig. 3.12B). Make the incision 2–3 cm more posterior to help with this part of the exposure. -
Carefully identify, ligate, and divide
the perforating branches of the profunda femoris in the middle third of
the femoral shaft (Fig. 3.12C). If the surgeon
inadvertently transects at the level of the septum, these vessels can
retract to the medial side of the septum, producing impressive
hemorrhage. -
For the lateral approach, divide the
vastus lateralis and intermedius in line with the incision. As in the
posterolateral approach, identify and ligate the perforating branches
of the profunda femoris with the descending branch of the lateral
femoral circumflex artery in the proximal third of the femoral shaft,
and the superolateral geniculate artery in the distal third.
useful if poor skin or violation of muscle compartments by tumor render
the posterolateral or lateral approaches impossible. It is not the
exposure of choice for most conditions, because
postoperative
quadriceps adhesions can result, particularly if the knee cannot be
mobilized immediately after surgery. Combined with an anterolateral
approach to the knee joint, it becomes a versatile and wide exposure
for T-type intra-articular fractures of the distal femur. Meticulous
layered closure and immediate mobilization of the knee joint prevents
loss of motion due to quadriceps adhesions. M. W. Chapman, the editor
of this book, prefers this approach for comminuted intra-articular
fractures of the distal femur (personal communication, 1999).
-
Make a skin incision along the line
between the anterosuperior iliac spine and the lateral border of the
quadriceps tendon as it inserts into the patella. Incise the
superficial and deep fascia in line with the incision, and develop the
interval between the rectus femoris medially and the vastus lateralis
laterally (Fig. 3.13A). This interval is easily identified proximally.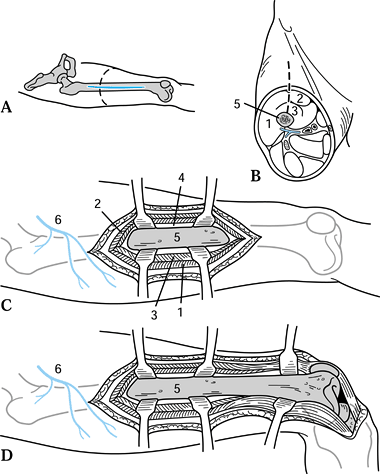 Figure 3.13. Anterolateral approach to the femoral shaft. A: Skin incision and level of cross section. B:
Plane of dissection between the rectus femoris and vastus lateralis
through the vastus intermedius. (From Schlumpf R. Distal Femur: Lateral
Approach. In: Rüedi T, von Hochstetter AHC, Schlumpf R, eds. Surgical Approaches for Internal Fixation. Berlin: Springer-Verlag, 1984:132-135.) C:
Retraction of the vastus intermedius and rectus femoris anteriorly and
vastus lateralis inferiorly exposes the entire femoral shaft. D: The dissection can be carried out distally to expose the articular surface of the distal femur and knee joint. 1, Vastus lateralis; 2, rectus femoris; 3, vastus intermedius; 4, periosteum; 5, femur; 6, lateral circumflex femoral artery. (From Thomas HA. The Femur. In: Hoppenfeld S, deBoer P, eds. Surgical Exposures in Orthopaedics: The Anatomic Approach. Philadelphia: JB Lippincott, 1984:372.) -
Divide the thinnest and midline portion
of the vastus intermedius in line with its fibers, and expose the femur
by subperiosteal dissection (Fig. 3.13B). The
exposure is best limited to the distal two thirds of the femoral shaft,
because proximally the innervation to the vastus lateralis limits
exposure. -
If it is desirable to expose the
articular condyles and knee, carry the incision through a lateral
parapatellar approach to the knee. The patella can be dislocated
medially (Fig. 3.13C, Fig. 3.13D).
useful only for the middle three fifths of the femoral shaft. It is
probably indicated only for treatment of tumors and exploration of the
sciatic nerve. It can be extended into Henry’s exposure of the sciatic
nerve to provide a comprehensive extensile approach to the posterior
thigh.
-
Position the patient prone on the
operating table, using appropriate bolsters to allow free abdominal and
chest movement. Align the incision with the femur from 5 cm distal to
the gluteal fold to 10 cm proximal to the popliteal crease (Fig. 3.14A). Incise the superficial and deep fascia in line with the skin incision, avoiding the posterior femoral cutaneous nerve.![]() Figure 3.14. Posterior approach to the femoral shaft. A: Skin incision and level of cross section. B:
Figure 3.14. Posterior approach to the femoral shaft. A: Skin incision and level of cross section. B:
Plane of dissection between the semimembranosus and adductor magnus and
the semitendinosus. (From Schlumpf R. Femoral Shaft: Lateral Approach.
In: Rüedi T, von Hochstetter AHC, Schlumpf R, eds. Surgical Approaches for Internal Fixation. Berlin: Springer-Verlag, 1984:124.) C: Lateral retraction of the sciatic nerve. 1, Biceps femoris, short head; 2, biceps femoris, long head; 3, linea aspera; 4, semimembranosus; 5, sciatic nerve; 6, adductor magnus; 7, semitendinosus. (From Thomas HA. The Femur. In: Hoppenfeld S, deBoer P, eds. Surgical Exposures in Orthopaedics: The Anatomic Approach. Philadelphia: JB Lippincott, 1984:376.) -
Identify the interval between the biceps
femoris and the vastus lateralis. In the proximal part of the
dissection, detach the short head of the biceps femoris sharply from
the linea aspera. Then reflect it medially (Fig. 3.14B) to expose the femoral shaft. -
In the distal half of the wound, retract the long head of the biceps laterally to expose the sciatic nerve (Fig. 3.14C).
Gently retract the sciatic nerve laterally to expose the femur. Take
the adductor magnus and biceps femoris off the linea aspera sharply.
For sciatic nerve explorations, begin the deep dissection in this
distal half of the wound.
the femoral artery; usually such arterial injuries are associated with
fractures. It is also occasionally useful for medial internal fixation
of fractures or osteotomies.
-
With the patient supine and the hip
flexed and externally rotated, position the knee in flexion. Begin the
incision at the mid thigh and extend it distally to 5 cm distal to the
adductor tubercle (Fig. 3.15A). Carefully
incise the superficial fascia and the deep fascia, which is quite thin
in this region; at the same time, avoid the saphenous vein and nerve,
which are superficial.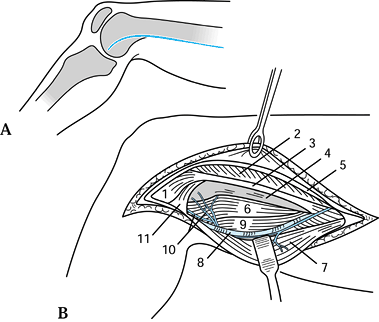 Figure 3.15. Medial approach to the distal femur. A: Skin incision. B:
The intramuscular septum falls posteriorly with the knee in flexion.
Mobilize it anteriorly or take it down and reattach it to gain exposure
to the midline of the distal femur. 1, Medial condyle, femur; 2, vastus medialis muscle; 3, adductor tendon; 4, femoral shaft; 5, deep fascia; 6, intramuscular septum; 7, sartorius; 8, saphenous nerve and superior geniculate artery; 9, biceps femoris muscle; 10, popliteal vessels; 11, gastrocnemius muscle. (From Stead Z. Medial Route Extended to Femoropopliteal Trunks to the Shaft. In: Henry AK, ed. Extensile Exposure, 2nd ed. Edinburgh: Churchill Livingstone, 1973:216.) -
Distally identify the anterior edge of
the sartorius, which falls posteriorly with progressive knee flexion.
The adductor tendon is visible. Mobilize it anteriorly or take it down
and reattach it to gain exposure to the midline of the distal femur. -
Incise its fascia with care posteriorly (Fig. 3.15B).
Posterior to the adductor, the popliteal vessels and, more deeply, the
tibial branch of the sciatic nerve are visible. Position internal
fixation plates anteriorly to the adductor tubercle after performing
subperiosteal dissection, taking care to avoid violating the joint
capsule.
combination of approaches that allow the sciatic nerve to be explored
from its extrapelvic origin to the popliteal fossae (2).
-
Position the patient prone and outline the “question mark” incision (Fig. 3.16A).
Avoid injury to the posterior cutaneous nerve of the thigh as it exits
from beneath the gluteus maximus and runs distally down the thigh.
After incising the deep gluteal fascia, develop the interval between
the gluteus medius and maximus.![]() Figure 3.16. Henry’s exposure of the sciatic nerve. A: Skin incision. B: Mobilization of the gluteal mass medially on its neurovascular bundle to expose the sciatic nerve. 1, Gluteus maximus; 2, gluteus medius; 3, iliotibial tract; 4, piriformis; 5, gemellus superior; 6, obturator internus; 7, gemellus inferior; 8, obturator externus; 9, greater trochanter; 10, quadratus femoris; 11, adductor magnus; 12, sciatic nerve. (From Stead Z. Structures Under the Gluteal Lid. In: Henry AK, ed. Extensile Exposure, 2nd ed. Edinburgh: Churchill Livingstone, 1973:189.)
Figure 3.16. Henry’s exposure of the sciatic nerve. A: Skin incision. B: Mobilization of the gluteal mass medially on its neurovascular bundle to expose the sciatic nerve. 1, Gluteus maximus; 2, gluteus medius; 3, iliotibial tract; 4, piriformis; 5, gemellus superior; 6, obturator internus; 7, gemellus inferior; 8, obturator externus; 9, greater trochanter; 10, quadratus femoris; 11, adductor magnus; 12, sciatic nerve. (From Stead Z. Structures Under the Gluteal Lid. In: Henry AK, ed. Extensile Exposure, 2nd ed. Edinburgh: Churchill Livingstone, 1973:189.) -
Cut the gluteus maximus free from its insertion into the
P.38
femur, and fold the entire gluteus maximus flap back medially on its
neurovascular bundle. The sciatic nerve, proximally exposed, is easily
traced to the superior margin of the long head of the biceps femoris,
where it passes deeply to this muscle (Fig. 3.16B). From this point distally, the entire exposure is as previously described for the posterior approach.
the knee joint for most intraarticular problems. The list includes
meniscectomy (total or partial), removal of loose bodies, stabilization
of osteochondral fractures, ligament or meniscal repair, drainage
procedures, ligament reconstructions, fixation or excision of patella
fractures, and synovectomy. The anteromedial deep dissection can be
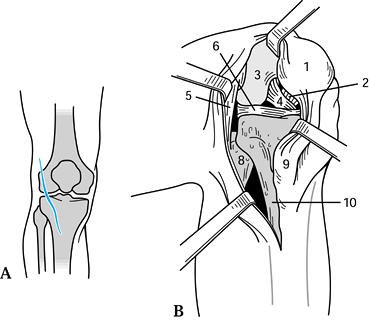
combined with a straight anterior skin incision (Fig. 3.17)
for more extensive exposure for these conditions and for total knee
replacement. Use it whenever possible, because it gives the best
possible route for reexploration, whenever repeat procedures may be
required or when later reconstructive procedures are anticipated.
 |
|
Figure 3.17. Anterior and anteromedial exposure to the knee. A: Skin incisions; anterior (solid line), anteromedial (dotted line). B: The deep exposure for the two approaches is the same. 1, Quadriceps tendon; 2, articular surface, patella; 3, lateral meniscus; 4, patellar ligament; 5, medial tibial plateau; 6, medial meniscus; 7, anterior cruciate ligament; 8, medial femoral condyle. (From Thomas HA. The Knee. In: Hoppenfeld S, deBoer P, eds. Surgical Exposures in Orthopaedics: The Anatomic Approach. Philadelphia: JB Lippincott, 1984:376.)
|
-
For the anterior incision, make a
straight incision midline extending 10 cm above the patella to 3 cm
below the tibial tubercle (Fig. 3.17A). For the
anteromedial incision, begin on the medial side of the quadriceps
tendon, 5–7 cm above the patella. Curve the incision around the
superomedial border of the patella, then distally to the medial side of
the tibial tubercle. Preserve the infrapatellar branches of the
saphenous nerve whenever possible. -
The deep dissection is identical for both procedures (Fig. 3.17B).
Divide the vastus medialis muscle from the quadriceps tendon on the
medial side, leaving a 5 mm cuff of tendon on the muscle side. Extend
the quadriceps tendon split proximally to the extent of the skin
incision. Divide the capsule and synovium together, 5 mm lateral to the
medial border of the patella. -
Carry this deep dissection down to the
medial side of the tibial tubercle. Flex the knee, completely divide
the synovium in line with the capsular incision, and dislocate the
patella laterally (Fig. 3.17B) to expose the
notch of the femur, revealing the anterior cruciate and medial
meniscus. Carefully preserve the patellar tendon insertion if the
patella is to be inverted for joint replacement procedures.
Subperiosteal dissection of the medial one half of the tendon at the
joint line will decrease the tension in the tendon during this maneuver.
exposure to all joint structures as do the anteromedial and the
anterior approaches. It is useful for exposure of the anterior two
thirds of the lateral meniscus, for isolated lateral compartment
reconstructive procedures, and for internal fixation of lateral tibial
plateau or femoral condyle fractures, particularly if combined with
anterolateral exposure of the femoral shaft.
-
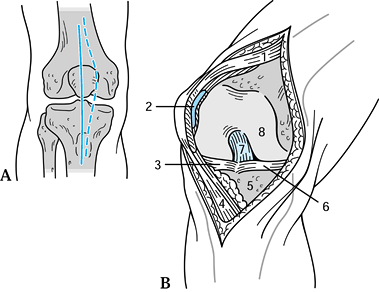
With the knee in slight flexion, begin
the incision 10 cm proximal to the patella in line with the insertion
of the vastus lateralis on the quadriceps tendon (Fig. 3.18A).
Curve the incision gently at the lateral patellar border, and extend it
distally to the level of the tibial tubercle lateral to it. The deep
capsular incision is 5 mm lateral to the insertion of the vastus
lateralis on the quadriceps tendon.![]() Figure 3.18. Anterolateral approach to the knee. A: Skin incision. B: Medial subluxion of the patella exposes the anterior cruciate and lateral meniscus. 1, Patella; 2, posterior cruciate ligament; 3, lateral femoral condyle; 4, anterior cruciate ligament; 5, fibular collateral ligament; 6, lateral meniscus; 7, transverse ligament; 8, fibular head; 9, tibial tuberosity; 10, lateral tibial surface. (From McConnell J. Surgical Approaches. In: Edmonson AS, Crenshaw AH, eds. Campbell’s Operative Orthopaedics, 6th ed, vol 1. St. Louis: CV Mosby, 1980:44.)
Figure 3.18. Anterolateral approach to the knee. A: Skin incision. B: Medial subluxion of the patella exposes the anterior cruciate and lateral meniscus. 1, Patella; 2, posterior cruciate ligament; 3, lateral femoral condyle; 4, anterior cruciate ligament; 5, fibular collateral ligament; 6, lateral meniscus; 7, transverse ligament; 8, fibular head; 9, tibial tuberosity; 10, lateral tibial surface. (From McConnell J. Surgical Approaches. In: Edmonson AS, Crenshaw AH, eds. Campbell’s Operative Orthopaedics, 6th ed, vol 1. St. Louis: CV Mosby, 1980:44.) -
Incise the synovium in the same plane, and sublux the patella medially to expose the anterior cruciate and lateral meniscus (Fig. 3.18B). The patella cannot be inverted medially because of the strong medial orientation of the quadriceps attachments.
frequently used for lateral extraarticular ligament reconstructions or
in combination with an anteromedial approach for an
intraarticular
reconstruction. It is also useful for exposure of the posterior half of
the lateral meniscus and for explorations of the common peroneal nerve
and its branches.
-
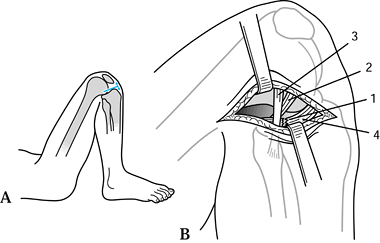
With the knee flexed 90°, make a gently curved 15 cm incision (dotted line in Fig. 3.19A)
just anterior to the biceps femoris tendon and fibular head to expose
the fascia lata. Keep the position of the common peroneal nerve (Fig. 3.19B) in mind constantly.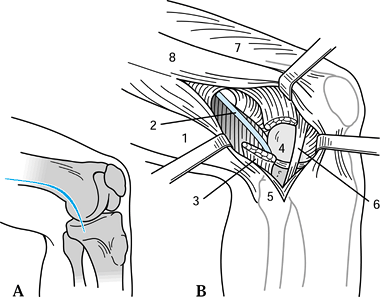 Figure 3.19. Henderson’s posterolateral approach to the knee. A: Skin incision can be extended proximally (dotted line) for exposure of the fascia lata. B: Exposure of the common peroneal nerve and fibular collateral ligament. 1, Biceps femoris; 2, common peroneal nerve; 3, lateral head of gastrocnemius (cut); 4, lateral femoral condyle; 5, fibular head; 6, fibular collateral ligament; 7, vastus lateralis; 8, iliotibial band.
 -
Proximally, follow the anterior surface
of the lateral intramuscular septum back to the linea aspera. At this
point, the nerve is just posterior to the dissection. -
Expose the lateral femoral condyle and
fibular collateral ligament origin in the midportion of the wound. The
lateral head of the gastrocnemius muscle is evident posteriorly and
protects the nerve at that level. The posterior half of the lateral
meniscus is visible posterior to the fibular collateral ligament with
the popliteus tendon coming up from posteroinferior to the
posterior-midmeniscus region (Fig. 3.19B). This
tendon may be retracted posteriorly as the capsule and synovium are
opened through a longitudinal incision above the menisci.
lateral meniscus. Resection of the meniscus does not require release of
the fibular collateral ligament.
-
Position and drape the patient to allow
full flexion; more than 100° of flexion is helpful. Make the incision
parallel to the lateral meniscus, beginning anteriorly at the lateral
border of the patellar tendon (Fig. 3.20A). Its posterior limit is at a line between the fibular head and lateral femoral condyle. Divide the subcutaneous
P.40
tissue in line with the incision, and divide the iliotibial band in line with its fibers.![]() Figure 3.20. Bruser’s posterolateral approach to the knee. A: Line of skin incision parallel to the lateral meniscus located halfway between the patella and tibial tubercle (arrow). B: Division of the iliotibial band. 1, Iliotibial band; 2, popliteal tendon; 3, fibular collateral ligament; 4, torn lateral meniscus. (From McConnell J. Surgical Approaches. In: Edmonson AS, Crenshaw AH, eds. Campbell’s Operative Orthopaedics, 6th ed, vol. 1. St. Louis: CV Mosby, 1980:47.)
Figure 3.20. Bruser’s posterolateral approach to the knee. A: Line of skin incision parallel to the lateral meniscus located halfway between the patella and tibial tubercle (arrow). B: Division of the iliotibial band. 1, Iliotibial band; 2, popliteal tendon; 3, fibular collateral ligament; 4, torn lateral meniscus. (From McConnell J. Surgical Approaches. In: Edmonson AS, Crenshaw AH, eds. Campbell’s Operative Orthopaedics, 6th ed, vol. 1. St. Louis: CV Mosby, 1980:47.) -
The knee must be flexed during this part
of the dissection to prevent transection of the iliotibial band. Divide
the iliotibial band along the lines of its fibers to Gurde’s tubercle,
expose the fibula, collateral ligament, and the torn lateral meniscus
central to it. The relaxed fibular collateral ligament must be
protected posteriorly when this incision is made (Fig. 3.20B).
The inferolateral geniculate artery should be ligated, because it lies
at the posterolateral corner of the meniscus. Incise the synovium,
allowing complete exposure of the meniscus.
is useful for exposure of the posteromedial corner of the knee joint
for posterior meniscal horn resections, posteromedial corner
reconstructions, or repair or reconstruction of the posterior cruciate
ligament.
-
Position the patient supine with the hip in external rotation and the knee flexed 90°.
-
Make a 10 cm incision from the adductor
tubercle along the course of the tibial collateral ligament and
anterior to the pes anserine tendons (Fig. 3.21A).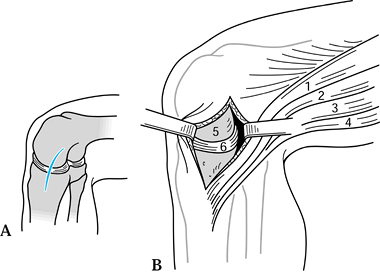 Figure 3.21. Henderson’s posteromedial approach to the knee. A: Skin incision. B: The deep dissection is carried out anterior to the pes anserine tendons. 1, Sartorius; 2, gracilis; 3, semimembranosus; 4, semitendinosus; 5, medial femoral condyle; 6, medial meniscus. (From Thomas HA. In: Hoppenfeld S, deBoer P, eds. Surgical Exposures in Orthopaedics: The Anatomic Approach. Philadelphia: JB Lippincott, 1984:400, 415.)
 -
Incise the oblique portion of the tibial collateral ligament in line with the tendons, and also incise the capsule below (Fig. 3.21B).
This incision exposes the medial meniscus and allows access to the
posteromedial compartment. For capsular and posterior cruciate
reconstructions, it is necessary to develop the interval between the
capsule and the pes anserine tendons and semimembranosus. -
Retract the hamstrings and medial head of
the gastrocnemius muscle posteriorly. For wider exposure, take down the
origin of the medial head of the gastrocnemius.
it provides invaluable exposure of the posterior neurovascular
structures and joint capsule. Indications for its use include exposure
of the popliteal neurovascular structures, posterior cruciate ligament
repairs, release of posterior knee contractures, and resection of
popliteal masses.
-
Position the patient prone. Initiate an S-shaped incision (Fig. 3.22A)
with the superior arm lateral and the transverse portion at the level
of the posterior crease (orient the incision transversely along the
flexion crease and direct it superolaterally and inferomedially).
Carefully incise the popliteal fascia in the midline.![]() Figure 3.22. Posterior approach to the knee. A: Skin incision. B: A linear split of the deep fascia. 1, Semimembranosus; 2, popliteal vein; 3, medial head of gastrocnemius; 4, small saphenous vein; 5, medial sural cutaneous nerve; 6, popliteal fascia; 7, lateral head of gastrocnemius; 8, biceps femoris; 9, common peroneal nerve. C: Sectioning of the gastrocnemius heads. 1, Semimembranosus; 2, tibial nerve; 3, medial head of gastrocnemius; 4, popliteal vein; 5, posterior joint capsule; 6, popliteal artery; 7, oblique popliteal ligament; 8, medial inferior genicular artery; 9, medial head of gastrocnemius; 10, small saphenous vein; 11, medial sural cutaneous nerve; 12, fascia; 13, lateral head of gastrocnemius; 14, plantaris; 15, lateral inferior genicular artery; 16, common peroneal nerve; 17, arcuate ligament; 18, lateral head of gastrocnemius; 19, plantaris; 20, biceps femoris. (From Thomas HA. The Knee. In: Hoppenfeld S, deBoer P, eds. Surgical Exposures in Orthopaedics: The Anatomic Approach. Philadelphia: JB Lippincott, 1984:431.)
Figure 3.22. Posterior approach to the knee. A: Skin incision. B: A linear split of the deep fascia. 1, Semimembranosus; 2, popliteal vein; 3, medial head of gastrocnemius; 4, small saphenous vein; 5, medial sural cutaneous nerve; 6, popliteal fascia; 7, lateral head of gastrocnemius; 8, biceps femoris; 9, common peroneal nerve. C: Sectioning of the gastrocnemius heads. 1, Semimembranosus; 2, tibial nerve; 3, medial head of gastrocnemius; 4, popliteal vein; 5, posterior joint capsule; 6, popliteal artery; 7, oblique popliteal ligament; 8, medial inferior genicular artery; 9, medial head of gastrocnemius; 10, small saphenous vein; 11, medial sural cutaneous nerve; 12, fascia; 13, lateral head of gastrocnemius; 14, plantaris; 15, lateral inferior genicular artery; 16, common peroneal nerve; 17, arcuate ligament; 18, lateral head of gastrocnemius; 19, plantaris; 20, biceps femoris. (From Thomas HA. The Knee. In: Hoppenfeld S, deBoer P, eds. Surgical Exposures in Orthopaedics: The Anatomic Approach. Philadelphia: JB Lippincott, 1984:431.) -
linear split of the deep fascia exposes
the common peroneal nerve, the popliteal vein, and two heads of the
gastrocnemius. Identify the sural nerve as it rests in the midline in
the distal portion of the wound, and trace it proximally until it leads
you to the tibial component of the sciatic nerve (Fig. 3.22B). -
Identify the common peroneal nerve from
proximal to distal as it runs along the posterior border of the biceps
femoris. The popliteal vein lies over the tibial nerve at the level of
the gastrocnemius muscle heads. The popliteal artery lies deep and
medial to the tibial nerve. There are five geniculate arteries that
limit retraction of the artery. One of the branches may have to be
ligated, depending on the direction that the dissection needs to take. -
To reach the posteromedial or
posterolateral corners of the joint section, the medial head or lateral
head of the gastrocnemius muscle can be sectioned, leaving a tendinous
cuff to repair (Fig. 3.22C). In this way, the
entire posterior capsule (popliteal artery, tibial nerve, and deep
capsular structures) in its medial and lateral extent can be exposed.
The capsule must be opened transversely to expose the posterior
cruciate ligament in the midline.

reduction of medial or lateral tibial plateau fractures, or for
resection of tumors or infectious processes involving this region of
the tibia.
-
With the knee gently flexed, make the
distal half of the straight anterior approach to the knee joint,
beginning at the superior pole of the patella. After incising the
subcutaneous tissue in line with the incision, subcutaneously dissect
in the lateral or medial direction (or both), with the knee flexed to
90° (Fig. 3.23). Figure 3.23. Anterior approach to the proximal tibial shaft. The skin incision of the anterior approach to the knee (see Fig. 3.17) can be extended distally to expose the proximal tibia. The pes anserine tendons can be released subperiosteally (dotted line) to expose the medial tibial condyle. 1, Quadriceps tendon; 2, quadriceps femoris, vastus medialis; 3, suprapatellar recess; 4, infrapatellar fatty body of Hoffa; 5, tibial tuberosity; 6, anterior cruciate ligament; 7, posterior cruciate ligament; 8, anterior horn, medial meniscus; 9,
pes anserinus. (From Schlumpf R. Knee Joint and Proximal Tibia: Lateral
Parapatellar Approach. In: Rüedi T, von Hochstetter AHC, Schlumpf R,
eds. Surgical Approaches for Internal Fixation. Berlin: Springer-Verlag, 1984:151.) -
To gain exposure medially, elevate the
pes anserine insertion and superficial portion of the medial collateral
ligament subperiosteally. Divide the meniscotibial ligament (i.e., the
deep portion of the medial collateral ligament) beneath the meniscus,
allowing visualization of the tibial joint surface. Leave enough tissue
attached to the tibia to allow reattachment of the meniscus. -
To gain exposure laterally, open the
joint capsule lateral to the patellar tendon. Elevate the musculature
of the anterior compartment subperiosteally posterior to the level of
the fibular collateral ligament. Elevate Gurde’s tubercle with an
osteotome or reflect the iliotibial band insertion to allow more
complete exposure for application of plates to the proximal lateral
tibia. Examine the joint surface by incising the meniscotibial
attachments of the anterior half of the lateral meniscus.
-
Position the patient laterally with the
affected limb up. Make the skin incision in line with the fibula
distally (to trace the superficial branch of the peroneal nerve) and
biceps femoris proximally, curving posteriorly at the joint line at an
angle of 45° (Fig. 3.24A).![]() Figure 3.24. Henry’s exposure of the peroneal nerve and proximal fibula. A: Skin incision. 1, Common peroneal nerve; 2, head of fibula. B:
Figure 3.24. Henry’s exposure of the peroneal nerve and proximal fibula. A: Skin incision. 1, Common peroneal nerve; 2, head of fibula. B:
The peroneal muscles have been divided transversely and retracted
anteriorly to expose the motor divisions of the deep peroneal nerve
proximally. 1, Common peroneal nerve (lat. popliteal); 2, head of fibula; 3, gastrocnemius; 4, soleus; 5, peroneus longus. (From Stead Z. In: Henry AK, ed. Extensile Exposure, 2nd ed. Edinburgh: Churchill Livingstone, 1973:293, 295.) -
Identify the common peroneal nerve where
it lies deep to the biceps tendon in the proximal portion of the wound.
Handle the nerve gently in a rubber sling for retraction. Divide the
deep fascia in line with the nerve,
P.42
developing
a plane of division between the soleus and peroneal muscles. A thin
extension of the peroneus longus origin must be divided at the fibular
neck (Fig. 3.24B).
The nerve is now freed as it curves anteriorly, dividing into muscular
branches. Elevate the peroneal muscles subperiosteally to expose the
upper one half of the fibula.
anterior route for osteotomies, internal fixation of fractures or
nonunions, excision of bone tumors, or drainage of infectious processes.
-
Position the patient supine with a pad
under the affected hip to gain slight internal rotation of the leg.
Make the incision 10–15 cm lateral and parallel to the crest of the
tibia (Fig. 3.25). Distally, incise along the
medial border of the anterior tibial tendon to allow intraarticular
exposure, if required. Reflect the skin and periosteum as a single
layer for a medial exposure. Alternatively, lateral subperiosteal
dissection allows retraction of the anterior compartment musculature.
Avoid complete soft-tissue elevation medially and laterally because of
the effect on bone blood supply with this radical exposure.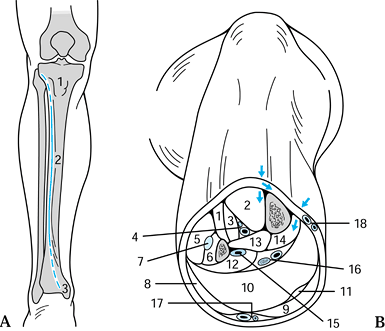 Figure 3.25. Anterior approach to the tibial shaft. A: Skin incision, just lateral to the tibial crest can be extended proximally and distally to expose the entire shaft (dotted lines). 1, Tibial tuberosity; 2, anterior border; 3, medial malleolus. B:
A cross section of the mid calf reveals the plane of dissection to the
lateral surface of the tibia and medially to the fascia of the deep
posterior compartment (arrows). 1, Extensor digitorum; 2, tibialis anterior; 3, extensor hallucis longus; 4, deep peroneal nerve, anterior tibial vessels; 5, peroneus longus; 6, peroneus brevis; 7, superficial peroneal nerve; 8, lateral head, gastrocnemius; 9, medial head, gastrocnemius; 10, soleus; 11, plantaris; 12, flexor hallucis longus; 13, tibialis posterior; 14, flexor digitorum longus; 15, peroneal artery; 16, tibial nerve with posterior tibial vessel; 17, sural nerve with small saphenous vein; 18,
saphenous nerve with great saphenous vein. (From Schlumpf R. Tibial
Shaft: Anterior Approach. In: Rüedi T, von Hochstetter AHC, Schlumpf R,
eds. Surgical Approaches for Internal Fixation. Berlin: Springer-Verlag, 1984:155, 156.)
infection associated with poor anterior skin coverage, elect a
posteromedial approach to the tibial shaft, particularly for the
proximal third. The two-incision method of compartment release also
calls for a posteromedial approach for release of the deep posterior
compartment.
-
Position the patient supine. Flex the
affected hip and rotate it externally with the knee flexed. Make the
incision in line with the tibia 1–2 cm posterior to the posterior
P.43
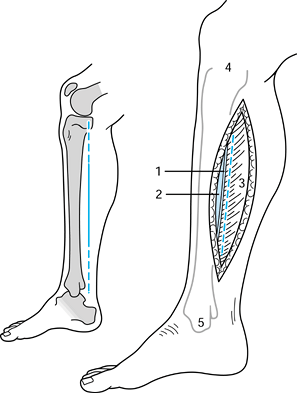
border of the tibia (Fig. 3.26A). Protect the saphenous vein and nerve as the subcutaneous tissue is incised in line with the skin incision.![]() Figure 3.26. Posteromedial approach to the tibial shaft. A: Skin incision. B: The deep dissection exposing the fascia. 1, Saphenous nerve; 2, great saphenous vein; 3, crural fascia (superficial); 4, medial condyle, tibia; 5, medial malleolus. (From Schlumpf R. Tibial Shaft: Posteromedial Approach. In: Rüedi T, von Hochstetter AHC, Schlumpf R, eds. Surgical Approaches for Internal Fixation. Berlin: Springer-Verlag, 1984:159, 161.)
Figure 3.26. Posteromedial approach to the tibial shaft. A: Skin incision. B: The deep dissection exposing the fascia. 1, Saphenous nerve; 2, great saphenous vein; 3, crural fascia (superficial); 4, medial condyle, tibia; 5, medial malleolus. (From Schlumpf R. Tibial Shaft: Posteromedial Approach. In: Rüedi T, von Hochstetter AHC, Schlumpf R, eds. Surgical Approaches for Internal Fixation. Berlin: Springer-Verlag, 1984:159, 161.) -
Divide the superficial compartment fascia
5 mm posterior to the posterior border of the tibia. Carry out the deep
dissection exposing the fascia of the lower leg posterior to the
saphenous nerve and vein. Divide the deep fascia posterior to the
border of the tibia in line with the fibers of the flexor hallucis
longus proximally, flexor digitorum longus in the mid tibia, and
posterior tibialis distally (Fig. 3.26B). Retract the muscles posteriorly, exposing the tibia for the required procedure.
thirds of the tibia and is also useful when the anterior and
anteromedial aspects of the leg have poor soft-tissue coverage. It is
the classic exposure for bone grafting of tibial nonunions.
-
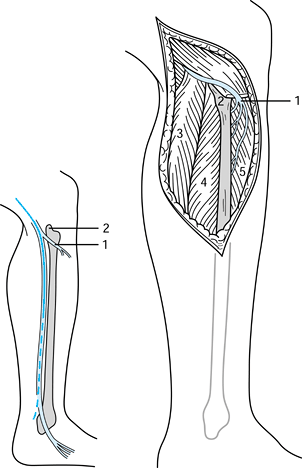
Position the patient prone or on his side with the affected leg up. Make the skin incision (Fig. 3.27A) longitudinally along the lateral border of the gastrocnemius (Fig. 3.27B).
The deep plane is between the peroneal musculature (laterally) and the
superficial and deep posterior compartment musculature (medially),
exposing the intraosseous membrane.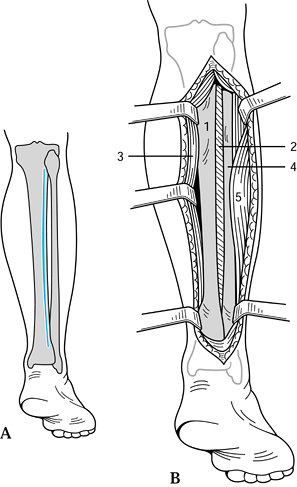 Figure 3.27. Harmon posterolateral approach to the tibial shaft. A: Skin incision. B: The deep plane is between the peroneal musculature and the superficial and deep posterior compartment musculature. 1, Tibia; 2, interosseous membrane; 3, soleus and gastrocnemius; 4, fibula; 5, peroneal muscles. (From Edmonson AS, Crenshaw AH, eds. Campbell’s Operative Orthopaedics, 6th ed, vol 1. St. Louis: CV Mosby, 1980:39.)
 -
Develop the plane between the triceps
surae posteriorly and peroneal muscles anteriorly, exposing the
posterior surface of the fibula. Elevate the flexor hallucis longus
portion of the posterior tibial muscle that originates from the
intraosseous septum, and strip the muscle medially off the posterior
surface of the tibia. Take care in the proximal one third of the wound
to avoid the peroneal artery and vein. The posterior tibial artery and
nerve lie between the flexor hallucis longus and the posterior tibial
muscle and are not easily seen; avoid medial retraction at any place
other than the subperiosteal level. -
With careful subperiosteal dissection,
expose the posterior surface of the middle two thirds of the tibia. In
nonunions for which this approach is most commonly
P.44
used,
callus, scar, and loss of the interosseous membrane can make exposure
in the region of the nonunion difficult. To facilitate exposure, use a
long incision. Expose the interosseous membrane and posterior tibia
first in areas of undisturbed anatomy proximally and distally to the
fracture. Once you have established the proper plane of dissection, it
is fairly easy to expose the nonunion. As you pass medial to the
peroneal muscles and follow the fibula to the interosseous membrane,
the line of dissection is more or less directly anterior. To avoid
perforating the membrane, use a large-key or Cobb elevator to develop
the exposure. In compartment syndrome where compartment fasciotomy is
required, swelling and hematoma can obscure the fascial septae dividing
the anterior, lateral, and posterior compartments. In this situation,
develop the skin and subcutaneous tissue flaps for 2.5–3 cm anteriorly
and posteriorly. In the midportion of the wound, make a transverse
incision through the deep fascia. Identification of the longitudinally
running fascial divisions between the compartments is then easy.
techniques of ankle arthrodesis, internal fixation of distal tibia
(i.e., intraarticular) fractures, joint debridement and removal of
loose bodies, synovectomy, drainage of septic joints, and joint
replacement arthroplasty. Through this approach, both malleoli and the
whole articular surface of the distal tibia can be exposed.
-
Position the patient supine with a folded
sheet under the hip of the affected side in order to internally rotate
the limb. Make a longitudinal 15 cm incision midway between the lateral
and medial malleoli, beginning 10 cm proximal to the joint line (Fig. 3.28A).
Identify and protect the terminal branches of the superficial peroneal
nerve. Incise the deep fascia of the leg in line with the skin
incision. Identify the interval between the extensor hallucis longus
and the extensor digitorum longus. Protect the anterior tibial artery
and the deep peroneal nerve, which are just medial to the extensor
hallucis tendon.![]() Figure 3.28. Anterior approach to the ankle. A: Skin incision. B: Division of the extensor retinaculum exposes the extensor hallucis and extensor digitorum tendons. 1, Extensor digitorum longus; 2, deep peroneal nerve and anterior tibial artery (neurovascular bundle); 3, extensor retinaculum; 4, extensor hallucis longus. C: Division of the joint capsule exposes the joint. 1, Extensor digitorum longus; 2, joint capsule of ankle; 3, extensor retinaculum; 4, dome of talus; 5, distal tibia; 6, extensor hallucis longus. (From Thomas HA. The Ankle and Foot. In: Hoppenfeld S, deBoer P, eds. Surgical Exposures in Orthopaedics: The Anatomic Approach. Philadelphia: JB Lippincott, 1984:472, 473.)
Figure 3.28. Anterior approach to the ankle. A: Skin incision. B: Division of the extensor retinaculum exposes the extensor hallucis and extensor digitorum tendons. 1, Extensor digitorum longus; 2, deep peroneal nerve and anterior tibial artery (neurovascular bundle); 3, extensor retinaculum; 4, extensor hallucis longus. C: Division of the joint capsule exposes the joint. 1, Extensor digitorum longus; 2, joint capsule of ankle; 3, extensor retinaculum; 4, dome of talus; 5, distal tibia; 6, extensor hallucis longus. (From Thomas HA. The Ankle and Foot. In: Hoppenfeld S, deBoer P, eds. Surgical Exposures in Orthopaedics: The Anatomic Approach. Philadelphia: JB Lippincott, 1984:472, 473.) -
Retract the tendon of the extensor
hallucis medially, taking the neurovascular bundle with it, and the
extensor digitorum longus laterally (Fig. 3.28B).
Distally, at the level of the ankle joint, the neurovascular bundle
crosses the ankle joint behind the extensor hallucis tendon. Mobilize
it carefully as the joint is exposed. -
The capsule is visible beneath the
tendons and can be longitudinally incised or dissected off the distal
tibia as the procedure requires (Fig. 3.28C).
internal fixation of intraarticular fractures of the distal tibia and
medial malleolus. It is an extensile continuation of the anterior
approach to the tibial shaft (Fig. 3.25).
-
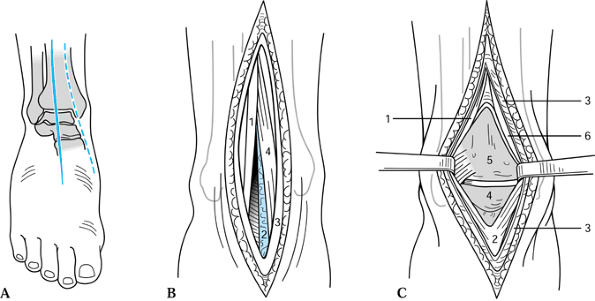
Following the course of the tibialis
anterior tendon, curve the incision medially toward the tip of the
medial malleolus, beginning 5 cm above the ankle joint (Fig. 3.29).
Identify the saphenous vein and nerve. Divide the ankle capsule
anterior to the deltoid ligament. Deeply develop the interval between
the tibialis anterior tendon and the medial malleolus. Retract the
tendon laterally, and open the joint by longitudinal incision and
subperiosteal dissection.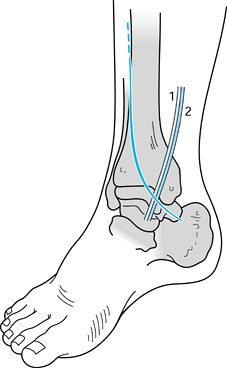 Figure 3.29. Anteromedial approach to the ankle. 1, Saphenous nerve; 2, saphenous vein. (From Schlumpf R. Medial Malleolus and Distal Tibia. In: Rüedi T, von Hochstetter AHC, Schlumpf R, eds. Surgical Approaches for Internal Fixation. Berlin: Springer-Verlag, 1984:167.)
It is useful for ankle arthrodesis, triple arthrodesis, and talectomy.
-
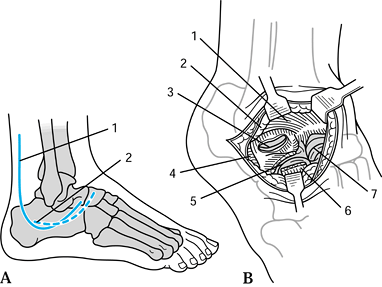
Make a 15 cm incision centered over the distal tibiofibular joint, beginning 5 cm proximal to the ankle joint (Fig. 3.30A).
Curve the incision anteriorly, crossing the ankle joint 2 cm medial to
the tip of the lateral malleolus and extending onto the dorsum of the
foot 2 cm medial to the base of the fifth metatarsal. The incision
crosses the distal tibiofibular joint and angles anteriorly over the
cuboid. Identify and protect the branches of the superficial peroneal
nerve and the saphenous vein.![]() Figure 3.30. Anterolateral approach to the ankle. A: Skin incision. B: Deep dissection exposes the sinus tarsi distally. 1, Extensor retinaculum; 2, anterior inferior tibiofibular ligament; 3, sinus tarsi fat pad; 4, peroneus tertius tendon; 5, extensor digitorum longus tendons. C: Retraction of the tendons exposes the anterior ligament complex of the ankle. 1, Interosseous membrane; 2, extensor retinaculum; 3, distal fibula; 4, anterior inferior tibiofibular ligament; 5, anterior talofibular ligament; 6, sinus tarsi fat pad; 7, extensor digitorum brevis; 8, joint capsule of ankle; 9, distal tibia. (From Thomas HA. The Ankle and Foot. In: Hoppenfeld S, deBoer P, eds. Surgical Exposures in Orthopaedics: The Anatomic Approach. Philadelphia: JB Lippincott, 1984:497.)
Figure 3.30. Anterolateral approach to the ankle. A: Skin incision. B: Deep dissection exposes the sinus tarsi distally. 1, Extensor retinaculum; 2, anterior inferior tibiofibular ligament; 3, sinus tarsi fat pad; 4, peroneus tertius tendon; 5, extensor digitorum longus tendons. C: Retraction of the tendons exposes the anterior ligament complex of the ankle. 1, Interosseous membrane; 2, extensor retinaculum; 3, distal fibula; 4, anterior inferior tibiofibular ligament; 5, anterior talofibular ligament; 6, sinus tarsi fat pad; 7, extensor digitorum brevis; 8, joint capsule of ankle; 9, distal tibia. (From Thomas HA. The Ankle and Foot. In: Hoppenfeld S, deBoer P, eds. Surgical Exposures in Orthopaedics: The Anatomic Approach. Philadelphia: JB Lippincott, 1984:497.) -
Develop the interval between the major
peroneal muscles laterally and the extensor muscles anteriorly. The
deep dissection is conducted between the extensor tendons and the
peroneal tendons, exposing the sinus tarsi distally (Fig. 3.30B). -
Retract the extensor tendons medially to expose the ankle capsule (Fig. 3.30C).
The origin of the extensor digitorum brevis can be elevated off the
calcaneus to expose the calcaneocuboid and talonavicular joints and the
fat within the sinus tarsi.
lengthenings, release of the posterior capsule of the ankle, and
exposure of posterior malleolus fractures.
-
The skin incision is based on the medial
border of the triceps surae tendon. Make a 10 cm longitudinal incision
along the posterolateral border of the tendo calcaneus to its insertion
on the calcaneus (Fig. 3.31A). Protect the terminal branches of the sural nerve laterally. Retract the tendo calcaneus medially (Fig. 3.31B).
Lengthening of the tendon can be performed if the procedure requires
it. Divide the areolar tissue anterior to the tendon, and enter the
space between the flexor hallucis longus tendon medially and the
peroneal tendons laterally.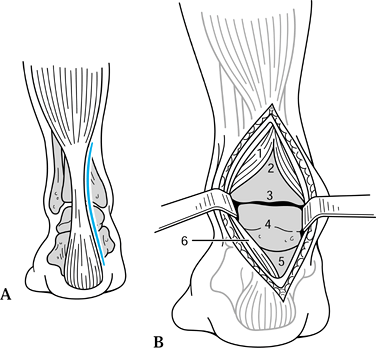 Figure 3.31. Posterior approach to the ankle. A: Skin incision. B: Deep dissection. 1, Flexor hallucis longus; 2, tibia; 3, ankle joint; 4, talus; 5, subtalar joint; 6, Achilles tendon. (From Stead Z. Exposing the Back of the Distal End of the Tibia. In: Henry AK, ed. Extensile Exposure, 2nd ed. Edinburgh: Churchill Livingstone, 1973:270-271.)
 -
Deep dissection carries the triceps surae
tendon and neurovascular bundle medially. Sharply dissect the lateral
fibers of the flexor hallucis muscle belly from the posterior fibular
border, and develop this interval, exposing the distal tibia, posterior
ankle joint, and posterior talus (Fig. 3.31B). The retracted flexor hallucis longus protects the medial neurovascular structures.
release, exploration of the neurovascular structures, exposure of
posterior malleolus fractures, and tendon lengthenings or transfers.
-
Position the patient supine in the figure-four position, with the affected ankle resting on the opposite thigh.
-
Make a 10 cm longitudinal incision along
the posterior tibial tendon, midway between the medial malleolus and
the tendo calcaneus (Fig. 3.32A). Incise the deep fascia in line with the skin incision (Fig. 3.32B).
Division of the superficial retinaculum exposes the posterior tibial,
flexor digitorum, and flexor hallucis tendons and the posterior tibial
artery and nerve.![]() Figure 3.32. Posteromedial approach to the ankle. A: Skin incision. B: Division of the superficial retinaculum. 1, Tibialis posterior; 2, flexor digitorum longus; 3, posterior tibial artery; 4, posterior tibial vein; 5, posterior tibial nerve; 6, flexor hallucis longus; 7, fascia over deep flexor compartment; 8, fibrous pulley over flexor hallucis longus (opened). (From Thomas HA. The Ankle and Foot. In: Hoppenfeld S, deBoer P, eds. Surgical Exposures in Orthopaedics: The Anatomic Approach. Philadelphia: JB Lippincott, 1984:485, 486.)
Figure 3.32. Posteromedial approach to the ankle. A: Skin incision. B: Division of the superficial retinaculum. 1, Tibialis posterior; 2, flexor digitorum longus; 3, posterior tibial artery; 4, posterior tibial vein; 5, posterior tibial nerve; 6, flexor hallucis longus; 7, fascia over deep flexor compartment; 8, fibrous pulley over flexor hallucis longus (opened). (From Thomas HA. The Ankle and Foot. In: Hoppenfeld S, deBoer P, eds. Surgical Exposures in Orthopaedics: The Anatomic Approach. Philadelphia: JB Lippincott, 1984:485, 486.) -
Retract the tendon of the flexor hallucis
longus medially after dissecting its lateral fibers off the fibula,
protecting the nerve and artery, and exposing the distal posteromedial
corner of the tibia with the ankle joint capsule.

of posterior malleolus fractures, posterior capsulotomy, posterior
subtalar facet arthrodesis, and tendon lengthenings and transfers.
-
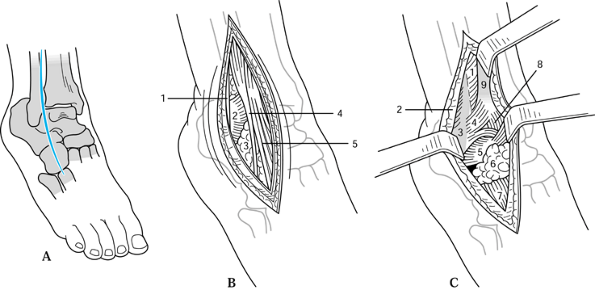
Position the patient prone. Make a
longitudinal 10 cm incision halfway between the posterior border of the
lateral malleolus and the lateral border of the Achilles tendon (Fig. 3.33A).
The lateral border of the triceps surae tendon is a landmark for the
incision. Protect the terminal branch of the sural nerve. The peroneus
brevis consists of a muscle belly in this region, and the peroneus
longus is tendinous. Incise the peroneal retinaculum to allow easy
repair.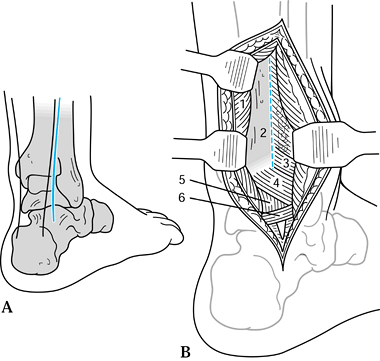 Figure 3.33. Posterolateral approach to the ankle. A: Skin incision. B: The tendon is retracted medially and the peroneal tendons laterally. 1, Flexor hallucis longus (detached); 2, posterior tibia (incise periosteum); 3, posterior inferior tibiofibular ligament; 4, transverse tibiofibular ligament; 5, posterior joint capsule of ankle; 6, posterior talofibular ligament. (From Thomas HA. The Ankle and Foot. In: Hoppenfeld S, deBoer P, eds. Surgical Exposures in Orthopaedics: The Anatomic Approach. Philadelphia: JB Lippincott, 1984:489, 491, 517.)
 -
Detach the lateral fibers of the flexor
hallucis longus where they arise from the fibula. Retract this muscle
medially, exposing the posterolateral ligament complex (Fig. 3.33B). Longitudinal subperiosteal dissection exposes the distal tibia, and a linear capsular incision exposes the joint.
longitudinal skin incisions directly over the malleoli (rather than
curved incisions) permit direct access, are extensile, and have low
morbidity (Fig. 3.34).
 |
|
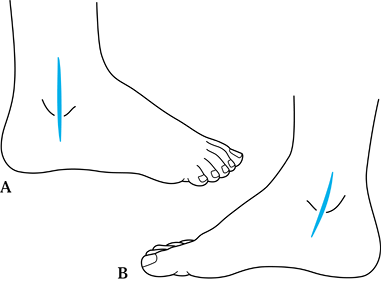
Figure 3.34. Medial and lateral approaches to the ankle. A: Lateral approach. The skin, subcutaneous tissue, and periosteum is incised in line with the distal fibula. B:
Medial approach. The incision is placed centrally in the midportion of the medial malleolus. The skin, subcutaneous tissue, and periosteum dissection is in line with the incision. Care must be taken not to divide the saphenous vein. |
the ankle joint allows good exposure of the talonavicular joint,
naviculocuneiform joint, and the first metatarsal–cuneiform joint.
Preserve the dorsal veins and gain direct exposure of the joints of the
mid foot between the tendons of the extensor digitorum. More distal
exposure and deep dissection exposes the bases of the metatarsals.
-
Beginning proximally, make the anterior incision (Fig. 3.35)
in line with the lateral aspect of the second metatarsal, and continue
it distally. Retract the deep peroneal nerve and dorsalis pedis artery
medially with the extensor hallucis longus and tibialis anterior
tendons, exposing the dorsal capsular structures of these joints.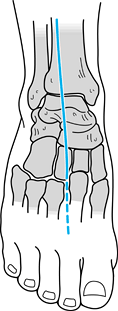 Figure 3.35. Anterior approach to the tarsus. This exposure is the distal extension of the anterior approach to the ankle (see Fig. 3.28). (From Thomas HA. The Ankle and Foot. In: Hoppenfeld S, deBoer P, eds. Surgical Exposures in Orthopaedics: The Anatomic Approach. Philadelphia: JB Lippincott, 1984:472, 513.)
 -
Incise the capsule of the involved joint
longitudinally and dissect subperiosteally to expose the joint(s) for
arthrodesis or open reduction of articular surfaces.
 |
|
Figure 3.36. Lateral approaches to the tarsus: Kocher and Ollier. A: Skin incisions. 1, Skin incision, Kocher approach; 2,
skin incision, Ollier approach. (From Stead Z. Exposure of the Distal Two-Thirds of the Anterior Neurovascular Bundle. In: Henry AK, ed. Extensile Exposure, 2nd ed. Edinburgh: Churchill Livingstone, 1973:277.) B: Deep dissection of the Ollier approach consists of detaching the extensor digitorum brevis and retracting distally exposing the midtarsus. The deep exposure of the Kocher approach is similar in its distal arm but yields better access to the subtalar joint because of its proximal arm. 1, Anterior talofibular ligament; 2, sinus tarsi fat pad; 3, posterior talocalcaneal joint; 4, peronei; 5, calcaneocuboid joint; 6, extensor digitorum brevis; 7, talonavicular joint. (From Thomas HA. The Ankle and Foot. In: Hoppenfeld S, deBoer P, eds. Surgical Exposures in Orthopaedics: The Anatomic Approach. Philadelphia: JB Lippincott, 1984:503.) |
-
Begin the incision as far proximally as indicated, and
P.49
proceed longitudinally 2 cm posterior to the fibula. Gently curve the
incision anteriorly at the distal flare of the fibula, and reach the
midpoint of the bone 2.5 cm distal to the tip (Fig. 3.36A).
Curve the incision 110° anteriorly in the direction of the
talonavicular joint. Incise the peroneal fascia, and retract the
tendons posteriorly, protecting the sural nerve. -
Divide the talocalcaneal ligament to expose the subtalar joint capsule (Fig. 3.36B).
If possible, avoid dividing the peroneal tendons because of the risk of
scarring within the sheath; if necessary, use a step-cut technique. The
calcaneonavicular joint capsule can be visualized by dissection further
distally, following the peroneus brevis tendon. -
To visualize the articular surface of the
tibia, divide the anterior talofibular ligament and sublux the talus by
varus stress. Divide the capsule and synovium anterior to the fibula,
revealing the articular surfaces of the ankle.
of the talonavicular joint, calcaneocuboid joint, and lateral subtalar
joint. It provides an excellent cosmetic result because of the
abundance of soft tissue in the area.
-
Begin the incision 3 cm posterior to the calcaneocuboid joint (Fig. 3.36A).
Follow the skin lines in an anteromedial direction, and end the
incision over the dorsal aspect of the talonavicular joint. Do not
undermine the skin flaps. -
Detach the origin of the extensor digitorum brevis, and retract it distally (Fig. 3.36B).
If possible, preserve the fat within the sinus tarsi to maintain the
contour of the foot and improve soft-tissue coverage. Medially, retract
the extensor tendons to expose the talonavicular joint. Laterally,
retract the peroneal tendons to fully expose the calcaneocuboid joint
and the posterior facet of the subtalar joint. The joint capsules can
be sharply dissected free in line with the joint surfaces to expose the
joints as necessary.
fractures in the setting of a trimalleolar ankle fracture calls for the
lateral Gatellier and Chastung approach. This method can also be used
for anterolateral osteochondral fractures.
-
Make the incision along the fibula, beginning 15 cm proximally from the tip (Fig. 3.37A).
Curve the incision anteriorly along the pathway of the peroneal tendons
at the tip of the fibula. Expose the fibula subperiosteally. Incise the
periosteal tendon sheath, allowing the tendons to sublux anteriorly,
and turn the fibula distally through the fracture.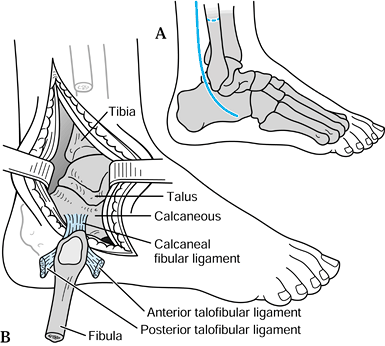 Figure 3.37. Lateral approach to the tarsus of Gatellier and Chastung. A: Skin incision and level of fibular osteotomy. B:
The fibula has been osteotomized and reflected, based on the
calcaneofibular ligament. Sectioning of the anterior and posterior
talofibular ligaments exposes the ankle joint. (From Stead Z. Exposure
of the Fibula and Nerves Related to It. In: Henry AK, ed. Extensile Exposure, 2nd ed. Edinburgh: Churchill Livingstone, 1973:293.) -
Alternatively, make an osteotomy 7–10 cm
from the fibular tip to allow this same maneuver. The calcaneofibular
and talofibular ligaments serve as the hinge for the fibula to allow
complete exposure of the distal tibia and ankle joint (Fig. 3.37B).
Fix the fracture or osteotomy of the fibula anatomically and rigidly,
and carefully reconstruct the peroneal tendon sheath. The disadvantage
of this approach is devascularization of the distal tibia.
-
Make the incision from an anterior
position located 3 cm anterior and 4 cm inferior to the tip of the
medial malleolus. Extend the incision in a straight line to the medial
border of the Achilles tendon. Divide the deep fascia in line with the
incision, and similarly divide the fat deep to this layer. -
Retract the abductor hallucis inferiorly, and expose the body of the calcaneus subperiosteally. Divide the plan
P.50
tar aponeurosis and strip the muscle origins inferiorly to expose the
plantar surface. Whenever possible, minimize the dissection of the
specialized plantar tissues because of the highly specialized septa
that originate in the body of the calcaneus.
subtalar joint for isolated subtalar arthrodesis or open reduction of
this joint.
-
Begin the incision at the lateral border of the tendo calcaneus at its insertion (Fig. 3.38).
Extend the incision obliquely to a point 4 cm distal to the lateral tip
of the malleolus. Protect the terminal branch of the sural nerve
posteriorly.![]() Figure 3.38. Lateral approach to the calcaneus. The skin incision is essentially that of Figure 3.36,
Figure 3.38. Lateral approach to the calcaneus. The skin incision is essentially that of Figure 3.36,
extended 2 cm distally. The peroneal tendon sheath is opened, and the
tendons are subluxed anteriorly to expose the subtalar joint. 1, Lateral malleolus; 2, posterior talocalcaneal joint; 3, peroneal fascia; 4, peroneal tubercle; 5, peroneal tendons. (From Thomas HA. The Ankle and Foot. In: Hoppenfeld S, deBoer P, eds. Surgical Exposures in Orthopaedics: The Anatomic Approach. Philadelphia: JB Lippincott, 1984:506.) -
Expose the peroneal tendons, and retract
superiorly to expose the bone and subtalar joint. In extreme
circumstances, the tendons can be sectioned and resutured. Handle the
fragile skin and soft tissues carefully in cases of trauma to lessen
the relatively high risk of wound complications after this exposure.
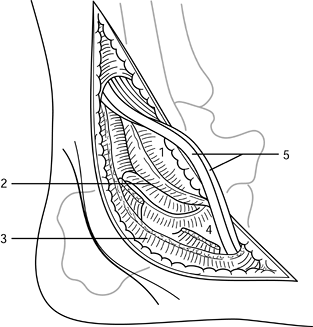
internal fixation of fractures of the calcaneus because it allows
better exposure of the posterior calcaneus (personal communication,
1988). It is essentially a lateral approach, but the skin incision
parallels the Achilles tendon as far as 1–2.5 cm above the
weight-bearing surface of the foot, where it then turns anteriorly,
parallel to the plantar aspect of the heel (Fig. 3.39).
Carry the incision to the calcaneocuboid joint, and develop the
proximal flap at a subperiosteal level. The sural nerve and peroneal
tendons are maintained within this thick flap. Do not make the corner
too short. Avoid excessive fixed retraction to prevent slough of the
corner of the flap.
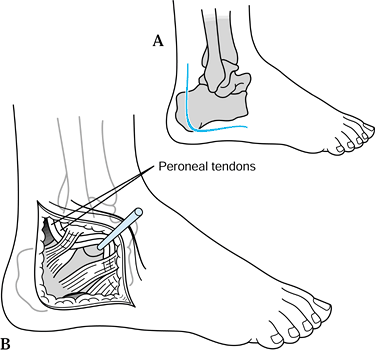 |
|
Figure 3.39. Lateral approach to the calcaneus for open reduction and internal fixation (ORIF), as popularized by Benirschke. A: The skin incision is more vertical and posteriorly placed than the standard lateral approach (see Fig. 3.38).
This enables full exposure of the calcaneal tuberosity. The incision is curved anteriorly at the inferior border of the calcaneus. B: The flap is elevated and includes the skin and subcutaneous fat, the calcaneal fibular ligament and perineal tendon sheaths. Kirschner wires can be placed in the talus to retract the flap. |
-
Position the patient prone. Connect the
posterior two thirds of the medial and lateral approaches at the level
of the insertion of the tendo calcaneus. To expose the subtalar joint
completely, step-cut to lengthen the tendo calcaneus. Carefully
preserve the sural nerve during this exposure. Expose the body of the
calcaneus medially and laterally by subperiosteal dissection.
-
Position the patient prone. Make a longitudinal incision in the middle of the heel (Fig. 3.40A).
![]() Figure 3.40. Gaenslen’s split heel approach to the calcaneus. A: Skin incision. B:
Figure 3.40. Gaenslen’s split heel approach to the calcaneus. A: Skin incision. B:
The specialized fibrofatty tissue of the heel pad has been divided in
line with the incision. The tuber of the calcaneus and the plantar
fascia has been divided and the plantar neurovascular bundle protected
distally. 1, Calcaneus; 2, plantar nerve; 3, plantar artery; 4, plantar fascia. (From Edmonson AS, Crenshaw AH, eds. Campbell’s Operative Orthopaedics, 6th ed, vol 2. St. Louis: CV Mosby, 1980:1317.) -
Split the tuber of the calcaneus 2–3 cm;
make certain that the skin incision is long enough to allow the split.
Divide the plantar aponeurosis from the plantar surface of the
calcaneus at the level of the abductor digiti quinti (Fig. 3.40B). -
Protect the lateral plantar artery and
nerve and retract them medially in the distal portion of the wound.
Divide the quadratus plantae longitudinally with sharp dissection and
split the calcaneus longitudinally with a sharp osteotome. Spread the
two halves to allow complete resection of necrotic bone. Preserve the
cortical shell as much as possible.
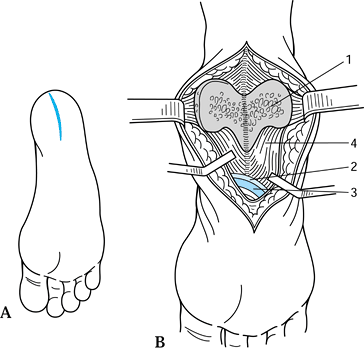
longitudinal incisions on the medial side of the foot over the first
metatarsal, on the lateral side of the foot over the fifth, or through
the second-to-third or third-to-fourth metatarsal intervals. For
multiple metatarsal fractures, the middle three bones can be reached
through the two intervals. If feasible, preserve veins along with minor
cutaneous nerve branches. Retract the extensor tendons medially or
laterally, and directly expose the bone.
the individual neurovascular bundles. Use the dorsal approach for
metatarsal bony problems because of the multiple layers of flexor
tendons. The intervals for the incisions are the same as the dorsal
incisions. Incise the deep fascia in line with the skin, and retract
the flexor tendons medially or laterally as indicated. The
neurovascular bundles lie among the flexor digitorum brevis, abductor
hallucis, abductor digiti quinti, and the long flexor tendons.
-
Approach the second through fifth metatarsophalangeal joints through dorsal incisions lateral to the extensor tendons (Fig. 3.41). In the case of the fifth meta
P.52
tarsophalangeal joint, make the incision on the medial side of the extensor tendon. Figure 3.41. Dorsal approach to the metatarsophalangeal joints. A: Skin incision outlined lateral to the extensor complex. 1, Saphenous nerve; 2, deep peroneal nerve; 3, branches of superficial and peroneal nerves; 4, extensor digitorum longus. B:
The extensor tendon can be retracted laterally, exposing the
metatarsophalangeal joint. For exposure of the metatarsal shafts, the
incisions are carried more proximally, the dorsal veins preserved
whenever possible, and the tendons retracted medially or laterally. 1, Extensor digitorum longus tendon; 2, joint capsule. (From Thomas HA. The Ankle and Foot. In: Hoppenfeld S, deBoer P, eds. Surgical Exposures in Orthopaedics: The Anatomic Approach. Philadelphia: JB Lippincott, 1984:525.) -
Retract the tendons, and open the joint capsule by a longitudinal incision.
-
For resection of common digital
(Morton’s) neuromas, make a longitudinal incision over the dorsum of
the web space of concern. Dissect deeply, taking care to identify and
retract the extensor tendons and superficial sensory nerves. Identify
the digital nerves and trace them proximally to the common digital
nerve.
the common digital nerves. A plantar approach is indicated as well in
cases of metatarsophalangeal joint sepsis. Make longitudinal incisions
between the metatarsal heads. The neurovascular bundles are located
deep to the long flexor tendons, which must be retracted to expose the
metatarsophalangeal joints to the side of least resistance. Although
earlier teaching indicated that plantar scars are painful, well-placed
ones usually are not.
through a 4 cm dorsomedial incision. Protect the dorsal digital nerve,
and turn the joint capsule back on a distally based flap for
reconstructive bunion procedures.
straight linear incisions by retracting the extensor mechanism to one
side. Carefully repair the extensor mechanism. The interphalangeal
joints can also be exposed by mid-lateral incisions, carefully
retracting the neurovascular bundles plantarward. In general, we do not
recommend a plantar incision, because the stout flexor tendons and
neurovascular bundles are problems from this approach.
scheme: *, classic article; #, review article; !, basic research
article; and +, clinical results/outcome study.