
VII – Foot and Ankle > Chapter 34 – Hallux Valgus Correction:
Modified Mcbride and Chevron Osteotomy
angle between the first metatarsal shaft and the proximal phalanx is
greater than 15 degrees. The condition represents a statistical range
of normality rather than a pathologic entity in and of itself. When a
patient presents complaining of a “bunion.” the clinician must first
determine the source of the symptoms, such as whether the chief
complaint is cosmetic or there is a localized pain due to poor shoe
fit, arthritis, tendonitis, neuroma, or progressive deformity of
adjacent toes. The treatment should be tailored to treat the chief
complaint and the inherent pathomechanics of hallux valgus.
Radiographs, although useful for determining corrective procedures and
their respective known limitations, are no substitute for a good
history and a problem-oriented clinical examination.
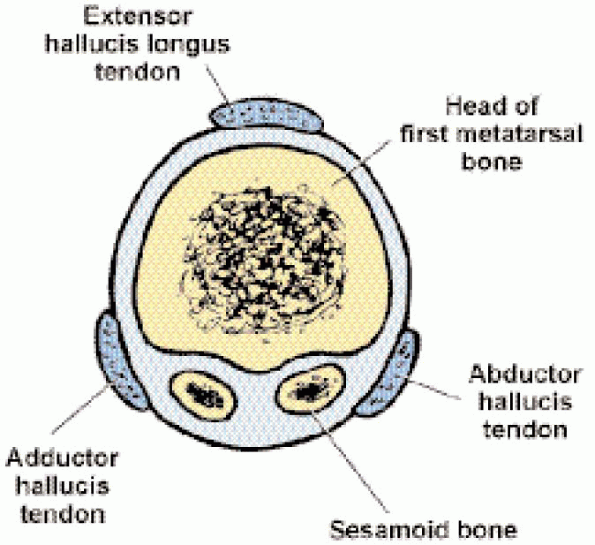
statically in place by medial and lateral collateral ligaments, the
volar plate and the sesamoid complex on the plantar aspect, and the
dorsal capsule on the dorsum of the MTP joint (Fig. 34-1).
The dynamic stabilizers are the abductor hallucis medially, the
adductor hallucis laterally (two heads indicate a conjoint tendon), the
extensor hallucis longus (EHL) and brevis dorsally, and the flexor
hallucis longus and brevis on the plantar aspect. The sesamoids sit on
either side of a crista. They are also held in place by the sesamoid
metatarsal retinaculum, with the lateral sesamoid tethered to the
second metatarsal head by the deep transverse metatarsal ligament. As
the HVA angle increases, the abductors become mechanically
disadvantaged and the extensors and flexors progressively fall lateral
to their neutral position and secondarily become adductors. The
abductor itself can be displaced plantarward, causing pronation of the
toe. Because every action has an equal and opposite reaction, the
result is increasing medialization of the metatarsal head and an
increase in the intermetatarsal angle. Ultimately, the static medial
ligaments stretch out, and the proximal phalanx subluxates laterally,
leading to an incongruous joint. Because the sesamoids are tethered by
the intermetatarsal ligament, they remain in place as the head moves
medially, making them appear to have dislocated laterally.
in the hallux valgus angle (HVA) or an associated bursa that thickens
the area. The degenerative exostosis of hallux rigidus can be
dorsomedial in location and mimic a hallux valgus but requires a
different treatment.
most common cause of failure or recurrence (barring the patient
returning to shoes that just do not fit) is stretching the indications
for surgery. Surgical treatment is most appropriate when it
addresses the symptoms and concerns of the patient. Hence, the surgical
decision-making process is “guided” by the HVA and the intermetatarsal
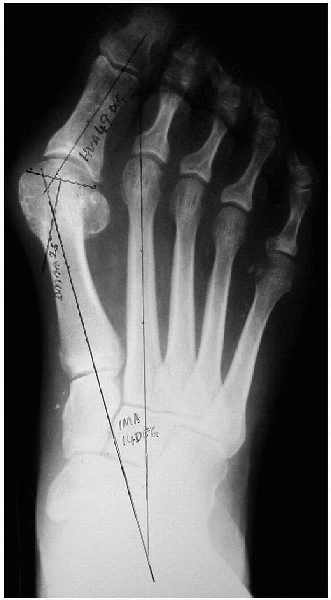
angle (IMA) rather than being dogmatically determined by them (Fig. 34-2 and Table 34-1).
 |
|
FIGURE 34-1. Anatomy of first metatarsophalangeal joint.
|
 |
|
FIGURE 34-2.
Weight-bearing radiograph with the hallux valgus angle (HVA), intermetatarsal angle (IMA), and distal metatarsal articular angle (DMAA) drawn. |
genetic predisposition, or both—hence the need for bony corrections and
a subgroup of patients who have increased distal metatarsal articular
angle (DMAA). For elderly patients, the surgeon should consider a
simple exostectomy, Keller procedure, or a fusion. For neuromuscular
conditions, the surgeon should first lean toward an MTP arthrodesis,
particularly if the condition is progressive. For patients with
metatarsocuneiform joint pathology (i.e., instability or degenerative
arthritis), an arthrodesis of the first metatarsocuneiform joint (i.e.,
Lapidus procedure) should be considered. For patients with MTP
arthritis (especially inflammatory joint disease), an arthrodesis
should be considered. An Aiken osteotomy of the proximal phalanx is
used for hallux valgus interphalangeus or to augment a procedure that
does not correct the hallux valgus angle or IMA satisfactorily. It may
be used in patients with asymptomatic hallux valgus associated with
hammering of the second toe to make space for the second toe to be
brought down into. Clinicians should beware of
younger patients with a hallux valgus and a congruent joint. They may
have an increased DMAA and require a distal bony procedure that
addresses this angular deformity. In an elderly patient,
remember the adage that “the punishment should fit the crime,” meaning
that the surgeon should perform a simple exostectomy or a Keller
procedure so the foot may fit in a shoe rather than performing a
complex distal soft tissue procedure with a proximal osteotomy. For
patients with neuromuscular problems, arthritis, or failed hallux
valgus surgery, an MTP fusion should be considered.
|
TABLE 34-1. GUIDE FOR THE CHOICE OF A SURGICAL PROCEDURE
|
||||||||||||||||||||||||||||||||
|---|---|---|---|---|---|---|---|---|---|---|---|---|---|---|---|---|---|---|---|---|---|---|---|---|---|---|---|---|---|---|---|---|
|
||||||||||||||||||||||||||||||||
-
Consider the symptoms (i.e., surgery should address the individuals complaints).
-
Assess the angles on weight-bearing, anteroposterior radiographs (Fig. 34-2).
-
Examine for instability or degenerative joint disease of the metatarsocuneiform joint.
-
Consult the guide for the choice of a surgical procedure (Table 34-1).
-
Wire driver, wire cutter
-
Sagittal saw
-
60-degree cutting guide (optional)
the EHL is tight and acts as a deforming force and must be lengthened.
An Esmarch tourniquet may noticeably tighten the EHL tendon. If this
occurs, the tourniquet is taken down so that the EHL is not
Z-lengthened erroneously. The leg can be placed on a wellpadded stand to facilitate access. A hip roll can prevent external rotation of the foot.
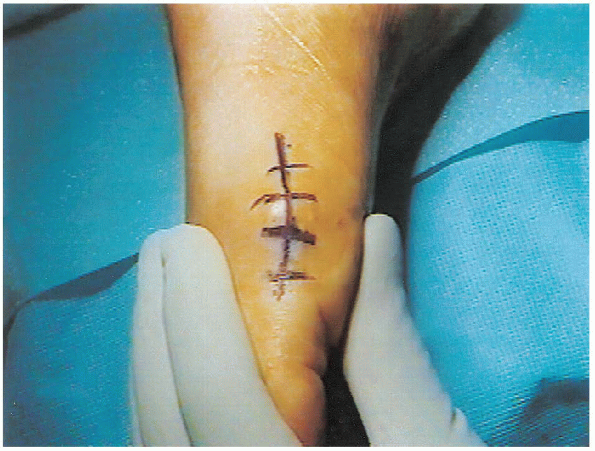
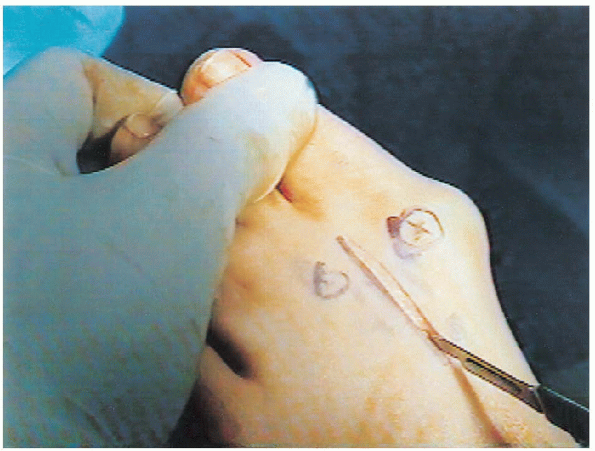
from the center of the middle one third of the proximal phalanx to the
center of the head to the center of the first metatarsal shaft (Fig. 34-3).
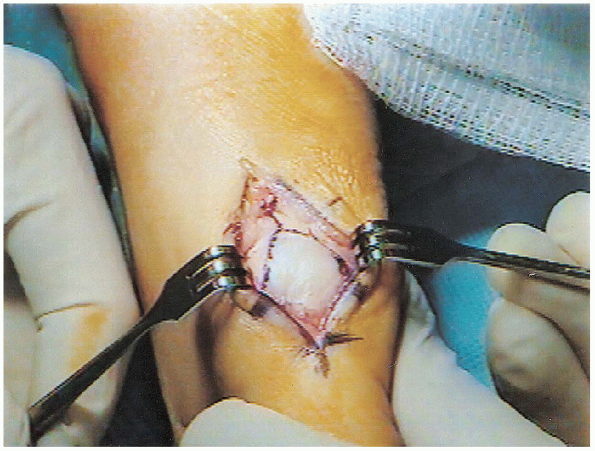
eminence, the surgeon should take care to spread down to the capsule,
using blunt dissection with a Stevens or Littler scissors. Often,
the dorsal digital nerve may have been displaced from its dorsomedial
position to a more medial central position on the exostosis and can be
inadvertently injured. A plane should be developed over the capsule that allows a V-Y capsulotomy.
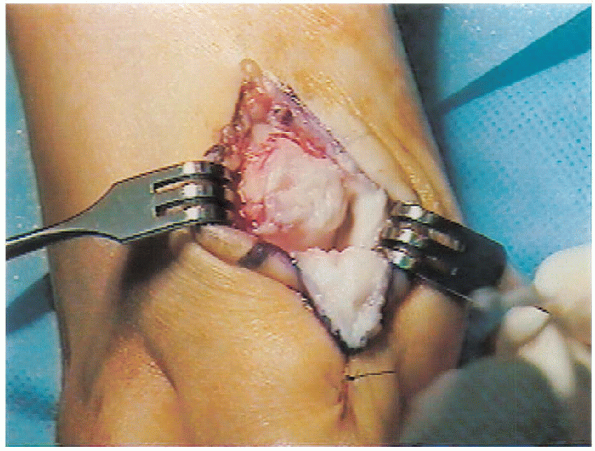
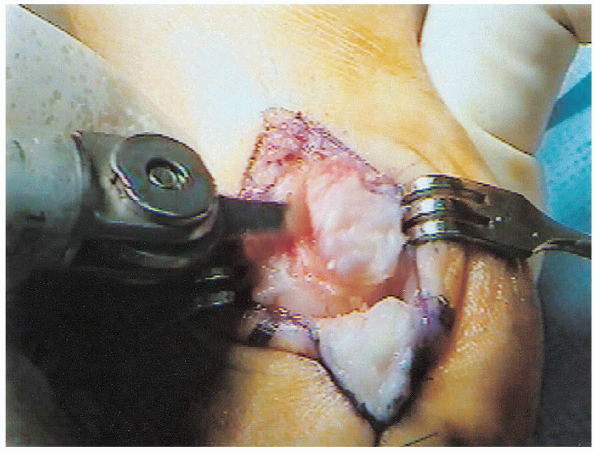
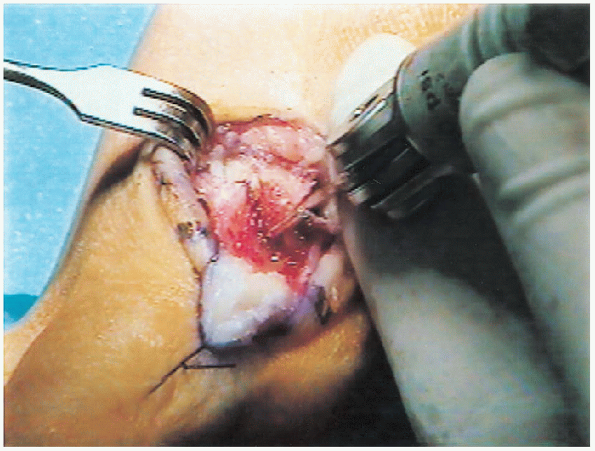
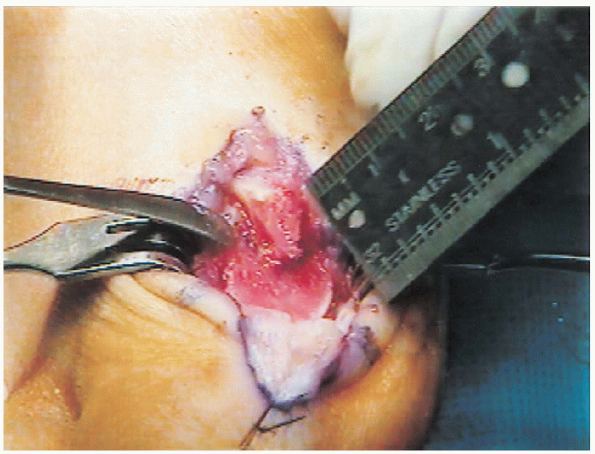
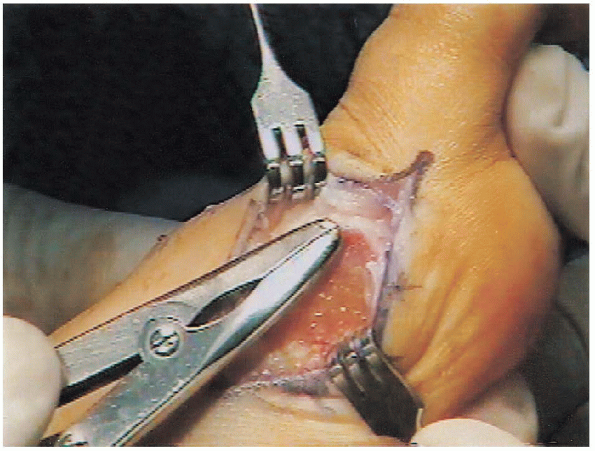
 An exostectomy is performed with a sharp osteotome or a sagittal saw at the level of the sulcus (Fig. 34-6). The cut should be made parallel to the medial margin of the foot and perpendicular to the dorsum of the foot. The center of the head is then determined at approximately
1 cm from the articular margin.
A 60-degree angled cut is marked at the center of the head in such a
manner that the limbs extend proximal to the joint capsule (Fig. 34-7).
Whether the dorsal limb is equal to the plantar limb depends on the
surgeon, especially if fixation with a screw is contemplated. A
0.62-inch Kirschner wire (K-wire) is inserted at the center of the head
to help in orienting the two cuts in the same plane and to help prevent
cutting beyond the center of the head. Divergent
cuts in the mediolateral plane should be avoided, because with these
type of cuts, the head may jam on the proximal shaft that then acts
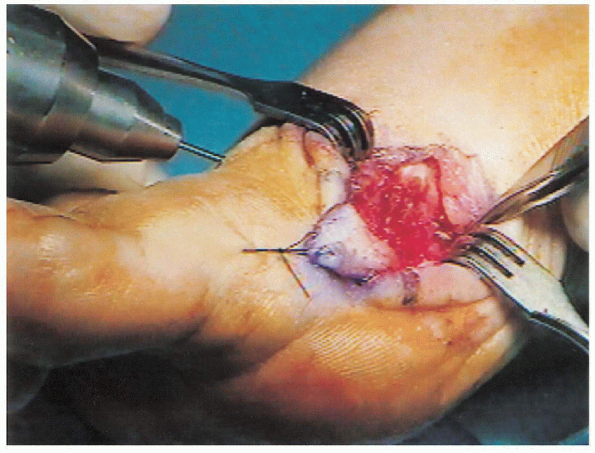
like a wedge and splits the head. The wire is cut short (Fig. 34-8), and a sagittal saw blade is used to make the osteotomy (Fig. 34-9).
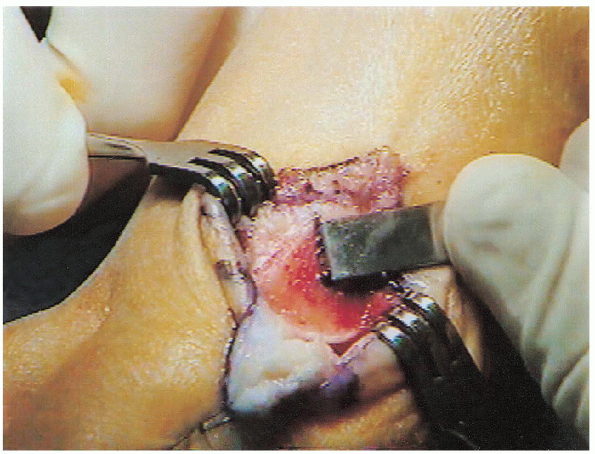
Soft tissue is gently elevated with a Freer elevator and retracted with
a narrow baby Hohmann retractor, taking care not to overstrip the
lateral tissue and devascularize the head. After cuts are made, the
blade can be removed and used as a probe to ensure a full lateral cut
and further clear the soft tissue that may prevent lateralization of
the head. The head is displaced approximately 4 mm laterally and impacted (Fig. 34-10).
In general, the osteotomy is stable in this position, because the
normal tissue tension (e.g., tendons) provides constant impaction at
the osteotomy site.
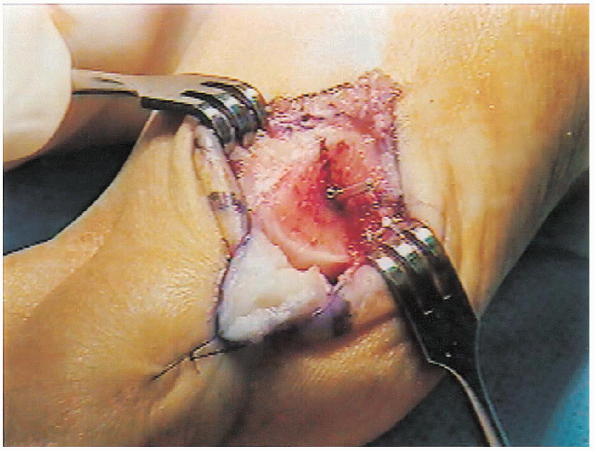
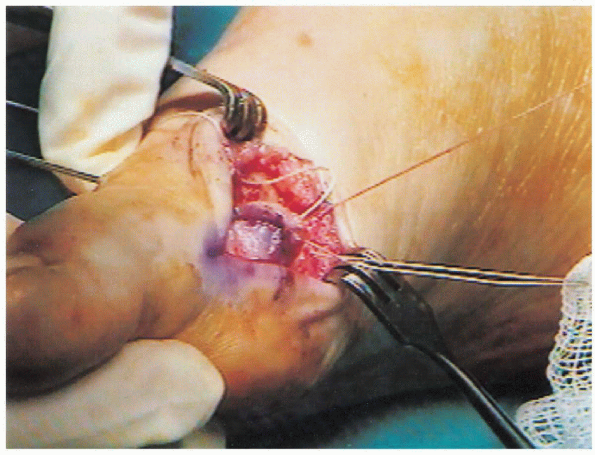
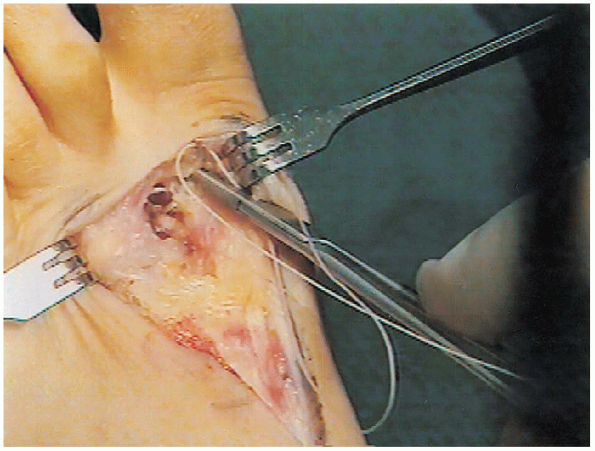
If the osteotomy appears to be unstable, a 0.45-inch K-wire can be
placed under direct visualization and left out through the skin (Fig. 34-11) ;
the wire can be removed at 3 weeks after surgery . The medial eminence
of the proximal shaft is shaved off and made smooth with a sagittal
saw. The V-Y capsulotomy is advanced and closed first with a 0- Vicryl corner stitch while the toe is held in varus (Fig. 34-12). The
capsulotomy is then closed with 0-Vicryl, taking care to identify the
dorsal digital nerve that is invariably trying to be incorporated into
the capsulorrhaphy. The skin is closed with 4-0 nylon vertical mattress sutures.
 |
|
FIGURE 34-3.
Incision landmarks from the center of the proximal phalanx to the center of the head to the center of the first metatarsal shaft. The incision is 6 to 8 cm long. |
 |
|
FIGURE 34-4. The V-Y capsulotomy is marked with the arms distal and the tail proximal.
|
 |
|
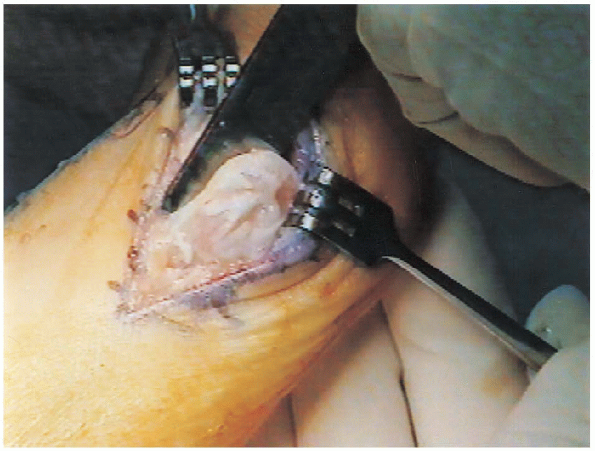
FIGURE 34-5. Exostosis exposed after sharp dissection.
|
 |
|
FIGURE 34-6. Exostectomy is performed with a sharp osteotome or a sagittal saw at the level of the sulcus.
|
 |
|
FIGURE 34-7.
The center of the head is determined, and a 60-degree angled cut is marked at the center of the head so that the limbs extend proximal to the joint capsule. |
 |
|
FIGURE 34-8. The Kirschner wire is cut short.
|
 |
|
FIGURE 34-9.
A saw blade is used to perform an osteotomy. A Freer elevator and a baby Hohmann retractor are used to elevate and retract the soft tissue. |
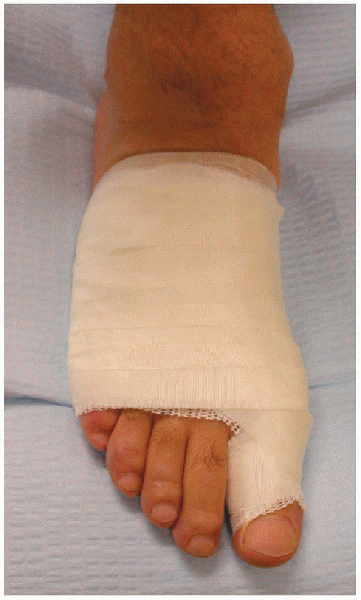
A Xeroform dressing is applied, followed by a toe spica bandage (Fig. 34-13). If
no internal fixation is used, the surgeon should exercise caution at
the time of dressing; otherwise, excessive tightness of the dressing
can undo the correction.
 |
|
FIGURE 34-10. The head is displaced approximately 4 mm laterally and impacted.
|
 |
|
FIGURE 34-11. If the osteotomy appears to be unstable, a 0.45-inch Kirschner wire can be placed under direct visualization.
|
bearing weight for 2 weeks. At 2 weeks, sutures are removed,
radiographs are taken, and a new toe spica is applied. The patient is
then allowed to walk on the heel, bearing weight as tolerated. At 3
weeks after surgery, the pin, if present, is removed, and a toe spica
is reapplied. The toe can be manipulated to break up adhesions, and the
spica is reapplied. During the fourth week, if the patient is amenable,
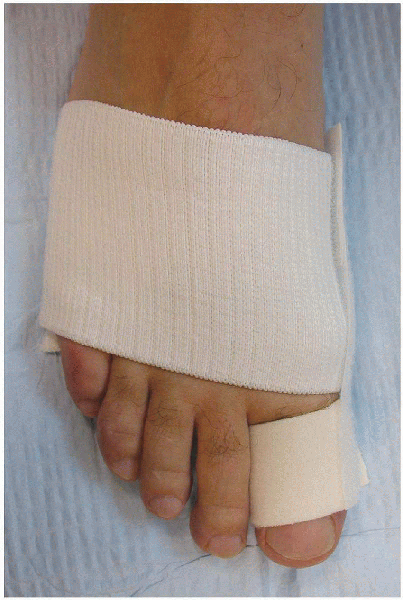
he can be placed in a DarcoTM splint (Fig. 34-14),
which is to be worn 24 hours each day. The splint can be removed to
washing the foot. By 6 to 8 weeks, the osteotomy is healed, and the
patient can go into a preapproved closed-toe shoe. Formal physical
therapy
can be started. Three months after surgery, the patient can try to wear
“dress shoes.” Outlining the foot on a piece of paper and superimposing
the shoe can help the clinician point out obvious sizing problems. The
patient should be instructed to wear the splint at night for 6 more
weeks.
 |
|
FIGURE 34-12. The V-Y capsulotomy is advanced and closed with a 0-Vicryl corner stitch while the toe is held in varus.
|
 |
|
FIGURE 34-13. A xeroform dressing is applied, followed by a toe spica cast.
|
 |
|
FIGURE 34-14. A Darco splint is applied to hold the toe in position.
|
tissue procedures. It releases the deforming force of the conjoint
tendon and the lateral joint contracture. Medially, it reefs up the
medial capsule after the eminence is removed. A lateral sesamoidectomy
can be performed for sesamoid degenerative joint disease (i.e.,
component of the classic McBride procedure).
-
Standard sagittal saw
-
Osteotomes
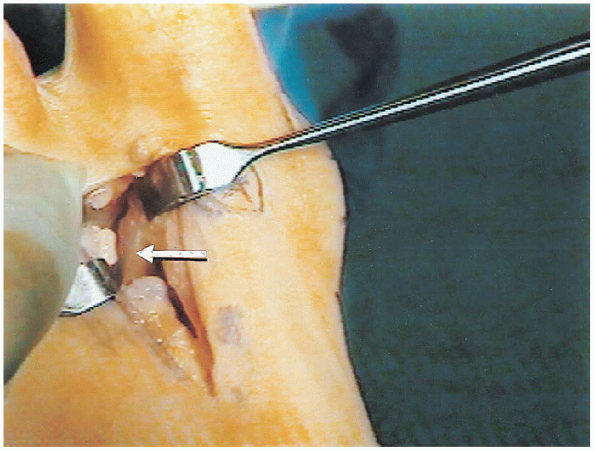
first intermetatarsal space (1-2 space) is approached dorsally. A space
is developed between the metatarsal heads using blunt dissection,
taking care to avoid injury to the dorsal digital nerve branches. A
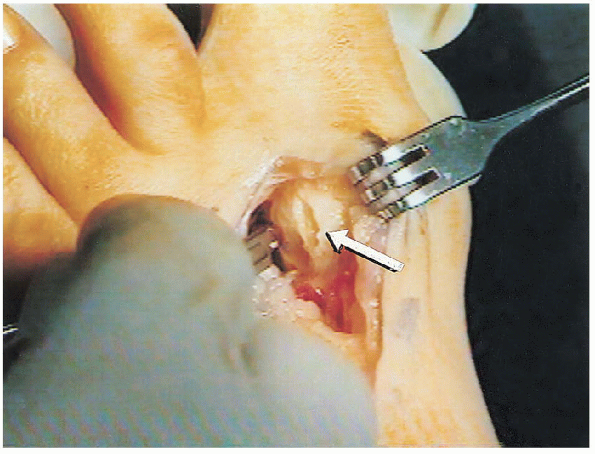
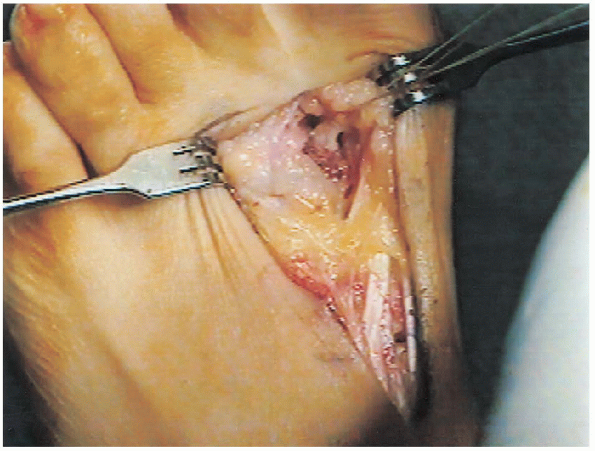
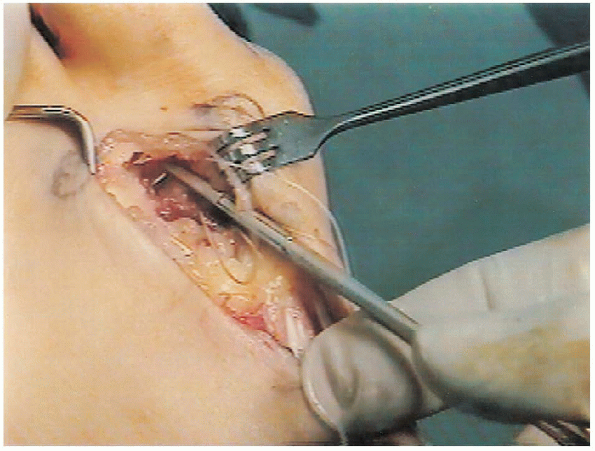
bursa may be encountered. The conjoint tendon is identified and freed
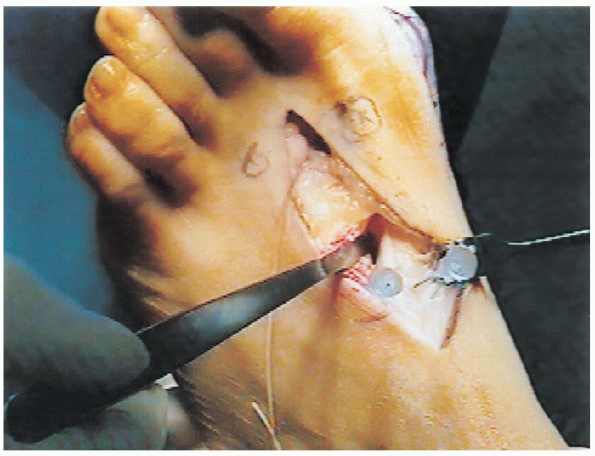
inferiorly to avoid injury to the plantar digital nerve (Fig. 34-16).
Sesamoid orientation is determined by a preoperative radiograph, which
may help while performing the longitudinal capsulotomy.
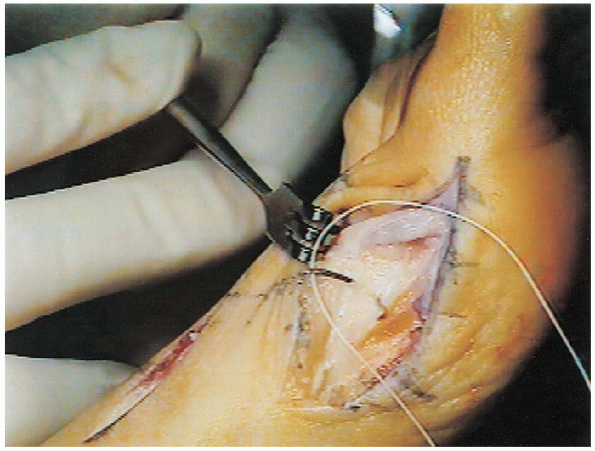
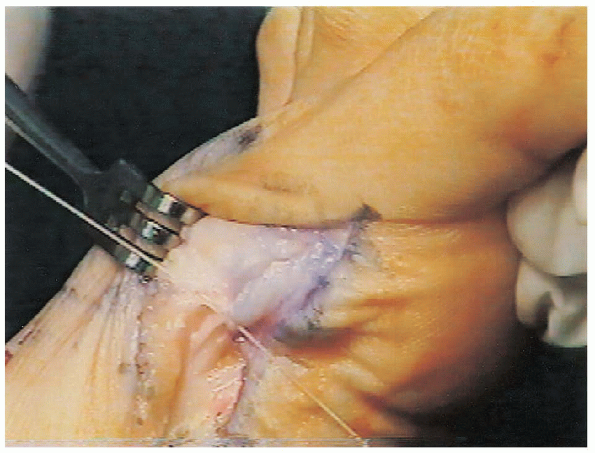
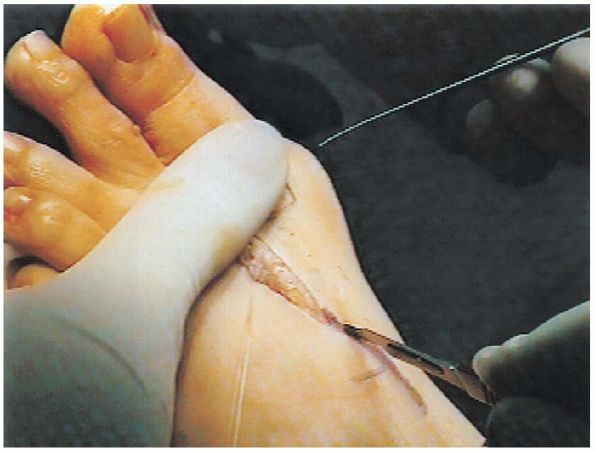
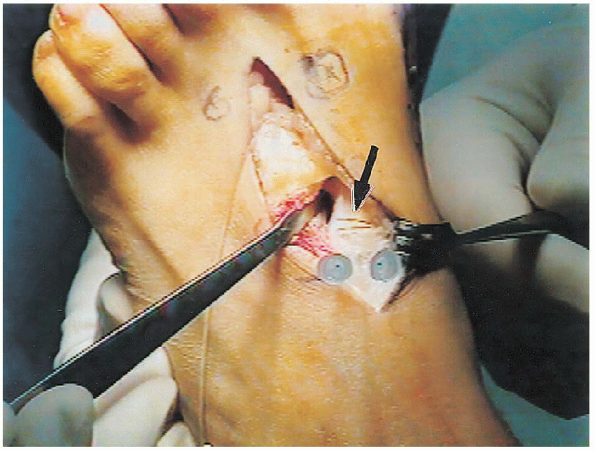
Sesamoids might have become rotated and the flexor hallucis brevis inadvertently tenotomized. The conjoint tendon is tenotomized (Fig. 34-17) at its insertion on the lateral base of the proximal phalanx, then stripped off the lateral sesamoid back to the muscle bellies, and tagged for future transfer. A lateral capsulotomy is performed with multiple stab wounds (Fig. 34-18) or a transverse capsulotomy. The toe must be stretched to at least 20 to 25 degrees of varus (Fig. 34-19). If unable to do so, consider releasing the lateral flexor hallucis brevis tendon. This should be done only when the toe cannot be stretchedinto adequate varus after the medial exostectomy
(which may be impinging) is performed to avoid an excessive release of
the lateral structures; the latter may increase the likelihood of
postoperative hallux varus.
 |
|
FIGURE 34-15.
Incision for the modified McBride procedure is similar to that for the chevron osteotomy plus first and second intermetatarsal head incisions of 4 cm. |
 |
|
FIGURE 34-16. The conjoint tendon is identified (arrow) and freed inferiorly to avoid injury to the plantar digital nerve.
|
 |
|
FIGURE 34-17.
The conjoint tendon is tenotomized at its insertion on the lateral base of the proximal phalanx and then stripped off the lateral sesamoid back to the muscle bellies and tagged for future transfer. |
 |
|
FIGURE 34-18. A lateral capsulotomy (arrow) is performed with multiple stab wounds.
|
 |
|
FIGURE 34-19. The toe must be brought into at least 20 to 25 degrees of varus after the capsulotomy
|
 |
|
FIGURE 34-20. A 6-cm medial incision made on the medial eminence.
|
 |
|
FIGURE 34-21. Longitudinal capsulotomy on the medial eminence.
|
which might have been displaced plantarward from its usual dorsomedial location. The capsulotomy can be longitudinal (Fig. 34-21)or a transverse diamond, as described by Mann. We prefer the former
because it can be used to correct the valgus and pronation of the first
toe.
Regardless of the method, the capsule and collateral ligament are stripped off the medial eminence to expose the exostosis. The eminence is removed 1 mm medial to the sulcus (Fig. 34-22) to avoid an increased likelihood of postoperative varus deformity. The sharp edges are smoothed with a rongeur and rasp (Fig. 34-23). Passive varus is rechecked to see if further lateralrelease is indicated. Tightness
of the EHL is sometimes present, acting as a valgus deforming force,
but it may be iatrogenic if an ankle Esmarch tourniquet is used.
 |
|
FIGURE 34-22. The eminence is removed 1 mm medial to the sulcus to avoid a postoperative varus deformity.
|
 |
|
FIGURE 34-23. Edges of the exostosis are smoothed with a rongeur.
|
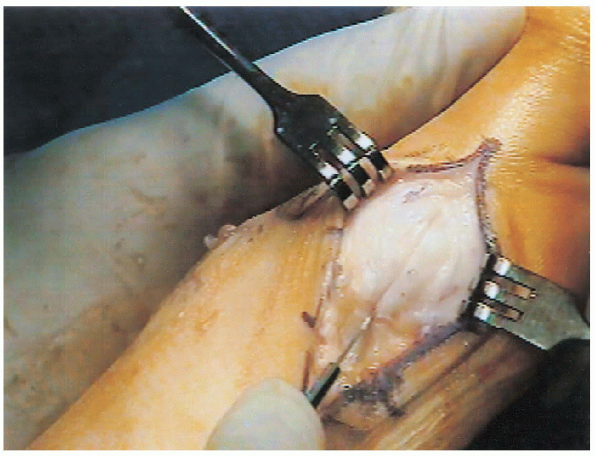
conjoint tendon is transferred to the dorsal lateral capsule of the
first metatarsal head with 0- Vicryl to act as a dynamic adductor of
the first ray and plantar flexor (Fig. 34-24).
A second 0- Vicryl suture is used to tie the capsules of the first (Fig. 34-25) and second metatarsal heads (Fig. 34-26)together to statically reduce the metatarsus primus varus if the
metatarsal cuneiform joint is mobile. The heads are forced together by
the assistant, who squeezes the forefoot as this suture is tied (Fig. 34-27).
Patients may complain of pain in this area because of the placement of
this suture. This pain resolves in time as the suture is absorbed. The
medial capsulorrhaphy is closed with the toe held in slight varus.
Beforesquaring the knot, the toe should be ranged to see if the repair of the
medial capsule and ligament is isometric, akin to anterior cruciate
ligament
isometry. The first suture of the medial capsulorraphy should be to periosteum (Fig. 34-28)
that is stable, because it acts as an anchor, or a drill hole is made
if none is available. The rest of the capsule can be closed with 2-0
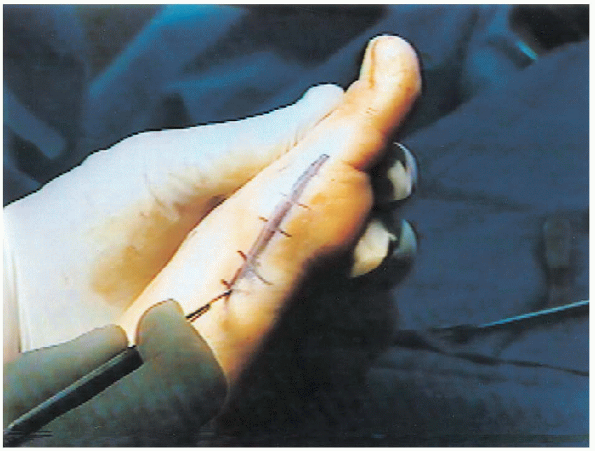
Vicryl (Fig. 34-29). The skin is closed with
4-0 vertical mattress sutures. The dressing is applied as in the
Chevron procedure. During toe spica application, the heads are squeezed
together to augment reduction of the intermetatarsal angle.
 |
|
FIGURE 34-24.
The conjoint tendon is transferred to the dorsal lateral capsule of the first metatarsal head with 0-Vicryl to act as a dynamic adductor of the first ray and plantar flexor. |
 |
|
FIGURE 34-25. Suture in the dorsolateral capsule of the first metatarsal head.
|
 |
|
FIGURE 34-26. Suture in the dorsomedial capsule of the second metatarsal head.
|
 |
|
FIGURE 34-27.
The capsules of the first and second heads are tied together to statically reduce metatarsus primus varus if the metatarsal cuneiform joint is mobile. The heads are forced together by the assistant, who squeezes the forefoot as the suture is tied. |
 |
|
FIGURE 34-28.
The first proximal knot should be tied through stable periosteum, which acts as an anchor. A drill hole is made if no stable periosteum is available. |
tolerated in a stiff postoperative shoe. Sutures are removed at
approximately 2 weeks, and a toe spica is reapplied on a weekly basis
to assure the alignment of the toe for 4-6 weeks. During this period,
undercorrection or overcorrection can be addressed. Range-of-motion
exercises can be started early if stiffness is a concern.
 |
|
FIGURE 34-29. During capsular closure, be aware of the digital nerve.
|
 |
|
FIGURE 34-30. Surgical incision landmarks for a proximal osteotomy at the base of the first metatarsal and metatarsocuneiform joint.
|
adjunct to a distal soft tissue procedure, usually in cases in which
the IMA is greater than 15 degrees or when Chevron would be
inappropriate (i.e., pronation of a toe or tightness of the conjoint
tendon). The technique varies from a crescentic proximal osteotomy to a
Chevron type or a closing
wedge.
Each technique has its advantages and disadvantages. We prefer a
closing wedge osteotomy similar to a high tibial osteotomy because it
is stable, predictable, and adjustable.
 |
|
FIGURE 34-31.
Two 25-gauge needles are placed in the joint to determine the plane of the metatarsal cuneiform joint. A baby Hohmann retractor is placed subperiosteally on the lateral side to protect the perforating branch of the dorsalis pedis artery and the deep peroneal nerve. |
-
Micro-sagittal saw with a long blade
-
Cannulated screw system with guide pins
-
Over drill
-
Image intensifier (optional)
centered over the first metatarsal cuneiform joint and taken through
the inferior bands of the extensor retinaculum. The EHL tendon is
pulled medially. The metatarsocuneiform joint is delineated by placing
two 25-gauge needles in it to determine the plane. The periosteum is
stripped off laterally and a baby Hohmann is placed to protect the
perforating branch of the dorsalis pedis artery and the deep peroneal
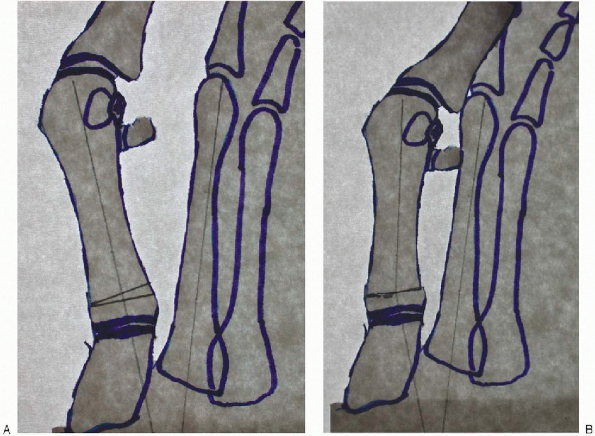
nerve (Fig. 34-31). Preoperative radiographs
determine the amount of wedge to be removed; sometimes, just the
thickness of the blade is sufficient (Fig. 34-32).
 |
|
FIGURE 34-32. A: Preoperative planning tracing of a preoperative radiograph to determine the amount of wedge to be taken. B: Preoperative tracing for correction of the deformity with wedge removed.
|
Thethickness of the metatarsal base is deeper than initially thought, and
probing with a free saw blade is recommended as is done in a Chevron.
If a plantar or lateral lip is left and unrecognized, it may cause the
surgeon to overcut medially or to make the wedge too large.
Place the guide wire for the screw in the proximal portion of the
medial wound while carefully watching for the digital nerve. Run the
guide wire up to the osteotomy site before crossing it. Saw away at the
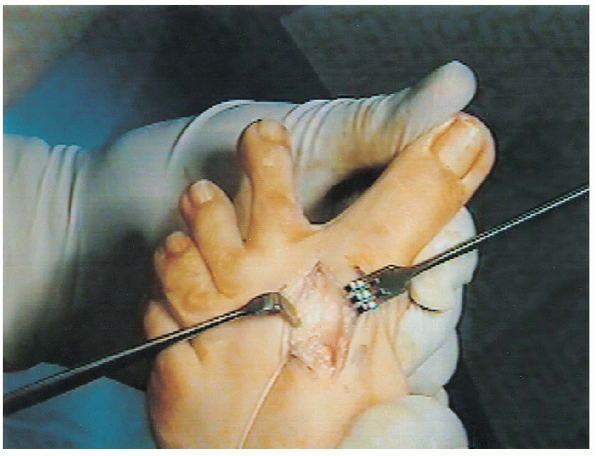
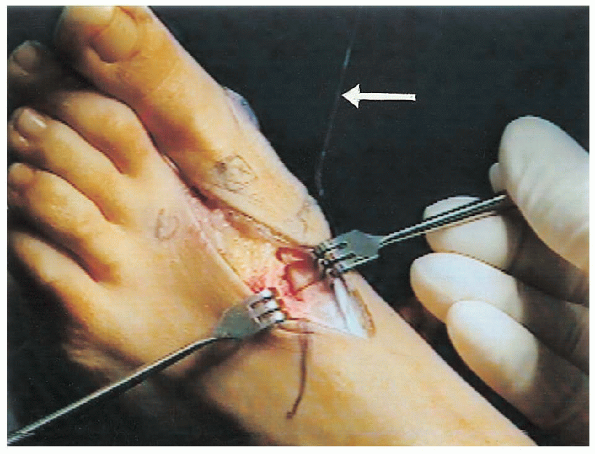
medial bone hinge until the bone can be easily bent over. Drive the wire across the osteotomy site into the proximal fragment,
and continue until the wire tents the skin dorsolaterally (Fig. 34-34). This makes recovery of the guide wire easy if it is cut while drilling (most guide wires are very thin).
Drill over the guide wire, tap the outer cortex, and insert the 4.0-mm,
partially half-threaded screw. As the screw is tightened down, the
metatarsal is forced into valgus as the screw head hits the cortex,
allowing the surgeon to fine tune the osteotomy.
If the medial hinge breaks, a K-wire or second screw should be placed
for stability. Overcorrection of metatarsus primus varus can result in
hallux varus. Transfer lesion to the second metatarsal head can occur
if the osteotomy is allowed to dorsiflex. Think
of Newton: every action has an equal and opposite reaction. While the
osteotomy is stabilized with the screw, holding the toe in varus and
dorsiflexion at the MTP joint pushes the head laterally and plantarward. This maneuver can prevent dorsiflexion at the osteotomy. The
sutures of the distal modified McBride (for adductor tendon transfer
and approximation of first and second metatarsal heads) should be
placed before the closure of the wedge osteotomy; otherwise, there will
be no room to do so after the osteotomy is closed.
 |
|
FIGURE 34-33. The osteotomy is marked (arrow) with an osteotome.
|
 |
|
FIGURE 34-34.
The guide wire is driven across one osteotomy site into the proximal fragment and continued until the wire tents the skin on the dorsolateral aspect of the foot. |
compliant patients can place weight on the heel, especially on stairs.
The clinician should watch out for noncompliant patients. In giving
patients an inch, they will often take a mile! Full weight bearing on
the foot can break the screw and displace the osteotomy.
carefully watching for and preventing varus positioning. Follow-up
evaluation is continued with the spica in place until the osteotomy is
stabilized; then, a soft splint is applied. The osteotomy heals in
approximately 6 to 8 weeks, at which time the screw is taken out under
local anesthesia in the office or in the operating room. This is a
powerful correction, and patients should be advised of the need for
orthotic and physical therapy for gait training with the “new foot.”