
surgeons of every discipline are faced with soft-tissue management
problems. If the wound is created in an operating room, a sterile
environment is assumed, as are gentle handling of tissues, sharply
incised margins, and little contamination by foreign bodies. In a wound
sustained in the civilian or military environment, however, avulsive
trauma, bacterial contamination, and the presence of foreign bodies are
the rule. Management principles remain the same for all wounds,
although certain aspects of care will need to be emphasized depending
on the particular wound.
preparation. For a wound to heal primarily, it must be cleansed of
devitalized tissue, foreign bodies, and bacteria. Although these
prerequisites usually exist in the operative wound, such is not the
case in the traumatic one.
closure. The patient usually has discomfort from wound examination and
cleansing; pain may compromise the surgeon’s ability to debride
adequately. Therefore, administration of local, regional, or general
anesthesia is usually appropriate before treatment is begun. Apply a
topical antibacterial to the surrounding skin to minimize subsequent
introduction of pathogenic organisms.
-
Vigorous flushing of the wound with
sterile saline dislodges foreign bodies and bacteria. Pulse irrigation
is particularly effective in removing contaminants. Begin with
irrigation and use it throughout the debridement. In type II or worse
open fractures, use at least 10 L of saline. -
To minimize blood loss in an extremity
wound, tourniquet hemostasis is often used, but tourniquets interfere
with the ability to detect devitalized muscle. -
Perform sharp debridement using forceps, a scalpel, and scissors.
-
Excise devascularized skin, fat,
subcutaneous tissue, and muscle. Soft tissue of questionable viability
is usually sacrificed. One exception is if removal of possibly viable
skin or muscle would result in exposure of an important structure
(major vessel, nerve, bone, or joint), whose integrity would then be
compromised. In this case, injured but potentially viable skin or
muscle can be left in place for 24 to 48 h before being reinspected. At
the point where viability can be accurately determined, the injured
tissue is either left in place to continue healing or debrided, and an
appropriate reconstructive alternative chosen. With the routine use of
microsurgical techniques, which allow replacement of larger amounts of
tissue, debridement can be more extensive when necessary. It is better,
however, to leave a wound open, returning the patient to the operating
room for serial examinations and debridements, than to excise what
would ultimately be viable tissue during the initial operation. -
A wound containing questionably viable or
contaminated tissue should never be closed because this would
predispose the patient to a serious or life-threatening infection. -
The use of prophylactic antibiotics in
traumatic wounds is controversial, but most surgeons administer a
broad-spectrum parenteral or oral antibiotic perioperatively.
debrided, closure can commence. The goal is rapid healing and recovery
of function by maximizing vascularity in the wound environment. If this
requirement cannot be met by primary wound closure, another technique
is chosen. The appropriate graft or flap method is selected based on
the likelihood of success, expected donor-site morbidity, and
anticipated appearance of the wound (including the donor site).
wound skin margins adjacent to one another during the healing process.
Close approximation confines the inflammatory response to a minimal
local area, permits rapid reepithelialization across a narrow gap, and
yields the smallest possible scar (10,25).
-
Commence closure with approximation of any fascial wound using absorbable sutures.
-
Subcutaneous tissue and fat are often
closed in an attempt to obliterate dead space, minimize localized fluid
accumulation, and reduce the risk of infection. The potential benefits
of dead space closure must be weighed against the risks of devitalizing
tissue by crushing it when sutures are tied and adding additional
foreign bodies (the sutures themselves). -
The skin is usually approximated in two
layers. Stitches of an absorbable material are placed through the
papillary and reticular dermis, and the knots are buried deeply by
being tied on the side toward the subcutaneous tissue (21). This strong dermal layer accepts most of the tension applied across the wound. -
The more superficial layer of skin
closure includes the epidermis and upper portion of the dermis. Sutures
are passed in either a continuous or interrupted fashion, using
absorbable or nonabsorbable materials. Continuous sutures can be placed
more quickly than interrupted ones, although interrupted sutures have
the theoretical advantage of producing less ischemia of the wound
margins. In any event, the superficial layer of sutures provides
accurate approximation of the skin edges, with the goal of minimizing
the resultant scar. Because these sutures are usually left exposed
where they cross the wound, they may leave visible epithelialized
tracks along their entire course as well as at the sites where they
enter the skin. Removing the skin sutures within 7 days of placement
may minimize the severity of skin scarring. -
There are alternatives to the superficial exposed skin suturing technique (4).
The same layer may be closed using a buried intracuticular suture that
leaves no marks in the skin surface. This method requires more
operative time, and, if a nonabsorbable suture is used, it may be more
difficult to remove. Staples can substitute for skin sutures; these
have the advantage of rapid application. They should be removed as soon
as possible to minimize scarring. Surgical wound closure tapes can be
placed rapidly and removed with little discomfort. Tapes are more
difficult to apply accurately, however, and the swelling that occurs in
the immediate postoperative period may result in increased tension and
blistering of the skin along the tape margins. Tape is often used to
reinforce a sutured wound or provide support once skin sutures have
been removed.
but questionably viable tissue may preclude primary wound closure even
if approximation of the skin is technically possible. In some cases,
local swelling may also prevent wound closure under minimal tension.
apposition performed several days after the initial wound, usually by 5
days or so, so that the tensile strength of the wound at 14 days is the
same as if it had been closed primarily.
-
At the time of the original surgical
intervention, a decision to delay closure is made. The wound is packed
loosely with moist sterile gauze, and a bulky dressing is applied. Skin
sutures may be placed at this time but not tied, obviating the need for
later anesthesia. -
Once the wound environment has been shown
to be free of significant bacterial contamination, devitalized tissues,
and excessive swelling, closure may be done by tying the previously
placed sutures or using primary suturing techniques. The interval
between initial wound preparation and delayed primary closure is
usually 2 to 4 days. -
Open fracture wounds are usually closed on or after the fifth day.
which primary or delayed primary closure is impossible and a more
complex reconstruction is not indicated. These situations arise when
patients present with small skin avulsion wounds or superficial
abrasions. The small full-thickness skin wound that has been left
untreated for several days and some fingertip amputations are examples
of wounds that may be allowed to heal secondarily. After cleansing and
debridement, a nonadherent dressing is applied, and daily dressing
changes are begun. The wound heals through a process of contraction,
granulation, and epithelialization.
delayed primary, or secondary closure. Examples include large burns
involving the epidermis and all layers of the dermis, sizable avulsion
injuries, and extensive areas of skin loss as might occur with tumor
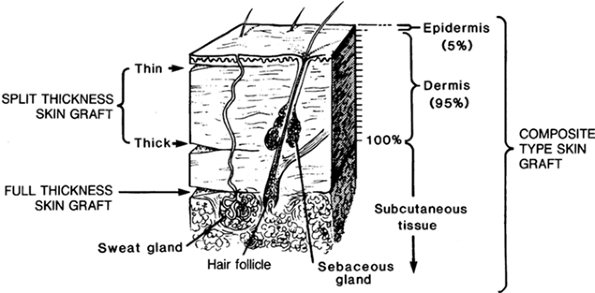
removal. In such cases, a split-thickness skin graft (STSG) can be used
for secure wound coverage (20). An STSG is a sheet of skin consisting of the entire epidermis and some of the dermis (Fig. 8.1).
 |
|
Figure 8.1.
Thickness of skin grafts. The split-thickness graft consists of all the epidermis and part of the dermis; the full-thickness graft consists of all the epidermis and all the dermis. |
bacteria per gram of tissue. All necrotic tissue and foreign bodies
must be removed. The site must be well vascularized, although not
necessarily exhibiting growth of granulation tissue. An STSG survives
poorly when applied to bone denuded of periosteum, tendon stripped of
peritenon, or cartilage separated from perichondrium.
Adherence of the graft to the recipient bed is maintained by a fibrin
clot that forms within minutes after skin transfer. For the first 24 to
48 h after transfer, the graft survives in an avascular state by
imbibing nutrients
from
wound fluids. Within 48 to 72 h after grafting, examination of the
successful STSG discloses circulating blood cells in the graft, with
generalized circulation being restored by the fourth to seventh day.
Processes proposed to explain this circulatory restoration include
attachment of vessels from the bed to vascular channels within the
graft and/or invasion of the graft by recipient-site vessels that form
new vascular channels throughout the grafted dermis. Whatever the
mechanism, the grafted skin begins to turn pink by the fourth or fifth
postoperative day. From that point, graft adherence becomes more
dependent on vascular ingrowth and fibroplasia.
STSG are made based on the demands of the wound, availability of donor
sites, and training of the surgeon. The thinner STSGs (0.008 to 0.012
in.) tend to take more easily than thicker grafts (>0.016 in.).
Thicker grafts may provide more durable wound coverage and contract
less than the thinner ones. An STSG of intermediate thickness (0.012
in. to 0.016 in.) often is the best compromise.
extremities, buttock, trunk, and occasionally the upper extremities.
The scalp provides an excellent donor site for STSGs to the face,
although raising a thick graft may result in alopecia. Place the donor
site in an area on which the patient does not lie; avoid the posterior
thigh and the back. Avoid selecting a donor site immediately adjacent
to the recipient wound, so that differing site-dressing requirements do
not interfere with one another. Select a donor site that is
aesthetically acceptable and easily concealed, such as the buttock in a
woman and the proximal thigh in a man.
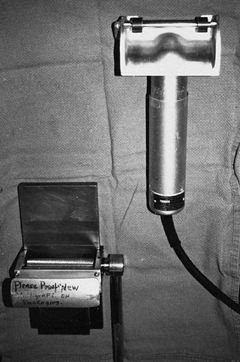
including free-hand knives with or without a guard, drum dermatomes,
and air-driven or electrically driven devices (Fig. 8.2).
Each instrument is suitable, although the air-driven and electrically
driven devices are often more readily accessible, are easier to
assemble and clean, and reliably raise a graft of uniform thickness.
Drum dermatomes are useful in obtaining larger sheet grafts, compared
with those raised by other instruments. Except for the drum dermatomes,
successful graft raising using the other instruments is facilitated by
antiseptic donor-site preparation, application of a lubricant (mineral
oil, blood, soap used for skin cleansing), maintenance of donor-site
skin tension by an assistant, and smooth, steady advancement of the
instrument during the cutting process.
 |
|
Figure 8.2. Dermatome and mesher are useful in skin grafts. The electric dermatome is useful for obtaining grafts of uniform thickness.
|
contraction. Ten to twenty percent of the graft’s surface area is lost,
probably as a result of recoil of dermal elastic fibers.
These incisions are made by applying the STSG to the obliquely ridged
side of a plastic skin carrier, then passing skin and carrier through a
device with numerous circular cutting blades. Depending on the length
and location of the cuts, the resultant meshed graft can be expanded to
a surface area of 1.5 or more times its original surface area. Thus, a
larger wound can be covered using a smaller donor site. Fluid
accumulating beneath the graft can escape through the interstices,
discouraging hematoma or seroma formation. A meshed graft conforms more
accurately than does an unmeshed one to an irregular wound bed, but one
disadvantage of the meshed graft is its inferior esthetic appearance
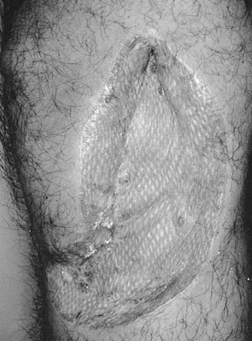
when compared with the unmeshed graft (Fig. 8.3).
 |
|
Figure 8.3. Symmetric patterned scarring typical of a healed meshed (1.5:1) split-thickness skin graft.
|
it should be secured to the recipient site. While final preparations
are being made, the graft can be stored in a saline- or blood-soaked
sponge. After an inspection of the recipient site has confirmed
adequate debridement and hemostasis, transfer and trim the graft to fit
the wound precisely. Avoid small areas of graft overlapping intact
skin, as the STSG will not take and may become a nidus for infection.
Secure the STSG into position using absorbable or nonabsorbable
sutures, staples, or surgical wound closure tapes.
important as any other step in achieving a healed wound. In rare cases,
no dressing is applied at all. Treat the margins with an antibiotic
ointment and evacuate immediately any observed fluid accumulation. This
technique is occasionally used for grafting of the face, where
dressings are difficult to apply, or for STSG coverage of a free
microvascular muscle flap, where constant access to the flap must be
provided for monitoring its circulation. Usually the recipient site is
dressed to preserve a clean environment, to prevent graft disruption by
trauma from an external source, to serve as a splint to protect against
patient motion with resultant shearing of the graft from its bed, and
to maintain uniform, constant pressure on the graft to discourage
seroma or hematoma formation.
gauze covered by a soft, bulky, pliable, absorbent material held in
place by tie-over sutures or, in the case of an extremity, by a
circumferential wrap. This is reinforced with a splint or cast to limit
joint mobility above and below the grafted site. Occasionally, if a
meshed graft has been applied over a previously contaminated wound, the
dressing is soaked initially and continuously with an antibiotic
solution. An alternative in irregular wounds is to apply bulky
saline-soaked cotton over the nonadherent gauze. This conforms well to
the wound, keeps the graft moist, and acts as a wick to keep fluids
from accumulating beneath the graft. Overwrap the cotton with
conforming gauze rolls or a bias-cut stockinette.
wound. Earlier dressing removal would be indicated for any local or
systemic signs of infection. After the initial dressing is removed,
perform a dressing change every 24 h for an additional 7 to 14 days.
This is covered by a bulky dressing for 24 h, at which time the entire
dressing, except for the fine-mesh gauze, is removed. The gauze dries
and forms a stable eschar. Reepithelialization of the donor site
proceeds from basal cells contained within the residual deep dermal
appendages. Over 1 to 2 weeks, the gauze separates spontaneously,
leaving a closed, often scaly donor-site scar. Flaking and itching can
be controlled through application of a skin lotion. Alternative methods
of STSG donor-site wound management range from the use of no dressing
to placement of a synthetic skin substitute, either permeable or
impermeable to water.
changes. Its color changes from an early pink hue to a more waxy
yellowish color, often lighter than the surrounding skin. Prolonged sun
exposure may, however, result in persistent hyperpigmentation.
Maturation of the STSG is accompanied by secondary contraction during
approximately the first 3 months of healing, followed by a gradual
softening of the scar (12). Thinner STSGs contract more than thicker grafts (45).
entire dermis and epidermis. FTSGs shrink by up to 40% in surface area
immediately on being raised as a result of elastic fiber recoil within
their substance (primary contraction). When sutured in place, however,
they tend to contract less than STSGs during the fibroblastic and
remodeling phases of wound healing (secondary contraction). This
feature is particularly important when skin grafts are planned for the
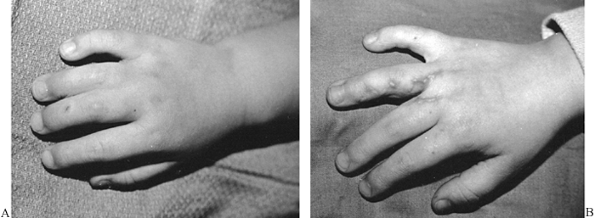
hands and feet (Fig. 8.4) (26). An FTSG is often selected over an STSG when wound contracture would result in a loss of maximum joint function.
 |
|
Figure 8.4. A: Simple syndactyly involving the ring and index fingers. B:
Syndactyly release through the use of interdigitating flaps and full-thickness skin grafts. Scar contracture has been minimized. |
amount of skin required. Because a full thickness of skin is removed,
the resultant wound cannot heal by reepithelialization but must be
either closed primarily, resurfaced with an STSG, or covered with a
vascularized flap. A large ellipse of lower abdominal or groin skin for
grafting can be removed and the resultant defect sutured under little
or no tension with the patient in a sitting position. Other FTSG donor
sites include the medial arm, retroauricular region, inferior gluteal
fold, and supraclavicular area.
bed, a properly prepared graft, and a secure dressing. The principles
of bed preparation are the same as those for STSGs. After the FTSG has
been raised, all fat and loose connective tissue are removed from the
deep surface, exposing the dermis. The FTSG is sutured in place and
covered with a compression dressing, and the area is immobilized in a
fashion similar to the STSG technique. Wounds are usually inspected in
5 days at the time of the first dressing change. A bluish hue is
typical for the FTSG when initially exposed; this changes to a more
normal skin tone over 3 to 7 days (2).
previously outlined region of skin and subcutaneous tissue, leaving it
attached to the body in an area large enough to maintain flap
vascularity. The skin flap carries its own blood supply, making it
ideal for covering poorly vascularized wounds. Such wounds include
those containing bare tendon, cartilage, or bone. Wounds in an area of
previous irradiation have poor vascularity and often require a skin
flap for closure.
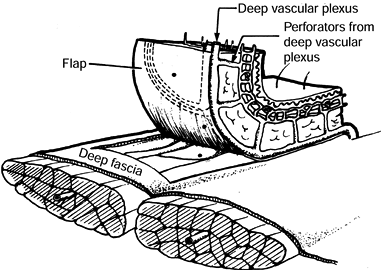
In every flap, the final common pathway for arterial inflow and venous
egress to and from the dermis and epidermis consists of the dermal and
subdermal vascular plexuses.
Dimensions of the random flap are determined by the size of the defect
to be closed. If a random flap is larger than a certain size, its tip
may die. In the past, the ratio of flap length to width was thought to
be important, although now it appears that absolute flap length is the
more important factor in determining random flap survival (24,40). Generally, however, skin flaps are still designed with a 1:1 width-to-length ratio.
 |
|
Figure 8.5. Random flap in which the skin is supplied by the subdermal plexus only.
|
Part of the surgical margin of the flap is incised and sutured
immediately. Seven to 14 days later, the flap is elevated and
transposed. During this interval, the flap becomes better vascularized
and/or more tolerant to ischemia, which allows it to survive to a
greater length than would be possible without the delay.
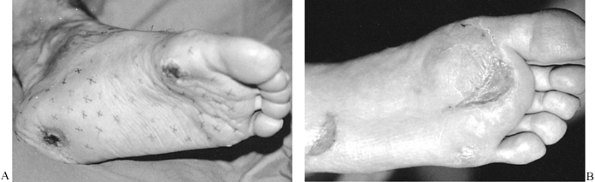
technical ability to elevate than do other types of flaps. They are
usually designed immediately adjacent to the wound requiring
reconstruction, obviating the need for a distant donor site (Fig. 8.6). Sometimes the random flap’s donor site cannot be closed primarily but requires a skin graft.
 |
|
Figure 8.6. A: Neurotrophic ulcers of the heel and first metatarsal head. B: Ulcers covered with random-pattern flaps. The flap donor sites were closed with split-thickness skin grafts.
|
Examples include the groin and posterior thigh flaps, containing the
superficial circumflex iliac and descending branch of the inferior
gluteal vessels, respectively (29,36).
An axial pattern flap will survive to a greater length than will a
random skin flap of similar dimensions. The pedicle of an axial skin
flap can occasionally be narrowed to contain only the vascular pedicle,
making it easier to transpose if somewhat more difficult to elevate (Fig. 8.8) (16,17).
Unfortunately, not all skin territories are supplied by a single
dominant vessel, which limits the number of donor sites for axial flaps.
 |
|
Figure 8.7. Axial flap with an identifiable artery running in the longitudinal axis of the flap.
|
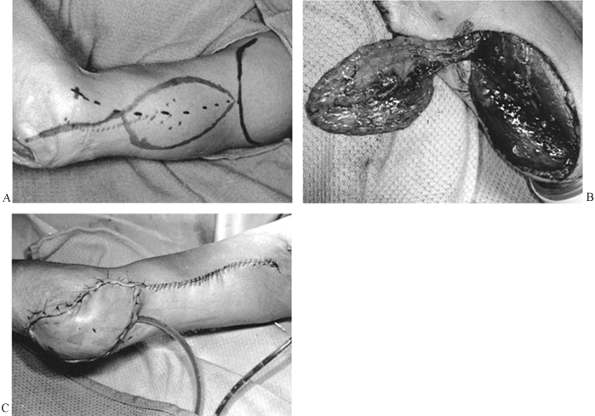 |
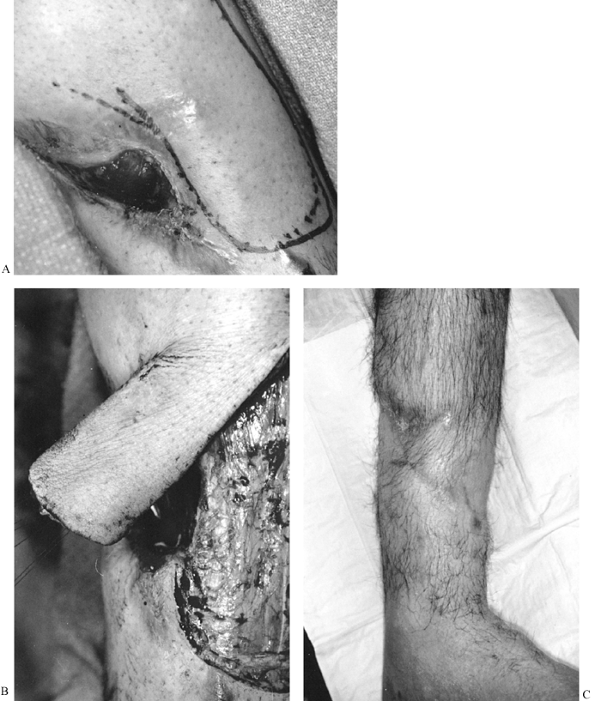
|
Figure 8.8. A: Lateral arm flap designed to close wound of the olecranon. B: Lateral arm flap elevated on its distal vascular pedicle (posterior radial collateral artery and vein). C: Flap inset.
|
paralleling the inguinal ligament. It is a skin flap containing the
superficial circumflex iliac artery (SCIA) and thus can be designed
longer than it is wide because of its direct arterial cutaneous blood
supply.
and forearm. It is usually attached to or inset into a hand defect and
then left attached for a period of 2 to 3 weeks before division of the
flap from the groin. The advantages of this flap are that the
vascularity is quite good and that the flap can be readily thinned
before coverage of the defect. The disadvantages are that the hand
remains in a dependent position and that the positioning and
immobilization for some patients can be quite challenging.
-
Identify and, with a marking pen, draw
the superficial circumflex iliac artery location on the skin. Outline
the flap by centering it over the anticipated artery location. The flap
width can vary between 5 and 15 cm; the length can extend from the
femoral artery out to the anterior superior iliac spine with reasonable
safety. The flap can be elevated without a delay procedure. -
The SCIA originates from the femoral
artery and courses laterally 2.5 to 3.0 cm below and parallel to the
inguinal ligament. The flap is usually raised from lateral to medial.
While dissecting medially over the sartorius muscle, dissect deeply to
include the sartorius fascia with the flap over the medial half of the
muscle. This avoids transecting the SCIA as it dives down to the
superficial femoral artery (SFA) just superficial to
P.164
the
sartorius fascia on the medial border of this muscle. Staying above the
deep fascia during the dissection all the way to the SFA risks
transecting the main arterial pedicle (SCIA) of the flap. -
You may extensively thin the distal or
lateral aspect of the flap that is to be set into the upper extremity
defect as long as the subdermal plexus is left intact. -
In most cases, the flap pedicle is
divided at 2 to 3 weeks. The groin defect can often be closed
primarily, without the need for a skin graft. Inset the flap at the
time of division or later, when it softens.
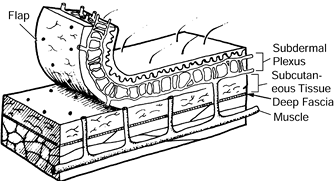
vessels that reach the skin by passing through fascial septa between
muscle bellies and then fanning out at the level of the deep fascia,
giving off perforating vessels that supply blood to the overlying skin (Fig. 8.9) (9).
This type of flap is better vascularized and will survive to a greater
length than will a random flap of comparable dimensions.
Fasciocutaneous flaps have been described in the head and neck region,
trunk, and extremities (43). The size and location
of an individual flap can be tailored to accommodate the reconstructive needs (Fig. 8.10).
One disadvantage of the fasciocutaneous flap is the frequent need for a
skin graft at the donor site, leaving a conspicuous deformity (15).
 |
|
Figure 8.9.
A fasciocutaneous flap consists of skin, subcutaneous tissue, deep fascia, and the deep vascular plexus, which is fed by a few perforators and in turn sends perforators up through the subcutaneous tissue to the dermal plexus. |
 |
|
Figure 8.10. A: Fasciocutaneous flap designed adjacent to exposed tibia. B: Fasciocutaneous flap elevated. C: Healed wound.
|
extremity defects was introduced in the 1970s when it was realized that
muscles could be moved around a single blood vessel supply site (the
pedicle) and maintain excellent vascularity. Muscles were classified by
Mathes according to the number of pedicles and their relative
contribution to the blood supply (32). For
example, the gastrocnemius muscle has a single dominant pedicle
consisting of the sural artery, whereas the soleus muscle receives a
dominant pedicle from the peroneal artery and a
second
dominant pedicle from the posterior tibial artery. In addition, the
soleus muscle has several minor pedicles given off by the posterior
tibial artery distally. Muscles may be detached from their origin and
insertion, and moved, tethered only by their dominant (or major)
pedicle, while maintaining excellent perfusion. Their viability is less
certain when a minor pedicle is used as a point of transfer or
rotation. The distance a muscle can move while tethered by its vascular
pedicle is known as its arc of rotation. Veins are found consistently
to run with the arterial pedicles. The most appropriate muscle for
transfer is one with a vascular pedicle close to or just proximal to
the recipient site; this allows for an adequate arc of rotation.
with large, irregular dead spaces or cavitary lesions with exposed bone
or metal. Muscle flaps are superior to skin flaps for resisting
infection with bacterial contamination (6) and are routinely used in the treatment of osteomyelitis (33)
after thorough debridement. They also are helpful in poorly
vascularized wounds secondary to radiation injury or chronic scarring,
and they provide excellent vascularity to support the incorporation of
bone grafts. Their use is now routine for type IIIB fractures of the
lower extremity, infected total hip or knee wounds, and large traumatic
wounds.
the timing of flap coverage for significant traumatic wounds continues
to be refined. Although the issue of ideal timing of flap coverage for
type III tibial injuries has been debated in the literature (5,47),
it is now generally agreed that coverage should be undertaken within
the first 5 to 7 days after injury, before wound colonization has
occurred.
management of many wounds that would have received regional muscle
flaps only a few years ago. Unrestricted by the anatomic limits of
regional flaps, microsurgical transfers are improving function and
esthetics and in some instances accelerating healing. Regional muscle
flaps, however, remain the foundation of lower-extremity reconstruction
proximal to the tibial distal third.
The medial and lateral gastrocnemius muscles fuse at the distal portion
of the popliteal fossa and join with the soleus to insert into the
Achilles tendon. The medial gastrocnemius is usually 2 to 3 cm longer
than the lateral gastrocnemius
and
is slightly more anteromedial. This gives the medial gastrocnemius a
significantly greater arc of rotation than the lateral muscle.
 |
|
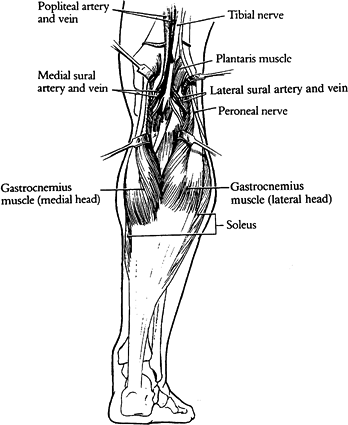
Figure 8.11.
The medial and lateral heads of the gastrocnemius are retracted to show their neurovascular pedicles consisting of sural vessels and branches of the tibial nerve. The soleus muscles lie immediately deep to the gastrocnemius. (Strauch B, Vasconez LO, Hall-Findlay EJ. Grabb’s Encyclopedia of Flaps. Boston: Little, Brown, 1990:1696.) |
sural artery and vein given off by the popliteal artery at the level of
the knee joint. The sural arteries run distally with the tibial nerve
branches for several centimeters before entering the muscle bellies on
their anterior surfaces.
separately because they have separate blood supplies and may be divided
at the posterior raphe. The arc of rotation of the medial muscle is
much greater than that of the lateral muscle because the medial muscle
is longer and the lateral muscle is restricted by the fibular head (Fig. 8.12).
This is most relevant for covering anterior defects. If the lateral
head is transferred anteriorly, it uses up much of the available length
traversing the fibular head. For anterior knee defects, even those that
are slightly anterolateral, the medial gastrocnemius is almost always
more effective. Proximal tibial defects in the region of the tuberosity
are the most easily covered; however, the arc of rotation is reliable
over the entire knee and patella and the proximal third of the tibia.
 |
|
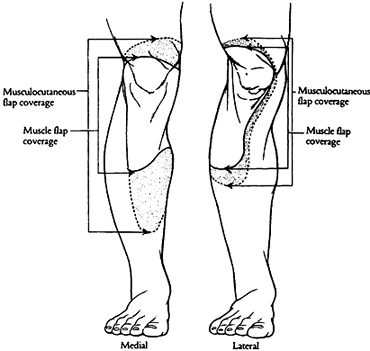
Figure 8.12. The areas of coverage of the medial and lateral gastrocnemius muscle flaps (solid line) and gastrocnemius musculocutaneous flaps (dashed line). Note that the lateral muscle does not cover the entire patella comfortably. (Strauch B, Vasconez LO, Hall-Findlay EJ. Grabb’s Encyclopedia of Flaps. Boston: Little, Brown, 1990:1697.)
|
plateau fractures, skin breakdown over a total knee prosthesis,
coverage of arthrodesis after pyarthrosis, closure of a wound over
femoral or total knee prosthesis for osteogenic sarcoma, and type IIIB
open fractures.
-
Make a long incision under tourniquet
control just posterior to the medial aspect of the tibia to within 5 to
10 cm of the medial malleolus (Fig. 8.13). Usually the saphenous vein is encountered with this incision; reflect it to either side of the wound.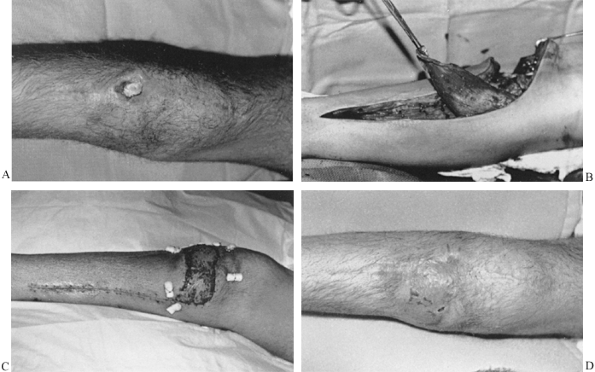 Figure 8.13. A:
High-energy comminuted tibial plateau fracture wound months after open
reduction with internal fixation with exposed bone and screws. B: Medial gastrocnemius flap is elevated after extensive debridement. C: Wound 7 days postoperatively with skin graft and bolsters in place. D: Healed wound 2 months postoperatively. -
Incise the deep fascia, exposing the
gastrocnemius muscle head. Dissect this deep fascia away from the
muscle in a loose areolar plane to the posterior midline where the
raphe between the medial and lateral gastrocnemius should be
identifiable. Sometimes the division of these muscles is indistinct. -
Dissect the gastrocnemius away from the underlying soleus muscle. The plantaris tendon should be clearly
P.168
visible lying on the superficial surface of the soleus muscle. The
gastrocnemius muscle is easily separated from the soleus in the
proximal-to-distal direction until the Achilles insertions are reached.
Leave a cuff of tendon insertion in continuity with the distal
gastrocnemius muscle so that this can be used for suturing later and
for traction during proximal flap dissection. Divide the midline raphe
and free the gastrocnemius as far proximally as needed to reach and
comfortably cover the defect. For defects in the tuberosity area, very
little further dissection is needed. -
Maneuvers to increase the arc of rotation
or length of usable flap include incising the fascia near the origin of
the muscle close to the femoral condyle. This may give 1 to 2 cm of
extra length. Sometimes this may require taking down the insertions of
the semimembranosus and semitendinosus muscles. To get further length,
the origin of the gastrocnemius can be divided from the femoral
condyle, although this is seldom necessary. It is also possible, as a
last resort, to flex the knee and get even further reach of the flap.
With division of the origin it is important not to put the pedicle
under too much tension because it is no longer protected by the
tendinous attachments when stretched. The flap will heal and allow
straightening of the knee, usually in 2 to 3 weeks, if this maneuver is
necessary. -
Set the flap into the defect after
thorough debridement by placing bolster sutures through the skin 2 to 3
cm from the wound edge. It is important to undermine the edges of the
wound to achieve this inset. The flap can be tunneled under the skin
bridge to the defect or directly inset by incising the skin between the
flap and the defect. We generally do not tunnel with significant
defects. The flap can be widened with multiple scorings of the fascia
on the deep aspect of the muscle if needed. If the defect is very
large, consider a free flap or possibly a gastrocnemius
musculocutaneous flap, which has a cutaneous extension (Fig. 8.12). -
Cover the flap with a meshed
split-thickness skin graft. The flap will atrophy and lose some of its
bulky appearance with time. This is partially dependent on whether the
innervation is left intact. -
Place a flat Jackson Pratt drain in the
donor wound, and place another drain under the flap. Apply a posterior
leg splint. Change the skin graft dressing in 3 to 5 days. The
extremity remains elevated and splinted after dressing changes for 2 to
3 weeks.
similar fashion with a lateral longitudinal incision. Care must be
taken with the peroneal nerve, and transposition is more limited around
the fibular head.
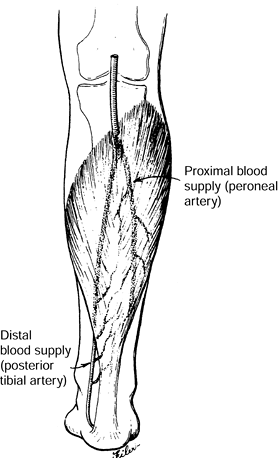
and the interosseous membrane. Its insertion is joined with the
gastrocnemius into the Achilles tendon. The peroneal artery supplies
the proximal and lateral half of the muscle, and the medial distal half
of the muscle is supplied by the posterior tibial artery (Fig. 8.14).
This vascular anatomy allows the muscle to be split in half
longitudinally and used as a split soleus muscle flap if a smaller flap
is desired. A distally based soleus flap is described based on
perforating vessels of the posterior tibial artery, although this flap
generally is not as reliable.
 |
|
Figure 8.14.
The soleus muscle is supplied proximally and laterally by the peroneal artery and medially and distally by the posterior tibial artery. The muscle may be split longitudinally for use as a hemisoleus flap. [Swartz WM, Jones NF. Soft Tissue Coverage of the Lower Extremity. Curr Probl Surg 22(6):34;1985.] |
middle-third defects of the tibia. Even in extensively damaged
extremities with midshaft fractures and lacerations of the soleus, it
can still be used with confidence. The usual indication is exposed bone
or a type III fracture of the middle third of the tibia with some skin
loss. Use of the flap acutely will provide well-vascularized, stable
coverage and ensure the likelihood of rapid recovery. The soleus flap
should be considered when plates and screws are used midshaft with any
compromise in soft-tissue coverage.
-
A medial approach is easiest. Make a long
incision just posterior to the medial border of the tibia from the
insertions of the hamstring muscles down to within several centimeters
of the medial malleolus (Fig. 8.15).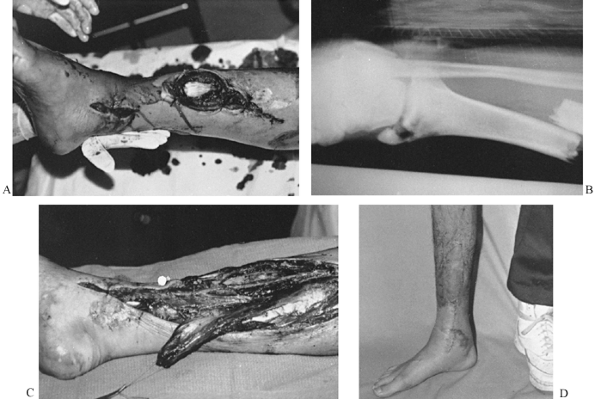 Figure 8.15. A: Type IIIB tibial fracture with exposed anterior tibial tendon and exposed fracture site. B: Radiograph of open tibial fracture and malleolar fracture, which were reduced and fixed with an interlocking nail. C: Soleus flap ready for transposition over fracture site and exposed tendon. D: Ambulatory patient 2 months postoperatively with healed wound.
 -
Under tourniquet control, develop the
plane between the soleus and gastrocnemius, which is primarily loose
areolar tissue. The plantaris should be visualized on the surface of
the soleus muscle. Dissecting distally, identify the insertions into
the Achilles tendon that join with gastrocnemius insertions. Shave a
thin portion of fascia off the tendon with the soleus rather than
stripping the muscle fibers off freely. -
Then dissect the soleus muscle
proximally, identifying perforating branches of the posterior tibial
artery. Tie these off rather than cauterizing them. It is often
necessary to divide the soleus sharply from the flexor digitorum
muscles as the dissection proceeds proximally. The muscle can be split
longitudinally to use only half of the flap (hemisoleus flap);
alternatively, the entire muscle can be used, which is more common. -
Transfer the muscle flap to the defect by
dividing the skin between the muscle and the defect and insetting the
flap as before. Cover the flap with a split-thickness skin graft on all
exposed portions. -
Place a drain in the donor site and under the flap. A posterior splint with elevation continues for 2 to 3 weeks.
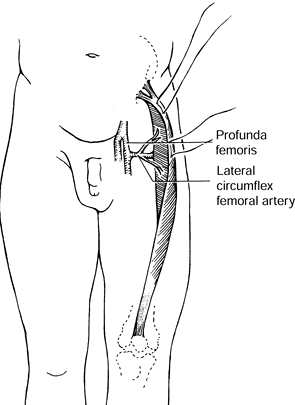
iliac spine and inserts into the patella. Its blood supply consists of
one or two dominant pedicles, which are branches of the lateral femoral
circumflex artery, which is in turn a branch of the profunda femoris
artery (Fig. 8.16). Innervation from the
femoral nerve accompanies the vascular pedicles in the proximal third
of the muscle. This is generally 8 to 10 cm inferior to the inguinal
ligament.
Rotation of the muscle around this vascular pedicle will reach the
trochanter and the lateral genital area. A skin paddle can be elevated
with the muscle if necessary.
 |
|
Figure 8.16.
Anatomy of rectus femoris muscle. Two to three pedicles from the lateral circumflex femoral artery enter the proximal third of the muscle belly. (Mathes SJ, Nahai F. Clinical Atlas of Muscle and Musculocutaneous Flaps. St. Louis: CV Mosby, 1979:44.) |
was the muscle flap of choice for the recalcitrant total hip
arthroplasty wound (39). After removal of their
prostheses, 27 patients with chronically infected hip wounds were
successfully treated with muscle flaps, 23 of which were rectus femoris
flaps. All patients had their hip arthroplasty reimplanted at least 12
months following the muscle flap.
the hip or proximal thigh. Other choices for the hip region are the
vastus lateralis muscle or rectus abdominis muscle; these should be
considered before resorting to a free flap.
-
Make a longitudinal incision over the
rectus femoris muscle from just below the inguinal crease down to 5 to
10 cm above the patella. Carry the dissection through the deep fascia,
identifying the rectus femoris muscle. Dissect it out from distal to
proximal, taking care to avoid damaging the pedicle when entering the
region 10 cm below the inguinal ligament. -
To reach the acetabulum, transpose the muscle or tunnel beneath the vastus lateralis muscle to reach the hip defect.
-
Debride the edges of the hip defect to
allow a layered closure. Close the donor and recipient sites over
drains. If the rectus femoris does not completely fill the dead space
of the acetabulum and hip wound, consider adding the vastus lateralis
or another muscle flap. -
It is important to close the quadriceps
muscles on either side of the rectus femoris in the midline to
partially offset its functional loss.
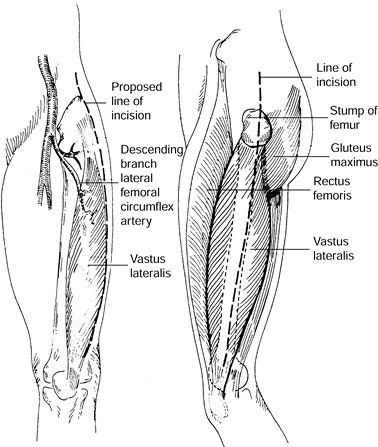
trochanter of the femur, the lateral intermuscular septum, and the
gluteal tuberosity, and it inserts into the patella (Fig. 8.17).
Its blood supply is from descending branches of the lateral femoral
circumflex artery; these branches enter the muscle close to 10 cm below
the anterior iliac
crest.
Innervation is from the femoral nerve entering close to the vascular
pedicle. The arc of rotation of this muscle is most useful for filling
acetabular defects. Most other defects of the thigh can be
reconstructed with skin grafts.
 |
|
Figure 8.17. Anatomy of vastus lateralis muscle. The dominant vascular pedicle is the descending branch of the lateral femoral circumflex. Dotted line
indicates the surgical incision from anterior and lateral view. (Collins DN, Garvin KL, Nelson CL. The Use of the Vastus Lateralis Flap in Patients With Intractable Infection After Resection Arthroplasty Following the Use of a Hip Implant. J Bone Joint Surg 69:512;1987.) |
hip wounds and can be used in addition to the rectus femoris if a large
dead space is present. The thigh has such abundant soft tissue that
muscle flaps are rarely needed outside of the hip region, and skin
grafts usually suffice.
-
Make a long lateral incision from the
trochanter to just anterior to the lateral femoral condyle. Incise the
fascia lata and expose the vastus lateralis muscle. Identify the
intermuscular septum between the rectus femoris and the vastus
lateralis. Dissection in this plane is aided by using a Gelpi
self-retaining retractor to spread the intermuscular septum. -
Identify and protect the lateral femoral
circumflex artery, its transverse branch to the tensor fascia lata
muscle, and its descending branch to the vastus lateralis. This should
be 8 to 10 cm distal to the anterior superior iliac spine. -
Separating the vastus lateralis from the
intermedius is the most difficult part of the operation and can be
quite bloody; it requires sharp dissection (Fig. 8.18).
Cut the tendinous insertion of the vastus lateralis 8 cm proximal to
the patella and then mobilize the muscle from distal to proximal with a
periosteal elevator, heading toward the pedicle (Fig. 8.19). Mobilize enough of the muscle to fill the dead space, and close the wound comfortably.![]() Figure 8.18.
Figure 8.18.
Cross section through the distal thigh demonstrates posterior vascular
perforators and the plane of transection for freeing the vastus
lateralis muscle. (Collins DN, Garvin KL, Nelson CL. The Use of the
Vastus Lateralis Flap in Patients With Intractable Infection After
Resection Arthroplasty Following the Use of a Hip Implant. J Bone Joint Surg 69:512;1987.)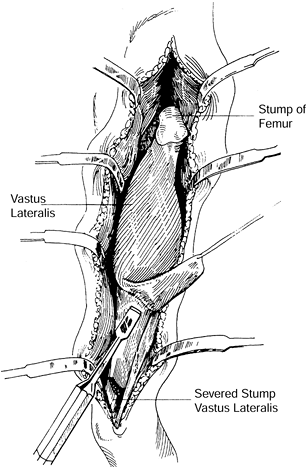 Figure 8.19.
Technique for freeing the vastus lateralis is demonstrated. (Collins
DN, Garvin KL, Nelson CL. The Use of the Vastus Lateralis Flap in
Patients With Intractable Infection After Resection Arthroplasty
Following the Use of a Hip Implant. J Bone Joint Surg 69:512;1987.) -
Often a split-thickness skin graft is
necessary to cover an exposed portion of the muscle flap, which should
not be closed too tightly. -
Place a drain in the donor site and in
the hip wound beneath the flap. Three weeks of relative immobility
assists the healing of the wound.
condyle of the tibia, the upper lateral surface of the tibia, and the
interosseous membrane and inserts on the base of the first metatarsal
bone and the medial cuneiform bone. Its blood supply is derived from
multiple perforators, usually six to eight, along the entire length of
the anterior tibial artery. Innervation is via branches of the deep
peroneal nerve. This type of blood supply with multiple minor pedicles
is referred to as segmental supply
and
does not allow for significant arcs of rotation without risk of
necrosis. This muscle is also important for dorsiflexion and inversion
of the foot and must have its tendon continuity preserved. Techniques
for longitudinal splitting of the muscle belly while preserving tendon
function have been developed using a medial or external split (22,41).
anterior to close an adjacent wound with a maximum width of 5 cm and a
length as long as the muscle belly. Such a flap is convenient for
coverage of midtibial defects. Often this flap can serve as the lateral
portion of a muscle sling around an injured tibia with the medial
portion of the sling fashioned with a medial gastrocnemius flap.
Splitting the tibialis anterior longitudinal muscle requires a
split-thickness skin graft by design.
-
The defect is almost always directly
adjacent to the tibialis anterior muscle with exposed tibia. Make the
skin incision longitudinally along the edge of the defect and proceed
just deep to the fascia covering the tibialis muscle. Reflect the
fascia and skin laterally, exposing the muscle. -
Identify the septum when dividing the
tibialis anterior and the extensor digitorum. Incise the muscle as far
lateral in the septum as possible and develop a 1.5-cm-thick flap of
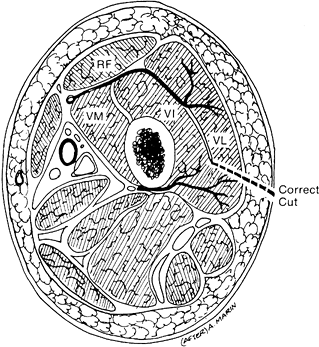
muscle (Fig. 8.20). Leave some muscle fibers on
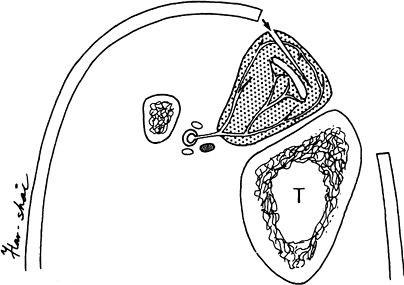
the tibialis tendon to allow for skin graft take. Flip the
anterolateral portion of the muscle over 180° to cover the tibial
defect (Fig. 8.21). Inset the muscle into the undermined medial edge of the wound, and apply a split-thickness skin graft.![]() Figure 8.20.
Figure 8.20.
Tibialis anterior muscle, which is supplied by the anterior tibial
artery, is shown. The muscle is supplied by vessels that surround the
medial tendon (T, tibia). The external
longitudinal splitting incision is started on the medial border of the
muscle. Muscle fibers are preserved overlying the tendon. (Hirshowitz
B, Moscona R, Kaufman T, Harshai Y. External Longitudinal Splitting of
the Tibialis Anterior Muscle for Coverage of Compound Fractures of the
Middle Third of the Tibia. Plast Reconstruct Surg 79:408;1987.)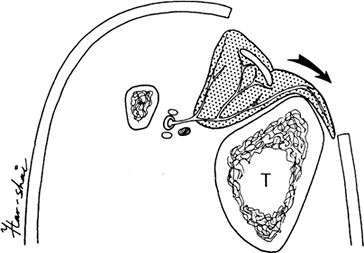 Figure 8.21.
Tibialis anterior muscle has been incised medially, and a 1.5-cm flap
of muscle is turned 180° to cover the tibial shaft. (Hirshowitz B,
Moscona R, Kaufman T, Harshai Y. External Longitudinal Splitting of the
Tibialis Anterior Muscle for Coverage of Compound Fractures of the
Middle Third of the Tibia. Plast Reconstruct Surg 79:4107;1987.) -
A medial gastrocnemius or a soleus flap
could possibly be required medially to complete coverage of the wound.
A posterior splint and bulky dressing are applied, and the leg is
elevated for 2 to 3 weeks.
that originates from the pubic symphysis and inserts on the costal
cartilages of the fifth, sixth, and seventh ribs. It has three and
sometimes four tendinous intersections that cross it in a transverse
direction. Its blood supply is from the inferior epigastric artery and
from the superior epigastric artery. The inferior epigastric artery is
the dominant pedicle and supplies the skin overlying the muscle as well
as the muscle from the pubis to several centimeters above the umbilicus
(Fig. 8.22). Flaps can be designed using the
muscle alone or with a skin paddle (myocutaneous flap). Innervation is
segmental from the 7th through 12th intercostal nerves. The arc of
rotation can be extended inferiorly by islanding the muscle flap on the
inferior epigastric pedicle and moving it inferior to the inguinal
ligament. The flap can also be made longer by taking an extended skin
paddle of abdominal skin. The musculocutaneous perforators of the flap
can support abdominal skin overlying the oblique muscles as far as the
anterior axillary line (Fig. 8.23).
 |
|
Figure 8.22.
The rectus abdominis muscle originates from the pubic symphysis and inserts on the costal cartilage of the fifth, sixth, and seventh ribs. The dominant pedicle is the inferior epigastric artery; however, the entire muscle and overlying skin can survive on the superior epigastric artery as well. (Mathes SJ, Nahai F. Clinical Atlas of Muscle and Musculocutaneous Flaps. St. Louis: CV Mosby, 1979:15.) |
 |
|
Figure 8.23.
A male patient is shown who sustained a traumatic injury of the left leg with exposure of the left trochanter. A left rectus abdominis musculocutaneous flap with an extended skin paddle was rotated 90° in a clockwise direction to cover the exposed hip. The flap was rotated around the inferior epigastric pedicle. The flap donor site is evident as a left paramedian abdominal incision. |
wounds when thigh muscles are not available. It can cover pubic bone
and iliac wing osteomyelitis. It can also be used for the hip joint
when necessary. It can be passed either preperitoneally behind the
pelvic bones or anteriorly across the inguinal region. Also, the
trochanter can be covered when the extended skin paddle is taken with
the muscle flap. The rectus abdominis can also be transferred as a free
flap using the inferior epigastric vessels for anastomosis with the
recipient vessels. Often the muscle is transferred to distal third
defects of the lower extremity or foot.
-
An incision is made overlying the length
of the rectus muscle (paramedian incision). At the inferior portion of
the wound, the incision is sometimes angled off laterally to overlie
the point at which the inferior epigastric artery and vein originate
from the external iliac vessels. This allows better exposure of the
inferior epigastric vessels. -
If a skin paddle is chosen, it is kept in
continuity with the muscle during the flap elevation. The anterior
rectus fascia is incised around the base of the skin island, and the
muscle is dissected free from the posterior sheath. Areas of the
tendinous intersectons are quite adherent to the muscle, and dissection
is tedious in these areas. If a large portion of the anterior rectus
sheath is taken with a skin paddle, then synthetic mesh is used to
close the anterior rectus sheath defect and prevent future herniation. -
The flap is usually transposed to the
defect using a direct inset and making an incision through the skin
from the flap to the defect. If the flap is transferred free, the
epigastric vessels are carefully dissected down to the external iliac
vessels. Often there will be two almost equal-sized inferior epigastric
veins, which will join into one single vein before emptying into the
external iliac vein. We often try to transect the vein at this common
site.
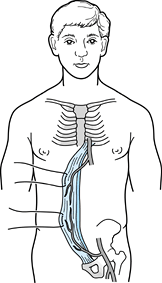
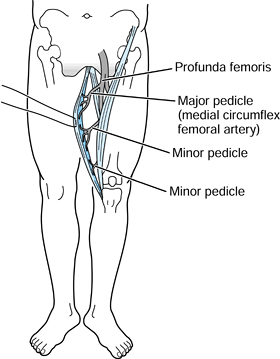
originates from the pubic symphysis and inserts on the medial tibial
condyle. As an accessory thigh adductor, it contributes minimally to
thigh adduction and is thus expendable for reconstructive purposes. The
main arterial pedicle is usually the medial femoral circumflex, which
is a branch of the profunda femoris artery. This vessel enters the
muscle approximately 8 to 10 cm from the origin of the gracilis, at the
pubic tubercle. There are minor pedicles distally originating from the
superficial femoral artery, but
these are usually divided during elevation of the flap (Fig. 8.24).
The entire muscle survives well on circulation from the proximal
dominant pedicle. The gracilis muscle can be used with an overlying
skin paddle, which can be as large as 10 by 30 cm.
 |
|
Figure 8.24.
The gracilis muscle originates from the pubic symphysis and inserts on the medial tibial condyle. The dominant pedicle is the medial femoral circumflex, which is most commonly a branch of the profunda femoris artery. The minor pedicles, located more distally, are usually divided during elevation of the flap. (Mathes SJ, Nahai F. Clinical Atlas of Muscle and Musculocutaneous Flaps. St. Louis: CV Mosby, 1979:349.) |
small defects of the groin and pubic region; however, it is usually
transferred microsurgically to distant sites for greatest usefulness.
When the skin paddle is included, the flap gains length and a greater
arc of rotation. It can be used in the pelvis over the pubic symphysis
and the ischium, and to cover groin wounds near the femoral vessels.
-
It is not trivial to locate the gracilis
muscle accurately, especially when edema, obesity, or distortion of the
anatomy is present. When the patient is in a lithotomy or frog-leg
position, the adductor longus can be easily palpated as a tendinous
structure in the medial groin area originating from the pubic
symphysis. Rolling over the adductor longus muscle in a posteroinferior
direction with one’s fingers brings one to the anterior edge of the
gracilis muscle proximally. The distal tendon inserts on the medial
tibial tubercle and is often seen during the dissection in a position
below the inferior edge of the sartorius muscle. It can be palpated as
a round tendinous structure in this distal location. -
When the gracilis is used as a muscle
flap, an incision is made overlying the muscle, and the dissection is
carried down to the gracilis muscle. The main pedicle is found coming
out between the adductor longus and magnus muscles in the fascial
septum. Often one artery and two identifiable veins constitute the
pedicle. If a skin paddle is desired, care must be taken to accurately
position the skin paddle over the muscle and not disrupt the connection
of the muscle and its surrounding fascia to the skin. We have found
that inclusion of increasing amounts of fascia around the gracilis
muscle enhances the circulation to the overlying skin. It should be
noted that historically the distal cutaneous territory of the gracilis
muscle has not been considered reliable from a vascular standpoint.
This skin segment or island is nourished by vessels originating from
and draining into the underlying muscle. Left attached to its major
vascular pedicle(s) or transferred microsurgically, the muscle can be
separated from its origin and insertion and moved great distances to
provide a stable reconstruction (Fig. 8.25).
 |
|
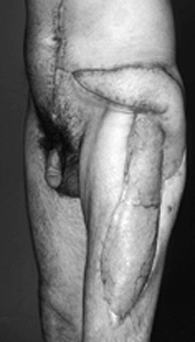
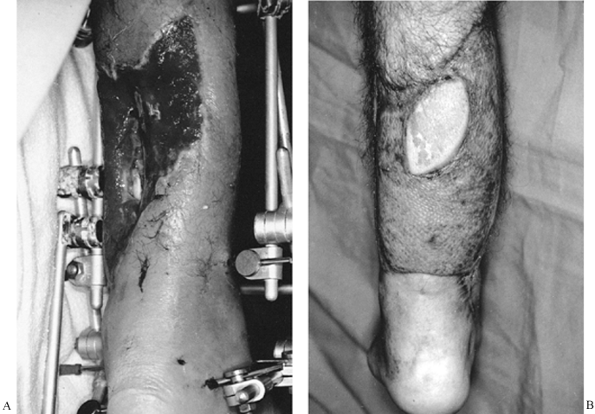
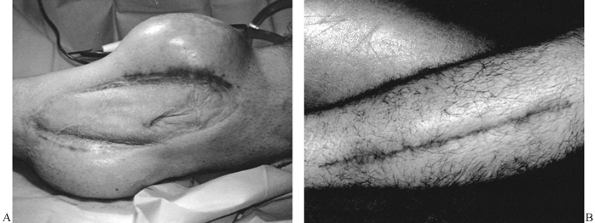
Figure 8.25. A: Soft-tissue wound of posterior leg. B:
Latissimus dorsi musculocutaneous flap used to achieve wound closure. Much of the muscle has been covered with a skin graft. The skin island was preserved as a marker of flap viability. |
potential base for a musculocutaneous flap. Some of the most versatile
ones are the latissimus dorsi, deltoid, rectus abdominis, gluteus
maximus, tensor fascia lata, and rectus femoris. Each of these flaps
can be transposed through a large arc of rotation and used to provide
bulk for dead space obliteration, well-vascularized tissue, and stable
skin coverage at the site of reconstruction (6).
be classified as either rotation or advancement in design. The rotation
flap moves through an arc of rotation as it is lifted from its origin
and placed over the defect for reconstruction (27).
Although generally thought of as semicircular in shape, rotation flaps
also include transposition, bilobed, and rhomboid flaps. The classic
Z-plasty is in reality two transposition (rotation) flaps designed,
raised, and interposed to break up, lengthen, or redirect an
unfavorable linear scar (13,18,38). The donor site of many rotation flaps can be closed primarily without a skin graft (28).
of rotation but is advanced along a straight line into the required
defect. Advancement flaps may be vascularized through a retained skin
pedicle or by perforating vessels from underlying fascia or muscle.
When it is designed in a rectangular shape and subsequently advanced,
excess skin at each corner of the flap’s base may need to be excised.
The V-to-Y advancement flap leaves no skin excess at its site of
elevation. The donor-site defect of most advancement flaps can be
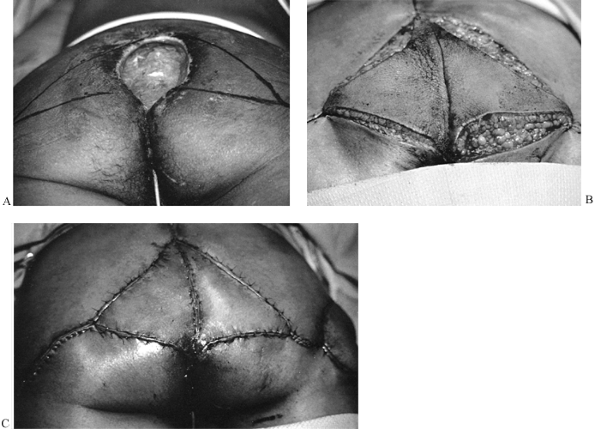
closed by primary suturing (Fig. 8.26).
 |
|
Figure 8.26. A: Sacral pressure sore. V–Y advancement flaps designed for wound closure. B: Flaps elevated. C: Wound closed.
|
The technique requires two operative procedures. Initially, a collapsed
silicone rubber bag (the tissue expander) is inserted subcutaneously
near the defect to be covered. Usually the expander is placed through a
separate incision made at a distance from the wound margin. After 1 to
3 weeks, when healing of the skin wound is ensured, saline is
introduced into the expander through a self-sealing port, either
contained within the expander or attached by Silastic rubber tubing.
Every 3 to 7 days 60 to 120 mL of saline is injected. The overlying
skin increases in surface area as the bag expands. This increase
reflects stretching of the skin, thinning of the dermis, and
recruitment of skin from adjacent areas. After maximum volume has been
reached, the expander is removed at a second operation, and the
expanded skin is advanced over the site to be reconstructed (Fig. 8.27). Primary wound closure is usually possible.
 |
|
Figure 8.27. A: Tissue expanders placed adjacent to grafted defect. The expanders have been fully inflated. B: Expanders removed, expanded skin advanced, skin graft excised, and wound closed.
|
wounds proximal to the knee or elbow. This technique is best used to
treat healed wounds, as placement of an expander adjacent to an open
wound is often complicated by infection within the expander pocket,
necessitating its removal (1,30).
hematoma, infection, and technical problems with fixation) and systemic
complications (thrombophlebitis, pulmonary embolism, and others). All
surgeons will encounter complications, so be prepared by taking
appropriate steps to minimize the risk of complications and be ready to
manage complications if they occur. Local wound complications are
minimized by careful preoperative planning; gentle, rapid, and precise
surgical technique; and appropriate aftercare. Systemic complications
are minimized by careful preoperative workup, ensuring that the
patient’s medical condition is as good as possible before surgery; good
anesthesia practices with good pulmonary ventilation throughout the
case; appropriate maintenance of blood volume; and immediate
mobilization of the patient after surgery, if possible.
The most common is probably excessively strong retraction for prolonged
periods. Rough handling contributes as well. Curvilinear or sharply
angled incisions that produce flaps may also predispose to wound
necrosis because of ischemia of the tips of the flaps; this is
particularly true when flaps are distally based. Straight-line
incisions are safest, particularly in the lower extremity. Preexisting
large-vessel disease, as in arteriosclerosis, or small-vessel disease,
as in diabetics, also predisposes to wound necrosis. Special
precautions are necessary, particularly in diabetics undergoing foot
surgery. In some cases, surgery may be contraindicated.
placed too closely together or too far from the wound edge also
devascularize the skin along the incision. Avoid tension in wound
closures. When a tourniquet is used, it is sometimes advisable to
deflate it just before skin closure so that the telltale pallor of skin
ischemia can be detected when sutures are placed. If excessive tension
is required to close a wound after elective surgery, it is often
prudent to leave the wound open until edema subsides. Closure can then
be done on a delayed basis. In some cases closure with a local rotation
flap or STSG may be necessary. Although cosmetically undesirable, this
may be a better alternative than wound-edge necrosis, which exposes
tendons, bone, or fixation devices.
problems about the knee and ankle. Most major knee surgery is best
performed through a straight, longitudinal incision placed over the
anterior aspect of the knee. This incision usually results in a
cosmetically acceptable scar. It also provides wide exposure of the
knee and is an excellent exposure if subsequent reconstructive surgery,
such as total knee arthroplasty, becomes necessary. In the ankle,
straight vertical incisions directly over the malleoli are preferable
to the L-shaped or C-shaped incisions often advised. Straight vertical
incisions provide excellent exposure and carry a minimal risk of
necrosis.
devices, and neurovascular bundles are not exposed, corrective surgery
may not be necessary. Maintain cleanliness and keep the wound covered.
This will allow the necrotic area to marginate and the wound to close
by secondary intention. However, healing by secondary intention can
take considerable time, secondary infection may occur, and the scar may
be cosmetically undesirable. If enough skin is available so that
closure without tension is possible, early excision of the necrotic
area with repeat closure is often desirable. Early plastic
reconstructive surgery may be necessary when necrosis results in
exposure of metallic fixation devices.
postoperative formation of seromas or hematomas, particularly if
suction drainage is used. However, certain factors predispose to seroma
or hematoma formation: large wounds in obese patients, large exposed
bone surfaces, dead space, and uncontrolled hemorrhage secondary to
coagulopathies. If a tourniquet is used, it may be wise to let the
tourniquet down to ensure that hemostasis has been achieved before
closure. If necessary, the tourniquet can be reinflated for a short
period to accomplish closure. Hypotensive anesthesia may also
predispose the patient to postoperative hemorrhage when the blood
pressure returns to normal. In these cases, wound suction drainage is
of paramount importance.
as the application of a fresh, dry dressing makes the patient more
comfortable and the wound can be checked for formation of a seroma or
hematoma. Seromas or hematomas that require intervention are those
resulting in significant postoperative swelling, accompanied by moist
wound edges with either serous or serosanguineous discharge.
Persistence of drainage predisposes to secondary retrograde infection
of the hematoma through the wound. If a seroma or hematoma is not
accompanied by local or systemic evidence of infection, it can usually
be observed for a few days, with dressing changes being done as
frequently as necessary to keep them dry. Careful sterile technique is
necessary. If any evidence of infection develops, such as reddening
about the wound or a persistent fever, or if the drainage persists for
more than 72 h, return the patient to surgery for exploration of the
wound and evacuation of the seroma or hematoma. At that time, try to
detect and control any potential sources of hemorrhage. Close the wound
in a watertight fashion over a suction drainage system. Take aerobic
and anaerobic cultures of
both
the fluids and the tissues of the wound. If local or systemic signs of
infection are present, it is prudent to begin appropriate antibiotics
until the results of cultures are received. Early evacuation of a
hematoma, particularly in hip and spine surgery, is important to avoid
the complication of secondary infection.
hematoma and is treated as outlined previously. If cultures of the
hematoma are positive, assume that acute infection has occurred. Acute
postoperative infection may have local signs of infection without
systemic signs, systemic signs of infection without local findings, or
both. When both are present, infection is presumed to be present.
Typical local signs of infection, such as erythema, swelling,
tenderness, and exudate, even in the absence of systemic signs, require
immediate action. Usually immediate exploration of the wound, to look
for infection and to obtain cultures, is necessary. In borderline cases
in which it is uncertain whether exploration of the wound is indicated,
perform deep aspiration to look for exudate and obtain cultures. Avoid
swab cultures of exudate from the surface of the wound, as these often
grow contaminants and confuse the clinical picture.
larger after sterile preparation of the skin. Probe the operated area
down to bone, if necessary, to look for retained hematoma, seroma, or
exudate. Send the material obtained for immediate Gram stain and
aerobic and anaerobic cultures. If any organisms are seen on Gram
stain, at least 10,000 organisms/mL are present in the wound, and
infection can be presumed. Immediate exploration of the wound for
debridement and irrigation is necessary. If exposure of the underlying
tissues or an implant is not of great concern, leave the wound open and
close it on a delayed basis. Where exposure of a joint or implant is of
concern, reclosure of the wound over a tube-suction system may suffice.
Consultation with an infectious-disease specialist is often helpful in
designing appropriate immediate antibiotic therapy, in classifying the
organism(s), and in determining antibiotic sensitivities.
systemic intravenous antibiotics usually suffices, followed by oral
antibiotics. Acute infections involving bone or implants almost always
require bactericidal levels of intravenous antibiotics for at least 3
weeks, followed by oral antibiotics for an additional 3 weeks. Unless
there are particular risk factors, or it appears that there is an
established bone infection, 6 weeks of intravenous antibiotics, as
often required for the treatment of osteomyelitis, is usually
unnecessary.
Compartment syndrome, as a complication of surgery, usually occurs in
association with acute traumatic injuries where the initial injury
causes the compartment syndrome. Compartment syndrome after elective
surgery is very unusual. The most common causes are closure of the deep
fascia in the presence of significant muscle swelling after prolonged
elective surgery and hemorrhage into a closed compartment following
undetected rupture of an artery. The two most common areas in which
these problems arise are the forearm and the leg.
the forearm musculature is common, and closure of the deep fascia is
difficult. Unless absolutely no tension is present, leave the deep
fascia open and close only the subcutaneous fat and skin. The same
applies to procedures on the diaphysis of the tibia, particularly
posterolateral bone grafting, when approximation of the muscles but not
the deep fascia is indicated. Be aware of the dangers in performing
surgery in the proximal third of the tibia, where inadvertent and
unrecognized laceration of one of the arteries of the popliteal artery
trifurcation can occur, producing a compartment syndrome.
previously discussed. Early recognition is of paramount importance.
Unexpectedly severe postoperative pain should always raise the question
of compartment syndrome. Dressings must be released and the part
examined to rule out increased intracompartmental pressures. If there
is any question, take intracompartmental pressure measurements. Release
of the surgical closure or fasciotomy may be necessary.
of or trauma to a subcutaneous sensory nerve, resulting in numbness in
the distribution of the nerve and formation of a painful neuroma.
Always keep the location of important sensory nerves in mind when
making incisions. Identify and protect sensory nerves in the surgical
field. In some cases, injury to subcutaneous nerves is unavoidable.
Long, anterior exposures of the knee usually involve the sensory
branches of the infrapatellar branch of the saphenous nerve. The
ilioinguinal exposure of the acetabulum involves the lateral femoral
cutaneous nerve of the thigh. In these cases, warn the patient before
surgery that injury to these nerves is likely and describe the
consequences. The patient must accept these consequences if the surgery
is to be performed.
nerves—such as the sciatic nerve at the hip, common peroneal nerve at
the knee, and ulnar nerves—is avoided by identifying the nerve at the
time of surgery and providing appropriate protection. In many cases
this involves appropriate positioning of the extremity to avoid tension
on the nerve. For example, in surgery of the hip or acetabulum, keep
the knee flexed to 90° and the hip extended, as retraction of the
sciatic nerve is often necessary and excessive tension must be avoided.
Avoid retraction of a nerve if possible. If it should prove necessary,
encircle the nerve with a broad rubber (Penrose) drain and gently hold
the nerve out of danger. Retract nerves gently and discontinue
retraction as soon as it is no longer necessary. Dissection of a nerve
free from its bed over prolonged distances risks devascularization and
injury to the nerve and should be performed only if essential to the
operative procedure. Intraoperative monitoring of nerve functions by
somatosensory evoked potentials is now commonly used for spine surgery
and pelvic and hip surgery that threatens the sciatic nerve.
check the dressings to ensure they are not tight. Ensure that splints
or other appliances are not applying pressure to the nerve. Inspect the
wound to ensure that local pressure problems are not present. If the
nerve was observed at surgery and protected throughout the case, and
you are certain that intraoperative damage did not occur, watchful
waiting usually suffices; most nerves will show return of function
within a short time. If the nerve involvement is unexpected, if
extrinsic causes of nerve pressure have been ruled out, and if you
suspect that some component of the procedure may be causing pressure on
the nerve that could be relieved by surgical intervention, early
exploration of the nerve may be indicated.
following scheme: *, classic article; #, review article; !, basic
research article; and +, clinical results/outcome study.
B, Moscona R, Kaufman T, Harshai Y. External Longitudinal Splitting of
the Tibialis Anterior Muscle for Coverage of Compound Fractures of the
Middle Third of the Tibia. Plast Reconstruct Surg 1987;79:407.
CY, Forrest CR, Morris SF. Pharmacological Augmentation of Skin Flap
Viability: A Hypothesis to Mimic the Surgical Delay Phenomenon or a
Wishful Thought? Ann Plast Surg 1989;22:293.
MJ, Brumback RJ, Manson PN, et al. Acute and Definitive Management of
Traumatic Osteocutaneous Defects of the Lower Extremity. Plast Reconstruct Surg 1987;80:1.