
– SURGICAL PRINCIPLES AND TECHNIQUES > CHAPTER 2 – SURGICAL
APPROACHES TO THE ACETABULUM AND PELVIS
pattern determine the surgical approach to the acetabulum. The vast
majority of fractures can be reduced and fixed through a single
surgical approach.
the fracture can be reduced through the chosen approach. Fixation is
less of a determining factor inasmuch as all three
approaches—ilioinguinal (II), Kocher-Langenbeck (KL), and extended
iliofemoral (EIF)—give access for fixation of both the anterior and
posterior columns. I prefer to operate on the Tasserit (Judet) surgical
table, placing patients prone for the KL, supine for the II, and
lateral for the EIF approaches. If the surgeon chooses to operate on a
standard table, particularly without traction, the reduction can
usually also be performed. In that case, however, the need for either
two approaches or the EIF may arise more often, and my recommendations
for surgical approach (Table 2.1) may not
apply. The KL and II approaches are preferable to the EIF approach
because the EIF involves more muscle stripping from the outside of the
bone. As a result, the period of rehabilitation is longer and the
incidence of heterotopic ossification is higher. If the reduction and
fixation are not judged to be possible through either the KL or II
alone, however, choose the EIF.
 |
|
Table 2.1. Acetabulum Fractures: Indications for the Various Operative Approaches
|
KL or II approaches, but during surgery he may find that completion of
the reduction is impossible. In these cases, complete the reduction and
fixation for the exposed column of the acetabulum, taking care not to
place fixation into unreduced fracture lines. Close the wound and turn
the patient from prone to supine or vice versa to perform a subsequent
II or KL approach.
floppy lateral position to perform simultaneous II and KL approaches.
Dispensing with the Tasserit table and placing the patient in the
floppy lateral position limits the effectiveness of either the II or KL
approach and makes the need for a second approach more likely. With the
patient in the floppy position, it is also difficult to maintain
adhesion of surgical drapes, and sterility is thereby compromised.
Second surgical approaches should rarely be needed if the surgeon does
appropriate preoperative planning (3,4).
fractures, it may be desirable to plan for the KL and II surgical
approaches to be performed successively in preference to the EIF.
First, position the patient prone, then supine, or vice versa.
returned to the historic Paris anatomy institute, the Fer à Moulin,
where he developed the II approach. The innovation of the approach was
that in opening the inguinal canal at its roof and floor for access to
the pelvis, it would nonetheless be possible to obtain a sound repair
of the soft tissues at the completion of the procedure. This elegant
approach remains the standard for access to the anterior column and
internal aspects of the innominate bone. Through this approach, the
interior of the joint can be visualized through displaced fracture
lines (intraoperative visualization with the image intensifier can be
helpful as well), but it is not visible after completion of the
reduction. The reduction is inferred by the reduction of the inner
aspect of the innominate bone.
-
Place a Foley catheter in the bladder before positioning the patient.
-
Position the patient supine, usually on a
fracture table—the Tasserit (Judet) table is preferable. Support the
pelvis with a narrow sacral support to facilitate the necessary access
around the iliac crest; a broad flat table top inhibits access. Place
the hip in about 20° of flexion to relax the iliopsoas and facilitate
access to the internal iliac fossa and true pelvis. -
Start the incision in the midline of the
abdomen, 2 cm proximal to the symphysis pubis. Direct the incision
laterally toward the anterior superior iliac spine, and follow the
iliac crest about two thirds of the way posteriorly to or beyond the
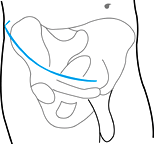
most lateral convexity of the crest (Fig. 2.1).![]() Figure 2.1. Skin incision for the II approach.
Figure 2.1. Skin incision for the II approach. -
Sharply incise the periosteum over the
iliac crest, and release the attachment of the abdominal muscles and
the iliacus from the iliac crest. Using a periosteal elevator, expose
the internal iliac fossa as far posteriorly and medially as the
anterior SI joint and the pelvic brim. Be careful to avoid injuring the
internal femoral cutaneous nerve to the thigh (discussed below). -
The first abdominal layer encountered is
the aponeurosis of the external oblique and the external rectus
abdominis sheath in the most medial portion of the incision. Incise
this layer in line with the skin incision. -
Reflect the aponeurosis of the external
oblique and the external rectus sheath distally as a single layer; the
inguinal canal is thereby unroofed (Fig. 2.2).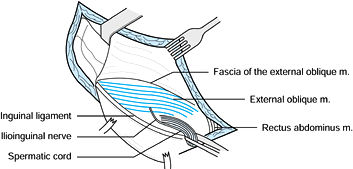 Figure 2.2. Unroofing of the inguinal canal.
 -
Detach the common origin of the internal
oblique and transverse abdominis from the inguinal ligament by sharply
incising along the ligament and splitting it. Leave about 1 mm of the
inguinal ligament with the muscle origin. Detach the transversalis
fascia from the inguinal ligament by splitting a small portion of the
ligament with the transversalis fascia. -
Medial to this split, transect the
conjoined tendon of the internal oblique and transverse abdominis and a
portion of the rectus tendon near the body of the pubis (Fig. 2.3). The medial portion of this dissection gives access to the retropubic space of Retzius.![]() Figure 2.3. Detachment of the abdominal muscles and fascia from the inguinal ligament.
Figure 2.3. Detachment of the abdominal muscles and fascia from the inguinal ligament. -
Perform the incision along the inguinal
ligament, with care to avoid injuring the structures immediately
underlying it, which include the external iliac vessels and their
accompanying lymphatics, the femoral nerve, and the lateral cutaneous
nerve of the thigh. -
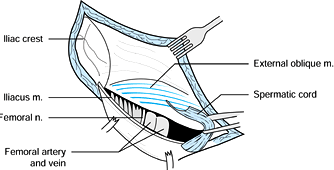
Beneath the inguinal ligament lie two
lacunae that contain the structures passing under it. Laterally is the
lacuna musculorum, and medially is the lacuna vasorum (Fig. 2.4).
The two lacunae are separated by the iliopectineal fascia, which runs
obliquely from the anterior iliac crest to the pectineal eminence and
the pelvic brim. The iliopsoas and the femoral and lateral cutaneous
nerves of the thigh are found in the lacuna musculorum. The femoral
vessels and their surrounding lymphatics are found in the lacuna
vasorum. The lateral cutaneous nerve of the thigh is found at a
variable distance from the anterior superior spine, from just adjacent
to it to 3 cm medially. It is usually found immediately after incision
along the inguinal ligament. The femoral nerve is more posterior and
medial within the iliopsoas sheath and intimately is associated with
the iliopsoas muscle.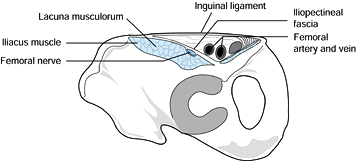 Figure 2.4. Oblique section of the lacuna musculorum and lacuna vasorum at the level of the inguinal ligament.
 -
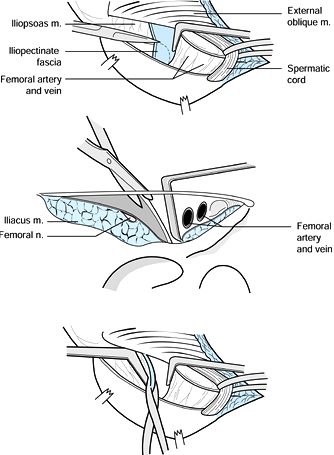
Incise the iliopectineal fascia, which
divides the false pelvis from the true pelvis, to gain access to the
true pelvis and its quadrilateral surface. Incise it at the level of
the inguinal ligament in a posterior and medial direction to the
pectineal eminence, and then detach it proximally from the pelvic brim.
Before dividing this fascia, fully isolate it by carefully dissecting
the external iliac or femoral vessels with the surrounding lymphatics
off the medial aspect of the fascia. Dissect the iliopsoas and femoral
nerve off the lateral aspect. Retract these structures medially and
laterally away from the fascia, and sharply incise the fascia to the
pectineal eminence. Cut the fascia proximally along the pelvic brim in
a proximal and posterior direction until the anterior SI joint is
palpable (Fig. 2.5 A, Fig. 2.5B and Fig. 2.5C).
The fascia attachment may be combined at the pectineal eminence with
the psoas minor tendon attachment. If the psoas minor tendon attachment
is present, it appears as a very dense section of the fascia and should
be transected.![]() Figure 2.5. A: Division of the iliopectineal fascia to the pectineal eminence. B: Oblique section dividing the fascia. C: Proximal division of the fascia from the pelvic brim.
Figure 2.5. A: Division of the iliopectineal fascia to the pectineal eminence. B: Oblique section dividing the fascia. C: Proximal division of the fascia from the pelvic brim. -
Pass a second Penrose drain around the
iliopsoas and femoral nerve together. Passing a finger posteriorly to
the external iliac vessels into the retropubic space medially, check
for the possibilities of a retropubic anastomosis or anomalous origin
to the obturator artery (corona mortis) from the external iliac. If
this anomalous artery is present, it should be palpable on the
posterior
P.20
aspect
of the superior pubic ramus. Visualize this area to check for the
anastomosis. If present, sacrifice this anastomosis by cauterizing it
or ligating it. Place a Penrose drain around the iliac vessels and
their surrounding lymphatics as a unit. Do not dissect the vessels
individually. Individual dissection injures the lymphatics and produces
postoperative lymphedema of the extremity. -
Further expose the bone and the fracture
lines by periosteal elevation along the superior pubis ramus and pelvic
brim. Use a periosteal elevator over the pelvic brim to clear the
obturator internus muscle from the quadrilateral surface, and approach
the posterior column. In doing so, approach the sciatic notch
carefully, because it is easy to injure the superior gluteal vessels or
branches of the internal iliac vein. The obturator nerve can easily be
seen as it runs parallel and medial to the quadrilateral surface and
enters the obturator canal at the superolateral aspect of the obturator
foramen. The exposure is now complete. Perform the operation through
the various windows surrounded by the structures crossing the inguinal
ligament. -
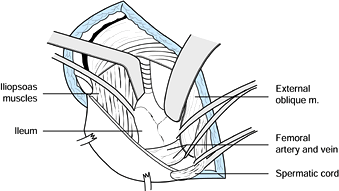
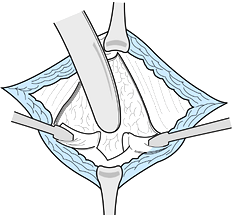
The first window (Fig. 2.6)
gives access to the internal iliac fossa, the anterior SI joint, and
the proximal pelvic brim. Retraction can be performed with lever
retractors placed on the anterior SI joint and the pelvic brim.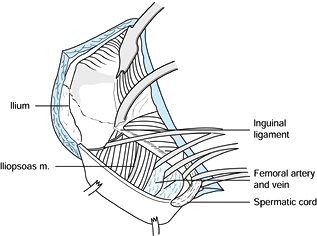 Figure 2.6. The first window of the II approach.
 -
The second window (Fig. 2.7),
which is accessed by retracting the iliopsoas and femoral nerve
laterally and the external iliac vessels medially, gives access to the
pelvic brim from the anterior SI joint beyond the pec-tineal eminence.
It also gives access to the quadrilateral surface for reduction of
posterior column fractures. The iliopsoas can be retracted fairly
vigorously laterally without danger of injury to the femoral nerve.
Take care with medial retraction of the external iliac vessels; this is
usually done with a ribbon retractor, with its tip placed against the
quadrilateral surface. After retraction of the vessels, check the pulse
repeatedly to be certain that too great a force has not been applied.![]() Figure 2.7. The second window of the II approach.
Figure 2.7. The second window of the II approach. -
The third window lies medial to the vessels and gives access to the superior pubic ramus and the symphysis
P.21
pubis as well as the quadrilateral surface (Fig. 2.8). The spermatic cord may be retracted medially or laterally.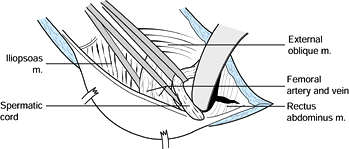 Figure 2.8. Access to the retropubic space and symphysis through the third window.
 -
It is often desirable to obtain access to
the external aspect of the ileum to manipulate the anterior column
segment for placing bone-holding forceps around the bone. Gain access
by releasing the inguinal ligament and sartorius from their origins on
the anterior superior spine. Elevate the tensor fascia lata and gluteus
minimus muscles from the anterior iliac wing as necessary. Detachment
of rectus origin and anterior hip capsule has been described for the
purpose of visualizing the articular surface following reduction, but I
believe that this procedure is unwise because it can easily
devascularize fracture fragments of the anterior column or wall. -
At the completion of the procedure, place
a suction drain in the space of Retzius. Also drain the internal iliac
fossa and true pelvis adjacent to the quadrilateral surface. If the
lateral ilium has been exposed, drain it as well. -
If the sartorius and inguinal ligament
have been released from the anterosuperior spine, reattach them using
suture through drill holes in the bone. Then reattach the abdominal
fascia to the fascia lata along the iliac crest. For the repair along
the iliac crest, draw the abdominal muscles anteriorly and distally,
because attachment of the abdominals in too proximal a position along
the crest prevents a satisfactory closure along the inguinal ligament.
column of the acetabulum. It affords excellent exposure of the
retroacetabular surface, the greater and lesser sciatic notch, the
ischial tuberosity, and the inferior portion of the iliac wing. The
anterior column can often be reduced and stabilized by manipulation
through the greater sciatic notch or by intraarticular manipulation
through the acetabulum.
-
Position the patient prone and on the
Tasserit or other suitable table. Keep the knee flexed at least 60° and
the hip extended during the operation to prevent tension on the sciatic
nerve.
-
Place a suture as a marker in the
abdominal muscles at the anterior superior spine when they are taken
down. Placing this suture back in position is a helpful guide to
closure, ensuring proper tension on the abdominal muscles. -
Then reattach the common origin of the
internal oblique and transverse abdominis to the inguinal ligament and
the transversalis fascia to the inguinal ligament. -
Then repair the conjoined tendon and
tendon of the rectus abdominis. Faulty repair of the transversalis
fascia can produce an inguinal hernia. -
Reapproximate the aponeurosis of the external oblique, then close the subcutaneous tissues and skin.
-
Start the incision about 5 cm lateral to
the posterosuperior spine, and extend it anteriorly and distally to the
tip of the greater trochanter and then distally along the axis of the
femur to approximately the midportion of the thigh (Fig. 2.9).![]() Figure 2.9. Skin incision for the KL approach.
Figure 2.9. Skin incision for the KL approach. -
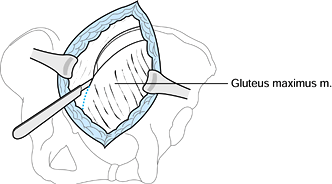
Split the gluteal fascia in line with the
fibers of the gluteus maximus, and split the fascia lata over the
femur. Incise the trochanteric bursa, and bluntly split the fibers of
the gluteus maximus. Halt the splitting of the gluteus maximus when the
neurovascular bundle of the inferior gluteal nerve is reached as it
crosses through the muscle fibers (Fig. 2.10).
It is possible to continue with the splitting if additional exposure is
needed, but the superior portion of the gluteus maximus will be
denervated. Transect the tendon of the gluteus maximus at its femoral
insertion. Beware of the large bleeder in this area.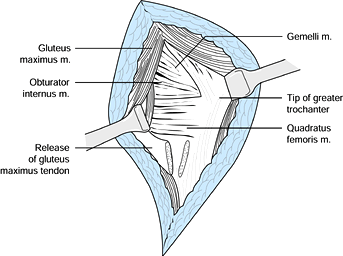 Figure 2.10. Splitting of the gluteus maximus muscle.
 -
It is useful to locate the sciatic nerve
as it crosses the posterior aspect of the quadratus femoris. Follow the
nerve proximally to where it disappears beneath the piriformis muscle.
To follow the nerve to this point, it is necessary to clamp and
cauterize a small vascular pedicle that crosses posteriorly and
laterally to the nerve. Transection of this pedicle allows more nerve
mobility and better posterior column exposure. -
Locate the tendon of the piriformis
muscle, tag it with suture, and transect it at its trochanteric
insertion. Reflect it posteriorly to expose the greater sciatic notch.
Identify the tendon of the obturator internus, which is paralleled by
the two gemelli superiorly and inferiorly. Tag these structures with
suture, and transect them at the trochanteric insertion. Reflection of
the obturator internus and the two gemelli from the retroacetabular
surface is an essential part of the exposure that is often missed. This
tendon leads to the lesser sciatic notch and the bursa of the obturator
internus, where the tendon passes through the lesser notch. As the
tendon with its accompanying gemelli are reflected posteriorly and
medially, the inferior portion of the retroacetabular surface and
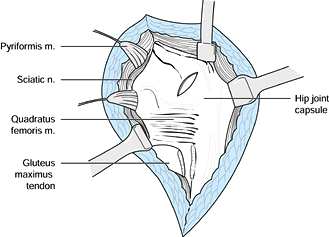
superior pole of the ischial tuberosity are clearly exposed. -
With a periosteal elevator, clear the
retroacetabular surface and the superior pole of the ischial
tuberosity. Use subperiosteal elevation on the inferior aspect of the
iliac wing and anteriorly superior to the hip capsule to expose this
area. In the area of the greater sciatic notch, avoid damaging the
superior gluteal vessels or nerve with the elevator. An elevator may
also be placed in the greater sciatic notch to clear the periosteum and
obturator internus origin from the quadrilateral surface. This
technique allows assessment of the fracture reduction by palpation of
the quadrilateral surface as far anteriorly as the pelvic brim. -
A Hohmann retractor with its tip driven
into the bone may be placed on the inferior iliac wing for retraction
of the abductors, but do not retract too proximally in this area; a
stretch injury of the superior gluteal nerve could result. Cobra
retractors or a specialized sciatic nerve retractor are normally placed
with its tip in the greater or lesser sciatic notch, but be careful not
to stretch the sciatic nerve (Fig. 2.11). If
more anterior access to the inferior wing is necessary, the gluteus
medius tendon may be partially or completely transected at its
insertion, or a trochanteric osteotomy can be performed.![]() Figure 2.11. Completed exposure of the retroacetabular surface.
Figure 2.11. Completed exposure of the retroacetabular surface. -
At the completion of the operation, place
suction drains to drain the greater sciatic notch and inferior iliac
wing area. Reattach the tendons of the piriformis and obturator
internus muscles to the trochanter. Repair of these muscles provides a
soft-tissue barrier between the sciatic nerve and internal fixation
plate on the posterior column. Repair the maximus tendon, and close the
fascia and skin. -
Leave suction drains in place for
approximately 48 hours. Mobilize the hip and begin gait training when
the patient is comfortable.

simultaneous access to both columns of the acetabulum. It is primarily
an approach to the external aspect of the innominate bone, giving
access to the entire external aspect of the iliac wing, the entire
retroacetabular surface, and the posterior column, including the
ischial tuberosity (Table 2.1). The internal aspect of the bone may also be exposed, with exposure of the distal portion of the internal
iliac fossa to the anterior SI joint and the anterior column distally
to the pectineal eminence. This exposure follows a logical
neurovascular interval, reflecting muscles innervated by the superior
and inferior gluteal nerves posteriorly and laterally and muscles
innervated by the femoral nerve medially. Exposure of the posterior
column is equal to that which can be obtained through the KL approach.
The anterior column exposure, however, is less extensive than the II
approach provides.
-
Place the patient in the lateral position, preferably on the Tasserit table.
-
Start the incision at the posterior
superior iliac spine, and carry it anteriorly along the crest to the
anterior superior spine and then anterolaterally down the thigh. -
Sharply incise the periosteum over the
iliac crest, and release the fascia lata from the crest.
Subperiosteally dissect the gluteal muscles and the tensor fascia lata
from the lateral aspect of the iliac wing (Fig. 2.12). Figure 2.12. Skin incision for the EIF approach.
 -
The incision in the deep fascia proceeds
from the anterior superior spine in a distal and slightly more lateral
direction. Split the fascia lata overlying the tensor fascia lata
muscle to a point approximately halfway down the thigh or until the
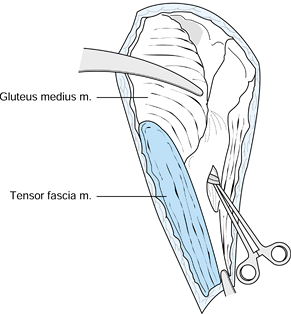
distal extent of the tensor fascia lata muscle is reached. Reflect the
tensor fascia lata muscle posteriorly from its medial fascial
compartment. -
Longitudinally split this medial fascia
to expose the rectus femoris muscle. Medial retraction of the rectus
exposes another layer of fascia and aponeurotic fibers directly
posterior to it. Split this fascia and associated aponeurosis
longitudinally. Clamp and ligate the internal femoral circumflex
vessels, which are found immediately beneath this fascia (Fig. 2.13).![]() Figure 2.13. Exposure of the lateral femoral circumflex vessels.
Figure 2.13. Exposure of the lateral femoral circumflex vessels. -
Opening this fascial plane exposes the
vastus lateralis and anterior portion of the trochanter with the
insertion of the gluteus minimus. Tag the portion of the trochanter
with the insertion of the gluteus minimus. Tag the tendon of the
gluteus minimus with a suture and transect it in its midsubstance,
leaving a 1 cm stump with the trochanter and another 1 cm with the
origin. It is also necessary to dissect sharply the gluteus minimus
insertion from the superior hip capsule and continue elevation of the
gluteal muscles until the greater sciatic notch is exposed. -
Identify the gluteus medius tendon at its
insertion on the lateral aspect of the greater trochanter, and transect
it in its midsubstance, leaving a 1 cm stump on the trochanter. Tag the
tendon on the muscle side with multiple sutures to facilitate
identification and repair (Fig. 2.14). Alternatively, after transecting the gluteus minimus tendon in the usual fashion, perform an osteotomy
P.24
of the greater trochanter to detach the gluteus medius insertion.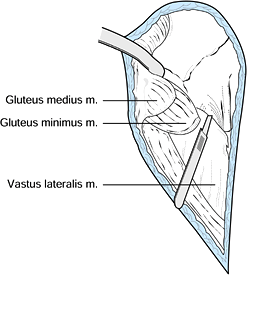 Figure 2.14. Transection of the gluteus minimus and gluteus medius tendons.
 -
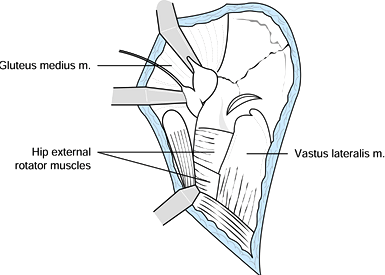
Identify the piriformis tendon at its
insertion on the superior aspect of the trochanter. Tag it with suture
and transect it near its insertion to further expose the greater
sciatic notch. Tag the tendon of the obturator internus and the two
gemelli with a single suture, and transect them near the trochanter.
Reflection of this tendon and the two gemelli from the retroacetabular
surface exposes the lesser sciatic notch and the bursa of the obturator
internus, where the tendon slides in the lesser sciatic notch from
inside the pelvis. -
Use subperiosteal dissection as necessary
to expose the bone surface and fracture lines. Subperiosteal dissection
along the posterior border of the greater sciatic notch gives access to
the quadrilateral surface and helps protect the superior gluteal
vessels and nerve, as they now fall away from the bone in a posterior
and medial direction. -
Excise the reflected head of the rectus
femoris muscle from the superior hip capsule to expose more of the
anterior column. A capsulotomy may be performed at the level of the rim
of the acetabulum to expose the internal aspect of the joint.
Distraction of the femoral head aids this exposure (Fig. 2.15).![]() Figure 2.15. Completed exposure of the external aspect of the bone.
Figure 2.15. Completed exposure of the external aspect of the bone. -
The internal iliac fossa may be exposed
by detachment of the abdominal muscles from the iliac crest, and by
detachment of the sartorius and inguinal ligament from the anterior
superior spine. Dissection may be carried out posteriorly and medially
to the anterior SI joint and the pelvic brim. -
Transection of the direct head of the rectus femoris at its bony origin completes the maximum access to the anterior column (Fig. 2.16).
Exposure beyond the pelvic brim allows access around the bone, which is
particularly useful for callus excision during surgery on old fractures.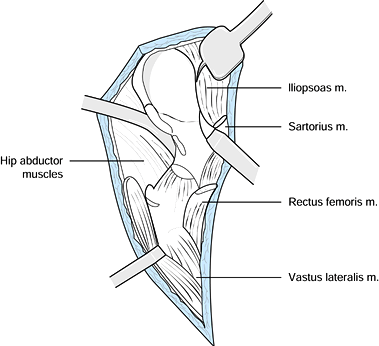 Figure 2.16. Exposure of the internal iliac fossa.
 -
With exposure of both sides of the iliac
wing, there is a danger of devascularizing large segments of the
anterior column. Carefully preserve vascular muscle pedicles to the
bone to maintain vascularity. In the case of a high anterior column
fracture that takes the anterior border of the iliac wing, it is wise
to preserve its attachments to the anterior hip capsule and rectus
femoris and, if possible, to additional muscle pedicles. -
Take care with dissection around the
greater sciatic notch. Injury to the superior gluteal vessels or nerve
in this area could compromise the blood and nerve supply to the large
abductor muscle flap. Place a wet sponge over the muscles to prevent
desiccation during the operation. -
At the completion of the operation, place
suction drains along the course of the rectus femoris and vastus
lateralis muscles to drain the external iliac fossa and greater sciatic
notch. If the internal aspect of the bone has been exposed, drain it as
well. Reattachment of the rectus femoris and sartorius origins is
facilitated by placement of a suture through a drill hole in the bone.
Reattach the tendons of the piriformis and obturator internus muscles
to the trochanter with suture. Repair the tendons of the gluteus medius
and minimus musles at the trochanteric insertion with multiple sutures.
Reapproximate
P.25
the fascia lata to the abdominal fascia at the iliac crest, and close the fascia lata anterolaterally over the thigh. -
Keep the suction drains in place for
about 48 hours after surgery. During the initial postoperative period,
use an abduction pillow while the patient is in bed. Start passive
mobilization of the hip within a few days but avoid passive abduction.
Begin gait training when the patient’s symptoms allow.
-
To approach the pelvic ring, position the
patient on a radiolucent table, with the sacrum centered over a
radiolucent area at least 1.5 m in length. This positioning allows
angulation of the image intensifier to facilitate assessment of the
reduction and to guide fixation. -
Place the patient supine for the approach
to the symphysis or anterior SI joint or prone for the approach to the
posterior pelvic ring. When both anterior and posterior reduction and
fixation are required, position the patient prone for the posterior
approach and subsequently turn the patient supine.
-
Position the patient supine on the operating table.
-
Insert a Foley catheter in the bladder before the operation.
-
Make either a transverse incision 2 cm proximal to the symphysis pubis or a vertical midline incision (Fig. 2.17).
The transverse incision gives a more cosmetic result, whereas the
vertical incision can be extended for intraabdominal access in the case
of multiple injuries.![]() Figure 2.17. Skin incision for the approach to the symphysis pubis.
Figure 2.17. Skin incision for the approach to the symphysis pubis.
simultaneous anterior and posterior approaches typically does not save
time and introduces significant problems: access to the bone becomes
more awkward (especially anterior), the image intensifier is more
difficult to use, and sterility is compromised. In some cases, it is
preferable to approach the anterior and posterior lesions
simultaneously through the II approach with the patient supine. In
other cases, the skin incision may appear as the II but the deep
dissection is done as for the approach to the symphysis and the
approach to the anterior SI joint.
-
In either case, locate the two heads of
the rectus abdominis. In the acute symphysis diastasis, one of the
heads of the rectus is commonly torn from its bony attachment. Separate
the two heads of the rectus abdominis from each other by a vertical
incision along the linea alba (Fig. 2.18).
Identify the pyramidalis muscle just proximal to the symphysis: Split
it vertically along the line of the linea alba. Directly beneath the
abdominal wall lie the preperitoneal fat proximally and the bladder
distally. In an acute injury, the bladder falls away from the posterior
surface of the symphysis, although it may adhere to the bone in an old
injury. If the bladder adheres to the bone, free the bladder carefully
with a periosteal elevator along the posterior aspect of the bone to
avoid injury to it.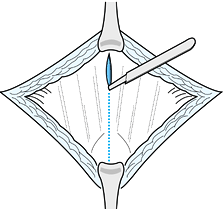 Figure 2.18. Incision along the linea alba.
 -
Leave the two heads of the rectus
abdominis attached to the anterior and outer aspect of the symphysis,
although the posterior portion of their insertion may be freed somewhat
by sharp dissection along the superior aspect of the symphysis and
superior pubic ramus. A long proximal split of the linea alba enhances
exposure. -
Place the point of a narrow Hohmann
retractor over the superior pubic ramus on each side of the symphysis,
and retract the two heads of the rectus laterally (Fig. 2.19).
Use a large malleable retractor in the space of Retzius to retract the
bladder posteriorly. Periosteal elevation along the superior part of
the symphysis and the superior ramus completes the exposure necessary
for reduction and plate application.![]() Figure 2.19. Retraction of the two heads of the rectus abdominis.
Figure 2.19. Retraction of the two heads of the rectus abdominis. -
The superior pubic ramus can also be
approached through this interval without transecting the rectus
abdominis if reduction and fixation of the ramus are indicated. -
Identify the obturator nerve and artery, which lie posterior to the most lateral portion of the superior pubic ramus.
-
It is also possible to continue with
proximal exposure of the pelvic brim and posterior exposure of the
quadrilateral surface, as is done with the Stoppa approach (1). -
If the fixation of the superior ramus is
planned or contemplated, it is advisable to prep the skin over the
iliac crest to allow extension of the incision to the II approach in
case it is necessary to extend a plate into the internal iliac fossa. -
At the completion of surgery, place a
suction drain in the retropubic space. Closure is normally simple, with
approximation of the two heads of rectus abdominis along the linea alba
and closure of the subcutaneous tissues and skin.
the sacrum, dislocations of the SI joint, or fracture dislocations of
the SI joint.
-
Position the patient prone on a fully radiolucent table, if available.
-
Make a vertical incision 2 cm lateral to
the posterosuperior spine. Start the incision 5 cm lateral to the iliac
crest, and end it 5 cm distal to the superior border of the greater
sciatic notch (Fig. 2.20).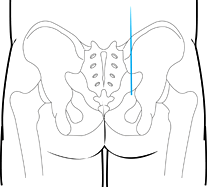 Figure 2.20. Skin incision for the approach to the posterior pelvic ring.
 -
Locate the very thin fascia overlying the
gluteus maximus, just beneath the subcutaneous tissue. Elevate the
subcutaneous tissue off the gluteal fascia medially to expose the point
of origin of the gluteus maximus from the posterior crest of the ilium
and from the posterior aspect of the sacrum more distally. -
Reflect the gluteus maximus from its
point of origin along the posterior ilium, and reflect it from the
sacrum. Immediately beneath the portion of the maximus that overlies
the sacrum is the fascia that overlies the multifidus muscles of the
spine. Reflect the maximus off this fascia (Fig. 2.21).![]() Figure 2.21. Reflection of the gluteus maximus muscle from the posterior crest and multifidus fascia.
Figure 2.21. Reflection of the gluteus maximus muscle from the posterior crest and multifidus fascia. -
Also reflect a portion of the medius and
minimus laterally from the iliac wing to expose the posteroexternal
aspect of the wing. Take care to not injure the superior gluteal
vessels and nerve as the gluteal muscles are reflected from the wing
immediately superior to the greater sciatic notch. -
Exposure of the greater sciatic notch is
necessary for reduction of the SI joint. It allows the surgeon to pass
a finger through the notch to palpate the anterior SI
P.27
joint
or to palpate a sacral fracture on the anterior portion of the sacrum.
It also permits assessment of the position of the neural foramina and
positions of fractures around the neural foramina. As you detach the
gluteal muscles from the posterior crest and sciatic notch area, also
detach the piriformis muscle from its origin at the greater notch. -
If the sacrum is fractured, it is
necessary to expose the fracture line as it traverses the posterior
sacral lamina. Elevate the multifidus muscles from the posterior aspect
of the sacrum in a lateral to medial direction starting at the lateral
edge of the sacrum. Small nerve branches that exit through the
posterior sacral foramina supply some sensation to the skin overlying
the sacrum and additionally innervate the multifidus muscles. It is
usually possible to preserve them, even when the sacral foramina are
exposed posteriorly; if they must be sacrificed, the resulting
disability is negligible (Fig. 2.22).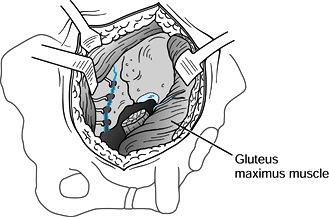 Figure 2.22. Completed exposure of the posterior ilium, SI joint, and sacral lamina.
 -
Although palpation is not necessary in
most cases, it is possible to obtain access for palpation of the
internal iliac fossa and anterior aspect of the superior SI joint by
releasing the erector spinaea muscles and abdominal muscles from the
superior portion of the crest and by placing a finger over the top of
the crest into the internal iliac fossa. -
At the completion of the operation, drain
the lateral ilium. Drain the greater sciatic notch; if the internal
iliac fossa has been exposed, drain it as well. Closure is simple:
Reapproximate the gluteal fascia to the fascia overlying the multifidus
and erector spinae muscles.
-
Position the patient supine.
-
Start the incision in line with the II
approach, about 5 cm medial and distal to the anterosuperior spine, and
proceed posteriorly along the iliac crest about two thirds of the way
along the crest. -
Sharply incise the periosteum over the
iliac crest. Release the abdominal muscles from the crest by
subperiosteal dissection. Incise the aponeurosis of the external
oblique muscle in line with the skin incision and reflect it distally. -
Split the lateral portion of the inguinal
ligament to detach the lateral portion of the origin of the internal
oblique and transversus abdominis muscles. Split the inguinal ligament
with care to avoid transecting the lateral cutaneus nerve of the thigh. -
Elevate the iliacus from the internal
iliac fossa medially to the SI joint and as far distally as the pelvic
brim. It is necessary to dissect subperiosteally along the anterior
aspect of the sacral ala, but take care to avoid too vigorous medial
dissection. The L-5 nerve root, which crosses the anterior sacral ala,
can suffer stretch injury from vigorous retraction exposure. Visualize
the anterior SI joint for reduction. Facilitate exposure by the use of
deep, straight-tipped, broad retractors or sharp-tipped Hohmann
retractors whose tips can be driven into the anterior sacrum.
-
Position the patient lateral or supine.
-
Incise the skin over and parallel to the iliac crest.
-
Cut the periosteum sharply along the
superior aspect of the crest. From this point, expose the external or
internal aspect of the wing by elevating the gluteal muscles, the
iliacus, or both, as necessary, for reduction and fixation.
required, is most commonly used for debridement of osteomyelitis due to
an overlying decubitus ulcer. It is also used occasionally for biopsy.
-
Position the patient supine on a regular
operating table and place the legs in the lithotomy position using
obstetric leg holders. -
Prepare and drape the perineum; use adhesive plastic drapes to exclude the anus from the field.
-
Make a vertical incision as long as
necessary for the exposure, directly over the ischium but somewhat
lateral; 7.5 to 10 cm. (3 to 4 inches) usually suffice. -
Dissect directly down to the ischium.
Exposure is usually facilitated by using an electric cautery knife to
reflect the muscle origins directly off the bone. -
Avoid injury to vital structures by
staying on bone. Remember that the pudendal nerve runs in Alcock’s
canal on the medial aspect of the ischium. -
If good hemostasis is obtained, then layered closure without a drain is possible. Infected wounds are often packed open.
scheme: *, classic article; #, review article; !, basic research
article; and +, clinical results/outcome study.
JD, Bolhofner BR. Acetabular Fracture Fixation Via a Modified Stoppa
Limited Intrapelvic Approach. Description of Operative Technique and
Preliminary Treatment Results. Clin Orthop 1994;305:112.
JM. Fractures of the Acetabulum: Accuracy of Reduction and Clinical
Results in Patients Managed Operatively Within Three Weeks After the
Injury. J Bone Joint Surg Am 1996;78:1632.