
Editors: Chapman, Michael W.
Title: Chapman’s Orthopaedic Surgery, 3rd Edition
Copyright ©2001 Lippincott Williams & Wilkins
> Table of Contents > SECTION I
– SURGICAL PRINCIPLES AND TECHNIQUES > CHAPTER 1 – SURGICAL
APPROACHES TO THE UPPER EXTREMITY
– SURGICAL PRINCIPLES AND TECHNIQUES > CHAPTER 1 – SURGICAL
APPROACHES TO THE UPPER EXTREMITY
CHAPTER 1
SURGICAL APPROACHES TO THE UPPER EXTREMITY
William L. Green
W. L. Green: Department of Orthopaedic Surgery, University of California, San Francisco, California, 94118.
Surgery injures tissues. Proper planning and thorough
understanding of the surgical exposure, however, can minimize tissue
injury and expedite the procedure. Proper exposure protects the
important neurovascular structures by providing direct observation or
enabling total avoidance. The surgical exposures described in this
chapter allow excellent exposure of the upper extremities.
Hemostasis is mandatory. Because most procedures in the
upper extremity are done under tourniquet control, a cut vessel
requires immediate coagulation or ligation. Otherwise, it retracts,
goes into spasm, and may later start bleeding. Never purposely cut a
cutaneous nerve. Every severed nerve forms a neuroma, and every neuroma
can become exquisitely tender. Always strive for a cosmetically
acceptable scar using, if possible, subcuticular sutures with
Steri-strips.
SHOULDER
STERNOCLAVICULAR APPROACH
Exposure of the sternoclavicular joint (SC) is rarely
necessary. Infection, arthritis, or posterior dislocation of this joint
may necessitate an open procedure.
necessary. Infection, arthritis, or posterior dislocation of this joint
may necessitate an open procedure.
-
If resecting the medial clavicle, remove 1.5 cm of bone, staying medial to the costoclavicular ligament.
-
For a posterior dislocation, release of
the sternocleidomastoid muscle origin superiorly may improve the
exposure. Be very careful of the vital structures posterior to the SC
joint (i.e., right innominate artery, left common carotid artery,
subclavian vein, and lung tissue).
ACROMIOCLAVICULAR APPROACH
Exposure of the acromioclavicular joint (AC) may be necessary for arthritis, dislocation, or intra-articular fracture.
-
Make a 6–7 cm, anterior to posterior
saber incision just medial to the AC joint. Incise the trapezius and
deltoid fascia, and elevate off the clavicle as needed. -
Cut the capsule perpendicular to the
joint and reflect it anteriorly and posteriorly to expose the joint. It
is important to reattach this capsule to close the space created if the
distal clavicle has been resected. -
If repair or reconstruction of the
coracoclavicular ligaments is required, extend the exposure inferiorly
to expose the coracoid process. This is best done by splitting the
deltoid or utilizing the deltopectoral interval (Fig. 1.1).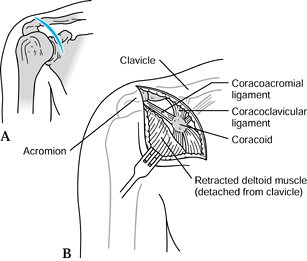 Figure 1.1. Exposure of the acromioclavicular joint and coracoid process.
HENRY’S ANTERIOR APPROACH
Henry’s anterior approach (3) is
used to treat recurrent anterior shoulder dislocations, fractures of
the proximal humerus, rotator cuff repairs or reconstructions, and
anterior shoulder arthrotomies and arthroplasties (Fig. 1.2).
used to treat recurrent anterior shoulder dislocations, fractures of
the proximal humerus, rotator cuff repairs or reconstructions, and
anterior shoulder arthrotomies and arthroplasties (Fig. 1.2).
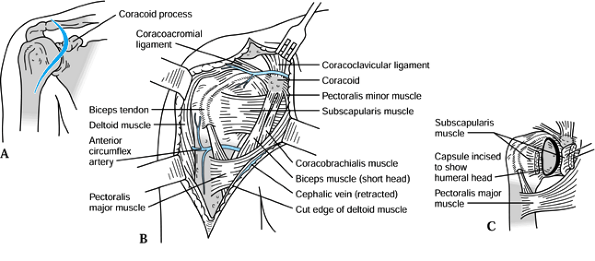 |
|
Figure 1.2. Henry’s anterior approach.
|
-
Position the patient in a semi-sitting
position (40° off the horizontal) with a rolled towel under the
ipsilateral scapula. The shoulder should be freely mobile. A Mayo
stand, padded with a pillow, next to the operating room table
facilitates resting the shoulder in abduction and external rotation.
Drape the arm free. Overwrap the stockinet on the hand and forearm to
facilitate control of the arm. -
Locate the deltopectoral groove. In an
obese patient, this groove is located by internal and external rotation
of the shoulder. Start the incision at the clavicle just medial to the
coracoid, and extend it distally along the deltopectoral groove to the
deltoid insertion for approximately 15 cm. -
Develop skin flaps to expose the deep
fascia. Open the fascia over the deltopectoral groove with blunt
scissors, looking for the cephalic vein. This vein serves as an
important landmark for identifying the avascular interval between the
deltoid and pectoralis major muscles. Bluntly develop this interval,
and retract the deltoid laterally and the pectoralis major medially.
The vein can be ligated or retracted with the deltoid. -
In the proximal wound, incise the
clavipectoral fascia arising over the coracoacromial ligament, and
identify and coagulate the underlying acromial branch of the
thoracoacromial artery. The anterior circumflex vessels lie in the
middle of the wound, just superior to the pectoralis major muscle; they
may need to be isolated, clamped, and coagulated. -
Retracting the coracobrachialis and short
head of the biceps medially with a broad retractor protects the
axillary neurovascular bundle. Detachment of the anterior deltoid
muscle from the clavicle should be avoided if at all possible, because
it usually weakens the anterior deltoid. If detachment is necessary,
carefully elevate a flap of tendon superiorly and inferiorly off the
clavicle for resuturing the deltoid, or detach the deltoid by removing
a small wafer of bone and reattaching it with drill holes later. For
extensive proximal humerus procedures, detach the deltoid insertion off
its tubercle distally and reflect the deltoid superiorly. This provides
excellent exposure. Repair of the deltoid is simplified by suturing it
to the origin of the brachialis with interrupted figure-eight sutures. -
If better exposure of the rotator cuff is
necessary, resection of the coracoacromial ligament and an anterior
acromioplasty as described by Neer (7)
facilitates exposure. The anterior joint capsule can be exposed by
releasing the subscapularis tendon. This is facilitated by passing a
curved hemostat from distal to proximal in the interval between the
tendon and the anterior joint capsule, exiting between the
subscapularis and the supraspinatus. Because the tendon and capsule
blend together near the humeral insertion of the tendon, cut it 2.5 cm
medial to its humeral insertion. After the tendon is released, tag it
with a nonabsorbable suture to ensure easy identification when it is
reattached. -
If exposure of the axillary neurovascular
structures is necessary, incise and reflect medially the humeral
insertion of the pectoralis major. Identify the loose fascia overlying
the short head of the biceps and coracobrachialis. Incise this fascia
medially over the coracobrachialis muscle 3.5 cm distal to the coracoid
to avoid cutting its innervation from the musculocutaneous nerve.
Develop the interval medial to the biceps and coracobrachialis muscles,
and reflect these muscles laterally to expose the neurovascular bundle. -
Wider exposure is possible if the muscle
origins from the coracoid are transected. If more proximal exposure is
needed, it may be necessary to transect the origin of the pectoralis
minor muscle. A more comprehensive exposure for total shoulder
arthroplasties is described in the article by Neer et al. (9).
In such cases, release the origins of the coracobrachialis and the
short head of the biceps from the tip of the coracoid, leaving a cuff
on the tip of the coracoid for repair. Leave the pectoralis minor
intact. Retraction medially must be gentle to avoid injury to the
musculocutaneous nerve.
P.5
LESLIE AND RYAN’S ANTERIOR AXILLARY APPROACH
Leslie and Ryan’s anterior axillary approach (Fig. 1.3) (5)
is useful for exposing the anterior shoulder for recurrent shoulder
dislocations if a more cosmetically acceptable scar is desired (4). The exposure, however, may be restricted in a patient with well-developed musculature.
is useful for exposing the anterior shoulder for recurrent shoulder
dislocations if a more cosmetically acceptable scar is desired (4). The exposure, however, may be restricted in a patient with well-developed musculature.
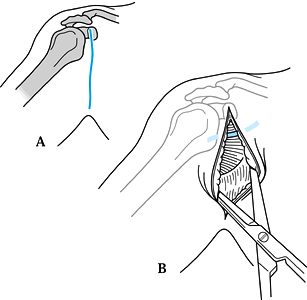 |
|
Figure 1.3. Leslie and Ryan’s axillary exposure.
|
-
With the patient’s arm at his side,
identify the superior aspect of the anterior axillary fold. From this
point, make an incision 7 cm inferiorly into the axilla. Because the
skin and subcutaneous tissue are quite mobile in this area, extensive
undermining above the deep fascia is possible for exposure of the
deltopectoral groove. -
The rest of the surgical exposure is as described previously
P.6
in the section on Henry’s Anterior Approach.
Exposure can be facilitated by extending the skin incision proximally
to the tip of the coracoid. This approach is identical to Henry’s
anterior approach, with the exception of the limited skin incision.
HENRY’S ANTERIOR STRAP APPROACH
Henry’s anterior strap approach is useful for exposing the rotator cuff.
-
Start the incision over the
acromioclavicular joint, and extend it 8 cm inferiorly along the
anterior deltoid, just lateral to the deltopectoral groove. -
After mobilizing skin flaps, identify the
clavicular attachment of the deltoid. Detach only as much of the
deltoid as necessary for exposure, using the technique as described
under Henry’s Anterior Approach. -
Incise the underlying subacromial bursa
to expose the rotator cuff. Internal and external rotation of the
shoulder help to further visualize the anterior and posterior portions
of the cuff.
LATERAL DELTOID SPLITTING EXPOSURE
The lateral deltoid splitting exposure is used for limited exposure of the rotator cuff and subacromial bursa (Fig. 1.4).
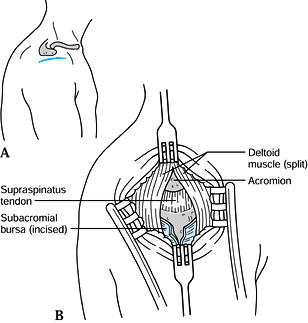 |
|
Figure 1.4. Lateral deltoid splitting exposure.
|
-
Make a transverse incision approximately
6 cm long, starting 2.5 cm inferior to the lateral tip of the acromion.
This gives a more cosmetic scar than a vertical incision. -
Undermine the skin flaps, and bluntly
incise the deltoid muscle parallel to its fibers from the tip of the
acromion superiorly to 4 cm inferiorly. Branches of the axillary nerve
course transversely, approximately 5 cm inferior to the tip of the
acromion; avoid cutting them. -
Expose the subacromial bursa in the floor
of this exposure. Incise the bursa and expose the underlying rotator
cuff. Rotation and abduction of the shoulder exposes most of the
rotator cuff in the operative field. Additional exposure of the rotator
cuff is facilitated by detaching the lateral one third of the deltoid
from the acromion and performing an anterior acromioplasty. Refer to
Henry’s Anterior Approach for a complete description.
POSTERIOR EXPOSURE
Exposure of the posterior shoulder joint may be
necessary for posterior shoulder instability, dislocation, glenoid
osteotomy, or soft tissue tumor. Two posterior surgical exposures may
be used. The posterior inverted U approach described by Abbott and
Lucas (1) detaches the deltoid from the scapular spine, and the other exposure splits the deltoid parallel to its fibers.
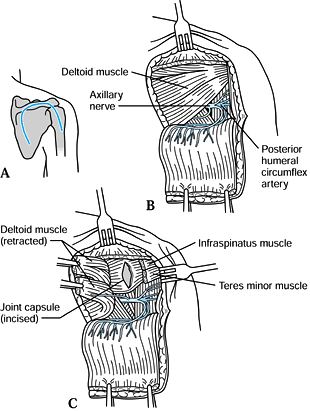
Abbot and Lucas Inverted U Approach
The posterior inverted U approach (Fig. 1.5) is based on the relatively avascular plane between the posterior and middle heads of the deltoid muscle.
 |
|
Figure 1.5. Abbott and Lucas inverted U approach.
|
-
Begin the incision parallel to the medial
border of the posterior deltoid muscle and extend 5 cm superiorly to
the spine of the scapula. Continue along the subcutaneous border of the
spine to the acromion laterally. -
Extend the incision inferiorly 7.5 cm to
the humeral head along the posterior and middle deltoid interval. By
blunt dissection, medially expose the posterior border of the deltoid,
and laterally expose the interval between the posterior and middle
deltoid fibers. -
Free the deltoid origin by subperiosteal
dissection from the scapular spine and reflect the skin and muscle flap
inferiorly, exposing the infraspinatus and the teres minor muscles and
the quadrangular space. -
The capsule can now be exposed by
splitting the interval between the infraspinatus and the teres minor
muscle medial to the conjoined tendon (sometimes this interval is
difficult to find initially). Better exposure can be gained by
detaching 1 cm of the infraspinatus tendon insertion and reflecting it
superiorly. The suprascapular nerve innervates this muscle below the
scapular spine, so be careful with its retraction.
P.7
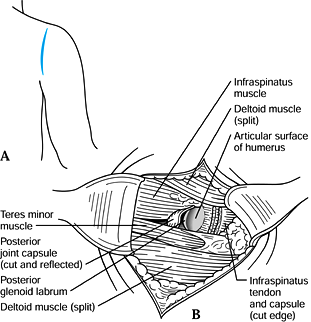
Deltoid Splitting Approach
The deltoid splitting approach (Fig. 1.6) theoretically prevents possible weakening of the deltoid.
 |
|
Figure 1.6. Posterior exposure.
|
-
Locate the posterior glenohumeral joint
by rotating the shoulder. The “soft spot” superior to the posterior
axillary line helps to identify the joint. Start a vertical incision
superiorly at the spine of the scapula and extend it inferiorly 6–7 cm,
parallel to the posterior axillary line. Undermine the skin flaps
medially and laterally. -
Bluntly split the deltoid parallel to its
fibers to expose the infraspinatus and teres minor portions of the
rotator cuff. The axillary nerve passes through the quadrangular space
beneath the teres minor to innervate the deltoid. In the posterior
deltoid, therefore, this nerve is located more inferiorly than in the
lateral deltoid. -
Develop the muscle interval between the
infraspinatus and the teres minor. This interval is located medial to
the conjoined insertions at the humeral neck. Avoid dissecting into the
infraspinatus muscle to protect its innervation from the suprascapular
nerve. -
Detach part of the infraspinatus tendon
off of the joint capsule, leaving a stump of tendon for later
reattachment. Retraction of the infraspinatus superiorly and the teres
minor inferiorly exposes the posterior joint capsule. Greater exposure
can be obtained by detaching more of the infraspinatus or part of the
teres minor. Avoid excessive retraction of the teres minor to prevent
traction injury to the axillary nerve.
HUMERUS
HENRY’S ANTEROLATERAL EXPOSURE
-
Identify the interval between the biceps and the brachialis by grasping and moving the mobile biceps muscle medially (Fig. 1.7).
Incise the skin just lateral to the border of the biceps 8 cm proximal
to the elbow flexion crease, and continue distally, crossing the elbow
flexion crease if needed. This exposure is extensile and can be carried
to the shoulder as needed using the deltopectoral interval.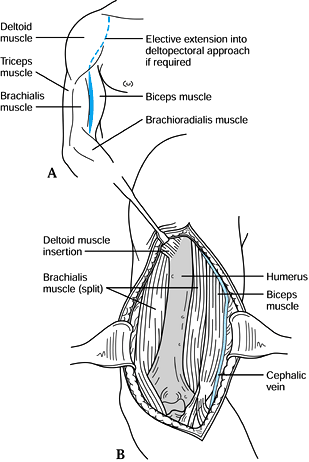 Figure 1.7. Henry’s anterolateral exposure.
 -
While protecting the cephalic vein,
retract the biceps medially to expose the brachialis covering the
distal anterior one half of the humerus. The shaft of the humerus is
exposed by blunt dissection through the brachialis muscle in an oblique
direction from proximal lateral to distal anterior. Do not sever the
cutaneous branches of the musculocutaneous nerve crossing over the
brachialis muscle distally. The radial nerve can be identified, if
necessary, by splitting the brachialis muscle 1 cm distal and
posterolateral to the deltoid insertion. Otherwise, the radial nerve is
protected by the brachialis muscle reflected laterally. -
Wider exposure of the humerus can be
achieved by flexing the elbow, which relaxes these muscles. If more
proximal exposure is needed, refer to Henry’s anterior shoulder
approach described previously. If more distal exposure is required,
refer to Henry’s anterior elbow exposure described later in this
chapter. -
In nonunions, full exposure of the radial
nerve may be necessary before safe exposure of the bone is possible. In
this case, undermine the skin anteriorly and posteriorly over the
distal arm. Identify the interval between the brachialis and
brachioradialis. This interval can be difficult to find. The fibers of
the two muscles have slightly different degrees of coarseness and
different directions, which the surgeon can detect visually. Split
bluntly into the most distal portion of this interval; a Metzenbaum
scissors is useful. Approximately 1–2.5 cm deep into the interval,
identify the radial nerve and follow it proximally into the spiral
groove or until you are proximal to the fracture and the nerve is freed
from all scar tissue and callus.
P.8
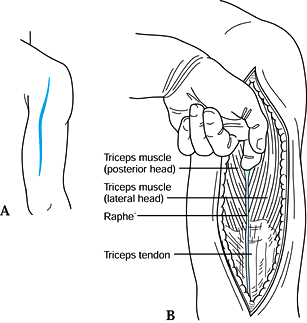
HENRY’S POSTERIOR EXPOSURE
-
To perform Henry’s posterior exposure (Fig. 1.8, Fig. 1.9),
place the patient prone on the operating table with the upper extremity
on an arm board or on a padded gynecologic knee support. The lateral
decubitus position with the arm supported on bolsters also works well.
Identify the long head of the triceps, which is mobile and
posteromedial. Using this as a landmark, make an incision (Fig. 1.8)
3 cm inferior to the acromion, extending distally along the lateral
edge of this muscle to the olecranon if necessary. Develop the skin and
subcutaneous flaps to expose the long and lateral heads of the triceps.![]() Figure 1.8. Henry’s posterior exposure (posterior and lateral heads of triceps exposure).
Figure 1.8. Henry’s posterior exposure (posterior and lateral heads of triceps exposure).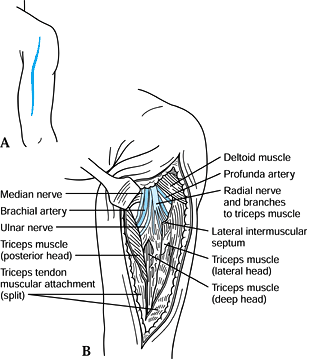 Figure 1.9. Henry’s posterior exposure (deep head of triceps exposure).
 -
Digitally develop the proximal interval
between these two heads of the triceps. Lift the seam from the
underlying tissue and split it distally. The distal one half of this
seam requires sharp dissection along the septum between the long and
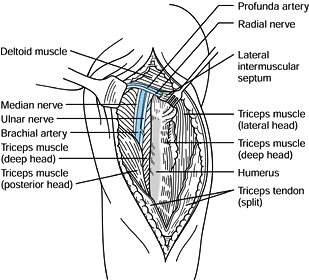
the lateral heads. Splitting the seam (Fig. 1.9) exposes the deep head of the triceps, with the neurovascular bundles located proximally. -
Notice the relation of the radial nerve
and its branches to the three heads of the triceps. While protecting
the median nerve, ulnar nerve, and brachial artery medially, and the
radial nerve and profunda artery laterally, the deep head of the
triceps can be safely split to expose the posterior shaft of the
humerus (Fig. 1.10). Confirm that branches of
the radial nerve are identified and protected before splitting the deep
head. The radial nerve may be further visualized distally by splitting
the lateral
P.9
intermuscular
septum. To expose the radial nerve more proximally requires incising
the tendinous insertion of the teres major and latissimus dorsi.![]() Figure 1.10. Henry’s posterior humeral shaft exposure.
Figure 1.10. Henry’s posterior humeral shaft exposure.
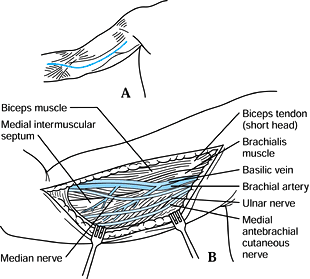
MEDIAL EXPOSURE
The medial approach is used to explore the median and ulnar nerves and brachial artery (Fig. 1.11).
 |
|
Figure 1.11. Medial exposure.
|
-
Identify the medial border of the mobile
biceps muscle. Start the incision proximally from the anterior axillary
fold to the level of the elbow flexion crease distally, following the
border of the biceps. If more distal exposure is needed, refer to the
anteromedial elbow exposure. Protect the branches of the medial
antecubital cutaneous nerve in the subcutaneous tissue. -
Starting proximally, incise the deep
fascia to expose the brachial artery, the basilic vein, and the median
and ulnar nerves. The artery, vein, and median nerve course distally,
staying anterior to the medial intermuscular septum to enter the
antecubital fossa. The ulnar nerve penetrates the intermuscular septum
at the midpoint of the upper arm, entering the posterior compartment of
the upper arm. To expose the ulnar nerve distally, incise this septum.
ELBOW
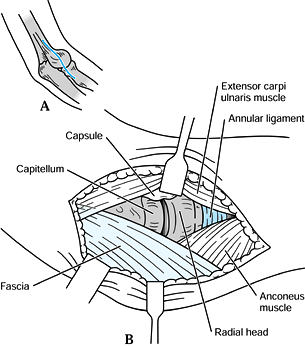
LATERAL EXPOSURE
The lateral exposure is useful for exposing the radial head and elbow joint for removal of loose bodies and synovectomy (Fig. 1.12).
 |
|
Figure 1.12. Lateral exposure.
|
-
Pronate the forearm and flex the elbow
90° on an arm board. Identify the lateral epicondylar ridge and the
radial head by rotating the forearm. Make a gentle curvilinear incision
along the lateral epicondylar ridge 3–4 cm proximal to the joint line
and extending 3–4 cm distal to the joint along the interval between the
extensor
P.10
carpi ulnaris and the anconeus overlying the radial head. -
Proximally, reflect the triceps
posteriorly. Reflect the extensor carpi radialis longus and the
brachioradialis anteriorly. This dissection can be subperiosteal, or a
wafer of bone may be taken with the extensor carpi radialis longus
origin. -
The radial nerve passes anteriorly
between the brachialis and the brachioradialis and therefore is
protected with this proximal exposure. Distally, sharply incise the
interval between the extensor carpi ulnaris and anconeus to expose the
underlying joint capsule. Incise the joint capsule from the lateral
epicondyle to the annular ligament of the radial head. Do not extend
the incision distal to the annular ligament, because this can sever the
posterior interosseous nerve, which crosses anterolaterally across the
radial neck through the supinator muscle. Pronation of the forearm
helps to place this nerve anterior to the operative field. A smaller
incision may be used if only the radial head is to be exposed. Wider
exposure for synovectomy or other procedures is accomplished by
detaching the common exterior origin and the joint capsule from the
humerus.
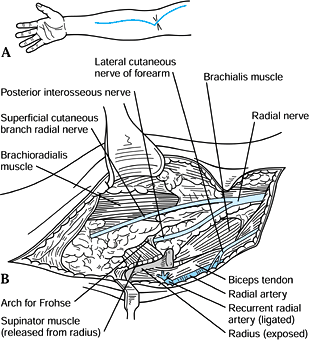
HENRY’S ANTEROLATERAL EXPOSURE
Henry’s anterolateral exposure is useful for exposing
the radial nerve and the arch of Frohse, lesions of the proximal
radius, and the radial tuberosity for bicipital tendon ruptures (Fig. 1.13) (2).
the radial nerve and the arch of Frohse, lesions of the proximal
radius, and the radial tuberosity for bicipital tendon ruptures (Fig. 1.13) (2).
 |
|
Figure 1.13. Henry’s anterolateral exposure.
|
-
Position the arm with the elbow extended
and the forearm supinated. Start the incision along the lateral border
of the biceps proximally, cross the elbow flexion crease in a
curvilinear fashion, and extend the incision distally along the medial
border of the brachioradialis. The length of the incision depends on
the operative needs. If exposure of the anterior distal humerus is
needed, refer to Henry’s anterolateral humeral surgical exposure
described previously. -
Identify and preserve the lateral
cutaneous nerve of the forearm proximally in the interval between the
biceps and brachialis muscles. Identify the biceps tendon and the
lacertus fibrosis. -
For better exposure, incise the lacertus
fibrosis, flex the elbow, and pronate the forearm. Bluntly develop the
interval between the brachioradialis laterally and the pronator teres
medially to expose the radial artery. -
Identify and ligate the recurrent radial
vessels located by sliding a finger distally along the lateral edge of
the bicipital tendon. Do not cut the radial artery. -
After these vessels are ligated, the
brachioradialis can be retracted laterally to expose the radial nerve
exiting the upper arm between the brachialis and brachioradialis. The
superficial cutaneous radial nerves pass distally into the forearm
under the covering of the brachioradialis muscle. The posterior
interosseous nerve
P.11
penetrates the supinator muscle under the arch of Frohse. -
To expose the proximal radius, reflect
the origin of the supinator off the radius just lateral to the radial
tuberosity. A small bursa identifies this interval. Identification of
the radial tuberosity is facilitated by pronating and supinating the
forearm while palpating over the bicipital tendon. Do not incise
through the supinator muscle, because this action can cut a branch of
the posterior interosseous nerve.
MEDIAL EXPOSURE
Use the medial exposure to expose the ulnar nerve or medial elbow joint (Fig. 1.14).
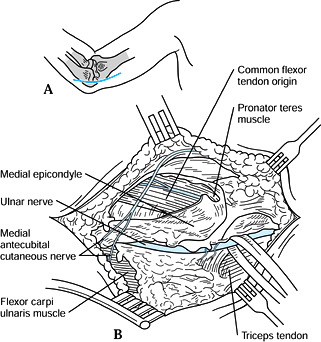 |
|
Figure 1.14. Medial exposure.
|
-
Place the elbow on an arm board with the
shoulder externally rotated and the elbow flexed 90°. Identify the
medial epicondyle. Start the incision approximately 4 cm proximal to
the epicondyle, and extend the incision 4 cm distally along the flexor
carpi ulnaris. -
Bluntly dissect the subcutaneous tissue and identify the branches of the medial antebrachial cutaneous nerves.
-
After these nerves are protected and the
deep fascia over the flexor-pronator muscles is exposed, palpate for
the ulnar nerve proximal to the ulnar groove. Expose this nerve by
incising its overlying fascia. -
If the nerve is to be transposed anteriorly, several principles apply:
-
The medial intermuscular septum must be incised to prevent proximal tethering of the transposed nerve.
-
The thick ligament over the ulnar groove must be incised.
-
The fascia over the flexor carpi ulnaris must be incised to prevent distal tethering of the nerve.
-
The ulnar muscular branches of the flexor carpi ulnaris may need to be exposed to facilitate the transfer.
-
Pass a 0.6 cm Penrose drain around the nerve for retraction.
-
Protect the accompanying small vessels to the ulnar nerve, if at all possible, to prevent ischemic damage to the nerve.
-
To expose the medial aspect of the elbow
joint, define the interval between the brachialis and pronator teres
anteriorly and protect the ulnar nerve posteriorly. Osteotomize the
medial epicondyle with its attached flexor pronator muscles and retract
it distally. Be careful not to retract it too vigorously, to prevent
median nerve injury. The joint capsule and medial collateral ligament
complex can be incised to expose the joint. The osteotomized bone may
be reattached with sutures or preferably with a 3–4 mm A-O cancellous
screw through a hole drilled before the osteotomy. During closure, do
not suture the deep fascia of the forearm, to prevent an iatrogenic
compartment syndrome.
-
ANTEROMEDIAL EXPOSURE
The anteromedial exposure is useful for exposing the brachial artery, median nerve, and bicipital tendon (Fig. 1.15).
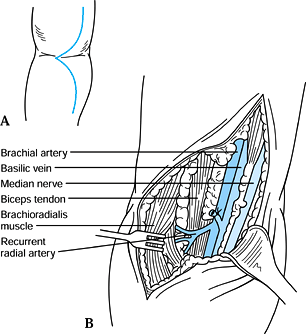 |
|
Figure 1.15. Anteromedial exposure.
|
-
Place the arm with the elbow extended and
the forearm supinated. Start the incision proximally along the medial
border of the biceps, zigzag along the elbow flexion crease, and extend
it distally along the pronator teres. The length of the incision
depends on the operative needs. If more proximal exposure is needed,
refer to the medial humeral exposure. -
Identify the basilic vein and branches of
the medial antebrachial cutaneous nerve in the subcutaneous tissue.
Incise the deep fascia proximally to expose the median nerve and
brachial artery. -
Trace these structures distally to the
level of the elbow flexion crease, where they dive under the lacertus
fibrosis. While protecting these structures, incise this fibrotic band. -
Bluntly develop the interval between the
brachioradialis and the pronator teres to expose the radial and ulnar
arteries and the median nerve. If more distal exposure of these nerves
is needed, refer to McConnell’s exposure of the median and ulnar nerves
of the forearm described later in this chapter.
P.12
BRYAN AND MORREY’S POSTEROLATERAL EXPOSURE
The posterolateral exposure of Bryan and Morrey (6)
is useful for previous elbow dislocations, arthroplasty, and repair of
comminuted interarticular fracture of the distal humerus. It avoids an
olecranon osteotomy by preserving the continuity of the triceps
mechanism.
is useful for previous elbow dislocations, arthroplasty, and repair of
comminuted interarticular fracture of the distal humerus. It avoids an
olecranon osteotomy by preserving the continuity of the triceps
mechanism.
-
Position the patient in a supine position
with a rolled towel under the scapula. A sterile tourniquet may be
utilized. Make a posterior incision lateral to the olecranon 9 cm
proximal to the olecranon tip, extending it 9 cm distal to the tip. -
Create a triceps and ulnar periosteal
flap in continuity by incising the lateral border of the triceps and
extending it distally 6 cm along the ulnar shaft. -
By careful subperiosteal dissection,
reflect the triceps tendon and its periosteal attachment in continuity
toward the lateral side, preserving the ulnar collateral ligament. -
The radial head can be exposed by
including the anconeus in the subperiosteal dissection. The ulnar nerve
is protected by the soft tissues. Exposure and transfer is usually not
necessary unless it is at risk. Now the entire posterior elbow joint is
exposed (Fig. 1.16). Further exposure for arthroplasty can be obtained by releasing the joint capsule.![]() Figure 1.16. Posterolateral exposure.
Figure 1.16. Posterolateral exposure.
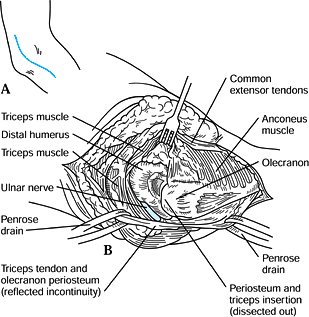
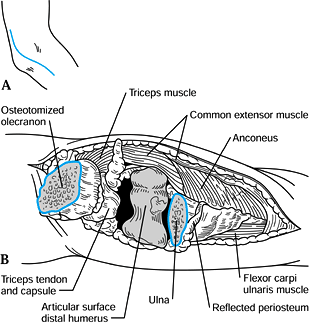
CHAPMAN’S COMPREHENSIVE POSTERIOR APPROACH
The Chapman comprehensive posterior approach was
developed for the open reduction and internal fixation of
intraarticular fractures of the distal humerus. It has also proven
useful for reconstructive surgery, including complete posterior and
anterior release for arthrofibrosis of the elbow. It avoids olecranon
osteotomy with its potential complications and provides better exposure.
-
Position the patient in the lateral
decubitus position with the operated elbow supported on a well-padded
gynecologic knee support and flexed to 90°. Be certain that the forearm
is not obstructed, as further flexion to 110° is necessary for full
exposure of the articular surface. -
Make a longitudinal midline posterior
incision as long as necessary, staying slightly to one side of the
olecranon; full exposure requires an incision at least 20 cm in length.
Incise directly down to the deep fascia. Creation of flaps is not
necessary unless transfer of the ulnar nerve is planned. -
If transfer of the ulnar nerve is necessary, do it now, placing the nerve in a subcutaneous tunnel.
-
Split the triceps muscle in the midline,
beginning proximally and extending distally to the olecranon. Split the
joint capsule as well. -
Using a #15 blade, reflect the triceps
insertion, medially and laterally, off the olecranon in continuity with
the forearm muscles, maintaining the integrity of the retinaculum and
periosteum. Take the joint capsule in continuity with these flaps (Fig. 1.17). Figure 1.17. Chapman’s comprehensive posterior approach.
 -
With meticulous subperiosteal dissection,
reflect the lateral triceps and the forearm muscle extensor origins in
continuity, laterally, staying on bone and including the joint capsule
until the tip of the lateral epicondyle is reached. Perform the same
maneuver medially, avoiding injury to the ulnar nerve, which in most
cases can be left undisturbed in its sulcus. Include the joint capsule
in this dissection, preserving its continuity with the overlying
musculocutaneous structures. -
For complete exposure, flex the elbow to
110° and distract the olecranon with a bone hook to expose the distal
third of the humerus and its entire articular surface. With further
release, it is possible to isolate and excise the anterior capsule if
needed.
Closure of a single layer of capsule, muscle, and
fascia, using interrupted figure-eight sutures, allows early
mobilization of the elbow joint.
fascia, using interrupted figure-eight sutures, allows early
mobilization of the elbow joint.
POSTERIOR TRANSOLECRANON EXPOSURE
The posterior transolecranon exposure is excellent for exposing a comminuted intra-articular distal humeral fracture (Fig. 1.18), although it does have the disadvantage of the olecranon osteotomy.
 |
|
Figure 1.18. Posterior transolecranon exposure.
|
-
Place the patient supine with her arm
across her chest. The skin incision is the same as that previously
described for the posterolateral approach to the elbow. Incise the deep
fascia to expose the triceps tendon and proximal olecranon. Identify
and protect the ulnar nerve medially. -
Make a 1 cm linear incision through the
triceps tendon to expose the tip of the olecranon. Predrill and tap the
olecranon for two fixation screws. Expose the medial and lateral
borders of the proximal 3 cm of the olecranon, protecting the ulnar
nerve. Before cutting the olecranon with a small oscillating saw, score
the bone at the proposed osteotomy site to ensure proper alignment
during reattachment. Cut the bone 2 cm from its tip. Use either a
transverse osteotomy, as illustrated, or a chevron osteotomy, which may
help with a more accurate reattachment. Use an osteotome to cut the
subchondral bone. -
Reflect the triceps proximally with its
attached olecranon. Release the remaining medial and lateral
soft-tissue attachments as necessary to facilitate proper exposure of
the distal intra-articular humerus. -
Perform closure by realigning the
olecranon fragment and securing it with two cancellous lag screws and
washers. An alternative method is to add a tension band wire.
P.14
HENRY’S POSTERIOR INTEROSSEOUS NERVE EXPOSURE
-
With the forearm pronated, palpate the
posterior border of the mobile wad to identify the interval between the
extensor carpi radialis brevis and the extensor digitorum communis (Fig. 1.19). Start an incision proximally, at the radiocapitellar joint line, and extend it 6 cm distally along this interval.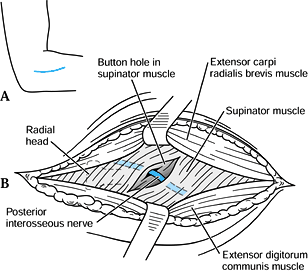 Figure 1.19. Henry’s posterior interosseous nerve exposure.
 -
Develop skin flaps and incise the deep
fascia. Distally, the interval between these muscles is easily
separated and, once identified, can be split with scissors from distal
to proximal to expose the underlying supinator muscle. Avoid cutting
into the supinator muscle during this step. -
Bluntly dissect along the muscle fibers
of the supinator 3 cm distal to the radial head to expose the posterior
interosseous nerve. Rotation of the forearm at this time facilitates
locating this nerve. -
If exposure of the proximal radius is needed, incorporate this incision with the lateral exposure of the elbow (Fig. 1.12).
After the posterior interosseous nerve is safely identified, the
supinator muscle can be reflected from the ulna to expose the proximal
radius.
FOREARM
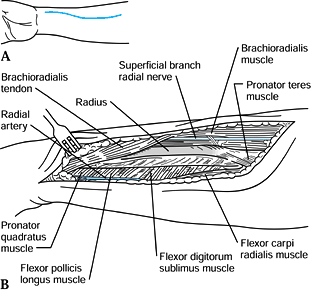
ANTERIOR EXPOSURE OF THE DISTAL TWO THIRDS OF THE RADIUS
To expose the proximal one third of the radius, refer to
Henry’s anterolateral elbow exposure described previously and to
Thompson’s approach described later in this chapter. In its distal
third, the anterior radius is flat and can accommodate a plate better
than the convex posterior surface (Fig. 1.20).
Henry’s anterolateral elbow exposure described previously and to
Thompson’s approach described later in this chapter. In its distal
third, the anterior radius is flat and can accommodate a plate better
than the convex posterior surface (Fig. 1.20).
 |
|
Figure 1.20. Anterior exposure of the distal two thirds of radius.
|
-
With the forearm supinated, start a
curvilinear incision 4–5 cm distal to the elbow flexion crease along
the medial border of the brachioradialis muscle, and extend it
inferiorly toward the radial styloid. The length of the incision
depends on the exposure needed. -
Incise the deep fascia, and distally
develop the interval between the brachioradialis and the flexor carpi
radialis to expose the medial border of the radius. Protect the radial
artery, which runs in this interval, and ligate its branches if needed. -
The superficial cutaneous branch of the
radial nerve travels under the brachioradialis muscle in the proximal
two thirds of the forearm and must be identified and protected. Expose
the radius distally by reflecting the pronator quadratus and the flexor
pollicis longus subperiosteally. -
For more proximal exposure
subperiosteally, dissect the flexor digitorum sublimis and pronator
teres off the radius. Forearm pronation facilitates proximal exposure
of the pronator teres attachment.
ULNAR SHAFT EXPOSURE
-
The ulnar shaft approach is facilitated by flexing the elbow and laying the arm across the patient’s chest (Fig. 1.21).
Identify the subcutaneous border of the ulna by palpation. Make a skin
incision just volar to this border. The length of the incision depends
on the surgical needs.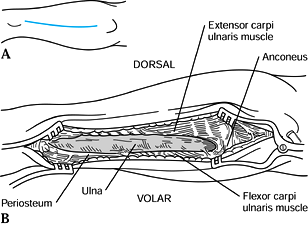 Figure 1.21. Ulnar shaft exposure.
 -
Incise the deep fascia, and distally
expose the ulnar shaft by incising the periosteum between the flexor
carpi ulnaris and the extensor carpi ulnaris. -
Subperiosteally, reflect the flexor carpi
ulnaris or extensor carpi ulnaris for volar or dorsal exposure,
respectively. To expose the shaft proximally, continue the
subperiosteal dissection between the flexor carpi ulnaris medially and
the anconeus laterally. -
Identify and protect the ulnar nerve if
the proximal ulna (olecranon) is exposed. In the distal exposure, the
ulnar nerve is safely protected if the flexor carpi ulnaris is
subperiosteally reflected.
P.15
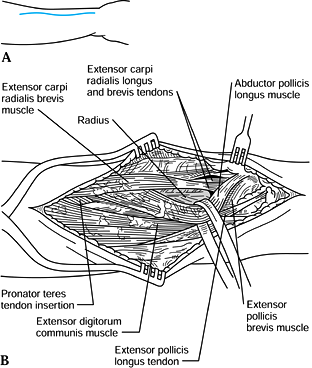
POSTERIOR EXPOSURE OF THE RADIUS
To expose the proximal one third of the posterior
radius, refer to Henry’s exposure of the posterior interosseous nerve
described previously and to Thompson’s extended exposure described
later in this section (Fig. 1.22).
radius, refer to Henry’s exposure of the posterior interosseous nerve
described previously and to Thompson’s extended exposure described
later in this section (Fig. 1.22).
 |
|
Figure 1.22. Posterior exposure of the distal two thirds of the radius.
|
-
With the forearm pronated, palpate for
the posterior border of the mobile wad to identify the interval between
the extensor carpi radialis brevis and the extensor digitorum communis.
Proximally start a curvilinear incision in this interval 5 cm distal to
the radiocapitellar joint, and extend it distally to the wrist joint
midway between the radial styloid and Lister’s tubercle. The length of
the incision depends on the surgical needs. -
Incise the deep fascia, and proximally
identify and develop the muscle interval between the extensor carpi
radialis brevis and the extensor digitorum communis to expose the
radial shaft. In the middle one third of this exposure, the abductor
pollicis longus and the extensor pollicis brevis cross the radial shaft
obliquely toward the distal radial border of the radius. These muscles
are left intact but mobilized so they can be retracted proximally and
distally as needed. -
To expose the distal radius, dissect
between the extensor carpi radialis brevis and the extensor pollicis
longus. The posterior interosseous nerve is not encountered with this
approach if the supinator muscle is not exposed and the radial shaft is
approached as described. For more proximal dissection, it is essential
to identify and protect the posterior interosseous nerve. -
In 1918, Thompson (10)
described extensions of this exposure, including exposure of the entire
radius and exposure of the posterior interosseous nerve if needed.
Follow the line of separation between the extensor digitorum communis
and the extensor carpi radialis brevis muscles up to the lateral
epicondyle of the humerus if needed. This fully exposes the supinator
muscle. Detaching the origins of these muscles from the lateral
epicondyle allows even wider exposure. By supinating the radius, the
junction of the supinator origin and the biceps tendon can be
visualized. -
Carefully dissect the supinator off the
radius, staying against bone. Expose only as much radius as necessary.
Avoid over-retraction, because a stretch injury to the posterior
interosseous nerve can result, particularly where it is tethered by the
motor branches to the extensor digitorum communis. To expose the
posterior interosseous nerve, identify it proximal to the supinator,
and trace it into the body of the supinator.
P.16
McCONNELL’S MEDIAN AND ULNAR NERVE EXPOSURE
-
Place the forearm supinated on an arm
board. Proximally, start the incision near the medial epicondyle and
extend it distally in a lazy-S fashion to the radial border of the pisiform (2) (Fig. 1.23).
The length of the incision depends on the surgical needs. Protect the
medial antebrachial cutaneous nerves in the proximal forearm.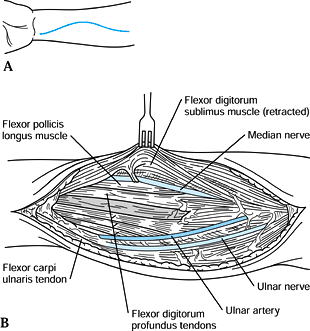 Figure 1.23. McConnell’s median and ulnar nerve exposure.
 -
Distally, expose the ulnar artery and
nerve by incising the deep fascia along the radial border of the flexor
carpi ulnaris. Retracting the flexor carpi ulnaris ulnarly and the
flexor digitorum sublimis radially allows the ulnar artery and nerve to
be visualized and followed proximally. Flexion of the wrist helps to
relax these tendons. -
The artery and nerve run parallel until
the proximal one third of the forearm, where the artery courses toward
the antecubital fossa and the ulnar nerve continues under the flexor
carpi ulnaris to the ulnar groove. Protect the branches of the ulnar
nerve innervating the flexor carpi ulnaris and part of the flexor
digitorum profundus in the proximal forearm. -
Distally, identify the median nerve as
the flexor digitorum sublimis is reflected radially. Follow the median
nerve proximally as it lies between the sublimis and profundus muscles.
Halfway up the forearm, the median nerve is bound to the intermediate
tendinous portion of the sublimis muscle. Because the nerve is on the
radial side of this juncture, incising along its ulnar border further
exposes the nerve. -
To expose the median nerve more
proximally, identify and develop the interval between the pronator
teres and the flexor carpi radialis. Just inferior and deep to the
pronator teres lies the median nerve. Sometimes the arch of the
sublimis covers the nerve at this level, but dissecting through this
portion of the sublimis exposes the nerve.
REFERENCES
Each reference is categorized according to the following
scheme: *, classic article; #, review article; !, basic research
article; and +, clinical results/outcome study.
scheme: *, classic article; #, review article; !, basic research
article; and +, clinical results/outcome study.
* 1. Abbott LC, Lucas DB. The Tripartite Deltoid and Its Surgical Significance in Exposure of the Scapulohumeral Joint. Ann Surg 1952;136:392.
# 2. Crenshaw AH. Surgical Approaches. In: Edmonson AS, Crenshaw AH, eds. Campbell’s Operative Orthopaedics, 6th ed. St. Louis: Mosby, 1980:81.
* 3. Henry AK. The Upper Limb and Neck. In: Henry AK, ed. Extensile Exposures, 2nd ed. Baltimore: Williams & Wilkins, 1957:15.
# 4. Hoppenfeld S, deBoer P. Surgical Exposures in Orthopaedics. Philadelphia: JB Lippincott, 1984:1.
* 5. Leslie JT, Ryan TJ. The Anterior Axillary Incision to Approach the Shoulder Joint. J Bone Joint Surg Am 1962;44:1193.
+ 6. Morrey BF, Bryan AS, Dobyns JH, Linscheid R. Total Elbow Arthroplasty. J Bone Joint Surg Am 1981;63:1050.
# 7. Morrey BF. Surgical Exposures of the Elbow. In: Morrey BF, ed. The Elbow and Its Disorders, 2nd ed. Philadelphia: WB Saunders, 1993:3.
* 8. Neer CS II. Anterior Acromioplasty for the Chronic Impingement Syndrome in the Shoulder. J Bone Joint Surg Am 1972;54:41.
* 9. Neer CS II, Watson KC, Stanton FJ. Recent Experience in Total Shoulder Replacement. J Bone Joint Surg Am 1982;64:3319.
* 10. Thompson JE. Anatomical Methods of Approach in Operating on the Long Bones of the Extremities. Ann Surg 1918;68:309.