
Cole & Sekiya: Surgical Techniques of the Shoulder, Elbow and Knee in Sports Medicine, 1st ed.
Copyright ©
2008 Saunders, An Imprint of Elsevier
CHAPTER 52 – Microfracture Technique in the Knee
William G. Rodkey, DVM,
Karen K. Briggs, MPH
Full-thickness chondral defects in the knee are common and present in a variety of clinical settings and at different ages. The shearing forces of the femur on the tibia as a single event may result in trauma to the articular cartilage, causing the cartilage to fracture, lacerate, and separate from the underlying subchondral bone or to separate with a piece of the subchondral bone. Chronic repetitive loading in excess of normal physiologic levels also may result in the fatigue and failure of the chondral surface. The single events are usually found in younger groups, whereas chronic degenerative lesions are more common in the middle-aged and older groups. Articular cartilage defects that extend full thickness to subchondral bone rarely heal without intervention. [7] [8] [9] [10] [11] [12] Techniques to treat chondral defects include abrasion, drilling, osteochondral autografts, osteochondral allografts, and autologous cell transplantation.[11] The senior author (J. R. S.) developed the microfracture technique to enhance chondral resurfacing by providing a suitable environment for new tissue formation and taking advantage of the body’s own healing potential, [7] [8] [9] [10] [11] [12] and the clinical experience now includes more than 3000 patients in whom microfracture has been done.
We have documented that arthroscopic débridement accompanied by microfracture of subchondral bone is a reliable and repeatable procedure to stimulate biologic repair of cartilage defects of the knee in patients in whom nonoperative treatment has failed or in whom acute lesions are encountered during arthroscopy. More invasive procedures, such as osteotomy, cartilage grafting, and unicompartmental arthroplasty, thus might be avoided or at least delayed for several years. Specifically, the goals of this procedure are to alleviate the pain and disabilities that can result from the chondral lesions and further to prevent late degenerative changes in the joint by restoring the joint surface. [7] [9] [10] [11] [12]
Patients who present with knee pain undergo a thorough physical and orthopedic examination. The cartilage lesions can be on the joint surfaces of the femur, tibia, or patella. At times, the physical diagnosis can be difficult and elusive, especially if only an isolated chondral defect is present. Identification of point tenderness over a femoral condyle or tibial plateau is a useful finding but in itself is not diagnostic. If compression of the patella elicits pain, this finding might be indicative of a patellar or trochlear lesion.
Indications and Contraindications
The microfracture technique is most commonly indicated for full-thickness loss of articular cartilage either in a weight-bearing area between the femur and tibia or in an area of contact between the patella and trochlear groove. [7] [8] [9] [10] [11] [12] Unstable cartilage that overlies the subchondral bone is also an indication for microfracture. If a partial-thickness lesion is probed and the cartilage simply scrapes off down to bone, we consider this to be a full-thickness lesion. Degenerative joint disease in a knee that has proper axial alignment is another common indication for microfracture (
Table 52-1
).
| Indications | Contraindications |
|---|---|
| Full-thickness defect (grade IV), acute or chronic | Partial-thickness defects |
| Unstable full-thickness lesion | Uncorrected axial malalignment |
| Degenerative joint disease lesion (requires proper knee alignment) | Inability of patient to commit to rehabilitation protocol |
| Acceptance by patient of rehabilitation protocol | Global degenerative osteoarthrosis |
Patients with acute chondral injuries are treated as soon as practical after the diagnosis is made, especially if the knee is being treated concurrently for meniscus or anterior cruciate ligament disease. Patients with chronic or degenerative chondral lesions often are treated nonoperatively (conservatively) for at least 12 weeks after a suspected chondral lesion is diagnosed. This treatment regimen includes activity modification, physical therapy, nonsteroidal anti-inflammatory drugs, viscosupplement injections, and perhaps dietary supplements that may have cartilage-stimulating properties. If nonoperative treatment is not successful, surgical treatment is considered. [7] [8] [9] [10] [11] [12]
No limitations are placed on how large an acute lesion can be and still be considered suitable for microfracture. [7] [8] [9] [11] We have observed that even very large acute lesions respond well to microfracture. [7] [8] [9] [11] Treatment of chronic degenerative lesions is not specifically limited by size, but more emphasis is placed on proper axial alignment and the presence of global degenerative changes throughout the knee. [6] [9] [13] General considerations for use of the microfracture procedure include the patient’s age, acceptable biomechanical alignment of the knee, the patient’s activity level, and the patient’s expectations. [6] [9] [11] [13]
Specific contraindications to microfracture are axial malalignment, unwillingness or inability of the patient to follow the required strict and rigorous rehabilitation protocol, partial-thickness defects, and inability of the patient to use the opposite leg for weight bearing during the minimal or non–weight-bearing time (see
Table 52-1
). [9] [10] [11] Other specific contraindications include any systemic immune-mediated disease, disease-induced arthritis, and cartilage disease. A relative contraindication is for patients older than 65 years because the authors have observed that some patients older than 65 years experience difficulty with crutch walking and the required rigorous rehabilitation. [9] [10] [11] Microfracture is also contraindicated with global degenerative osteoarthrosis or if the cartilage surrounding the lesion is too thin for a perpendicular rim to be established to hold the marrow clot. [6] [9] [10] [11] In these advanced degenerative cases, axial malalignment is also a confounding factor. [6] [9] [10] [11] [13]
For diagnostic imaging, we use long standing radiographs to observe for angular deformity and for joint space narrowing that is often indicative of loss of articular cartilage. We also obtain standard anteroposterior and lateral radiographs of both knees as well as weight-bearing views with the knees flexed to 30 to 45 degrees. Patellar views are also useful to evaluate the patellofemoral joint.
Magnetic resonance imaging that employs newer diagnostic sequences specific for articular cartilage has become a mainstay of our diagnostic work-up of patients with suspected chondral lesions.
Specific Steps (
Box 52-1
)
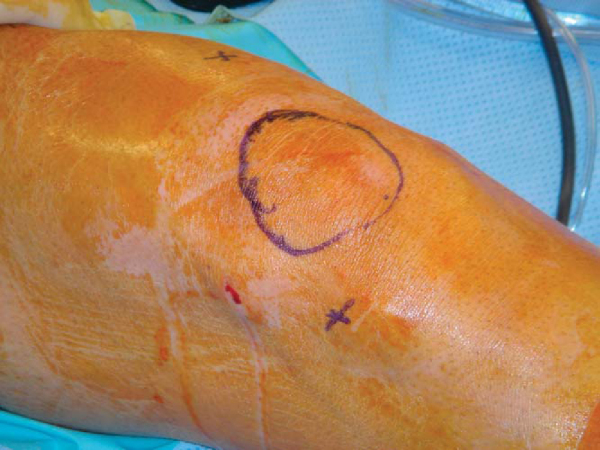
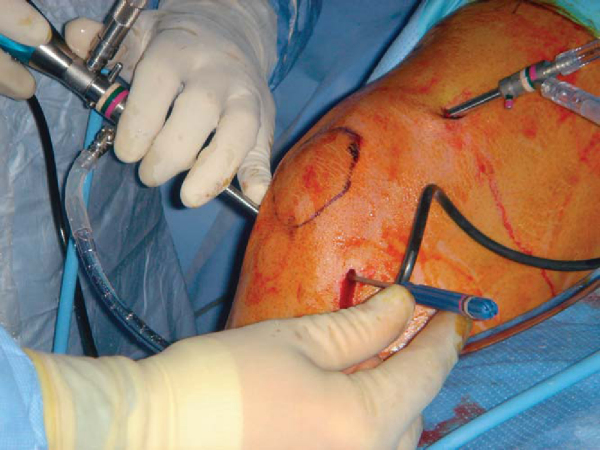
Standard arthroscopic portals can be used for microfracture (
Fig. 52-1
). We make three portals: a superior and medially placed inflow portal and medial and lateral parapatellar portals (
Fig. 52-2
). Accessory portals are occasionally made as needed for lesions in difficult locations. We typically do not use a tourniquet during the microfracture procedure; rather, we vary the arthroscopic fluid pump pressure to control bleeding. An initial thorough diagnostic examination of the knee should be done. We carefully inspect all geographic areas of the knee including the suprapatellar pouch, the medial and lateral gutters, the patellofemoral joint, the intercondylar notch and its contents, and the medial and lateral compartments including the posterior horns of both menisci. We do all other intraarticular procedures before completing microfracture, with the exception of ligament reconstruction. This sequence helps prevent loss of visualization when the fat droplets and blood enter the knee from the microfracture holes. This technique also decreases the amount of time that the microfractured bone is exposed to the elevated intraarticular pressures and fluid flow, which can decrease the formation of the clot that is critical to success. We pay particular attention to soft tissues, such as plicae and the lateral retinaculum, which potentially could produce increased compression between cartilage surfaces. [7] [8] [9] [10] [11] [12]
|
|
|
|
Figure 52-1 |
|
|
|
|
Figure 52-2 |
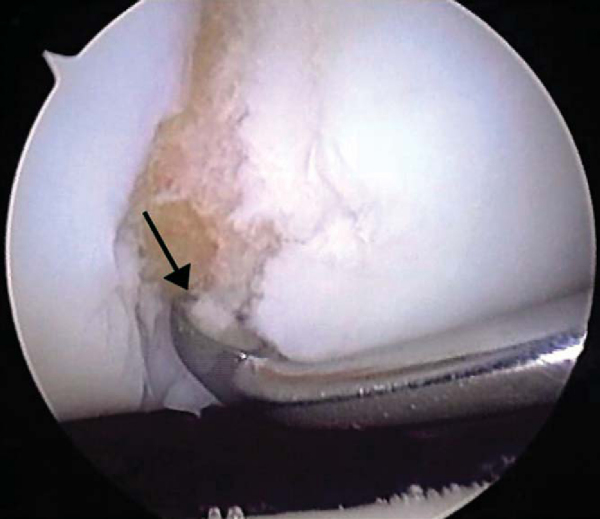
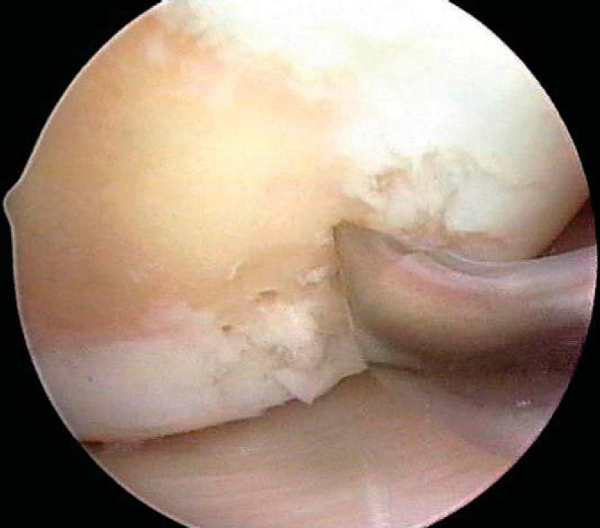
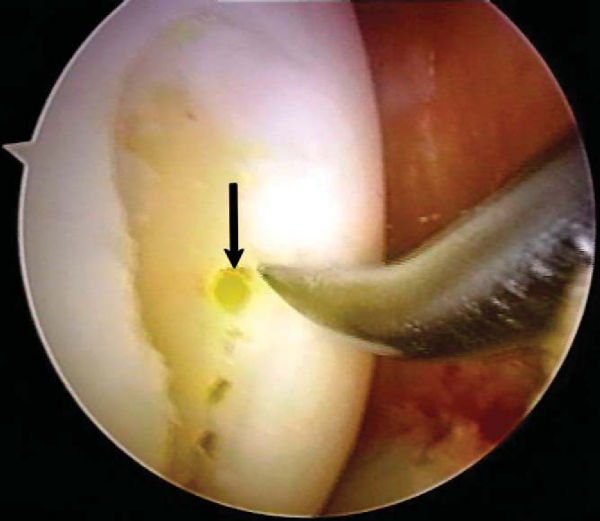
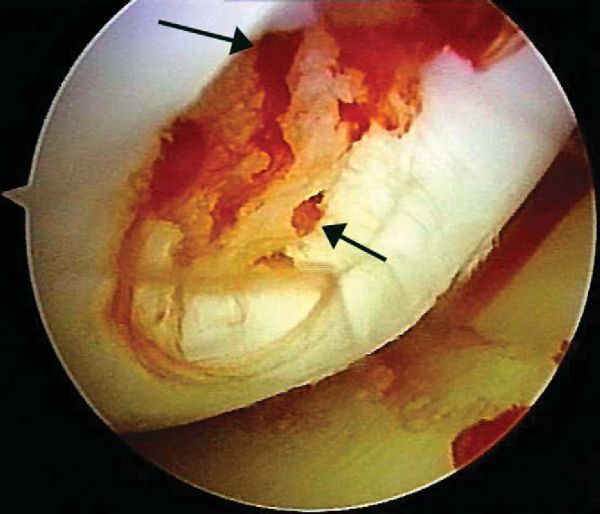
After careful assessment of the full-thickness articular cartilage lesion, we débride the exposed bone of all remaining unstable cartilage. We use a hand-held, curved curet and a full-radius resector to débride the cartilage. It is critical to débride all loose or marginally attached cartilage from the surrounding rim of the lesion (
Fig. 52-3
). Establishment of a stable full-thickness border of cartilage surrounding a central lesion is optimal for microfracture because it provides some degree of protection to the regenerating tissue that is forming in the treated lesion. The calcified cartilage layer that remains as a cap to many lesions must be removed, preferably by use of a curet (see
Fig. 52-3
). Thorough and complete removal of the calcified cartilage layer is extremely important on the basis of animal studies we have completed. [1] [2] Care should be taken to maintain the integrity of the subchondral plate by not débriding too deeply; otherwise, the joint shape and geometry might be negatively altered. This prepared lesion, with a stable perpendicular edge of healthy, well-attached viable cartilage surrounding the defect, provides a pool that helps hold the marrow clot (“super clot,” as we have termed it) as it forms. [9] [11]
|
|
|
|
Figure 52-3 |
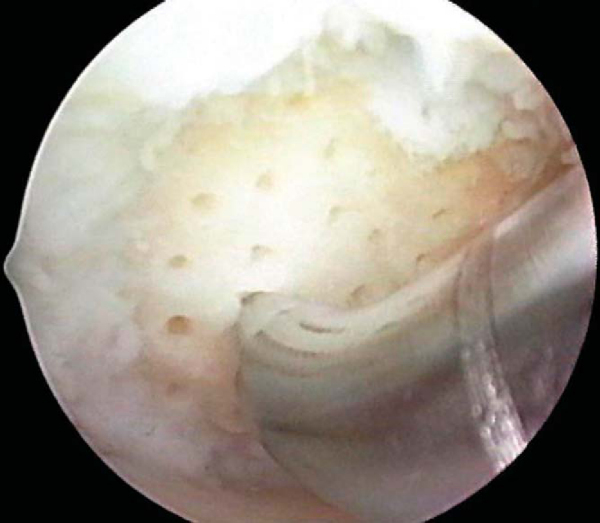
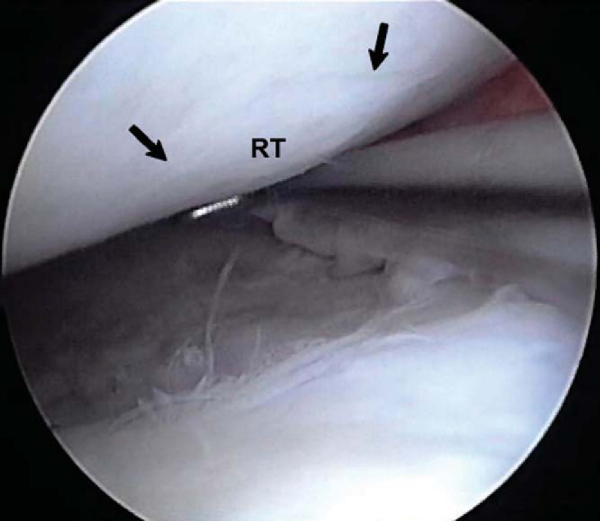
After preparation of the lesion, we use an arthroscopic awl to make multiple holes, or microfractures, in the exposed subchondral bone plate. We use an awl with an angle that permits the tip to be approximately perpendicular to the bone as it is advanced, typically 30 or 45 degrees (
Fig. 52-4
). There also is a 90-degree awl that should be used only on the patella or other soft bone. The 90-degree awl should be advanced only manually, not with a mallet. The holes are made as close together as possible, but not so close that one breaks into another, thus damaging the subchondral plate between them and potentially altering the joint shape. This technique usually results in microfracture holes that are approximately 3 to 4 mm apart. When fat droplets can be seen coming from the marrow cavity, the appropriate depth (approximately 2 to 4 mm) has been reached (
Fig. 52-5
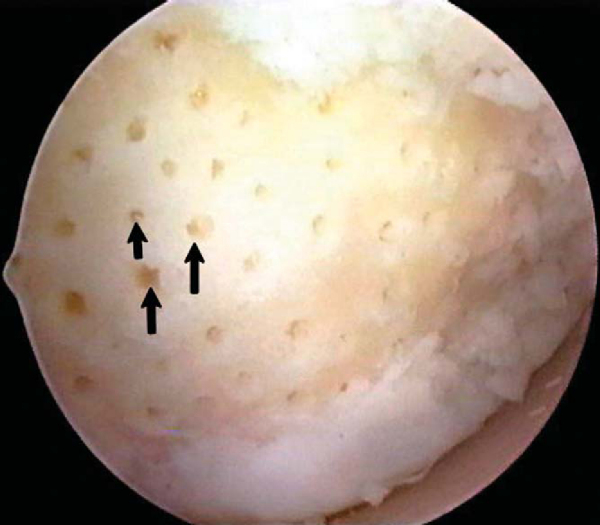
). The arthroscopic awls produce essentially no thermal necrosis of the bone compared with hand-driven or motorized drills. We make microfracture holes around the periphery of the defect first, immediately adjacent to the healthy stable cartilage rim (see Figs. 52-4 and 52-5 [4] [5]); then we complete the process by making the microfracture holes toward the center of the defect (
Fig. 52-6
). We assess the treated lesion at the conclusion of the microfracture to ensure that a sufficient number of holes has been made before reducing the arthroscopic irrigation fluid flow (
Fig. 52-7
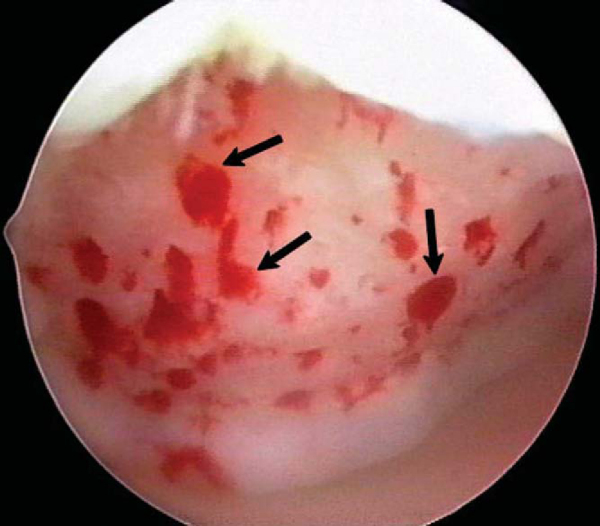
). After the arthroscopic irrigation fluid pump pressure is reduced, under direct visualization we are able to observe the flow of marrow fat droplets and blood from the microfracture holes into the prepared lesion (
Fig. 52-8
). The quantity of marrow contents flowing into the joint is judged to be adequate when we observe marrow elements emanating from all microfracture holes (
Fig. 52-9
). We then remove all instruments from the knee and evacuate the joint of fluid. [9] [10] [11] Intraarticular drains should not be used because the goal is for the surgically induced marrow clot rich in marrow elements to form and to stabilize while covering the lesion. [1] [2]
|
|
|
|
Figure 52-4 |
|
|
|
|
Figure 52-5 |
|
|
|
|
Figure 52-6 |
|
|
|
|
Figure 52-7 |
|
|
|
|
Figure 52-8 |
|
|
|
|
Figure 52-9 |
Chronic degenerative chondral lesions commonly have extensive eburnated bone and bone sclerosis with thickening of the subchondral plate,[6] thus making it difficult to do an adequate microfracture procedure. In these instances and when the axial alignment and other indications for microfracture are met, we first make a few microfracture holes with the awls in various locations of the lesion to assess the thickness of the eburnated bone. We often use a motorized bur to remove the sclerotic bone until punctate bleeding is seen. After the bleeding appears uniformly over the surface of the lesion, a microfracture procedure can be performed as previously described. [6] [9] [10] [11] We have observed noticeably improved results for these patients with chronic chondral lesions since we began using this technique. However, if the surrounding cartilage is too thin for a perpendicular rim to be established to hold and protect the marrow clot, we probably would not do a microfracture procedure in patients with such advanced degenerative lesions. [6] [9] [10] [11]
The microfracture awl produces a rough surface in the subchondral bone to which the marrow clot can adhere more easily, yet the integrity of the subchondral plate is maintained for joint surface shape and geometry (see
Fig. 52-7
). The microfracture procedure virtually eliminates thermal necrosis and provides a roughened surface for blood clot adherence, and the different angles of arthroscopic awls available provide easier access to areas of the knee that are difficult to reach. The awls provide not only perpendicular holes but also improved control of depth penetration compared with drilling. We believe that the key to the entire procedure is to establish the marrow clot to provide the optimal environment for the body’s pluripotential marrow cells (mesenchymal stem cells or progenitor cells) to differentiate into stable tissue within the lesion. [1] [2]
The rehabilitation program after microfracture for treatment of chondral defects in the knee is crucial to optimize the results of the surgery. [7] [11] The rehabilitation promotes the optimal physical environment for the mesenchymal stem cells to differentiate and to produce new extracellular matrix that eventually matures into a durable repair tissue (
Fig. 52-10
). The surgically induced marrow clot provides the basis for the most ideal chemical environment to complement the physical environment. [1] [2] This newly proliferated repair cartilage then fills the original defect. The rehabilitation protocol varies on the basis of anatomic location. The protocols for femorotibial lesions and for patellofemoral lesions are summarized in the Key Rehabilitation Points.
|
|
|
|
Figure 52-10 |
| KEY REHABILITATION POINTS | ||||||||||||||||||||||||||||||||||||||||||||||||
|
Femorotibial lesions
Patellofemoral lesions
|
Patients are focused on their abilities to regain knee function over time and to return to their desired level of activities, especially athletics.[4] We advise patients that they may not reach their maximum level of improvement for at least 2 years after undergoing the microfracture procedure.[7] However, the repair tissue appears to be durable (see
Fig. 52-10
) and permits return of knee function and increased activity levels.
Functional[5] and activity level[14] scores that appear in published reports on microfracture are summarized in
Table 52-2
.
| Author | Focus | Followup (Range) | Age Range of Patients | Lysholm Function | Tegner Activity |
|---|---|---|---|---|---|
| Steadman et al[7] (2003) | Traumatic lesions | Average of 11.3 years (7 to 17) | 13-45 years | 89 | 6 |
| Knutsen et al[3] (2004) | Traumatic lesions | Average of 2 years | 18-45 years | 76 | 4 |
| Steadman et al[8] (2003) | NFL players | Average of 4.5 years (2 to 13) | 22-36 years | 90 | 9 |
| Miller et al[6] (2004) | Degenerative knees | Average of 2.6 years (2 to 5) | 40-70 years | 83 | 4.5 |
| Sterett and Steadman[13] (2004) | High tibial osteotomy and microfracture | Average of 3.8 years (2 to 7) | 34-79 years | 78 | 5 |