
Editors: Morrey, Bernard F.; Morrey, Matthew C.
Title: Master Techniques in Orthopaedic Surgery: Relevant Surgical Exposures, 1st Edition
Copyright ©2008 Lippincott Williams & Wilkins
> Table of Contents > Section III – Spine > 14 – Lumbar Spine
14
Lumbar Spine
PART 1. Anterior Exposure of the Lumbar Spine
Paul M. Huddleston
Scott Zietlow
Jason C. Eck
Orthopedic surgeons developed and refined the anterior
lumbar exposures early in the 20th century for the treatment of
tuberculous spinal conditions and as a method to treat
spondylolisthesis (1,2).
The anterior lumbar anatomy is complex; as a result, many of these
techniques have been developed and performed in close cooperation with
General Surgery specialists. This collaboration should continue. During
routine exposures, an additional set of seasoned hands will facilitate
speeding the case to completion. For more difficult and complex
exposures, the same hands may very well mean the difference between a
serious but transient intraoperative complication or lasting morbidity
and death. Regardless of the difficulty of the case, “the best interest
of the patient is the only interest to be considered” (3).
ANTERIOR PARAMEDIAN RETROPERITONEAL LUMBAR EXPOSURE
Indications
-
Biopsy
-
Arthroplasty
-
Arthrodesis
Position
The patient should be placed in the supine position on
an operative frame or table that will allow intraoperative x-ray or
fluoroscopy in two planes. The use of a bolster under the lower back
will accentuate lumbar lordosis and facilitate exposure of the anterior
lumbosacral junction. If the patient is obese, the table may be placed
in a Trendelenburg position and tape placed upon the upper abdomen and
the pannus retracted cranially. The upper extremities are placed on
well-padded arm boards in a “90-90” position. The head is secured in a
neutral position. All bony prominences are padded. All monitoring lines
and catheters are safely secured.
P.316
 |
|
FIGURE 14-1
|
Landmarks
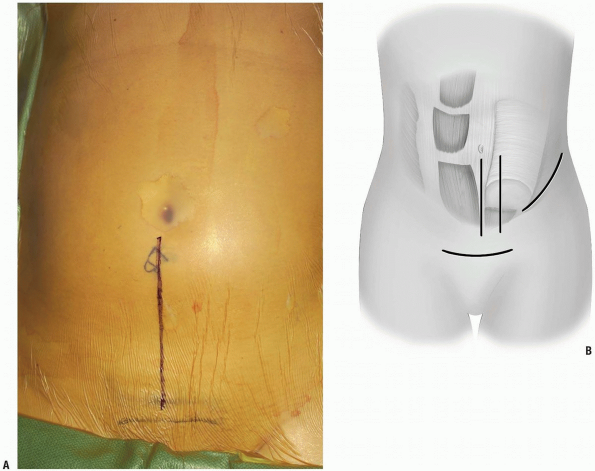
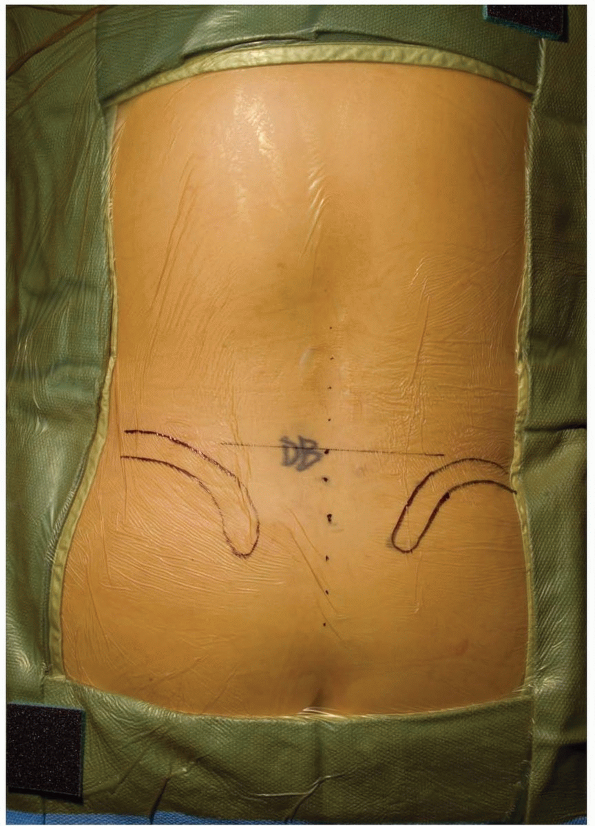
Lines are drawn overlying from below the umbilicus heading inferiorly towards the pubic bones and symphysis (Fig. 14-1A). The symphysis will signify the lower limit of the possible skin and muscle dissection.
Equipment
A minimum of two large bore peripheral IVs should be
placed. Additional monitoring with central venous and peripheral
arterial lines is used as necessary. The use of headlamp illumination
and operative loupes is left to the discretion of the surgeon but is
recommended. A bipolar cautery, in addition to a monopolar, should be
available for controlling hemostasis near and around the neural
elements. If intraoperative neuromonitoring is used, then leads are
placed in the lower extremity prior to the prep and drape.
Intraoperative x-rays of fluoroscopy will aid in the identification of
operative levels and verify the location of any implants placed.
Self-retaining abdominal retractors may be used but the authors prefer
handheld retractors if available, as these tend to be easier on the
tissues.
Technique
-
Incision: to access the lower three
levels of the lumbar spine or in patients with a large abdomen, a
midline incision is ideal. For visualization of the lowest lumbar level
or when cosmesis is an issue, a low transverse incision is preferred.
Alternatively, a paramedian longitudinal incision may be placed
directly over the rectus abdinus to minimize the development of dead
space above the fascia and subsequent possible wound infection (Fig. 14-1B). -
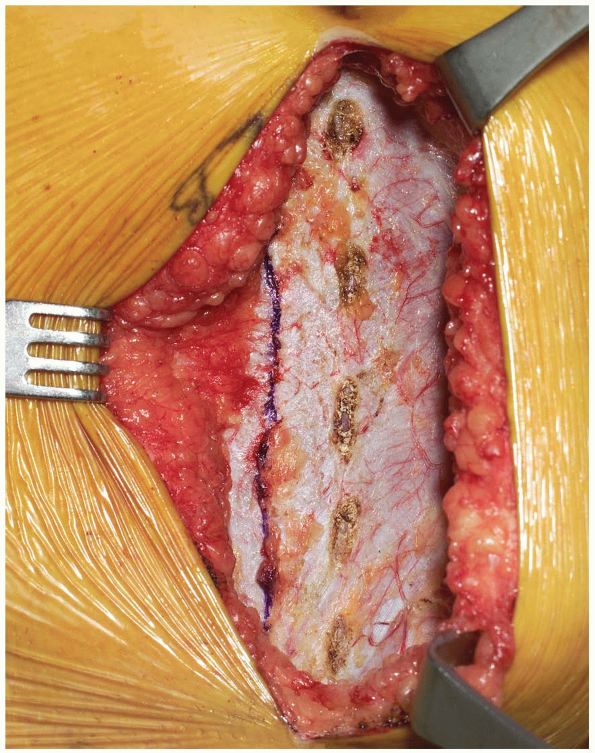
Dissection progresses through the skin
and subcutaneous tissue levels to the fascia. A small skin flap is then
elevated over the left abdominal region to provide access to the
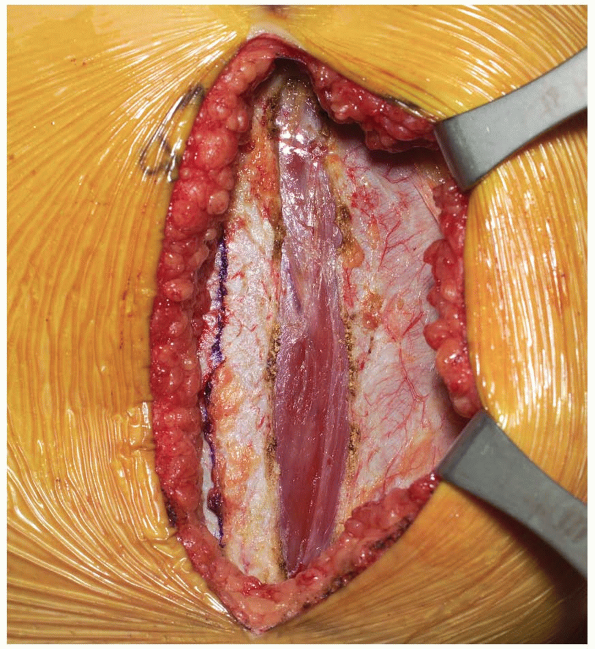
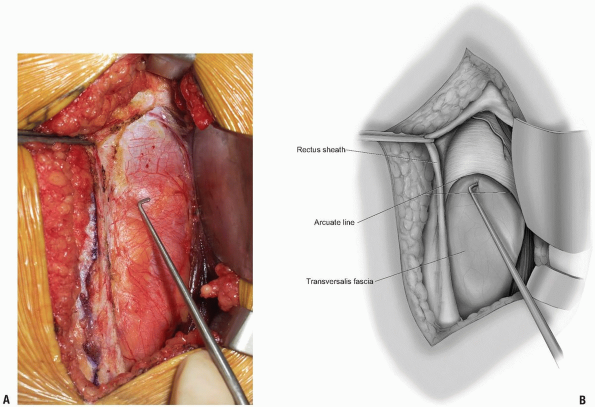
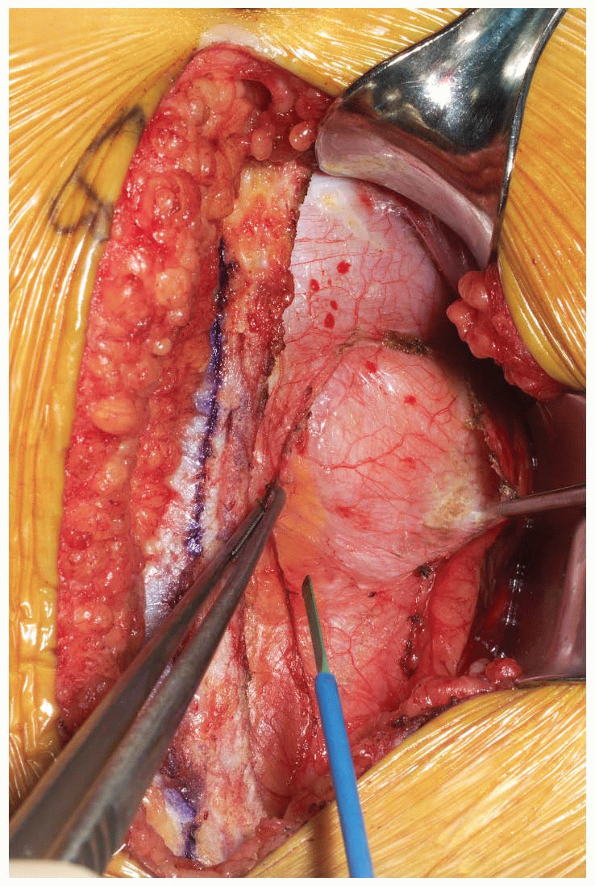
anterior rectus sheath (Fig. 14-2). The midline is identified and the fascia is divided over the left rectus muscle (Fig. 14-3).
The muscle is dissected from its medial fascial border and the various
perforating vessels are ligated, divided, and cauterized as needed (Fig. 14-4). -
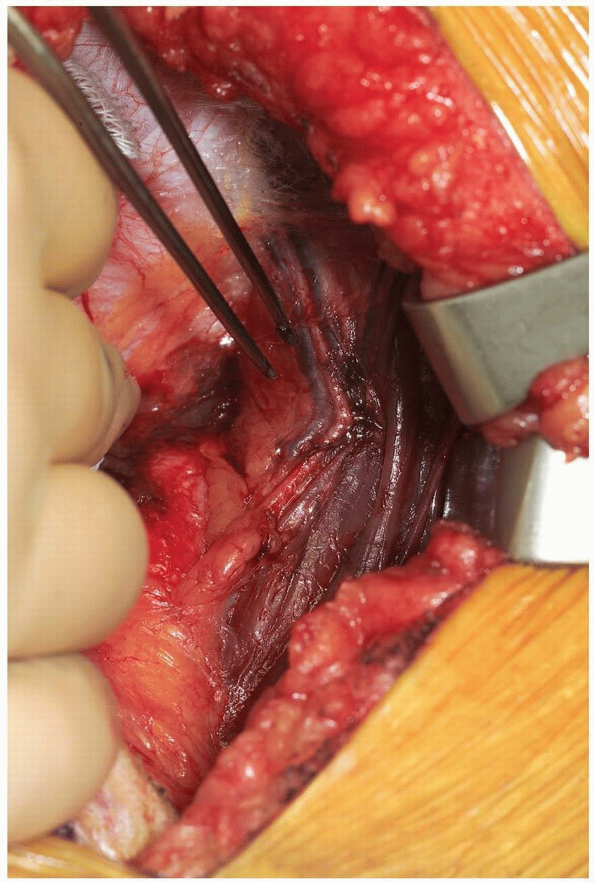
The posterior rectus fascia is visualized and the arcuate line identified (Fig. 14-5).
Using surgical forceps to elevate the posterior rectus fascia, a small
incision is made through this using an electrocautery or knife (Fig. 14-6).
Care is taken not to incise the peritoneum and abdominal viscera.
Development of this potential space allows access anterior to the
peritoneum through to the retroperitoneal space (Fig. 14-7).
This is a critical portion of the surgical approach and the surgeon
must be confident they are in the correct tissue plane to avoid injury
to the abdominal contents and/or damage to the lateral abdominal lumbar
neurovascular structures. -
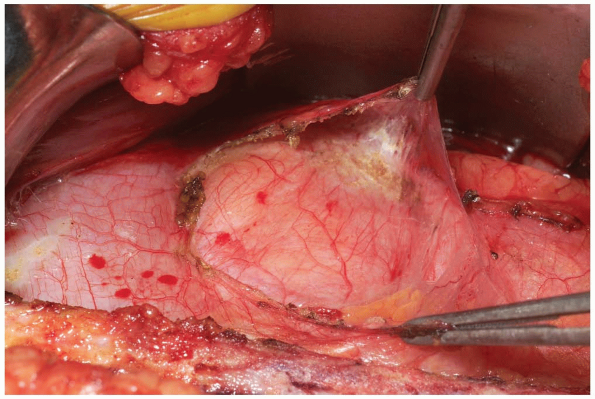
The dissection is developed laterally
towards the retroperitoneal space. This can be performed by manual
blunt dissection, using a “sponge-on-a-stick” if necessary. Peritoneal
tears, if encountered, should be repaired with an absorbable suture on
a tapered needle as they are recognized. The abdominal structures are
then mobilized from patient’s left to right direction within the
abdominal cavity. -
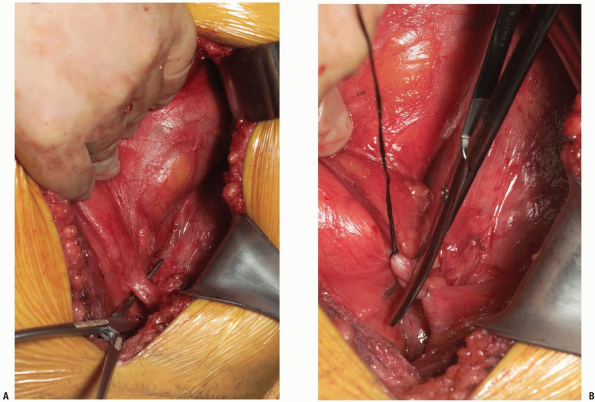
As the retroperitoneal dissection
progresses laterally, retroperitoneal fat may be encountered as well as
the round ligament or vas deferens. If necessary, the round ligament
may be divided to assist in mobilization (Fig. 14-8).
The blunt dissection should continue cranial to these structures. If
the patient has a larger body habitus and/or the exposure is difficult,
the posterior rectus sheath can be divided cranially in a “north to
northeast” fashion. This need not be repaired upon subsequent closure
and facilitates more generous mobilization of the abdominal contents
and/or visualization of the mid to upper lumbar spine if necessary. -
Care is taken to identify the ureter (Fig. 14-9).
This will be seen as a small, white structure within the
retroperitoneum. This can be identified by very carefully observing its
peristalsis or gently inducing or testing for the peristalsis by
compression with a small forceps. -
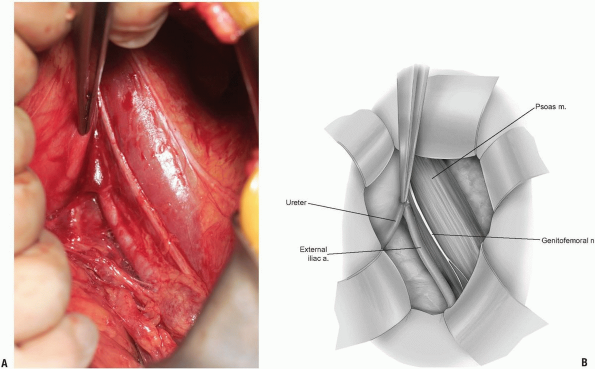
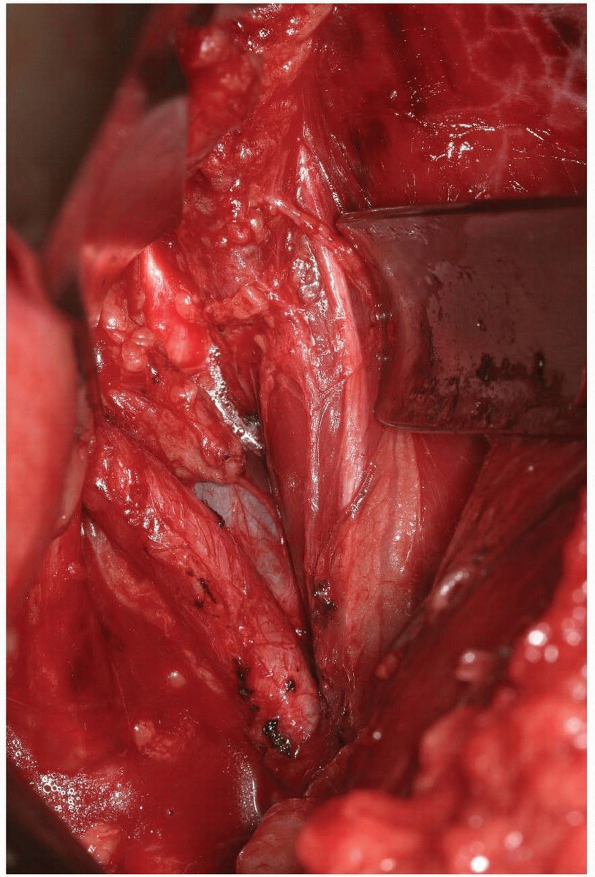
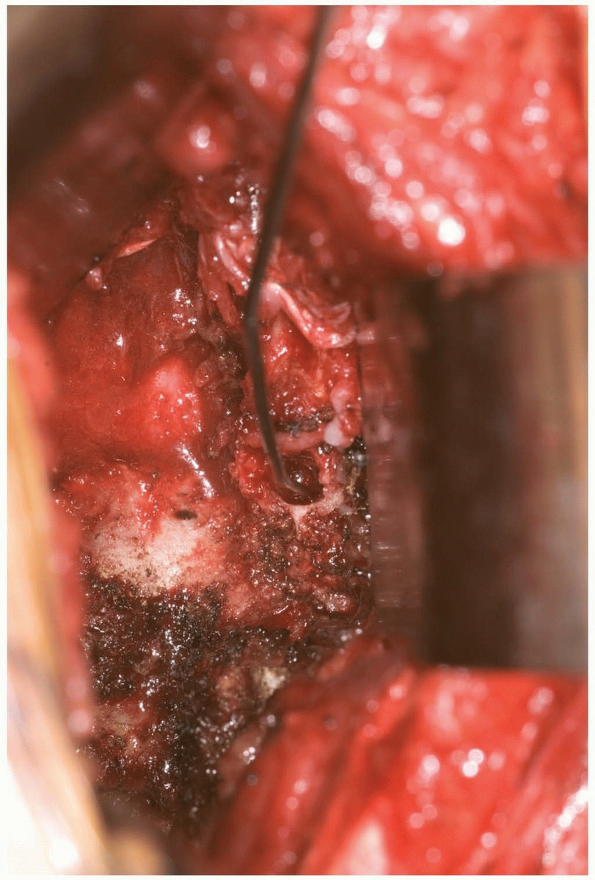
The iliopsoas becomes visible within the field and the anterior neural structures upon it can be appreciated (Fig. 14-10). Care again should be taken not to damage these with electrocautery, or pressure from surgical retractors.
-
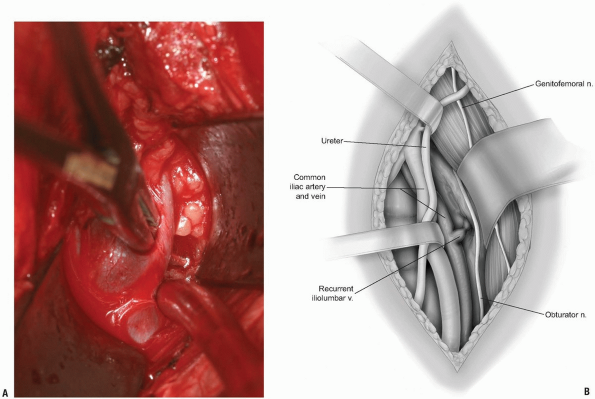
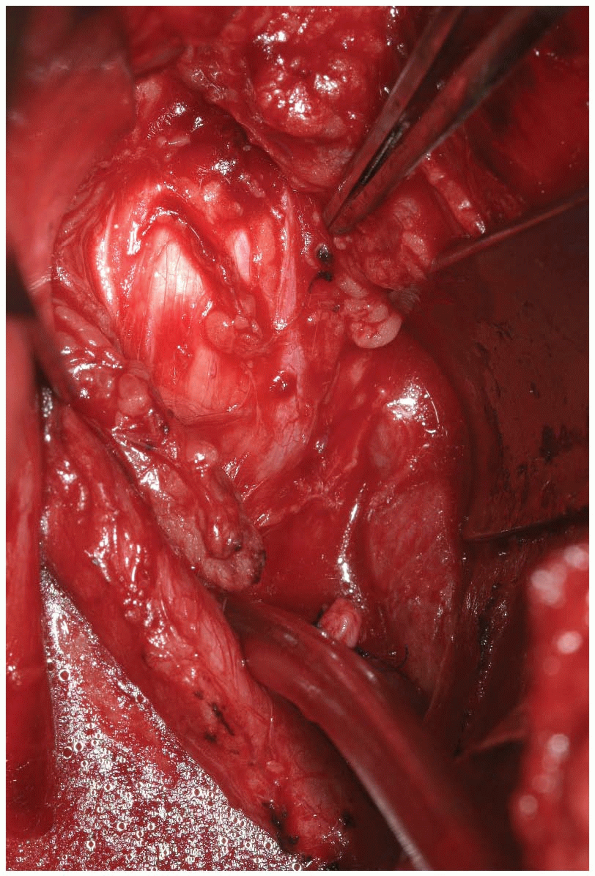
If exposure to the upper lumbar spine is
necessary, exploration and mobilization of the external iliac vein and
artery will be necessary to identify and ligate the ascending or
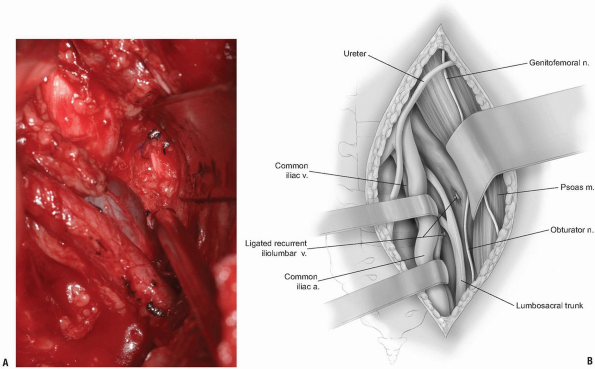
recurrent iliolumbar vein (Fig. 14-11).
These vessels appear as short, medium, or multiple lateral insertions
into the common iliac vein from a cranial direction. These branches are
deep within the abdomen near the pelvic brim where visibility is poor.
They should be doubly ligated prior to be being divided (Fig. 14-12).
The obturator nerve and lumbosacral trunk are especially at risk in the
area below the recurrent iliolumbar vessels over the lateral aspect of
the sacrum (Fig. 14-13). -
The sympathetic chain is most easily
moved laterally, away from the midline. This is most easily
accomplished by blunt dissection with a small sponge. Large branches of
the sympathetic chain may be ligated and divided with any attendant
vessels if necessary. -
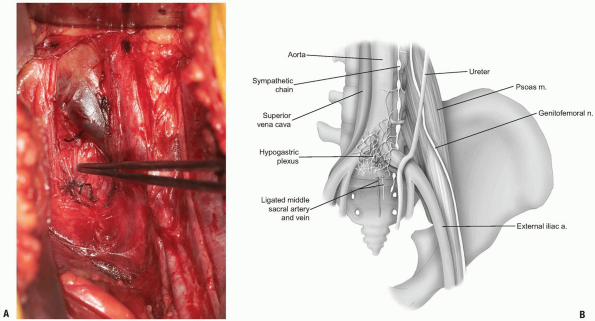
To access the lumbosacral junction, below
the confluence of the common iliac veins, the middle sacral artery and
veins should be identified and ligated (Fig. 14-14).
Divide the hypogastric plexus in a vertical fashion with a sharp blade
and use a small sponge to blunt dissect the filmy, plexus laterally
towards the iliac vessels. Careful placement of self-retaining or
handheld retractors will protect the great vessels and allow clear
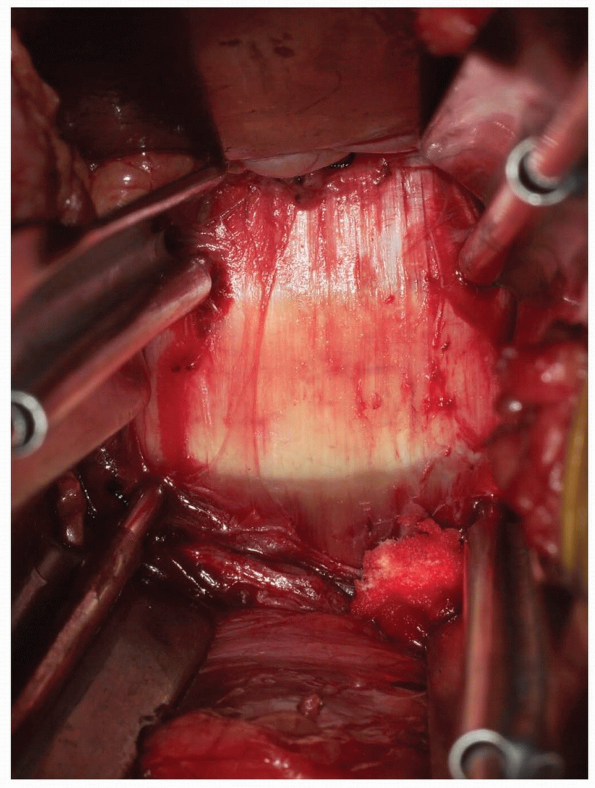
visualization of the disc space (Fig. 14-15). -
Following the operative procedure, a
final sponge and needle count is performed. The fascial layer is closed
in a watertight fashion using a running suture. The subcutaneous layer
is repaired and the skin approximated. In the presence of a large dead
space, the use of a suprafascial drain is optional.
P.317
 |
|
FIGURE 14-2
|
 |
|
FIGURE 14-3
|
 |
|
FIGURE 14-4
|
P.318
 |
|
FIGURE 14-5
|
 |
|
FIGURE 14-6
|
 |
|
FIGURE 14-7
|
P.319
 |
|
FIGURE 14-8
|
P.320
 |
|
FIGURE 14-9
|
 |
|
FIGURE 14-10
|
P.321
 |
|
FIGURE 14-11
|
P.322
 |
|
FIGURE 14-12
|
 |
|
FIGURE 14-13
|
P.323
 |
|
FIGURE 14-14
|
 |
|
FIGURE 14-15
|
P.324
Pearls and Pitfalls
-
If cosmesis is an issue, the low
transverse incision can be utilized to expose the lumbosacral junction
in a thin patient. The lateral paramedian vertical incision uses a
smaller skin flap with less chance of subcutaneous hematoma and
concomitant healing issues. For exposure of more cranial levels or in
patients with complicating anatomy, a lateral abdominal incision will
be the most extensile. -
Extremely large peritoneal tears offer
the surgeon the option to repair or not repair as it is unlikely that
significant compression and compromise of the abdominal viscera will
occur. With smaller defects, identify and repair them as they are
encountered. -
If there is a question about
identification or injury of the ureter, indigo carmine can be given to
the patient intravenously in the operating room. This will manifest
itself as a very dark, red color in a few minutes that is easily
visible within the ureter, the bladder, or abdominal cavity if a ureter
injury is present. In revision cases and approaches or areas where
significant scarring and adhesion are present such as infection or
tumor or radiation field, then preoperative ureter stents can be placed
to assist in identification and protection of this vital structure. -
Injury to the sympathetic chain may cause
sympathetic dysfunction in the lower extremity. Side effects include
increased warmth to the leg, increased hair growth and sweating with
subsequent maceration of the foot and/or the development of allodynia.
Injuries can be lessened by using blunt dissection around the chain and
avoiding the use of electrocautery. -
The genitofemoral and lateral femoral
cutaneous nerves can be damaged as they course over and through the
iliopsoas muscle. Care must be taken in the placement of retractors
within this area. The lumbosacral trunk and obturator nerve are at
great risk near the recurrent iliolumbar vessel in the lateral aspect
of the sacrum. Because of this, “blind” cauterization must never be
used to attempt to control bleeding in this area. -
While exposing and dissecting over and
around the anterior lumbar spine, avoid the use of electrocautery if
possible and utilize blunt dissection to minimize the neural trauma to
the hypogastric plexus. Abdominal ileus and trouble with micturition
can be expected following an extensive anterior vessel dissection. In
males, additional risks include sexual dysfunction and sterility
secondary to retrograde ejaculation.
LATERAL LUMBAR APPROACH
Indications
-
Biopsy
-
Arthrodesis
-
Arthroplasty
-
Trauma
Position
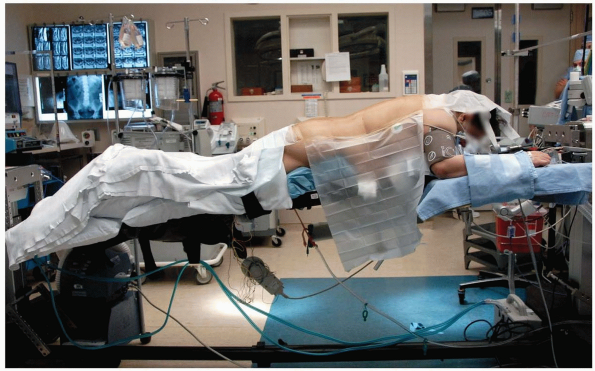
The patient should be placed in the sloppy lateral
position with the operative side up on an operative frame or table that
will allow intraoperative x-ray or fluoroscopy in two planes. The use
of a bean bag under the down side will allow manipulation of the
patient’s torso as necessary to gain better visualization from both
anterior and lateral perspectives, if necessary. If the patient is
significantly over their ideal BMI, the table may be placed in a
Trendelenburg position and tape placed upon the upper abdomen and the
pannus retracted cranially. The upper extremities are placed in an
“over-under” position. The head is secured in a neutral position. All
bony prominences are padded. All monitoring lines and catheters are
safely secured.
P.325
Landmarks
The surgical landmarks include the 12th rib, umbilicus, pubic bones and upside iliac crest.
Equipment
A minimum of two large bore peripheral IVs should be
placed. Additional monitoring with central venous and peripheral
arterial lines is used as necessary. The use of headlamp illumination
and operative loupes is left to the discretion of the surgeon but is
recommended. A bipolar cautery in addition to a monopolar should be
available for controlling hemostasis near and around the underlying
neural elements. If intraoperative neuromonitoring is to be used, then
leads are placed in the lower extremity. Intraoperative x-rays of
fluoroscopy will aid in the identification of operative levels and
verify the placement of any implants placed. Self-retaining chest wall
and abdominal retractors are used with additional handheld retractors
added as needed.
Technique
-
Incision: lines are drawn overlying from over or just below the 12th rib to just below the umbilicus.
-
The dissection continues down through the
skin and subcutaneous tissue to the level of the fascia. The fascia is
divided in line with the skin incision in a muscle splitting fashion
and the approach continues as described with the anterior approach.
Pearls and Pitfalls
-
Advantages include a different angle of
approach to the anterior lumbar spine in situations where a direct
anterior transperitoneal or retroperitoneal approach has been
previously performed. Specialty and technique-specific instruments can
allow the possibility of anterior spinal discectomies and placement of
interbody devices even in situations where the scarring of the great
vessels might otherwise seem too onerous. -
This approach is very extensile. It is
possible to visualize the lumbar spine from the lumbosacral to
thoracolumbar junction through a single incision. -
Denervation of the abdominal wall with
pseudohernia is an infrequent but disappointing complication of the
approach. It is tolerated poorly by patients and often recalcitrant to
surgical treatment. -
Closing this approach will be much more
time consuming than the anterior approaches. Due to the muscle-dividing
nature of the lateral approach, the subsequent patient recovery tends
to be more painful. -
Confusion may occur with variations in
segmentation of the lower lumbar sacral spine. It is strongly
recommended that operative levels be confirmed with nontraumatic
radiographic markers placed for identification with intraoperative
x-ray.
P.326
PART 2. Posterior Exposures of the Lumbar Spine
Paul M. Huddleston
Jason C. Eck
The surgeon has many options for approaching the
posterior lumbar spine. For biopsy, decompression, arthrodesis, and/or
instrumentation, many of these exposures may seem to be simple
variations of a common theme. Only when the surgeon has considered the
balance between visualization and morbidity will the differences be
clearer. From “new,” minimally invasive techniques to more established
“old school” maximally invasive revision work, each technique has
evolved along the spectrum of this balance. We should constantly remind
others and ourselves that these approaches are but another tool for the
surgeon and that the key to success will always be “the decision, not
just the incision.”
POSTERIOR EXPOSURE FOR UNILATERAL LUMBAR DECOMPRESSION
Indications
-
Discectomy
-
Hemilaminotomy
Position
The patient should be placed in the prone position. The
use of either longitudinal bolsters at the patient’s sides or any
operative frame that allows the abdomen to hang free can reduce
intra-abdominal pressure. This decreases epidural venous pressure and
blood loss during the case (Fig. 14-16).
The upper extremities are placed on well-padded arm boards in a “90-90”
position. The head is secured in a neutral position. All bony
prominences of the extremities are padded.
 |
|
FIGURE 14-16
|
P.327
Landmarks
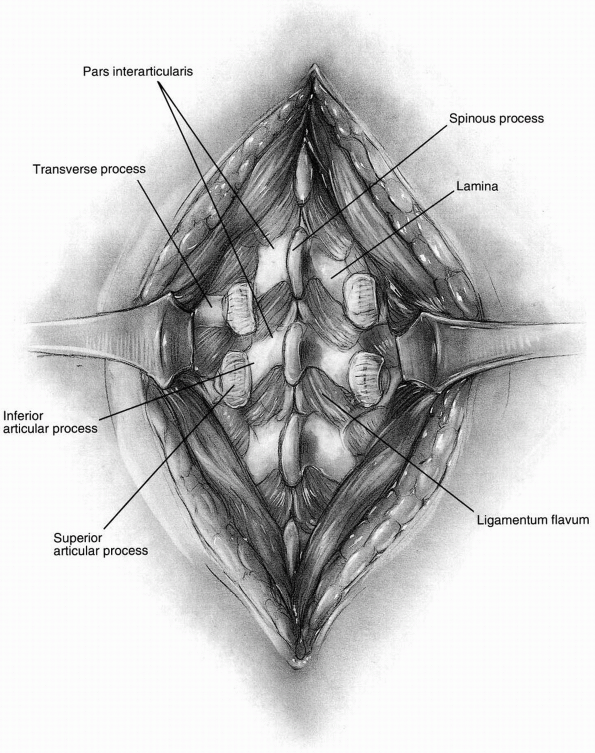
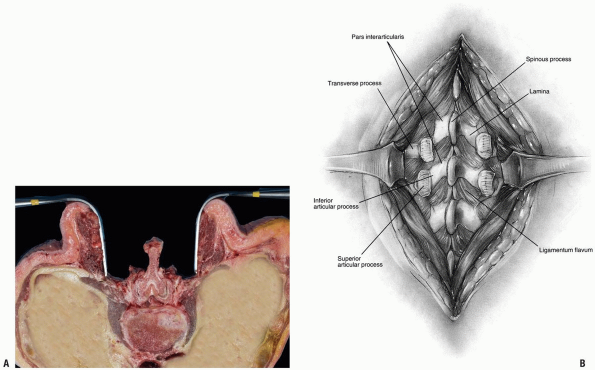
A line is drawn connecting the superior most point of the iliac crests. This roughly identifies the L4-5 disc space (Fig. 14-17).
The spinous processes are typically easily palpable. A spinal injection
needle may be used to mark the site for potential surgical incision and
a lateral intraoperative x-ray taken to assist in minimizing the skin
incision.
The spinous processes are typically easily palpable. A spinal injection
needle may be used to mark the site for potential surgical incision and
a lateral intraoperative x-ray taken to assist in minimizing the skin
incision.
Equipment
The use of headlamp illumination with operative loupes
or an operative microscope is left to the discretion of the surgeon but
is recommended. A bipolar cautery in addition to a monopolar should be
available for controlling hemostasis near and around the underlying
neural elements.
or an operative microscope is left to the discretion of the surgeon but
is recommended. A bipolar cautery in addition to a monopolar should be
available for controlling hemostasis near and around the underlying
neural elements.
 |
|
FIGURE 14-17
|
P.328
Technique
-
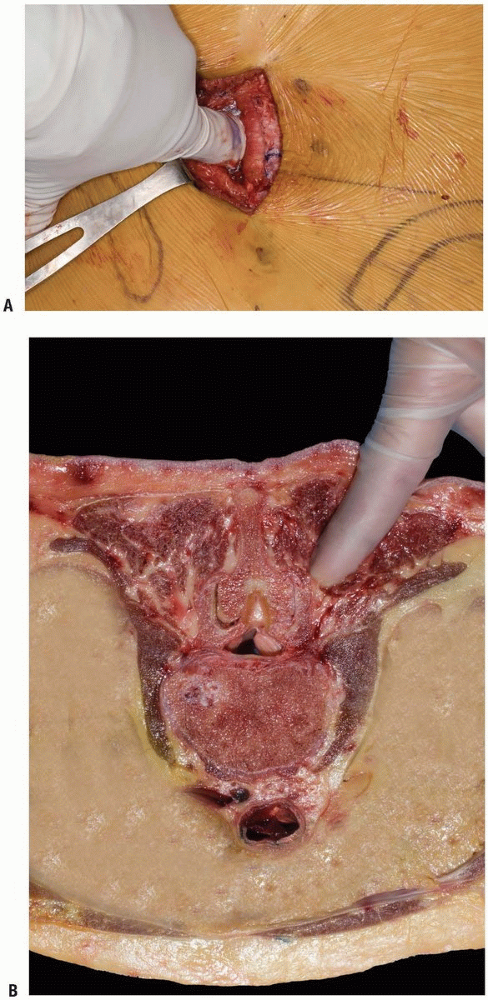
Incision: a midline longitudinal incision is made over the spinous process above the operative level.
-
The incision is taken down to the fascial
layer. The spinous process should be easily palpable. The paraspinous
muscles of the affected side are then subperiosteally elevated off the
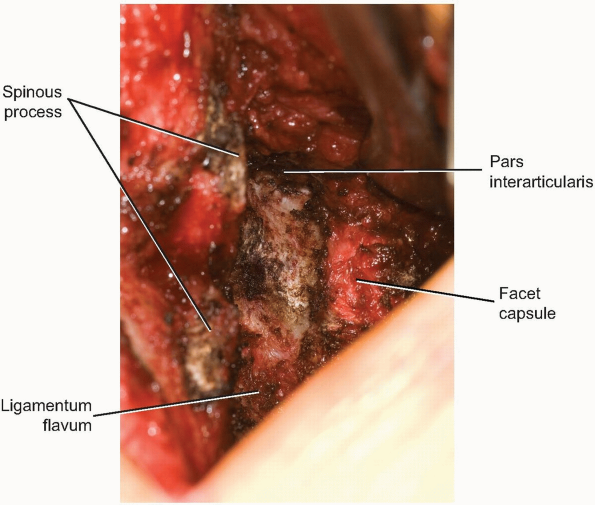
spinous process and lamina using a periosteal elevator (Fig. 14-18).
Dissection should be carried lateral to the facet joint. Care should be
taken not to violate the capsule of the facet joint. A hand-held or
self-retaining retractor can be used to maintain the exposure (Fig. 14-19). -
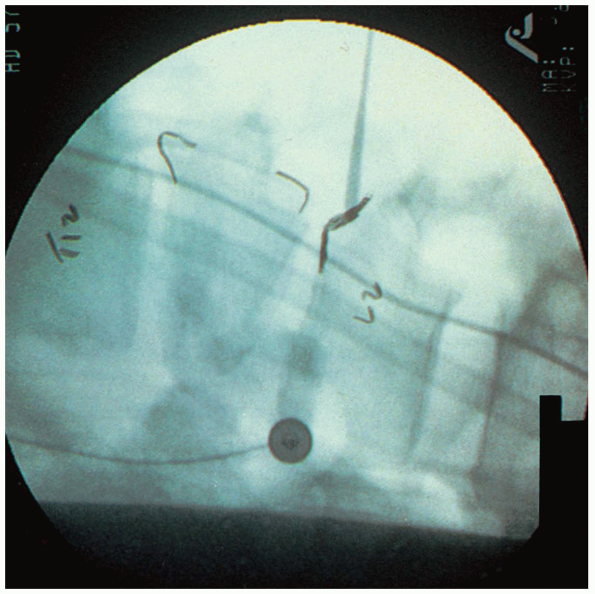
Intraoperative fluoroscopy or radiographs
should be taken to verify the appropriate level by placing a
radiographic marker. These may be orthogonal but a lateral projection
is usually satisfactory. To accomplish this, the ligamentum flavum is
then dissected off the superior edge of the inferior lamina using
either a curette or elevator. A small periosteal elevator is then
placed just medial to the lumbar pedicle in question. This will
identify the operative level even in the most degenerative or distorted
of cases. The intraoperative radiograph may then be obtained (Fig. 14-20). -
A rongeur or high-speed burr is then used
to remove the inferior portion of the superior lamina and superior
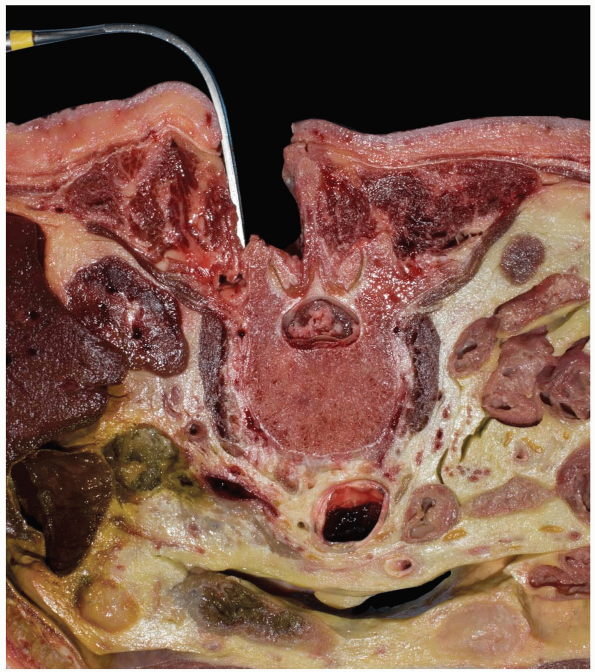
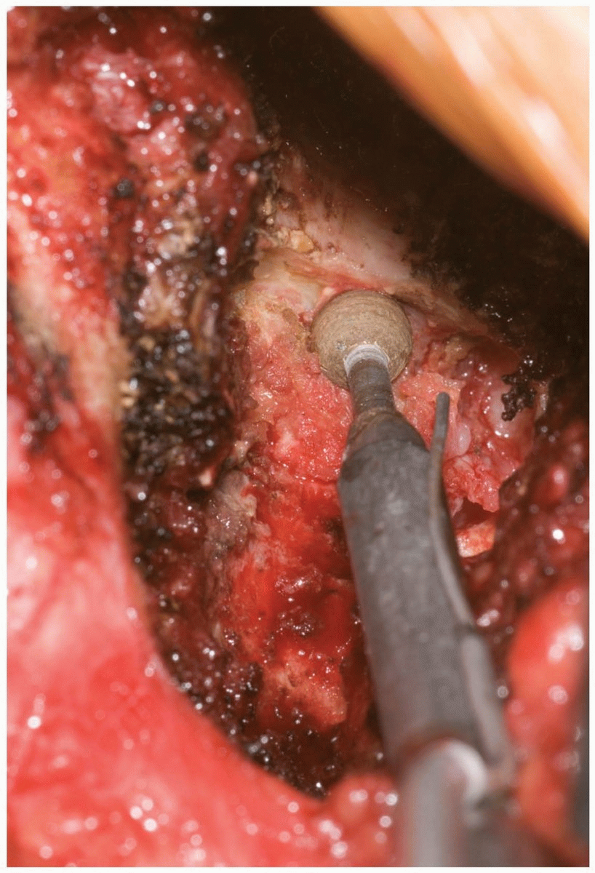
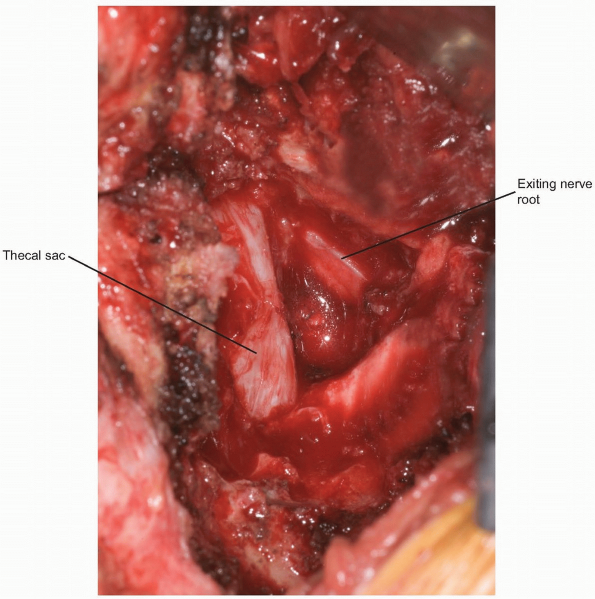
portion of the inferior lamina (Fig. 14-21). This will allow release of the insertion of the ligamentum flavum from the superior lamina of the caudal vertebra (Fig. 14-22). Immediately underneath this ligament is the epidural fat, thecal sac, and exiting nerve roots (Fig. 14-23).
In some cases the medial portion of the facet joint must be removed to
provide sufficient visualization. An adequate amount of facet joint
should be preserved to maintain adequate post-operative motion segment
stability. Lateral decompression should be carried flush to the medial
wall of the pedicle to ensure adequate decompression of the lateral
recess and traversing nerve root. -
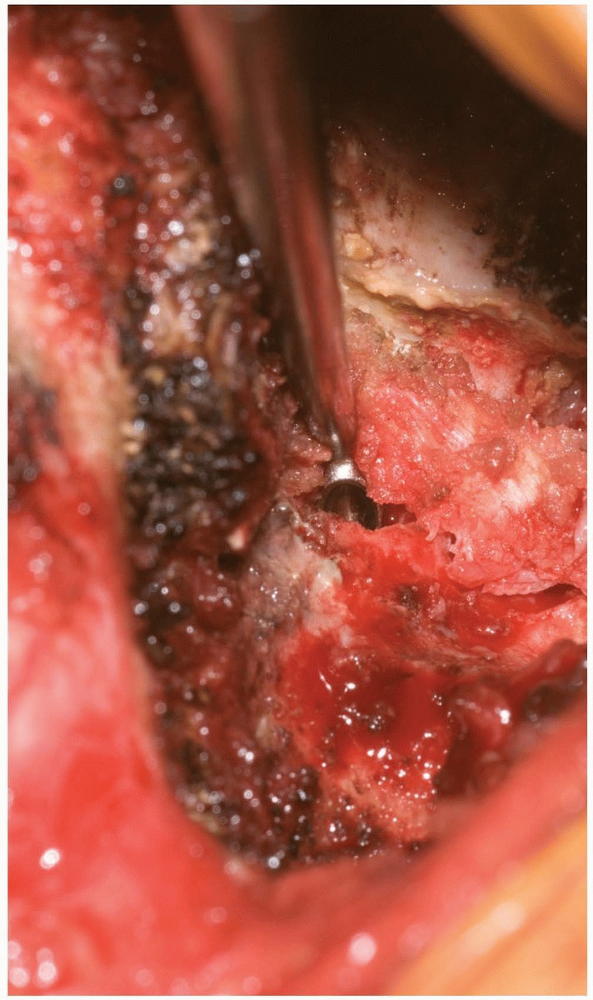
After sufficient bone and ligamentum flavum have been removed the exiting nerve root should be visualized (Fig. 14-23).
If the exposure is being performed for discectomy then the nerve root
can be carefully retracted toward the midline to expose the disc space.
A bipolar cautery may be used to coagulate obstructing epidural veins. -
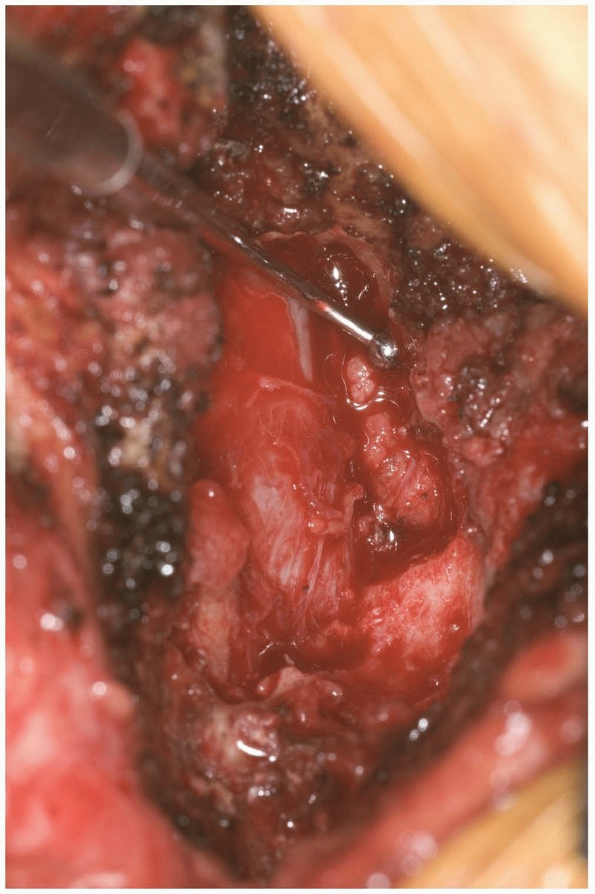
The approach to the disc space is
completed with an annulotomy. A scalpel on a long handle or a small
freer can puncture the annulus. Small rongeurs or punches can be used
to remove any free or extruded disc material. The remaining disc space
is irrigated with sterile saline solution injected with any small
catheter and syringe. -
A ball-tip probe or flat elevator is used
to prove the foramen to assure an adequate decompression has been
performed. If necessary, additional bone can be removed at this time. A
final irrigation is performed. The dura is visualized to verify it
remains intact. -
The fascial layer is meticulously closed
in a watertight fashion using interrupted and running suture. The
subcutaneous layer is repaired and the skin approximated. The use of a
drain is optional.
 |
|
FIGURE 14-18
|
 |
|
FIGURE 14-19
|
P.329
 |
|
FIGURE 14-20
|
 |
|
FIGURE 14-21
|
 |
|
FIGURE 14-22
|
P.330
 |
|
FIGURE 14-23
|
P.331
Pearls and Pitfalls
-
Dissecting only on the affected side eliminates contralateral soft tissue destruction and leads to faster recovery.
-
Assisted illumination by either head lamp
or operating microscope will greatly improve visualization, especially
if smaller incisions are utilized. -
An extension-type operating room table
may be used for lumbar spinal decompressions but the approximation of
the lamina and spinous processes that occur with these devices may make
visualization more difficult. Subsequently, the surgeon will be working
through an extended lumbar spine, which may make accessing the spinal
canal and disc space a challenge. -
The increased visualization achieved by
using an operative microscope will improve the visualization and
participation of an assistant or student, if present. -
Any suspicion of the presence of an
incidental durotomy created during the surgical approach should be put
to rest prior to wound closure. Bad news never gets better with age!
POSTERIOR BILATERAL EXPOSURE OF THE LUMBAR SPINE
Indications
-
Laminectomy
-
Central stenosis
-
Bilateral stenosis
-
-
Posterolateral arthrodesis
-
Posterior instrumented arthrodesis
Position
The patient should be placed in the prone position. The
use of either an Andrew’s table with the patient in the knee-chest
position or a Wilson frame can allow the abdomen to hang free and
reduce intra-abdominal pressure. This decreases epidural venous
pressure and blood loss during the case. The upper extremities are
placed on well-padded arm boards in a “90-90” position. The head is
secured in a neutral position with padding over the eyes. All bony
prominences of the extremities are padded.
Landmarks
A line is drawn connecting the superior most point of
the iliac crests. This roughly identifies the L4-5 disc space. The
spinous processes are typically easily palpable. A spinal injection
needle may be used to mark the site for potential surgical incision and
a lateral intraoperative x-ray taken to assist in minimizing the skin
incision.
the iliac crests. This roughly identifies the L4-5 disc space. The
spinous processes are typically easily palpable. A spinal injection
needle may be used to mark the site for potential surgical incision and
a lateral intraoperative x-ray taken to assist in minimizing the skin
incision.
Equipment
The use of an operative microscope or loupes as well as
intraoperative monitoring is left to the discretion of the surgeon. A
bipolar cautery in addition to a monopolar should be available for
controlling hemostasis near and around the underlying neural elements.
intraoperative monitoring is left to the discretion of the surgeon. A
bipolar cautery in addition to a monopolar should be available for
controlling hemostasis near and around the underlying neural elements.
Technique
-
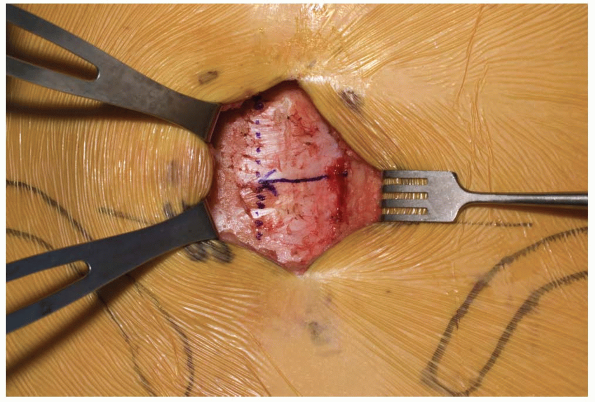
Incision: a midline longitudinal incision is made over the spinous process above and below the planned operative level (Fig. 14-24).
-
The incision is taken down to the fascial
layer. The spinous process should be easily palpable. The paraspinous
muscles of both sides are then subperiosteally elevated off the spinous
process and lamina using a periosteal elevator (Fig. 14-25).
Dissection should be carried out to the facet joint. Care should be
taken not to violate the capsule of the facet joint unless fusion is
planned at that level. In cases of laminectomy alone there is typically
no need to violate the facet capsules. -
Care should be taken to maintain the
facet capsule until proper levels have been radiographically confirmed.
A clamp can then be placed on the spinous process and an intraoperative
lateral radiograph taken to confirm the appropriate level. -
The rongeur may be used to remove the
spinous processes if indicated and attached soft tissues. Otherwise,
care should be taken to preserve as many of the anatomic structures
(spinous processes, facet capsules) until it is necessary to sacrifice
them. -
To completely visualize the thecal sac,
the decompression should effectively undermine the origin of the
ligamentum flavum on the under-half of the inferior aspect of the
superior vertebrae and the lateral recess allowing complete
visualization of the neural elements. A high-speed burr or Kerrison
rongeurs is used to remove the lamina and medial portions of facet
joints. No more than 50% of either facet joint should be removed at a
given level to maintain stability (see Fig. 14-21). -
The decompression should extend from the
pedicle above to the pedicle below, including any encroaching facet
complex on either side. -
If posterolateral fusion is planned then
the dissection progresses over the facet joint to the tips of the
transverse processes. Decortication of the transverse processes may be
performed using curettes, periosteal elevators or a high speed burr. If
present, the lateral aspect of the pars and facet joint should be
decorticated to provide additional surfaces for arthrodesis. -
The ideal visualization of the
posterolateral transverse processes will be obtained from the opposite
side of the operating table. Working on the contralateral lateral
gutter will minimize surgeon fatigue and minimize the overall length of
the wound and soft tissue dissection. -
If entry into the lumbar vertebral
pedicle is planned, either in anticipation of biopsy or
instrumentation, it is critical for the entry point to be adequately
visualized. The entry site into the pedicle and the trajectory of any
implants can be confirmed by the anatomy and by using intraoperative
radiographs or fluoroscopy. Direct visualization of the medial aspect
of the pedicle through a lamino-foraminotomy can assist with
orientation if necessary. Care should be taken to avoid breach of the
medial and inferior pedicular walls, as these are most likely to lead
to nerve root irritation or injury. -
At this point any necrotic or devitalized
tissue is removed. Irrigation of the operative field and a careful
sponge and needle count is performed. -
The dura is inspected to verify that it
is intact. A ball-tip probe or flat elevator is used to verify adequate
decompression of each foramen. -
The fascial layer is meticulously closed
in a watertight fashion using interrupted and running suture. The
subcutaneous layer is repaired and the skin approximated with either
skin closure performed in a style consistent with the preference of the
surgeon. The use of a drain is optional.
P.332
 |
|
FIGURE 14-24
|
 |
|
FIGURE 14-25
|
P.333
Pearls and Pitfalls
-
The use of an extension table can assist
in achieving sagittal plane balance when more than one motion segment
is being considered for instrumentation. -
It is highly recommended that for more
lengthy cases that direct pressure over the face and eyes be avoided by
use of a cranial pinion. Preoperative positioning of the patient’s head
at an elevation higher than the heart may decrease facial and neck
edema.
P.334
EXPOSURE OF THE LUMBAR SPINE FOR TRANSFORAMINAL LUMBAR INTERBODY FUSION
Technique
-
A traditional midline longitudinal
approach is made to the lumbar spine. Care is taken to keep the
supraspinous and interspinous ligaments intact. The paraspinous muscles
are subperiosteally elevated from the dorsal surface of the lamina out
to the tip of the transverse process, allowing the dorsal aspect of the
vertebral bodies to be exposed (see Fig. 14-26). -
The decision is made to approach the
canal and disc space unilaterally. Usually the side with a symptomatic
radiculopathy is chosen. If there is a degenerative or developmental
curve present then the side of the concavity is chosen. Pedicle screws
are placed as described above. An inferior hemilaminectomy and total
facetectomy are performed. This allows complete exposure of the lateral
spinal canal, thecal sac, foramen, and exiting nerve root. -
The superior and inferior pedicles,
thecal sac with traversing nerve root, and the exiting root compose a
“vascular triangle.” The lower nerve root is protected by sliding a
nerve root retractor along the upper surface of the pedicle of the
inferior vertebra. The upper nerve root lies along the inferomedial
surface of the pedicle and can be directly visualized (Fig. 14-26). -
A knife or elevator is used to enter the
outer annulus and complete discectomy is performed. Endplate
preparation is completed with specialized instruments. -
Distraction across the disc space can
then be performed. An implant is then impacted into place to the middle
of the disc space. Graft position can be confirmed using fluoroscopy.
The posterior two-thirds of the disc space are then packed with bone
graft. The distraction across the interspace is then relaxed and the
rods are the attached to the pedicle screws and the interspace can be
compressed. -
Posterolateral intertransverse process fusion can then be performed as described.
-
Copious irrigation is then performed. A layered close is performed as described above.
-
For a more minimalist approach, a
unilateral subperiosteal dissection is performed on the side where the
facetectomy is to be performed. A muscle splitting Wiltse type approach
may be performed on the contralateral side (Fig. 14-27). -
Blunt dissection down to the level of the
facet complex minimizes soft tissue trauma and provides a relatively
bloodless exposure (Fig. 14-28). -
The transverse processes and the intertransverse ligament are then identified (Fig. 14-29). Pedicle fixation is then placed after adequately identifying and preparing the entry point into the pedicle.
Pearls and Pitfalls
-
The surgical approach for a transforaminal lumbar interbody fusion (TLIF) is useful for all levels of the lumbar spine.
-
Correct exposure of the interbody space
through the vascular triangle should allow interbody arthrodesis with
minimal or no retraction on the thecal sac or the exiting nerve root.
This is especially critical at the L1-2 and L2-3 lumbar levels as the
spinal cord will terminate in this region in most adults.
P.335
 |
|
FIGURE 14-26
|
 |
|
FIGURE 14-27
|
P.336
 |
|
FIGURE 14-28
|
 |
|
FIGURE 14-29
|
P.337
Acknowledgment
The editors acknowledge with appreciation the time and
expertise contributed by Drs. Harold Gregory Bach and Mark Mikhael in
the preparation of the material used in this chapter.
expertise contributed by Drs. Harold Gregory Bach and Mark Mikhael in
the preparation of the material used in this chapter.
PART 1 REFERENCES
1. Ito H, Tsuchiya J, Asami G. A new radical operation for Pott’s diseases. J Bone Joint Surg 1934;16:499-515.
2. Capener, N. An operation for spondylolisthesis. Lancet 1932; I:1233.
3. Mayo WJ. Commencement address. Rush Medical College, Chicago, 1910.