
revolutionized by the advent of successful arthroplasty techniques.
Because of this success, the role of the HTO has essentially been
downgraded to a temporizing procedure. The estimated duration of pain
relief and acceptable functional level after a HTO is on the order of 8
to 10 years. Most series report a greater than 50% conversion to knee
arthroplasty or loss of symptomatic relief beyond 10 years. Relatively
speaking, HTO is viewed as an optional delay before the more
“definitive” total knee arthroplasty. The major advantage of the HTO is
that, once healed, it allows for minimal restriction of activities
postoperatively. As with any surgery, however, the postoperative
outcome is strongly related to the preoperative severity of disease and
level of function. Properly selected, physiologically younger patients
should be allowed to return to vigorous activities, which would
otherwise be prohibited after knee replacement arthroplasty.
axis lateral to the midline of the knee joint to significantly reduce
excessive joint forces across the worn medial tibiofemoral joint space
and consequently retard the mechanical degenerative process. Long-term
clinical studies have shown that age, weight, and degree of correction
play a determinant role in the duration of pain relief and functional
autonomy.
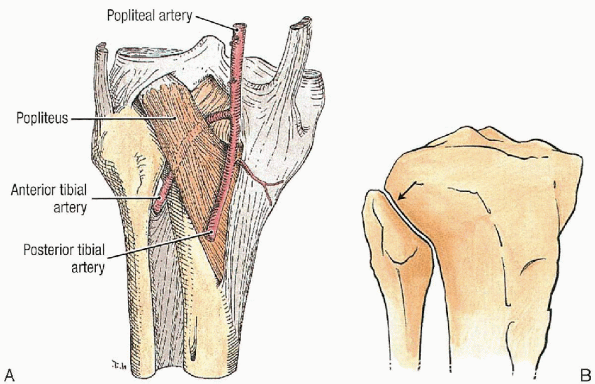
any periarticular surgery. In the case of a HTO, the surgeon must be
mindful of the arterial branching pattern in the posterior high tibial
area. The main arterial popliteal trunk divides at approximately the
level of the base of the fibular head into the anterior and posterior
arteries. The distal portion of the popliteal artery lies superficial
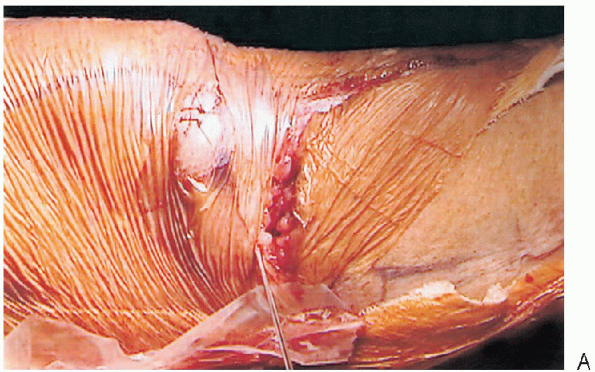
to the popliteus and deep to the gastrosoleus complex (Fig. 27-1A). Because
of their immediate proximity to the proximal tibia, the posterior
arteries are at risk of injury from blunt compression or sharp injury
during surgical exposure. With respect to the local nerve
anatomy, the structure at greatest risk is the common peroneal nerve as
it wraps posteroanteriorly, slightly lateral to the operated zone (Fig. 37-1B).
 |
|
FIGURE 27-1. A: Division of the popliteal artery. B: Anterolateral view of the proximal tibiofibular joint (arrow).
|
and must be well conceptualized in planning the closed wedge reduction
and osteoclysis of the medial tibial hinge. Failure to appreciate the
contours of the inverted metaphyseal flare may lead to incongruous
osteotomy surfaces or dangerously deep penetration with sharp
instruments (Fig. 27-1B). Iatrogenic fracture of the medial cortical periosteal hinge causes irreversible loss of intrinsic stability.
On the anterior aspect of the tibial metaphysis lies the tibial
tubercle with its sensitive patellar ligamentous insertion. Care must
be taken to avoid injury to this structure because its disruption leads
to disastrous mechanical consequences.
axial compression so as to warrant a shortening fibular osteotomy or
disruption of the proximal tibiofibular joint. Both of these procedures
have the potential for a local peroneal direct or indirect lesion.
popularized and defined in its modern form by M.B. Coventry. The
standard procedure consists of a laterally based, closing wedge
osteotomy proximal to the tibial tubercle. The method has since
undergone variations based on the instrumentation and fixation methods.
It remains, nonetheless, an established standard. In severe
corrections, it may yield a slight loss of length and potential joint
obliquity. An alternate technique, the semicircular (dome) osteotomy,
was subsequently developed and gained popularity abroad. Although it
offers theoretical advantages, it is technically more difficult,
because it requires a hemispherical supratubercular osteotomy.
advances in grafting methods, a pure opening wedge technique and a
hybrid (closing and opening) technique have gained popularity in
selected centers. The intended advantage of this method is the delivery
of bone augmentation and restitution of joint alignment. Its champions
also point to this being less invasive surgery on the safer, medial
aspect of the tibial metaphysis. The downside lies in the need for bone
augmentation, particularly autogenous harvesting with second-site
morbidity or allograft with potentially delayed osseointegration. The
use of either material source still requires rigid fixation and
weight-bearing protection postoperatively. My preferred method is the
classic closed wedge osteotomy. The rationale for this stems from its
established record and my personal experience.
 |
|
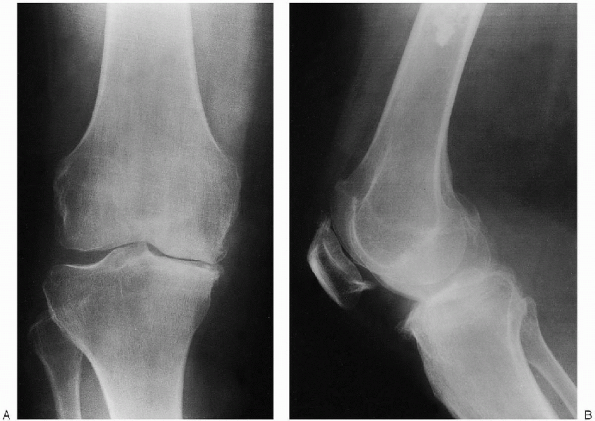
FIGURE 27-2. Preoperative weight-bearing radiographs demonstrate varus osteoarthritis: anteroposterior view (A) and lateral view (B).
|
-
Isolated monocompartmental medial tibiofemoral osteoarthritis (mechanical, degenerative, noninflammatory arthritis)
-
Physiologic age older than 65 years
-
Absence of morbid obesity
-
Minimum preoperative range of motion of 90 degrees of flexion
-
Extension deficit of less than 15 degrees
-
Passively correctable varus deformity of less than 15 degrees
-
Lateral tibial subluxation less than 10 mm
-
Absence of ligamentous instability
overstated in the case of upper tibial osteotomy. The exact angular
correction must be determined with the use of a long leg alignment film
series. The potential distortion attributable to fixed contractures must be eliminated through the use of weight-bearing views (Fig. 27-2). This
minimizes the risk of overcorrection if the joint space asymmetry is
amplified by spurious opening of the lateral space from a medial joint
contracture in an unloaded situation. The goal of the procedure
is to restore the valgus alignment of the leg. Numerous studies have
demonstrated that one of the most reliable prognostic factors is a
correction to a valgus alignment of at least 8 degrees of valgus. This
implies a transfer of the mechanical axis to a point within the
innermost portion of the lateral third of the joint line on the coronal
anteroposterior projection.
osteotomy. The point of reference remains the medial cortical hinge.
The proximal level is set at a level allowing for a safe thickness of
the proximal fragment to minimize the risk of iatrogenic fracture or
intraarticular penetration of the fixation hardware. Based on this
proximal reference, a triangular wedge is calculated to yield a
resultant tibiofemoral axis of at least 8 degrees. The lateral height
of the right-angle inverted triangle should not exceed 15 mm. Care must
also be given to properly measure the posterior slope of the tibial
joint line. Loss of flexion can result from inadvertent reduction of
the anatomic slope. After successful radiographic templating is
completed, many surgeons complete the preoperative planning by
fashioning a metallic triangular template of the appropriate dimension
for intraoperative assistance.
critical for the delineation and execution of the osteotomy. Rigid,
medium-gage Kirschner wires (K-wires) are used as guide wires. Most
commercially available HTO instrumentation sets include a cannulated
protractor. Alternatively, a precut, customized metallic wedge template
can be used for sizing the lateral height of the resected fragment. A
cannulated large fragment set and a specially contoured tibial
metaphyseal compression plate or blade plate are necessary for the
instrumentation and fixation of the closed osteotomy. This method of
fixation is more reliable than the traditional staples. The oscillating
saw should be fitted with a rigid, long, and narrow blade. This
minimizes the risk of inadvertent excursion into surrounding soft
tissues. The osteotomy margins may require final adjustments and
debridement of the medial hinge before the final closure and fixation.
This is best achieved with sharp osteotomes and fine curettes.
Intraoperative radiographs are preferable before closure.
Immobilization is usually provisional in the immediate postoperative
period and is best achieved through a wellmolded posterior long leg
splint or a bivalved long leg cast made of plaster of Paris.
After an adequate anesthesia level has been achieved, a tourniquet is
applied to the affected proximal thigh. Intravenous antibiotics are
then administered. A sandbag may be placed in order to assist in
positioning during the procedure. A simple urethral catheterization may
then be performed using standard protocol. The affected lower extremity
is then prepared and draped in a standard sterile fashion. The draping
should allow for a free extremity, i.e., full circumferential access
distal to the mid-thigh area. Based on the surgeon’s preference, the
leg may then be exsanguinated and the tourniquet pressure applied. If a
tourniquet is used, inflation should be performed with the knee in
flexion, so as to minimize quadriceps tethering.
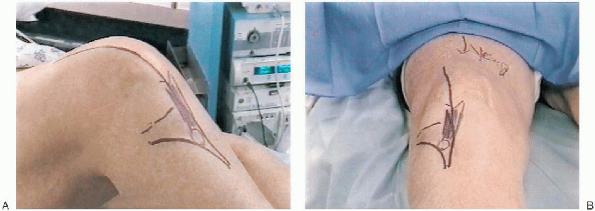
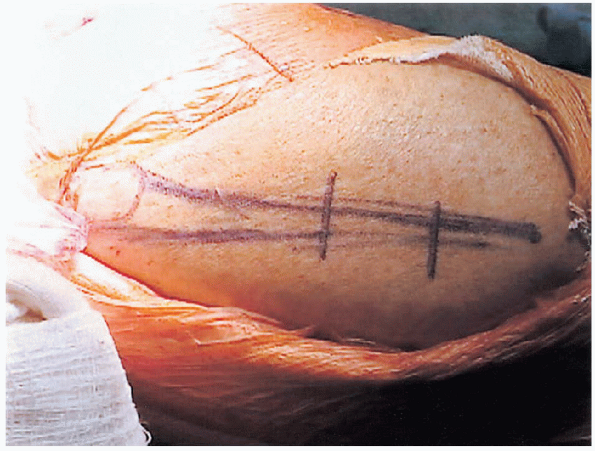
cutaneous and subcutaneous routes and extent. The classic incision is a
curved anterolateral incision. It originates at a point slightly distal
to Gerdy’s tubercle and tibial ridge to proceed first medially then
veers inferiorly in a gentle curve to a point lateral and distal to the
tibial tubercle. Due to the probable need for future conversion to a
total knee arthroplasty, an alternate incision route is now commonly
used, namely, the anterior midline approach (Fig. 27-3).
The rationale of this approach is to minimize the risk of skin necrosis
associated with intersecting scars at acute angles. The incision must
be of sufficient length to allow for a subcutaneous deep exposure of
the lateral tibial metaphysis up to Gerdy’s tubercle. This then ensures
proper visualization of the proximal insertion of the anterior lower
leg extensor muscles.
border of the extensor group is detached and reflected distally and
laterally by subperiosteal elevation. Once completed, the full lateral
anterior metaphyseal flare should be accessible for instrumentation.
Hemostasis of the deep layer is then performed. The approach is
subperiosteal, and no internervous planes are used. No major nerve or
vessels are at risk in this relatively shallow anterolateral approach.
The
surgical
structures at risk are the major popliteal vessels and the peroneal
nerve. The risk is incurred at the time of the osteotomy and closed
reduction.
 |
|
FIGURE 27-3. Surgical incision and landmarks: classic anterolateral incision (A) and anterior midline (B).
|
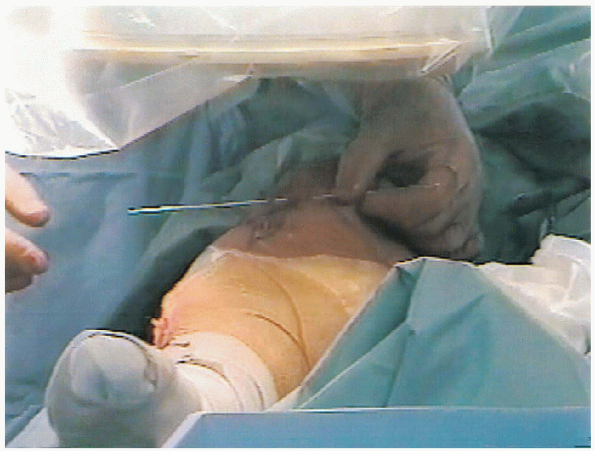
joint line in the coronal plane. This is done by laying a wire anterior
to the surface of the knee and is confirmed by fluoroscopy (Fig. 27-4).
The cutaneous landmarks are then marked with a surgical pen on the
anterior tibial surface. A second K-wire is subsequently dragged
distally in a parallel fashion so as to lie 5 to 10 mm below the margin
of the tibial plateaus. Cutaneous landmarks are again drawn. This level
represents the proximal fixation margin. Under fluoroscopic guidance, a
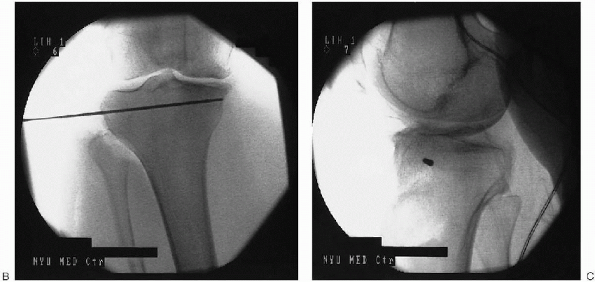
K-wire is inserted at the selected level, aiming medially from the
lateral side (Fig. 27-5). This wire serves as a
guide wire for the instrumentation of the proximal fragment. The
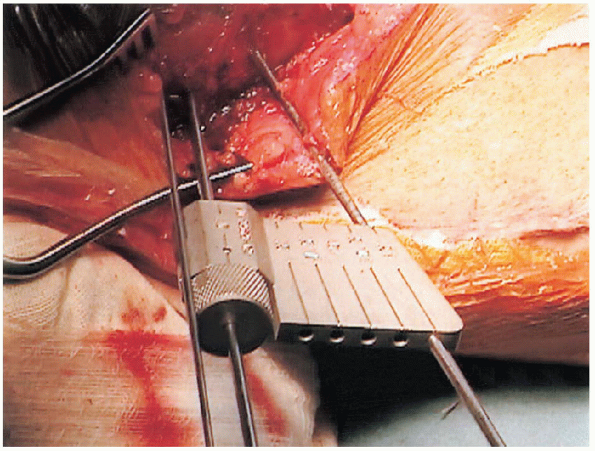
author’s preferred method is a cannulated blade plate (Fig. 27-6).
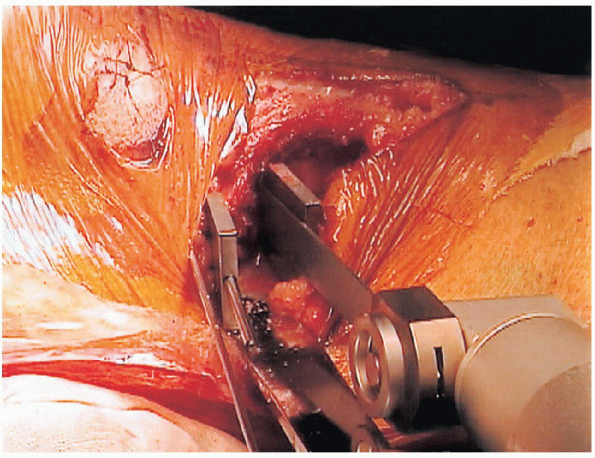
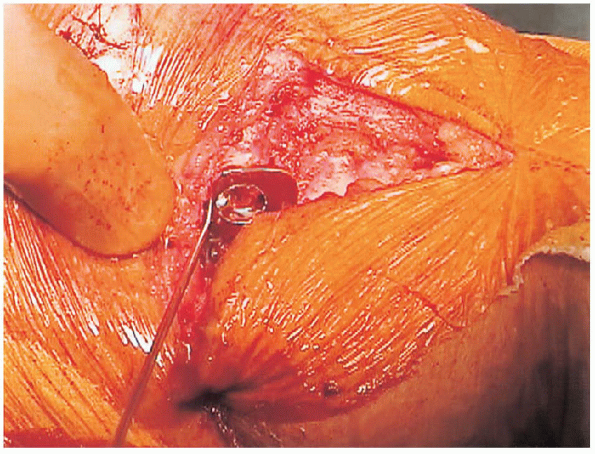
Instrumentation of the fixation blade slot is the next step. A third
level is then determined by again dragging a wire distally by a minimum
of 5 mm. This level represents the actual proximal osteotomy margin. Insufficient
thickness of the proximal tibial fragment may lead to intraarticular
fracture at the time of instrumentation or potential cutting out of the
proximal fixation hardware. Under fluoroscopic guidance, one or
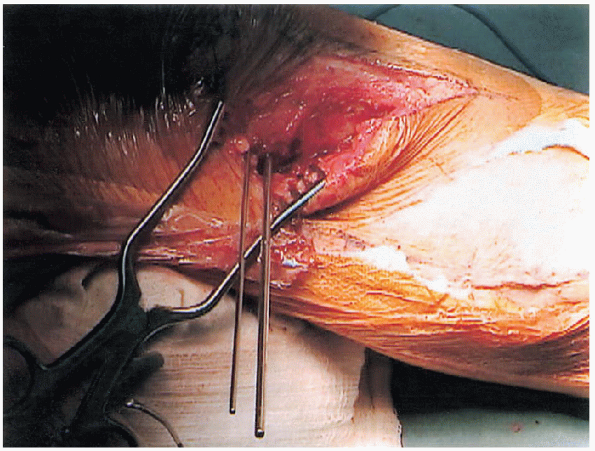
two parallel K-wires are then inserted at the selected lower level,
aiming medially from the lateral side (Fig. 27-7).
If two wires are used, their points of insertion correspond to the
anterior and posterior margins of the central third of the tibial
metaphysis in the sagittal plane. It is of great importance to respect
the slope of the tibial joint surface. Failure to do so may lead to
unacceptable recurvatum or flexion deformity. After successful
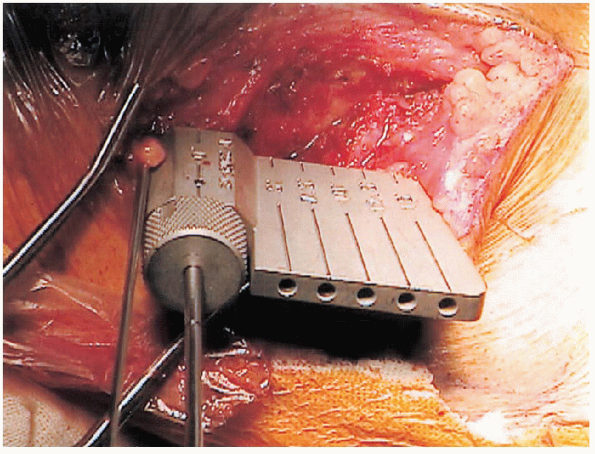
insertion of these wires, a cannulated protractor (Fig. 27-8)
is used to determine the position and angle of the inferior border of
the intended wedge. Alternatively, the lateral height of the
anticipated wedge can be measured based on a preoperative template. The maximal amount of resection
should generally be less than 15 mm. This
precaution minimizes the risk of lateral, peroneal nerve compression
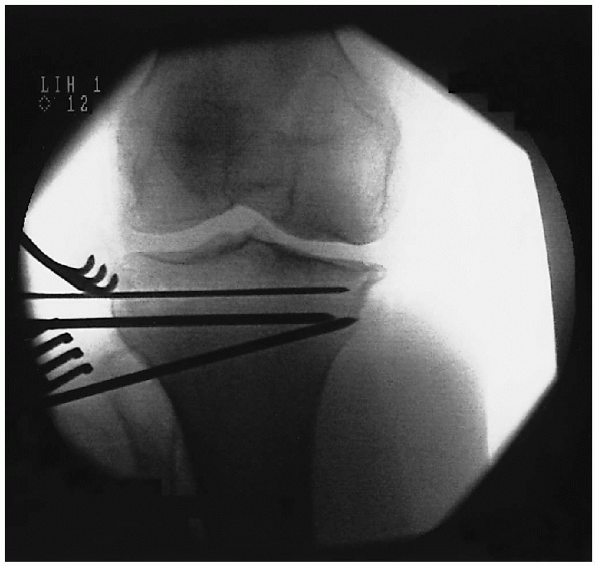
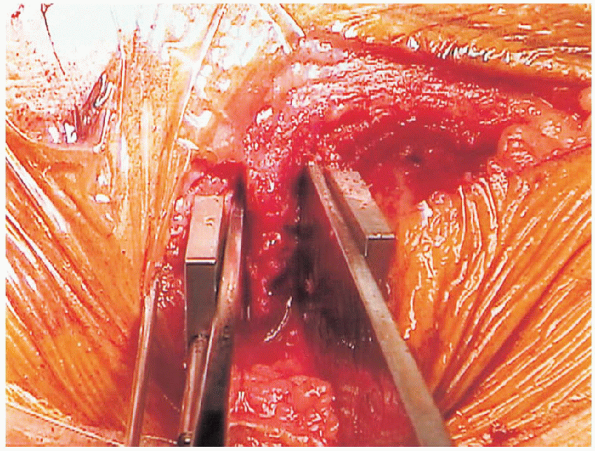
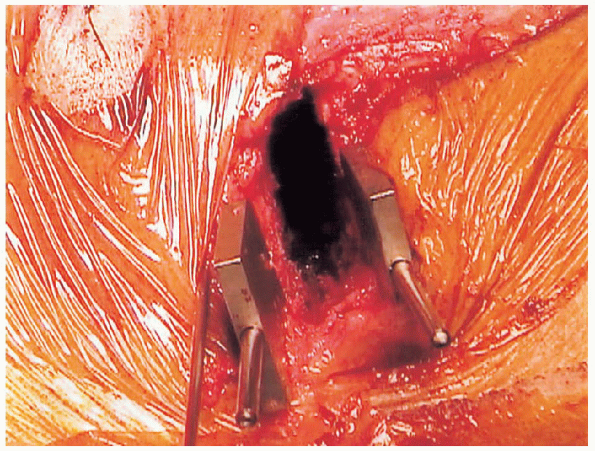
injury and overcorrection in valgus. After insertion of the inferior guide wire (Fig. 27-9), final fluoroscopic verification is made (Fig. 27-10). The wires should converge to a point immediately adjacent to the internal border of the medial cortex. Transection
of the cortical hinge has a potentially catastrophic effect on the
stability of the closed osteotomy and should be avoided at all cost by
careful positioning of the guide wires. Before the osteotomy,
release of the lateral column is necessary. Two methods are available:
resection of a small segment of the fibula, or a dissociation of the
proximal tibiofibular joint. The former method is the most widely used
option.
 |
|
FIGURE 27-4. Fluoroscopic determination of proximal fixation level.
|
 |
|
FIGURE 27-5. Position and insertion of proximal guide wire: clinical view (A), anteroposterior fluoroscopy. (continued)
|
 |
|
FIGURE 27-5. Continued. Anteroposterior fluoroscopy (B), and lateral fluoroscopy (C).
|
 |
|
FIGURE 27-6. Creation of proximal blade slot: clinical view (A) and fluoroscopy view (B).
|
 |
|
FIGURE 27-7. Insertion of proximal guide wires.
|
 |
|
FIGURE 27-8. Close-up view of a cannulated protractor.
|
 |
|
FIGURE 27-9. Insertion of a distal guide wire using a cannulated protractor.
|
 |
|
FIGURE 27-10. Fluoroscopic evaluation of proximal and distal guide wires.
|
 |
|
FIGURE 27-11. Incision for a proximal fibula-shortening osteotomy.
|
 |
|
FIGURE 27-12. Exposure for a segmental shortening osteotomy of a proximal fibula.
|
The incision measures approximately 6 cm and is centered on a point
corresponding to the junction of the proximal and central-third of the
fibula. Any resection limited to the proximal third incurs an
unacceptable risk of direct peroneal nerve injury. The subcutaneous
dissection is carried along the intercompartmental septum down to the
periosteum. Subperiosteal exposure of a 2.5-cm segment is then made.
Using proper soft tissue protection this segment is osteotomized
through parallel transverse osteotomies and then resected (Figs. 27-12 and 27-13).

Some surgeons have described an alternative method consisting of a
beveled oblique osteotomy without bone resection. This method carries a
theoretical risk of local tissue excessive compression and injury.
The position of the oscillating saw is confirmed by fluoroscopy in both
planes. The saw-blade is guided by the inferior margin of the inserted
K-wires. The osteotomy stops short of perforating the medial cortex.
|
FIGURE 27-13. Excision of a segment during a shortening osteotomy of a proximal fibula.
|
 |
|
FIGURE 27-14. Distal osteotomy of a proximal tibia.
|
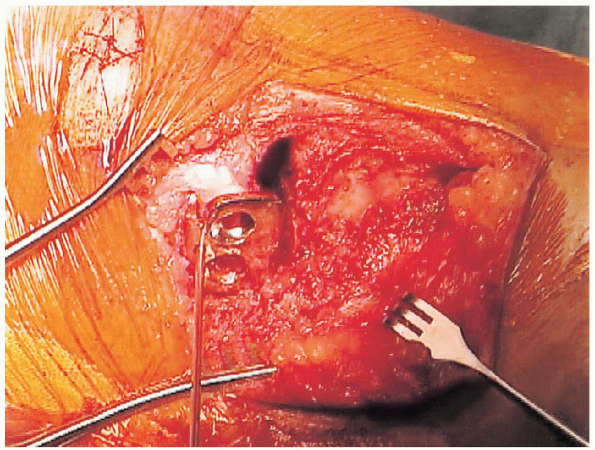
completion of the proximal osteotomy, the position is confirmed by
fluoroscopy. The distal angulated osteotomy is then made in the same
anteroposterior plane. The blade uses the superior portion of the
inclined wire as a guide. As discussed above, it is of paramount
importance to avoid transgression of the medial cortex. After
completion of the second cut, the wedge fragment is extracted. An
osteotome and fine curettes are routinely used to refine the deep
portion of the osteotomy (Figs. 27-14, 27-15 and 27-16).
The wedge osteotomy is then closed under vigilant fluoroscopic visualization (Fig. 27-17)After closure of the wedge, the new lateral metaphyseal contour may
require trimming and smoothening to facilitate insertion of the
fixation hardware.
means of external cast immobilization. This technique offers the
advantage of postoperative adjustment but the disadvantage associated
with cast immobilization. External fixation
by
special fixators such as the Ilizarov apparatus have also been
described. Olive wires carry, however, a higher risk of nerve and soft
tissue complications.
 |
|
FIGURE 27-15. Completion of a proximal tibial osteotomy with an osteotome.
|
 |
|
FIGURE 27-16. Completed wedge resection before closed reduction.
|
 |
|
FIGURE 27-17. Completed reduction.
|
 |
|
FIGURE 27-18. Completed osteotomy before closed reduction.
|
 |
|
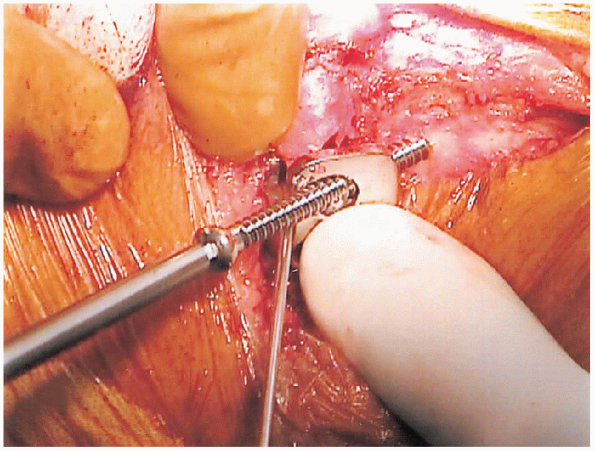
FIGURE 27-19. Screw fixation of a distal fragment.
|
Final fluoroscopic verification is important to allow for any screw length adjustment (Fig. 27-20).After fixation has been accepted, closure is initiated over a deep
drain. The deep layers are closed with resorbable multifilament braided
interrupted sutures. The skin and subcutaneous tissues are closed
according to the surgeon’s preference. A final examination of the
angular correction is then made before the application of a sterile
dressing.
Final radiographs are then obtained. A provisional cast splint is
recommended to allow coronal plane stabilization. In the event of a
medial cortical transsection and displacement with failure of the
medial hinge, a full circumferential cast is fashioned with provisional
bivalve division to allow for postoperative swelling.
bleeding. It typically can be removed on the first postoperative day.
The use of a hinged long leg brace is preferred to ensure proper
healing and avoid accidental displacement. The selected brace should
include a double upright hinge system with customized valgus alignment.
The range of motion need not be restricted if stable fixation was
achieved.
stability of the completed fixation. In uncertain cases, the initial
loading should be limited to weight of the leg with a gradual increase
over a 6-week period. The use of an assistive device is strongly
recommended in the initial postoperative period.
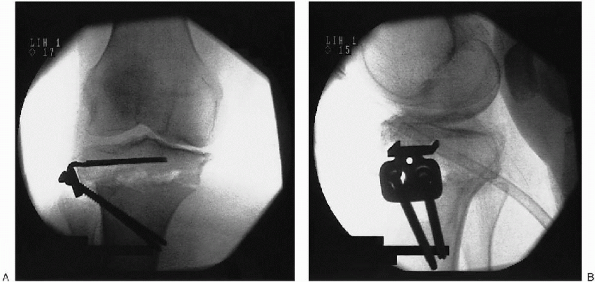 |
|
FIGURE 27-20. Postoperative anteroposterior (A) and lateral (B) fluoroscopy of a completed high tibial osteotomy.
|
unloaded heel slide exercises. Loaded open chain knee exercises are to
be avoided. Isometric strengthening program is favored until osseous
consolidation has been confirmed.
an incomplete proximal osteotomy, an undesired fracture may be
sustained at the time of the controlled osteoclysis of the medial
cortex (closing of the wedge). Ideally, the medial cortex should retain
an intact periosteal hinge to avoid destabilization. If the hinge is
disrupted but undisplaced, protective bracing may be sufficient.
However, in cases of associated translation and unacceptable shifting
of the proximal fragment further internal fixation is recommended.
transgression of the lowest plateau. This complication definitely
requires an open arthrotomy with restoration of the articular surface
and subchondral internal fixation.
columnar (fibular) release, a nerve palsy may ensue. This lesion, if
unrecognized immediately postoperatively, may lead to a complete loss
of peroneal innervation. If recognized early, surgical intervention may
be indicated to allow for nerve exploration and possible decompression
neurolysis. Any residual deficit is treated supportively with an ankle
foot orthosis (AFO) and follow-up electromyographic testing at 6 weeks.
above, the postoperative period naturally also entails continued
vigilance and treatment of standard complications. These include
bleeding, superficial nerve lesions, infection, thromboembolic events,
among others.
first three to five days to control for any potential complication. If
discharge took place within days, a wound check is recommended at the 7
to 10 day mark. Routine verbal contact with the physiotherapist or
rehabilitation specialist is favored until the next office visit. This
typically takes place 4 to 6 weeks after surgery. A radiograph is done
at that time to ensure early consolidation and absence of displacement
or collapse of the osteotomy. Outpatient therapy is subsequently
prescribed with gradual weight bearing and resistance for the next 6
weeks. At this 3-month visit, the patient should have regained
autonomous, unassisted ambulation. Further follow-up visits are then
scheduled on a 3-month interval basis until 1 year postoperatively and
on a yearly basis thereafter.
High tibial osteotomy: use of an osteotomy jig, rigid fixation, and
early motion versus conventional surgical technique and cast
immobilization. Clin Orthop 1991;271:212-217.