
Authors: Koval, Kenneth J.; Zuckerman, Joseph D.
Title: Handbook of Fractures, 3rd Edition
Copyright ©2006 Lippincott Williams & Wilkins
> Table of Contents > I – General Considerations > 1 – Closed Reduction, Casting, and Traction
1
Closed Reduction, Casting, and Traction
PRINCIPLES OF CLOSED REDUCTION
-
Displaced fractures, including those that
will undergo internal fixation, should be reduced to minimize soft
tissue complications. -
Splints should respect the soft tissues.
-
Pad all bony prominences.
-
Allow for postinjury swelling.
-
-
Adequate analgesia and muscle relaxation are critical for success.
-
Fractures are reduced using axial traction and reversal of the mechanism of injury.
-
One should attempt to correct or restore length, rotation, and angulation.
-
Reduction maneuvers are often specific for a particular location.
-
One should immobilize the joint above and below the injury.
-
Three-point contact and stabilization are necessary to maintain most closed reductions.
COMMON SPLINTING TECHNIQUES
-
“Bulky” Jones
-
Lower extremity splint, commonly applied
for foot and ankle fractures, that uses fluffy cotton or abundant cast
padding to help with postinjury swelling. The splint is applied using a
posterior slab and a U-shaped slab applied from medial to lateral
around the malleoli.
-
-
Sugartong splint
-
Upper extremity splint for distal forearm
fractures that uses a U-shaped slab applied to the volar and dorsal
aspects of the forearm encircling the elbow (Fig. 1.1).
-
-
Coaptation splint
-
Upper extremity splint for humerus
fractures that uses a U-shaped slab applied to the medal and lateral
aspects of the arm, encircling the elbow, and overlapping the shoulder.
-
-
Ulnar gutter splint
-
Volar/dorsal hand splint
-
Thumb spica splint
-
Posterior slab (ankle) with or without a U-shaped splint
-
Posterior slab (thigh)
Visit the University of Ottawa web site for general casting techniques and specifics on placing specific splints and casts: http://www.med.uottawa.ca/procedures/cast/
CASTING
-
The goal is semirigid immobilization with avoidance of pressure or skin complications.
-
It is often a poor choice in the treatment of acute fractures owing to swelling and soft tissue complications.
 Figure
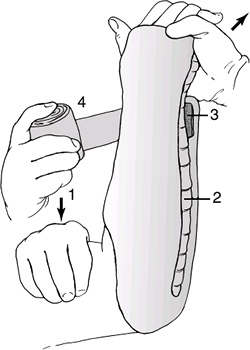
1.1. A sugar-tong plaster splint is wrapped around the elbow and
forearm and is held using a circumferential gauze bandage. It should
extend from the dorsal surface of the metacarpophalangeal joints to the
volar surface of the fracture site(From Bucholz RW, Heckman JD, Court-Brown C, eds. Rockwood and Green’s Fractures in Adults, 6th ed. Philadelphia: Lippincott Williams & Wilkins, 2006.)-
Padding: This is placed from distal to
proximal with a 50% overlap, a minimum two layers, and extra padding at
the fibular head, malleoli, patella, and olecranon. -
Plaster: Cold water will maximize the molding time.
-
6-inch width for thigh
-
4- to 6-inch width for leg
-
4- to 6-inch width for arm
-
2- to 4-inch width for forearm
-
-
Fiberglass
-
This is more difficult to mold but more resistant to water and use breakdown.
-
Generally, it is two to three times stronger for any given thickness.
-
-
P.4
Visit the University of Ottawa web site for general casting techniques and specifics on placing specific splints and casts: http://www.med.uottawa.ca/procedures/cast/
Below Knee Cast (Short Leg Cast)
-
This should support the metatarsal heads.
-
The ankle should be placed in neutral; apply with the knee in flexion.
-
Ensure freedom of the toes.
-
Build up the heel for walking casts.
-
Fiberglass is preferred for durability.
-
-
Pad the fibula head and the plantar aspect of the foot.
P.5
Above Knee Cast (Long Leg Cast)
-
Apply below the knee first.
-
Maintain knee flexion at 5 to 20 degrees.
-
Mold the supracondylar femur for improved rotational stability.
-
Apply extra padding anterior to the patella.
Short and Long Arm Casts
-
The metacarpophalangeal (MCP) joints should be free.
-
Do not go past the proximal palmar crease.
-
-
The thumb should be free to the base of the metacarpal; opposition to the fifth digit should be unobstructed.
-
Even pressure should be applied to achieve the best mold.
-
Avoid molding with anything but the heels of the palm, to avoid pressure points.
COMPLICATIONS OF CASTS AND SPLINTS
-
Loss of reduction
-
Pressure necrosis, as early as 2 hours after cast/splint application
-
Tight cast or compartment syndrome
-
Univalving: 30% pressure drop
-
Bivalving: 60% pressure drop
-
Cutting of cast padding to further reduce pressure
-
-
Thermal injury
-
Avoid plaster thicker than 10 ply
-
Avoid water hotter than 24°C
-
Unusual with fiberglass
-
-
Cuts and burns during cast removal
-
Thrombophlebitis or pulmonary embolus: increased with lower extremity fracture and immobilization but prophylaxis debated
-
Joint stiffness: joints should be left
free when possible (i.e., thumb MCP for short arm cast) and placed in
position of function when not possible to leave free
POSITIONS OF FUNCTION
-
Ankle: neutral dorsiflexion (no equinus)
-
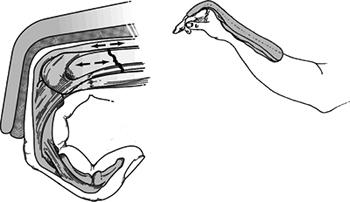
Hand: MCP flexed (70 to 90 degrees), interphalangeal joints in extension (also called the intrinsic plus position) (Fig. 1.2)
TRACTION
-
This allows constant controlled force for
initial stabilization of long bone fractures and aids in reduction
during operative procedures. -
The option for skeletal versus skin traction is case dependent.
Skin Traction
-
Limited force can be applied, generally not to exceed 10 lb.
-
This can cause soft tissue problems, especially in elderly patients or those with or rheumatoid-type skin.
-
It is not as powerful when used during operative procedures for both length and rotational control.
-
Bucks traction uses a soft dressing around the calf and foot attached to a weight off the foot of the bed.
![]() Figure 1.2. Position of function for the MCP joint.
Figure 1.2. Position of function for the MCP joint.-
This is an on option to provide temporary comfort in hip fractures.
-
A maximum of 10 lb of traction should be used.
-
Watch closely for skin problems, especially in elderly or rheumatoid patients.
-
P.6
Skeletal Traction (Fig. 1.3)
-
This is more powerful, with greater fragment control, than skin traction.
-
It permits pull up to 20% of body weight for the lower extremity.
-
It requires local anesthesia for pin insertion if the patient is awake.
-
The anesthesia should be infiltrated down to the sensitive periosteum.
-
-
It is the preferred method of temporizing
long bone, pelvic, and acetabular fractures until operative treatment
can be performed. -
Choice of thin wire versus Steinmann pin
-
Thin wire is more difficult to insert with a hand drill and requires a tension traction bow.
-
The Steinmann pin may be either smooth or threaded.
-
A smooth pin is stronger but it can slide through the skin.
-
A threaded pin is weaker and bends more
easily with increasing weights, but it will not slide and will advance
more easily during insertion. -
In general, the largest pin available is chosen, especially if a threaded pin is selected.
-
-
Tibial Skeletal Traction
-
The pin is placed 2 cm posterior and 1 cm distal to the tibial tubercle.
-
It may go more distal in osteopenic bone.
-
-
The pin is placed from lateral to medial to direct the pin away from the common peroneal nerve.
 Figure
1.3. Skeletal traction sites. Various sites for skeletal traction are
available. The techniques range from traction in the olecranon to skull
traction, as illustrated here.(Modified from Connolly J. Fractures and Dislocations: Closed Management. Philadelphia: WB Saunders, 1995.) -
The skin is released at the pins’ entrance and exit points.
-
One should try to stay out of the anterior compartment.
-
One should use a hemostat to push the muscle posteriorly.
-
-
A sterile dressing is applied next to the skin.
P.7
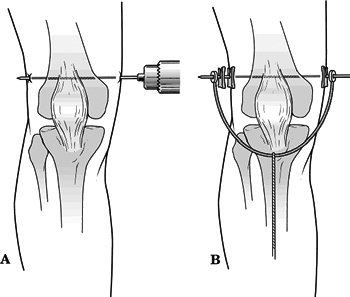
Femoral Skeletal Traction (Fig. 1.4)
-
This is the method of choice for acetabular and proximal femur fractures (especially in ligamentously injured knees).
-
The pin is placed from medial to lateral
(directed away from the neurovascular bundle) at the adductor tubercle,
slightly proximal to the femoral epicondyle.-
The location of this pin can be determined from the AP knee radiograph using the patella as a landmark.
-
-
One should spread through the soft tissue to bone to avoid injury to the superficial femoral artery.
P.8
Balanced Skeletal Traction
-
This allows for suspension of the leg with longitudinal traction.
-
It requires an overhead trapeze, a traction cord, and pulleys.
-
It is often helpful in the initial stabilization of femur fractures.
 |
|
Figure
1.4. (A) Technique of inserting skeletal pins for femoral traction. A skeletal traction pin is inserted in the distal femur from medial to the lateral. Local anesthetic is infiltrated down to the periosteum, and care is taken to avoid the neurovascular structures in the posteromedial aspect of the knee. A hand drill is used to insert the 3-mm Steinmann pin, and care is taken to avoid pinching of the skin, which can be painful. (B) The pin is padded, and a traction bow is attached. (Modified from Connolly J. Fractures and Dislocations: Closed Management. Philadelphia: WB Saunders, 1995.)
|
Calcaneal Skeletal Traction
-
This is most commonly used with a
spanning external fixation for “traveling traction,” or it may be used
with a Bohler-Braun frame. -
The pin is placed from medial to lateral,
directed away from the neurovascular bundle, 2 to 2.5 cm posterior and
inferior to the medial malleolus.
Olecranon Traction
-
This is rarely used today.
-
A small to medium-sized pin is placed
from medial to lateral in the proximal olecranon; the bone is entered
1.5 cm from the tip of the olecranon. -
The forearm and wrist are supported with skin traction with the elbow at 90 degrees of flexion.
Gardner Wells Tongs
Halo
-
Indicated for certain cervical spine fractures as definitive treatment or supplementary protection to internal fixation.
-
Disadvantages
-
Pin problems
-
Respiratory compromise
-
-
Technique
-
Positioning of patient to maintain spine precautions
-
Fitting of halo ring
-
Preparation of pin sites
-
Anterior: above the eyebrow, avoiding the supraorbital artery, nerve, and sinus
-
Posterior: superior and posterior to the ear
-
-
Tightening of pins to 6 to 8 ft-lb
-
Retightening if loose
-
Pins only once at 24 hours after insertion
-
Frame as needed
-
-