
Editors: Chapman, Michael W.
Title: Chapman’s Orthopaedic Surgery, 3rd Edition
Copyright ©2001 Lippincott Williams & Wilkins
> Table of Contents > SECTION IV – SPORTS MEDICINE > Shoulder > CHAPTER 77 – SHOULDER ARTHROSCOPY
CHAPTER 77
SHOULDER ARTHROSCOPY
John P. Meehan
J. P. Meehan: Department of Orthopaedic Surgery, University of California, Davis, Medical Center, Sacramento, California, 95817.
HISTORY
Shoulder arthroscopy as a diagnostic and therapeutic
modality continues to evolve as our understanding of the anatomy and
pathophysiology of the disease processes, as well as new technologies,
allow us to treat a broader variety of shoulder ailments. Although
there are reports in the literature regarding the use of the
arthroscope in the 1930s and 1940s, it was Watanabe’s work in the 1950s
in developing more practical arthroscopic instrumentation that
ultimately led to the development of routine knee arthroscopy in the
1970s (4). The routine use of the arthroscope
in the shoulder lagged behind its use in the knee, but by the early
1980s its benefits as a less invasive surgery for the shoulder were
clearly established. It was during the late 1970s and early 1980s that
shoulder arthroscopy expanded its applications from that of diagnosis
to that of treatment (2). Many procedures such
as subacromial decompression, distal clavicle excision, and instability
and rotator cuff repairs, which previously required open surgical
incisions, could now be treated effectively with the use of shoulder
arthroscopy.
EQUIPMENT
The operating room should be equipped with a standard
operating room table that allows adjustments for height;
flexion/extension of the head, torso, and legs; and tilt in the long
and short planes of the table. Typically, the video monitor, recorder,
and printer are stored in a cabinet that allows easy viewing by all
operating room personnel.
operating room table that allows adjustments for height;
flexion/extension of the head, torso, and legs; and tilt in the long
and short planes of the table. Typically, the video monitor, recorder,
and printer are stored in a cabinet that allows easy viewing by all
operating room personnel.
Shoulder arthroscopy is aided by continuous distention
with a fluid medium. Normal saline is the fluid most commonly used, as
it has demonstrated no harmful effects on articular cartilage or from
systemic absorption. Both static (i.e., gravity-assisted) and
arthroscopic pump systems are available and can be used according to
the surgeon’s preference (3).
The effectiveness of shoulder arthroscopy is augmented
by the large variety of mechanical instrumentation available today.
Mechanical shavers, burrs, and resectors can all assist the surgeon in
treating the intraarticular as well as extraarticular conditions. The
ability to use electrocoagulation and cautery in a fluid medium was an
important advance for shoulder arthroscopy. While capillary oozing is
readily controlled by the hemostatic pressure within the glenohumeral
joint from either a pump or gravity system, the surgical electrode is
extremely valuable for procedures within the subacromial space, where
excessive bleeding from the coracoacromial artery is sometimes
encountered.
P.2080
A plethora of hand instruments, similar to the hand
instruments in knee arthroscopy, have also been developed for the
shoulder. Basket forceps, grasping forceps, curets, and probes are but
a few of those available.
instruments in knee arthroscopy, have also been developed for the
shoulder. Basket forceps, grasping forceps, curets, and probes are but
a few of those available.
POSITION
The two common positions for shoulder arthroscopy are
the lateral decubitus position and the beach-chair position. Each
position has advantages and disadvantages, and most surgeons choose the
one they are most comfortable with, which is frequently the one they
trained with. Proponents of the lateral position feel the continuous
traction allows easier glenohumeral and subacromial arthroscopy.
Proponents of the beach-chair position argue that it is more convenient
for regional anesthesia and when converting to open procedures. I
prefer the lateral decubitus position for most shoulder cases but
occasionally utilize a beach-chair position if the possibility of an
open capsular repair exists. The alternative is to reprep and redrape
after the arthroscopy is performed in the lateral position.
-
For the lateral decubitus position, place
the patient on a standard operating table that is equipped with a bean
bag. Kidney rests, adhesive tape, and thorax-positioning devices can be
utilized to further stabilize patients after they are turned onto their
side and after placing a padded roll to protect the neurovascular
structures of the axilla. -
Flex the down-side leg at the hip and the
knee, and tape over the pelvis, securing it to the operating room table
to further stabilize the patient. Place a pillow between the legs.
Protect the peroneal nerve and malleoli of the down-side leg. Flex the
dependent arm forward. -
Flex the elbow, supporting it on a padded
arm board. Support the cervical spine to prevent hyperextension that
might cause a cervicobrachial radiculopathy. Tilt the torso 30°
posteriorly to bring the glenohumeral joint horizontal with the floor. -
Place a plastic adhesive U-drape
proximally, from a line just medial to the vertebral border of the
scapula posteriorly, over the medial third of the clavicle superiorly
and medial to the coracoid process anteriorly. Then place another
smaller plastic adhesive drape across the ends of the U-drape at the
mid-thorax level. -
Traction may be applied to the arm with
various commercial devices. Secure the traction apparatus to the
operating table in a position that allows abduction and forward
flexion. Then various forms of skin traction can be applied to the
forearm and hand. I prefer to wrap the hand and forearm with cotton
cast padding (Webril), followed by reusable adhesive strips on the
volar and dorsal forearm, with a loop around the hand to allow
subsequent placement of a Z-hook and an S-hook, which can be attached
to the traction apparatus. -
Secure the adhesive strips with elastic
adhesive wrap (Coban) around the forearm. Place the remaining roll of
Webril in the patient’s palm to support the fingers. Do not exceed
10–15 lbs longitudinal traction, and adjust the traction weight
downward depending on the individual patient. I most commonly use 7½
lbs.
The position of the arm varies slightly from surgeon to
surgeon when the patient is in the lateral decubitus position, but it
generally ranges from 20° to 70° of abduction and from 10° to 20° of
forward flexion. In addition, a stack of towels or an assistant’s hand
can help provide a perpendicular translation force when placed between
the chest wall and the proximal humerus.
While many surgeons feel the lateral position allows for
easier diagnostic and arthroscopic procedures, many feel it is more
difficult when converting to open procedures, especially open anterior
capsular shifts and large rotator cuff tears. These surgeons employ a
beach-chair position if conversion to an open procedure is anticipated.
I have found that a capsular shift procedure can be performed without a
reprep and redrape if the bean bag is deflated, the patient is allowed
to fall back to a semisupine position, and the arm is rewrapped with a
sterile cover. Only rarely is a complete reprep and redrape required.
In addition, most open rotator cuff repairs can be performed simply by
releasing traction, covering the hand and forearm with a sterile wrap,
and either keeping the patient in the lateral position or deflating the
bean bag and allowing her to fall back to a semisupine position.
PORTALS
A variety of portals have been described for accessing
the glenohumeral joint, the subacromial space, and the
acromioclavicular (AC) joint.
the glenohumeral joint, the subacromial space, and the
acromioclavicular (AC) joint.
Glenohumeral Joint
For the glenohumeral joint, two portals are commonly
used: a posterior portal and an anterior portal. Multiple variations of
the anterior portal have been described.
used: a posterior portal and an anterior portal. Multiple variations of
the anterior portal have been described.
-
Before making skin incisions, be sure to
outline the anatomic landmarks. Begin with the posterior angle of the
acromion, which is subcutaneous and can be easily palpated in most
patients. From this point, draw a line along the posterior acromion
extending medially for a short distance, and anteriorly for a short
distance along the lateral edge of the acromion. The angle formed is
usually slightly obtuse rather than 90°. -
Identify the supraclavicular fossa by
placing a thumb in the quadrangular space formed by the clavicle
anteriorly, and the acromion laterally and posterolaterally. -
Place a circle over the coracoid process anteriorly, and draw in the coracoacromial ligament.
-
Finally, estimate the position of the AC joint, which can be difficult in patients with arthritic changes (Fig. 77.1).
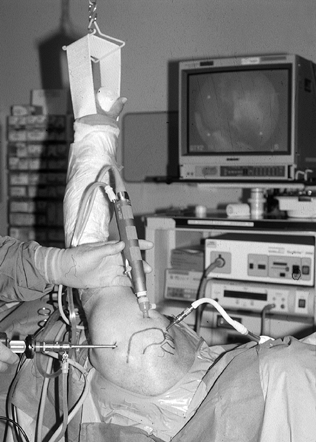 Figure 77.1. Setup for glenohumeral portal.
 -
The entry portal is posterior, which
provides adequate visualization of the glenohumeral joint and also
allows placement of the other portals under direct arthroscopic
visualization. Place the posterior portal in what has been described as
the soft spot, or the posterior glenohumeral joint line, which
typically is 2 cm inferior and 1 cm medial to the posterolateral corner
of the acromion. Locate the soft spot by grabbing the humeral head with
your hand, using the thumb to palpate the posterior glenohumeral joint
line and the long finger to palpate the anterior glenohumeral joint
line. Typically, one can translate the humeral head back and forth to
confirm the position of the joint line. -
Make a 3–5 mm incision along Langer’s
lines through skin and subcutaneous tissues, being careful not to
penetrate the deltoid muscle. With a blunt trocar in the arthroscopic
cannula, advance in the direction of the coracoid through the deltoid
muscle, through the infraspinatous and teres minor interval, to the
posterior joint line. The blunt tip of the trocar can be used to
palpate the curve of the humeral head and the stepoff of the posterior
glenoid, and the interval of the joint line in between. -
The joint capsule will be soft with some
elasticity, as opposed to the hard surfaces of the humeral head and the
glenoid. With the nondominant hand around the cannula at skin level,
use your dominant hand to advance the trocar through the capsule, which
will be accompanied by a slight pop. Use the nondominant hand to
prevent overpenetration, and also for more precise control of the
trocar as it enters the joint. Some surgeons prefer to use a spinal
needle first to access the joint. They can then confirm intraarticular
placement of the needle by injecting 30–40 ml of saline through a
syringe, and noting the resistance to injection and backflow from the
needle after removal of the syringe. In the intact joint, the
resistance slowly increases as fluid is injected, and the syringe can
be removed after 15–20 ml have been inserted. -
After entering the joint, perform a
diagnostic arthroscopy. Some surgeons create an anterior portal at this
point to create an outflow and to allow the insertion of
instrumentation to assist with the diagnostic portion of the procedure.
As the ability to perform more procedures with the
arthroscope increased, so did the number of anterior portals described
by various authors. The most frequently used anterior portal allows
anterior instrumentation and visualization of the posterior portion of
the joint. There are multiple techniques for creating this anterior
portal. Most are performed under direct arthroscopic visualization with
either an outside-in or an inside-out technique. While viewing with the
arthroscope from the posterior portal, the interval in which the
anterior portal will be established is a triangle formed by the long
head of the biceps, the superior border of the subscapularis tendon,
and the glenoid (3).
An outside-in technique frequently used is to make a
skin incision directly in line with the arthroscope, which, if it is
looking at the interval above, will be just lateral and slightly
superior to the tip of the coracoid process. Some surgeons use a spinal
needle to enter the joint prior to making the skin incision. An
incision should never be made inferior or medial to the tip of the
coracoid as this could potentially injure the neurovascular structures
in the axillary sheath (4).
-
At this point, shift your view to the
video camera screen, which is still looking at the triangle formed by
the superior border of the subscapularis tendon, the long head of the
biceps tendon, and the glenoid. -
Advance the plastic cannula slightly to
see an indentation of the anterior capsule in or near the superior
aspect of the triangle above and make minute adjustments in the
position or angle of the plastic cannula before advancing it under
direct visualization into the joint. Alternatively, use an inside-out
technique with the arthroscope and a Wissinger rod. -
Advance the arthroscope into the superior
aspect of the previously mentioned triangle, and maintain the cannula
in this position. -
Remove the scope from the cannula and
place a Wissinger rod through the cannula, the joint, and the anterior
deltoid; tent the skin. Now make the skin incision, and further advance
the rod. Place the plastic cannula over the Wissinger rod and
retrograde it into the joint. Remove the Wissinger rod and reintroduce
the arthroscope to the posterior portal.
A third portal described for the glenohumeral joint is
the superior portal. This portal is used must less frequently than the
anterior and posterior portals. It is created in the supraclavicular
fossa, bounded by the distal clavicle and the AC joint anteriorly, the
acromion laterally, and the base of the spine of the scapula
posteriorly (4). This portal can be used for
inflow, as well as to view the posterior glenoid labrum, the posterior
portion of the humeral head, and, with a limited view, the rotator
cuff. It is a relatively safe portal; the only structure at risk is the
suprascapular nerve, which is about 3 cm inferior to the intended
course of the instrumentation.
-
Palpate the skin approximately 1 cm
medial to the acromion in the soft spot of the supraclavicular fossa.
Then introduce a spinal needle at an angle of 40°, aiming slightly
lateral and posterior, with the intention of entering the joint
posterior to the attachment of the long head of the biceps and above
the posterior superior glenoid rim. -
Make a small skin incision and pass a
blunt trocar through the trapezius, the muscular portion of the
supraspinatus, and the superior joint capsule into the glenohumeral
joint. -
With the posterior portal, the nerves at
risk for injury are the suprascapular nerve medially and the axillary
nerve inferiorly. The suprascapular nerve lies approximately 2 cm
medial to the posterolateral glenoid, travelling in the spinoglenoid
notch. The axillary nerve travels through the quadrangular space at the
inferior border of the teres minor, which is approximately 2–4 cm
inferior to the portal placement as described. -
With the classic anterior portal, as long
as you stay lateral to the coracoid process, the chances of a severe
neurovascular injury are minimized. The cephalic vein is located
anterior and lateral to the anterolateral acromion and is rarely
injured with these techniques.
Subacromial Space
The lateral and subacromial portals allow examination of
the superior surface of the rotator cuff, the undersurface of the
acromion (particularly the anterior inferior surface), and the
coracoacromial ligament, and they allow access to the AC joint.
the superior surface of the rotator cuff, the undersurface of the
acromion (particularly the anterior inferior surface), and the
coracoacromial ligament, and they allow access to the AC joint.
Multiple portals have been described for approaching the
subacromial space from the lateral aspect of the shoulder. They can
range anywhere from the anterior edge to the posterior edge, but they
all must be at least 2 cm lateral to the lateral edge of the acromion
to allow access to its entire undersurface. They should not be more
than 3 cm from the lateral edge of the acromion, as the risk of
injuring the axillary nerve increases. Anterolateral, mid-lateral, and
posterolateral portals can be used, depending on whether you need
access to the AC joint (anterolateral) for distal clavicle excisions
and subacromial decompressions, or the superior surface of the rotator
cuff (mid-lateral) for rotator cuff repairs, or even accessory portals
(posterolateral) if additional outflow is needed.
-
To introduce a blunt trocar and scope
cannula into the subacromial space, use the skin incision and the
deltoid perforation from the primary posterior portal as described for
the glenohumeral arthroscopy. Aim the scope cannula and blunt trocar
slightly superior and toward the central aspect of the undersurface of
the acromion. -
Use the blunt trocar to palpate the
undersurface of the acromion, and distend the space with fluid through
the cannula. Alternatively, using a syringe, inject 30 cc from a
lateral approach prior to advancing the scope cannula. Fluid egress
when the blunt trocar is removed provides confirmation. -
Under direct visualization, establish a
lateral portal with a 5.5 mm plastic cannula through which
instrumentation can be passed. -
Not uncommonly, the subacromial space is
severely scarred and inflamed so that visualization is obscured. When
this occurs, place a shaver or synovial resector through the lateral
portal, with its teeth facing upward against bone, and begin shaving
with an anterior to posterior sweeping motion until landmarks come into
view. Similarly, the hypertrophied bursal tissue can be removed from
the superior surface of the rotator cuff with gentle sweeping motions
in an anterior to posterior direction. -
Considerable bleeding can be encountered, especially from the inflamed bursal tissues, so be prepared with
P.2083
electrocautery to assist with hemostasis. Once the bursal space is
cleared, you should be able to visualize the superior surface of the
rotator cuff from the AC joint to a point distal and lateral to the
greater tuberosity.
The undersurface of the acromion is usually covered with
a thick periosteal layer, and the anterior third is covered by the
fibers of the coracoclavicular ligament, which attach under the
anterior edge of the acromion, thereby forming the anterior roof of the
acromial arch (6). The ligament is 2–3 cm wide at its acromial insertion.
a thick periosteal layer, and the anterior third is covered by the
fibers of the coracoclavicular ligament, which attach under the
anterior edge of the acromion, thereby forming the anterior roof of the
acromial arch (6). The ligament is 2–3 cm wide at its acromial insertion.
DIAGNOSTIC ARTHROSCOPY
Glenohumeral Joint
-
Begin the diagnostic arthroscopy with the
patient in a lateral decubitus position, after entering the
glenohumeral joint through the posterior portal and establishing an
anterior portal for outflow and instrumentation. A nerve hook can be
placed through the anterior cannula to assist with the procedure.
Institute a systematic approach for reviewing the intraarticular
anatomy of the shoulder, to avoid missing any abnormalities. Keep the
orientation of the glenoid surface, as viewed on the video monitor,
parallel to the floor, with the humeral head superior, the glenoid
inferior, and the biceps tendon perpendicular and between the two (6).
The initial view will allow inspection of the biceps tendon from the
passage through the rotator cuff interval to its attachment to the
superior labrum at the supraglenoid tubercle. -
Inspect the humeral head for articular
surface defects, such as that seen with a Hill-Sachs lesion on the
posterior superior humeral head. Do not confuse the Hill-Sachs lesion
with the normal intracapsular portion of the humeral neck that is
devoid of cartilage, the so-called anatomic bare patch. Also inspect
the articular surface of the glenoid, remembering that a pitted area,
less than 10 mm and with smooth chondral margins, is a normal finding
in many older individuals (5). At this point,
you may continue the arthroscopy in a posterior to anterior direction,
or, as I prefer, in an anterior to posterior direction. -
Inspect the superior and anterior glenoid
labrum. There is considerable anatomic variation in both the size and
the attachments to the labrum. Inspect the insertion of the biceps
tendon into the glenoid labrum for fraying or detachments, especially
superior labral tears from anterior to posterior (SLAP lesions) (6) (Fig. 77.2; see also COLOR FIG. 77.2).![]() Figure 77.2. (See COLOR FIG. 77.2.) Superior labral tear from anterior to posterior (SLAP lesion).
Figure 77.2. (See COLOR FIG. 77.2.) Superior labral tear from anterior to posterior (SLAP lesion). -
Next, inspect the anterior glenoid labrum
for fraying, and probe for possible detachments from the anterior
glenoid neck, which, when associated with a history of dislocation, is
called a Bankart lesion. When viewing the anterior superior labrum,
make a mental note of a normal anatomic variant, in which the middle
glenohumeral ligament forms a cordlike structure that is contiguous
with the anterosuperior labrum, forming a foramen of variable size
between the ligament and the labrum (6). -
Inspect the anterior glenohumeral
ligaments, which are thickened portions of the anterior capsule and can
be quite variable. The superior glenohumeral ligament is the most
difficult to visualize arthroscopically. It appears as a confluence of
the capsule at the inferior edge of the rotator interval, and it is
frequently obscured by the biceps tendon.

The middle glenohumeral ligament can vary in width, but
it typically passes the superior border of the subscapularis in an
obliquely vertical manner (at approximately 45°) to insert on the
superior glenoid. It can vary from being very discrete to absent, with
a range of variations between (3). The inferior
glenohumeral ligament is the most constant and clinically significant
of the glenohumeral ligaments. It has been described as a suspensory
sling that stabilizes the joint. It originates along the anterior and
inferior labrum and attaches along the anteroinferior portion of the
humeral neck. Its origin has been called a labrocapsular complex, which
describes the confluence of the inferior glenohumeral ligament, the
anterior inferior glenoid labrum, and the periosteum of the
anteroinferior glenoid. The axillary recess, or inferior recess, is a
loose outpouching of the capsule and synovium inferior to the humeral
head. It is a lax portion of the inferior glenohumeral ligament between
the antero- and posterosuperior bands.
The final structure to be inspected is the
intraarticular or undersurface of the rotator cuff. The rotator cuff is
made up of the tendons of the subscapularis, the supraspinatus, the
infraspinatus, and the teres minor. The tendon of the subscapularis,
located anteriorly, has already been inspected. The tendon of the
supraspinatus is located adjacent and slightly posterior to the long
head of the biceps.
-
Inspect the insertion of the
supraspinatus by following the long head of the biceps laterally. The
insertions of the infraspinatus and teres minor are located posterior
and inferior to the insertion of the supraspinatus. Abnormalities of
the rotator cuff can range from fraying, or partial-thickness tears
seen only on the undersurface (glenohumeral side), to full-thickness
tears seen both on the undersurface and on the superior surface when
viewed from the subacromial space.
Subacromial Space
-
Upon completion of the glenohumeral
arthroscopy, withdraw the arthroscope after allowing the outflow to
drain the shoulder joint. Insert a blunt trocar into the cannula and,
using the same posterior portal skin incision, insert the arthroscope
into the subacromial space as previously described, again aiming
superior and for the midportion of the acromion. It is sometimes useful
to use a sweeping motion of the cannula on the undersurface of the
acromion to break up any adhesions that might be there. -
Remove the blunt trocar and insert the
arthroscope with inflow attached. Orient the camera with the acromion
at the top and the rotator cuff at the bottom of the screen. In some
patients, there will be a distinct subacromial space and viewing will
be easy. A normal subacromial space will have a thin, smooth bursal
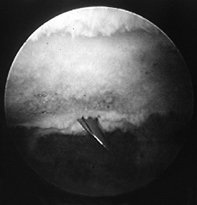
layer on the superior surface of the rotator cuff (1). The undersurface of the acromion will have a thin periosteal layer (Fig. 77.3)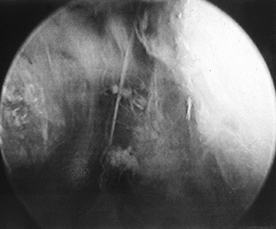 Figure 77.3. Subacromial space with bursal layer.
 -
In patients with chronic impingement
syndrome, the subacromial space can be difficult to visualize and may
have a cobweb appearance from adhesions. In this situation, establish
an anterolateral portal using the 5.5 mm plastic cannula with the
orange-colored trocar, aiming perpendicular to the arthroscopic cannula
and slightly in front of it. When the orange trocar comes into view,
insert a shaver under direct visualization. With the blades positioned
toward the undersurface of the acromion, remove the scarred tissues in
a controlled and safe manner. -
Identify the anterior inferior surface of
the acromion, the coracoacromial ligament, the AC joint medially, the
superior surface of the rotator cuff as far lateral as possible, and
especially the supraspinatus tendon near its musculotendinous junction.
Frequently, a probe can be used from the anterolateral portal to help
identify delaminations in the tendon or longitudinal tears that are not
immediately obvious. -
Close the portals with simple nonabsorbable sutures or subcuticular sutures, depending on your preference.
-
After diagnostic procedures, encourage
the patient to begin range-of-motion exercises of the shoulder, elbow,
wrist, and hand on the first postoperative day; the patient should also
discard the sling when comfortable, typically within a week or by the
first postoperative visit. Slowly reintroduce functional and
recreational activities once motion and strength are regained.
ACROMIOCLAVICULAR JOINT
-
The AC joint is most commonly approached
from the same portals as used for subacromial procedures, although
separate transcutaneous portals specifically for the AC joint have been
described. Place lumbar puncture needles either in the AC joint itself,
or use to outline the anterior and posterior border of the joint (Fig. 77.4; see also COLOR FIG. 77.4). To aid in visualization of the distal clavicle, remove fibrosis or hypertrophied bursal tissue in the subacromial space.![]() Figure 77.4. (See COLOR FIG. 77.4.) Localizing the acromiocla-vicular joint.
Figure 77.4. (See COLOR FIG. 77.4.) Localizing the acromiocla-vicular joint. -
Because most arthroscopic AC joint
procedures are performed in conjunction with a subacromial
decompression, next remove the periosteal tissue on the undersurface of
the acromion, the coracoclavicular ligament, and bone from the
anteromedial border of the acromion to the posteromedial border. Once
this bone is removed, the distal clavicle can be easily visualized. -
Approach the resection of the distal
clavicle from the lateral approach or from the anterior approach. I
perform the procedure from the lateral approach, with the arthroscope
in the posterior portal and the instrumentation in the lateral portal.
With an assistant pushing down on the superior surface of the distal
clavicle, push the tip of the arthroscopic burr directly into the
middle of the face of the distal clavicle to a depth of approximately
5–6 mm, depending on the patient. Using circular movements, enlarge the
hole until the entire distal clavicle bone has been removed. The
superior AC joint capsule and ligaments should remain intact. The goal
is to create a space that is approximately 1 cm in width between the
medial edge of the acromion and the cut surface of the distal clavicle (3). Alternatively, place the burr through the anterior portal and remove bone in an anterior to posterior direction.
P.2085
SUBACROMIAL DECOMPRESSION
As surgeons have become experienced with shoulder
arthroscopy, they have realized the benefits of avoidance of deltoid
detachment as well as early return of function associated with
arthroscopic acromioplasty. Typically, this procedure is performed
after a thorough glenohumeral joint and subacromial space arthroscopy,
and after the diagnosis of impingement syndrome has been confirmed.
-
Use the same portals as for the
subacromial space arthroscopy, specifically the posterior and the
anterolateral or mid lateral. I prefer to view the procedure with the
arthroscope in the posterior portal and instrumentation inserted
through the anterolateral or mid lateral portal. -
Insert a blunt instrument through the
lateral portal and confirm the bone outlines of the anterior,
anterolateral, and lateral acromion. Then insert an electrocautery
device and incise the thickened periosteal tissues on the undersurface
of the anterior acromion, as well as the hypertrophied coracoacromial
ligament. -
When incising the coracoacromial
ligament, a vessel is frequently encountered that can cause bleeding,
which makes visualization difficult. At this point, advance the
arthroscope with the inflow attached as close to the vessel as
possible, providing a tamponade effect, and coagulate it with the
electrocautery. -
Insert an arthroscopic shaver, typically
a full-radius resector, through the lateral portal and remove the
previously incised soft tissue. Expose the entire bone undersurface of
the anterior acromion. Follow with a 5.0 mm arthroscopic oval burr. The
goal is to remove enough bone to prevent further impingement, although
surgeons differ as to what the actual amount is. I strive to remove at
least a burr’s width (5.0 mm) of bone from the projected undersurface,
noting that frequently an anterior hook to the acromion requires
additional bone removal. I begin by going from lateral to medial on the
acromion, thereby allowing easier access to the medial structures.
Sweep the burr from anterior to posterior, removing progressively less
bone posteriorly. Typically, the distance of bone removal from anterior
to posterior is around 2.0 cm. Medially, you should see the clavicular
facet of the acromion.
Detailed explanations and techniques for treating a variety of other common shoulder disorders are covered in chapter 78, chapter 79, and chapter 80.
As the experience of surgeons and the development of instruments have
improved, so has the ability to use the arthroscope to treat these
conditions. Shoulder instability, glenoid labrum injuries, and many
rotator cuff tears can now be approached with an arthroscope and/or
limited incision techniques. Laser and radiofrequency devices are being
applied with encouraging short to midterm results.
Additional applications include removal of loose bodies,
synovectomy, biopsy, irrigation and debridement for infection, and
treatment of refractory adhesive capsulitis.
synovectomy, biopsy, irrigation and debridement for infection, and
treatment of refractory adhesive capsulitis.
REFERENCES
P.2086
Each reference is categorized according to the following
scheme: *, classic article; #, review article; !, basic research
article; and +, clinical results/outcome study.
scheme: *, classic article; #, review article; !, basic research
article; and +, clinical results/outcome study.
# 1. Andrews JR, Schemmel SP. Arthroscopic Acromioplasty. Surg Rounds Orthop November 1989.
# 2. Craig EV. The Shoulder: Master Techniques in Orthopaedic Surgery. New York: Raven Press, 1995.
# 3. Ellman H, Gartsman GM. Arthroscopic Shoulder Surgery and Related Procedures. Philadelphia: Lea and Febiger, 1993.
# 4. Meister K. Diagnostic Arthroscopy of the Shoulder. In: Andrews J, Timmerman L, eds. Diagnostic and Operative Arthroscopy. Philadelphia: WB Saunders, 1997.
# 5. Morrison DS. Arthroscopic Surgery of the Shoulder. In: Chapman MW. Operative Orthopaedics, 2nd ed. Philadelphia: JB Lippincott, 1993:2361.
# 6. Snyder SJ. A Complete System for Arthroscopy and Bursoscopy of the Shoulder. Surg Rounds Orthop July 1989.