
Cole & Sekiya: Surgical Techniques of the Shoulder, Elbow and Knee in Sports Medicine, 1st ed.
Copyright ©
2008 Saunders, An Imprint of Elsevier
CHAPTER 67 – Double-Bundle Posterior Cruciate Ligament Reconstruction
Jon K. Sekiya, MD
Posterior cruciate ligament (PCL) injuries are rare and infrequently occur in isolation. Despite our increased knowledge of the anatomy and mechanism of injury, PCL reconstruction has not obtained the success of ACL reconstruction.[1] Frustrating to the surgeon is the lack of consensus regarding the optimal management of PCL injuries. Even when surgical intervention is determined, the confusion does not cease—graft type, single versus double bundle, acute versus chronic reconstruction, and transtibial versus inlay technique are issues that are difficult to resolve.
The clinical outcome of PCL deficiency has not been uniformly poor.[16] Thus, indications for surgical intervention of isolated PCL tears are disputed. The majority of PCL reconstructions occur in conjunction with other ligamentous reconstructions or repairs. Therefore, the timing of PCL reconstruction may depend on the concomitant ligamentous repairs or reconstructions, which risks jeopardizing stability or stiffness. In addition, the chronicity of the injury has been shown to affect the clinical results.[15]
In this chapter, we discuss indications, physical examination findings, and three different techniques of double-bundle PCL reconstruction with a bifid bone–patellar tendon–bone allograft: transtibial, open tibial inlay, and arthroscopic tibial inlay. Previously, the senior author (J. K. S.) reported our technique for a bifid bone–patellar tendon–bone allograft for reconstruction of the PCL.[14] This graft closely re-creates the anatomic configuration and size of the native PCL
Acutely, there is usually a history of a direct blow to the anterior lower leg or a hyperextension injury associated with concomitant mild swelling. A PCL injury may also occur in the setting of a knee dislocation in conjunction with other ligamentous injuries. In trauma, 95% of patients with a PCL injury have an associated ligamentous injury, with the posterolateral structures being most common (approximately 60%).[2] Chronically, instability may be the only complaint.
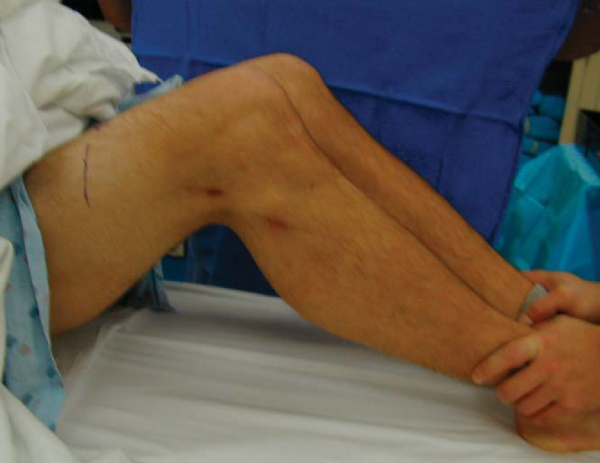
On physical examination, it is important to assess the neurovascular status of the injured limb. This is especially important if there is a history of a knee dislocation, which has a higher risk of such an injury. Inspection and palpation for an effusion is followed by assessment of the range of motion. With the knee in a flexed position, palpate for the natural tibial step-off and evaluate the anterior border of the tibial plateau in relation to the femoral condyles. In addition, a Godfrey test can be performed, whereby the lower leg is elevated with the knee flexed approximately 90 degrees to assess for the presence of a “sag.” A posterior drawer test with the knee in 90 degrees of flexion is also performed to evaluate the amount of posterior tibial translation (
Fig. 67-1
). It is important to recognize the presence of a posterolateral corner knee injury, which is commonly associated with a PCL injury and will accentuate the posterior drawer.[13] The gait pattern is inspected for any varus thrust. If a posterolateral corner injury is suspected, the physical examination should include a reverse pivot shift test, a dial test, a posterolateral drawer test, and varus stress testing at both 30 degrees and 90 degrees.
|
|
|
|
Figure 67-1 |
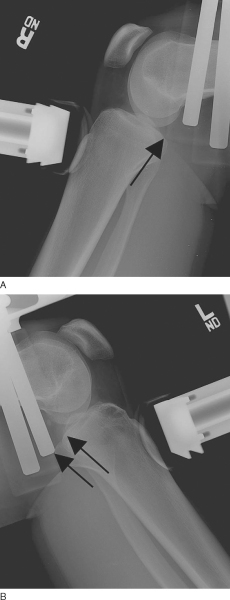
Radiographs of the knee are obtained to inspect for any fracture in the acute setting or for any medial or patellofemoral compartmental arthrosis in the chronic setting. Long-cassette films should be obtained if any fixed or dynamic instability is suspected. Posterior tibial subluxation can sometimes be seen on the lateral radiograph. Otherwise, a comparative stress lateral radiograph can also be obtained (
Fig. 67-2
).
|
|
|
|
Figure 67-2 (demonstrated by the arrows) |
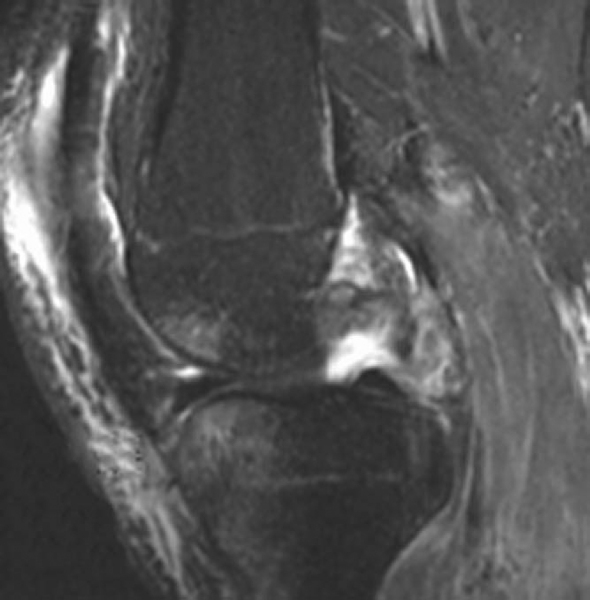
A bone scan may be useful in chronic PCL insufficiency to identify degenerative changes. A magnetic resonance imaging evaluation is essential, not only to confirm a PCL injury but, more important, to assess for any concomitant posterolateral corner injury that will affect the operative plan (
Fig. 67-3
).
|
|
|
|
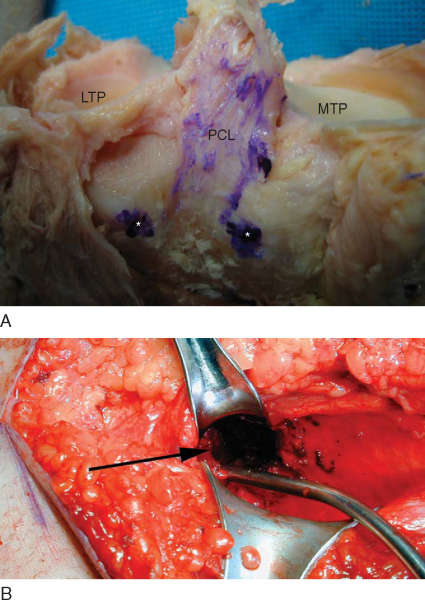
Figure 67-3 demonstrates an acute complete tear of the PCL off the tibia. There is an associated posterolateral corner injury. |
Indications and Contraindications
Isolated PCL injuries (grades I and II) can be treated nonoperatively with protected weight bearing and quadriceps muscle rehabilitation. The absolute indications for reconstruction of an isolated PCL tear are persistent instability (grade III) and bone avulsion, although some authors dispute the existence of an isolated grade III PCL injury. [13] [15] Regardless, most PCL reconstructions occur in conjunction with a knee dislocation or multiligamentous injury. The timing of PCL reconstruction is controversial, but an acute reconstruction is generally accepted for bone avulsion injuries or for addressing combined ligamentous injuries—especially a posterolateral corner injury. Acute PCL reconstruction is contraindicated in the setting of a traumatic open knee injury or a significantly stiff knee.
A whole, nonirradiated, frozen patellar tendon allograft is thawed at room temperature in antibiotic saline. To improve efficiency, the graft may be prepared during induction of anesthesia or by a trained assistant during the diagnostic arthroscopy. If uncertainty exists as to whether the PCL reconstruction should be performed, the graft is thawed after the diagnostic arthroscopy.
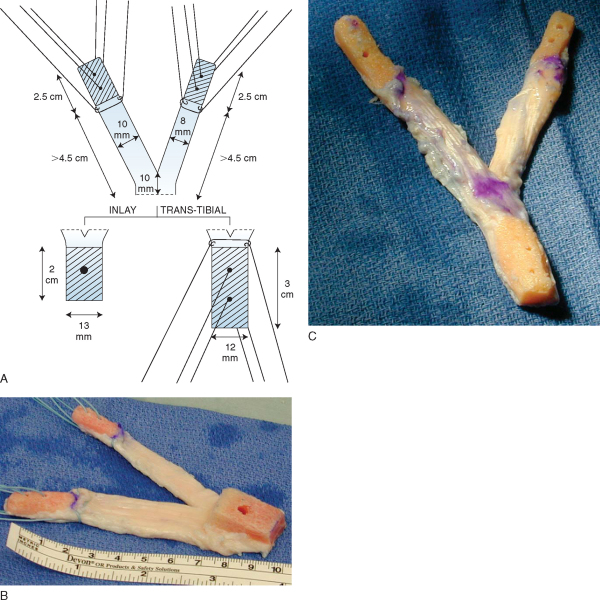
The required minimum dimensions of the patellar tendon allograft are 45 mm of tendon length and 22 mm of tendon width. For patients taller than 6 feet, we prefer a minimum tendon length of 50 mm, particularly if an open inlay technique is chosen for tibial fixation. The central 20-mm segment of the graft is identified and incised with a scalpel to form two bundles. Both an 11-mm and a 9-mm graft are fashioned to re-create the anterolateral and posteromedial bundles, respectively. For a right knee, the 11-mm anterolateral bundle is lateral with the cancellous side facing anterior, and the 9-mm posteromedial bundle is medial. This most closely mimics the normal PCL morphologic appearance as described by Harner et al[6] and reproduces the PCL “twist.” The patellar bone segment is used for the femoral attachments and is split with an oscillating saw along the line of the tendon fibers between the two bundles. Each patellar bone block is then cut to a length of approximately 20 mm. A rongeur is used to fashion the bone blocks to fit the respective femoral tunnel sizes of 11 mm and 9 mm corresponding to the size of the tendon. It is important to “bullet-tip” the ends of each plug to facilitate later passage within the femoral tunnels. Each femoral bone plug is then drilled with two separate 2.0-mm holes, and passing sutures of No. 2 FiberWire (Arthrex, Naples, Fla) are then placed through them. One additional No. 2 FiberWire suture is placed at the bone-tendon interface for additional fixation. The prepared femoral bone plugs are suitable for use with either the tibial inlay or the arthroscopic transtibial tunnel technique. However, preparation of the tibial bone plug is different for the arthroscopic and open inlay procedures. For the tibial inlay reconstruction, the tibial bone plug is sized to approximately 20 mm long, 13 mm wide, and 12 mm thick. A single 4.5-mm gliding hole is placed in the center of the plug for later placement of a 4.5-mm fully threaded cortical screw (Synthes, Paoli, Pa) for fixation of the graft within the tibial trough.
The arthroscopic transtibial graft dimensions differ from the inlay with regard to the tibial bone plug. The transtibial bone plug is approximately 30 mm long and 12 mm in diameter. Two 2.0-mm drill holes are drilled in the bone plug and threaded with No. 2 FiberWire. An additional FiberWire suture is sewn to the tendon-graft interface. The graft tip is “bulleted” to facilitate later passage within the tibial tunnel (
Fig. 67-4
).
|
|
|
|
Figure 67-4 (A reprinted with permission from Sekiya JK, Kurtz CA, Carr DR. Transtibial and tibial inlay double-bundle posterior cruciate ligament reconstruction: surgical technique using a bifid bone–patellar tendon–bone allograft. Arthroscopy 2004;20:1095-1100.) |
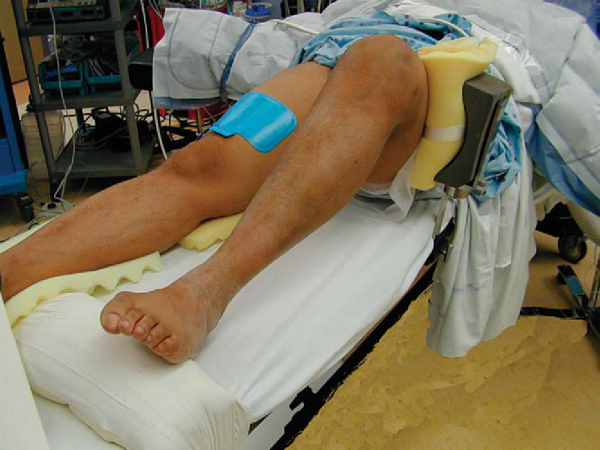
The anesthesia team places both femoral and sciatic peripheral nerve catheters in the preoperative holding area (but they are not dosed) for postoperative pain management. No anesthetic is introduced until neurologic assessment has occurred on completion of the case. The patient is then brought to the operating room and placed supine on a radiolucent table. The patient then undergoes endotracheal intubation, but no long-acting paralytics are given to hide neurologic stimulation. An examination under anesthesia is performed to document PCL deficiency. A tourniquet is applied to the thigh but is usually not used. A post is attached to the operating room table at the level of the tourniquet. For the open inlay technique, a gel pad bump is placed under the contralateral hip to facilitate later exposure to the posteromedial knee of the operative extremity in the figure-four position. A 5-pound beanbag is secured to the operating room table at a location that will maintain the knee in approximately 90 degrees of flexion. The leg is prepared with both alcohol and DuraPrep, and an extremity drape is applied to the lower leg. A preoperative time-out is performed to identify the patient, the extremity, and the procedure (
Fig. 67-5
).
|
|
|
|
Figure 67-5 |
Surgical Landmarks, Incisions, and Portals
A bump is placed between the post and the leg to help stabilize the knee in a flexed position while the foot rests on the prepositioned sandbag. With the knee flexed approximately 90 degrees, standard anteromedial and anterolateral portal incisions are made and diagnostic arthroscopy is performed initially to address and to document additional injuries. The PCL stump is arthroscopi-cally débrided from the femoral origin, and any anatomic variations in bundle location are noted. An attempt is made to preserve any intact meniscofemoral ligaments, but they are often sacrificed because they hinder passage of the large PCL graft. The center of the medial femoral condyle is identified, and a 4-cm incision is placed along the posterior border of the vastus medialis. This incision will be used later for femoral tunnel placement.
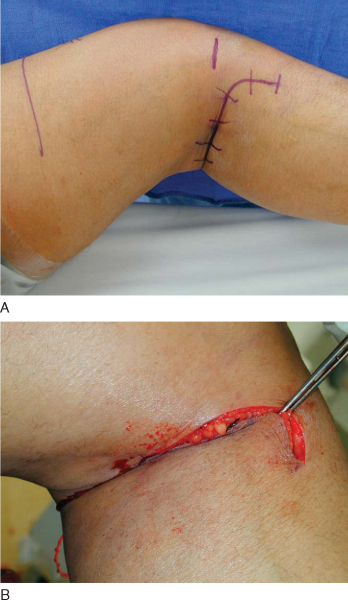
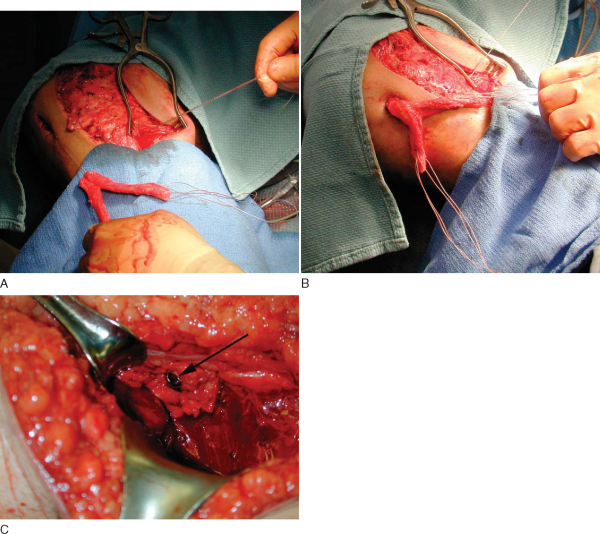
The leg is then flexed to 90 degrees and brought into a figure-four position while the bump is repositioned under the lateral ankle. This accentuates the external rotation of the hip and facilitates access to the posteromedial lower leg. A 5- to 7-cm incision is made starting in the crease of the popliteal fossa and curving distally along the posteromedial border of the tibia (
Fig. 67-6
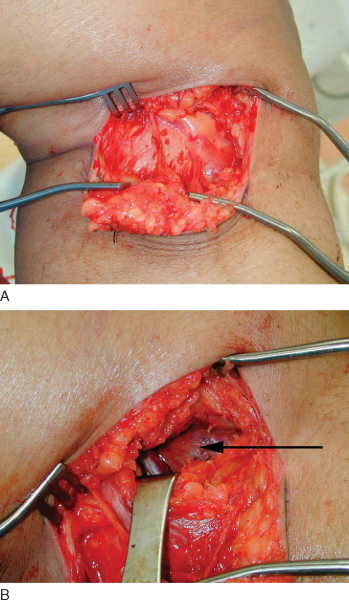
). The dissection is continued through the subcutaneous fat down to the level of the sartorius fascia and the fascia overlying the medial head of the gastrocnemius. The fascia is incised along the palpable posteromedial tibial border. The semimembranosus and pes anserinus tendons are retracted anteriorly and proximally while the medial head of the gastrocnemius is elevated from the tibial cortex and retracted posteriorly. The medial border of the gastrocnemius is followed distally along the posterior tibia, and the proximal border of the popliteus muscle is identified (
Fig. 67-7
). The popliteus muscle is elevated subperiosteally off the posteromedial surface of the tibia and mobilized laterally and distally.
|
|
|
|
Figure 67-6 |
|
|
|
|
Figure 67-7 |
Specific Steps (
Box 67-1
)
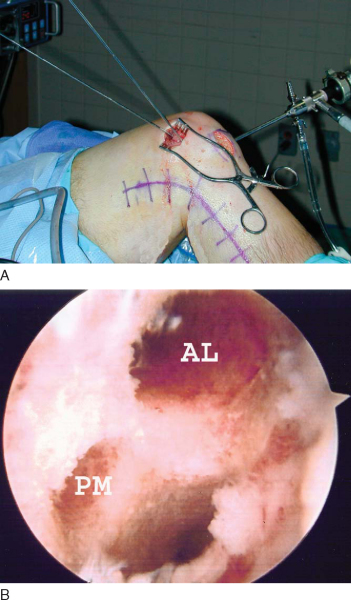
An outside-in femoral target PCL guide is used to place the two 3/32-inch Steinmann pins by arthroscopic guidance. One pin is placed at each center of the anatomic locations of the anterolateral and posteromedial bundles. We prefer to drill the two femoral tunnels from outside in for three reasons: (1) a study by Handy et al[4] suggested that the femoral tunnel–to-graft angle is less severe with this technique; (2) we can more easily tension the grafts and fix them outside-in as opposed to inside-out; and (3) we can supplement metal interference screw fixation by tying the sutures over the bone bridge for the two tunnels or over a plastic button. On the basis of anatomic studies of the PCL origin, for the right knee the Beath pin for the anterolateral bundle is placed at the 12:30-o’clock position approximately 5.5 mm from the articular margin, and the smaller posteromedial bundle is placed at the 3-o’clock position approximately 6 to 7 mm from the articular margin. [6] [10] Cannulated reamers are drilled over the guide pins to make an 11-mm anterolateral and a 9-mm posteromedial tunnel (
Fig. 67-8
).
| Surgical Steps | ||||||||||||||||||||||||
|
|
|
|
|
Figure 67-8 |
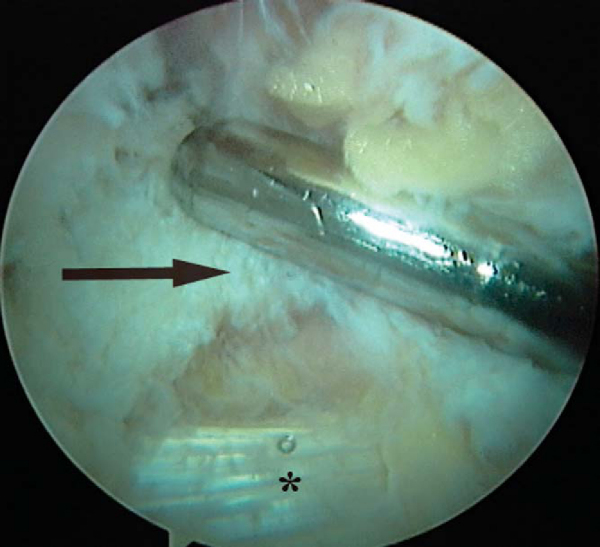
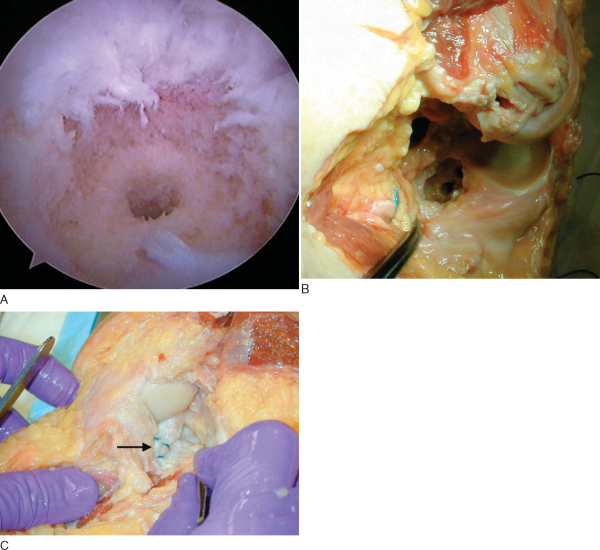
The knee is placed into the figure-four position, and attention is redirected to the posteromedial exposure of the tibia. The superior tibial insertion site of the PCL begins in a fossa between the two palpable prominences of the medial and lateral plateaus of the tibia.[17] The fossa serves as a guide to the location of the trough (
Fig. 67-9
). A vertical arthrotomy is made with a scalpel between the two prominences. The remaining PCL insertion is identified and débrided. A quarter-inch curved osteotome or bur is used to make a trough 13 mm wide, 12 mm deep, and extending distally 2 cm. It is important to keep a shelf of bone superiorly in the trough to help stabilize the graft when later it is recessed into place.
|
|
|
|
Figure 67-9 (From Whiddon DR, Sekiya JK. Double-bundle PCL reconstruction with a bifid bone-patellar tendon-bone allograft. Oper Tech Sports Med 2006;13(4):233–240.) B, A trough for the tibial inlay is made (arrow) with a curved osteotome or bur. It is important to keep a shelf of bone superiorly in the trough to help stabilize the graft when it is later recessed into place. |
Tibial Inlay Graft Passage and Fixation
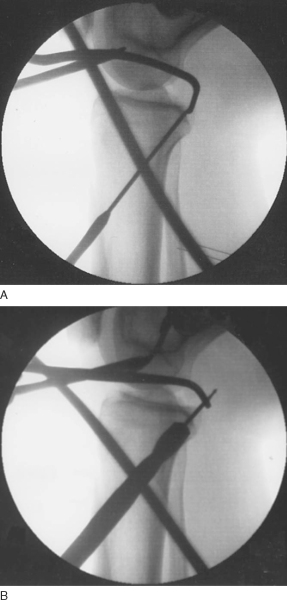
A 3.2-mm transtibial drill hole is placed in the center of the trough corresponding to the 4.5-mm gliding hole in the graft’s tibial bone plug. The transtibial depth is measured, and a 3.2-mm tap is then placed. The graft is more easily passed in an anterior to posterior direction from inside the joint into the trough. The anteromedial parapatellar portal is slightly extended to accommodate the graft’s passage. The sutures are kept separated for each respective graft bundle for later identification and passage. A 4.5-mm fully threaded cortical screw corresponding to the measured length plus 10 mm is used to lag the bone block into the trough (
Fig. 67-10
). We use intraoperative fluoroscopy to verify the location of the graft. The lateral view is easily obtained with the knee in the figure-four position, and the leg is extended for the anteroposterior view.
|
|
|
|
Figure 67-10 |
Femoral Graft Passage and Fixation
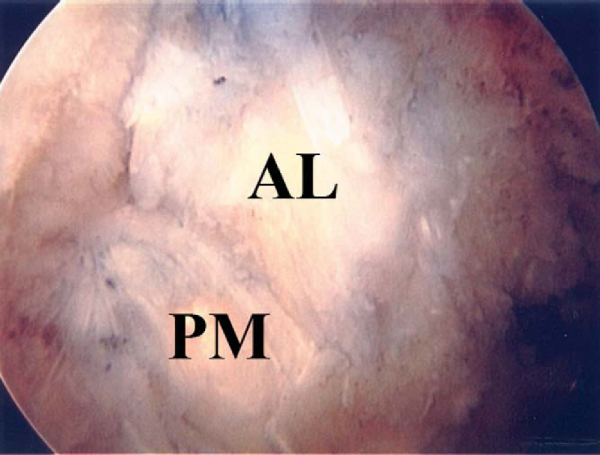
The anterolateral and posteromedial bundle grafts are then passed through the femoral tunnels by use of a suture passer. The extended medial parapatellar arthrotomy is often useful for passage and manipulation of the bone plugs into their respective tunnels. After the graft is fully seated in the femoral tunnels, the natural PCL twist is observed (
Fig. 67-11
).[6] Several cycles of flexion and extension are recommended to pre-tension each graft. On the basis of biomechanical evidence, both the anterolateral and posteromedial bundles of the PCL graft are fixed at 90 degrees of knee flexion with a metal interference screw placed from outside in.[3] A gentle anterior drawer force is applied during screw insertion to re-create the natural tibial step-off.
|
|
|
|
Figure 67-11 |
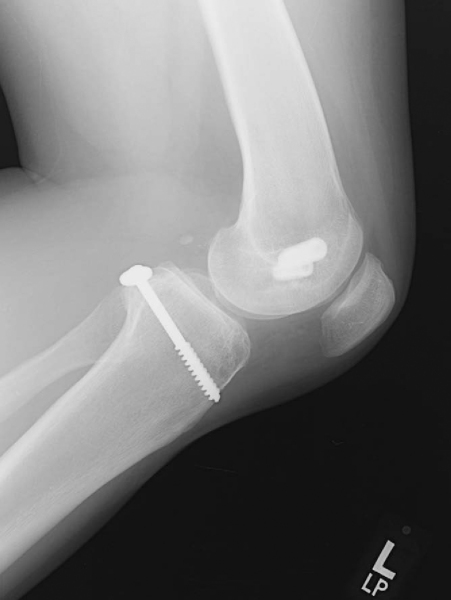
The knee is then placed through a range of motion, with any limitation of full extension or flexion noted. Anterior and posterior laxity is carefully examined. If any problems exist, the femoral fixation is released, the problem is rectified, and the grafts are retensioned. Any remaining bone plug protruding from the femoral tunnels is removed with a rongeur before skin closure. The sutures are tied together over the tunnel bone bridge or over a plastic button for additional fixation. Dorsalis pedis and posterior tibial artery pulses are checked. Anteroposterior and lateral radiographs are obtained before leaving the operating room (
Fig. 67-12
).
|
|
|
|
Figure 67-12 |
A bump is placed between the post and the leg to help stabilize the knee in a flexed position while the foot rests on the prepositioned sandbag. The previously mentioned medial and lateral parapatellar tendon portals are used for the diagnostic arthroscopy. The 70-degree arthroscope is placed through the notch to facilitate placement of an accessory posteromedial portal. The PCL insertion is identified, and the majority of the remaining PCL is débrided. However, the PCL footprint is preserved to properly identify the placement of the transtibial tunnel.
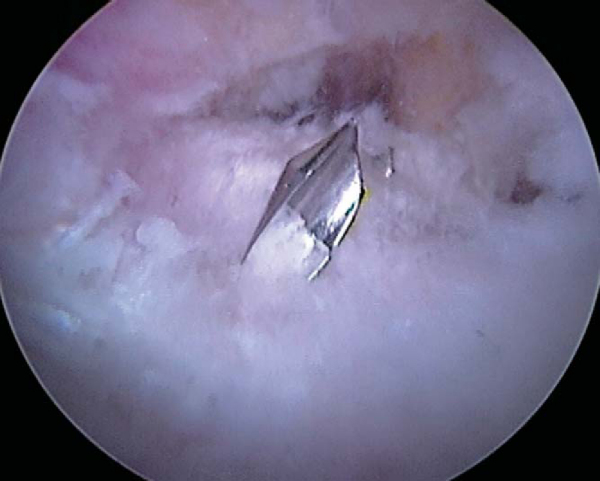
An arthroscopic tibial PCL guide is placed in the center of the PCL footprint approximately 1.5 cm distal to the articular edge of the posterior plateau (
Fig. 67-13
). This corresponds to the junction of the middle and distal thirds of the posterior tibial slope. The PCL guide is set at 60 degrees (a more vertical position) to decrease the acuity of the turn as the graft enters the joint. The centering bullet device is then used to mark the anteromedial tibial skin for incision placement. The guide pin is drilled under direct visualization. Again, we use intraoperative fluoroscopy to verify the position of the guide wire on a lateral projection to ensure that the pin just penetrates the posterior cortex and is not driven into any neurovascular structures posteriorly. The guide wire is then overdrilled with a 12-mm reamer under fluoroscopic guidance to ensure that the integrity of the posterior tibial cortex remains intact (
Fig. 67-14
). The tunnel is dilated with a 12-mm dilator, and the anterior edge of the tunnel is chamfered to decrease possible graft abrasion.
|
|
|
|
Figure 67-13 |
|
|
|
|
Figure 67-14 |
Transtibial Graft Passage and Fixation
The medial parapatellar portal is extended to accommodate the graft. A No. 2 braided suture is placed into the posterior knee through the transtibial tunnel with an arthroscopic grasper. It is visualized and grasped out the medial parapatellar arthrotomy and used as a suture shuttle to pull the tibial bone plug anterograde down the tunnel. The knee may need to be cycled to facilitate seating of the graft within the transtibial tunnel. The posteromedial and anterolateral limbs of the graft are then placed into their respective femoral tunnels. The tibial bone plug is pulled distally in the tunnel so that the posteromedial bundle is set approximately 10 mm from the outer femoral cortex. This will ensure that no graft protrudes from the outer femoral cortex. The tibial bone plug is tensioned and then fixed with a 10-×30-mm metal interference screw. The tibial fixation is augmented by tying the sutures over a button at the entrance of the tibial tunnel. The anterolateral and posteromedial bundles are then tensioned and secured as previously described.
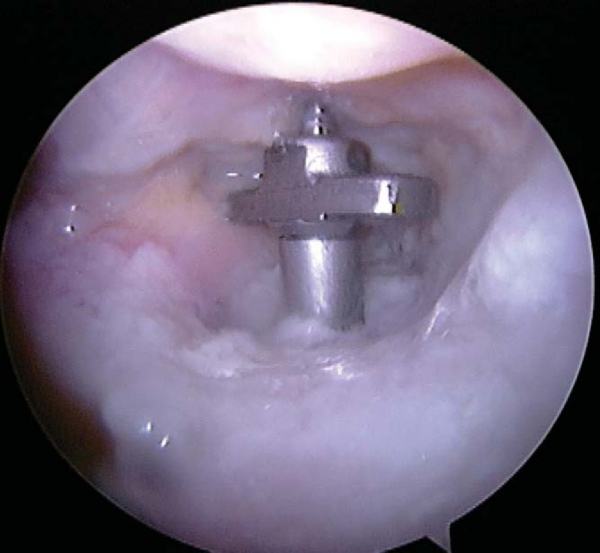
Brick Campbell and the senior author (J. K. S.) have developed an arthroscopic PCL inlay technique that has undergone successful in vitro preliminary testing.[20] Similar anterolateral, anteromedial, and posteromedial portals are made as previously described. The PCL footprint is prepared. Custom arthroscopic instrumentation is used to make two overlapping circular defects 12 mm in diameter and totaling 18 mm in length (Smith & Nephew, Inc, Andover, Mass). By use of a modified PCL tibial pin guide, two parallel pins are drilled from the anterior tibial cortex into the PCL footprint (
Fig. 67-15
). Again, we use intraoperative fluoroscopy to observe advancement of the pins posteriorly. The Beath pins are observed exiting at the appropriate location, with overpenetration prevented by the guide. A centering sleeve from the guide is removed, and each pin is overreamed with an EndoButton reamer (Smith & Nephew, Inc.). An end-threaded rod is passed into each drill site, emerging from the footprint. The 12-mm retrograde reamer blade is then placed onto the threads through the posteromedial portal and tightened as the rod rotates clockwise (
Fig. 67-16
). The tibial PCL footprint is then engaged by the reamer and cut retrograde to a depth of approximately 10 mm. The rod is then advanced and the reamer blade removed. The rod is then moved to the second hole and the reaming process repeated, making a figure-of-eight defect 12 mm wide by 18 mm long. A correspondingly shaped tibial bone block is fashioned with two 2.0-mm drill holes. A jig has been fabricated to check the bone block fit in the tibial defect. Once good bone block–defect match is obtained, one No. 2 FiberWire suture is looped through each of the two bone block drill holes. The FiberWire suture is passed down the tibial drill holes with a suture passer and tied over the anteromedial tibial cortex (
Fig. 67-17
). The graft is passed anterograde through the extended anteromedial portal arthrotomy and secured as previously described.
|
|
|
|
Figure 67-15 |
|
|
|
|
Figure 67-16 |
|
|
|
|
Figure 67-17 |
A hinged knee brace locked in full extension is applied to the operative extremity. Cryotherapy is used to assist with management of postoperative pain and swelling. Extension bracing is continued for 4 weeks, providing support to the tibia to prevent posterior translation and excessive stress on the graft. Partial weight bearing (30%) and quadriceps exercises are started on the first postoperative day. Sym metric full hyperextension is achieved, and passive prone knee flexion, quadriceps sets, and patellar mobilization exercises are performed with the assistance of a physical therapist for the first month. A continuous passive motion machine is used with a maximum flexion of 90 degrees. In the second month, a stationary bicycle is begun, and full flexion is achieved by 3 months. At 4 months, focused rehabilitation with closed-chain exercises and many repetitions are begun—leg presses, step-ups, mini-squats, hamstring curls, elliptical trainer. At 6 months, slow running without cutting is initiated. At 9 to 12 months, sport-specific functional training exercises are begun with gradual return to previous sport. The criteria for return to sport are as follows: quadriceps and hamstring strength at least 90% of opposite leg; one-leg hop test and vertical jump at least 90% of opposite leg; full-speed run, shuttle run, and figure-of-eight running without a limp; squat and rise from a full squat; and no effusion or quadriceps atrophy in conjunction with a satisfactory clinical examination.
Complications are rare but can happen. Failure to carefully position the extremity with adequate padding can lead to neurapraxia. Loss of motion (usually decreased flexion) can result from errors in graft positioning and excessive tensioning during graft fixation or from inadequate range-of-motion exercises during postoperative rehabilitation. Residual laxity can also occur.
Injury to the popliteal vessels is an infrequent but serious complication. With the transtibial technique, great care must be taken to ensure that overpenetration of the posterior tibial cortex does not occur. With the inlay technique, the vessels need to be retracted laterally, and the surgeon should always be aware of their location while drilling. In addition, the thigh and calf should be routinely palpated to ensure that no compartment syndrome develops from fluid extravasation into the soft tissues. Avascular necrosis of the medial femoral condyle can be avoided by placing the femoral tunnel entry and exit points proximal enough to allow preservation of the subchondral bone.
Biomechanical in vitro cadaver studies have documented the advantage of a double-bundle PCL construct. [5] [8] [12] [22] Race and Amis[12] demonstrated that anatomic double-bundle PCL reconstruction with a bone–patellar tendon–bone graft more closely approximates normal knee kinematics in a cadaver model compared with single-bundle reconstruction. Harner et al[5] published a paper supporting double-bundle PCL reconstruction with a transtibial Achilles allograft. However, a biomechanical cadaver study noted no difference between a transtibial and a tibial inlay technique for PCL reconstruction.[9] In addition, Sekiya et al[22] demonstrated that an open double-bundle PCL reconstruction with a bifid bone–patellar tendon–bone tibial inlay allograft was significantly more stable than a single-bundle construct as compared with intact knees by stress radiography measurements. Furthermore, Sekiya et al,[20] in a separate study, noted that arthroscopic tibial inlay double-bundle PCL reconstruction with a bifid bone–patellar tendon–bone construct was comparable to an open technique by stress radiography measurements and physical examination.
Clinical double-bundle PCL reconstruction studies are in evolution (
Table 67-1
). [7] [11] [18] [19] [21] The report of Wang et al[19] is the only published randomized prospective study. Thirty-five patients underwent either single- or double-bundle transtibial PCL reconstruction with autogenous hamstring autograft. No statistically significant clinical or radiographic differences were demonstrated. However, the two hamstring tendons were separated during the double-bundle technique, with the smaller gracilis tendon being used as the posteromedial bundle. Thus, the laxity testing may have been different if a larger, more anatomic graft had been used instead.
| Author | Patients | Followup | Graft | Postoperative Anterior-Posterior Translation | Functional Outcome |
|---|---|---|---|---|---|
| Yoon et al[21] (2005) | 27 | 25 months | Transtibial; Achilles allograft | 2.4-mm side-side (average) | Lysholm score: 91.8 (average) |
| Noyes and Barber-Westin[11] (2005) | 19 | 35 months | Tibial inlay; quadriceps tendon autograft | 2.3-mm side-side (average) | IKDC score: 14 A, B; 5 C, D |
| Stannard et al[18] (2003) | 30 | 25 months | Tibial inlay; Achilles allograft | 0.2-mm side-side (average) | Lysholm score: 89.4 (average) |
| Houe and Jorgensen[7] (2004) | 10 double-bundle | 35 months | Transtibial; hamstring autograft | 3-mm side-side (average) | Lysholm score: 95 (average) |
| 6 single-bundle | 35 months | Transtibial; bone-tendon-bone autograft | 2-mm side-side (average) | Lysholm score: 100 | |
| Wang et al[19] (2004) | 16 double-bundle | 41 months | Transtibial; hamstring autograft | 3.1-mm side-side (average) | Lysholm score: 89 (average) |
| 19 single-bundle | 28.2 months | Transtibial; hamstring autograft | 2.3-mm side-side (average) | Lysholm score: 88 (average) |
1.
Bach BR: Graft selection for posterior cruciate ligament surgery.
Oper Tech Sports Med 1993; 1:104-109.
2.
Fanelli GC, Edson CJ: Posterior cruciate ligament injuries in trauma patients. Part II.
Arthroscopy 1995; 11:526-529.
3.
Fox RJ, Harner CD, Sakane M, et al: Determination of the in situ forces in the human posterior cruciate ligament using robotic technology: a cadaveric study.
Am J Sports Med 1998; 26:395-401.
4.
Handy MH, Blessey PB, Miller MD: Measurement of the tibial tunnel/graft angle and the graft/femoral tunnel angle in posterior cruciate ligament reconstruction: a cadaveric study comparing two techniques for femoral tunnel placement.
Arthroscopy 2003; 19(suppl):36.
5.
Harner CD, Janaushek MA, Kanamori A, et al: Biomechanical analysis of a double-bundle posterior cruciate ligament reconstruction.
Am J Sports Med 2000; 28:144-151.
6.
Harner CD, Xerogeanes JW, Livesay GA, et al: The human posterior cruciate ligament complex: an interdisciplinary study: ligament morphology and biomechanical evaluation.
Am J Sports Med 1995; 23:736-745.
7.
Houe T, Jorgensen U: Arthroscopic posterior cruciate ligament reconstruction: one- vs. two-tunnel technique.
Scand J Med Sci Sports 2004; 14:107-111.
8.
Mannor DA, Shearn JT, Grood ES, et al: Two-bundle posterior cruciate ligament reconstruction: an in vitro analysis of graft placement and tension.
Am J Sports Med 2000; 28:833-845.
9.
Margheritini F, Mauro CS, Rihn JA, et al: Biomechanical comparison of tibial inlay versus transtibial techniques for posterior cruciate ligament reconstruction: analysis of knee kinematics and graft in situ forces.
Am J Sports Med 2004; 32:587-593.
10.
Mejia EA, Noyes FR, Grood ES: Posterior cruciate ligament femoral insertion site characteristics: importance for reconstructive procedures.
Am J Sports Med 2002; 30:643-651.
11.
Noyes FR, Barber-Westin S: Posterior cruciate ligament replacement with a two-strand quadriceps tendon–patellar bone autograft and a tibial inlay technique.
J Bone Joint Surg Am 2005; 87:1241-1252.
12.
Race A, Amis AA: PCL reconstruction: in vitro biomechanical comparison of “isometric” versus single and double-bundle “anatomic” grafts.
J Bone Joint Surg Br 1998; 80:173-179.
13.
Sekiya JK, Haemmerle MJ, Stabile KJ, et al: Biomechanical analysis of a combined double bundle posterior cruciate ligament and posterolateral corner knee reconstruction.
Am J Sports Med 2005; 33:360-369.
14.
Sekiya JK, Kurtz CA, Carr DR: Transtibial and tibial inlay double-bundle posterior cruciate ligament reconstruction: surgical technique using a bifid bone–patellar tendon–bone allograft.
Arthroscopy 2004; 20:1095-1100.
15.
Sekiya JK, West RV, Ong BC, et al: Clinical outcomes after isolated arthroscopic single-bundle posterior cruciate ligament reconstruction.
Arthroscopy 2005; 21:1042-1050.
16.
Shelbourne KD, Rubinstein RA: Methodist Sports Medicine Center’s experience with acute and chronic isolated posterior cruciate ligament injuries.
Clin Sports Med 1994; 13:531-543.
17.
Sheps DM, Otto D, Fernhout M: The anatomic characteristics of the tibial insertion of the posterior cruciate ligament.
Arthroscopy 2005; 21:820-825.
18.
Stannard JP, Riley RS, Sheils TM, et al: Anatomic reconstruction of the posterior cruciate ligament after multiligament knee injuries: a combination of the tibial-inlay and two-femoral-tunnel techniques.
Am J Sports Med 2003; 31:196-202.
19.
Wang CJ, Weng LH, Hsu CC, Chan YS: Arthroscopic single- versus double-bundle posterior cruciate ligament reconstructions using hamstring autograft.
Injury 2004; 35:1293-1299.
20.
Whiddon DR, Miller MD, Sekiya JK, et al. Double-bundle PCL reconstruction: an open versus a new arthroscopic inlay technique. The American Orthopaedic Society for Sports Medicine, Hershey, Pa, 2006. Unpublished data.
21.
Yoon KH, Bae DK, Song SJ, Lim CT: Arthroscopic double-bundle augmentation of posterior cruciate ligament using split Achilles allograft.
Arthroscopy 2005; 21:1436-1442.
22.
Zehm CT, Miller MD, Sekiya JK, et al. Single bundle versus open double bundle inlay. The American Orthopaedic Society for Sports Medicine, Hershey, Pa, 2006. Unpublished data.