
Cole & Sekiya: Surgical Techniques of the Shoulder, Elbow and Knee in Sports Medicine, 1st ed.
Copyright ©
2008 Saunders, An Imprint of Elsevier
CHAPTER 68 – Posterior Cruciate Ligament Tibial Inlay
Mark D. Miller, MD
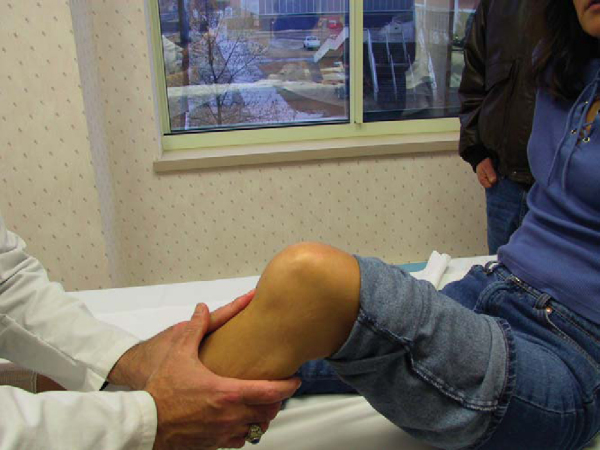
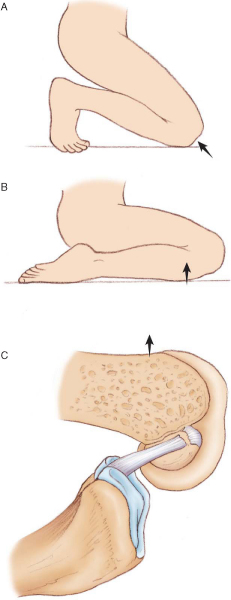
Injuries to the posterior cruciate ligament (PCL) are much rarer than those to the anterior cruciate ligament (ACL). Knowledge of and experience in evaluation and management of the PCL still lag behind those of the ACL. Recently, more emphasis has been placed on accurate evaluation and treatment of PCL injuries, either in isolation or in combined ligament injury patterns. The PCL serves as the primary restraint to posterior tibial translation at 90 degrees. Classically, the posterior drawer examination has been the standard for evaluation of PCL stability (
Fig. 68-1
). More recently, emphasis has been placed on objective measurement of posterior tibial subluxation (
Fig. 68-2
). [10] [11] Other components of the physical examination include the reverse pivot shift, quadriceps sag, quadriceps active test, and dial test. As always, comparison with the contralateral extremity should be performed. Radiologic evaluation should include anteroposterior and lateral radiographs and magnetic resonance imaging of the knee.

The PCL is attached to the posterolateral portion of the medial femoral condyle and passes posteriorly and laterally to attach into a depression on the posterior aspect of the tibia, bordered by a medial and lateral prominence. The attachment on the posterior tibia is approximately 1 cm distal to the joint line. The average length is 38 mm, and the average width is 13 mm; the midpoint of the ligament is the narrowest point—an average of 11 mm. [8] [9] The two bundles of the PCL are the anterolateral and posteromedial. Traditionally, attention has been focused on the reconstruction of the anterolateral bundle. More recent research has verified the importance of the posteromedial bundle as well as of the meniscofemoral ligaments of Humphrey and Wrisberg. The anterolateral and posteromedial bundles appear to function in a reciprocal pattern, with the anterolateral bundle tight in flexion and the posteromedial bundle tight in extension.
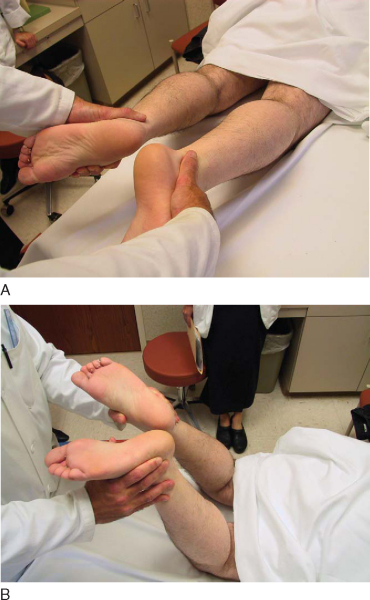
PCL injuries occur with a posteriorly directed blow to the proximal tibia, often from a dashboard or hyperextension injury to the knee. When the mechanism of injury involves a direct blow to the anterior tibia, the foot position at the time of contact plays a role in the injury pattern; ankle plantar flexion is associated with PCL injury, and ankle dorsiflexion is associated with patellofemoral injury (
Fig. 68-3
). Patients often suspect an injury to the knee, although the presentation is much less dramatic than with ACL injuries. Most isolated PCL injuries are grade I or grade II and may be treated nonoperatively with emphasis on regaining of full range of motion and quadriceps rehabilitation to counteract the tendency toward posterior tibial subluxation. In many circumstances, the PCL may actually “heal” as seen on magnetic resonance imaging (
Fig. 68-4
). Debate continues about persistent objective laxity in these “healed” PCL tears; however, lower grade, isolated PCL injuries are still treated nonoperatively. [17] [18] Grade III PCL injuries are rare in isolation and are most frequently seen with loss of secondary restraints and concomitant posterolateral knee injury. It is extremely important that PCL injuries associated with lateral side injuries are identified because this will affect both the treatment and results of PCL injury and reconstruction (
Fig. 68-5
). The grade III and the symptomatic isolated grade II PCL injury should be surgically reconstructed.
|
|
|
|
Figure 68-3 |
|
|
|
|
Figure 68-4 |

|
|
|
|
Figure 68-5 |
There are multiple techniques for PCL reconstruction. This chapter deals with operative treatment of the PCL by a single-bundle tibial inlay technique with bone–patellar tendon–bone autograft. This technique is called the inlay because the bone from the graft is placed into a trough made in the posterior aspect of the tibia (inlaid), at the footprint of the PCL. This posterior approach for fixation of the tibia avoids the “killer turn” associated with transtibial PCL reconstructions, reducing the stress placed across the graft.[2] This single-bundle technique reliably reconstructs the anterolateral bundle of the PCL.
It is our preference to use bone–patellar tendon–bone autograft because of the bone to bone fixation possible with this graft and because of problems with allograft, including delayed incorporation, infection risk, late laxity, and cost. If autograft is not available, an allograft with a bone block is another option (i.e., Achilles tendon, bone–patellar tendon–bone, or quadriceps tendon).
Examination Under Anesthesia, Positioning, and Diagnostic Arthroscopy
The surgical procedure starts with a thorough examination under anesthesia to confirm the preoperative examination findings. It is imperative at this time to ensure that the posterolateral structures are intact. A tourniquet is placed high on the thigh, and it is deflated before closure of the posterior wound to ensure that there is no injury to the posterior vascular structures.
The patient can be positioned either supine or in the lateral decubitus position. Arthroscopy can be performed in the lateral decubitus position, alleviating the need for intraoperative repositioning, or the patient can be repositioned after arthroscopy to facilitate the approach to the posterior tibia. The authors’ preference is to use the lateral decubitus position for both arthroscopy and PCL reconstruction (
Fig. 68-6
). Care must be taken to adequately pad the contralateral leg to avoid pressure necrosis. The operative extremity can be abducted and externally rotated to facilitate the arthroscopy as well as the exposure of the medial side of the knee.
|
|
|
|
Figure 68-6 |
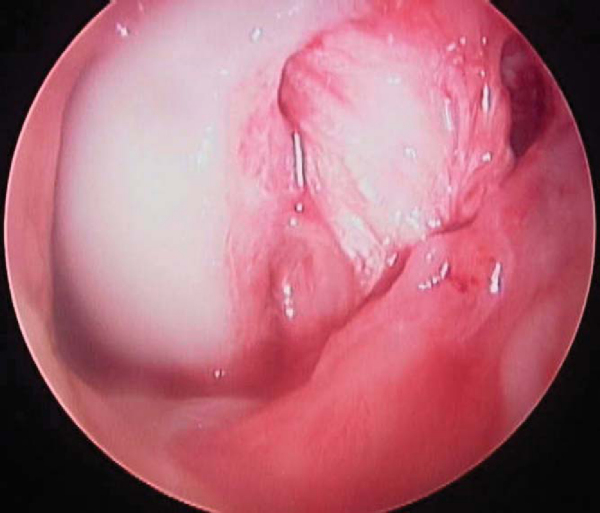
All intraarticular pathology is addressed at this time. The torn PCL may be difficult to recognize until it is viewed completely. An indication of a PCL tear is a “sloppy ACL sign” or ACL pseudolaxity.[6] Once the torn PCL is identified, the PCL stump is débrided, with preservation of any fibers in continuity.
Specific Steps (
Box 68-1
)
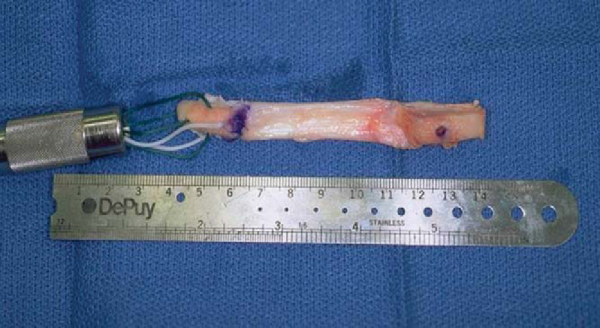
While the extremity is abducted and externally rotated, the bone–patellar tendon–bone autograft is harvested from the ipsilateral knee in standard fashion. The graft is harvested and prepared to be rectangular on the tibial inlay side and bullet shaped on the femoral side to allow smooth passage into the femoral tunnel (
Fig. 68-7
).
| Surgical Steps | ||||||||||||
|
|
|
|
|
Figure 68-7 |
An incision is made in Langer’s lines at the medial knee slightly anterior and superior to the medial femoral epicondyle (
Fig. 68-8
). Dissection is carried down in line with the vastus medialis muscle to the level of the condyle. It is important to visualize the bone at this stage for protection of the soft tissues and for accurate placement of the PCL guide. In addition, good visualization allows easy identification of the tunnel when you are ready to perform femoral tunnel fixation. The guide is placed with arthroscopic assistance at the 1-o’clock position (on the right knee) or the 11-o’clock position (on the left knee) and 8 mm deep (away from the articular surface) (
Fig. 68-9
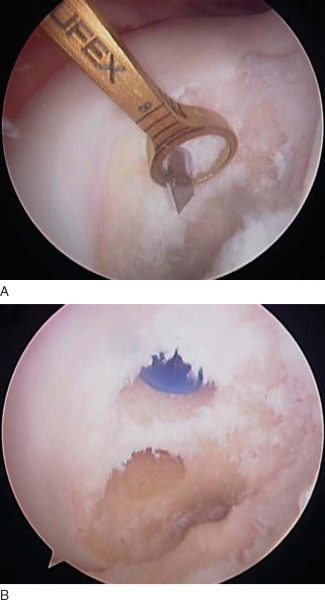
). The guide pin is drilled from outside in by use of the PCL guide, with the ideal placement in the medial femoral notch confirmed arthroscopically. The starting point of the guide pin must be proximal (farther from subchondral bone) enough to avoid subchondral collapse, insufficiency fractures, or avascular necrosis of the condyle from drilling of the femoral tunnel.[1] The tunnel is then drilled over the guide wire, and the edges are débrided to facilitate graft passage at a later stage. A looped smooth 18-gauge wire is placed retrograde through the tunnel into the joint and used to pass the autograft from the back of the knee into the joint and femoral tunnel at a later stage.
|
|
|
|
Figure 68-8 |

|
|
|
|
Figure 68-9 |
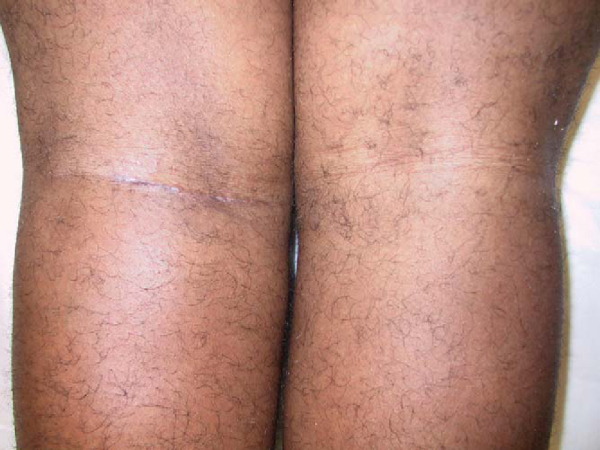
The extremity is then placed back in the lateral decubitus position. A posterior approach is made in line with the flexion crease of the knee, providing for excellent exposure and cosmesis (
Fig. 68-10
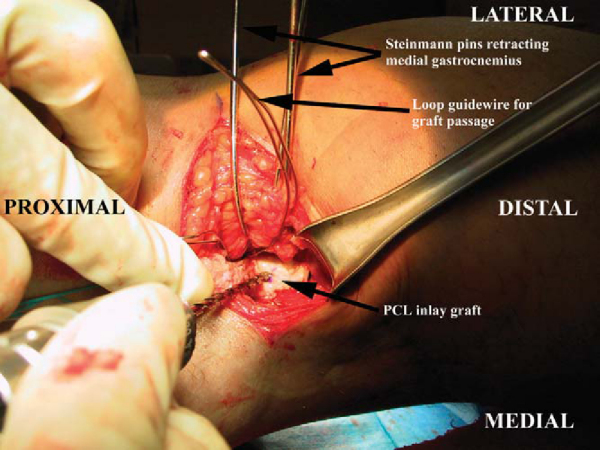
). The fascial incision is made in a hockey stick fashion, perpendicular to the skin incision at the most lateral part of the skin incision and curving distally between the medial gastrocnemius and the semimembranosus muscle belly. The most important landmark to identify at this time is the medial head of the gastrocnemius muscle. Once the plane between the medial gastrocnemius and the semimembranosus is identified, blunt dissection is used and the gastrocnemius muscle is mobilized and retracted laterally. It is useful at this point to place a series of smooth Steinmann pins from posterior to anterior and to bend them to serve as a self-retainer.[13] Staying in this interval protects the neurovascular bundle, and it is not necessary to visualize the posterior neurovascular structures with this technique. Once the gastrocnemius and neurovascular bundle are retracted and protected, the posterior tibia and capsule are identified. The medial and lateral prominences of the posterior tibia mark the PCL footprint. The lateral prominence is smaller and often more difficult to palpate; however, the medial prominence should be readily apparent at this point. Therefore, the trough is prepared lateral to the medial prominence. Preparation of the bone trough for the inlay is fashioned by hand, with either osteotomes or a high-speed bur. The trough should be closely size matched to the bone plug from the graft, as this is an inlay graft. A generous, vertical, posterior arthrotomy is made to form the trough proximally. Once the trough is completed, the prepared graft is then retrieved and inlayed into the trough and secured with two pins from a cannulated screw set, preferentially for a screw size of 4.5 mm (
Fig. 68-11
). The graft is then passed into the joint with the previously placed looped smooth 18-gauge wire. Screw fixation is then performed with two bicortical screws securing the bone plug into the posterior trough. Alternatively, the bone plug can be fixed with one 6.5-mm cancellous screw or with a staple. It is our preference to fix this graft with two bicortical 4.5-mm screws.
|
|
|
|
Figure 68-10 |
|
|
|
|
Figure 68-11 |
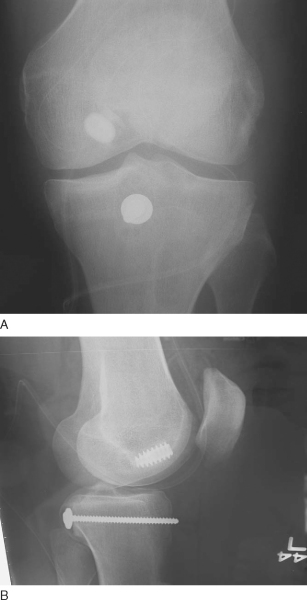
The graft is passed from posterior into the joint. The bullet-shaped bone plug is passed into the previously drilled and prepared femoral tunnel. Once the graft is positioned in the femoral tunnel, a guide pin is placed on the anterior side of the graft from outside in. While maximum manual tension is applied to the graft, the knee is cycled to remove any kinks in the graft. While tension is continued on the graft, an anterior drawer force is applied with the knee at 90 degrees. An interference screw is then placed over the guide pin, and it should be removed when the interference screw is about halfway seated to avoid having the guide pin bound up in the fixation. The interference screw is then seated the remainder of the way, and the graft is visualized arthroscopically to ensure that the interference screw is not proud at the joint level. Tension on the graft is constant until the interference screw is fully seated. Depending on the choice of grafts and the stability of the reconstruction, double fixation can be obtained with a post and washer, with staples, or over a button on the medial femoral cortex (Figs. 68-12 and 68-13 [12] [13]). A Hemovac drain may be placed in the posterior wound if there is a concern of postoperative hematoma. Routine dressings are applied, and ice to the knee is recommended.
|
|
|
|
Figure 68-12 |
Postoperative extension bracing may help prevent tibial subluxation for the first 1 to 2 weeks. Postoperative care of the PCL reconstruction focuses on regaining full range of motion. We prefer to stress prone extension modalities to allow gravity both to help obtain extension and to protect against posterior sag. Active quadriceps activity is allowed, with no active hamstring motion or strengthening. Hamstring exercises can be started actively at 3 to 4 months. It is important to be aware and to counsel the patient that PCL rehabilitation is more difficult than ACL rehabilitation, and full recovery including full range of motion can often take up to a year.
PCL reconstructions are not common in the routine practice setting. The operation can be lengthier than other more common surgical procedures, and thus certain precautions need to be taken. Careful positioning and padding of the contralateral extremity need to be performed preoperatively to prevent neurapraxia or pressure sores. Loss of motion is not uncommon and is often related to excessive graft tension, tensioning in extension, and inadequate postoperative rehabilitation. Neurovascular injuries are rare; however, the posterior approach to the tibia places the surgeon close to the popliteal artery and tibial nerve. Finally, patients may continue to have postoperative laxity in the knee by instrumented and objective testing measures. Fortunately, this laxity is rarely associated with functional instability, and patients are routinely unaware of this subtle asymmetry. Accurate tunnel placement and proper graft tensioning may reduce the incidence of laxity after surgical reconstruction of the PCL.
Patients with chronic PCL insufficiency tend to have increased knee pain, effusions, and late chondrosis of the medial and patellofemoral compartment. [3] [7] The PCL-deficient knee also increases stress across both the medial and lateral meniscus,[15] possibly accounting for the recurrent effusions and late chondrosis. Although these patients often report good subjective results, they have functional deficits and late changes as described.[17] The long-term outcome of the PCL-injured knee remains highly variable.
The results of PCL reconstruction are generally good (
Table 68-1
). [4] [12] [14] The patient can expect return to grade I laxity or better. Many studies have confirmed varying degrees of residual laxity after reconstruction by objective and clinical examination. Despite this laxity, most patients have minimal or no symptoms. The functional results of PCL reconstruction are not necessarily correlated with the objective laxity observed.
| Author | Followup | Results |
|---|---|---|
| Cooper and Stewart[5] (2004) | Minimum 2 years | 34 of 41 grade I or better on posterior drawer examination; average Telos side-to-side difference of 4.11 mm |
| Seon and Song[16] (2006) | Minimum 2 years | 20 of 22 grade I or better on posterior drawer examination |
| Berg[2] (1995) | Minimum 2 years | KT-1000 quadriceps active drawer at 70 degrees improved in all patients (4/4) |
| Jung et al[19] (2004) | Minimum 2 years | Telos improved from 10.8 to 3.4 mm; KT-1000 improved from 9.0 to 1.8 mm |
1.
Athanasian EA, Wickiewicz TL, Warren RF: Osteonecrosis of the femoral condyle after arthroscopic reconstruction of a cruciate ligament. Report of two cases.
J Bone Joint Surg Am 1995; 77:1418-1422.
2.
Berg EE: Posterior cruciate ligament tibial inlay reconstruction.
Arthroscopy 1995; 11:69-76.
3.
Boynton MD, Tietjens MB: Long-term followup of the untreated isolated posterior cruciate ligament–deficient knee.
Am J Sports Med 1996; 24:306-310.
4.
Clancy WG, Shelbourne KD, Zoellner GB: Treatment of knee joint instability secondary to rupture of the posterior cruciate ligament.
J Bone Joint Surg Am 1983; 65:310-332.
5.
Cooper DE, Stewart D: Posterior cruciate ligament reconstruction using single-bundle patella tendon graft with tibial inlay fixation: 2- to 10-year followup.
Am J Sports Med 2004; 32:346-360.
6.
Fanelli GC, Giannotti BF, Edson CJ: The posterior cruciate ligament: arthroscopic evaluation and treatment.
Arthroscopy 1994; 10:673-688.
7.
Gill TJ, DeFrate LE, Wang C, et al: The effect of posterior cruciate ligament reconstruction on patellofemoral contact pressures in the knee joint under simulated muscle loads.
Am J Sports Med 2004; 32:109-115.
8.
Girgis FG, Marshall JL, Monajem A: The cruciate ligaments of the knee joint. Anatomical, functional and experimental analysis.
Clin Orthop 1975; 106:216-231.
9.
Harner CD, Livesay GA, Kashiwaguchi S: Comparative study of the size and shape of human anterior and posterior cruciate ligaments.
J Orthop Res 1995; 13:429-434.
10.
Hewett TE, Noyes FR, Lee MD: Diagnosis of complete and partial posterior cruciate ligament ruptures: stress radiography compared with KT-1000 arthrometer and posterior drawer testing.
Am J Sports Med 1997; 25:648-655.
11.
Margheritini F, Mancini L, Mauro CS, Mariani PP: Stress radiography for quantifying posterior cruciate ligament deficiency.
Arthroscopy 2003; 19:706-711.
12.
Miller MD, Bergfeld JA, Fowler PJ, et al: The posterior cruciate ligament injured knee: principles of evaluation and treatment.
Instr Course Lect 1999; 48:199-207.
13.
Miller MD, Olszewski AD: Posterior cruciate ligament injuries. New treatment options.
Am J Knee Surg 1995; 8:145-154.
14.
Noyes FR, Barber-Westin SD: Treatment of complex injuries involving the posterior cruciate and posterolateral ligaments of the knee.
Am J Knee Surg 1996; 9:200-214.
15.
Pearsall AW, Hollis JM: The effect of posterior cruciate ligament injury and reconstruction on meniscal strain.
Am J Sports Med 2004; 32:1675-8160.
16.
Seon JK, Song EK: Reconstruction of isolated posterior cruciate ligament injuries: a clinical comparison of the transtibial and tibial inlay techniques.
Arthroscopy 2006; 22:27-32.
17.
Shelbourne KD, Davis TJ, Patel DV: The natural history of acute, isolated, nonoperatively treated posterior cruciate ligament injuries.
Am J Sports Med 1999; 27:276-283.
18.
Shelbourne KD, Muthukaruppan Y: Subjective results of nonoperatively treated, acute, isolated posterior cruciate ligament injuries.
Arthroscopy 2005; 21:457-461.
19.
Young-Bok Jung, Suk-Kee Tae, Ho-Joong Jung, Kee-Hyun Lee: Replacement of the torn posterior cruciate ligament with a mid-third patellar tendon graft with use of a modified tibial inlay method.
J Bone Joint Surg Am 2004; 86:1878-1883.