
Cole & Sekiya: Surgical Techniques of the Shoulder, Elbow and Knee in Sports Medicine, 1st ed.
Copyright ©
2008 Saunders, An Imprint of Elsevier
Section – Other Techniques of the Shoulder
CHAPTER 22 – Arthroscopic Repair of SLAP Lesions by the Single-Anchor Double-Suture Technique
Stephen J. Snyder, MD
SLAP (superior labrum anterior and posterior) tears were largely underappreciated before the advent of shoulder arthroscopy and modern magnetic resonance imaging techniques. In 1985, Andrews et al[1] described superior glenoid labral lesions related to the long head of the biceps in 73 throwing athletes. In 1990, Snyder et al[14] proposed the name SLAP lesion to describe a more complex injury involving the superior labrum extending from anterior to posterior in relation to the biceps tendon anchor.
Mechanisms causing SLAP lesions range from tensile failure at the biceps root to compression loading with the shoulder in the flexed and abducted position.[1] More recently, Burkhart and Morgan[3] have described a peel-back mechanism of the superior labrum with progressive enlargement in overhead athletes.
Snyder’s original classification consists of four subgroups (types I to IV) based on the condition of the superior labrum and the attachment of the biceps anchor to the superior labrum and superior glenoid tubercle.[14] Combined and complex lesions have frequently been observed. Maffet et al[7] expanded the original classification of SLAP lesions, introducing what they have labeled types V to VII.
A thorough history is essential in elucidating an injury to the superior labrum. Typically, the patients are teenage male athletes who complain of shoulder pain exacerbated by overhead activity. This is often associated with popping, snapping, catching, or locking, similar to mechanical symptoms associated with a meniscal tear. [7] [14] SLAP lesions must be differentiated from other pathologic processes of the shoulder, such as instability, impingement, rotator cuff tear, and acromioclavicular joint disease.
Both the comprehensive physical examination and the history are essential in raising the index of suspicion for a possible SLAP lesion. A complete examination is important but not accurate in predicting with certainty the existence of a SLAP lesion, although there are several tests that may prove useful. The biceps tension (Speed) test was the most accurate in our study. [5] [12] [16] The Speed test result is positive when pain is elicited with resisted forward elevation of the fully supinated arm with the elbow extended and the arm flexed to 90 degrees. The compression-rotation sign described by Andrews et al[1] is demonstrated with the patient supine, the shoulder elevated to 90 degrees, and the elbow flexed to 90 degrees. An axial load is then applied to the humerus to compress the glenohumeral joint while the arm is rotated. A positive test result is pain as well as mechanical symptoms elicited during this test. The O’Brien sign, or the active compression test, is elicited by first placing the arm in 90 degrees of forward flexion and 10 to 20 degrees of adduction. The arm is then fully internally rotated into the thumb-down position. The patient is then asked to resist downward pressure to the arm that is applied by the examiner. Pain is produced when an unstable superior labrum is present. The test is then repeated but with the arm in full supination; the pain should be decreased in this position compared with the initial position for the test result to be considered positive.[10]
As with most shoulder disease, standard radiographic evaluation includes four views of the shoulder (anteroposterior, axillary, outlet, and acromioclavicular joint views). Although plain radiographs are not specific for labral disease, they are important to rule out other coexisting pathologic processes of the shoulder.
Magnetic resonance imaging has been popular in evaluating labral lesions. Nonenhanced magnetic resonance imaging has proved to be unreliable in determining the presence of SLAP tears unless a superior paralabral cyst is present. It is, however, useful to evaluate for concomitant pathologic changes, such as rotator cuff tears, acromioclavicular joint disease, and biceps disease. Standard magnetic resonance imaging is also valuable in detecting a paralabral cyst encroaching on the spinoglenoid notch, a finding that is often associated with superior and posterior labral tears. The use of gadolinium contrast medium for magnetic resonance arthrography offers improved visualization of intraarticular structures and is known to improve the ability to detect SLAP tears accurately; however, reported results continue to be somewhat unpredicable. [2] [17]
Indications and Contraindications
Because physical findings and magnetic resonance imaging scans are often equivocal, a high index of suspicion for a SLAP lesion should exist, especially when a patient is symptomatic after an appropriate amount of conservative treatment and an associated mechanism of injury (i.e., abrupt traction or a throwing athlete). If the patient fits the diagnostic criteria and is not able to function at his or her desired level, consideration should be given to diagnostic arthroscopy.
Once general endotracheal anesthesia is achieved, the patient is placed in lateral decubitus position supported with a beanbag. The arthroscopic video equipment tower is on the anterior side of the table in clear view of the surgeon. Once the patient is prepared and draped, the arm is suspended in a traction device. A sterile suspensory arm-holding traction sleeve is applied and connected to the overhead device by a sterile S hook. Approximately 10 pounds of weight is applied to hold the arm in a position of approximately 70 degrees of abduction and 10 degrees of forward flexion.
Surgical Landmarks, Incisions, and Portals
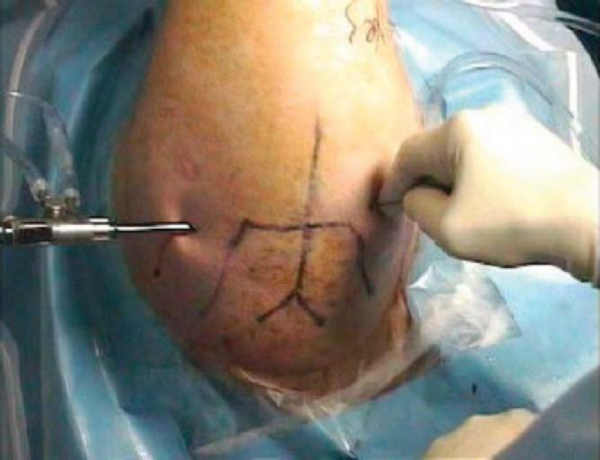
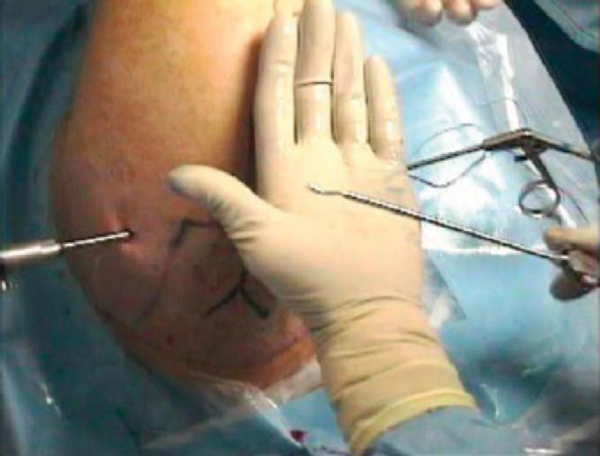
The bone landmarks of the acromion, clavicle, and acromioclavicular joint are outlined with a marking pen. A bursal orientation line is drawn; this begins at the posterior aspect of the acromioclavicular joint and extends laterally across the acromion onto the deltoid.
The posterior portal is established first. It is usually located 2 cm inferior and 1 cm medial to the posterolateral corner of the acromion. A small stab incision is made through the skin and subcutaneous tissues with a No. 11 scalpel blade. A blunt obturator in an arthroscopic sheath is used to enter the glenohumeral joint.
Next, the anterior superior portal is established by an outside-in technique. This portal is placed just superior to the biceps tendon in the rotator interval with use of a spinal needle to confirm proper location. This is the most crucial portal because it must be located to allow insertion of the suture anchor into the superior glenoid on the posterior aspect of the biceps anchor.
The third portal is the anterior midglenoid portal. This portal is made by the outside-in method as well. A spinal needle enters the skin approximately 2 cm inferior to the anterior superior portal and penetrates the capsule through the rotator interval at the superior edge of the subscapularis tendon. It is important to maximize the distance between the anterior superior and midglenoid portals to facilitate instrumentation.
Examination Under Anesthesia and Diagnostic Arthroscopy
Examination under anesthesia is performed to evaluate the mobility and stability of the joint. This is followed by a complete diagnostic arthroscopy from both anterior and posterior portals. The superior labrum is best visualized from the posterior portal and palpated with a probe from the anterior superior portal. When a SLAP lesion is present, the labrum may be frayed, torn, or detached or a combination. As categorized by Snyder et al,[14] there are four basic types. A type I SLAP lesion has a frayed superior labrum, but the biceps anchor attachment to the superior glenoid is intact. Type II lesions have a separation of the superior labrum and biceps anchor from the superior glenoid with or without fraying of the superior labrum. Type III lesions appear similar to a bucket-handle tear of the meniscus; the superior labrum is torn, but it may or may not be displaced with an otherwise normal biceps anchor. Type IV is similar to type III with a bucket-handle labral tear, but the tear extends into the biceps tendon.
Type I and type III SLAP lesions in which the biceps anchor is otherwise stable are treated by débridement alone. We use a 4.0-mm full-radius shaver and débride the labrum to a smooth edge. The shaver is used from both anterior and posterior portals on viewing from the opposite side. After shaving, a probe is used to evaluate the remaining labrum and the biceps anchor.
Type II lesions are repaired by a single-anchor double-suture technique as outlined in
Box 22-1
.
| Surgical Steps | ||||||||||||||||||
|
Type IV lesions are treated similarly to type II lesions unless the biceps tendon split is severe. When more than about 30% of the tendon is included with the displaced labral tear, one must consider repairing the tendon, releasing it, and repairing the labrum as with a type II SLAP lesion or performing a biceps tenodesis. In most cases, we prefer to excise the labral fragment along with the attached portion of torn biceps. If the remaining tendon appears healthy and the anchor is stable, then it is left alone. If the tendon appears degenerative, it will be released and tenodesed, especially in the young active patient.
Single-Anchor Double-Suture SLAP Repair
With the arthroscope in the standard posterior portal, we establish the anterior superior portal with an outside-in technique. A spinal needle determines the ideal location. Insert the needle approximately 2 cm from the anterolateral corner of the acromion so that it enters the joint in the superior edge of the rotator interval behind the biceps tendon (
Fig. 22-1
). Ensure that the needle can readily reach the superior neck of the glenoid on passing posterior to the biceps. After an incision is made with a No. 11 blade in Langer’s lines, insert a clear, smooth, plastic 6-mm operating cannula along the chosen path.
|
|
|
|
Figure 22-1 |
Next, establish an anterior midglenoid portal with the same outside-in technique as outlined before, entering through the rotator interval just above the subscapularis tendon.
2. Prepare the Labrum and Glenoid
Débride any remaining soft tissue off the superior glenoid below the detached labrum–biceps anchor. Trim any fraying of the labrum (
Fig. 22-2
). The posterior portion of the lesion and glenoid are best trimmed with the shaver in the posterior portal and the arthroscope anteriorly. The superior glenoid rim and neck are only slightly decorticated, with care taken not to remove excessive bone. The bone here is often relatively soft, and use of a bur is seldom necessary.
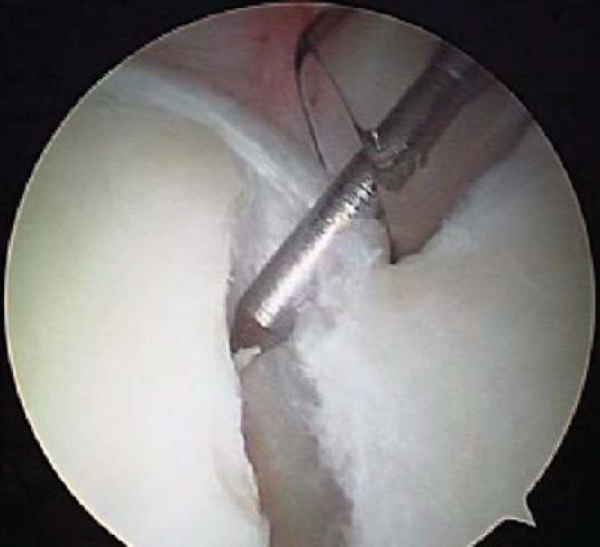
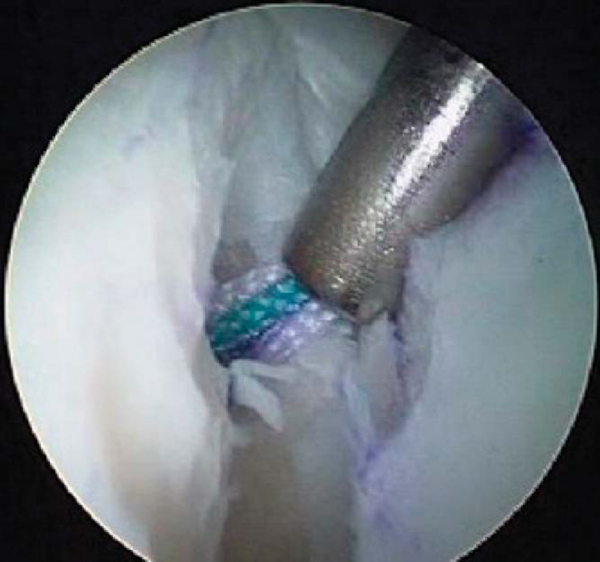
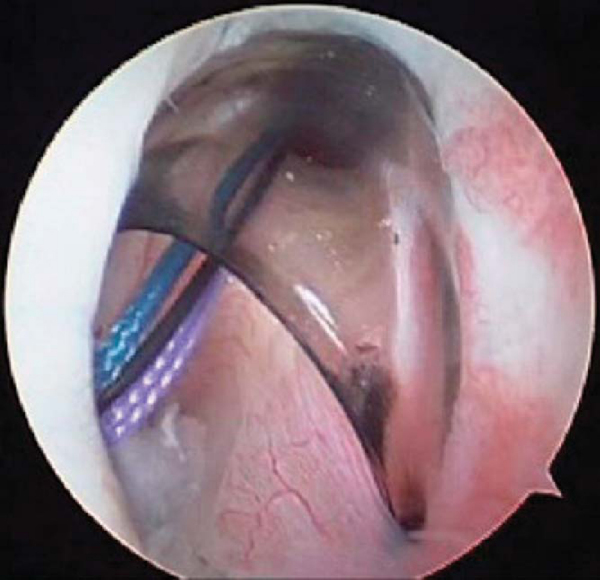
Insert a 2-mm Revo punch into the anterior superior portal and posterior to the biceps to make a pilot hole for the double-suture 4-mm Big Eye Revo anchor (Linvatec, Largo, Fla). The punch must penetrate the superior glenoid exactly at the center of the biceps anchor just below the edge of the cartilage angled 45 degrees relative to the glenoid surface. Extreme caution must be exercised to ensure that the punch is completely within the bone and does not skive off posteriorly or medially above the glenoid (
Fig. 22-3
).
|
|
|
|
Figure 22-3 |
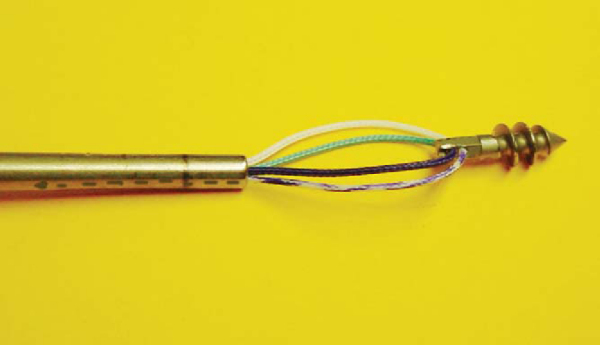
We use a titanium 4-mm × 12-mm threaded anchor. The vertically oriented eyelet is first loaded with two strands of nonabsorbable No. 2 suture in a specific manner. One suture is white and the other is dark green. By convention, the green suture is at the upper end of the eyelet and the white suture is at the lower portion of the eyelet closer to the screw threads. To facilitate suture management, we color half of each suture limb purple with a surgical marking pen. The anchor is then loaded on the inserter such that the purple suture ends exit on the same side of the eyelet (
Fig. 22-4
). The anchor is then inserted into the pilot hole until the horizontal seating line is below bone and the purple limbs of the suture are toward the biceps tendon. Seating the anchor so that the opening of the eyelet is toward the biceps allows easier sliding of suture. The screwdriver is removed, and sutures are tested for security by gentle traction (
Fig. 22-5
).
|
|
|
|
Figure 22-4 |
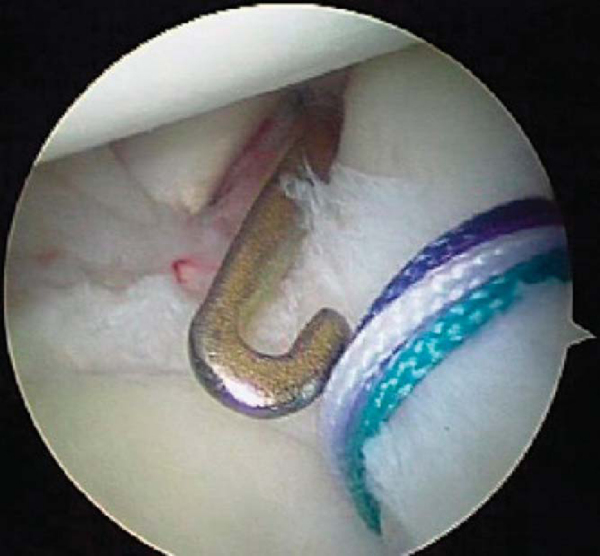
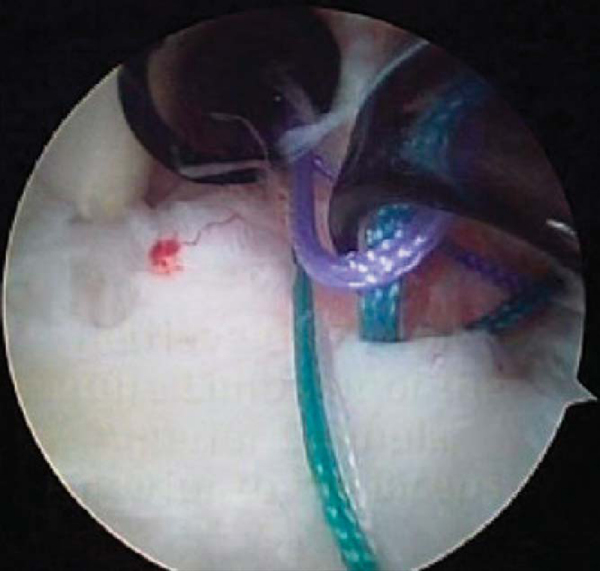
With a crochet hook, retrieve the two unmarked suture limbs through the anterior midglenoid portal (
Fig. 22-6
). Place the suture outside the cannula by use of a switching rod. Next retrieve the two purple-dyed suture limbs through the anterior midglenoid cannula (
Fig. 22-7
).
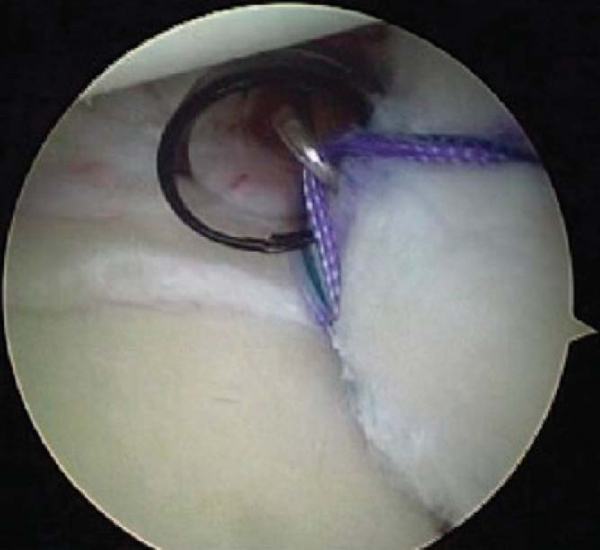
Insert a Spectrum (Linvatec) medium-sized crescent hook loaded with a Shuttle Relay suture passer (Linvatec) through the anterior superior cannula (
Fig. 22-8
). Puncture the superior labrum on the posterior edge of the center of the biceps attachment. Pass the needle through the root of the biceps and under the labrum directly in line with the anchor. The Shuttle Relay is advanced into the joint and retrieved with a grasper through the anterior midglenoid cannula. The two purple suture limbs inside the cannula are loaded into the Shuttle eyelet and shuttled through the superior labrum and the anterior superior cannula (
Fig. 22-9
).
|
|
|
|
Figure 22-8 |
|
|
|
|
Figure 22-9 |
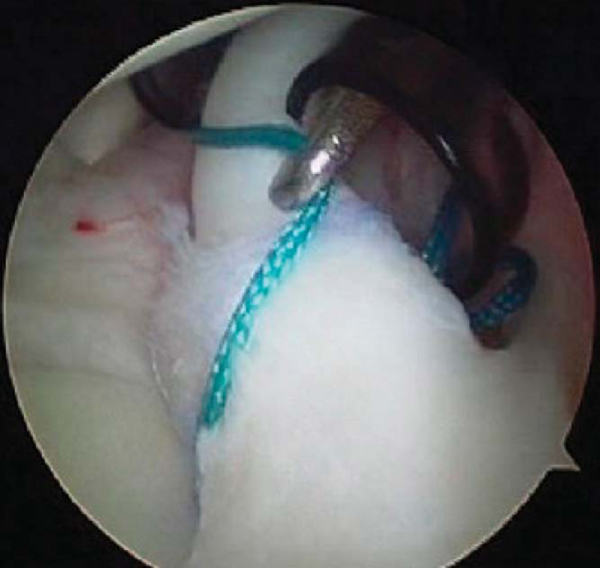
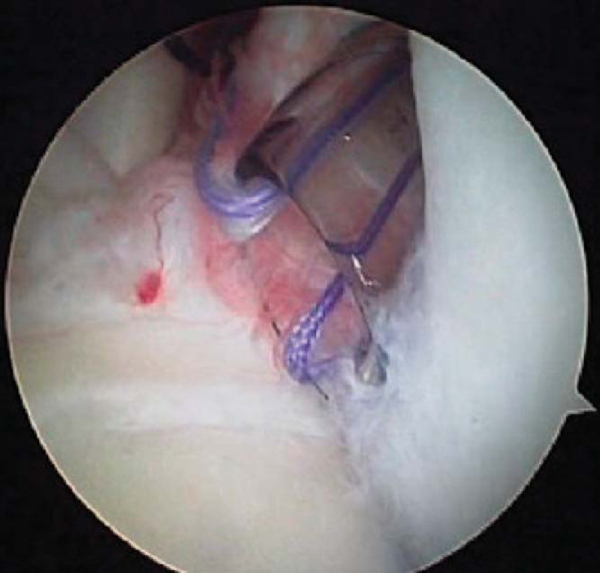
Next, the purple-white suture is transferred from the anterior superior portal into the midglenoid cannula with a crochet hook anterior to biceps tendon (
Fig. 22-10
). This will avoid tangling of the purple-white suture when the green sutures are tied. Then retrieve the purple-green suture into the anterior superior portal posterior to the biceps tendon with a crochet hook (
Fig. 22-11
). Pull the purple-green suture (the one through the labral tissue) to make it the shorter limb and use it as the initial post strand. Tie the green suture with a sliding-locking knot and three alternating half-hitches (
Fig. 22-12
).
|
|
|
|
Figure 22-10 |
|
|
|
|
Figure 22-11 |
|
|
|
|
Figure 22-12 |
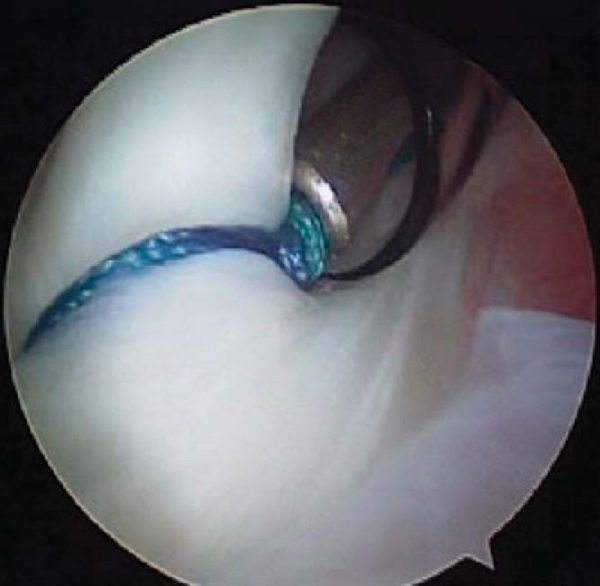
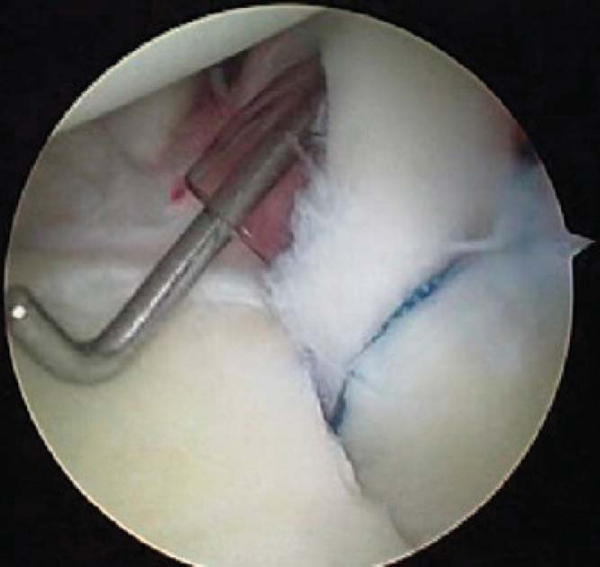
Retrieve both limbs of the white suture anterior to the biceps into the anterior superior cannula with a crochet hook (
Fig. 22-13
). Pull the purple-white strand to make it the shorter limb and tie it with a sliding knot. Evaluate the repair by pulling on the biceps tendon with a probe, checking for tension and stability (
Fig. 22-14
).
|
|
|
|
Figure 22-13 |
|
|
|
|
Figure 22-14 |
The portals are closed with a single 3-0 subcutaneous stitch supplemented with a Steri-Strip. A sterile dressing is applied.
The shoulder is protected in a 15-degree UltraSling (DJ Orthopedics, Carlsbad, Calif). The patient should begin elbow, wrist, and hand exercises immediately, with gentle pendulum exercises after 1 week. The shoulder should be protected from excess stress on the biceps tendon for 12 weeks. Progressive resistance exercises are allowed at 6 weeks. Vigorous throwing or strenuous lifting is allowed after 3 months if there are no limitations on motion and the patient is asymptomatic.
| • | Missed coexisting shoulder disease | |
| • | Failure to insert anchor properly | |
| • | Failure to recognize anatomic variants (e.g., Buford complex, sublabral hole) | |
| • | Stiffness with loss of external rotation |
Good to excellent results are achieved in nearly 80% of cases, and patients exhibit a measurable decrease in pain and increase in return to preinjury activity level (
Table 22-1
). However, the outcome depends on concurrent pathologic changes and the treatment rendered.
| Author | Followup | Outcome |
|---|---|---|
| Yoneda et al[18] (1991) | 24 months minimum | 80% good–excellent |
| Field and Savoie[5] (1993) | 21 months mean (range: 12-42 months) | 20 of 20 (100%) good–excellent (Rowe) |
| Resch et al[12] (1993) | 18 months mean (range: 6-30 months) | 12 of 14 (86%) successful |
| Pagnani et al[11] (1995) | 1 year minimum | 19 of 22 (86%) satisfied |
| Morgan et al[8] (1998) | 12 months mean | 84% excellent |
| Stetson et al[16] (1998) | 3.8 years mean (range: 14 months-8 years) | 82% good–excellent (Rowe) |
| Samani et al[13] (2001) | 35 months mean (range: 24-51 months) | 88% successful |
| O’Brien et al[9] (2002) | 3.7 years mean (range: 2-7.4 years) | 23 of 31 (74%) good–excellent |
| Kim et al[6] (2002) | 33 months mean (range: 24-49 months) | 94% satisfactory (UCLA) |
| Cohen et al[4] (2006) | 44 months mean (range: 25-97 months) | 71% good–excellent |
1.
Andrews JR, Carson Jr WG, McLeod WD: Glenoid labrum tears related to the long head of the biceps.
Am J Sports Med 1985; 13:337-341.
2.
Bencardino JT, Beltran J, Rosenberg ZS, et al: Superior labrum anterior-posterior lesions: diagnosis with MR arthrography of the shoulder.
Radiology 2000; 214:267-271.
3.
Burkhart SS, Morgan CD: The peel-back mechanism: its role in producing and extending posterior type II SLAP lesions and its effect on SLAP repair rehabilitation.
Arthroscopy 1998; 14:637-640.
4.
Cohen DB, Coleman S, Drakos MC, et al: Outcomes of isolated type II SLAP lesions treated with arthroscopic fixation using a bioabsorbable tack.
Arthroscopy 2006; 22:136-142.
5.
Field LD, Savoie III FH: Arthroscopic suture repair of superior labral detachment lesions of the shoulder.
Am J Sports Med 1993; 21:783-790.
6.
Kim SH, Ha KI, Kim SH, et al: Results of arthroscopic treatment of superior labral lesions.
J Bone Joint Surg Am 2002; 84:981-985.
7.
Maffet MW, Gartsman GM, Moseley B: Superior labrum–biceps tendon complex lesions of the shoulder.
Am J Sports Med 1995; 23:93-98.
8.
Morgan CD, Burkhart SS, Palmeri M, et al: Type II SLAP lesions: three subtypes and their relationship to superior instability and rotator cuff tears.
Arthroscopy 1998; 14:553-565.
9.
O’Brien SJ, Allen AA, Coleman SH, et al: The trans–rotator cuff approach to SLAP lesions: technical aspects for repair and a clinical followup of 31 patients at a minimum of 2 years.
Arthroscopy 2002; 18:372-377.
10.
O’Brien SJ, Pagnani MJ, Fealy S, et al: The active compression test: a new and effective test for diagnosing labral tears and acromioclavicular joint abnormality.
Am J Sports Med 1998; 26:610-613.
11.
Pagnani MJ, Speer KP, Altchek DW, et al: Arthroscopic fixation of superior labral lesions using a biodegradable implant: a preliminary report.
Arthroscopy 1995; 11:194-198.
12.
Resch H, Golser K, Thoeni H, et al: Arthroscopic repair of superior glenoid labral detachment (the SLAP lesion).
J Shoulder Elbow Surg 1993; 2:147-155.
13.
Samani JE, Marston SB, Buss DD: Arthroscopic stabilization of type II SLAP lesions using an absorbable tack.
Arthroscopy 2001; 17:19-24.
14.
Snyder SJ, Karzel RP, Del Pizzo W, et al: SLAP lesions of the shoulder.
Arthroscopy 1990; 6:274-279.
15.
Snyder SJ: Shoulder Arthroscopy,
2nd ed.. Philadelphia: Lippincott Williams & Wilkins; 2003:147-165.
16.
Stetson WB, Snyder SJ, Karzel RP, et al. Long-term clinical followup of isolated SLAP lesions of the shoulder. Presented at the 65th annual meeting of the American Academy of Orthopaedic Surgeons; March 1998.
17.
Waldt S, Burkart A, Lange P, et al: Diagnostic performance of MR arthrography in the assessment of superior labral anteroposterior lesions of the shoulder.
AJR Am J Roentgenol 2004; 182:1271-1278.
18.
Yoneda M, Hirooka A, Saito S, et al: Arthroscopic stapling for detached superior glenoid labrum.
J Bone Joint Surg Br 1991; 73:746-750.