
Cole & Sekiya: Surgical Techniques of the Shoulder, Elbow and Knee in Sports Medicine, 1st ed.
Copyright ©
2008 Saunders, An Imprint of Elsevier
CHAPTER 61 – Patellar Tendon Allograft for Anterior Cruciate Ligament Reconstruction
R. Alexander Creighton, MD
Anterior cruciate ligament (ACL) reconstruction is one of the most common procedures performed by orthopedic surgeons today. There are numerous graft choices, both autograft and allograft, and each has its advantages and disadvantages. The ideal graft should reproduce native anatomy of the ACL, ensure secure fixation with rapid biologic incorporation, and minimize morbidity to the patient. Bone–patellar tendon–bone autograft, one of the most common graft choices, provides excellent bone fixation, strength, and anatomic reconstruction. However, this graft choice has been criticized for donor site morbidity with postoperative patellofemoral pain in up to 55% of patients.[8]
Bone–patellar tendon–bone allografts have been used in revision procedures but are now being used increasingly in primary reconstructions because of elimination of donor site morbidity, smaller incision, decreased operative time, and decreased postoperative pain. Potential disadvantages include possible disease transmission, slower biologic remodeling time, possible low-level immune response, limited availability, and increased cost.[5]
A thorough history should be elicited. This includes mechanism of injury, associated injuries, prior level of activity, current symptoms of instability, any prior surgery, and any history of immune compromise that may preclude use of allograft tissue.
Factors Affecting Surgical Indication
| • | Range of motion | |
| • | Effusion | |
| • | Lachman test for anterior translational instability | |
| • | Pivot shift test for rotational instability |
Factors Affecting Surgical Planning
| • | Lateral capsular Segond avulsion fracture | |
| • | Tibial eminence avulsion fracture | |
| • | Osteochondral injury or loose body | |
| • | Overall alignment of knee |
| • | Discontinuity of ACL fibers | |
| • | Typical bone bruises on lateral femoral condyle and lateral tibial plateau | |
| • | Associated meniscal, chondral, and ligament injuries |
Indications and Contraindications
There are several populations of patients in which allograft may be preferred to autograft in ACL reconstruction[11]:
Autograft bone–patellar tendon–bone may be the better choice in a high-demand athlete who wishes to return to play as soon as possible, given the slower biologic remodeling time for allograft tissue. In addition, given the small risk of disease transmission, allograft may not be a good choice in an immunocompromised patient.
Once the decision has been made to proceed with allograft tissue, it is the surgeon’s responsibility to ensure that there is an appropriate graft at the time of surgery. According to Bernard R. Bach, Jr., MD (personal communication), the length of a bone–patellar tendon–bone allograft can be estimated on the basis of the patient’s height (
Table 61-1
). The information on the graft label is double-checked before the patient is brought to the operating room. It may be prudent to have a second graft specimen available in case any problems are encountered after thawing of the graft or in its preparation.
| Patient’s Height | Estimated Graft Length |
|---|---|
| 60 inches | 35-37 mm |
| 62 inches | 38-40 mm |
| 65 inches | 40-42 mm |
| 68 inches | 42-44 mm |
| 72 inches | 45-47 mm |
| 74 inches | 48-50 mm |
| 77 inches | >50 mm |
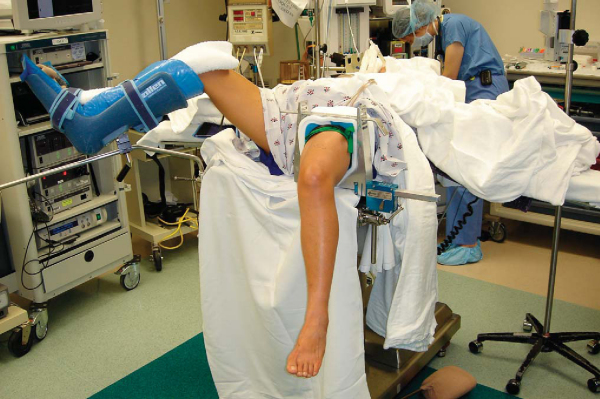
The procedure can be performed under regional, spinal, or general anesthesia on the basis of the surgeon’s, anesthesiologist’s, and patient’s preferences. A femoral nerve block may aid in immediate postoperative pain control. The patient is placed in the supine position on the operating table, and a thorough examination under anesthesia is performed. The operative leg is placed in a leg holder with a tourniquet on the upper thigh (
Fig. 61-1
). It is essential to be able to flex the knee to at least 110 degrees to facilitate femoral screw placement. The contralateral leg is placed in a padded foot holder with the hip and knee slightly flexed to prevent common peroneal nerve or femoral nerve palsy. The leg is then prepared and draped.
Surgical Landmarks, Incisions, and Portals
| • | Patella | |
| • | Patellar tendon | |
| • | Tibial plateau | |
| • | Tibial tubercle |
Portals and Incisions (
Fig. 61-2
)
| • | Superomedial or superolateral outflow portal | |
| • | Inferomedial portal | |
| • | Inferolateral portal | |
| • | Tibial tunnel incision | |
| • | Accessory portal for femoral screw insertion |
|
|
|
|
Figure 61-2 |

Examination Under Anesthesia and Diagnostic Arthroscopy
A thorough examination under anesthesia includes Lachman, anterior and posterior drawer, varus and valgus, and pivot shift testing. External rotation and thigh-foot angles at 30 and 90 degrees are evaluated for assessment of posterolateral instability. Findings are compared with the contralateral knee.
Diagnostic arthroscopy is performed for assessment of associated chondral lesions, ligament injuries, and meniscal disease.
Specific Steps (
Box 61-1
)
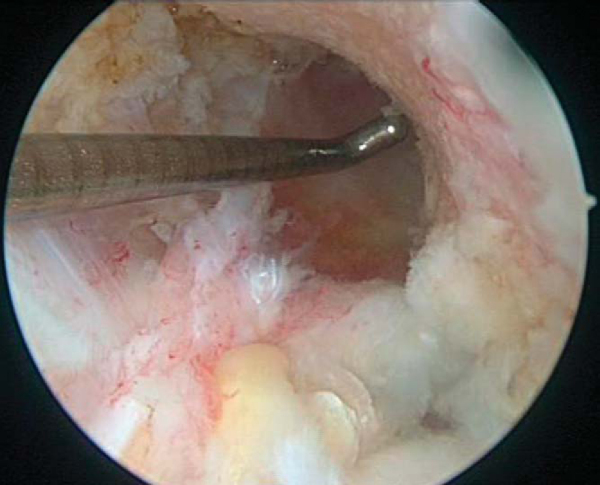
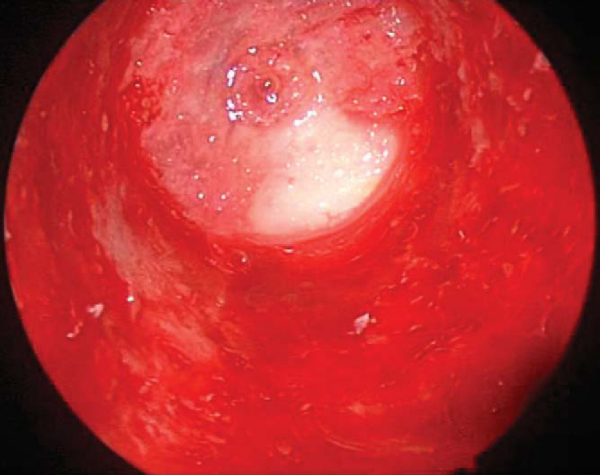
1. Notch Preparation and Notchplasty
Remnant ACL and soft tissue are débrided from the lateral wall and roof by a combination of arthroscopic scissors, a 4.5-mm full-radius shaver, and a tissue ablator. The notchplasty is performed with a quarter-inch curved osteotome, arthroscopic grabber, and 5.5-mm spherical bur, moving from anterior to posterior and from apex to inferior, making sure to avoid misinterpretation of a vertical ridge two thirds posteriorly as the true posterior outlet. The goals of the notchplasty are to allow visualization of the entire lateral wall and over-the-top position and to prevent graft impingement with the knee in full extension. A probe is used to palpate the over-the-top position to confirm the appropriate position (
Fig. 61-3
).
| Surgical Steps | ||||||||||||||||||
|
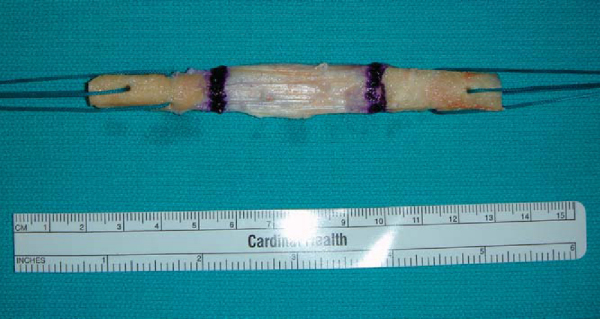
The allograft is thawed by soaking it in normal saline at room temperature (
Fig. 61-4
). Excess fat pad and soft tissue are removed from the graft. The graft construct length is measured, as the length of the soft tissue affects the angle selected on the tibial aiming device. N+10 mm is generally sufficient to reduce significant graft construct mismatch; this is a modification of Miller’s N+7 mm rule whenever the tibial tunnel drill angle equals the length of the soft tissue component of the graft plus 10. For example, if the soft tissue measures 45 mm, the selected drill angle is 45+10 or 55 degrees. The bone plugs should be approximately 25 mm in length. The bone plugs are contoured to fit easily through a 10-mm sizer tube.

The femoral bone plug–tendon interface is marked on the cancellous surface with a sterile marking pen to ensure complete seating of the bone plug in the femoral tunnel during placement. Two 1.6-mm holes are drilled through the tibial and femoral bone plugs parallel and perpendicular to the cortical surfaces. A No. 5 braided polyester suture is passed through each hole (
Fig. 61-5
).
A variable-angle tibial guide is set on the basis of the N+10 measurement and placed in the inferomedial portal to determine the location of the incision for the tibial tunnel. This should be at least 25 mm below the joint line and superior to the insertion of the pes anserinus tendons. A 2-cm skin incision is made at this point, and skin flaps are elevated. A periosteal window is elevated with a Cobb elevator on the medial flare of the tibia. Intra-articularly, the guide is positioned in the sagittal plane by use of the posterior edge of the anterior horn of the lateral meniscus. The guide should be centrally placed to allow passage of the graft between the posterior cruciate ligament and the lateral wall of the notch. It should be approximately 7 mm anterior to the posterior cruciate ligament (
Fig. 61-6
). The guide pin is drilled through the guide, and it is arthroscopically verified that it is posterior (3 to 5 mm) to the intercondylar notch with the knee extended. The pin is then reamed with the appropriately sized reamer based on the size of graft bone plugs. The intraarticular edges of the tunnel are smoothed with a rasp (
Fig. 61-7
).
|
|
|
|
Figure 61-6 |

The goal of femoral tunnel preparation is to prepare a tunnel that originates at the 1- to 1:30-o’clock position in the left knee and the 10:30- to 11-o’clock position in the right knee. This provides a nearly anatomic-isometric position of the graft. With the pump turned off and the knee “dry,” a 7-mm femoral offset guide is placed through the tibial tunnel to the over-the-top position. The orientation of the tibial tunnel affects the ability to place the femoral aimer correctly. The guide allows a 1- to 2-mm thin posterior cortical rim after reaming. The pin is reamed to a depth 5 to 8 mm longer than the length of the femoral bone plug to allow possible recessing of the bone plug (
Fig. 61-8
). The femoral tunnel is smoothed, and the arthroscope is placed in the femoral tunnel and rotated 360 degrees to ensure that the posterior wall is intact (
Fig. 61-9
).

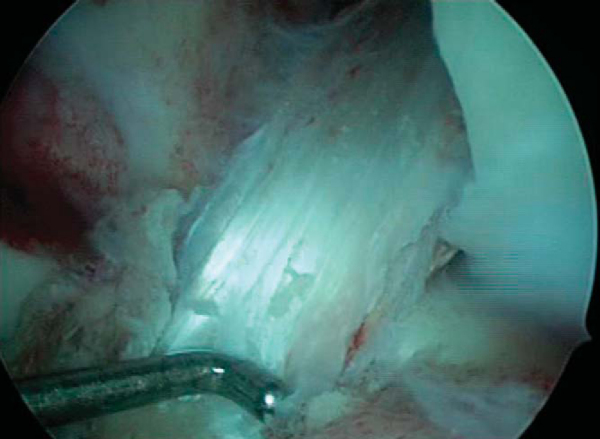
5. Graft Insertion and Fixation
A Beath pin is placed through the tibial tunnel and into the femoral tunnel and advanced out the anterior thigh. The sutures from the femoral bone plug are passed through the eyelet of the Beath pin, and by pulling the Beath pin out of the thigh, the sutures are retrieved. The graft is pulled in a retrograde fashion, seating the femoral bone plug into the femoral tunnel, with use of the arthroscope to confirm placement. The bone plug is pushed nearly flush with the femoral surface entrance. The graft is left 3 to 5 mm in the joint to act as a skid for placement of the interference screw guide pin. An accessory anteromedial portal is made to facilitate placement of the nitinol guide pin (see
Fig. 61-2
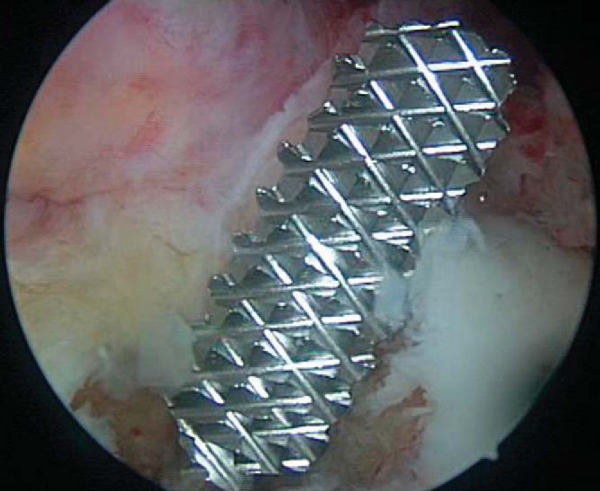
). The nitinol pin is placed through the accessory portal and slid into the femoral tunnel, anterior to the graft and bone plug. The bone plug is then seated flush with the femoral tunnel entrance. A 7 × 20-mm cannulated metal interference screw is advanced over the guide wire while the knee is kept flexed 110 to 120 degrees. The guide pin should be removed before the screw is fully seated; otherwise it may be difficult to remove. Advance the screw until its base is flush with the base of the femoral plug, taking care not to lacerate the soft tissue of the graft while placing the screw (
Fig. 61-10
).

The knee is cycled through a full range of motion, noting the movement of the tibial bone plug within its tunnel. While the knee is cycled 90 degrees to full extension, the graft should shorten 1 to 2 mm during the final 20 to 30 degrees of full extension (“gross isometry test”). The graft is rotated 180 degrees, which places the tibial bone plug cortical surface anterior. The screw is placed on the cortex for better fixation. By placement of the screw anterior to the graft, it is less likely to injure the graft if it extends beyond the tendo-osseous junction proximally. With the knee extended and axially loaded, an 8 × 20-mm cannulated metal interference screw is used to secure the tibial bone plug. A final arthroscopic evaluation is performed to confirm graft placement and to irrigate the knee of any loose debris (
Fig 61-11
).
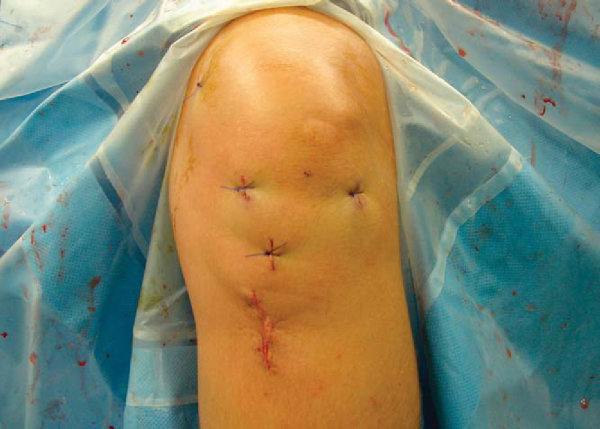
The periosteal flap over the tibial tunnel and hardware is loosely approximated with No. 0 Vicryl. The subcutaneous layer is closed with No. 2 Vicryl. The skin is closed with a running 4-0 Monocryl suture. The portals are closed with a simple 3-0 Prolene suture (
Fig. 61-12
). The incisions, the deep tissues, and the knee joint are injected with bupivacaine. Steri-Strips, gauze pads, and a loose single-layer of Kerlix are placed over the wounds. A cryotherapy device and drop-lock brace in full extension are placed on the knee.
| • | Graft failure at fixation or intrasubstance tear | |
| • | Infection (case reports of infection with Clostridium septicum[3]) | |
| • | Arthrofibrosis | |
| • | Neurovascular injury | |
| • | Disease transmission (risk estimated to be 1:1,600,000,[2] no documented cases with current screening standards) |
| PEARLS AND PITFALLS | ||||||||||||||||||||||||||||||
|
Most studies that have compared outcomes of ACL reconstruction by bone–patellar tendon–bone allograft versus autograft have shown no significant difference in laxity, functional testing, or failure rate. Significantly decreased postoperative pain and smaller incisions have been shown with the use of allograft. The one study that showed significant difference in failure rates used only irradiated allografts, which have been shown to be weaker (
Table 61-2
).
| Author | Followup | Outcome |
|---|---|---|
| Harner et al[7] (1996) | 3-5 years | No significant difference in laxity, functional testing, or failure rate compared with autograft |
| Decreased loss of extension with allograft vs. autograft (P = .009) | ||
| Peterson et al[9] (2001) | 5 years | No significant difference in laxity, functional testing, or failure rate compared with autograft |
| Decreased loss of extension with allograft vs. autograft (P = .027) | ||
| Chang et al[4] (2003) | 2-year minimum | 91% good–excellent results vs. 97% good–excellent results with autograft |
| No significant difference | ||
| Poehling et al[10] (2005) | 5 years | Decreased pain postoperatively with allograft vs. autograft at 1 week, 6 weeks, and 3 months (P = .0006, P = .0007, P = .0270) |
| Fewer activity limitations at 3 and 6 months with allograft (P = .0431, P = .0014) | ||
| Increased laxity by KT-1000 in allograft (P = .0520) | ||
| Gorschewsky et al[6] (2005) | 2 and 6 years | Increased rupture rate of allograft vs. autograft at 2 and 6 years (P = .004) with use of irradiated grafts |
| Bach et al[1] (2005) | 2-year minimum | 94% primary allograft reconstructions mostly or completely satisfied |
1.
Bach B, Aadalen K, Dennis M, et al: Primary anterior cruciate ligament reconstruction using fresh-frozen nonirradiated patellar tendon allograft.
Am J Sports Med 2005; 33:284-292.
2.
Bach B, Tradonsky S, Bojchuk J, et al: Arthroscopically assisted anterior cruciate ligament reconstruction using patellar tendon autograft: five- to nine-year followup evaluation.
Am J Sports Med 1998; 26:20-29.
3.
Barbour S, King W: The safe and effective use of allograft tissue—an update.
Am J Sports Med 2003; 31:791-797.
4.
Chang S, Egami D, Shaieb M, et al: Anterior cruciate ligament reconstruction: allograft versus autograft.
Arthroscopy 2003; 19:453-462.
5.
Creighton R, Bach B: Revision anterior cruciate ligament reconstruction with patellar tendon allograft.
Sports Med Arthrosc Rev 2005; 13:38-45.
6.
Gorschewsky O, Klakow A, Riechert K, et al: Clinical comparison of the Tutoplast allograft and autologous patellar tendon (bone–patellar tendon–bone) for the reconstruction of the anterior cruciate ligament.
Am J Sports Med 2005; 33:1202-1209.
7.
Harner C, Olson E, Irrgang J, et al: Allograft versus autograft anterior cruciate ligament reconstruction.
Clin Orthop 1996; 324:134-144.
8.
Miller S, Gladstone J: Graft selection in anterior cruciate ligament reconstruction.
Orthop Clin North Am 2002; 33:675-683.
9.
Peterson R, Shelton W, Bomboy A: Allograft versus autograft patellar tendon anterior cruciate ligament reconstruction: a 5-year followup.
Arthroscopy 2001; 17:9-13.
10.
Poehling G, Curl W, Lee C, et al: Analysis of outcomes of anterior cruciate ligament repair with 5-year followup: allograft versus autograft.
Arthroscopy 2005; 21:774-785.
11.
Strickland S, MacGillivray J, Warren R: Anterior cruciate ligament reconstruction with allograft tendons.
Orthop Clin North Am 2003; 34:41-47.