
Cole & Sekiya: Surgical Techniques of the Shoulder, Elbow and Knee in Sports Medicine, 1st ed.
Copyright ©
2008 Saunders, An Imprint of Elsevier
CHAPTER 62 – Hamstring Tendon Autograft for Anterior Cruciate Ligament Reconstruction
Neal Chen, MD,
Nader Darwich, MD
The success of anterior cruciate ligament (ACL) reconstruction is influenced by many factors, such as the initial tensile properties of the graft tissue, the initial fixation of the graft, the healing at the graft fixation sites, the biologic remodeling of the graft, and the type of postoperative rehabilitation program used. Owing to its high initial tensile strength and stiffness, ability to be rigidly fixed to bone, rapid healing of bone to bone at the graft fixation sites, and outcome studies documenting predictable success in restoration of anterior knee laxity and elimination of the pivot shift phenomenon, the central-third patellar tendon autograft is considered by many surgeons to be the “gold standard” for ACL reconstruction. However, because of the well-documented donor site morbidity associated with the harvest of patellar tendon autografts, improvements in soft tissue graft fixation techniques, and clinical outcome studies demonstrating no significant difference between patellar tendon and hamstring tendon ACL reconstructions, four-stranded hamstring tendon autografts have become an increasingly popular graft choice for ACL reconstruction.[*] In this chapter, we describe our current surgical technique for performing ACL reconstruction with autogenous doubled gracilis and semitendinosus tendon (DGST) grafts.
*
References 1, 2, 4, 5, 7, 12, 13, 15, 18, 22, 26, 28, 30 [1] [2] [4] [5] [7] [12] [13] [15] [18] [22] [26] [28] [30].
History and Physical Examination
Patients thought to have an ACL tear should provide detailed history of the initial injury and any subsequent injuries and their treatment. The diagnosis is confirmed by the Lachman and pivot shift tests or by magnetic resonance imaging if needed. It is particularly important to recognize associated injuries to the posterolateral and posteromedial structures. Failure to recognize and to treat associated patholaxity at the time of the ACL reconstruction may result in continued complaints of instability or failure of the ACL reconstruction.
A preoperative anteroposterior radiograph of the involved knee in full extension and standing anteroposterior and posteroanterior 45-degree flexion views of both knees are important to rule out associated bone injury or joint space narrowing and to assess skeletal maturity of the patient. A true lateral radiograph of the injured knee in maximum hyperextension allows measurement of the intercondylar roof–femoral angle, which can be useful for preoperative planning of the tibial tunnel in the sagittal plane. A Merchant view of both knees is helpful in assessment of patellar alignment and tilt. Full-length standing radiographs of both lower extremities from hips to ankles are indicated in patients with joint space narrowing to allow measurement of the mechanical axis. Combined or staged tibial osteotomy and ACL reconstruction may be indicated in patients with malalignment and symptoms of pain and instability.
Indications and Contraindications
Hamstring tendon autografts are indicated for any acute or chronic ACL reconstruction. ACL reconstructions performed with hamstring tendon grafts have been shown to result in faster recovery of quadriceps muscle strength, lower incidence of donor site pain, and less interference with kneeling and crawling than after ACL reconstructions performed with patellar tendon autografts. [12] [18] [26] Because of less interference with kneeling and crawling, hamstring tendon grafts are the autogenous graft of choice for patients whose occupation, lifestyle, or religion requires “knee walking,” crawling, or kneeling. Hamstring tendon grafts are also our preferred autogenous graft for patients with a history of extensor mechanism surgery or trauma. We also prefer hamstring tendon grafts for patients with a history of patellofemoral pain or patellar tendinopathy. Finally, hamstring tendon grafts are the autogenous graft of choice when ACL reconstruction is indicated in patients with open growth plates.
The only absolute contraindication to use of hamstring tendon grafts for ACL reconstruction is previous harvest of the hamstring tendons. In cases in which prior pes anserine transfer or open surgical procedures on the medial side of the knee have been performed, the resulting scarring and alteration of normal tissue planes may complicate harvest of hamstring tendon grafts. In these situations, the surgeon may elect to use an alternative autograft or allograft tissue. Studies demonstrating a significant loss of knee flexor strength at high flexion angles suggest caution in use of hamstring tendon grafts for athletes such as gymnasts, wrestlers, sprinters, and American football defensive backs and safeties, who require maximum flexor strength at high angles of flexion. [9] [32]
Rigid initial graft fixation is critical to the success of any ACL reconstruction.[4] Attainment of rigid initial graft fixation prevents failure and minimizes elongation at the graft fixation sites during cyclic loading of the knee before healing at the graft fixation sites has occurred.[4] Because of the longer time required for hamstring tendon grafts to heal to bone, it is important to use graft fixations that are strong and stiff and that resist slippage under cyclic loading, to prevent the development of progressive laxity in the postoperative period. However, at present, the optimal graft fixation method for hamstring tendon grafts remains controversial, and there is little consensus as to what fixation methods produce the best clinical outcomes.
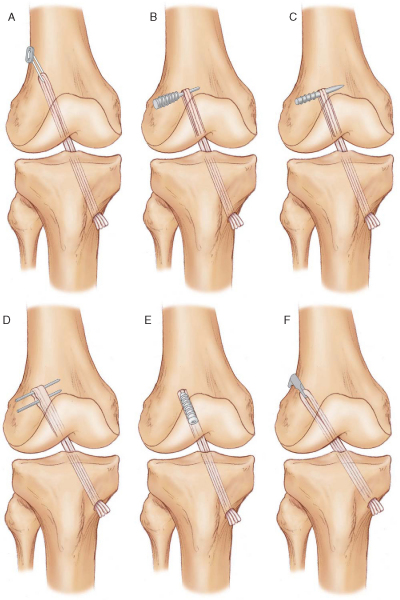
Femoral Fixation Options (
Fig. 62-1
)
Laboratory biomechanical studies have demonstrated that the EndoButton CL and cross pins provide strong femoral fixation with minimal slippage during cyclic loading. [6] [19] Although intertunnel fixation with interference screws is a popular hamstring tendon graft fixation technique, our laboratory biomechanical studies have demonstrated that this fixation method is the weakest and has the largest amount of slippage during cyclic loading. [6] [19] We prefer femoral fixation with the EndoButton CL for the following reasons:
|
|
|
|
Figure 62-1 |
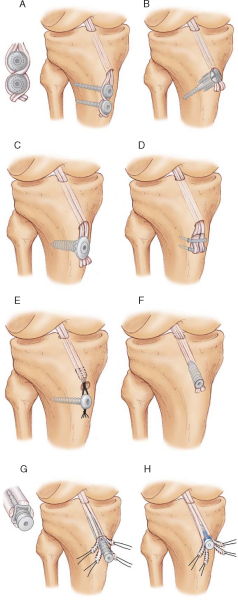
Tibial Fixation Options (
Fig. 62-2
)
Tibial fixation is the weak link of ACL graft fixation, and tibial fixation of hamstring tendon grafts remains problematic.[4] Problems with tibial fixation result primarily from the lower bone mineral density of the proximal tibia and the fact that tibial fixation devices must resist shear forces applied parallel to the axis of the tibial bone tunnel.[4] Cortical fixation techniques can address the issue of the lower bone mineral density of the proximal tibia. However, these implants are often prominent and may cause local skin irritation and pain and require a second operation for removal.[24] Intratunnel tibial fixation with interference screws eliminates the problem of prominent hardware; however, laboratory biomechanical studies have shown that this fixation method is the weakest and demonstrates the greatest amount of slippage under cyclic loading. [20] [24] On the basis of its ease of use and of biomechanical studies that demonstrate high initial fixation strength and stiffness with minimal slippage under cyclic loading conditions, we prefer intertunnel tibial fixation with the IntraFix tibial fastener (DePuy-Mitek, Norwood, Mass). [7] [19]
|
|
|
|
Figure 62-2 |
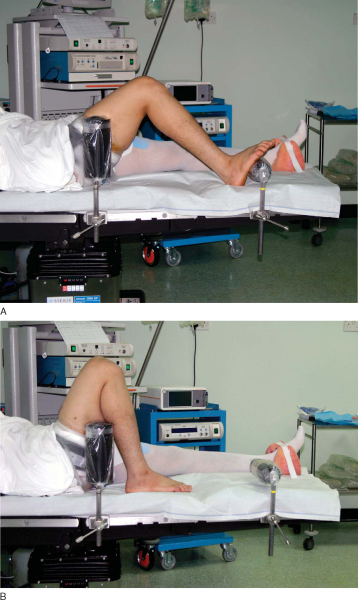
The operation is performed as an outpatient procedure under general or regional anesthesia. A thigh-length TED antiembolism stocking (Kendall Company, Mansfield, Mass) and a foam rubber heel pad are applied to the well leg. A padded pneumatic tourniquet is applied high on the thigh of the operative leg but is rarely used during the operation. The patient is positioned supine on the operating room table and given 1 g of a first-generation cephalosporin intravenously followed by a continuous intravenous infusion of ketorolac at 4 mg/hr. A lead gonad shield is applied to protect the patient from radiation exposure during intraoperative fluoroscopy. Our preferred technique is to position the lower extremity so that a full, free range of motion can be performed during the procedure. Full unrestricted flexion of the knee is particularly important if the femoral tunnel is drilled by the anteromedial portal technique. We use a padded thigh post and hip positioner placed at the level of the tourniquet and a padded, L-shaped footrest that can be moved along the side rail of the operating room table, allowing the flexion angle of the knee to be changed during the procedure. The padded footrest is typically adjusted to maintain the knee at 90 degrees of flexion without manual assistance. The padded hip positioner stabilizes the patient’s pelvis and the padded thigh post acts as a fulcrum to allow application of valgus force to the knee, permitting the medial compartment to be opened for performance of meniscus surgery (
Fig. 62-3
). Use of a standard circumferential arthroscopic leg holder and dropping the foot of the operating room table limit knee flexion and may compromise drilling of the femoral tunnel by the anteromedial portal technique.
|
|
|
|
Figure 62-3 |
After routine iodine skin preparation and sterile draping, a solution of 5 mg of morphine sulfate plus 20 mL of 0.25% bupivacaine (Marcaine) with 1:100,000 epinephrine is injected into the suprapatellar pouch for preemptive analgesia. With the use of a continuous ketorolac intravenous infusion and intraarticular administration of morphine, we have not found it necessary to use femoral nerve blocks for postoperative pain management. Use of an infusion pump improves joint distention and visualization, allowing the procedure to be performed without inflation of the tourniquet.
Specific Steps (
Box 62-1
)
1. Hamstring Tendon Graft Harvest
Harvest of the hamstring tendons can be performed through a vertical or oblique skin incision centered over the tibial insertion of the pes anserine tendons (
Fig. 62-4
). When the transtibial tunnel technique is used to drill the femoral tunnel, it is important to center the vertical skin incision midway between the anterior tibial crest and the posteromedial border of the tibia to allow the tibial tunnel to be positioned along the anterior fibers of the medial collateral ligament (MCL). If the femoral tunnel is to be drilled by the anteromedial portal technique, the vertical skin incision can be positioned closer to the anterior crest of the tibia. This incision is more extensile and can easily be extended to harvest a patellar tendon graft should premature amputation of the semitendinosus tendon graft occur. The oblique skin incision runs parallel to Langer’s lines (resulting in a more cosmetic appearance), provides better proximal exposure of the tendons, and requires less skin retraction during drilling of the tibial tunnel. The anatomic course of the infrapatellar branches of the saphenous nerve also makes them less vulnerable to injury when the oblique skin incision is used.[31] However, the saphenous nerve can be injured if the oblique skin incision is positioned too close to the posteromedial corner of the tibia or sharp dissection is extended back into this region.[31] Should premature amputation of the semitendinosus tendon occur, the oblique skin incision is not extensile and an additional skin incision is required to harvest a patellar tendon autograft. We recommend against use of the oblique skin incision until experience is gained with the harvesting technique and the surgeon is able to consistently harvest hamstring tendon grafts of adequate length.
|
|
|
|
Figure 62-4 (From Brown CH, Sklar JH, Darwich N. Endoscopic anterior cruciate ligament reconstruction using autogenous doubled gracilis and semitendinosus tendons. Tech Knee Surg 2004;3:217.) |
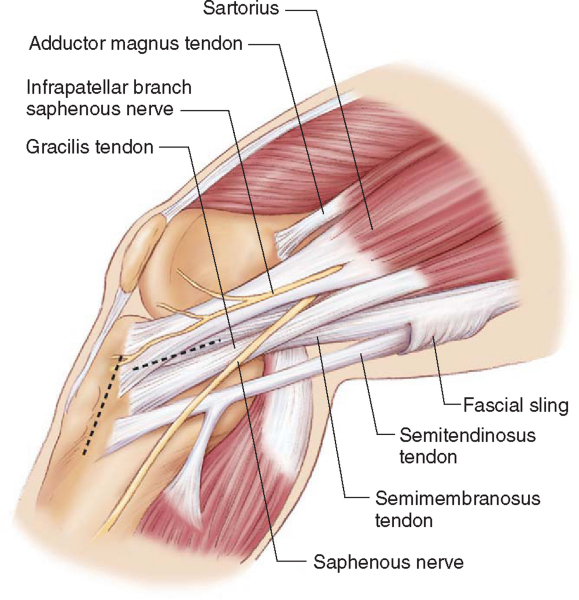
In the average-size patient, the superior border of the sartorius tendon is approximately one finger width below the tibial tubercle or three finger widths below the medial joint line (personal observation: the tendons insert more proximally in Middle Eastern patients). In revision cases involving a failed primary patellar tendon reconstruction, the distal portion of the previous patellar tendon harvest incision can be extended distally 2 to 3 cm below the tibial tubercle, allowing simultaneous harvest of the hamstring tendon grafts and removal of the tibial fixation hardware.
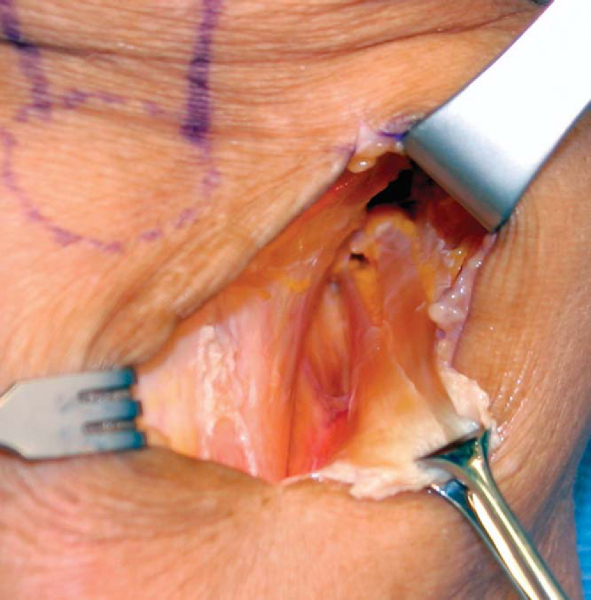
The skin incision and subcutaneous tissues are infiltrated with a solution of 0.25% bupivacaine with 1:100,000 epinephrine for hemostasis and preemptive analgesia. We routinely harvest the tendon grafts without inflation of the tourniquet. The sartorius fascia is exposed by sharp and blunt dissection. We use an inside-out technique to harvest the two tendons because this technique gives an excellent view of the internal aspect of the pes anserine and allows the surgeon to better visualize and to identify any of the associated anatomic variations or variable tendon attachments to the tibia, which are common.[21] In the inside-out technique, the conjoined tibial insertion of the two tendons is detached from the tibia by making an inverted L-shaped incision through the sartorius fascia. The sartorius fascia is grasped with an Allis clamp and lifted away from the tibia, thus protecting the underlying MCL. The fascia is incised parallel to the gracilis tendon and the tibial insertion of the two tendons is sharply released from the crest of the tibia, revealing the inner aspects of the two tendons (
Fig. 62-5
).
|
|
|
|
Figure 62-5 |
A right-angled type clamp is used to separate the two tendons from the undersurface of the sartorius fascial flap, which is preserved for later closure. The gracilis tendon is sharply divided and grasped with wide Allis-Adair tissue forceps (Codman & Shurtleff, Inc., Raynham, Mass). Blunt scissors dissection is used to free the tendon from the undersurface of the sartorius fascia. It is important to bluntly release the interconnecting fascial bands that run between the two tendons. Sharp or scissors dissection along the superior border of the gracilis should be avoided to prevent injury to the saphenous nerve, which leaves Hunter canal and crosses over the superior border of the gracilis tendon at the posteromedial corner of the knee.[31] Five throws of a running baseball-style whipstitch are placed in the free end of the gracilis tendon with a No. 2 nonabsorbable suture (Ti+Cron, United States Surgical, Norwalk, Conn; Ethibond special order D-5757, Ethicon, Inc., Somerville, NJ).
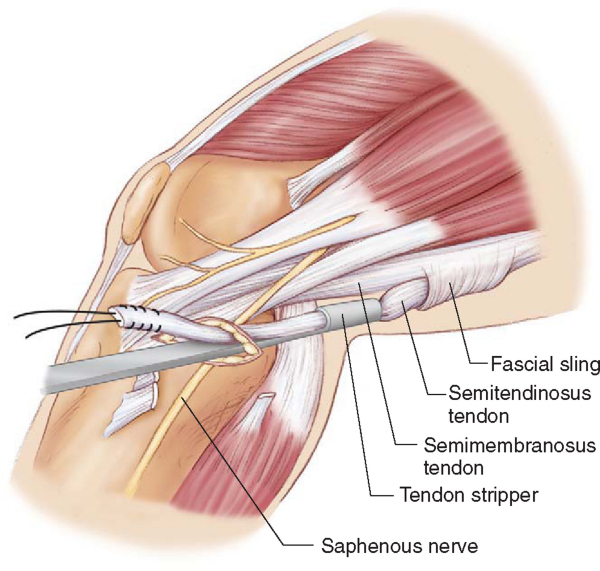
Depending on the surgeon’s preference, the tendons can be harvested with a slotted tendon stripper, a closed Brand-type tendon stripper, or a tendon harvester (Linvatec, Largo, Fla). The gracilis tendon is harvested by flexing the knee to 90 degrees and advancing the tendon stripper parallel to the tendon by a slow, steady, rotating motion. The semitendinosus tendon is harvested in a similar fashion; however, there are more extensive fascial connections that extend from the inferior border of the semitendinosus tendon to the medial head of the gastrocnemius. [7] [31] These fascial connections must be released to prevent premature amputation of the semitendinosus tendon.
More proximally in the thigh, the surgeon may encounter a second potential troublesome area at a band of thickened semimembranosus fascia that courses inferior and medial to the semimembranosus tendon.[7] This thickened band of fascia forms a sling for the semitendinosus tendon, suspending it from the inferior border of the semimembranosus muscle. Premature amputation of the semitendinosus tendon can result if the tendon stripper passes outside of the tendon’s normal path (
Fig. 62-6
).[7] If excessive resistance is encountered in attempting to advance the tendon stripper through this region, it is tempting to pull harder on the semitendinosus tendon and to apply more force to the tendon stripper to advance it. However, this can cause the fascial sling beneath the semimembranosus to constrict, making it more difficult to pass the tendon stripper. Decreasing tension on the tendon and “navigating” the tendon stripper through the fascial sling will often lead to success. In a heavily muscled individual, the tendon stripper will often meet resistance at the musculotendinous junction; this can be overcome by steady pressure and rotation of the tendon stripper or by use of the larger 7.4-mm diameter stripper (Smith & Nephew Endoscopy, Andover, Mass). A successful graft harvest typically results in graft lengths of 20 to 26 cm for the gracilis and 24 to 30 cm for the semitendinosus tendon.
|
|
|
|
Figure 62-6 (From Brown CH, Sklar JH. Endoscopic anterior cruciate ligament reconstruction using quadrupled hamstring tendons and endobutton femoral fixation. Tech Orthop 1998;13:285.) |
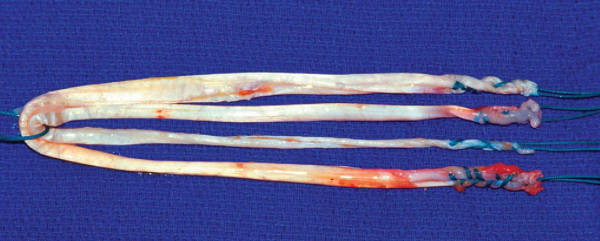
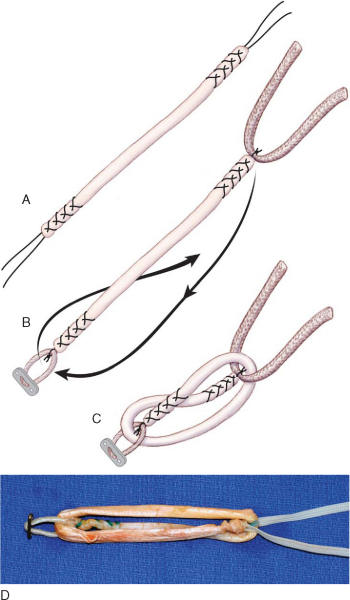
Preparation of the hamstring tendon grafts is facilitated by use of a graft preparation board (Graft Master II; Smith & Nephew Endoscopy). Residual muscle fibers on the proximal end of both tendons are removed by blunt dissection with a metal ruler, a large curet, or a Cushing-type periosteal elevator. The two tendons are cut to the same length, and the proximal end of each tendon is tubularized with a running, baseball-style whipstitch of a No. 2 nonabsorbable suture. The sutures on each end of the tendon grafts are tensioned with a “cinching” motion to remove excess slack from the whipstitches. The two tendon grafts are looped around a No. 5 suture, making a DGST graft (
Fig. 62-7
). The diameter of the DGST graft is measured to the nearest 0.5 mm by use of a 0.5-mm incremental sizing block or sizing tubes. The whipstitches from the gracilis and semitendinosus tendons on each end of the graft are tied together approximately 12 cm from the end of the tendon grafts. This facilitates use of a graft-tensioning device later in the procedure. The DGST graft is looped around an EndoButton tensioning post (Smith & Nephew Endoscopy), and the DGST graft is covered with a moist laparotomy pad and pretensioned on the graft preparation board with 5 to 10 pounds for the remainder of the procedure.
|
|
|
|
Figure 62-7 (From Brown CH, Sklar JH, Darwich N. Endoscopic anterior cruciate ligament reconstruction using autogenous doubled gracilis and semitendinosus tendons. Tech Knee Surg 2004;3:221.) |
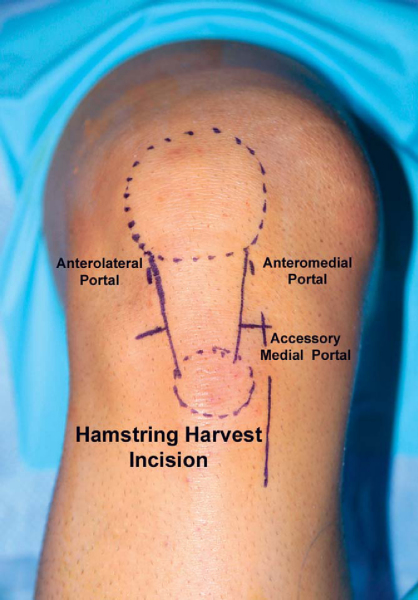
3. Arthroscopic Portal Placement
As recommended by Cohen and Fu,[10] we use three portals for ACL reconstruction (
Fig. 62-8
). A high anterolateral portal at the level of the inferior pole of the patella adjacent to the lateral border of the patellar tendon is used for the routine viewing portal. The height of this portal places the arthroscope above the fat pad and provides an excellent “look down” view of the ACL tibial attachment site. This portal gives a frontal view of the femoral attachment site of the ACL and is most helpful in determining the clock orientation and high-low placement of the femoral tunnel. An anteromedial portal at the level of the inferior pole of the patella adjacent to the medial border of the patellar tendon is used for instrumentation and viewing of the medial wall of the lateral femoral condyle. This portal provides a more orthogonal view of the ACL femoral attachment site and allows more accurate assessment of shallow-deep femoral tunnel placement (
Fig. 62-9
).
|
|
|
|
Figure 62-9 |
An accessory medial portal located directly inferior to the anteromedial portal at the level of the medial joint line is used for drilling of the femoral tunnel.
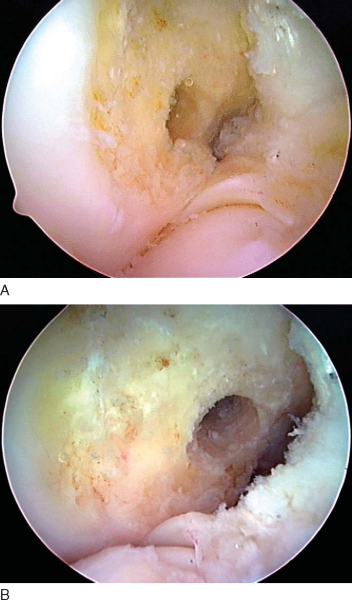
4. Preparation of the Intercondylar Notch
Preparation of the intercondylar notch is necessary to allow visualization of the ACL femoral attachment site. A routine diagnostic arthroscopy is performed, and associated meniscal and chondral injuries are treated appropriately. The torn fibers of the ACL are removed from the lateral femoral condyle and the tibial attachment site by a motorized shaver, electrocautery pencil, or radiofrequency probe. We have found that use of a radiofrequency probe is faster, allows hemostasis to be achieved, and more completely removes the soft tissue along the lateral wall of the intercondylar notch, providing better visualization of the bone anatomy. Use of the anteromedial portal technique allows the femoral tunnel to be positioned lower down the sidewall of the lateral femoral condyle, resulting in a more horizontal orientation of the ACL graft. A more horizontal ACL graft avoids posterior cruciate ligament impingement and in most cases eliminates the need for notchplasty. However, a selective notchplasty may be required in the case of congenitally narrowed notches or in chronic cases with notch stenosis due to the development of notch osteophytes.
Transtibial Tunnel Technique Versus Anteromedial Portal Technique
Hamstring ACL reconstruction can be performed by the transtibial tunnel or anteromedial portal technique. [7] [22] [25] [26] [29] Regardless of the surgical technique used, the following goals must be achieved to optimize the outcome of the procedure:
| • | An anatomically positioned, impingement-free tibial tunnel | |
| • | A tibial tunnel with a minimum length of 40 mm | |
| • | An orientation of the femoral tunnel at a 9:30- to 10-o’clock position along the sidewall of the lateral femoral condyle | |
| • | A femoral tunnel with a minimum length of 40 mm |
Achievement of these goals will eliminate roof impingement, optimize graft fixation with the EndoButton CL and IntraFix tibial fastener, and maximize the ability of a single-tunnel hamstring ACL reconstruction to control tibial rotation.[23]
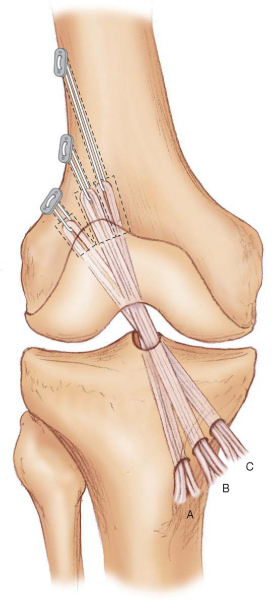
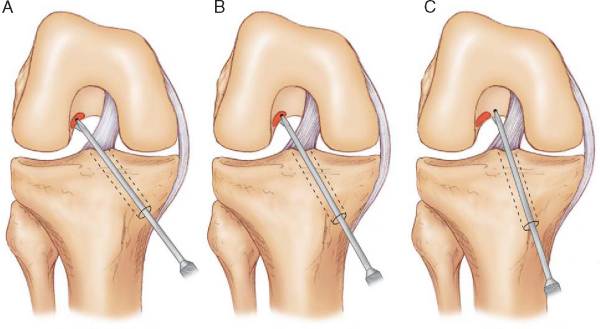
Advantages of the transtibial tunnel technique are that it is familiar to most surgeons and does not require the knee to be flexed to 120 degrees during drilling of the femoral tunnel. Joint distention and the field of view in the intercondylar notch are compromised when the knee is flexed to 120 degrees or more, as required with the anteromedial technique. The transtibial tunnel technique also tends to produce longer femoral tunnels in the range of 40 to 50 mm. Femoral tunnel lengths in this range are advantageous for the EndoButton CL fixation technique because they allow a minimum of 25 mm of DGST graft to be inserted into the femoral socket. Another advantage of the transtibial tunnel technique is that the length of the femoral tunnel typically results in the EndoButton implant’s resting on the stronger cortical bone of the distal femur. The major disadvantage of the transtibial tunnel technique is that free positioning of the femoral tunnel in the intercondylar notch is not possible because the femoral tunnel location is determined by the axis of the tibial tunnel.
In the transtibial tunnel technique, the angle of the tibial tunnel in the coronal plane determines femoral tunnel length and the position of the ACL graft in the intercondylar notch (
Fig. 62-10
).[7] Laboratory biomechanical studies have demonstrated that single-tunnel ACL grafts placed at the 10-o’clock position provide better rotational control as compared with ACL grafts at the 11-o’clock position.[23] For the femoral tunnel to be positioned at the 10-o’clock location, the tibial guide pin must be started adjacent to the anterior fibers of the MCL[7] (
Fig. 62-11
). However, in some cases, even when these recommendations are followed, it may not be possible to place the femoral tunnel at the desired position. When faced with this situation, we recommend switching to the anteromedial portal technique to avoid malpositioning of the ACL graft. For a detailed description of hamstring ACL reconstruction performed by the transtibial tunnel technique, we refer the reader to our previously published technique.[7]
|
|
|
|
Figure 62-10 (From Brown CH, Sklar JH. Endoscopic anterior cruciate ligament reconstruction using quadrupled hamstring tendons and endobutton femoral fixation. Tech Orthop 1998;13:288.) |
|
|
|
|
Figure 62-11 (Redrawn from Brown CH, Sklar JH, Darwich N. Endoscopic anterior cruciate ligament reconstruction using autogenous doubled gracilis and semitendinosus tendons. Tech Knee Surg 2004;3:222.) |
In the anteromedial portal technique, the femoral tunnel is drilled through the anteromedial portal or an accessory anteromedial portal. [23] [29] Because the femoral tunnel is made independently of the tibial tunnel, free placement in the intercondylar notch is always possible. Advantages of the anteromedial portal technique include the following:
| • | The ability to position the femoral tunnel in a more anatomic position lower down the sidewall of the lateral femoral condyle | |
| • | The freedom to locate the starting position of the tibial tunnel anywhere along the medial surface of the tibia | |
| • | The freedom to drill a steeper and therefore longer tibial tunnel | |
| • | The possibility of drilling the femoral tunnel before drilling the tibial tunnel, which helps maintain joint distention, improving joint visualization during the remainder of the procedure |
However, the anteromedial portal technique requires the knee to be flexed 120 degrees or more during the drilling of the femoral tunnel, which limits joint distention and provides a more unconventional field of view in the notch that can result in spatial disorientation. [23] [29] The anteromedial portal technique also tends to produce a more horizontal femoral tunnel that results in the EndoButton implant’s lying on the weaker metaphyseal bone of the distal femur.[8] In our opinion, the ability of the anteromedial portal technique to allow a more anatomic placement of the femoral tunnel far outweighs its few disadvantages. For this reason, the anteromedial portal technique for femoral tunnel drilling has become our preferred surgical technique for performing ACL reconstruction.
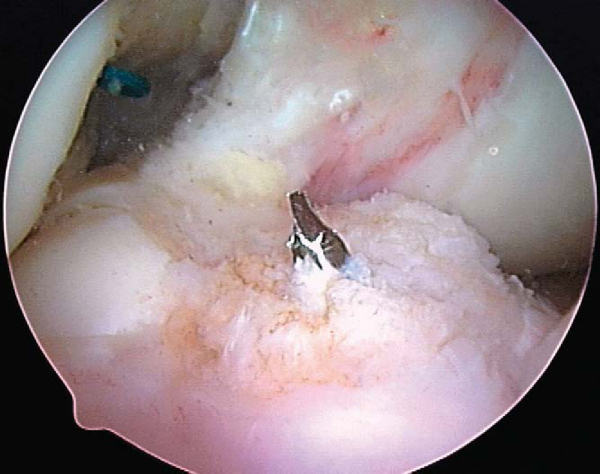
Use of the low accessory medial portal for drilling of the femoral tunnel allows a longer femoral tunnel to be achieved than does drilling through the anteromedial portal. The resulting longer femoral tunnel is more advantageous for femoral fixation with the EndoButton CL. The location for the accessory medial portal is made by an 18-gauge spinal needle. This portal is located as low as possible just above the medial joint line. Placement of the portal too medially produces a shorter femoral tunnel and risks injury to the medial femoral condyle by the endoscopic drill bit during drilling of the femoral tunnel. The accessory medial portal is established under direct vision with a No. 11 knife blade, with care taken to avoid injury to the medial meniscus. Dilation of the portal with the blunt arthroscope obturator followed by the tips of the Metzenbaum scissors helps ease future passage of instrumentation.
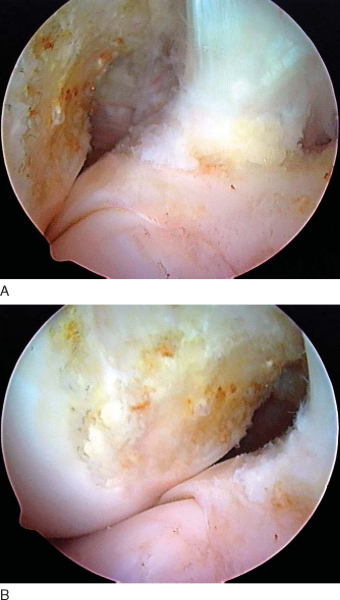
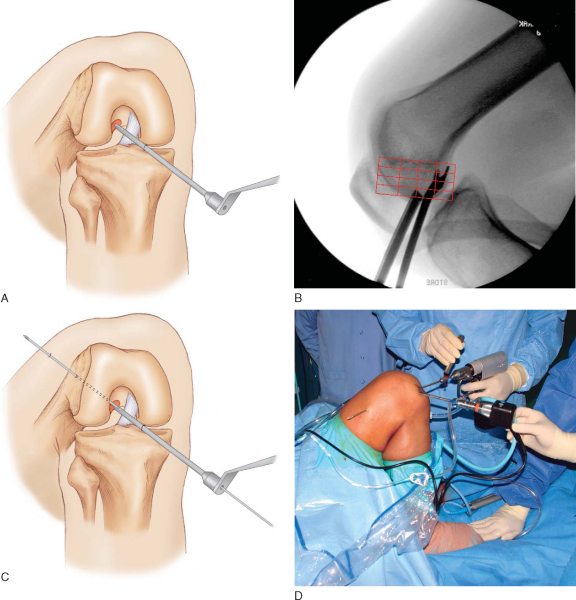
A microfracture awl is passed through the accessory medial portal and used to mark the starting point for the femoral tunnel under arthroscopic guidance. Correct placement of the awl along the lateral wall of the intercondylar notch can be verified by intraoperative fluoroscopy with the radiographic quadrant method.[3] Fine tuning of the awl’s position is performed under fluoroscopic guidance. Additional confirmation of the correct starting point can be made by viewing the tip of the awl through the anteromedial portal (
Fig. 62-12
).
|
|
|
|
Figure 62-12 |
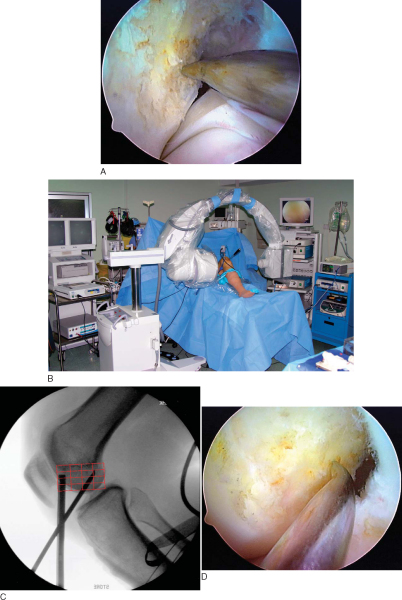
A 4- or 5-mm offset femoral aimer is passed through the accessory medial portal, and the knee is slowly flexed to 120 degrees. The blade of the femoral offset aimer is placed in the over-the-top position, and a 2.7-mm drill-tipped guide pin is positioned at the site of the microfracture awl penetration mark. Fluoroscopy can be used to check the guide pin placement. The knee is slowly brought into full flexion, and line of sight is used to verify that the guide pin will exit the lateral thigh above the intermuscular septum. The 2.7-mm drill-tipped guide wire is drilled out through the soft tissues of the lateral thigh (
Fig. 62-13
). Inadequate knee flexion can result in the guide pin’s coming to lie inferior to the intermuscular septum, placing the peroneal nerve at risk. A 4.5-mm EndoButton drill bit (Smith & Nephew Endoscopy) is used to drill a channel through the lateral femoral cortex. A closed-end femoral socket is drilled with the appropriately sized, calibrated endoscopic 0.5-mm drill bit (
Fig. 62-14
). The femoral socket depth must allow for the length of the DGST graft to be inserted into the femur (usually 25 to 30 mm) plus an extra 6 mm to allow the EndoButton to clear the lateral femoral cortex and to flip. An EndoButton depth gauge (Smith & Nephew Endoscopy) inserted through the accessory medial portal is used to measure the femoral tunnel length. A loop of No. 5 nonabsorbable suture is inserted into the eyelet of the passing pin, and the ends of the suture are passed out of the lateral thigh. The loop of No. 5 suture is passed into the joint and positioned at the entrance to the femoral tunnel. This suture will be used later in the procedure to pass the hamstring tendon graft. Because cylindric hamstring tendon grafts contact the entire edge of the femoral tunnel during cyclic motion of the knee, it is extremely important to bevel or chamfer the tunnel edges with a rasp to minimize graft abrasion.
|
|
|
|
Figure 62-13 |
|
|
|
|
Figure 62-14 |
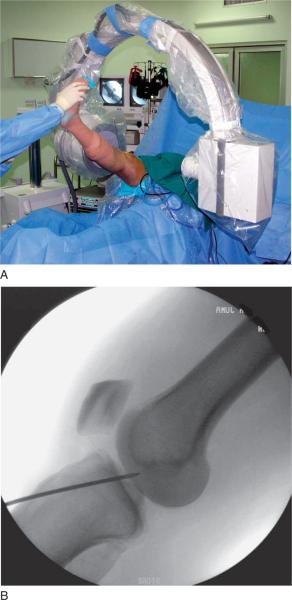
In our surgical technique, a tibial tunnel length of 40 to 50 mm is optimal; this range will allow the 30-mm-long IntraFix sheath to be inserted flush with the tibial cortex, with no risk that the sheath will protrude into the intraarticular portion of the knee joint. Setting the adjustable tibial aimer between 50 and 55 degrees will usually allow these tunnel lengths to be achieved. The starting location of the tibial guide pin along the medial surface of the tibia is not critical when the anteromedial portal technique is used. The anterior horn of the lateral meniscus, the medial and lateral tibial spines, and the posterior cruciate ligament are used as landmarks to locate the intraarticular position of the tibial guide pin (
Fig. 62-15
). It is extremely helpful to use fluoroscopy to ensure correct placement of the tibial guide pin. With the knee in maximum extension, a true lateral fluoroscopic view of the knee with the femoral condyles overlapping is obtained. The tip of the guide pin should be parallel to and 2 mm posterior to Blumensaat’s line (
Fig. 62-16
). An offset parallel drill guide can be used to reposition the guide pin if necessary. To prevent anterior drift of the tibial tunnel, a cannulated, rear-entry–style, 0.5-mm drill bit is used to drill the tibial tunnel. Half-round or angled ACL chamfering rasps are used to smooth the intraarticular edges of the tibial tunnel to minimize graft abrasion. Soft tissue around the superior edge of the tibial tunnel is cleared with an electrocautery pencil and a Cobb periosteal elevator in preparation for insertion of the IntraFix tibial fastener.
|
|
|
|
Figure 62-15 |
|
|
|
|
Figure 62-16 |
7. Calculation of EndoButton CL Length and Graft Preparation
The required continuous-loop length is calculated by subtracting the amount of graft to be inserted into the femoral socket from the directly measured femoral tunnel length. For example, assuming the femoral tunnel length measures 48 mm, and 30 mm of DGST graft has been chosen to be inserted into the femoral tunnel, the required continuous-loop length is calculated as follows: 48 mm – 30 mm=18 mm. Because the continuous-loop lengths come in 5-mm increments, a 15- or 20-mm-loop comes closest to the calculated length. In general, we prefer to use the shortest possible continuous loop because this increases the stiffness of the femur–EndoButton CL–DGST graft complex. In the example cited before, we would choose a 15-mm length of loop. The appropriate length of EndoButton CL is selected and placed in the EndoButton holder (Smith & Nephew Endoscopy), and the axilla of the DGST graft is passed through the continuous loop. The two ends of the DGST graft are equalized in length and pretensioned to 10 pounds on the graft preparation board. The graft is marked with a surgical marking pen at the measured femoral tunnel length. A full-length No. 2 flipping suture and a No. 5 passing suture are passed through the end holes of the EndoButton. A second No. 5 suture can be inserted into the same hole as the No. 2 flipping suture and passed alongside the graft and out of the tibial tunnel. If necessary, this “safety suture” can be used to disengage the EndoButton from the distal femur, allowing the hamstring tendon graft to be removed from the knee.
8. Graft Passage and Femoral Fixation
The loop of No. 5 suture is retrieved from the femoral tunnel and pulled out of the tibial tunnel. The No. 2 flipping suture and No. 5 passing suture are passed through the loop of the No. 5 suture and pulled out the lateral thigh. Under arthroscopic visualization, the EndoButton and the attached hamstring tendon graft are passed across the joint and into the femoral socket by use of the No. 5 passing suture. The DGST graft must be advanced until the previously placed insertion mark is seen to pass up into the femoral socket a distance of a few millimeters. This extra distance allows the EndoButton to pass outside the lateral femoral cortex and to flip. The No. 2 flipping suture is pulled in a proximal direction, parallel to the femoral tunnel, and the EndoButton will be felt to flip against the lateral femoral cortex. Correct deployment can be verified by pulling on the No. 2 sutures and feeling the EndoButton “teeter-totter” against the lateral femoral cortex. If any doubts exist about secure deployment of the EndoButton, fluoroscopy can be used to check the position of the EndoButton.
Tension is applied to the hamstring tendon graft, and the previously placed mark at the insertion length will be seen to slide back down the femoral tunnel. If the measurements are correct, this mark should lie at the entrance of the femoral tunnel. If it should become necessary to remove the graft, the No. 5 passing suture on the EndoButton can be pulled proximally, tipping the EndoButton away from the femoral cortex. The No. 5 safety suture that exited the tibial tunnel is pulled, tipping the opposite end of the EndoButton into the 4.5-mm tunnel. The EndoButton will then disengage from the femoral cortex, and the graft can be removed by applying tension to the whipstitches on the tibial end of the graft.
The opposite ends of the hamstring tendon graft are applied to a graft-tensioning device (Smith & Nephew Endoscopy), and a preload of 80 to 100 N is applied to the graft. The tensioning device is designed to apply equal tension to each end of the four-stranded hamstring tendon graft and to spread the tendons apart, allowing easier insertion of the IntraFix tibial fastener. Application of equal tension to all four limbs of the hamstring tendon graft optimizes initial fixation strength and stiffness.[16] The knee is cycled from 0 to 90 degrees for a minimum of 30 cycles, with a preload of 80 to 100 N applied to the graft by the tensioning device. Application of a preload and cycling of the knee are important steps as they allow the EndoButton CL to settle on the femoral cortex and remove creep from the polyester continuous loop, the tendon whipstitches, and the hamstring graft. At present, the optimal graft tension and knee flexion angle during tibial fixation are unknown. Depending on the graft excursion pattern detected in cycling of the knee, we tend to fix the graft with the knee positioned between 0 and 20 degrees of flexion. The usual graft excursion pattern detected with our bone tunnel placements results in pulling of the DGST graft into the tibial tunnel (tightening) during the last 20 degrees of terminal extension. When there is minimal graft excursion detected, we tend to fix the graft with the knee at 20 degrees of flexion and near full extension with greater excursions. Because of the high fixation strength and stiffness and the resistance to slippage of the IntraFix tibial fastener, we caution against applying excessive tension (>80 N) to the graft or fixing the knee at a flexion angle of more than 20 degrees. A high graft tension force in combination with the knee flexed more than 20 degrees may result in a permanent flexion contracture.
Although the IntraFix tibial fastener is available as a bioabsorbable implant, we continue to prefer the original Delrin plastic version. The bioabsorbable version requires more precise sizing and a larger number of implants, increasing inventory. In addition, the bioabsorbable screw can break, leaving the surgeon with a difficult salvage situation.
Concentric placement of the IntraFix tibial fastener is critical to the success of the technique and starts with the identification of the central axis of the tibial tunnel. The central axis of the tibial tunnel is identified by passing a 1.1-mm guide wire up the center of the tensioning device and down the center of the four graft strands into the knee joint. Once the central axis of the tibial tunnel is identified, the tensioner should be held in this orientation during the subsequent steps to avoid divergent placement of the implant. The four-quadrant trial dilator is inserted down the center of the four hamstring tendon strands and oriented so that each graft strand sits in its own channel. While the desired tension is maintained on the hamstring graft, the four-quadrant trial dilator is tapped into the tibial tunnel for a distance of 30 to 35 mm. This step compresses and separates the four tendon strands and notches the bone tunnel wall to receive the 30-mm IntraFix sheath.
The 30-mm IntraFix sheath is placed on the sheath inserter with the derotational tab on the sheath oriented to match the tab on the sheath inserter. The knee is positioned at the chosen flexion angle, and a final tension of 60 to 80 N is applied to the DGST graft by use of the tensioning device. It is important to maintain the chosen flexion angle and desired graft tension during the subsequent steps. The IntraFix sheath is inserted between the four graft strands, making sure that each graft strand is positioned into a separate channel of the sheath with the derotational tab on the sheath oriented at the 3-o’clock or 9-o’clock position. Orientation of the derotational tab at these positions allows the IntraFix sheath to be inserted more deeply into the tibia, avoiding prominence. The IntraFix sheath is tapped into the bone until the derotational tab is inserted flush with the cortex (
Fig. 62-17
).
|
|
|
|
Figure 62-17 |
The sheath inserter is removed, and the 0.042-inch guide wire for the tapered screw is inserted through the center of the sheath until a loss of resistance is felt as the tip of the guide wire enters the knee joint.
An IntraFix tapered screw size of 1 mm larger than the tibial tunnel diameter is chosen. For example, we use a 7- to 9-mm tapered screw for an 8-mm tibial tunnel. Given the typical size of most DGST grafts, the 7- to 9-mm tapered screw is most commonly used. While tension is maintained on the DGST graft, the IntraFix tapered screw is inserted into the sheath until the superior aspect of the screw head is flush with or buried just below the tibial cortex (
Fig. 62-18
). The best bone quality is at or next to the tibial cortex, and overly deep insertion of the screw may decrease fixation strength.[5] Protruding or prominent areas of the polyethylene sheath are trimmed flush with the tibial cortex with a No. 15 blade and a small bone rongeur.
|
|
|
|
Figure 62-18 |
The fixation strength of any intratunnel tibial fixation device depends on the local bone mineral density. [4] [20] [24] If the surgeon thinks that there was inadequate torque during the insertion of the tapered screw or if the patient has soft bone, we recommend that supplemental tibial fixation be used. Depending on the length of the DGST graft, the protruding tendons can be stapled below the tibial tunnel with a small barbed staple (Smith & Nephew Orthopaedics, Memphis, Tenn), or the tendon whipstitches can be tied around an extra-small nonbarbed staple or tibial fixation post.
The stability and range of motion of the knee are checked. It is important to verify that the patient has full range of motion before leaving the operating room. The arthroscope is inserted into the knee, and graft tension and impingement are assessed. Our usual graft placement and tensioning technique result in the four strands of the DGST graft being maximally tight between 0 and 20 degrees, with the graft tension decreasing slightly as the knee is flexed to 90 degrees (
Fig. 62-19
). After confirmation that the patient has a full range of motion and negative Lachman and pivot shift test results, the passing and flipping sutures are pulled out of the lateral thigh.
|
|
|
|
Figure 62-19 |
A closed suction drain is inserted under the sartorius fascia up into the hamstring harvest site and is helpful in preventing postoperative hematoma formation and decreasing ecchymosis along the medial side of the knee. The sartorius fascia that was preserved during the graft harvest is repaired back to the tibia with a 0 absorbable suture. The subcutaneous tissue is closed in layers with fine absorbable sutures. A running 3-0 Prolene subcuticular pullout suture produces a cosmetic closure. A second solution of 5 mg of morphine sulfate plus 20 mL of 0.25% bupivacaine with 1:100,000 epinephrine is injected into the suprapatellar pouch, and a 30-mg bolus of ketorolac is given for postoperative pain control. The continuous intravenous ketorolac infusion is continued until the patient is discharged from the day-surgery unit. A light dressing is applied over the wound, followed by a thigh-length TED antiembolism stocking, Cryo/Cuff (DJ Orthopedics, Vista, Calif), and knee immobilizer. The Hemovac drain is removed when the patient is discharged from the day-surgery unit.
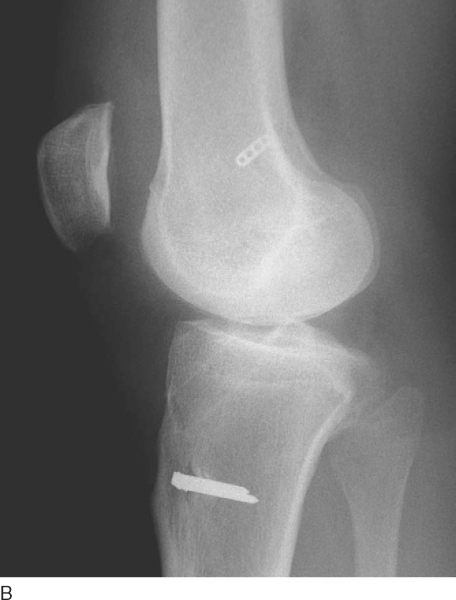
The patient is seen at 7 to 10 days for suture removal and postoperative radiographs (
Fig. 62-20
).
|
|
|
|
Figure 62-20 |
Our postoperative rehabilitation protocol is described in
Table 62-1
. The weight-bearing schedule is modified if a meniscus repair, microfracture, or other associated ligamentous surgery has been performed.
| Goals | Exercises |
|---|---|
| Phase I: Days 0-7 | |
| Control pain, inflammation, joint effusion, swelling | Knee Cryo/Cuff, thigh-length TED stocking, elevation |
| Full passive extension equal to that of the opposite knee | Heel props, pull knee into hyperextension with elastic band |
| Achieve 90-degree flexion | Wall slides, gravity-assisted flexion sitting on the edge of a table |
| Prevent quadriceps shutdown | Electrical muscle stimulation, quad isometrics, straight-leg raises, active assisted extension 90-0 degrees |
| Prevent heel cord contracture | Ankle pumps, calf stretches with elastic bands |
| Gait training | Weight bearing as tolerated with knee immobilizer and crutches; meniscus repair, revisions: ↑25% body weight/week, wean off crutches at end of week 4 |
| Phase II: Weeks 1-2 | |
| Control inflammation, pain, joint effusion, swelling | Continue phase I exercises |
| Maintain full symmetric extension | Continue phase I exercises |
| Achieve 100-125 degrees of flexion | Assisted flexion with use of opposite leg, wall slides, heel drags, rolling stool |
| Develop muscle control to be safely weaned off knee immobilizer and crutches | Continue phase I exercises, mini-squats, toe raises, active extension 90-30 degrees |
| Protect hamstring donor site | Prevent sudden, forceful hamstring stretching with the knee and hip in extension, such as attempting to lean forward to put on socks and shoes or leaning forward to pick up an object off the floor |
| Phase III: Weeks 2-4 | |
| Maintain symmetric extension | Heel props, prone heel hangs, lock knee out, “stand at attention” |
| Patients who fail to obtain symmetric extension should be considered for extension splinting or a “drop-out” cast | |
| Wean off knee immobilizer | Discard immobilizer when straight-leg raises are performed without a quad lag |
| Wean off crutches | One crutch with ability to bear 75% of body weight; discard crutches with full weight bearing and ability to walk with normal heel-toe gait |
| Achieve 125-135 degrees of flexion | Heel slides, sitting back on heels |
| Hamstring strengthening | Hamstring isometrics 0-90 degrees, pull rolling stool backward |
| Quadriceps strengthening | Continue phase II exercises, mini-squats with elastic band for resistance |
| Hip strengthening | Side-lying hip abduction, adjustable-angle hip machine |
| Proprioceptive training | Balance board double-leg stance |
| Aerobic conditioning | Elliptical machine |
| Phase IV: Weeks 4-6 | |
| Obtain full flexion | Heel slides, sitting back on heels |
| Continue quadriceps, hamstring, and hip strengthening | Mini-squats, leg press 50-0 degrees, front step-ups (control hip valgus), StairMaster backward, proprioceptive neuromuscular facilitation, toe raises, seated leg-curl machine 0-90 degrees |
| Proprioceptive training | Balance board double- and single-leg stance, add ball throws and catches |
| Aerobic conditioning | Stationary bike (adjust to protect patellofemoral joint), elliptical machine, pool exercises |
| Phase V: Weeks 6-12 | |
| Increase lower extremity strength and endurance | Increase intensity of phase IV exercises, high-speed (300-360 degrees/sec) isokinetics, extension (90-30 degrees), flexion (0-90 degrees), elliptical machine, StairMaster backward and forward, treadmill walking, pool exercises |
| Advance proprioceptive and perturbation training | Increase intensity of phase IV exercises |
| Phase VI: Weeks 12-16 | |
| Increase quad and hamstring strength | Increase intensity of phase IV exercises, midrange (180-240 degrees/sec) isokinetics, extension (90-30 degrees), flexion (0-90 degrees) |
| Increase hamstring strength at high flexion angles | Prone leg curls with elastic tubing and leg-curl machine (90-120 degrees) |
| Jogging and running | Treadmill jogging and running, outdoor running on low-impact surface |
| Crossover drills | Lateral step-over, carioca drills |
| Phase VI: Weeks 16-24 | |
| Hard cutting and sports-specific drills | Figure-of-eight, circle run, plyometrics, hopping, jumping, sprinting |
| Return to noncontact sports at 4-5 months | Golf, tennis, biking, hiking |
| Return to full sports at 6 months (revisions, 9 months) | |
The risks of complications such as infection, deep venous thrombosis, and loss of motion are the same as for ACL reconstructions performed with other graft sources. However, we are unaware of reports of extensor mechanism rupture or patellar fracture after ACL reconstruction performed with hamstring tendon grafts. Complications unique to hamstring tendon grafts include premature amputation of the hamstring tendons, saphenous nerve injury, bleeding at the hamstring tendon harvest site, and hamstring muscle “pulls.”
The risk of premature amputation of the tendons can be minimized by following the recommendations outlined in the section on graft harvest. If the gracilis tendon is amputated but the semitendinosus is successfully harvested, it is possible in most cases either to triple or to quadruple the semitendinosus tendon, depending on its length (
Fig. 62-21
). In these situations, the EndoButton CL can still be used for femoral fixation; however, because of the shorter length of the graft construct, alternative tibial fixation is obtained by tying the EndoButton tape around a fixation post or an extra-small nonbarbed staple. If necessary, the tibial fixation can be augmented with a 25- to 30-mm bioabsorbable screw with a diameter 1 mm greater than that of the tibial tunnel. If the semitendinosus tendon is amputated, it will be necessary to use an alternative autograft, such as the patellar tendon or quadriceps tendon, or allograft tissue if preoperative consent has been obtained. The possibility of premature amputation of the tendons should be discussed during the informed consent process, and the patient and surgeon should agree on a course of action should this complication occur.
|
|
|
|
Figure 62-21 (From Brown CH, Sklar JH, Darwich N. Endoscopic anterior cruciate ligament reconstruction using autogenous doubled gracilis and semitendinosus tendons. Tech Knee Surg 2004;3:233.) |
| PEARLS AND PITFALLS | |||||||||||||||||||||||||||||||||
|
Historical perceptions of hamstring ACL reconstructions are that they produce unpredictable objective stability, tend to stretch out with time, and are not as good as reconstruction with a patellar tendon graft.
Meta-analyses of Yunes et al[33] and Freedman et al[14] concluded that patellar tendon autografts produce greater stability and result in higher postoperative activity levels. However, these studies included some series in which older hamstring fixation methods and two-stranded hamstring tendon grafts were used. Prospective randomized controlled studies comparing quadrupled hamstrings with bone–patellar tendon–bone reconstructions have demonstrated no significant differences in laxity or in clinical outcome measures at early followup. [1] [2] [13] [15] [22] [26] [30] A metaanalysis performed by Prodromos et al,[28] in which the results were stratified by graft and fixation type, demonstrated that four-stranded hamstring tendon grafts had overall stability rates equal to or higher than those of patellar tendon grafts. This study also demonstrated that the four-stranded hamstring stability rates were fixation dependent; series using EndoButton femoral fixation and second-generation tibial fixation resulted in higher stability rates than did all other graft-fixation combinations. When the literature is carefully analyzed, four-stranded hamstring ACL reconstruction with second-generation fixation is comparable to patellar tendon autograft reconstruction, and current preconceptions regarding four-stranded hamstring ACL reconstructions may be a historical artifact (
Table 62-2
).
| Author | Year | Average Followup | Manual Max KT ≤2 mm | Clinical Outcome | Donor Site Morbidity |
|---|---|---|---|---|---|
| EndoButton Femoral Fixation with Second-Generation Tibial Fixation | |||||
| Cooley et al[11] | 2001 | 5.7 years | 100% | 85% IKDC score normal or nearly normal | 24% increased PF crepitus |
| Eriksson et al[12] Prospective randomized STG vs. PT | 2001 | 33 months | STG, 43% PT, 48% NS |
Lysholm score increased from 61 to 86 58% IKDC score normal or nearly normal Lysholm and Tegner scores, range of motion, laxity NS from PT |
STG and PT PF pain scores NS Kneeling pain: PT > STG |
| Feller and Webster[13] Prospective randomized STG vs. PT | 2003 | 3 years | 85% | 93% IKDC score normal or nearly normal PT greater extension deficit; quad strength, activity levels NS from PT |
Kneeling pain: STG, 26%; PT, 67% |
| Gobbi et al[15] | 2003 | 3 years | 90% | Lysholm score, 91 | Kneeling pain, 7% |
| 72% IKDC score normal or nearly normal | 10% mild PF crepitus | ||||
| Gobbi ST vs. STG | 2005 | 3 years | ST, 88% | Lysholm score: ST, 92; STG, 94 | Kneeling pain, 3% |
| STG, 89% | 94% IKDC score normal or nearly normal | 10% mild PF crepitus | |||
| 8% required hardware removal | |||||
| Prodromos et al[27] | 2005 | 4.5 years | 86% | Lysholm score, 95 72% IKDC normal or nearly normal No difference between males and females in Lysholm score or KT laxity scores No patient required hardware removal |
PF crepitus: mild, 20%; moderate, 3% |
| Cross-Pin Femoral Fixation | |||||
| Aglietti et al[1] Prospective randomized STG vs. PT | 2004 | 2 years | STG, 57% PT, 65% NS |
IKDC score normal: STG, 57%; PT, 63% (NS) Range of motion, quad and hamstring strength, postoperative activity levels NS |
PF symptoms: NS Kneeling pain: STG, 15%; PT, 62% |
| Harilainen et al[17] Prospective randomized STG vs. PT | 2005 | 2 years | STG, 72% | 88% negative pivot shift | Not reported |
| PT, 62% | Lysholm score, 96 | ||||
| NS | 85% IKDC score normal or nearly normal | ||||
| Knee scores, range of motion, quad and hamstring strength NS | |||||
| STG: 58% required removal of tibial fixation hardware | |||||
| Fabbriciani | 2005 | 2 years | 61% | 90% IKDC score normal or nearly normal | Not reported |
|
IKDC, International Knee Documentation Committee; PF, patellofemoral; PT, patellar tendon; NS, not significant; ST, semitendinosus tendon; STG, semitendinosus tendon and gracilis construct. |
1.
Aglietti P, Giron F, Buzzi R, et al: Anterior cruciate ligament reconstruction: bone–patellar tendon–bone compared with double semitendinosus and gracilis tendon grafts.
J Bone Joint Surg Am 2004; 86:2143-2155.
2.
Aune AK, Holm I, Risberg MA, et al: Four-strand hamstring tendon autograft compared with patellar tendon–bone autograft for anterior cruciate ligament reconstruction: a randomized study with two-year followup.
Am J Sports Med 2001; 29:722-728.
3.
Bernard M, Hertel P, Hornung H, Cierpinski T: Femoral insertion of the ACL. Radiographic quadrant method.
Am J Knee Surg 1997; 10:14-22.
4.
Brand JC, Weiler A, Caborn DNM, et al: Graft fixation in cruciate ligament reconstruction.
Am J Sports Med 2000; 28:761-774.
5.
Brown CH, Steiner ME, Carson EW: The use of hamstring tendons for anterior cruciate ligament reconstruction. Technique and results.
Clin Sports Med 1992; 12:723-756.
6.
Brown CH, Wilson DR, Hecker AT, Ferragamo M: Graft-bone motion and tensile properties of hamstring and patellar tendon anterior cruciate ligament femoral graft fixation under cyclic loading.
Arthroscopy 2004; 20:922-935.
7.
Brown CH, Sklar JH, Darwich N: Endoscopic anterior cruciate ligament reconstruction using autogenous doubled gracilis and semitendinosus tendons.
Tech Knee Surg 2004; 3:215-237.
8.
Brucker PU, Zelle BA, Fu F: Intraarticular endobutton displacement in anatomic anterior cruciate ligament double-bundle reconstruction: a case report.
Oper Tech Orthop 2005; 15:154-157.
9.
Carofino B, Fulkerson J: Medial hamstring tendon regeneration following harvest for anterior cruciate reconstruction: fact, myth, and clinical implication.
Arthroscopy 2005; 21:1257-1264.
10.
Cohen SB, Fu F: Three-portal technique for anterior cruciate ligament reconstruction: use of a central medial portal.
Arthroscopy 2007; 23:325.e1-325.e5.
11.
Cooley VJ, Deffner KT, Rosenberg TD: Quadrupled semitendinosus anterior cruciate ligament reconstruction: 5-year results in patients without meniscus loss.
Arthroscopy 2001; 17:795-800.
12.
Eriksson K, Anderberg P, Hamberg P, et al: There are differences in early morbidity after ACL reconstruction when comparing patellar tendon and semitendinosus tendon graft. A prospective randomized study of 107 patients.
Scand J Med Sci Sports 2001; 11:170-177.
13.
Feller JA, Webster KE: A randomized comparison of patellar tendon and hamstring tendon anterior cruciate ligament reconstruction.
Am J Sports Med 2003; 31:564-573.
14.
Freedman K, D’Amato M, Nedeff D, et al: Arthroscopic anterior cruciate ligament reconstruction: a metaanalysis comparing patellar tendon and hamstring tendon autograft.
Am J Sports Med 2003; 31:2-11.
15.
Gobbi A, Mahajan S, Zanazzo M, Tuy B: Patellar tendon versus quadrupled bone-semitendinosus anterior cruciate ligament reconstruction: a prospective clinical investigation in athletes.
Arthroscopy 2003; 19:592-601.
16.
Hamner DL, Brown CH, Steiner ME, et al: Hamstring tendon grafts for reconstruction of the anterior cruciate ligament: biomechanical evaluation of the use of multiple strands and tensioning techniques.
J Bone Joint Surg Am 1999; 81:549-557.
17.
Harilainen A, Sandelin J, Jansson K: Cross-pin femoral fixation versus metal interference screw fixation in anterior cruciate ligament reconstruction with hamstring tendons: results of a controlled prospective randomized study with 2 year followup.
Arthroscopy 2005; 21:25-33.
18.
Kartus J, Movin T, Karlsson J: Donor-site morbidity and anterior knee problems after anterior cruciate ligament reconstruction using autografts.
Arthroscopy 2001; 17:971-980.
19.
Kousa P, Järvinen TLN, Vihavainen M, et al: The fixation strength of six hamstring tendon graft fixation devices in anterior cruciate ligament reconstruction. Part I: femoral site.
Am J Sports Med 2003; 31:174-181.
20.
Kousa P, Järvinen TLN, Vihavainen M, et al: The fixation strength of six hamstring tendon graft fixation devices in anterior cruciate ligament reconstruction. Part II: tibial site.
Am J Sports Med 2003; 31:182-188.
21.
Levy M, Prud’homme J: Anatomic variations of the pes anserinus: a cadaver study.
Orthopedics 1993; 16:601-606.
22.
Liden M, Ejerhed L, Sernert N, et al: Patellar tendon or semitendinosus tendon autografts for anterior cruciate ligament reconstruction: a prospective, randomized study with 7-year followup.
Am J Sports Med 2007; 35:740-748.
23.
Loh JC, Fukuda Y, Tsuda E, et al: Knee stability and graft function following anterior cruciate ligament reconstruction: comparison between 11 o’clock and 10 o’clock femoral tunnel positions.
Arthroscopy 2003; 19:297-304.
24.
Magen HE, Howell SM, Hull ML: Structural properties of six tibial fixation methods for anterior cruciate ligament soft tissue grafts.
Am J Sports Med 1999; 27:35-43.
25.
O’Donnell JB, Scerpella TA: Endoscopic anterior cruciate ligament reconstruction: modified technique and radiographic view.
Arthroscopy 1995; 11:577-584.
26.
Pinczewski LA, Lyman J, Salmon LJ, et al: A 10-year comparison of anterior reconstruction with hamstring tendon and patellar tendon autograft: a controlled, prospective trial.
Am J Sports Med 2007; 35:564-574.
27.
Prodromos CC, Han YS, Keller BL, Bolyard RJ: Stability results of hamstring anterior cruciate ligament reconstruction at 2- to 8-year followup.
Arthroscopy 2005; 21:138-146.
28.
Prodromos CC, Joyce BT, Shi K, Keller BL: A metaanalysis of stability after anterior cruciate ligament reconstruction as a function of hamstring versus patellar tendon graft and fixation type.
Arthroscopy 2005; 21:1202-1208.
29.
Radowski CA, Harner CD: Medial portal technique for anterior cruciate ligament reconstruction.
In: El Attrache NS, Harner CD, Mirzayan R, Sekiya JK, ed. Surgical Technique in Sports Medicine,
Philadelphia: Lippincott Williams & Wilkins; 2007:359-367.
30.
Shaieb MD, Kan DM, Chang SK, et al: A prospective randomized comparison of patellar tendon versus semitendinosus and gracilis tendon autografts for anterior cruciate ligament reconstruction.
Am J Sports Med 2002; 30:214-220.
31.
Soloman CG, Pagnani MJ: Hamstring tendon harvesting: reviewing anatomic relationships and avoiding pitfalls.
Orthop Clin North Am 2003; 34:1-8.
32.
Tashiro T, Kurosawa H, Kawakami A, et al: Influence of medial hamstring tendon harvest on knee flexor strength after anterior cruciate ligament reconstruction. A detailed evaluation with comparison of single- and double-tendon harvest.
Am J Sports Med 2003; 31:522-529.
33.
Yunes M, Richmond JC, Engels EA, Pinczewski LA: Patellar versus hamstring tendons in anterior cruciate ligament reconstruction: a metaanalysis.
Arthroscopy 2001; 17:248-257.