
Cole & Sekiya: Surgical Techniques of the Shoulder, Elbow and Knee in Sports Medicine, 1st ed.
Copyright ©
2008 Saunders, An Imprint of Elsevier
CHAPTER 1 – Patient Positioning, Portal Placement, Normal Arthroscopic Anatomy, and Diagnostic Arthroscopy
Shoulder arthroscopy has become a key component in both the diagnosis and treatment of various pathologic conditions of the shoulder. Arthroscopy allows a detailed examination of the glenohumeral joint as well as of the subacromial space, with minimal patient morbidity compared with classic open procedures. As we have gained experience and arthroscopic techniques have continued to evolve, our ability to treat patients with minimally invasive arthroscopic procedures has only improved our care of patients. Adherence to the basic principles of shoulder arthroscopy, including proper patient positioning and portal placement, is essential no matter the level of the surgeon’s experience. On the basis of these principles, each surgeon should develop an effective, reproducible technique that methodically examines the shoulder joint. To recognize truly pathologic conditions of the shoulder, it is paramount to have a firm understanding of normal anatomic variants that are common in the shoulder. This appreciation will prevent inaccurate diagnosis and improper treatment. Our ability to effectively and efficiently perform shoulder arthroscopy is associated with reduced patient morbidity and quicker rehabilitation.
Based on the preference of the anesthesiologist, the surgeon, and the patient, shoulder arthroscopy can be performed under general anesthesia, interscalene block (i.e., regional), or a combination thereof. Certainly, regional anesthesia may be advantageous for many procedures performed in an outpatient setting.
| • | Keep mean arterial pressure between 70 and 90 mm Hg (systolic blood pressure of 100 mm Hg) to maximize visualization.[10] | |
| • | Obese patients with a large abdomen may be at increased risk for superior vena cava compression (resultant hypotension) when they are placed in a beach chair position. | |
| • | Temporary ipsilateral phrenic nerve palsy routinely results from an interscalene block.[14] | |
| • | Interscalene block complications can be minimized if the block is performed before the induction of general anesthesia and when a nerve stimulator is used.[1] |
An examination under anesthesia should be performed on all patients before they undergo arthroscopy. The examination under anesthesia can detect side-to-side differences in laxity and motion that may be helpful in confirming a diagnosis and developing a treatment plan (
Table 1-1
).
| Motion Abnormality | Potential Pathologic Condition |
|---|---|
| Increased external rotation | Subscapularis rupture |
| Limited forward flexion–external rotation | Adhesive capsulitis, osteoarthritis |
| Limited internal rotation with arm abducted 90 degrees | Isolated tight posterior capsule |
| Increased anterior translation | Microinstability, secondary or internal impingement |
Checklist for Examination Under Anesthesia (Both Shoulders)
| • | Forward flexion | |
| • | Internal and external rotation—arm abducted to 90 degrees and at the side | |
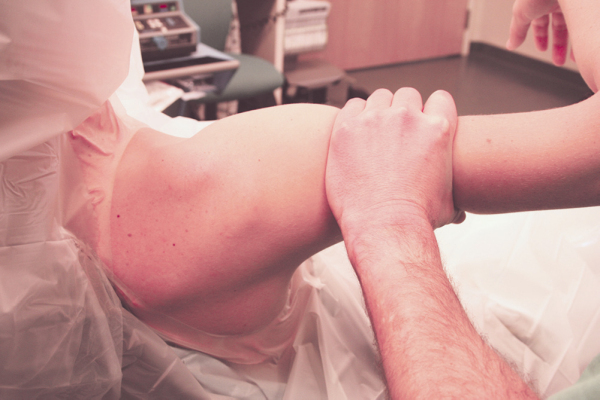
| • | Anterior translation is determined and graded. Abduct the arm to 90 degrees and apply an axial load and anterior force to the proximal humerus ( Fig. 1-1 and ). |
|
| • | Posterior instability is tested by flexing the shoulder to 140 degrees. The humerus is adducted to 15 degrees as a posteriorly directed axial force is applied. | |
| • | Sulcus sign |
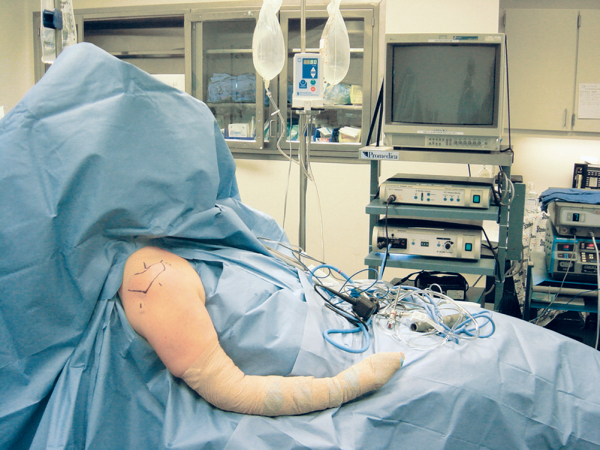
On the basis of the surgeon’s preference and training and the proposed surgical procedure, the patient is placed into either a beach chair or lateral decubitus position. Most procedures can be performed through either position.
Beach Chair Position (
Fig. 1-2
)
| • | Place the patient on the edge of the table to optimize access to the shoulder (removable backs are optimal if the bed is equipped). | |
| • | Support the patient’s head and neck in neutral position. | |
| • | Place the table into 10 to 15 degrees of Trendelenberg. | |
| • | Flex the table 45 to 60 degrees. | |
| • | Place the lower legs parallel to the floor. | |
| • | Elevate the back of the table. | |
| • | Tilt the table away from the operative side slightly. | |
| • | Firmly support the thorax on the operative side (helps diminish neck angulation). |
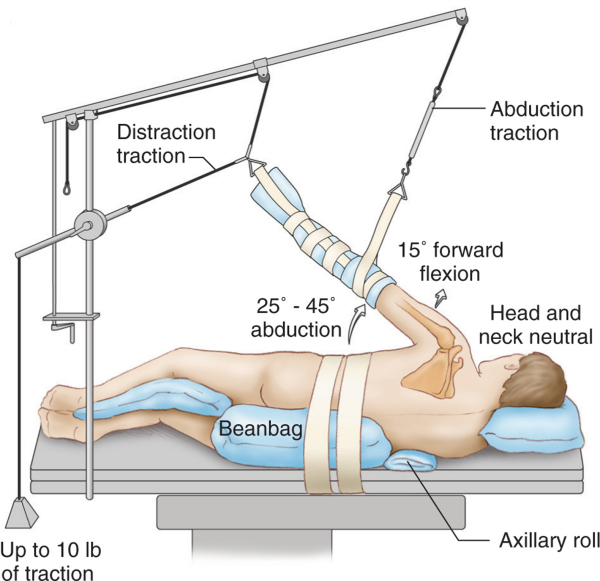
Lateral Decubitus Position (
Fig. 1-3
)
| • | Place the patient on a beanbag or stabilizing device with bone prominences padded. | |
| • | Roll the torso posterior 25 degrees to position the glenoid parallel to the floor. | |
| • | Place an axillary roll. | |
| • | Secure torso. | |
| • | Suspend the arm so that it can be prepared and draped. | |
| • | Place the arm into a foam traction sleeve and connect to traction device. | |
| • | Position the arm in 25 to 45 degrees of abduction and 15 degrees of forward flexion. | |
| • | Apply traction with the arm in neutral. | |
| • | Place 10 pounds of weights for longitudinal traction and a similar or lower amount for abduction traction. | |
| • | For larger or well-muscled individuals, 15 pounds is acceptable. | |
| • | More than 20 pounds is not recommended (increased risk of neurapraxia [5] [13]). | |
| • | Ensure that the head is in neutral position after traction is applied. |
The shoulder is prepared and draped following established surgical principles.
| • | Allow access to at least the middle of the scapula posteriorly. | |
| • | Placement of a snug plastic U-drape with the U facing inferiorly tends to direct extravasating fluid away from the neck and trachea. [2] [13] |
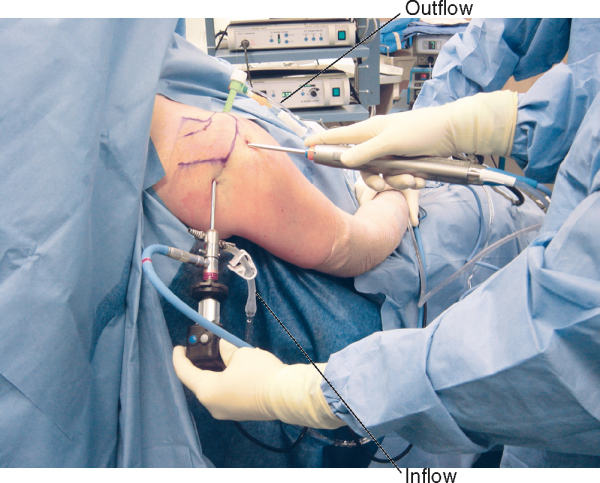
After positioning of the patient, the equipment is set up. A tower containing a video monitor, control box, light source, and power shaver is set up opposite the operative side to allow optimal visualization for the surgeon and the assistant (see
Fig. 1-2
). The fluid pump is also placed on the opposite side of the surgeon to allow visualization of fluid pressure. Bipolar or monopolar devices may be placed adjacent to the pump system with controls placed at the surgeon’s feet.
In the beach chair position, the surgeon stands slightly behind the patient’s shoulder and the assistant stands at the level of the arm so that the arm can be positioned throughout the case. If the lateral decubitus position is used, the surgeon stands above the patient’s shoulder and the assistant is positioned just below the surgeon toward the foot of the table. The surgical scrub technician typically stands behind the surgeon and assistant or alternatively may be just distal to the first assistant. A Mayo stand is placed just distal to the first assistant and should contain basic shoulder arthroscopy equipment or any equipment that will be used frequently for the case (
Fig. 1-4
).
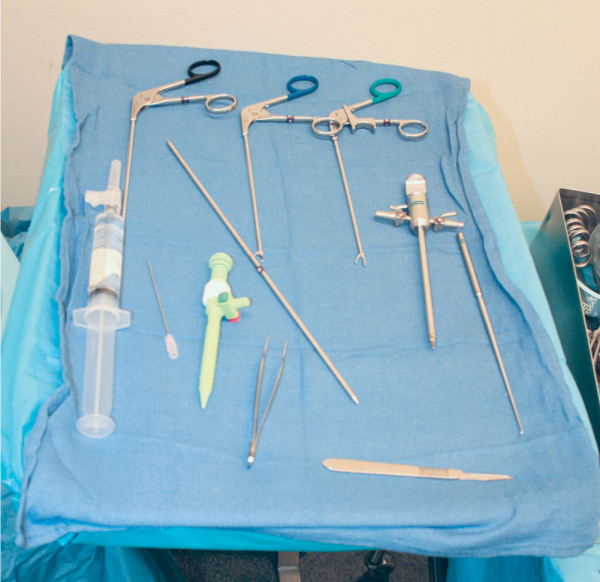
Instrumentation for Basic Shoulder Arthroscopy
| • | 30-mL syringe | |
| • | 30-degree arthroscope | |
| • | Cannula | |
| • | Inflow and suction tubing | |
| • | Probe | |
| • | Spinal needle | |
| • | Motorized shaver | |
| • | Electrocautery (monopolar or bipolar cautery and ablation device very useful) |
For more advanced reconstructive procedures, the necessary cannulas, fixation devices, and instruments must be available. It is recommended that these devices be available in the surgical suite in case of unexpected pathologic findings during the procedure.
Sterile saline, which is infused with a fluid management pump, is preferred for shoulder arthroscopy. Alternatively, a gravity-driven system may be used. Either will allow the surgeon to increase or decrease the fluid pressure throughout the case, based on visualization.
Optimizing Visualization with the Fluid System
| • | Addition of epinephrine into the fluid bags improves hemostasis. | |
| • | Inflow is connected to the scope cannula. | |
| • | Outflow is initially through the scope cannula but is switched to the anterior or lateral cannula once it is available for optimized fluid management. | |
| • | Fluid pressure within the joint is kept below 70 to 80 mm Hg and can typically be maintained at 35 to 40 mm Hg. | |
| • | Subacromial space pressure may need to be intermittently increased until hemostasis is obtained with cautery (drive scope toward bleeding vessel—inflow clears visual field). | |
| • | Maintenance of outflow helps prevent extravasation into the tissues. |
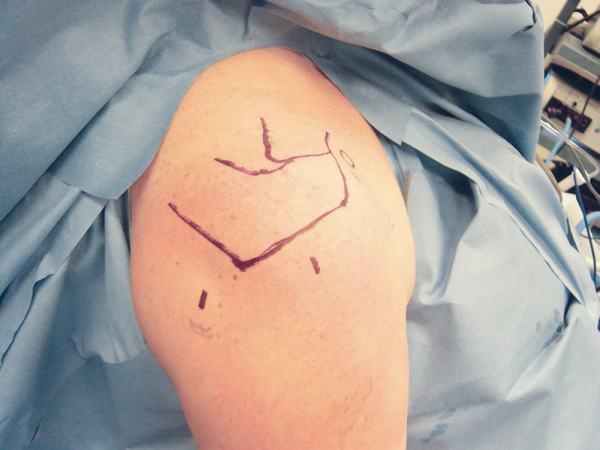
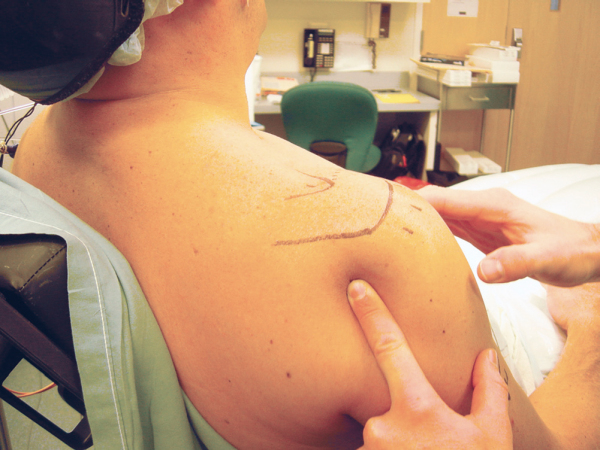
Once the patient is positioned, a surgical marking pen is used to accurately outline bone landmarks of the shoulder. After the patient’s anatomy is outlined, the proposed portals should be marked (
Fig. 1-5
). Multiple portals can be used during shoulder arthroscopy, depending on the specific procedure to be performed (
Fig. 1-6
).
|
|
|
|
Figure 1-6 (From Mazzocca AD, Cole BJ, Romeo AA. Shoulder: patient positioning, portal placement, and normal arthroscopic anatomy. In Miller MD, Cole BJ, eds. Textbook of Arthroscopy. Philadelphia, Elsevier, 2004:74.) |
All arthroscopic shoulder procedures begin with placement of the arthroscope into the glenohumeral joint through the posterior portal. There are several methods to aid in determining optimal posterior portal placement. One method is to measure from the posterolateral corner of the acromion. The appropriate starting position for a posterior portal typically lies 1 to 1.5 cm medial to the lateral edge of the posterolateral acromion as well as 2 to 2.5 cm distal. Another method involves manual palpation of the posterior “soft spot,” which represents the interval between the infraspinatus and teres minor muscles. In addition, the surgeon can translate the humeral head posteriorly while palpating the glenohumeral joint line (
Fig. 1-7
).
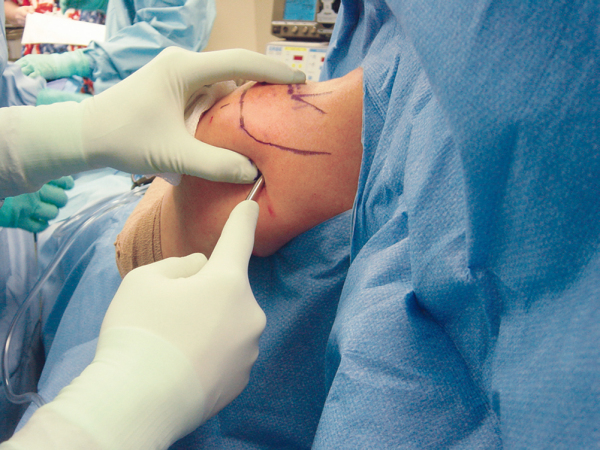
Posterior portal placement for the lateral decubitus position is slightly different from that for the beach chair position. In the lateral position, because of glenohumeral distraction, the posterior portal tends to be erroneously positioned too medial and proximal. It is generally recommended to place the portal 3 cm inferior and in line with the posterolateral acromion.[8]
The skin is injected with a local anesthetic with epinephrine, and a 5- to 6-mm incision is made through the dermis with a No. 11 scalpel blade. Some surgeons prefer to insufflate the joint with 20 to 30 mL of saline to facilitate safe trocar introduction. The arthroscopic cannula is introduced with a blunt trocar. While using the dominant hand to hold the cannula, the surgeon palpates the tip of the coracoid process with the nondominant hand to serve as a guide while the cannula is gently inserted through the posterior capsule and into the joint (
Fig. 1-8
). Alternatively, one may wish to palpate the shoulder with the same hand as the shoulder being operated on and to insert the scope with the contralateral hand. It may be helpful to aim the arthroscopic trocar toward the coracoid as an anatomic landmark because this will typically place the cannula in line with the glenohumeral joint. Gentle pressure is used to enter the posterior joint capsule. Do not use excessive pressure if the trocar does not “pop in” through the capsule. However, there may be significant variability in the pressure required to enter the shoulder joint, depending on the thickness of the posterior capsule. If there is difficulty finding the joint line, the assistant may gently rotate the humeral head to determine whether the cannula is positioned against the humeral head or the glenoid. It may also be helpful to have the assistant grab the arm distal to the axilla and create an abduction distraction force on the joint to open the joint space.
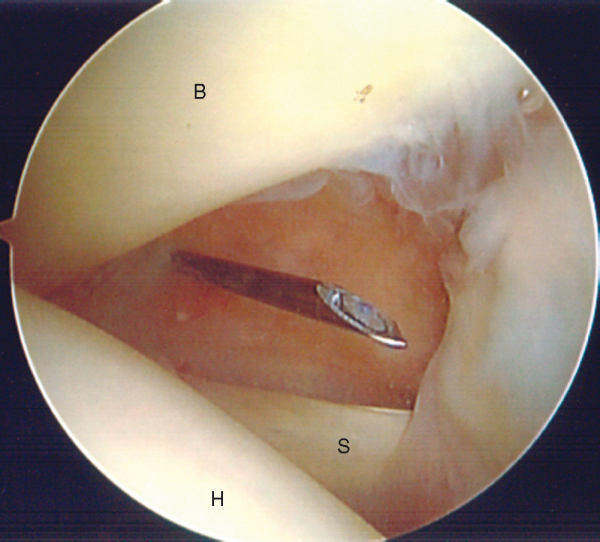
The standard anterior portal is placed in the rotator interval or triangle formed by the subscapularis, humeral head, and biceps tendon. An outside-in technique uses a spinal needle that is placed just lateral to the coracoid through the rotator interval. The spinal needle can be used to optimize portal placement and angulation (
Fig. 1-9
). Before an incision is made, it is helpful to determine whether more than one portal will be required (Bankart or superior labral anterior-posterior [SLAP] repair) because portals should be established as far apart as possible to aid in triangulation and to reduce crowding. A 5- to 6-mm skin incision is made with a No. 11 scalpel, and under direct visualization, a plastic cannula and trocar are advanced through the rotator interval and into the joint. Typically, this anterior cannula is connected to plastic tubing and used as outflow to gravity.
|
|
|
|
Figure 1-9 |
An alternative technique to making the anterior portal is the inside-out method using a Wissinger rod. With this technique, the arthroscope is driven into the anterior triangle. The arthroscope is then removed and a Wissinger rod is passed through the cannula, going through the anterior capsule and tenting the skin anteriorly. A portal is made through the skin, and a plastic cannula may then be placed over the rod and delivered into the joint anteriorly.
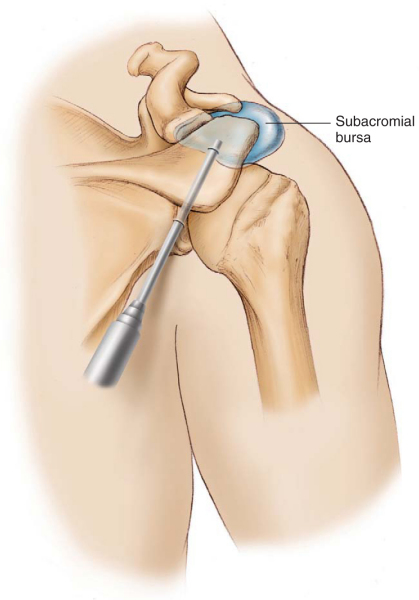
Once the glenohumeral arthroscopy is complete, the trocar should be reinserted into the cannula to enter the subacromial space. The cannula is then pulled back outside the joint and gently slid over the rotator cuff in an anterolateral direction to enter the subacromial space. Alternatively, the trocar can be used to palpate the posterior acromion and slid directly underneath the acromion in an anterolateral direction. The trocar should be used to sweep in a medial to lateral direction to break up a portion of the bursa, which may help in the distention of this potential space. The subacromial bursa is generally located in the anterior half of the acromion (
Fig. 1-10
). Distal traction on the lower humerus will assist in opening a tight subacromial space.
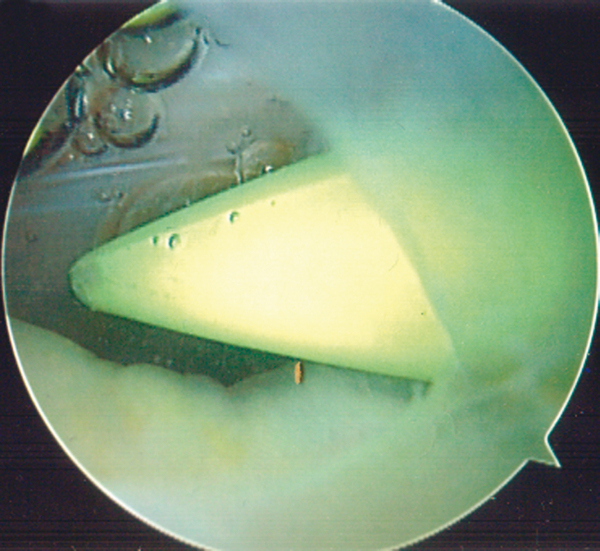
A standard lateral portal is used to access the subacromial space. The axillary nerve, the significant structure at risk, is located 3.8 to 5.1 cm distal to the acromion.[4] The anterior posterior position of the standard lateral portal should be in line with the notch formed by the posterior aspect of the clavicle and the spine of the scapula. The portal will be approximately 2 cm distal to the acromion. Fine-tune the final portal location with the use of a spinal needle under direct visualization once the arthroscope is in the subacromial space. Do not make this portal too close to the acromion. Placement of traction on the arm will assist in opening the subacromial space. A dull trocar is used to enter the subacromial space after the incision is made in the dermis (
Fig. 1-11
).
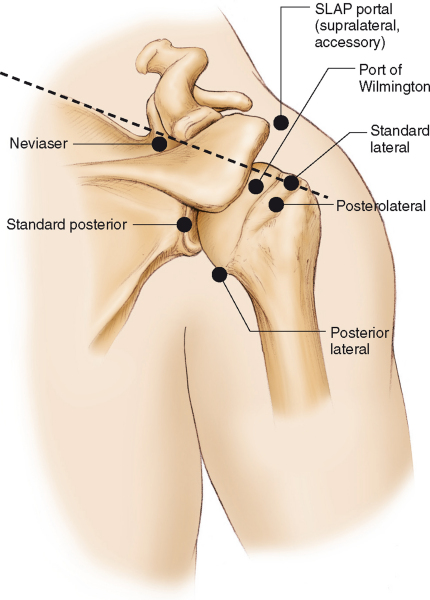
Accessory Anterior Portals (
Fig. 1-12
)
| • | Within the superior rotator interval just adjacent to the acromion | |
| • | Useful for labral reconstructions and SLAP repairs | |
| • | Separate the two portals in the rotator interval as much as possible |
|
|
|
|
Figure 1-12 (From Mazzocca AD, Cole BJ, Romeo AA. Shoulder: patient positioning, portal placement, and normal arthroscopic anatomy, In Miller MD, Cole BJ, eds. Textbook of Arthroscopy. Philadelphia, Elsevier, 2004:72.) |
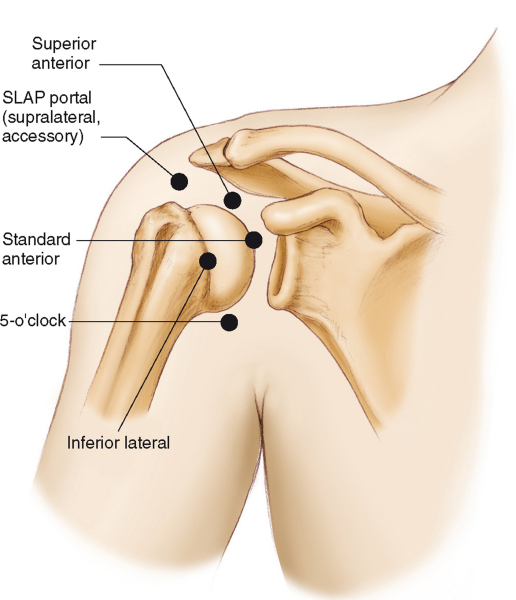
| • | Placed just lateral to the acromion[6] | |
| • | Spinal needle is used to enter the subacromial space or joint obliquely | |
| • | Useful for arthroscopic rotator cuff repair |
| • | Placed in the notch between the posterior acromioclavicular joint and the spine of the scapula | |
| • | Useful for arthroscopic rotator cuff repair, distal clavicle resection, and SLAP repairs | |
| • | Suprascapular nerve and artery approximately 3 cm medial to the portal[4] |
Anterior Inferior Portal (5-o’clock)
| • | Useful for arthroscopic labral reconstruction | |
| • | Lateral to the conjoined tendon and in the lower third of the subscapularis muscle | |
| • | Average of 22.9 mm from the musculocutaneous nerve and 24.4 mm from the axillary nerve[3] | |
| • | Cephalic vein is the closest structure at risk (average of 9.8 mm from the portal[7]) |
| • | Over subscapularis tendon, coming from a lateral to medial direction. | |
| • | Useful for Bankart repairs. |
| • | Used for posterior superior labral repairs on the glenoid | |
| • | 1 cm lateral and 1 cm inferior to the posterolateral corner of the acromion | |
| • | Goes through the infraspinatus tendon (no cannula) |
Posterolateral Portal (7-o’clock)
| • | Useful for posterior arthroscopic stabilization procedures | |
| • | 2 cm inferior and lateral to the standard posterior portal |
Diagnostic Arthroscopy and Normal Anatomy
Shoulder arthroscopy always begins with insertion of the arthroscope into the glenohumeral joint through the posterior portal. Once the posterior portal is established, the surgeon should develop a systematic approach to evaluate the glenohumeral joint and subacromial space (
Box 1-2
). It may be helpful to divide the joint into sectors. Rotating the 30-degree objective in conjunction with moving the arthroscope throughout the shoulder will allow a more efficient and thorough evaluation.
| Surgical Steps in Diagnostic Arthroscopy | ||||||||||||||||||||||||||||||
|
1. Establish Posterior Portal (See Earlier)
Once in the shoulder initially, proceed to the rotator interval to evaluate for tendinitis and inflammation of the biceps tendon and rotator interval. Also attempt to determine whether one or more anterior portals may be required. A spinal needle may be used to probe the interarticular structures at that time as well as to help establish a landmark for the anterior portal.
2. Establish Anterior Portal (See Earlier)
Once the cannula is inserted into the rotator interval under direct visualization, it can be used as a working portal as well as for outflow.
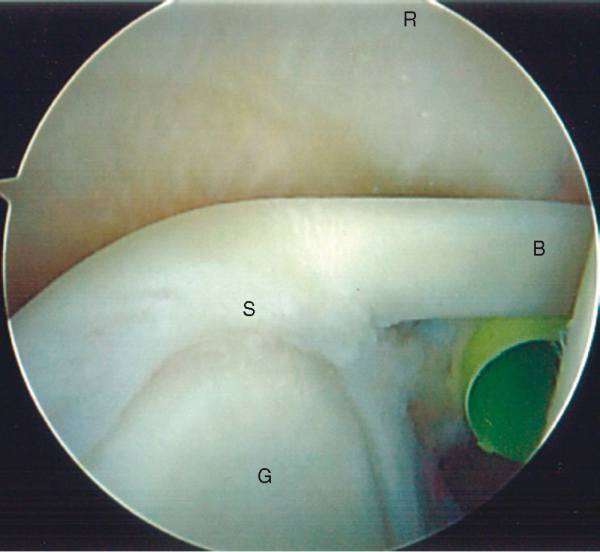
3a. Evaluate Anterior Superior Sector
Diagnostic evaluation should commence by visualizing various structures in the anterior superior sector. This includes the biceps tendon, the superior labrum, the coracohumeral ligament, and the superior glenohumeral ligament as well as the anterior superior labrum. The biceps tendon attaches to the supraglenoid tubercle on the posterior superior aspect of the glenoid rim. The biceps origin is attached to the superior labrum or to significant fibers in the anterior superior and posterior superior labrum (
Fig. 1-13
).
|
|
|
|
Figure 1-13 |
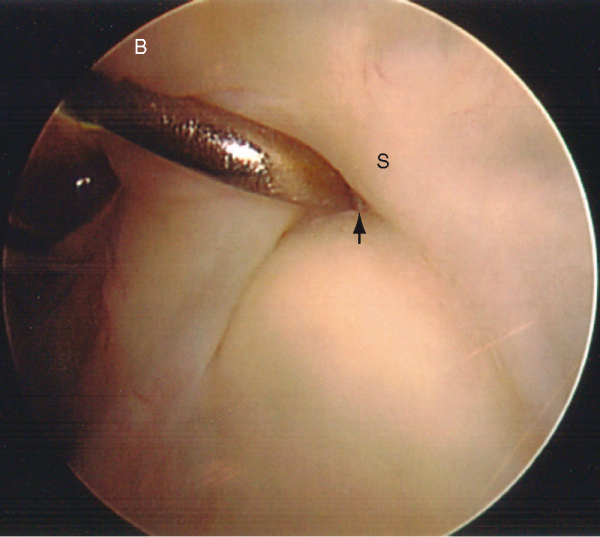
With use of a probe from the anterior portal, the labrum and biceps attachment site are evaluated. There is often a normal recess under the superior labrum where the biceps complex attaches to the glenoid, which is often diagnosed as a SLAP tear by inexperienced arthroscopists. If the hyaline cartilage of the glenoid articular surface can be followed to the base of the superior labrum, the biceps anchor is stable and should not be repaired with sutures (
Fig. 1-14
). Overhead athletes should be evaluated with the arm abducted and externally rotated in an attempt to visualize the peel-back phenomenon. When the arm is abducted and externally rotated, the superior labrum may rotate off the superior glenoid posteriorly and superiorly. This may be visualized better through the anterior cannula or portal.
The biceps should be thoroughly evaluated from the insertion point down through the intertubercular groove (
Fig. 1-15
). The biceps can be followed into the bicipital groove by forward flexion, elbow flexion, and slight internal rotation of the arm. The tendon can be further evaluated by use of a probe or grasper to pull the tendon farther into the joint (
Fig. 1-16
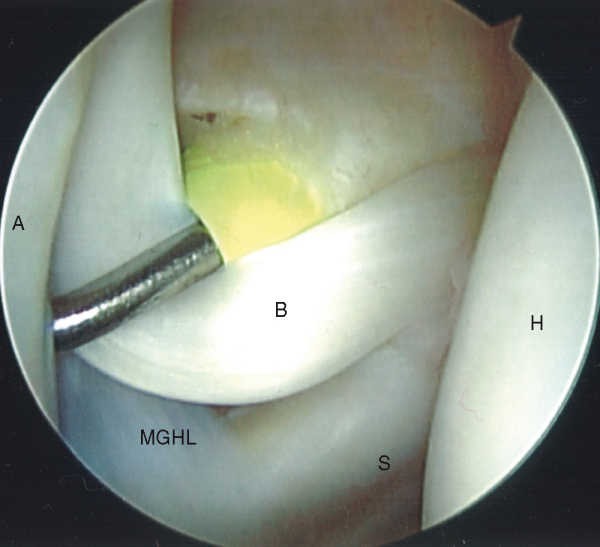
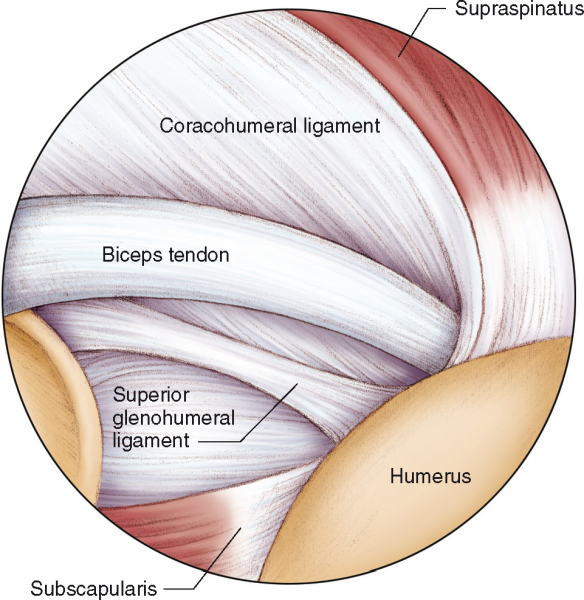
). The biceps tendon is bordered by the subscapularis tendon medially as well as by the supraspinatus tendon laterally. Injury or disruption of the superior glenohumeral ligament, coracohumeral ligament, or subscapularis can cause medial biceps instability. The structures surrounding the biceps tendon, including the coracohumeral ligament and superior glenohumeral ligament, should be evaluated at this time. The coracohumeral ligament encircles the biceps tendon after it originates at the base of the coracoid, sending fibers to the biceps tendon and the supraspinatus tendon as it inserts into the front of the subscapularis tendon (
Fig. 1-17
). The superior glenohumeral ligament runs from the anterior superior aspect of the glenoid to insert into the upper portion of the lesser tuberosity (see Figs. 1-15 and 1-17 [15] [17]) and is considered the floor of the bicipital groove.
|
|
|
|
Figure 1-15 |

|
|
|
|
Figure 1-16 |
|
|
|
|
Figure 1-17 (From Mazzocca AD, Alberta FG, Cole BJ, Romeo AA. Shoulder: diagnostic arthroscopy. In Miller MD, Cole BJ, eds. Textbook of Arthroscopy. Philadelphia, Elsevier, 2004:80.) |
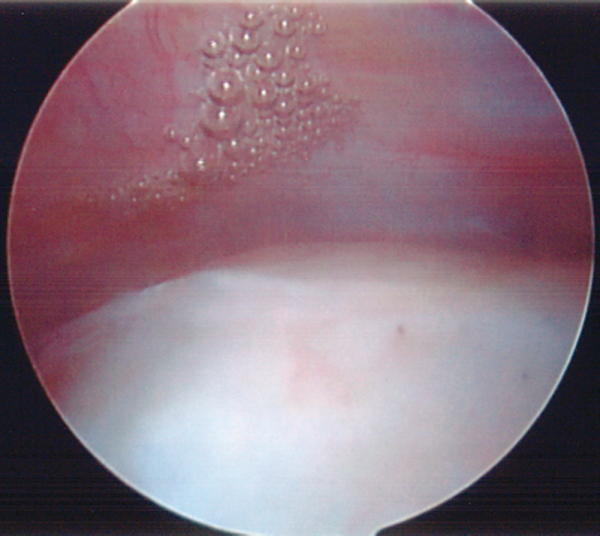
The anterior superior labrum is evaluated next. It is this region of the shoulder that shows a significant degree of anatomic variability. Four common anatomic variations are seen involving the anterosuperior labrum and middle glenohumeral ligament (
Fig. 1-18
). This variability may be physiologic detachment with a confluence of the middle glenohumeral ligament, simple detachment (sublabral hole), or complete absence. [12] [15]
|
|
|
|
Figure 1-18 |
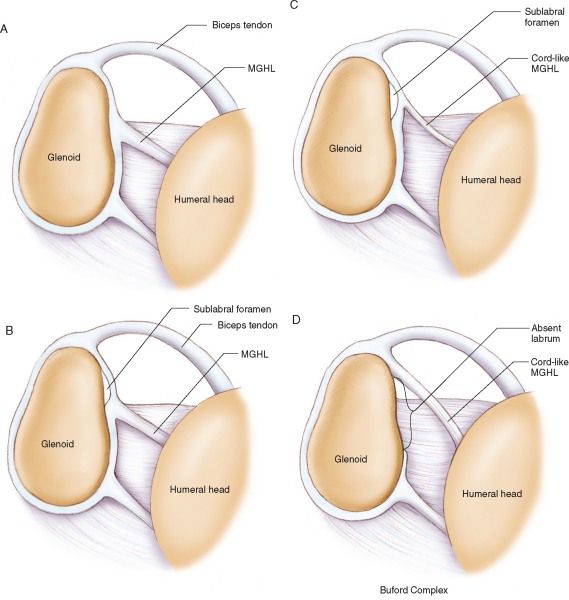
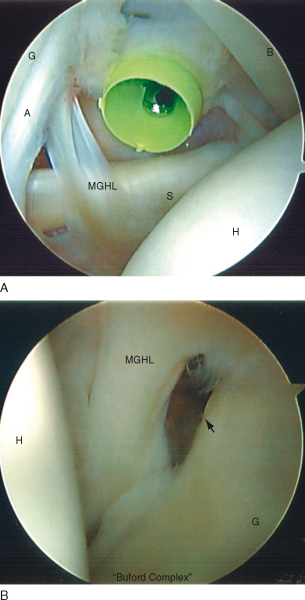
The middle glenohumeral ligament can also be variable in structure. At times, it may seem virtually nonexistent during arthroscopy. Commonly, it ranges from a sheet-like ligament to a robust cord-like structure as seen in a Buford complex (
Fig. 1-19
). With a Buford complex, the cord-like middle glenohumeral ligament originates high on the glenoid, and the anterior superior labrum is absent. It is important to recognize this as a normal anatomic variant. Erroneous diagnosis of this normal cord-like ligament as a labral tear and repair to the anterosuperior glenoid will result in significant restriction of normal motion.[15]
|
|
|
|
Figure 1-19 |
The subscapularis tendon should be carefully examined for partial-thickness and full-thickness tears. External rotation of the shoulder will allow evaluation of the subscapularis under tension. It is not possible to visualize the entire subscapularis tendon arthroscopically, but most disease tends to occur proximally. Make sure to evaluate the subscapularis recess for loose bodies.
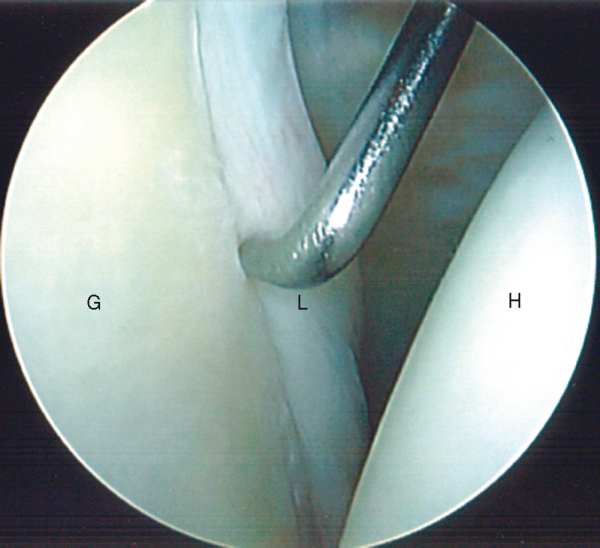
The anterior inferior labrum is evaluated with a probe (
Fig. 1-20
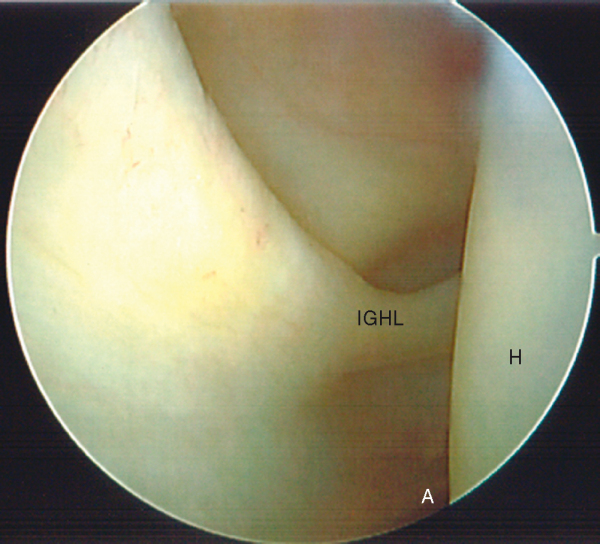
). This area should be inspected for degenerative tearing or scuffing as well as for a true Bankart lesion. In contrast to the anterosuperior labrum, any detachment of the labrum below the equator of the glenoid is considered pathologic. The inferior glenohumeral ligament runs from the glenoid to the anatomic neck of the humerus and can be inspected by externally rotating the shoulder, thereby placing the ligament on tension (
Fig. 1-21
). The humeral attachment can actually be better visualized by placing the scope in the anterior portal.
|
|
|
|
Figure 1-21 |
By continuing to drive the scope inferior, the anterior axillary pouch is assessed for laxity, loose bodies, and synovitis. In a loose shoulder, one may be able to evaluate the entire axillary pouch at that time. Alternatively, it can be examined after evaluation of the posterior rotator cuff insertion.
3d. Evaluate Rotator Cuff Insertion and Humeral Head
With the arm slightly abducted, forward flexed, and externally rotated and the 30-degree objective pointed laterally, the entire rotator cuff insertion should be inspected, beginning at the anterior supraspinatus just lateral to the bicipital groove (
Fig. 1-22
). Assess for both partial-thickness and full-thickness tears. If a partial-thickness rotator cuff tear is encountered, a spinal needle can be placed anterolaterally through the subacromial space and into the tear site. This can be marked with a polypropylene (Prolene) suture to evaluate the bursal side of the same region of the tendon.
|
|
|
|
Figure 1-22 |
The rotator cuff insertion can be followed posteriorly with the aid of humeral rotation. The bare area of the humeral head, which often contains remnants of old vascular channels, can be visualized and borders the attachment site of the infraspinatus tendon (
Fig. 1-23
). Continuing to sweep inferiorly around the posterior rotator cuff insertion will bring the arthroscope into the posterior axillary pouch (
Fig. 1-24
). Throughout this process, the articular cartilage on the entire humeral head and glenoid should be evaluated (
Fig. 1-25
).
|
|
|
|
Figure 1-23 |

In some patients, the posterior labrum can be adequately visualized with the scope in the posterior portal. However, if visualization is inadequate or posterior labral disease is suspected, it is advantageous to place the scope into the anterior portal. This can be accomplished by temporarily placing the arthroscope into the anterior plastic cannula and placing the trocar back into the metal cannula posteriorly. The metal cannula can even serve as a probe device to evaluate the posterior labrum and posterior capsule as well as the posterior articular surface (
Fig. 1-26
). If necessary, a plastic cannula can be placed in the posterior portal to use a probe.
|
|
|
|
Figure 1-26 |

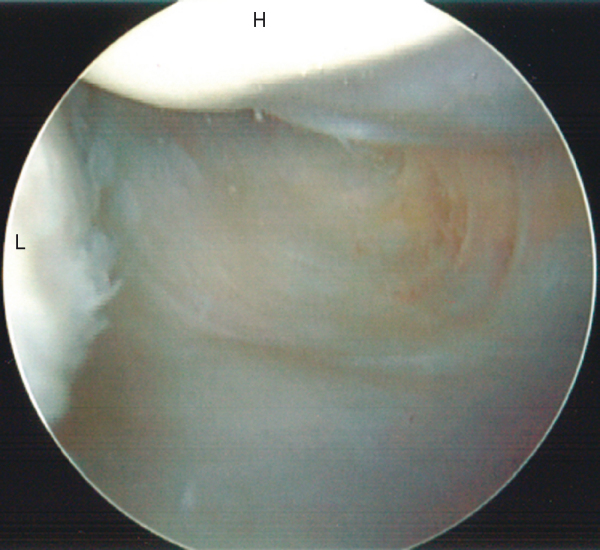
Once the glenohumeral arthroscopy is complete, the cannula is placed into the subacromial space (see earlier). If there is a significant amount of subacromial bursal tissue obscuring the view, it may be helpful to reintroduce the trocar into the cannula to sweep and make a potential space. A lateral portal can now be made with the aid of a spinal needle. The portal should be placed distally enough to give adequate access under the acromion but be positioned above the rotator cuff. In the presence of thick bursal tissue, a brightly colored plastic trocar can be helpful to triangulate and begin removal of bursal tissue.
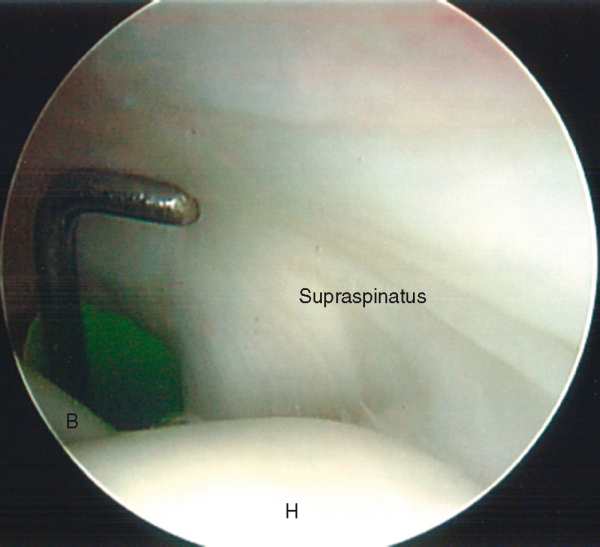
It will likely be necessary to use an oscillating shaver through the lateral portal to remove the subacromial bursa to properly visualize the subacromial structures (
Fig. 1-27
). A coagulation device often aids in hemostasis. The assistant should apply traction to open the subacromial space. The space is evaluated for bursitis, subacromial adhesions, scuffing of the coracoacromial ligament, acromial morphologic features, and the rotator cuff. The rotator cuff should be completely evaluated by rotating the humeral head (
Fig. 1-28
). The arthroscope can also be placed into the lateral portal, allowing complete visualization of the posterior rotator cuff.
|
|
|
|
Figure 1-27 |
| • | Hemorrhage | |
| • | Iatrogenic articular cartilage and rotator cuff injury | |
| • | Fluid extravasation | |
| • | Neurovascular complications (very rare) | |
| • | Infection | |
| • | Complications related to anesthesia |
1.
Bishop JY, Sprague M, Gelber J, et al: Interscalene regional anesthesia for shoulder surgery.
J Bone Joint Surg Am 2004; 86:2135-2142.
2.
Blumenthal S, Nadig M, Gerber C, Borgeat A: Severe airway obstruction during arthroscopic shoulder surgery.
Anesthesia 2003; 99:1455-1456.
3.
Davidson PA, Tibone JE: Anterior-inferior (5 o’clock) portal for shoulder arthroscopy.
Arthroscopy 1995; 11:519-525.
4.
Hollinshead WH: Anatomy for Surgeons, vol III. 2nd ed.. Philadelphia: Harper & Row; 1969.
5.
Klein AH, France JC, Muschler TA, et al: Measurement of brachial plexus strain and arthroscopy of the shoulder.
Arthroscopy 1987; 3:45-52.
6.
Laurencin CT, Detsha , O’Brien SJ, Altchek DW: The superior lateral portal for arthroscopy of the shoulder.
Arthroscopy 1994; 10:255-258.
7.
Lo IK, Lind CC, Burkhart SS: Glenohumeral arthroscopy portals established using an outside-in technique: neurovascular anatomy at risk.
Arthroscopy 2004; 20:596-602.
8.
Mazzocca AD, Cole BJ, Romeo AA: Shoulder: patient positioning, portal placement, and normal arthroscopic anatomy.
In: Miller MD, Cole BJ, ed. Textbook of Arthroscopy,
Philadelphia: Elsevier; 2004:65-77.
9.
Mazzocca AD, Alberta FG, Cole BJ, Romeo AA: Shoulder: diagnostic arthroscopy.
In: Miller MD, Cole BJ, ed. Textbook of Arthroscopy,
Philadelphia: Elsevier; 2004:78-85.
10.
Morrison DS, Schafer RK, Friedman RL: The relationship between subacromial space pressure, blood pressure and visual clarity during arthroscopic subacromial decompression.
Arthroscopy 1995; 11:557-560.
11.
Pitman MI, Nainzadeh N, Ergas E, et al: The use of somatosensory evoked potentials for detection of neurapraxia during shoulder arthroscopy.
Arthroscopy 1988; 4:252-255.
12.
Rao AG, Kim TK, Chronopoulos E, McFarland EG: Anatomical variants in the anterosuperior aspect of the glenoid labrum: a statistical analysis of seventy-three cases.
J Bone Joint Surg Am 2003; 85:653-659.
13.
Rogerson JS. How to avoid complications in the subacromial space. Presented at the Arthroscopy Association of North America Fall Course; Phoenix, Arizona; December 1, 2005.
14.
Urmey WF, Talts KH, Sharrock NE: One hundred percent incidence of hemidiaphragmatic paresis associated with interscalene brachial plexus anesthesia as diagnosed by ultrasonagraphy.
Anesth Analg 1991; 72:498-503.
15.
Williams MM, Snyder SJ, Buford Jr D: The Buford complex—the “cord-like” middle glenohumeral ligament and absent anterosuperior labrum complex: a normal anatomic capsulolabral variant.
Arthroscopy 1994; 10:241-247.