
Aspiration and Injection of Upper and Lower Extremities
-
For any injection, consider infiltrating
the subcutaneous skin of the entry site. It will improve the patient’s
comfort, and it will allow one to make several attempts without extra
discomfort for the patient. -
When using corticosteroids, be aware of
the possibility of subcutaneous atrophy or skin color changes if the
medication is left subcutaneously. -
In an obese patient, be prepared to use spinal needles.
-
Use larger gauge needles with large
syringes (20 cc and above) if an aspiration of a joint is going to be
performed as blood or pus presents a thicker texture than synovial
fluid.When trying to rule out a septic joint, avoid having the
entry site over the area of cellulitis as this will contaminate the
joint and eventually the sample sent to the lab.
palpate the medial aspect of the humeral head and enter just medial to
this. In our experience, more physicians now prefer a posterior
approach. A posterior aspiration or infiltration of the shoulder is
performed with an entry site located approximately 2 cm distal and 1 cm
medial to the posterior corner of the acromion (Fig 29-1B).
At this level the “soft spot” of the shoulder can be felt. The needle
will be placed perpendicular to the posterior chest wall and aiming for
the coracoid process, which is felt over the anterior aspect of the
shoulder with the opposite hand. A “pop” will be felt when the capsule
is penetrated with a medium-sized needle. Slight rotation of the arm
may be used to confirm if the needle tip is over the glenoid rim versus
the humeral head and the need for any relocation of the needle.
 |
|
Figure 29-1. Shoulder joint and subacromial space.
|
approximately 30 degrees cephalad, the subacromial space can be
reached. Sometimes if the needle is angled too superiorly, or in an
obese patient, the needle will hit the posterior margin of the acromion
and it will have to be “walked” into the subacromial space.
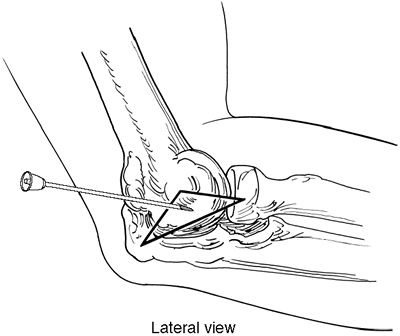
to the pain and increased intraarticular fluid. The entry site will be
located at the center of the triangle formed by the lateral epicondyle,
the radial head, and the most lateral corner of the olecranon. At this
level the “soft spot” of the elbow joint is felt and the elbow joint
can be easily reached. A second approach can be done immediately
proximal to the superior margin of the olecranon and centered over the
middle third of the olecranon through a transtendinous approach for the
triceps tendon. This would provide full access to the olecranon fossa.
for “tennis elbow” will be performed after identifying the most tender
spot. For the most part it will be located just a few centimeters
proximal to the lateral epicondyle. With an angle of 30 degrees, the
painful spot is reached with the tip of the needle, and after backing
out a few millimeters the medication is injected. Multiple “hits” with
the tip of the needle
against the lateral cortex of the humerus will be made to “agitate” the attachment site of the ECRB.
 |
|
Figure 29-2. Elbow joint.
|
 |
|
Figure 29-3. Wrist joint.
|
Most commonly, we can access the proximal radiocarpal joint in between
the third and fourth extensor tendon compartments. This is located
approximately 1 cm distal to Lister’s tubercle which is easily
palpable. On the same direction and moving 2 cm distal from the
tubercle, we will have access to the intercarpal joint. The joint space
in between the carpal bones is quite limited, and most of the time the
medication will be placed in between the capsule and bony structures
and not in between the carpal bones. The distal radioulnar joint can be
approached in between the fourth and fifth extensor tendon
compartments. The entry site for the needle is located over a divot
which may be felt radial to the most prominent portion of the ulna.
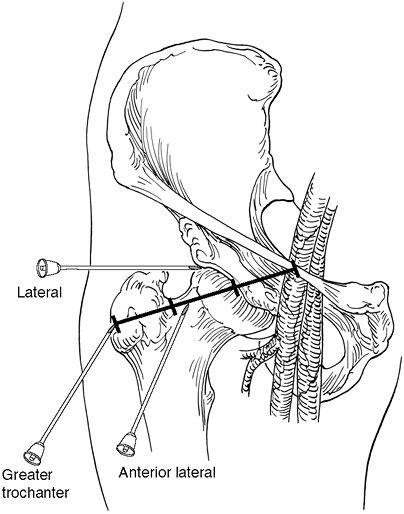
fluoroscopic guidance. A lateral or anterolateral approach can be
recommended to access the hip joint. With any hip aspiration/injection,
the femoral pulse must be palpated and marked to get a good sense of
the location of the femoral neurovascular bundle and the chances for
injury after different maneuvers. Spinal needles must be used to reach
a joint as deep as the hip joint. The anterolateral approach will have
an
entry
site located approximately over the junction of the lateral with the
middle third of the total distance between the greater trochanter and
the inguinal ligament. With this entry site, the needle will be angled
approximately 45 degrees cephalad and 45 degrees medially. It is
recommended to proceed with imaging intensification in order to
guarantee full access to the hip joint. The lateral approach consists
of performing an injection right above the tip of the greater
trochanter and aiming straight medial to reach the junction of the
femoral head with the femoral neck. The needle will be angled slightly
anteriorly in order to correct for the femoral anteversion. An
alternative to this is to place the extremity in internal rotation by
15 degrees to 20 degrees and the needle parallel to the coronal plane.
 |
|
Figure 29-4. Hip joint.
|
within the office, without any fluoroscopic assistance. The needle is
placed slightly distal to the most prominent or painful area, and
angled 30 degrees to 40 degrees from inferior to superior until the
lateral cortex of the femur is touched with the tip of the needle. At
this level, pull back a few millimeters and proceed with the injection
of the area. The medication should go without much resistance as a
confirmation of being in a virtual space (i.e., greater trochanter
bursa).
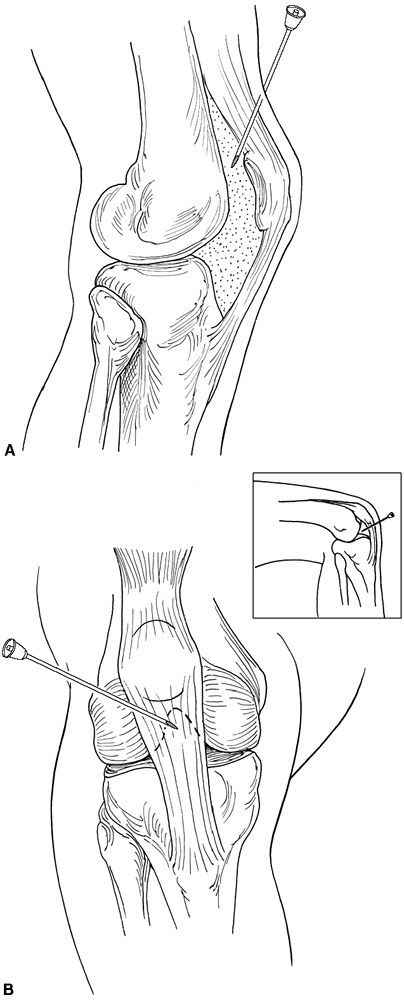
increased space between the patella and the femur as the patella is
translated anteriorly by the increased intraarticular pressure.
Therefore, under those circumstances, the easiest approach is to
proceed laterally. The needle will be placed at a 90 degrees angle with
the long axis to the limb. The entry site will be located at the level
of the proximal pole of the patella. Laterally, a void between the
patella and the femur may be felt and the needle will be easily
introduced at that level. Aspiration of the joint can be performed with
subsequent “milking” of the intraarticular effusion.
 |
|
Figure 29-5. Knee joint.
|
this approach is slightly more difficult as there is no virtual space
created between the patella and the femoral trochlea. In an attempt to
inject the knee joint through the already described lateral approach,
the non-trained physician most likely will hit and damage the articular
surface of the patella and/or femur. Therefore, the authors prefer to
proceed with a lateral approach, similar to the one performed during
knee arthroscopy (Fig 29-5B).
This is located at the level of the inferior pole of the patella and a
few millimeters lateral to the border of the patellar tendon. The
needle is aimed at 30 degrees caudad and 30 degrees medially, toward
the trochanteric notch. The knee will be flexed at 90 degrees when this
is performed. During the injection of the medication, some resistance
may be felt, which is related to the presence of the retropatellar fat
pad. This will be avoided by moving the needle either forward or
backward until the injection becomes easier to perform.
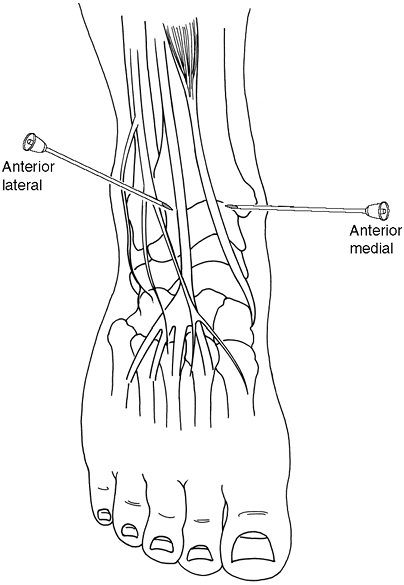
medial aspect. The needle will be placed at approximately 60 degrees
from the sagittal plane with an entry site immediately medial to the
anterior tibial tendon. A “soft spot” can be felt which corresponds to
the tibiotalar joint. The “shoulder” of the tibial plafond will be
easily identified at that level. Special attention is required to
direct the needle to be oblique enough to avoid any scuffing of the
cartilage as the ankle joint is a very superficial joint. An
alternative approach is to proceed with a lateral aspiration or
injection
which will be done lateral to the extensor digitorum longus tendon.
Also, 60 degrees of obliquity is recommended. The level for the entry
site is similar to the one described for the medial approach. The
dorsal cutaneous branch of the superficial peroneal nerve is at risk
for an injury with the use of the lateral approach. In most occasions
it can be seen or felt with forced plantar flexion of the foot and the
fourth toe, which places the superficial nerve under tension.
 |
|
Figure 29-6. Ankle joint.
|