
– Staying Out of Trouble in Pediatric Orthopaedics > 2 – The
Pediatric Orthopaedic Physical Exam
|
|
orthopaedic surgeon with unique challenges and demands. Children
between the ages of 14 months and 3 years often have an appropriately
learned fear of doctors and needles, and may be uncooperative.
Nevertheless, the physician is expected to perform a reliable
examination upon which the diagnosis and future decisions are based.
This chapter focuses on those aspects of the physical examination that
are of special concern to pediatrics.
physical exam, elements of history are unique to pediatrics, and must
be considered in conjunction with the exam. Birth history, such as
prematurity, birth weight, perinatal complications and number of days
spent in the hospital may provide clues to an underlying disorder. The
most useful developmental milestone is the age independent walking
began. This may be considered normal if the child began walking by
roughly 18 months of age; frequently no further milestones are needed
if this is the case. Grandparents may help elucidate the family
history, e.g., the patient’s father walked on his toes till age 3. To
stay out of trouble, proceed with the assumption that the parent or
referring doctor is always right until proven otherwise by a thorough
history and exam.
apprehension. Consider sitting as far away as possible from the child
while chatting in a friendly manner with the parents, occasionally
engaging the child in part of the conversation. A little effort in
relationship building with the child up front usually leads to a better
exam (which may explain why pediatric orthopaedists wear such silly
ties). Treating even young children with genuine respect and not
ignoring them while talking to parents goes a long way.
before physical contact, as once the child starts crying, information
that can be gained from observation will be quite limited. Some
children, typically between 14 months and 3 years of age, will be
completely uncooperative, thus the only chance you will have to observe
their gait is when they walk into the room. Take advantage of that
opportunity if at all possible.
rule of thumb is to examine the hips and spine of every child under 5
years of age unless the patient has a fracture or other clearly
localized complaint. This cursory exam may consist only of the Galeazzi
test, abduction of the hips, and inspection and palpation of the spine
under a child’s shirt. It is quite easy to forget to examine parts of
the body other than those pertaining to the chief complaint. To avoid
this blunder, plan on examining the area of chief complaint last. For
example, when an infant is brought to you for evaluation of a possible
torticollis, examine the spine and upper and lower extremities first
before focusing in on the neck. The parents will not let you leave the
room without examining the neck, but it is easy to forget to examine
the hips.
sides; take advantage of this by examining the “normal” side first for
comparison. Avoid loss of credibility in the parents’ eyes by checking
for muscle tone. Many children have already been evaluated by a
therapist or other doctor and diagnosed (often overdiagnosed) with
hypo- or hypertonia. Muscle tone of the upper and lower extremities may
be tested by rapidly flexing elbows, knees, and ankles to assess the
overall tone as well as doing a side-to-side comparison.
indicative of cerebral palsy with spastic hemiplegia, while increased
tone of the lower extremities compared to the upper extremities may be
indicative of cerebral palsy with spastic diplegia. Depending upon the
family, consider referral to an appropriate specialist for evaluation
of the child’s increased muscle tone, rather than blurting out the
emotionally laden diagnosis of cerebral palsy at the first visit.
to a child’s state of wakefulness rather than an underlying disorder.
When lifting a child of any age, with the examiner’s hands under the
child’s axilla, muscle tone about the shoulder girdle should be strong
enough to support the child’s weight. If a child slips through the
examiner’s hands, consider Duchenne muscular dystrophy or some other
neuromuscular disorder.
door to the exam room and asking the parents if they would like to take
their child for a walk in the hallway is often effective. If that
doesn’t work, taking the child away from the parents to observe the
child walk back to the parents usually works. Toddlers can be expected
to walk with a wide-based, waddling-gait pattern with the hands held
wide for balance. While it is normal for children learning to walk to
fall down frequently, a history of increasing falling should alert the
physician to the possibility of a progressive neurologic condition,
such as cerebral palsy, tumor, or other pathology. Where there is a
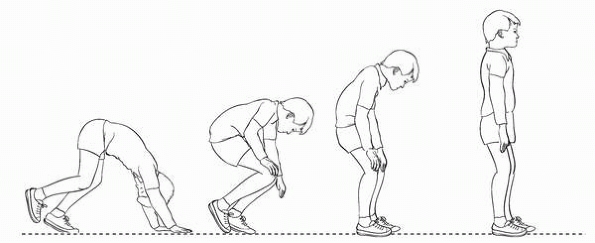
history of progressive falling or weakness, a Gower’s test should be
performed. To perform the Gower’s test, the child is asked to rise to a
standing position from a sitting position on the floor. If the child
uses the hands as if climbing up the legs and knees when arising, a
muscular dystrophy should be suspected. A positive Gower’s test indicates proximal muscle weakness involving the gluteus maximus (Fig. 2-1).
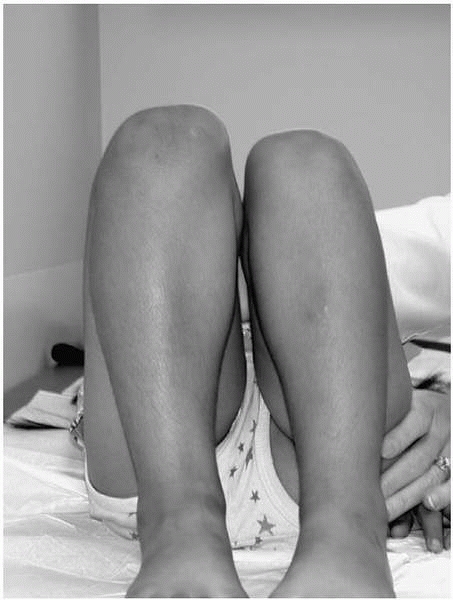
If a Gower’s test is positive, the calves should be inspected for
pseudo-hypertrophy. If the patient has a positive Gower’s test with
associated muscle weakness, a referral to a pediatric neurologist is
recommended to evaluate for muscular dystrophy; a CPK should be
considered as well.
pattern it may be helpful to evaluate one aspect of gait at a time,
possibly moving from the feet, upwards to ankles, knees, hips, torso
and arms. Walking up on one’s toes should alert the physician to the
possibility of cerebral palsy or other neuromuscular conditions.
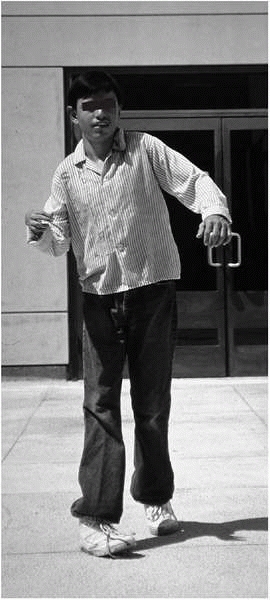
Running often helps amplify otherwise subtle gait disturbances such as
a unilateral flexed elbow indicative of cerebral palsy with spastic
hemiplegia (Fig. 2-2).
straight ahead and the feet point inwards during gait this is
consistent with internal tibial torsion. If both the feet and the knees
point inwards, this is consistent with internal femoral torsion.
 |
|
▪ FIGURE 2-1
Weakness of proximal muscles causes child to use arms to climb up legs on arising from sitting position is present in Duchenne muscular dystrophy and other conditions. The hardest part about this test is remembering to do it. |
 |
|
▪ FIGURE 2-2
Child with hemiplegia demonstrates characteristic elbow flexion. Note that this child has posturing of both elbows, suggesting asymmetric bilateral involvement. |
if they feel you have not spent sufficient time and attention analyzing
their child’s gait pattern. Bringing parents into the hallway and
having them point out their concerns about the child’s gait pattern is
usually time well spent. If you find some minor asymmetry in the gait
and share this with parents, it usually validates their concerns. If
you are not certain whether a limp is present, closing your eyes and
listening for an irregular cadence of foot strike often helps.
trouble, and deserves in-depth attention in this text and your
practice. Examination of an infant’s hip should be performed first
while the infant is calm and relaxed. Unlike many centers in Europe,
with universal screening of infants’ hips for developmental dysplasia
of the hip (DDH), the physical examination is usually the only chance
of picking up a dislocated or subluxated hip in most children in North
America.
and provocative tests of hip stability will be referred to as Barlow
and Ortolani tests, which attempt to dislocate and relocate the hip,
respectively. These tests are technically difficult, especially in
light of how rarely the test is positive in most practitioners’ hands.
We recommend stabilizing the pelvis with one hand, with the thumb on
the pubic symphysis and the fingers under the sacrum. While many
physicians test both hips simultaneously, logic suggests that giving
your full attention to one moving joint at a time is preferable in the
setting of such an important exam.
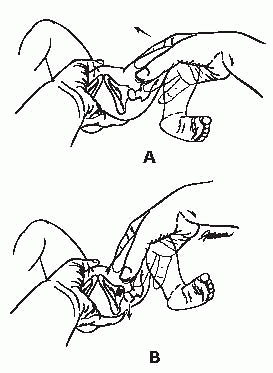
while bringing the hip from abduction to adduction, the primary
maneuver is to push downwards in line with the femoral shaft with your
palm on the knee. The secondary maneuver is pushing laterally on the
medial proximal femur with your thumb. A positive finding is a
palpable, and usually visible, posterior dislocation of the hip. It is
not a high-pitch tissue click, but rather a deeper clunk, with
significant motion such as going over a speed bump
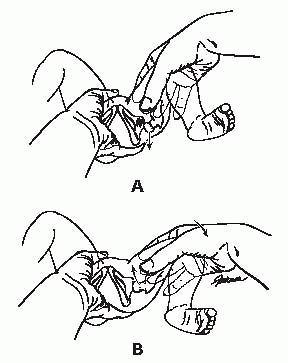
socket with your long finger. As in the Barlow test, a positive finding
is the palpable deep resonance of going over a speed bump. Usually a
positive finding can be seen by others in the room. A high-pitched
click is common and does not represent DDH, but is probably a product
of soft-tissue structures moving over bony prominences.
 |
|
▪ FIGURE 2-3 Barlow Maneuver. Palm pushes down on knee to push hip out back.
|
 |
|
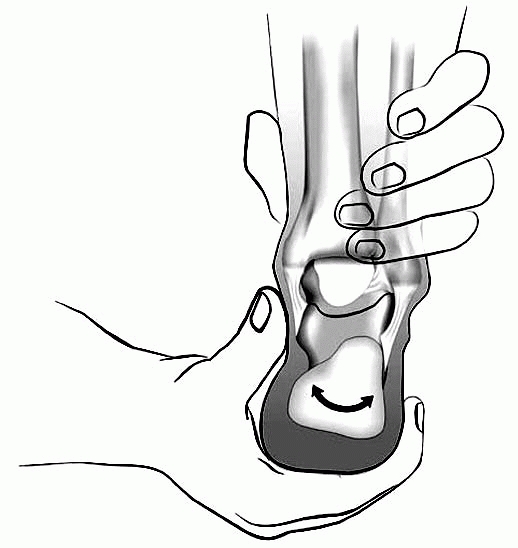
▪ FIGURE 2-4 Ortolani Maneuver: Fingers lift up on greater trochanter to lift hip in place.
|
the hip are impossible. This point cannot be overstated. Even a
newborn’s tight muscles may mask instability. Do whatever is necessary
to obtain a hip exam in a calm baby, including pacifiers, reexamination
after feeding, during feeding, or even rescheduling the exam for a
different day. Unlike the Galeazzi test, the Barlow provocative test
and the Ortolani tests may be performed on a parent’s lap if this helps
keep the infant calm. To stay out of trouble do not be afraid to
consider an ultrasound as an extension of the physical exam of a hip.
There is no shame in sending the baby with an equivocal exam for an
ultrasound, with a repeat examination a week or two later.
however, there are three pitfalls to avoid with this test. One, in the
first few weeks of life an infant’s hip joints may be hyper-lax and
abduct fully, even with a dislocated hip. Thus, testing hip abduction
is of limited value in the evaluation of newborns. Two, in the case of
bilaterally dislocated hips, abduction is symmetrical, though
decreased. In most infants, one should be suspicious of DDH if the hips
do not abduct more than 60-70 degrees. And three, a child on a parent’s
lap may be positioned with the pelvis slightly tilted, which may mask
hip asymmetry. Thus, hip abduction should be evaluated with the child
supine on an examining table.
 |
|
▪ FIGURE 2-5
Asymmetry of hip abduction is associated with a unilateral hip dislocation in the hip that abducts less. A potential pitfall is not leveling the pelvis on the exam table; subtle asymmetry may be missed in that event. |
 |
|
▪ FIGURE 2-6
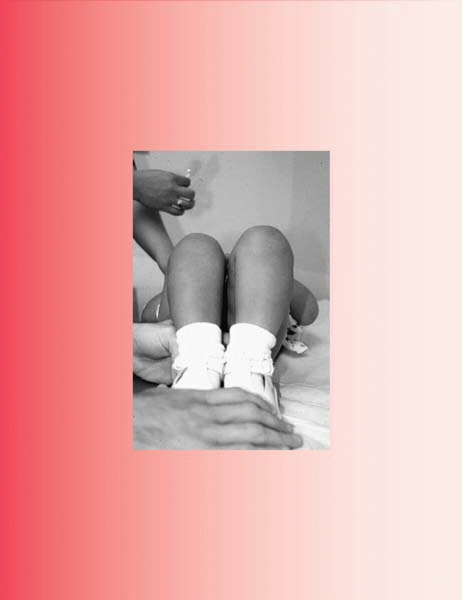
Galeazzi test is positive when knees are at different heights. When positive, there may be a unilateral dislocated hip or a leg length discrepancy. |
questionable value. They are commonly seen, but often are not
indicative of underlying DDH. The simplest test to perform is the
Galeazzi test, in which the child lies supine, with the hips fully
flexed, feet flat on the table, and the ankles touching the buttocks (Fig. 2-6).
indicative of a dislocated hip, or other less common conditions such as
proximal femoral focal deficiency, hemihypertrophy, etc. To stay out of
trouble, this test is best performed on an examining table, not the
mother’s lap, with all diapers, blankets and clothing out from under
the baby, as even a 1-cm fold of clothing under the hemipelvis may mask
a limb length discrepancy. Being peed on at times is just part of the
job.
bilateral dislocated hips. In a newborn with bilateral dislocated hips,
the only abnormality on physical exam may be a lack of the normal hip
flexion contractures of infancy.
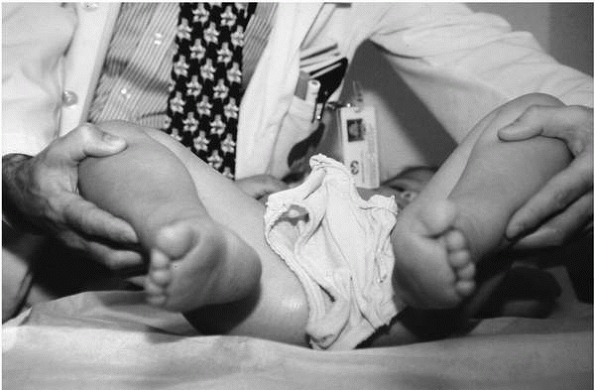
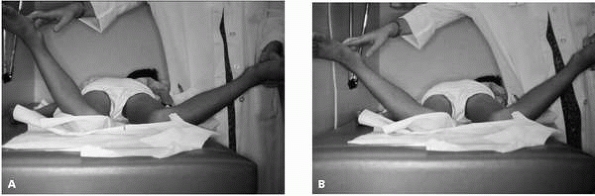
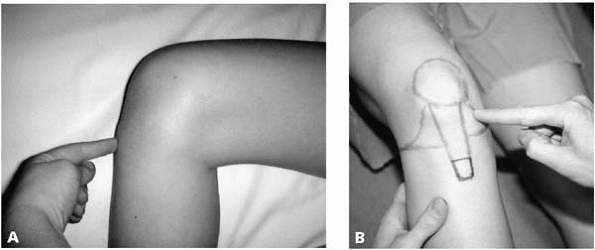
older children is prone internal rotation. The child lies prone on the
examining table, with the knees flexed 90 degrees and the tibias
pointing towards the ceiling. The ankles are then brought outwards as
far as the child comfortably tolerates. Hip internal rotation is 0
degrees if the tibia points towards the ceiling or 90 degrees if they
fall completely outwards and become horizontal. Asymmetry of hip
internal rotation usually indicates intraarticular hip pathology in the
hip with less rotation. (Fig. 2-7). Common
conditions causing limited internal rotation include transient
synovitis, infection, a slipped capital femoral epiphysis (SCFE), and
Legg-Calvé-Perthes disease. Uncommon causes of asymmetric internal
rotation include a healed femur fracture with axial malalignment and
asymmetric unilateral femoral torsion.
This test should be performed in any child who is limping or
complaining of leg pain without clear localization. Another pitfall
with this test is not stabilizing the pelvis in neutral rotation,
allowing pelvic tilt to mask the asymmetric internal rotation. The most
common problem with this test is simply forgetting to do it. Remember
that in children, hip pathology may cause referred pain to the thigh,
or even the knee.
 |
|
▪ FIGURE 2-7
Asymmetry of internal hip rotation is best appreciated prone. Asymmetry localizes intraarticular pathology to the hip with less internal rotation. A potential pitfall occurs when the test is performed while the pelvis is not perfectly flat on the table, as noted by the seemingly different findings in these two photos (A and B). |
 |
|
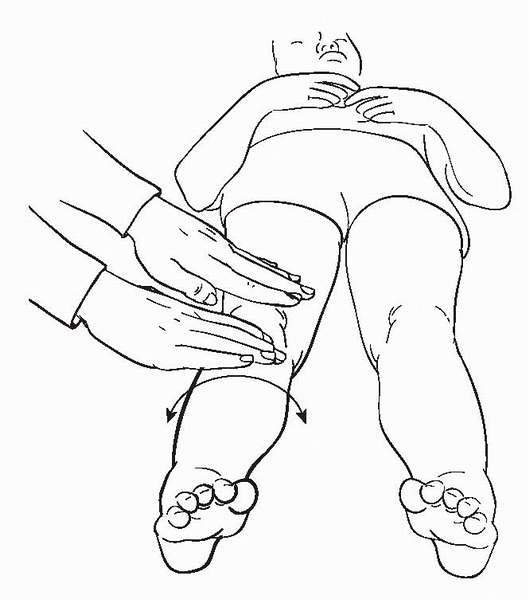
▪ FIGURE 2-8 Log roll. Rolling the leg from side to side will help you distinguish between septic hip and transient synovitis.
|
In this test the child is supine, with the hip and knee fully extended.
A child with an acute hip infection will often resist lying with the
hip fully extended. Rolling the leg back and forth causes internal and
external rotation of the hip. By pretending to examine the foot, an
examiner often discovers much more motion than the nondistracted child
would permit. This test is particularly useful in helping to
distinguish between transient synovitis and septic arthritis. In septic
arthritis, children are uncomfortable with nearly any internal
rotation, while a child with transient synovitis will often allow up to
30 degrees of internal rotation if the examiner is gentle and patient.
supine position, place a hand across both anterior superior iliac
spines in young children, or a forearm in larger children, to make
certain you are not causing pelvic tilt and masking asymmetric hip
abduction or adduction.
one of the examiner’s hands under the lumbar spine to feel when flexion
of the lumbar spine begins to
occur.
It is surprisingly easy to join the club of doctors who have mistaken
spine flexion for hip flexion in a patient with a hip fusion. If
passive flexion of the hip is accompanied by obligate external
rotation, an SCFE may be present.
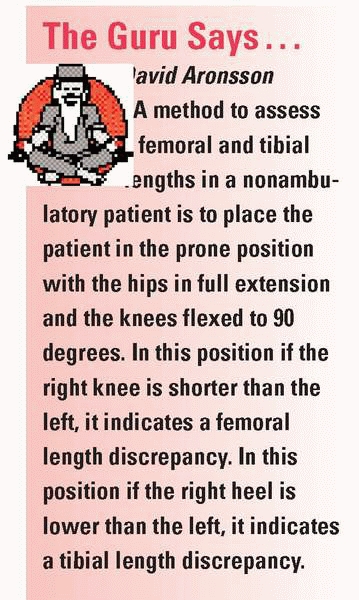
spine to the medial malleolus in a supine patient is notoriously
inaccurate, particularly in squirming and overweight children. A much
simpler method is to place the examiner’s fingers on the iliac crests
when the child is standing (Fig. 2-9), and
observing for asymmetric heights of the iliac crests. For nonambulators
or uncooperative children the Galeazzi test as described above is
useful. The Galeazzi test is particularly useful in demonstrating to
parents the presence or absence of a leg length discrepancy. A pitfall
in the assessment of leg lengths is a unilateral hip abduction
contracture, with the abducted leg giving the appearance of being
longer in nearly all positions. To avoid this pitfall, make certain
that the pelvis is level during the Galeazzi test.
 |
|
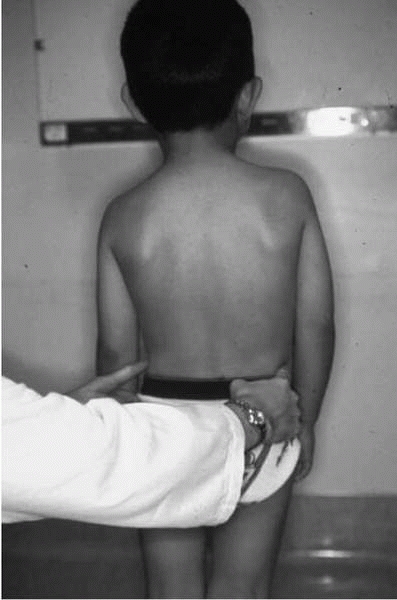
▪ FIGURE 2-9
Limb lengths may be easily and accurately assessed, and demonstrated to parents, by placing your fingers on the iliac crests. A potential pitfall is the child with a significant limb length discrepancy who bends the short knee in an attempt to “stand up straight.” |
on angular and torsional deformities. A common pitfall is to mistake
tibial torsion for genu varum, as discussed in Chapter 23.
To avoid this pitfall, examine the child in the supine position, making
certain the patellas point straight up with the legs fully extended.
With internal tibial torsion, the feet will point inwards. If the leg
is straight in this position, showing the parents is often reassuring.
the knees may be measured with a ruler when the ankles are together for
future comparison. Similarly, in cases of genu valgum, with the knees
lightly touching, the space between the medial malleolus may be
measured.
important pitfall to avoid is forgetting to examine the hips. Find the
point of maximum tenderness about the knee and you can diagnosis the
majority of pediatric knee problems (Fig. 2-10).
In an acutely injured knee that hurts “all over,” localizing the point
of maximum tenderness may be impossible and best deferred to a return
visit in one to two weeks. Traumatic knee effusions in children should
be taken very seriously. Radiographs are always warranted, and if
negative, then possibly an MRI should be obtained. In a child with a
traumatic effusion, everyone suspects an ACL injury, but a patellar
dislocation or subluxation is commonly the cause of the effusion when
the chief complaint is “my knee gave out.” In the setting of trauma,
remember a distal femoral Salter I fracture is possible in a child with
open growth plates, while an MCL injury is more common in the
adolescent. The two may be differentiated by point of maximal
tenderness, radiographs (possibly with stress), or even an MRI.
 |
|
▪ FIGURE 2-10
The point of maximal tenderness is often easy to identify in the subcutaneous structures of the knee. These photos demonstrate the different points of maximal tenderness in Osgood-Schlatter disease with tibial tubercle tenderness (A) versus a medial meniscal tear with joint line tenderness (B). |
the leg 6 cm above and 10 cm below the patella provides objective
evidence of the child’s use of the limb. The first muscle in the
quadriceps mechanism to atrophy is the vastus medialis obliquis (VMO),
so do not measure too high on the thigh. Depending on the size of the
child, 1 to 2 cm of increased circumference of the dominant thigh may
be considered within normal limits. While most asymptomatic “clicking”
about the knee is not of concern, children may have unstable discoid
lateral menisci. The squat test—crouching like a catcher—will almost
always produce pain in a patient with a meniscus tear.
subchondral bone of the distal femur or patella loses its blood supply.
Wilson’s sign is often sited as a key test to diagnose osteochondritis
desiccans involving the distal femur, but it is often falsely negative.
A positive Wilson’s sign occurs when the patient’s knee is passively
extended with the tibia internally rotated; at 30 degrees of flexion
the patient experiences pain that is immediately relieved by externally
rotating the tibia.
patient lie supine with the knee extended. The examiner holds the
superior end of the patella firmly against the femur, preventing it
from moving proximally, while the patient contracts the quadriceps (Fig. 2-11).
Pain is considered indicative of patellofemoral pain syndrome. It is
important to ask the patient if this is the type of pain that has been
experienced, as the test may be overly sensitive, and identify
subclinical patellofemoral pathology that is not the source of knee
pain that prompted the doctor’s visit.
 |
|
▪ FIGURE 2-11
In the patella grind test, the examiner holds the superior end of the patella firmly against the femur, preventing it from moving proximally, while the patient contracts the quadriceps. Pain is considered indicative of patellofemoral syndrome, though the test may be overly sensitive. |
cause you to think that the patient has an associated neurologic
disorder until proven otherwise. If the pes cavus is unilateral, it may
be associated with a tethered spinal cord. Look for redness or
callosities over the talar head, 5th metatarsal head, or other bony
prominences. Look at the shoes as patterns of shoe wear may provide a
clue to abnormal foot position.
tendon and hind foot should be in a neutral to slightly valgus position
when standing, and when the child stands on the toes, the heel should
invert into slight varus. If the first metatarsal is pronated or
plantarflexed, it will cause the hindfoot to roll into varus with
weight bearing. The Coleman block test is classically described for
assessment of hind foot mobility, however we have found a much simpler
test preferable, described by Price and Price.1
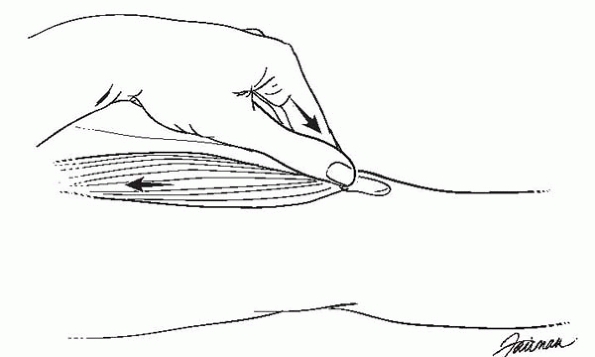
With the child prone and the knees flexed to 90 degrees, grasp the
tibia with one hand and cup the heel with the other hand. Observe hind
foot motion while moving the heel into varus and valgus positions (Fig. 2-12).
 |
|
▪ FIGURE 2-12
Subtalar motion may be simply evaluated by observing passive motion of the heel in the prone patient. Have one hand cup heel in palm, while the other holds leg above ankle. |
should be evaluated with the child standing on the toes, or in a
non-weight-bearing position. If the arch is flat when standing, but is
re-created when the child is on the toes or non-weight bearing, this by
definition is a flexible flat foot. Almost all babies have flat feet
from the significant subcutaneous fat in this region; the arch will
increase from birth to about 10 years of age. Beware that a child with
a rigid flat foot may have a tarsal coalition. Subtalar motion may be
assessed by stabilizing the tibia with one hand, while cupping the heel
with the other hand and moving the hindfoot from side to side. This is
a deceptively difficult exam as motion at the ankle joint may be
mistaken for subtalar motion.
foot may be secondary to a valgus ankle. Palpation of the ankle should
reveal that the lateral malleolus is more distal than the medial
malleolus. If not, consider fibular hemimelia or other anomalies.
Remember to test ankle dorsiflexion with the foot in maximum supination
to lock the subtalar joint and prevent midfoot motion from giving the
appearance of ankle dorsiflexion. Also, begin to test ankle
dorsiflexion with the knee bent to relieve the pull of the
gastrocnemius, then with the knee straight. The decrease in the amount
of dorsiflexion achieved with the knee extended, compared to that with
the knee flexed, represents the contribution of the medial and lateral
gastrocnemius muscles to the equinus contracture. It is important to
remember that lack of ankle dorsiflexion and increased muscle tone are
present in many neuromuscular disorders.
length discrepancy will often develop ankle equinus on the short leg
from chronic toe walking, which should not be confused with an
underlying neurologic condition. Conversely, children with cerebral
palsy with spastic hemiplegia usually have a short leg on the affected
side, with the equinus resulting primarily from muscle spasticity, not
the leg length discrepancy.
present a few challenges. A longitudinal deficiency of the tibia may
give the appearance of a clubfoot. A rather significant amount of
metatarsus adductus should not be too troublesome as long as the foot
is passively correctable. A key finding that helps differentiate
metatarsus adductus from a congenital clubfoot deformity is that the
clubfoot cannot be dorsiflexed past neutral.
of the spine is to not have the patient sufficiently unclothed in
deference to modesty. No more than bottom underwear and either a bikini
top or gown that opens to the back should be worn. Inspection of the
skin for lesions (neurofibromatosis) and the feet for deformities is
important, as well as observing a child bend naturally without being
encumbered by half pulled-up T-shirts. No examination of the spine is
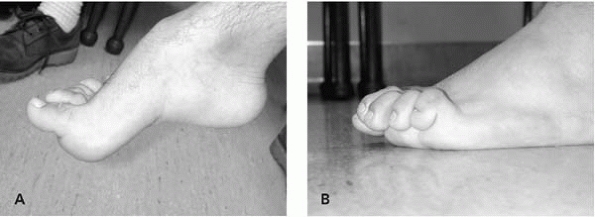
complete unless the feet have been inspected (Fig. 2-13).
 |
|
▪ FIGURE 2-13 No examination of the spine is complete until the shoes and socks have been removed. A cavus foot (A) or claw toes (B) indicates underlying neurologic pathology may be present.
|
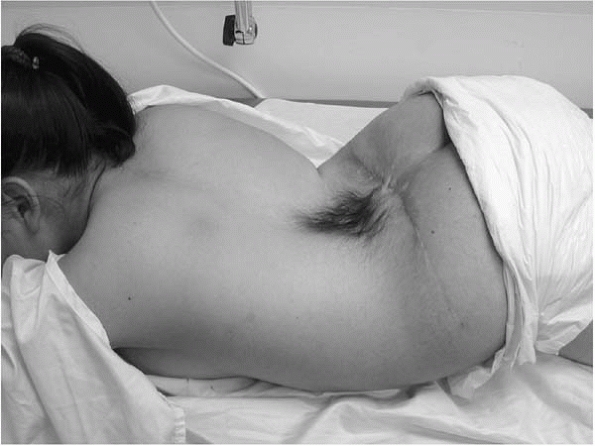
defect or a hairy patch may suggest an underlying spinal dysraphism.
Hairy patches tend to be overdiagnosed by eager residents and medical
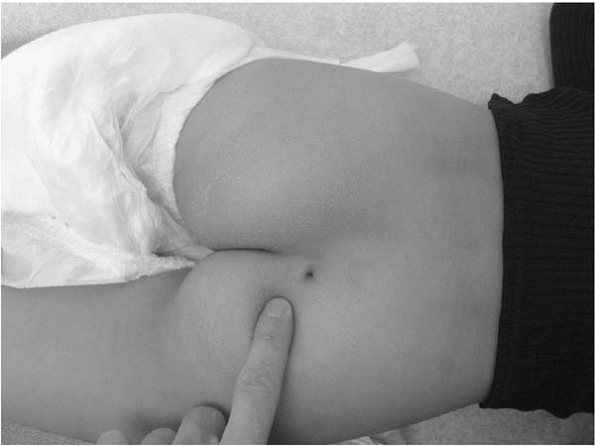
students. The real thing is usually unequivocal (Fig. 2-14). Dimples above the gluteal cleft may be indicative of underlying spinal pathology, and may warrant an MRI (Fig. 2-15). Small dimples within the gluteal cleft are less concerning in an otherwise normal child.
shoulder blades, and waist should be evaluated. Comparison of the space
between the patient’s arms and waist for side-to-side symmetry is
particularly sensitive in the identification of scoliosis in the
standing position. To perform the Adams forward bending test, have the
child standing in front of the examiner facing away from the examiner.
The examiner’s head should be at back level, which usually means the
examiner sits on a stool. Ask the child to place the hands together, as
this ensures that any observed shoulder asymmetry is not due to one
hand reaching further downwards than the other. Then ask the child to
bend forward as if trying to touch the toes.
 |
|
▪ FIGURE 2-14 A true hairy patch (one with enough hair to braid) is associated with underlying spinal pathology.
|
 |
|
▪ FIGURE 2-15 A dimple above the gluteal cleft may be associated with spinal dysraphism.
|
a false positive test because of a limb length discrepancy. Remember to
first assess the limb lengths by placing your fingers on the child’s
iliac crests when sitting behind the child. If one leg is significantly
longer, this will give the appearance of an ipsilateral lumbar fullness
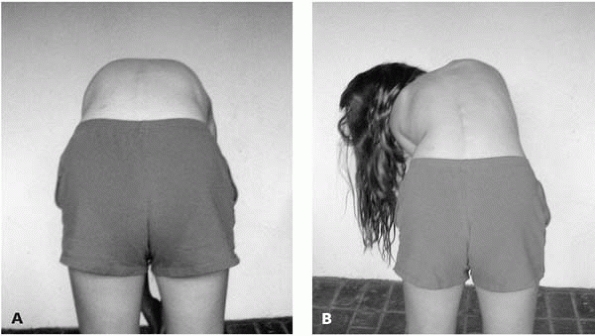
during the Adams forward bending test. A red flag in this test is if
the child consistently bends or “lists” off to one side when asked to
bend forwards. This may be indicative of a serious underlying spinal
pathology (Fig. 2-16).
 |
|
▪ FIGURE 2-16
When a child repeatedly bends to one side, or “lists” when bending forward in the Adam’s forward bending test, this may indicate underlying spinal pathology. A: Child bending normally. B: Child listing to the left. |
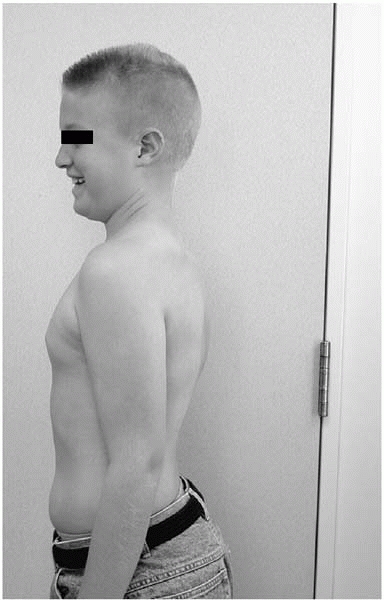
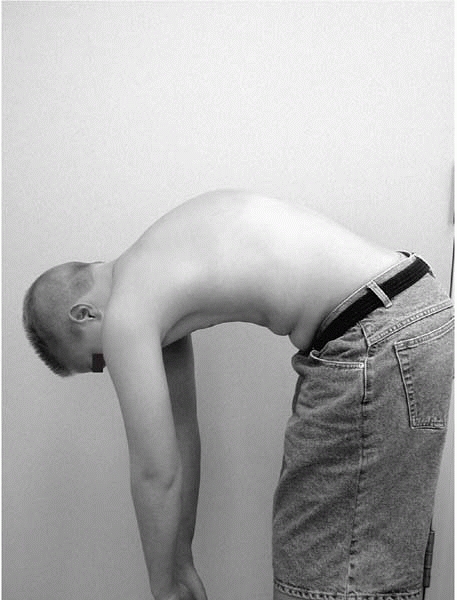
observe from the side as well if sagittal alignment is of concern. A
sharp angulation is indicative of Scheuermann’s kyphosis. We have seen
many children with Scheuermann’s kyphosis successfully hide their
deformity when standing up, only to be revealed when bending forward (Figs. 2-17 and 2-18).
have the child bend backward as well as forward. Localized pain in the
lower lumbar region with
back
extension may be indicative of spondylolysis or spondylolisthesis.
Palpation of the back is often quite illuminating when a patient’s
chief complaint is back pain. When a child complains of tenderness to
palpation that seems out of proportion or nonphysiologic, a repeat
palpation of the back when the child’s attention is diverted may fail
to produce the same reaction. Although children seek secondary gain
less frequently than adults, this finding suggests that secondary gain
or other psychologic forces should be considered.
 |
|
▪ FIGURE 2-17 Child with Scheuermann’s kyphosis who smiles as he believes he is escaping detection.
|
 |
|
▪ FIGURE 2-18 Forward bending test shows sharp kyphotic angulation. Radiographs confirmed Scheuermann’s kyphosis.
|
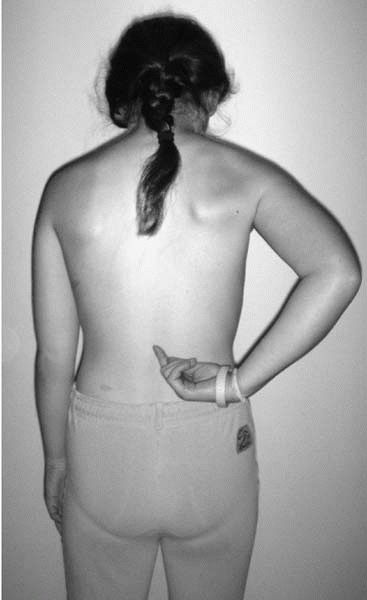
evaluation of a patient with back pain is the “finger test.” When asked
to show the doctor where the back hurts, if the child points with one
finger to a specific, repeatable location, this suggests underlying
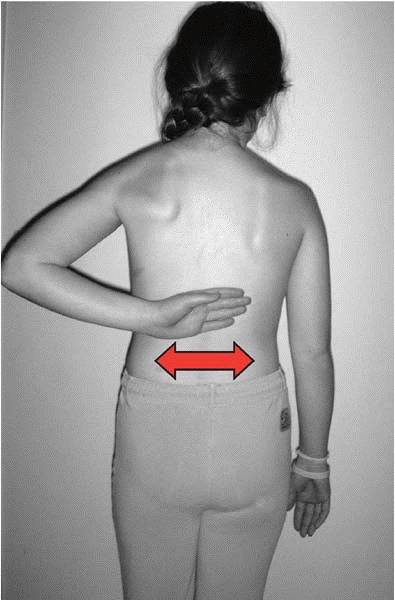
pathology (spondylolysis, tumor, etc.). When a child motions over a
large area of the back, particularly a transverse distribution across
the lumbar spine, adult type mechanical low back pain is more likely (Figs. 2-19 and 2-20).
position may reveal the traditional cock robin position of torticollis,
in which the head is tilted in one direction and rotated in the
opposite direction. Inspection of the head and neck should be performed
looking for webbing of the neck, and a low-set hairline, as is seen in
Klippel-Feil syndrome, in addition to palpation of the potentially
tight sternocleidomastoid muscle, as is seen in congenital muscular
torticollis.
 |
|
▪ FIGURE 2-19
Positive finger test. Child points with finger to one repeatable location as the source of back pain. This raises the suspicion of underlying spinal pathology. |
 |
|
▪ FIGURE 2-20
Nonlocalized back pain, especially transversely distributed over the lumbar region, is more likely to be adult style musculoskeletal back pain. |
examination of the spine is the neurologic examination. This may be
performed relatively quickly and should be considered in a patient with
any spinal complaint. To perform a brief neurologic examination, first
have the child walk on the toes, walk on the heels, and jump up and
down on one foot at the time. Sit on a stool next to the child, who
sits on the edge of the exam table with legs hanging off. Inspect the
feet for deformities, and sharply dorsiflex each ankle to test for
clonus and assess muscle tone. Test the patella tendon and Achilles
tendon reflexes. This can usually be done with the examiner’s fingers,
as many children do not appreciate being hit with a hammer. If the
patella tendon reflexes are not forthcoming, a useful trick is to ask
the child to gently push against your finger placed over the anterior
ankle while tapping the patella tendon. This slight amount of
quadriceps contraction is usually sufficient to encourage a reflex at
the next attempt.
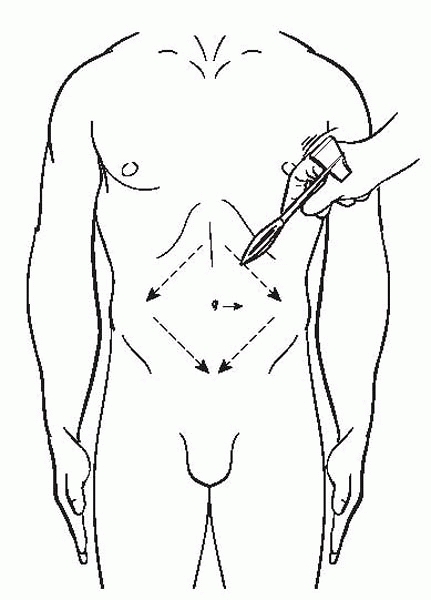
The abdominal reflexes are assessed by lightly stroking the skin to the
side of the umbilicus and observing for any movement of the umbilicus
in the direction of the stimulus. The test is positive when the
movement is asymmetrical and a positive abdominal reflex may be the
only detectable clinical finding in a patient with scoliosis secondary
to syringomyelia (Fig. 2-21).
touch should be tested in the following dermatomes: L3—medial knee,
L4—medial malleolus, L5—dorsum of big toe, S1—plantar and lateral
aspect of the foot. Lightly touch each area on both legs simultaneously
and ask the child if it feels normal and the same on both sides.
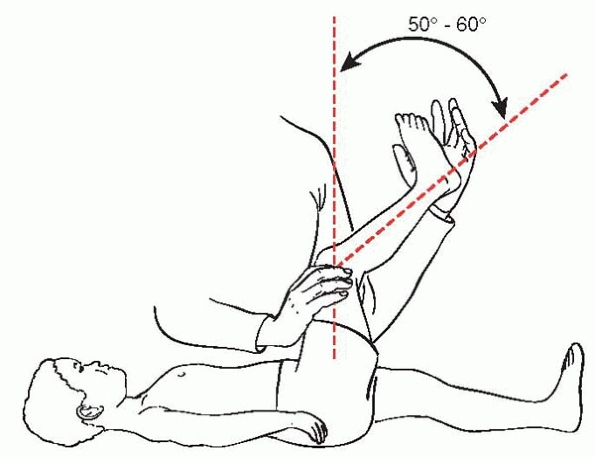
angle. The popliteal angle may be thought of as the ESR of the spine
examination, in that it is very sensitive to underlying spinal
pathology such as a spondylolisthesis or tethered spinal cord, but not
very specific. The reason why varied spinal pathologies may lead to a
final common pathway of hamstring tightness is open to speculation.
With the child supine flex one hip to 90 degrees with the knee bent,
then slowly extend the knee as far as is comfortable. The angle between
the tibia and vertical femur is the popliteal angle. An angle over 50
to 60 degrees may be considered abnormal, and the cause of hamstring
tightness should be sought (Fig. 2-22).
-
Hop on each foot, one at a time
-
Walk on heels
-
Reflexes
-
Foot inspection
-
Ankle dorsiflexion to assess muscle tone and clonus
-
Sensation
-
Popliteal angle
 |
|
▪ FIGURE 2-21
The umbilicus reflex is positive when the umbilicus moves asymmetrically in response to lightly stroking the adjacent skin with a sharp object. This may indicate an underlying syrinx. In the setting of scoliosis, this finding justifies an MRI. |
 |
|
▪ FIGURE 2-22
The popliteal angle may be thought of as the ESR of the neurologic exam. It is very sensitive for nerve root irritation, but not specific. It may be considered positive if the angle is >50-60 degrees. |
other areas of the body in children. Particular attention should be
paid to the height of the scapula, as a high-riding scapula may be
indicative of Sprengel deformity. When elevating the shoulder to 180
degrees, the normal ratio of glenohumeral to scapulothoracic motion is
2:1. If the scapula is elevated and does not appear to be abducting in
a normal fashion, consider the possibility of a Sprengel deformity.
Young children can be so flexible and thin that their humeral head can
be palpated in the axilla during full shoulder elevation; this is not
pathologic if the patient is flexible. If a brachial plexus injury is
suspected, pay careful attention to the amount of shoulder external
rotation present, as this is often limited following a brachial plexus
injury involving the C5 and C6 nerve roots.
expected. Following healing of a fracture adjacent to the elbow joint,
the carrying angle may be compared to the contralateral side. Normal
elbow hyperextension is quite common in children and teenage girls.
Children who lack full elbow extension should be considered to have
serious pathology (e.g., osteochondritis dissecans, avascular necrosis,
arthritis, infection, occult fracture), until proven otherwise. It even
has been said that there cannot be anything seriously wrong with an
elbow if it will fully extend. To assess elbow flexion, ask patients to
touch their shoulder with their fingers. Approximately 125 degrees of
elbow flexion is required to perform this task, which is better
tolerated in young children than use of the goniometer.
degrees should be expected. Limited forearm rotation most often results
from a fracture, however careful attention to the radial head is
warranted. Early recognition of a dislocated radial head may avoid
later problems. A prominent radial head may be indicative of a
congenital radial head dislocation, or an unrecognized Monteggia lesion.
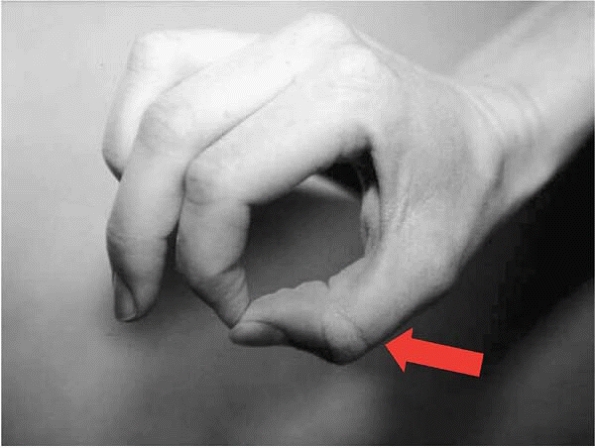
a child’s hand is to assess nerve function. A careful preoperative
examination of nerve function prior to fracture treatment may help keep
the surgeon out of trouble. The most commonly damaged nerve in a
supracondylar fracture of the distal humerus is the anterior
interosseous branch of the median nerve. To test this nerve, ask the
child to make an O with the index finger and thumb. Active
interphalangeal flexion of the thumb and index finger confirms that the
nerve is intact (Fig. 2-23).
prior to performing a closed reduction and crossed pinning of a distal
humeral supracondylar fracture if using a medial pin is planned. Motor
function of the ulnar nerve may be tested by asking children to cross
their fingers. Young, apprehensive children seem to find this test
difficult. If a child can be convinced to pinch something between the
thumb and index finger, the examiner may palpate a contraction of the
muscle belly of the first dorsal interosseous muscle and confirm motor
function of the ulnar nerve.
avoided as future examinations may be severely compromised. In the
preverbal or uncooperative child,
soaking
the hand in a wet cloth for a few minutes will produce a wrinkling of
the skin where sensory nerves are intact. This may substitute for a
sensory examination. To evaluate the sensory component of a nerve in an
older child, it is accurate and painless to test two-point
discrimination using a paper clip, comparing the injured side with the
uninjured side.
 |
|
▪ FIGURE 2-23
Active interphalangeal flexion of the thumb and index finger confirms that the anterior interosseous branch of the median nerve is intact (arrow). This is the most commonly damaged nerve in a supracondylar fracture of the distal humerus. |
-
Examine the area of chief complaint last, so you don’t forget the other parts (except for hip dysplasia).
-
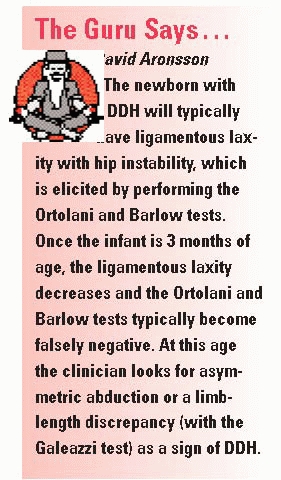
Ortolani and Barlow tests may be negative in a child with a dislocated hip by age 3 months.
-
If a baby is crying, high quality provocative tests of the hip are impossible.
-
The single most useful exam in the evaluation of an older child’s hip is prone internal rotation.
-
In a child presenting with knee or leg pain, the most important pitfall to avoid is forgetting to examine the hips.
-
A cavus foot or claw toes should immediately cause you to think that the patient has an associated neurologic disorder until proven otherwise.