
Editors: Morrey, Bernard F.; Morrey, Matthew C.
Title: Master Techniques in Orthopaedic Surgery: Relevant Surgical Exposures, 1st Edition
Copyright ©2008 Lippincott Williams & Wilkins
> Table of Contents > Section II – Lower Extremity > 11 – Foot and Ankle
11
Foot and Ankle
Julie E. Adams
Joseph R. Cass
Harold Kitaoka
ANATOMIC CONSIDERATIONS
The ankle is stabilized by anatomic congruence of the
talus in the mortise as well as the strong ligaments and capsular
attachments. The medial ligaments coalesce into a strong single
ligament known as the deltoid ligament (1,2). It has superficial and deep fibers (1,2).
The lateral collateral ligament is comprised of three discrete
components; the anterior talofibular ligament, the calcaneofibular
ligament, and the posterior talofibular ligament (1,3).
The thin anterior talofibular ligament is most commonly disrupted with
ankle sprains. Other stabilizers of the ankle joint include the
syndesmosis and interosseous membrane.
Soft Tissue Anatomy
The muscles of the foot may be divided into the
intrinsic muscles, whose origins and insertions lie in the foot, and
extrinsic muscles, whose bellies lie proximal and tendons extend into
the foot to exert their influences. Plantarly, the musculature of the
foot is arranged in four layers, from plantar to dorsal: (a) abductor
hallucis, flexor digitorum brevis, abductor digit minimi; (b) flexor
digitorum longus, flexor hallucis longus, quadratus plantae, and the
lumbricals; (c) flexor digiti minimi brevis, adductor hallucis, flexor
hallucis brevis; and (d) the four dorsal and three plantar interossei
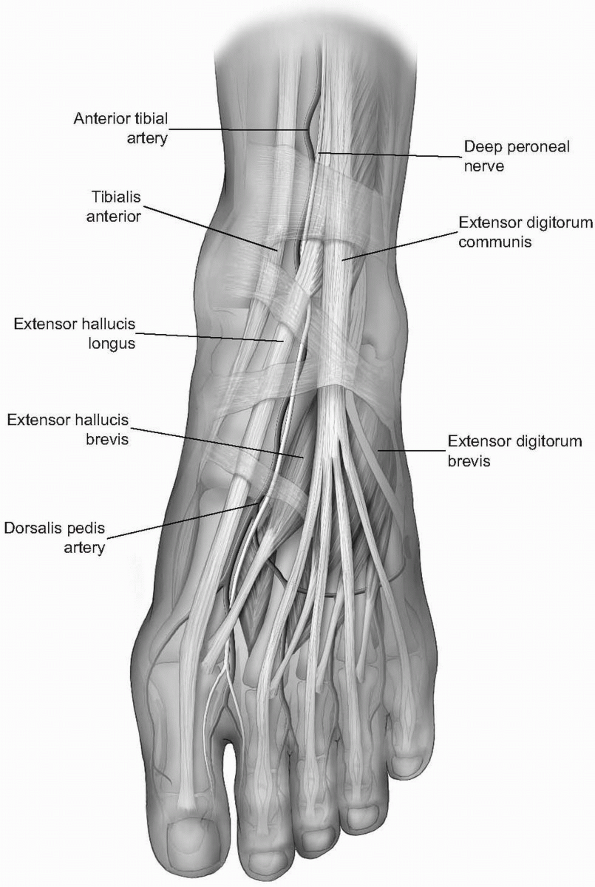
muscles. Dorsally, the extensor digitorum brevis and extensor hallucis
brevis lie in a relatively superficial plane (Fig. 11-1).
intrinsic muscles, whose origins and insertions lie in the foot, and
extrinsic muscles, whose bellies lie proximal and tendons extend into
the foot to exert their influences. Plantarly, the musculature of the
foot is arranged in four layers, from plantar to dorsal: (a) abductor
hallucis, flexor digitorum brevis, abductor digit minimi; (b) flexor
digitorum longus, flexor hallucis longus, quadratus plantae, and the
lumbricals; (c) flexor digiti minimi brevis, adductor hallucis, flexor
hallucis brevis; and (d) the four dorsal and three plantar interossei
muscles. Dorsally, the extensor digitorum brevis and extensor hallucis
brevis lie in a relatively superficial plane (Fig. 11-1).
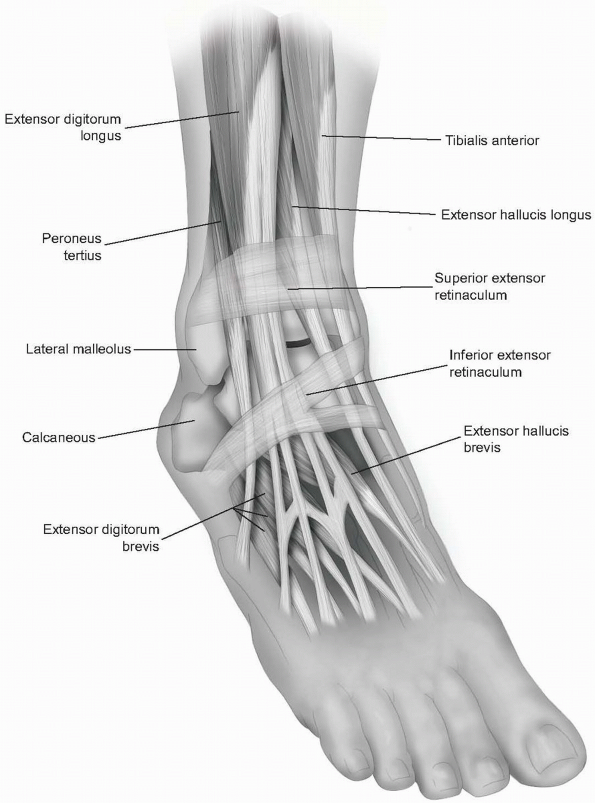
Overlying the tendons of the ankle are the retinacula,
which prevent bowstringing of the tendons. The superior extensor
retinaculum lies anteriorly and is split by the tibialis anterior
tendon. The inferior extensor retinaculum lies over the dorsum of the
foot and is Y shaped. It stretches from the lateral os calcis to the
medial malleolus and to the plantar aponeurosis (Fig. 11-2).
The flexor retinacula are lateral and consist of the superior peroneal
retinaculum, which is a thickening of deep fascia stretching from the
tip of the lateral malleolus to the calcaneus, and the inferior
peroneal retinaculum, which crosses from the peroneal tubercle to
lateral calcaneus.
The potential internervous planes include medially,
between the tibial nerve innervated flexors (tibialis posterior) and
the deep peroneal nerve innervated extensors (tibialis anterior); posterolaterally between the flexors (flexor hallucis longus) and the superficial peroneal nerve innervated everters (peroneus brevis); and laterally, between the extensors (peroneus tertius) and the everters (peroneus brevis) (4).
Neurovascular Anatomy
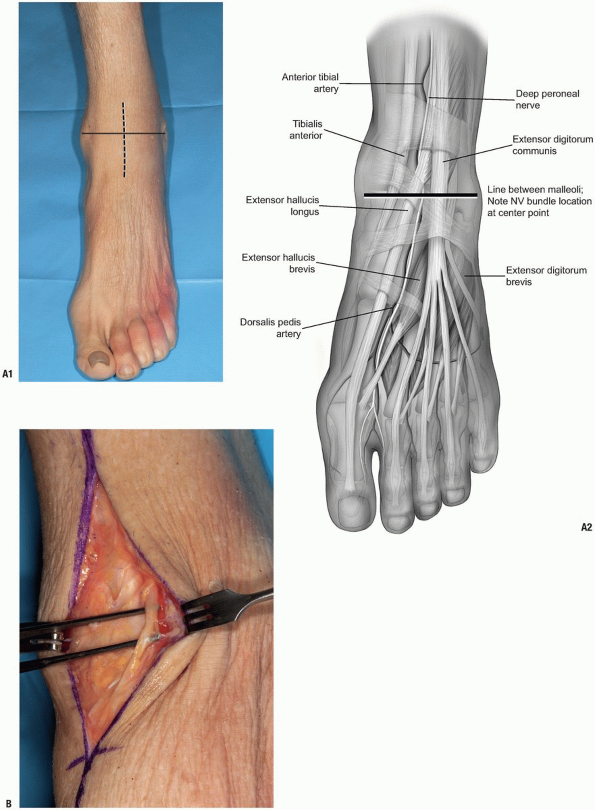
Anteriorly, the anterior tibial artery and the deep
branch of the peroneal nerve course toward the foot, crossing the ankle
joint midway between the malleoli (see Fig. 11-1) (4, 5, 6).
The anterior tibial artery lies between the tibialis anterior tendon
and the extensor hallucis longus proximal to joint and then between the
extensor hallicus longus (EHL) and the extensor digitorum longus (EDL)
distal to the
P.234
joint.
It becomes the dorsalis pedis artery distally as it enters the foot.
The deep peroneal nerve supplies the extensor digitorum brevis (EDB)
and extensor hallucis brevis and provides cutaneous sensation to the
first web space.
 |
|
FIGURE 11-1
|
 |
|
FIGURE 11-2
|
Posteromedially, the neurovascular bundle includes the
posterior tibial artery and the tibial nerve and courses posterior to
medial malleolus, lying between the tendons of the flexor digitorum
longus (FDL) and flexor hallucis longus (FHL) (Fig. 11-3).
The posterior tibial artery passes behind the tendon of the flexor
digitorum longus before entering the sole of the foot and dividing into
medial and lateral plantar arteries. Analogous to the hand, the lateral
plantar nerve supplies sensation to 1.5 digits, while the medial
plantar nerve supplies 3.5 digits (1,3).
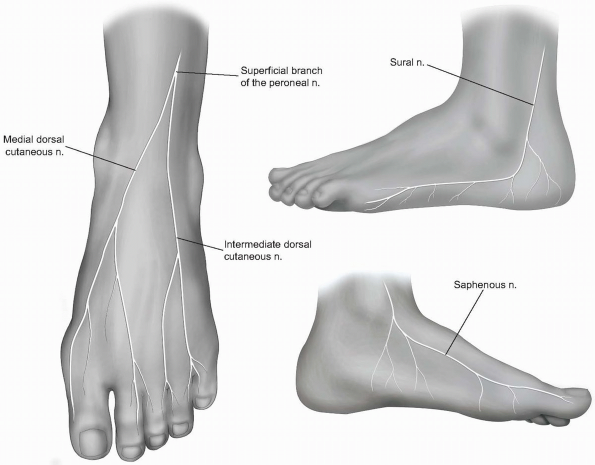
Several superficial structures are important to identify
and preserve. The saphenous nerve, the terminal branch of femoral
nerve, runs with the long saphenous vein anterior to medial malleolus.
Proximally, it pierces the deep fascia between the sartorius and
gracilis tendons. The branches of the nerve are closely associated with
those of the long saphenous vein throughout their courses. The
saphenous nerve passes anterior to the medial malleolus to provide
cutaneous sensation to the medial first ray and base of the big toe.
The nerve divides into two branches at the level of the medial
malleolus and thus supplies sensation to the medial midfoot as well (Fig. 11-4).
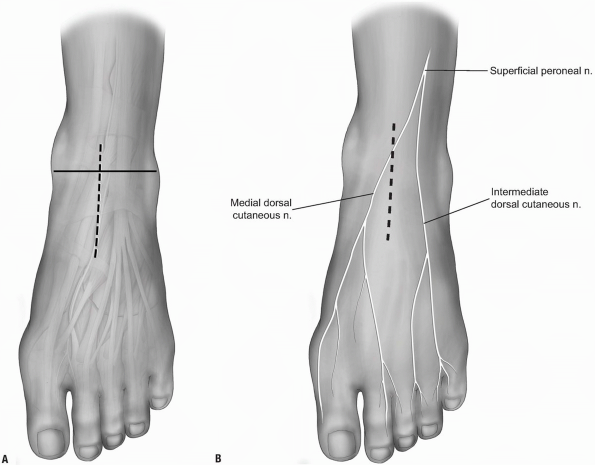
The superficial peroneal nerve is a terminal branch of
the common peroneal nerve. It pierces the deep fascia of the anterior
compartment at the distal one-third of the leg and distally crosses the
ankle anteriorly at the mid-malleolar line. It is superficial and
lateral to the anterior tibial neurovascular bundle. It divides into
the medial and intermediate dorsal cutaneous nerves, which provide
sensation to the dorsum of the foot (see Fig. 11-4).
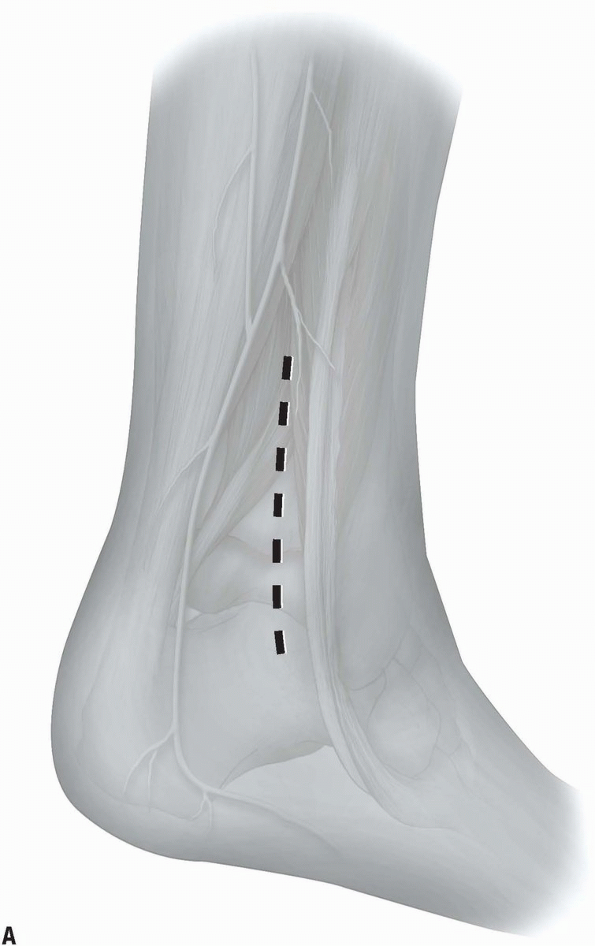
The sural nerve is the terminal branch of tibial nerve
and runs over the lateral aspect of the leg and foot, posterior to the
lateral malleolus. It pierces the deep fascia in the posterior calf
then travels distally, lateral to the Achilles tendon. The sural nerve
travels with the short saphenous vein, with which its branches are
closely bound. Its path curves anteriorly distal to the lateral
malleolus along the fifth
P.235
ray
to finally become the lateral dorsal cutaneous nerve of the foot and
provides sensation to the lateral aspect of the foot (see Fig. 11-4) (1,2,4,5).
 |
|
FIGURE 11-3
|
 |
|
FIGURE 11-4
|
P.236
APPROACHES TO THE DISTAL TIBIA/ANKLE JOINT (5,7-10)
Anteromedial Approach to the Distal Tibia/Ankle Joint
Indications
The standard anterior approach to the ankle joint
involves entering via the plane between the tibialis anterior medially
and the neurovascular bundle and toe extensors laterally. This works
well for intraarticular ankle procedures but not as well for distal
tibial fracture reduction and fixation. This anteromedial approach
works well for medial plating and fractures of the distal tibia in
which the medial side has failed in compression and requires plating
and bone grafting.
Technique
-
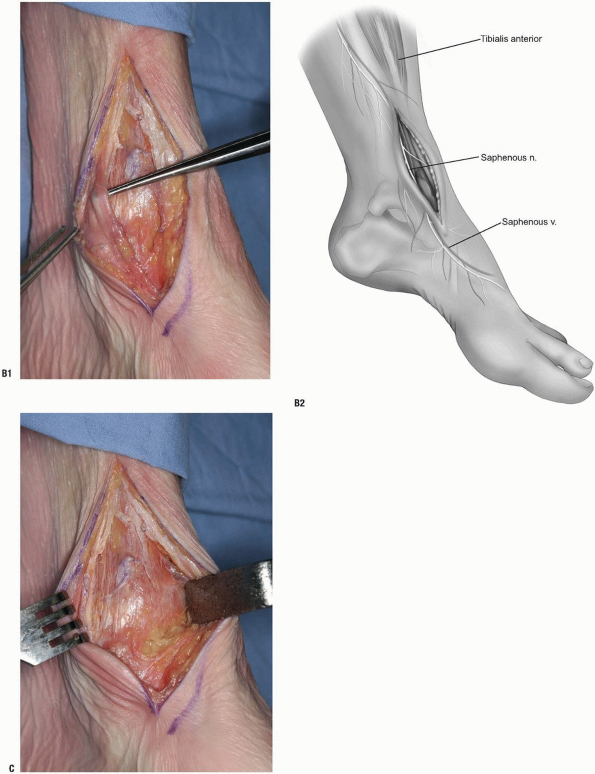
The incision is made medial, rather than lateral, to the tibialis anterior tendon (Fig. 11-5A).
-
That tendon is retracted laterally along
with the other structures lateral to it. One must identify and preserve
the saphenous nerve; otherwise the medial malleolus and medial distal
tibia are well presented via this approach (Fig. 11-5B). The tubercle of Chaput is not as well visualized via this approach, however. -
The knee retractor may be utilized to retract the anterior tibial tendon laterally and the ankle capsule is readily visible (Fig. 11-5C).
Anterolateral Approach to the Distal Tibia/Ankle Joint
Indications
Pilon fractures with compression failure laterally can
be easily exposed anterolaterally. This is an excellent exposure for
application of anterolateral periarticular plates. The interval is
defined by retracting the extensors of the ankle and toes medially
along with the neurovascular bundle.
be easily exposed anterolaterally. This is an excellent exposure for
application of anterolateral periarticular plates. The interval is
defined by retracting the extensors of the ankle and toes medially
along with the neurovascular bundle.
-
Note: One
has to watch out for the superficial peroneal nerve as it crosses the
fibula and proceeds distally and medially. The peroneus tertius is a
part of the extensor digitorum communis. -
Note: This anterolateral exposure has been described both as between the tertius and communis tendons, or lateral to those tendons.
 |
|
FIGURE 11-5
|
P.237
 |
|
FIGURE 11-5 (Continued)
|
P.238
Technique
-
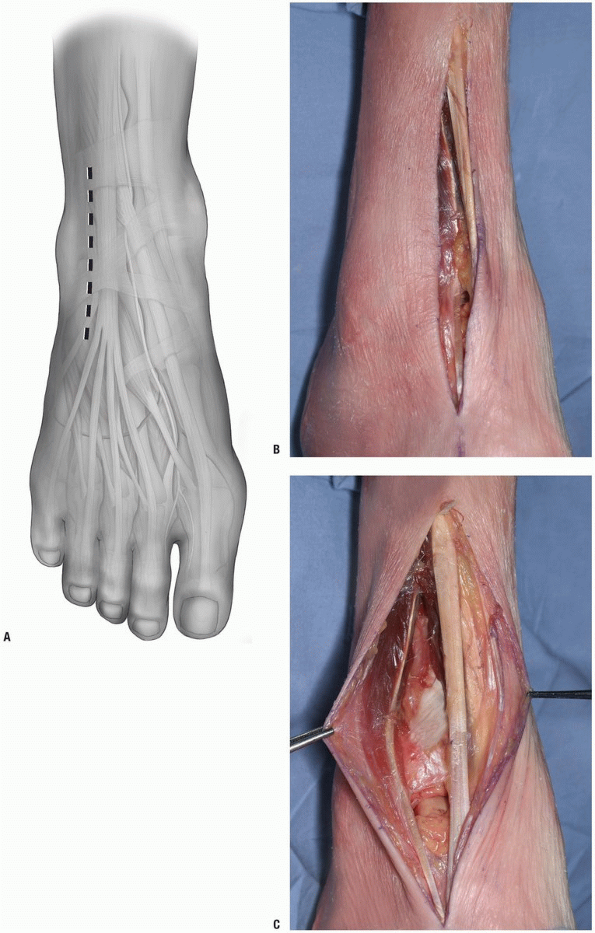
The incision is made in line with the fourth metatarsal distally (Fig. 11-6A). It is a straight incision, crossing the ankle joint.
-
Note: It
can be extended proximally as necessary, freeing up the anterior
compartment muscles as necessary. It can be extended distally and
allows access to the dorsal lateral aspect of the talar neck as well,
if necessary.
-
-
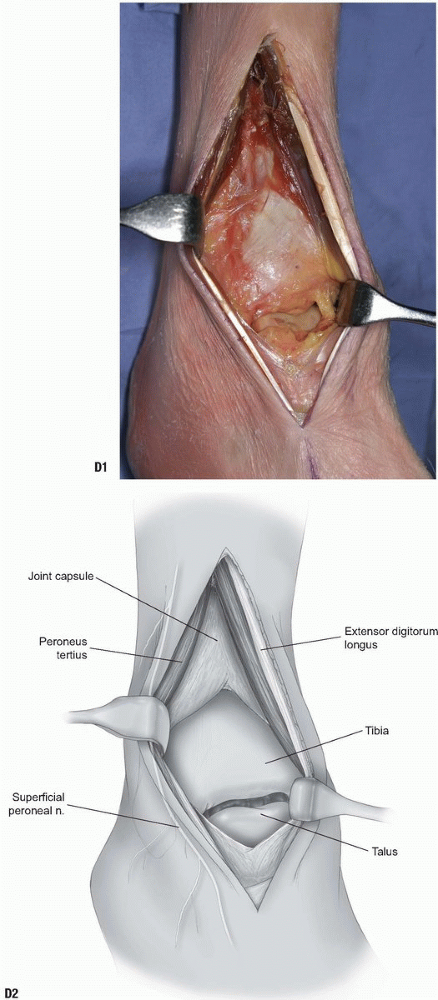
After incising the skin, the retinaculum is encountered and incised as well (Fig. 11-6B). The tendons and neurovascular structures are identified (Fig. 11-6C).
-
The extensor muscles are retracted laterally and the peroneus tertius medially.
-
With retraction, the joint and anterior
distal tibia are easily observed. The superficial peroneal nerve is
behind the lateral retractor along with the peroneus tertius tendon (Fig. 11-6D).
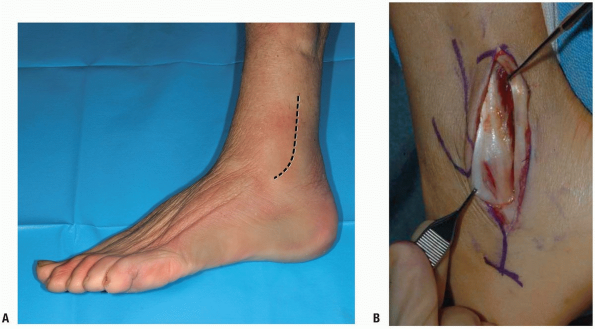
Posteromedial Approach to the Distal Tibia/Ankle Joint
Indications
Occasionally it is necessary to approach the tibia or
the talus via a posterior medial approach, usually for medial malleolar
fractures or possibly to expose the talus with a medial malleolar
osteotomy.
the talus via a posterior medial approach, usually for medial malleolar
fractures or possibly to expose the talus with a medial malleolar
osteotomy.
Position
This can be accomplished with the patient prone or
supine. If the patient is positioned supine, a bump can be placed under
the opposite hip. The ipsilateral leg is then flexed and externally
rotated.
supine. If the patient is positioned supine, a bump can be placed under
the opposite hip. The ipsilateral leg is then flexed and externally
rotated.
Technique
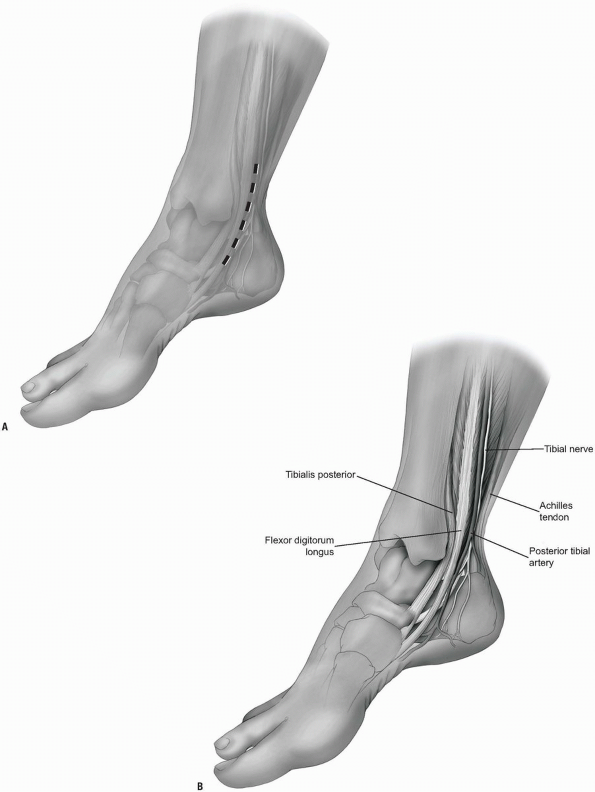
-
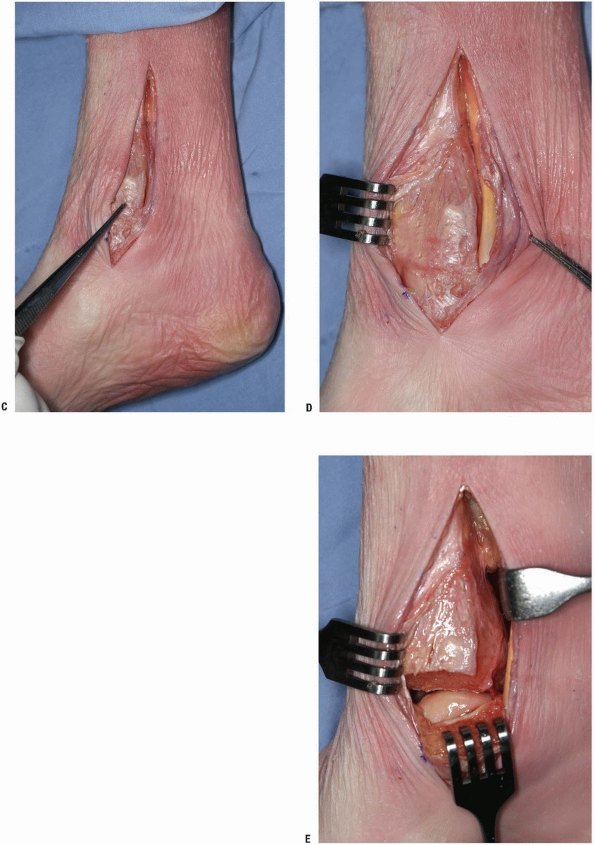
The incision is made at approximately the midpoint between the Achilles tendon and the medial malleolus (Fig. 11-7A).
-
Note: The
plane past the neurovascular bundle can either be via the flexor
digitorum longus medially and the neurovascular bundle laterally,
between the neurovascular bundle and the flexor hallucis longus, or by
retracting the flexor hallucis medially and protecting the nerve and
artery (Fig. 11-7B).
-
-
The malleolus is readily exposed by a periosteal elevator (Fig. 11-7C).
One cannot directly visualize the intraarticular aspect of the distal
tibia directly via this approach but it works well for indirect
reduction techniques and also for posteromedial fractures of the talus.-
Note: It is
also possible, by making the incision more anteriorly over the
posterior aspect of the medial malleolus, to access both the posterior
distal tibia and the medial malleolus.
-
-
Release the cephalad attachments of the posterior tibial sheath (Fig. 11-7D) and retract the tendon distally and posteriorly.
-
The malleolus is osteotomized, and by
retracting the malleolar fragment distally, the posterior reduction of
the articular surface may be assessed (Fig. 11-7E).-
Note: Both
the tibial and talar articular surfaces are visible, along with the
posterior tibia, through this approach. This approach works well for
the supination-adduction type ankle fracture pattern where there is
medial plafond depression that has to be elevated.
-
P.239
 |
|
FIGURE 11-6
|
P.240
 |
|
FIGURE 11-6 (Continued)
|
P.241
 |
|
FIGURE 11-7
|
P.242
 |
|
FIGURE 11-7 (Continued)
|
P.243
Posterolateral Approach to the Distal Tibia/Ankle Joint (4,11)
Indications
One can access pilon fractures and fibular fractures through the posterolateral corner of the ankle as well.
Positioning
Typically the patient is positioned prone, although
supine positioning can be utilized with a bump under the ipsilateral
hip. The patient can also be placed in a sloppy lateral position.
Positioning may depend on the patient’s other injuries.
supine positioning can be utilized with a bump under the ipsilateral
hip. The patient can also be placed in a sloppy lateral position.
Positioning may depend on the patient’s other injuries.
Technique
-
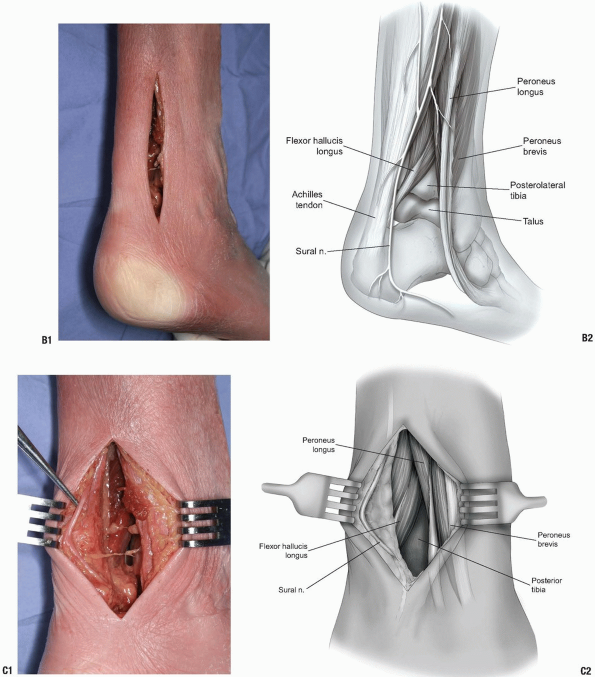
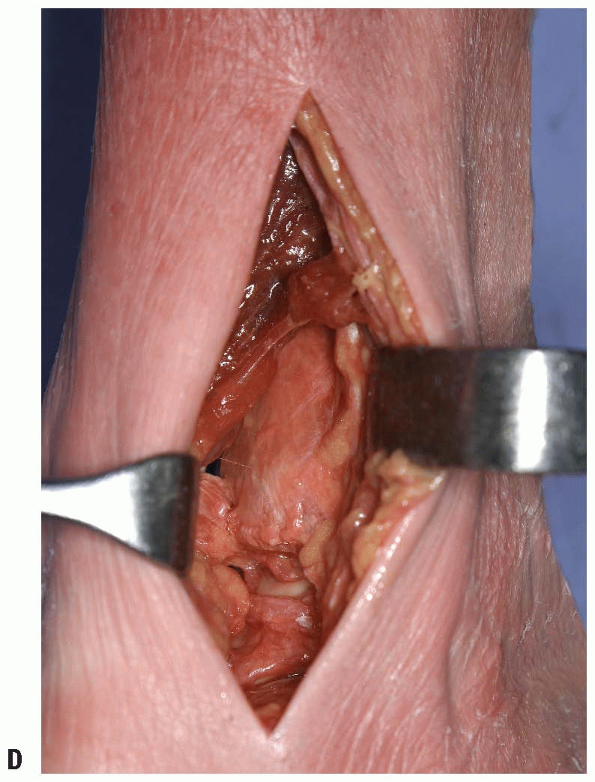
An incision is made between the fibula and the Achilles tendon (Fig. 11-8A). The dissection is carried medial to the peroneal musculature (Fig. 11-8B).
-
The sural nerve must be identified and protected (Fig. 11-8C).
-
The flexor hallucis longus muscle is elevated as needed and retracted medially (Fig. 11-8D).
-
Note: Both
the posterior-lateral tibia and the posterior aspect of the fibula can
be approached from this direction. Like with the posteromedial
approach, the articular surface of the distal tibia won’t be directly
seen with this exposure. Both of these approaches work well if one is
applying a buttress plate, however. Reduction and plating of fibula can
be accomplished as well and one can maintain a very wide skin bridge
between anterior and posterior incisions.
-
 |
|
FIGURE 11-8
|
P.244
 |
|
FIGURE 11-8 (Continued)
|
P.245
 |
|
FIGURE 11-8 (Continued)
|
Anterior Approach to the Distal Tibia/Ankle Joint
This approach has been described utilizing two
intermuscular planes: between the tibialis anterior tendon and extensor
hallucis longus tendon, or between the extensor hallucis longus and
extensor digitorum communis tendons. The structure at risk is the
anterior neurovascular bundle, consisting of the anterior tibial artery
(dorsalis pedis) and the deep peroneal nerve.
Indications
-
Ankle arthrodesis
-
Ankle arthroplasty (2,12)
-
Address intraarticular pathology (loose body excision, synovectomy, septic arthritis decompression/debridement)
-
Open reduction and internal fixation of pilon or talar body fractures
Position
The patient is positioned supine, with bony prominences well padded. A soft bolster under the ipsilateral hip is helpful.
Landmarks
The medial and lateral malleoli are palpable. A
transverse line is drawn connecting the malleoli. The center of this
bimalleolar line corresponds to the position of the neurovascular
bundle. The plane of dissection for this approach is between either the
tibialis anterior and EHL, or the EHL and the extensor digitorum
communis (Fig. 11-9A).
transverse line is drawn connecting the malleoli. The center of this
bimalleolar line corresponds to the position of the neurovascular
bundle. The plane of dissection for this approach is between either the
tibialis anterior and EHL, or the EHL and the extensor digitorum
communis (Fig. 11-9A).
P.246
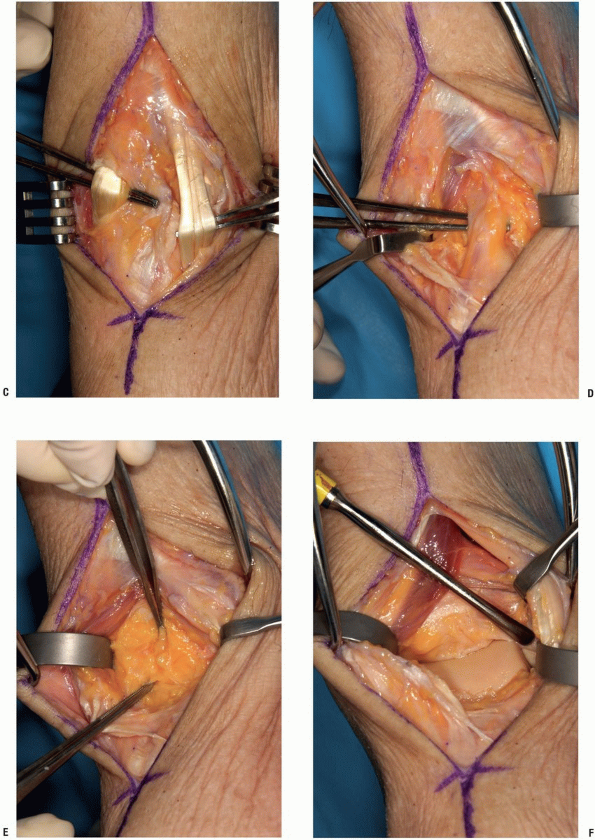
Technique
-
An incision of appropriate length is made
anteriorly through skin only, bisecting the distance between malleoli.
An incision is made through the extensor retinaculum to expose the
appropriate intermuscular plane. The superficial peroneal nerve lies
laterally, marked by the forceps in Figure 11-9B. -
In Figure 11-9C,
the anterior tibial tendon is medial, the extensor digitorum communis
tendon is lateral to the neurovascular bundle, and the extensor
hallucis longus tendon is visible beneath the incompletely removed
retinaculum, medial to the neurovascular bundle. In Figure 11-9D,
the neurovascular bundle is located after retracting the extensor
hallucis longus medially and the extensor digitorum communis laterally. -
The tendons are retracted along with the
neurovascular bundle. Typically this is retracted with the lateral
tendons exposing the capsule (Fig. 11-9E).
A longitudinal incision is made in the capsule. Retractors can be
introduced. The surgeon will be able to visualize the anterior ankle
from lateral gutter to medial gutter, and, depending on how much
distraction and plantarflexion are applied, most if not all of the
articular surfaces of the ankle joint (Fig. 11-9F).
Posterior Approach to the Distal Tibia/Ankle Joint
Occasionally it is necessary to approach the ankle joint
from its direct posterior aspect. Such situations might include
tibiotalar or tibiocalcaneal arthrodeses. The patient is positioned
prone, and an incision is made directly over the Achilles tendon. The
tendon is transected and its ends retracted proximally and distally.
The ankle and subtalar joint can be exposed directly by retracting the
flexor hallucis medially and the peroneal tendons laterally. Although
the posterior aspect of the distal tibia is well exposed via this
approach, the posterolateral approach works as well without sacrificing
the Achilles tendon.
P.247
 |
|
FIGURE 11-9
|
P.248
 |
|
FIGURE 11-9 (Continued)
|
P.249
LATERAL APPROACHES TO THE FIBULA/PERONEAL TENDONS
Indications
-
Open reduction and internal fixation of fibular fractures.
-
Ankle arthrodesis in conjunction with fibular osteotomy.
-
Exposure of the posterolateral tibia.
-
Exposure of the peroneal tendons.
-
Limited exposure of the talus and talocalcaneal joint.
Positioning
The patient is positioned supine, with bony prominences
padded. A hip bump placed under the ipsilateral hip may be helpful to
facilitate exposure. Alternatively, if this approach is utilized in
conjunction with a medial approach for ankle arthrodesis, positioning
in the semilateral position with the operative extremity up, may be
helpful.
padded. A hip bump placed under the ipsilateral hip may be helpful to
facilitate exposure. Alternatively, if this approach is utilized in
conjunction with a medial approach for ankle arthrodesis, positioning
in the semilateral position with the operative extremity up, may be
helpful.
Landmarks
The distal fibula is subcutaneous and is readily palpable.
Technique
-
Incision: for approaches to the distal
fibula for open reduction and internal fixation of fractures or for
osteotomy for access to the ankle joint, a longitudinal incision of
appropriate length is made curving along the posterior margin of the
fibula, with the distal limb curving anteriorly (Fig. 11-10A).
If the pathology to be addressed is in the peroneal tendons, a curved
longitudinal incision maybe made paralleling the posterior border of
the fibula and curving over the peroneal tubercle. -
Full thickness flaps are made down to the
periosteum, with care to avoid the sural nerve and the short saphenous
vein posteriorly. The perforating branches of the peroneal artery lie
deep to the distal fibula medially. In addition, the peroneal tendons
are at risk, particularly with anterior subluxation. -
The fibula may be osteotomized to gain
access to the joint, as for ankle arthrodesis. The osteotomy should be
made obliquely, at a level 4 to 6 cm proximal to the tip of the lateral
malleolus. One may lengthen the incision distally to visualize the
subtalar joint (3,13,14). -
Alternatively, if the pathology to be
addressed lies within the peroneal tendons, the deep fascia overlying
the peroneal retinaculum is incised. The retinaculum and the fascial
sheath of the peroneal tendons are incised (Fig. 11-10B).-
Note: If
access to the talus or talocalcaneal joint is needed, the peroneal
longus and brevis tendons can be retracted anteriorly to expose the
capsule of the talocalcaneal joint, which is then incised. Likewise,
the calcaneofibular ligament may be incised to provide further exposure
of the talus.
-
P.250
 |
|
FIGURE 11-10
|
Pearls and Pitfalls
-
The sural nerve and the short saphenous vein are at risk in the posterior portion of the field.
-
Likewise, the peroneal tendons may be at risk, particularly in cases in which they subluxate anteriorly.
EXPOSURES OF THE TALUS
The talus can be exposed via posteromedial exposure (as
discussed previously). Only the posteromedial aspect is satisfactorily
seen through this approach. Similarly, a small corner of the
posterolateral talus can be seen from the posterolateral approach,
although even this amount is compromised by the syndesmotic ligaments
just superior to the talus. The talar neck can be exposed dorsally by
utilizing the distal part of the anterior ankle exposure, as discussed
previously as well.
The utilitarian approaches to the talar neck are
primarily the anterolateral and anteromedial approaches. In repair of
talar neck fractures the surgeon needs to be cognizant of the potential
for varus of valgus malunion of the fracture and so visualization of
both the medial and lateral aspects is helpful. For talar body
fractures, the aforementioned medial approach to the ankle is useful,
with the malleolar osteotomy. In many cases, however, the soft tissues
have been avulsed from the medial malleolus as part of the injury
mechanism. If that is the case, there is usually enough instability
that the talus can be abducted out of the ankle mortise enough to
visualize and repair the body fracture. By avoiding the osteotomy, one
can avoid further compromise of the vascular supply of the medial
malleolus.
Anteromedial Talar Neck Exposure
The incision can be longitudinal along the neck of the
talus, or vertically, as an extension of the anteromedial distal tibia
exposure. The interval is between the anterior tibial and posterior
tibial tendons. The saphenous vein and nerve are at risk. Care should
be taken to avoid excessive retraction dorsally or plantarly to avoid
further disruption of the talar blood supply. The medial neck is
directly visible upon incision the capsule. One can see the anterior
articular surface of the calcaneus as well as the sustentaculum via
this approach.
Anterolateral Talar Neck Exposure
The incision can be made as a part of the anterolateral
distal tibial exposure. The peroneus tertius is retracted dorsally and
the neck exposed. One probably will encounter small branches of the
superficial peroneal nerve. Through this exposure one can see the
anterolateral articular surface of the talus, the lateral process of
the talus, the sinus tarsi, and the neck itself. Again, caution should
be exercised in stripping soft tissues from the attachment to the talus.
EXPOSURE OF THE HINDFOOT: THE SUBTALAR JOINT
• Note: The posterior
facet of the subtalar joint can be exposed with a variety of incisions:
transverse, longitudinal, or along the skin tension lines. The deeper
approach is the same, however. With reflection of the extensor
digitorum brevis distally and plantarward, and posterior retraction of
the peroneal tendons, the dorsolateral surface of the calcaneus, the
lateral talar neck, and the posterior facet can be visualized (15,16).
P.251
Technique
-
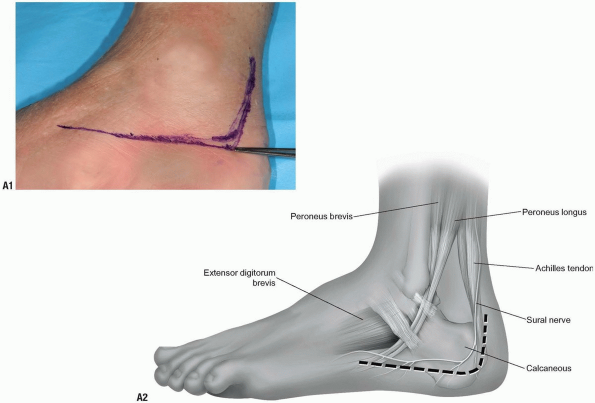
A horizontal incision is made just distal to the lateral malleoulus and extends anteriorly approximately 5 to 6 cm (Fig. 11-11A, B and C).
-
The extensor digitorum brevis is
retracted distally and anteriorly. The peroneal tendons are retracted
posteriorly. The lateral talocalcaneal ligament is identified (Fig. 11-11D). -
The posterior facet is now exposed with a band retractor holding peroneal tendons posteriorly (Fig. 11-11E).
-
Note: With
dissection dorsally, one can expose the talar neck. By freeing the EDB
from the calcaneus from proximal to distal, one can see all of the
lateral anterior process of the calcaneus to the calcaneocuboid joint.
By placement of a laminar spreader in the sinus tarsi, or some form of
distractor across the talocalcaneal joint, the articular surface of the
posterior facet can be visualized.
-
 |
|
FIGURE 11-11
|
P.252
 |
|
FIGURE 11-11 (Continued)
|
P.253
EXTENSILE TRAUMA APPROACH TO THE LATERAL CALCANEUS
Indications
For operative treatment of fractures of the calcaneus,
the standard approach is the loosely L-shaped incision along the
posterior and inferior aspect of the lateral calcaneus (17).
This is not an incision to be undertaken lightly as the incidence of
wound healing and deep infection has been reported to be as high as
30%. Careful soft tissue handling is paramount. Recently, less invasive
approaches, which are combinations of lateral sinus tarsi and medial
sustentacular approaches have been described.
Position
The patient is positioned laterally, with careful attention to padding of dependent prominences.
Technique
-
The incision proceeds from proximal to
distal, beginning lateral to the Achilles tendon. The inferior corner
is at the junction of the vertical limb and the glabrous skin of the
heel. It is then extended distally along that border, proceeding
slightly anteriorly if necessary to access the calcaneo-cuboid joint (Fig. 11-12A). -
The incision is carried directly to bone
and the posteroinferior angle and then the soft tissues are stripped
directly off of the bone (Fig. 11-12B). -
The surgeon must avoid taking off the
tissues in layers. The sural nerve should be dorsal and anterior to the
skin incision but plantar branches are routinely encountered. These are
severed (Fig. 11-12C). -
The peroneal tendons and sheath, and
calcaneofibular ligament are released from the calcaneus. With further
dissection, the EDB is elevated from the anterior process (Fig. 11-12D). After proper flap mobilization, K-wires can be placed in the talus and fibula as needed for retraction.
 |
|
FIGURE 11-12
|
P.254
 |
|
FIGURE 11-12 (Continued)
|
P.255
MIDFOOT EXPOSURES
Dorsal Approach to the Talo-Navicular Joint
The talo-navicular joint can be exposed dorsally as an
extension of the anterior ankle joint exposure. It can also be exposed
medially as an extension of the talar neck exposure (4,6,16). The dorsal approach is described here.
extension of the anterior ankle joint exposure. It can also be exposed
medially as an extension of the talar neck exposure (4,6,16). The dorsal approach is described here.
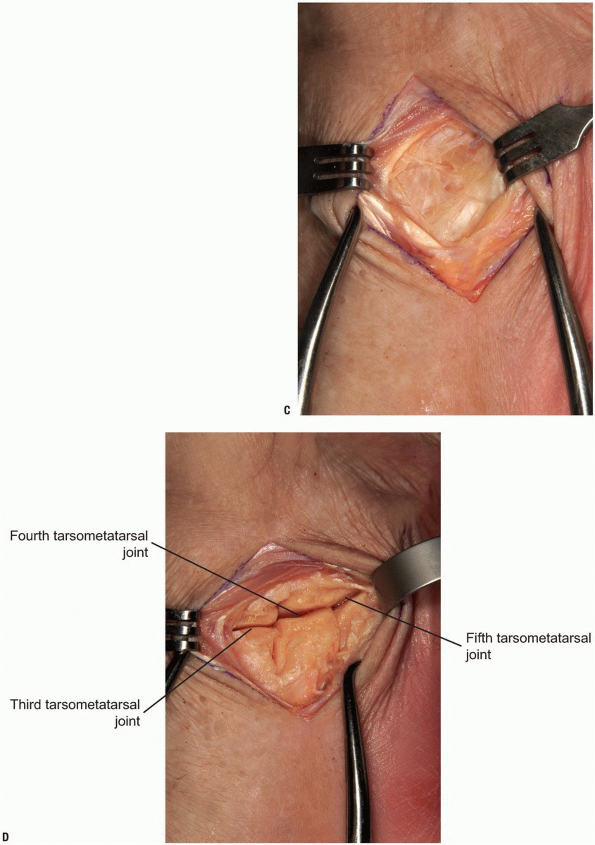
Technique
-
The interval between the tibialis anterior tendon (AT) and the EHL tendon is identified (Fig. 11-13A).
-
The skin is incised and then the
retinaculum. Superficial to the retinaculum are found branches of the
superficial peroneal nerve (Fig. 11-13B).-
Note: These
should be handled with care, resected if necessary. Cutaneous neuromas
are occasionally a problem after the dorsal approaches to the foot.
-
-
The retinaculum is incised and the interval between the AT and the EHL developed.
-
The dorsalis pedis and deep peroneal nerve are near, and deep, to the EHL tendon (Fig. 11-13C).
-
The capsule is incised and the joint exposed (Fig. 11-13D). The naviculo-cuneiform joint can be exposed by extending the approach.
 |
|
FIGURE 11-13
|
P.256
 |
|
FIGURE 11-13 (Continued)
|
Lisfranc Joint Exposure
Indications
The five tarsometatarsal joints are exposed via dorsal
approaches. One would use these exposures for injuries to the Lisfranc
complex, or fusions of these joints. If the procedure is being
performed for fracture repair, the image intensifier can be used to
center the incisions over the appropriate joints. Typically, one can
reach three joints with one longitudinal approach.
• Note: Care should be
taken in the spacing of these incisions, leaving wide bridges of skin.
These longitudinal incisions can be extended distally for dorsal
compartment fasciotomies. These approaches are relatively
straightforward, the surgeon needs to be aware of the cutaneous nerves
and the NV bundle overlying the medial and intermediate cuneiform
joint, and then in the first web space.
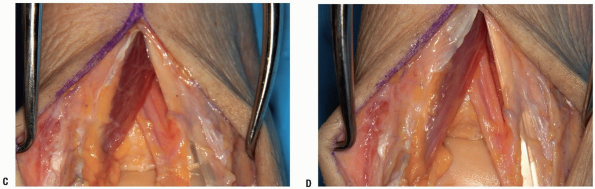
Technique
-
Skin incision over second tarsometatarsal joint (Fig. 11-14A).
-
The EHL is identified and retracted by scissors; forceps are on the extensor digitorum brevis (EDB) (Fig. 11-14B).
-
The EDB and NV bundles are retracted to the right, EHL to left (Fig. 11-14C).
-
The capsule is exposed and entered.
Forceps to bottom in space between first and second metatarsal. Top
forceps in medial-intermediate cuneiform joint (Fig. 11-14D).
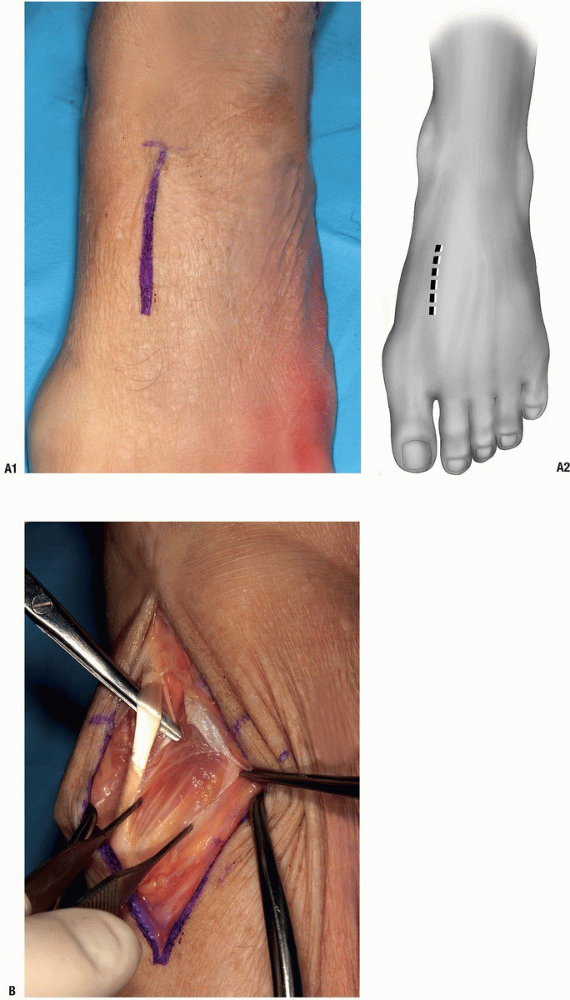
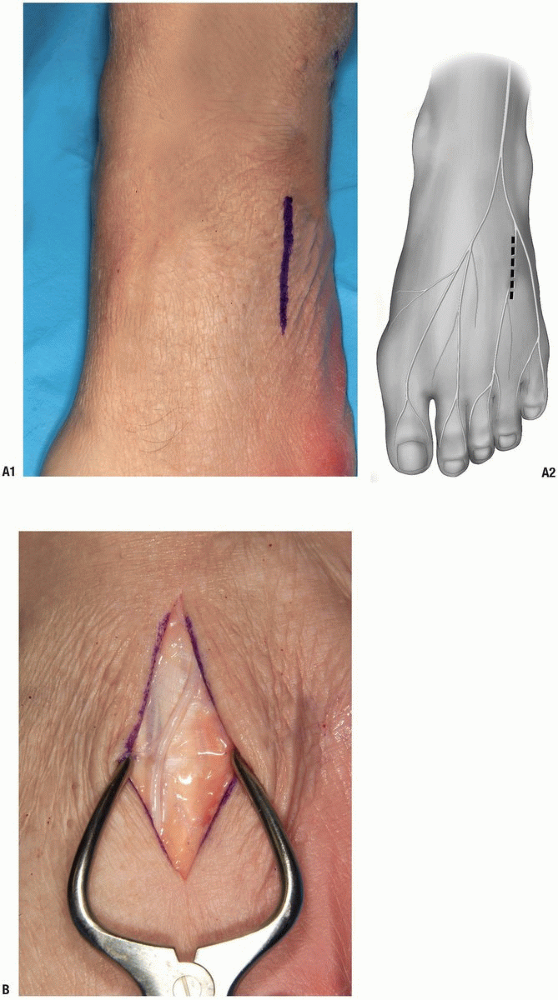
Exposure of Lateral Lisfranc Joint
Technique
-
Exposure of the 3-5 tarsal metatarsal joints. A longitudinal incision is centered over fourth tarsometatarsal joint (Fig. 11-15A).
-
Note: The cutaneous branch of superficial peroneal nerve is in close proximity to this incision (Fig. 11-15B).
-
-
The EDC is at the left of photo. Joint capsule visible (Fig. 11-15C).
-
The capsule is incised. Tarsometatarsal joints of third (top of photo) through fifth visible (Fig. 11-15D).
P.257
 |
|
FIGURE 11-14
|
P.258
 |
|
FIGURE 11-14 (Continued)
|
P.259
 |
|
FIGURE 11-15
|
P.260
 |
|
FIGURE 11-15 (Continued)
|
P.261
EXPOSURES OF THE GREAT TOE
The exposures of the toes are very straightforward. The most significant is that of the MTP of the great toe.
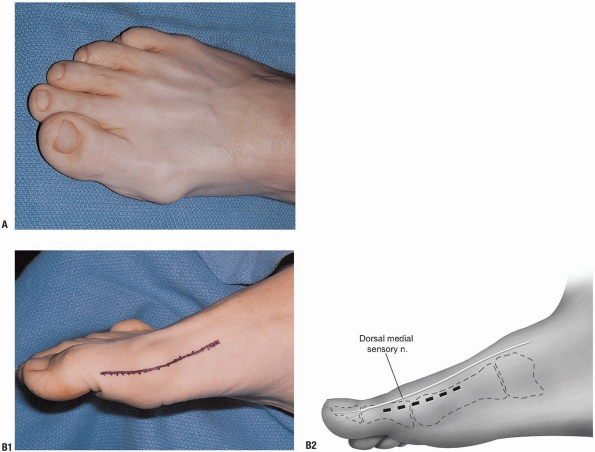
Great Toe: Medial Exposure of the First Metatarsophalangeal Joint
Indications
-
Bunion procedures.
-
Removal of exostoses such as for hallux rigidus.
Position
The patient is supine. A sandbag under the ipsilateral hip may be helpful.
Landmarks
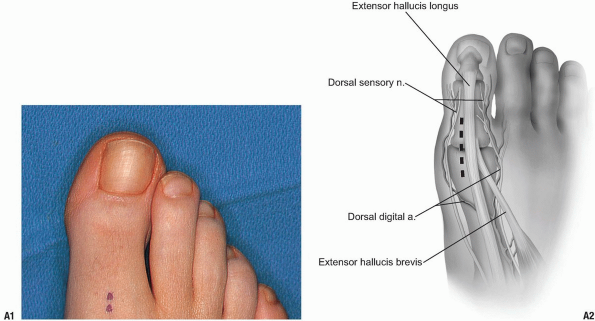
The prominence of the metatarsal head, midpoint of the articulation from the medial perspective (Fig. 11-16A).
Technique
-
Incision: an Esmarch tourniquet is
usually applied just above the ankle. A linear incision is made with a
length depending upon the pathology. In most instances this measures
approximately 4 to 5 cm. It may be extended somewhat more proximally as
needed. It is placed slightly dorsal or less commonly, volar to the mid
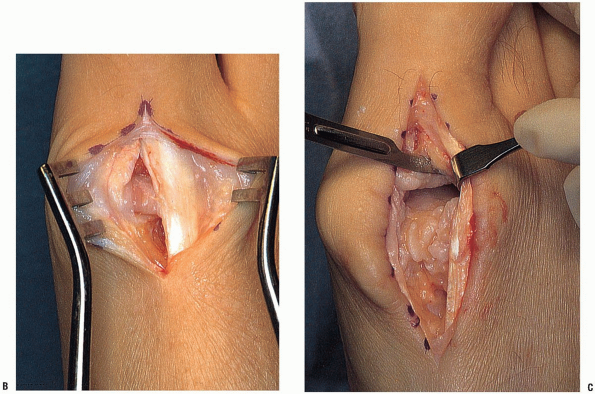
point of the prominent metatarsal head (Fig. 11-16B). -
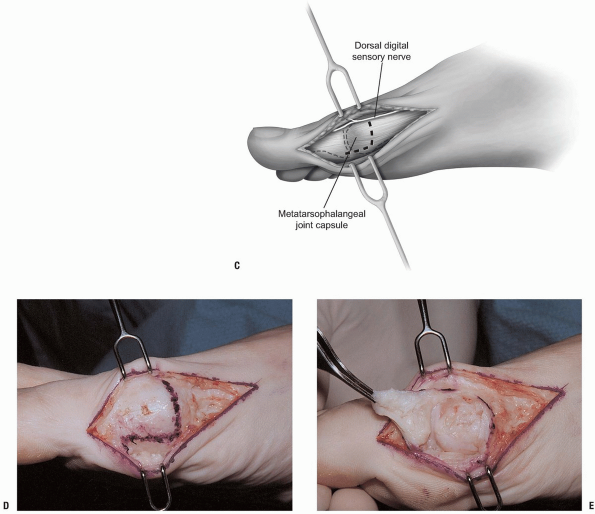
The dissection carries to the
subcutaneous tissue taking care to avoid the dorsal cutaneous nerve
which emerges from the dorsal aspect of the incision (Fig. 11-16C). -
The bursal tissue and capsule covering
the joint is exposed. With incision of the capsule, the metatarsal head
or exostosis is exposed. Depending on the procedure, the capsulotomy
can be a “U” or “L” shaped distally based flap (Fig. 11-16D). As this flap is elevated the metatarsophalangeal joint is exposed (Fig. 11-16E). -
Additional reflection of the capsule around the metatarsal head may be required to execute the desired procedure.
-
Closure consists of suturing the lateral
capsule to the soft tissue proximally, typically with a 2-0 absorbable
suture. Care should be made to avoid prominent knots as this is a site
of pressure for shoe wear.
P.262
 |
|
FIGURE 11-16
|
 |
|
FIGURE 11-16 (Continued)
|
P.263
Pearls and Pitfalls
Beware of the cutaneous nerve; a neuroma of this nerve can be quite bothersome in the postoperative period.
Dorsum of the Metatarsophalangeal Joint
Indications
Removal of exostoses.
Position
Supine, an Esmarch tourniquet can be used.
Landmarks
Mid point of the dorsal aspect of the joint.
Technique
-
Incision: a 3 cm incision directed just medial to the midline (Fig. 11-17A).
-
The dissection carries through the skin exposing the long extensor tendon of the great toe (Fig. 11-17B). This is retracted laterally exposing the capsule.
-
The capsule is incised and the exostosis and interarticular pathology may be addressed (Fig. 11-17C).
-
Closure: skin closure is routine. Absorbable sutures without prominent knots are preferable.
 |
|
FIGURE 11-17
|
P.264
 |
|
FIGURE 11-17 (Continued)
|
REFERENCES
1. Acton R. Surgical principles based on anatomy of the foot: Preoperative planning. Foot Ankle 1982;2(4):200-204.
2. Anderson T, Montgomery F, Carlsson A. Uncemented STAR total ankle prostheses. J Bone Joint Surg Am 2004;86-A Suppl 1(Pt 2):103-111.
3. Weller GG, Graham JL, Kile TA. Anatomy and surgical approaches. In: Morrey BF, ed. Reconstructive Surgery of the Joints. Rochester, MN: Mayo Foundation, 1996.
4. Hansen ST. Functional Reconstruction of the Foot and Ankle. Philadelphia: Lippincott Williams & Wilkins, 2000.
5. Hoppenfeld S, de Boer P. The foot and ankle. In: Surgical Exposures in Orthopaedics: The Anatomic Approach. Philadelphia: JB Lippincott, 1984; 513-576.
6. Kagaya H, Yamada S, Nagasawa T, et al. Split posterior tibial tendon transfer for varus deformity of hindfoot. Clin Orthop Relat Res 1996;(323):254-260.
7. Kitaoka HB. Arthrodesis of the ankle: technique, complications, and salvage treatment. Instr Course Lect 1999;48:255-261.
8. Michelson J, Amis JA. Talus-calcaneus-cuboid (triple) arthrodesis. In: Kitaoka HB, ed. Master’s Techniques in Orthopaedic Surgery: The Foot and Ankle. Philadelphia: Lippincott Williams & Wilkins, 2002; 401-424.
9. Penny JN, Davis LA. Fractures and fracture-dislocations of the neck of the talus. J Trauma 1980;20(12):1029-1237.
10. Sarrafian SK. Topographic anatomy and surgical approaches to the ankle and foot. In: Jahss M, ed. Disorders of the Foot and Ankle: Medical and Surgical Management. Philadelphia: WB Saunders Company, 1991.
11. Konrath GA, Hopkins G, 2nd. Posterolateral approach for tibial pilon fractures: a report of two cases. J Orthop Trauma 1999;13(8):586-589.
P.265
12. Takakura Y, Tanaka Y, Kumai T, et al. Ankle arthroplasty using three generations of metal and ceramic prostheses. Clin Orthop Relat Res 2004;(424):130-136.
13. Rupp RE, Podeszwa D, Ebraheim NA. Danger zones associated with fibular osteotomy. J Orthop Trauma 1994;8(1):54-58.
14. Smith RW. Ankle arthrodesis. In: Kikaoka HB, ed. Master’s Techniques in Orthopaedic Surgery: Foot and Ankle. Philadephia: Lippincott Williams & Wilkins, 2002; 533-549.
15. Kitaoka HB. Talocalcaneal (subtalar) arthrodesis. In Master’s Techniques in Orthopedic Surgery: The Foot and Ankle. Philadelphia, Lippincott Williams & Wilkins, 2002; 387-399.
16. Younger AS, Hansen ST, Jr. Adult cavovarus foot. J Am Acad Orthop Surg 2005;13(5):302-315.
17. Freeman
BJC, Duff S, Allen PE, et al. The extended lateral approach to the
hindfoot: anatomical basis and surgical implications. J Bone Joint Surg Br 1998;80B:139-142.
BJC, Duff S, Allen PE, et al. The extended lateral approach to the
hindfoot: anatomical basis and surgical implications. J Bone Joint Surg Br 1998;80B:139-142.