
II – FRACTURES, DISLOCATIONS, NONUNIONS, AND MALUNIONS > Pelvis and
Femur > CHAPTER 20 – DIAPHYSEAL FRACTURES OF THE FEMUR
dedicated to the memory of Richard C. Maurer, M.D., who wrote the
section on periprosthetic fractures in the second edition.
bed rest in fracture treatment. Immobilization is implicated in
complications ranging from constipation and atelectasis to osteoporosis
and pulmonary embolism, the last of which can cause death. For patients
with multiple injuries, the complications of immobilization can lead to
significantly increased morbidity and mortality (see Chapter 14).
Fractures of the femoral shaft are of special significance because of
the femur’s size and proximal position in the lower extremity,
necessitating long periods of bed rest with nonoperative treatment.
This problem has stimulated two different approaches to treatment: the
nonoperative approach of cast bracing, and operative treatment using
intramedullary nails or plates.
initially into the proximal fragment in a retrograde direction, as
opposed to retrograde insertion through the knee, which is addressed
later in this chapter) placement of medullary nails for stable,
mid-shaft fractures had an unacceptable rate of infection. With the
introduction of closed medullary nailing, infection became a rare
problem, and early mobilization was possible with stable fracture
patterns (18). With open reduction, adjunctive
cerclage wiring was used in unstable and comminuted cases. Because the
nail extended the full length of the femur, there was no stress riser
effect. Devascularization of a significant portion of the inner wall of
the femur occurs as a result of reaming, but this is rarely clinically
significant (see Chapter 11). Because in most
fractures the nail functions as a load-sharing device, rather than
bearing all of the load, axial loading across fractures with stable
patterns is encouraged, thus promoting callus formation.
virtually all diaphyseal femur fractures. Reaming and nailing can be
performed immediately after injury for most open femur fractures. It
was once feared that this practice would lead to complications such as
infection, fat embolism, nonunion, or, in the case of the patient with
multiple injuries, adult respiratory distress syndrome (ARDS) and
multiple organ failure. It is now recognized that infection is not a
major problem and union rates are actually improved; fat embolism,
ARDS, and other problems are all substantially decreased or prevented
by femur stabilization soon after injury.
stabilization of proximal diaphyseal as well as subtrochanteric and
associated femoral neck fractures and very distal supracondylar
fractures. As experience with interlocking femoral nails has grown, it
has become apparent that interlocking of femoral fractures using proper
technique does not delay union and that the early removal of locking
screws (dynamization) to facilitate fracture union is not typically
required (7,8,11,12,39).
Further impetus for the use of interlocking nails has come with the
finding that a number of femur fractures are more comminuted than
initially recognized, necessitating the added fixation of locking
screws.
of the femur: a grading system for soft-tissue injuries and a system
for classifying the fracture pattern (33,57,73).
the intrinsic stability of the fracture and guide the selection of
treatment. In most diaphyseal femur fractures, this translates into a
decision about whether to lock the nail proximally, distally, or at
both locations. Pattern, location, and degree of comminution contribute
to overall fracture stability. For example, short oblique fracture
patterns are usually stable with standard (i.e., unlocked) nailing when
they occur near the isthmus and are comminuted not more than
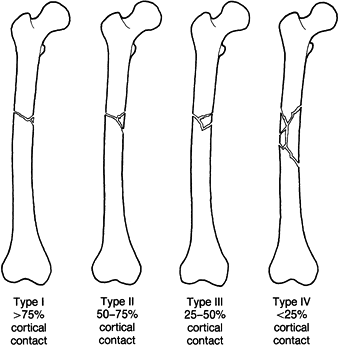
Winquist-Hansen type II (Fig. 20.1) (18).
At more proximal or more distal locations, or if more comminuted, these
fractures are not stable under axial loading. On the other hand, even
in apparently stable patterns such as the short oblique fracture, there
can be a split extending proximally or distally from the fracture site
that cannot be seen on preoperative or even postoperative radiographs.
With weight bearing, this can shift, resulting in malposition. As a
result, I now statically lock all fractures of the femoral shaft
proximally and distally, impacting the fracture site to maximize bone
apposition and thereby eliminating any gap, when nailing
Winquist-Hansen type I and type II fractures. For the purposes of this
chapter, the Winquist-Hansen classification is simple, practical, and
useful for clinical decision making, particularly if it is applied to
the proximal, middle, and distal thirds of the diaphysis. The
Orthopaedic Trauma Association
has
adopted and expanded the classification of the AO Group. Their system
is much too detailed and complex for presentation here but is very
useful for exploring the nuances of fracture management and for
research. Interested readers are referred to the Special Edition of the
Journal of Orthopaedic Trauma devoted to this classification system (57).
 |
|
Figure 20.1. The Winquist-Hansen classification of comminution in fractures of the femoral shaft.
|
A few comments are required here, however. Measures of torsional
rigidity, bending stiffness, and resistance to compression (shortening)
have shown conclusively that first-generation interlocked nails using
either an oblique proximal cross-locking screw and transverse distal
cross-locking screws, or transverse cross-locking screws both
proximally and distally, are mechanically superior to unlocked nails
and to early designs such as the Brooker-Wills with internally deployed
distal fins (5,15,31,35,42).
Some interlocking nails are provided with cross-locking holes in both
the anteroposterior (AP) and mediolateral planes and/or have a slotted
hole available so that the fracture will compress with weight bearing.
reaming, the maximum diameter is smaller, and therefore the
cross-locking screws have had to be of smaller diameter as well. In
spite of modifications in both design (solid nails) and materials
(titanium alloys), these smaller nails have an increased breakage rate.
In resisting torsional forces, one screw proximally and distally
appears to be just as effective as two screws (35).
For fractures in the distal third of the femur, where there is no
effective contact between the inner wall of the cortex and the nail in
the distal fragment, two transverse cross-locking screws are necessary
to provide adequate stability (15). Stability
in supracondylar fractures is enhanced with larger-diameter nails,
insertion to subchondral bone at the knee, and use of two cross-locking
screws (15,31,34).
In mid-diaphyseal fractures with stable patterns, Winquist-Hansen I and
II, one cross-locking screw proximally and distally is adequate. In
Winquist-Hansen III and IV patterns, use the maximum number of cross
screws available in the nail design being used (34).
adolescents. In mid to late adolescents and in some younger children
who have associated multiple injuries, particularly head injuries,
internal fixation with devices such as the Ender nail is necessary to
avoid injury to the growth plates (see Chapter 19 and Chapter 164).
In adults, the indications for treatment of femur fractures in balanced
suspension and skeletal traction and/or functional cast braces have
nearly disappeared due to the tremendous advantages of intramedullary
nailing, particularly since the sophistication of current techniques
has reduced the incidence of complications to very acceptable levels.
In addition to the systemic risks of nonoperative care already
mentioned, the prolonged bed rest and immobilization (3 to 6 months) is
not tolerable to most patients today, and it is accompanied by a
significant incidence of malunion, nonunion, and permanent joint
stiffness, particularly in the knee.
intramedullary techniques are not available or where the risks of
surgery are unacceptable, nonoperative management remains the mainstay;
the techniques for it are discussed in detail in Chapter 10.
In recent years, I have not used balanced suspension and skeletal
traction as the sole method for treating a fracture of the femur in
adults. I use functional cast braces combined with intermittent
traction for supracondylar fractures of the femur in situations where
surgery is contraindicated, such as in the presence of serious systemic
illness in the elderly, coexisting infection in the region of the
fracture, or comminution and severe osteoporosis. Using a well-molded
cast-brace with intermittent tibial pin traction, it is possible to
mobilize these patients to a chair at bedside within the first week
after fracture and to obtain a reasonably good outcome in most cases (49,51).
fractures of the shaft of the femur is rarely indicated today but still
has a specific role in the armamentarium of the trauma surgeon (1,26,27,36). Indications for external fixation include the following:
-
Patients with multiple injuries who are
hemodynamically unstable or who have a particular combination of
injuries in which rapid stabilization of the femur with minimal
soft-tissue trauma is essential -
Some femoral-shaft fractures in children and adolescents (see Chapter 164)
-
High-grade or severely traumatized open
fractures where external fixation may be a temporary or definitive
method of stabilization -
Some femur fractures with an associated
vascular injury that requires repair, where internal fixation is either
difficult or contraindicated -
The rare fracture in which systemic or local factors contraindicate internal fixation
of the diaphysis of the femur today is locked intramedullary nailing
utilizing closed percutaneous techniques. Direct open reduction of the
fracture may be indicated in the following cases:
-
The fracture is not reducible by closed
technique, or a bone fragment is incarcerated in the canal, which
precludes passage of a guide pin or the nail. -
The patient is a victim of
multiple-system injuries and is on a regular operating table where
convenience and speed are best facilitated by a modified open nailing
(see Chapter 11, Chapter 12, and Chapter 14). -
The fracture is open, and irrigation and debridement of it exposes the fracture site.
-
A preexisting deformity or implant is
present in the femur, necessitating open osteotomy and/or hardware
removal to make nailing possible.
make an incision directly over it and then to dissect through the
quadriceps where the femur has torn it, rather than make a separate
independent approach. The incision need be only large enough to admit
the fingers to facilitate passage of the guide pin across the fracture
site. Once this has been achieved, and if good fluoroscopic
visualization is available, it is usually possible to close the wound
and proceed with nailing as one would for closed technique. This has
the advantage of minimizing the amount of time the wound is open, and
it allows the medullary contents and reamed bone to accumulate around
the fracture site following reaming, which enhances union.
are rarely used today in most developed countries, but because of the
simplicity and low cost of the procedure, it can be performed open with
either antegrade or retrograde technique in areas of the world where
more sophisticated locking nail techniques under fluoroscopic control
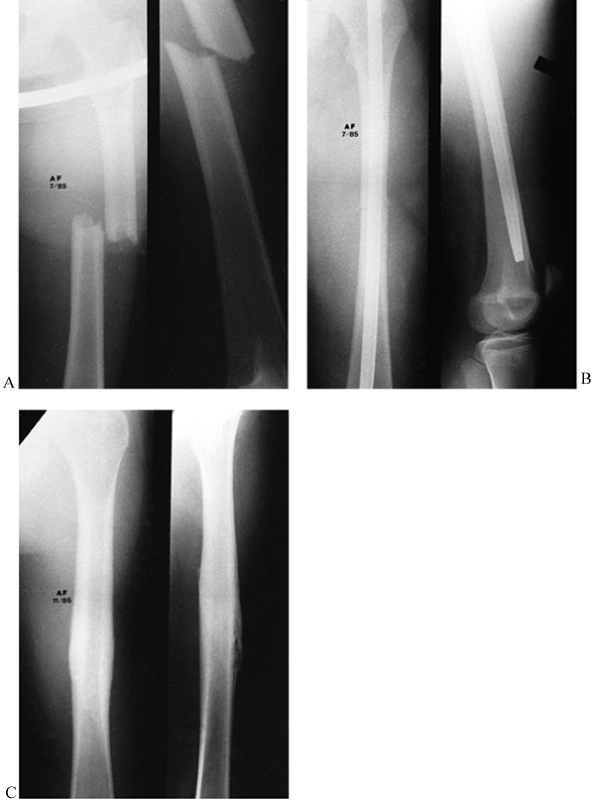
are not available. A typical case is illustrated in Figure 20.2. Flexible nonreamed nails such as the Ender nail (see Chapter 19)
can be inserted both antegrade and retrograde, and either singly or
multiply, and are used today most commonly in femur fractures in
children or early adolescents who require internal fixation. The Ender
nail did not provide enough control of malrotation and shortening to be
used routinely in fractures of the diaphysis in adults. Its simplicity
and low cost, particularly when combined with temporary skeletal
traction and cast bracing, make it a very useful technique in less
developed countries.
 |
|
Figure 20.2. A: The classic indication for medullary nailing of a short, oblique, mid-isthmus fracture. B: A standard medullary nail is placed. C:
After removal 16 months later, there is a smooth, well-remodeled callus, and the general shape of the bone is quite normal, with no significant varus or valgus and some maintenance of an anterior bow. Ideally, a medullary nail should restore this normal anterior bow and result in a normal position of the knee. Because the pattern and location of the fracture allowed secure fixation with a standard medullary nail, no interlocking was performed, although I now lock nearly all nails. The nail was intentionally left slightly short in this fracture because an open epiphysis was present distally, even though this patient was very close to the end of growth. Additionally, cancellous bone near the knee is quite dense in young patients, making it difficult to drive the nail farther. |
the diaphysis of the femur is antegrade, interlocked, reamed nailing
using closed technique (10,11,12,14,16,17,39,45,61,72,77,78 and 79).
The main focus of this chapter will be on this technique.
Reconstruction nails providing fixation into the femoral head and neck
in combination with distal locking are not indicated in the vast
majority of diaphyseal fractures of the femur and are reserved for
subtrochanteric fractures, some pathologic fractures in the proximal
femur, and some concomitant ipsilateral fractures of the hip and
femoral shaft (see Chapter 19).
have all shown that the best results come from interlocked nailing that
maximizes bone apposition at the fracture site, with the use of closed
techniques and no direct intervention at the fracture site by open
means, and with static interlocking even in segmental fractures of the
femur.
When Küntscher and others first developed intramedullary nailing prior
to World War II, nails were generally inserted without reaming. When
all the advantages of using larger, reamed nails became apparent,
unreamed nails for the femur nearly disappeared in developed countries.
As we began to carry out early reamed, locked nailing of fractures
of
the femur in patients with increasingly severe multiple injuries,
investigators at a number of important trauma centers in both Europe
and North America raised the issue of whether embolization of the
contents of the medullary canal to the lungs was a significant factor
in increasing morbidity (discussed in detail in Chapter 11).
In addition, the introduction of retrograde nailing through the
intercondylar notch of the knee was particularly useful with nonreamed
techniques. In a prospective randomized trial comparing unreamed to
reamed nails, Clatworthy et al. (24) found that
union was slower in the unreamed group, and a high incidence of implant
failure in the nonreamed nails led them to discontinue the study early.
Both they and Tornetta and Tiburzi (72) found
no advantage in fixing routine femoral fractures with nonreamed nails
and recommended the routine use of reamed nails because of quicker
union and fewer implant failures with the larger nails. They did not
believe that the quicker operating time and somewhat lower blood loss
in the nonreamed groups was a sufficient advantage to justify their
use. This remains controversial, however. Most surgeons recommend
unreamed nails for severely and multiply injured patients with
concomitant severe pulmonary compromise or injury (see Chapter 11).
introduced retrograde nailing of the femur through a lateral
epicondylar portal with the use of a Küntscher-style nail, primarily as
a means of fixing the femoral shaft in combined concomitant ipsilateral
fractures of the shaft and femoral neck. The technique has now been
abandoned in favor of using an entry through the intercondylar notch of
the femur, because the eccentric entry site made reduction difficult
and resulted in persistent varus deformity (64,68,71).
knee has recently become popular because of the previously successful
experiences nailing tibias through this same approach and the challenge
of stabilizing a femur fracture in a quick, efficient manner in
patients with multiple injuries, whom orthopaedic surgeons frequently
found in the supine position on a regular operating table after general
surgical procedures. Devices used for retrograde nailing have included
specially designed short nails that provide additional screw fixation
in the distal fragment and were not designed to penetrate beyond the
isthmus (46), standard locked intramedullary nails designed for antegrade use (52),
and long retrograde nails designed for this technique. These can be
used reamed or nonreamed. The cross-locking screws are somewhat more
distal than standard nails, thereby increasing the range of
supracondylar fractures that can be handled. All current designs use AP
cross-locking proximally, as most surgeons view it as technically
easier to accomplish because of improved fluoroscopic visualization (30,32,35,37,52,53,58,63).
-
Elimination of the need for a fracture table in most cases
-
A much easier starting point without the
risks associated with proximal entry in the pyriformis fossa, which
include injury to the sciatic nerve, fracture of the femoral neck,
avascular necrosis of the femoral head, comminution of the proximal
femur due to eccentric entry, and heterotopic bone at the nail entry
site
arthrotomy of the knee and partial reaming of the articular cartilage
at the roof of the intercondylar notch; therefore, potential risks
include the following:
-
Early knee dysfunction
-
Patellofemoral pain
-
Loss of knee motion
-
Arthrosis of the knee
-
Knee sepsis
-
The tendency to use smaller nails, which could increase the rate of nonunion and risk of implant breakage
-
Subtrochanteric fracture at the proximal tip of the nail
-
Less secure fixation distally,
particularly in osteoporotic bone, since the more recently designed
nails tend to place cross-locking screws in the cancellous bone of the
metaphysis rather than through cortical bone at the metaphyseal
diaphyseal junction
show, some of these concerns have been borne out through recent
clinical experience, and others have not proven to be a problem. Large
numbers of retrograde nails have been used only in the last 5 years.
Only time will tell whether this technique will continue to be used for
difficult fractures of the femur or, in the long run, replace antegrade
nailing. ElMaraghy et al. (29) studied the
effect of nail entry and reaming in the canine femur on arterial
profusion of the anterior and posterior cruciate ligaments. They
demonstrated that profusion in the anterior cruciate ligament is
decreased by 52% and in the posterior cruciate ligament by 49% acutely.
Whether this returns to normal with time and whether it has any
significant clinical effects on either healing or function of these two
ligaments is currently not known.
effect of the entry site on patellofemoral contact area and pressures.
When they used the intact femur for comparison, they found no
differences unless the nail was left 1 mm proud of the cartilage
and
this resulted in statistically significant increases in the mean
pressure at 120° of flexion, and in the maximum pressure at 90° of
flexion. Their studies suggest that the intercondylar entry hole does
not have any significant biomechanical effects on patellofemoral
function as long as good surgical technique is followed. To this point,
no study has been sufficiently large or long enough to state whether
this entry site will increase the incidence of later arthrosis, but,
based on the experience in sports medicine with various intraarticular
reconstructive procedures of the knee, this does not appear to be a
problem.
studied the relationship of the femoral artery and nerve to the
proximal third of the femur. They demonstrated that the femoral artery
that lies medial to the femur has up to 15 branches in the proximal
third of the femur, but the closest lies 4 cm distal to the lesser
trochanter. The femoral nerve lies medial but has multiple branches
crossing the anterior femur, the first of which crosses 4 cm distal to
the pyriformis fossa; the fewest are above the lesser trochanter. Riina
et al. recommended that AP cross-locking always be performed above the
lesser trochanter to minimize risk to these structures.
showed only one infection, which resulted in a septic knee, among 271
fractures followed for between 1 and 2 years. The infection responded
to treatment and did not result in osteomyelitis. There were 10
nonunions (3.7%), which were more common with smaller unreamed nails
and for the most part responded to reamed exchange nailing or local
bone graft for bone deficiency. Only two rotary malunions were
reported. When there was no concomitant injury to the knee, all authors
reported that knee motion returned to normal or nearly normal, with
minimal long-term complaints. No cases of arthrosis were reported, but
of course the follow-up is quite short. Union seemed to be faster and
the incidence of nonunion lower when reamed nails larger than 10 mm in
diameter, with larger cross-locking screws, were used.
comparable to those reported with antegrade nailing, but there is
neither sufficient evidence nor a long-enough follow-up at the present
time to state whether retrograde nailing will replace antegrade nailing
as the method of choice for stabilization of fractures of the shaft of
the femur. Considering the fact that the published series thus far had
a higher incidence of open fractures and multiply injured patients, the
results are quite encouraging.
of the femur has now been firmly established. Current indications
include the following:
-
Multiple injuries, when nailing on a regular table in the supine position and use of an unreamed nail are advantageous
-
Combination fractures of the femoral
shaft and tibial shaft, when nailing of both fractures through the same
entry site is possible -
Communicant ipsilateral fractures of the
femoral neck and shaft, when independent fixation of the shaft and neck
fractures is desired -
Ipsilateral fractures of the acetabulum
and pelvis, when avoidance of a surgical wound about the hip makes
surgery of the pelvis and acetabulum on a delayed basis less risky -
Pregnant or massively obese patients when proximal access to the hip or lateral decubitus positioning for nailing is difficult
-
Periprosthetic fractures in the distal femur when retrograde nailing is superior to open fixation or antegrade nailing
trochanter to 10 cm proximal to the knee joint, locked intramedullary
nailing is the treatment of choice and has replaced plate fixation.
Plating a mid-diaphyseal femur fracture involves a much larger surgical
procedure, more blood loss, and a higher incidence of nonunion and loss
of knee motion than medullary nailing (67). Plate fixation is indicated in the following cases:
-
For femur fractures in settings where
inadequate experience with intramedullary nailing or nonavailability of
intraoperative fluoroscopy or instruments and implants makes medullary
nailing impractical -
When a vascular repair has been done and
plate fixation is feasible through the same surgical approach and/or is
less risky to the vascular repair than intramedullary nailing -
In ipsilateral concomitant fractures of
the femoral neck when retrograde nailing or antegrade nailing using
reconstruction nails is not available or when there is preexisting knee
pathology that prevents the knee from being flexed beyond the 45° angle
that is necessary to obtain the proper entry site -
For nonunions or malunions of the femur
when the medullary canal is obliterated or an open osteotomy and/or
bone graft is required, when nailing will be more difficult than plate
fixation, or when the devascularization of the femur caused by reaming
is not desirable -
When skin conditions or other factors at the hip and knee, such as a preexisting arthrodesis, preclude intramedullary nailing
increased rates of infection or nonunion (4,10,45,75,77).
Perform an immediate, thorough, layer-by-layer irrigation and
debridement, and institute appropriate bactericidal intravenous
antibiotics as soon as possible. Then re-prepare and redrape so that a
clean operative field is available for intramedullary nailing. Gustilo
grades I, II, and IIA and AO grades IO1, IO2, and IO3 of open fractures
may be routinely treated in this fashion. Individually assess Gustilo
grade IIIB and AO grade IO4. If these more severe grades are highly
contaminated, have marginal soft tissues that cannot be debrided at the
initial debridement, or are neglected (more than 12 hours old), then
consider primary external fixation if the patient needs to be mobilized
immediately. If up to 2 weeks in skeletal traction is not
contraindicated in isolated fractures, then this is an alternative.
Locked intramedullary nailing can be done when the wound is closed and
there is no evidence of infection.
intramedullary nailing does not carry an increased infection rate as
long as there has been no infection along the pin tracks. It may be
prudent to remove the external fixator, debride the pin tracks, and
close them (maintaining the patient in traction for a few days until
these wounds are sealed) before carrying out intramedullary nailing.
Gustilo grade IIIC and AO grades IO4 and NV3–5 fractures can be
initially stabilized with an external fixator, although plating may be
preferred if little additional periosteal stripping is necessary.
the wounds and leave the traumatic wound open, performing delayed
primary closure within 5 days if the wound is ready. The huge muscle
mass around the femur facilitates revascularization and provides
excellent coverage of bone and implants; therefore, flaps are rarely if
ever indicated except in fractures around the knee. More recent studies
have shown no infections or nonunions in 28 patients with Gustilo grade
I–IIIA open fractures (4), and no infections
and only two delayed unions in a series of 56 patients with open
fractures of the femur due to low-velocity gun-shot wounds treated with
immediate interlocked reamed nailing (77).
Routine bone grafting is not necessary to secure adequate rates of
union in open femur fractures treated by nailing unless there is
segmental bone loss.
decreased rates of infection in open fractures of the tibia, no data
support their superiority over reamed nails for open fractures of the
femur.
primary to delayed intramedullary nailings in 42 patients with open
fractures, including 33% with grade III injuries, and had overall
infection and nonunion rates of 2.4%, with no significant difference
between the two groups (see Chapter 12 on open fractures).
as soon as possible in cases of multiple trauma and in isolated
fractures. In addition to the physiologic advantages of early fracture
stabilization and patient immobilization, it is technically easier to
nail a femur immediately after the injury. Muscle spasm, contracture,
hemorrhage, and swelling are less prominent, making the closed
reduction easier. The decreased length of hospitalization contributes
to the cost-effectiveness of acute trauma care.
injuries, and ensure hemodynamic stability. Obtain AP and lateral
radiographs of the entire fractured femur, including the entire hip
joint and knee joint. Look carefully for occult fractures of the
femoral neck. This requires a high-quality AP radiograph taken with the
hip in internal rotation to be certain that the femoral neck is in full
profile (usually done under anesthesia in the operating room). Obtain a
high-quality cross-table lateral view of the hip as well.
as possible, as this is important to maintain length and to stabilize
the thigh, thereby reducing pain, reducing hemorrhage, and maintaining
overall alignment and length, which facilitates later nailing. Two
choices exist for skeletal traction. A transverse ¼-inch-diameter or
larger pin placed at the level of the tibial tubercle is most
frequently used. Its advantages are that it is not a potential
contaminator of the femoral canal (if nailing is to be delayed over 24
hours) and does not interfere with the tip of the nail as it is driven
to the distal end of the femur. Its disadvantages include a tendency to
cause knee extension as traction is applied on the fracture table, and
a limited ability to control a short distal fragment of femur.
better control in distal fractures without interfering with nail
placement. To position the traction pin, place a 0.062-inch or larger,
smooth Kirschner wire (K-wire) just distal to the superior patellar
pole, keeping it as anterior as possible. In this position, it is
likely to remain out of the path of the approaching nail, particularly
with nail designs that employ an anterior bow. For a distal fracture
that is to be nailed with the patient in the lateral decubitus
position, insert the traction pin somewhat obliquely so that it runs in
a distal–medial to proximal–lateral direction. The resultant pull
through a traction bow tends to counteract the valgus alignment caused
by gravity.
whether a K-wire or a Steinmann pin, is that if the distal fragment is
not placed into appropriate position for nailing, the pin holds it in a
fixed position, which can make reduction of the fracture and driving of
the nail exceedingly difficult. It also interferes with distal
cross-locking. The tibial pin allows the distal femoral fragment to
“float,” so alignment is simplified. This issue is addressed in more
detail during the following discussion on fracture reduction. I prefer
to use a proximal tibial Steinmann pin.
fracture table or cannot undergo countertraction from the perineal
post, it is possible to apply traction and reduce the fracture by means
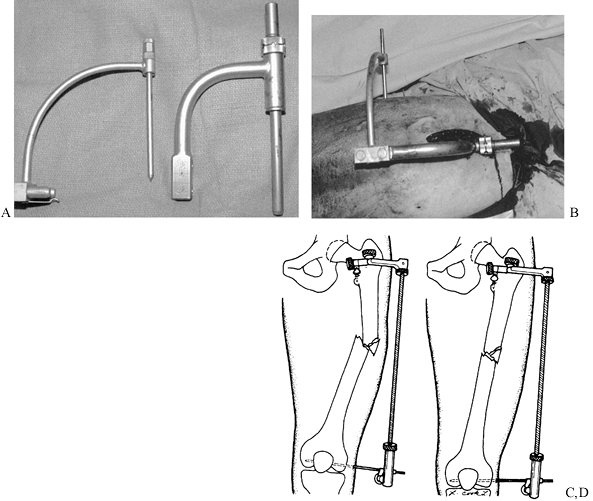
of a modified femoral distractor (Fig. 20.3).
The Synthes (Paoli, PA) Universal Femoral Distractor utilizes an
accessory targeting device that attaches to the proximal targeting
guide of their universal nail system. The targeting guide allows
placement of the proximal Schanz pin into the lesser trochanter through
a small stab incision (Fig. 20.3A). Place the
distal Schanz pin parallel to the femoral articular surface, distal to
the intended location of the nail tip, taking care not to traumatize
the adjacent femoral artery, vein, or nerve (Fig. 20.3B). With the fixator in place, distraction can be achieved as well as control of flexion/extension, varus/valgus, and rotation (Fig. 20.3C). Utilize a radiolucent table and an image intensifier (Fig. 20.3D).
 |
|
Figure 20.3. Use of a femoral distractor to provide traction for medullary nailing. A: A Synthes accessory targeting device (left) and the proximal targeting guide to which it attaches (right). B: Placement of the distal Schanz pin. C: The fixator in place. D: Reduction of the fracture with distraction.
|
AO femoral distractor as efficacious as a fracture table and a better
time saver. Some surgeons even advocate nailing fractures on a regular
table, using hand traction and manipulation rather than the distractor,
as they found the distractor to be technically challenging and
time-consuming (79). This manual technique,
however, requires a very experienced surgical team and is technically
difficult, and the surgeon must be prepared to open the fracture if
reduction cannot be achieved. I recommend against this technique for
routine nailing in the hands of the average surgeon, and I advocate use
of a tibial pin on a fracture table.
table for closed intramedullary nailing. Most surgeons prefer a
fracture table and use the supine position because they are most
comfortable with this position, as they use it on a frequent basis for
hip fractures. The only advantage of the supine position is easier
positioning of the patient and assessment of rotation. Particularly for
heavily muscled or obese patients, the supine position makes access to
the nail entry point at the proximal end of the femur challenging, and
impingement of the instrumentation against the table or the side of the
patient makes fracture reduction and execution of the nailing much more
difficult.
much more technically exacting, it requires the surgeon and usually two
assistants to position the patient, and judging rotation can be more
difficult. In addition, in multiply injured patients and in those with
pulmonary injury or spine fractures, the lateral decubitus position is
a greater threat to the spine and compromises pulmonary function. In
the latter instances, the supine position is indicated. In addition,
the supine position is much more convenient for bilateral fractures and
carrying out simultaneous procedures. Because the nailing is much
easier, I much prefer the lateral position.
-
For lateral positioning, I use a
¼-inch-diameter or stronger transverse Steinmann pin placed
transversely through the proximal tibia and dressed with a
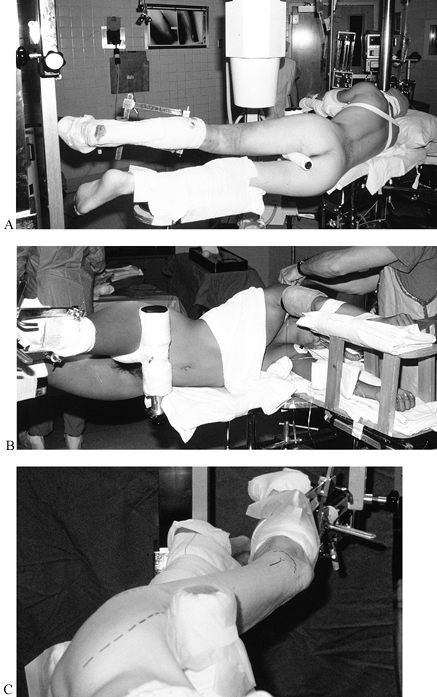
circumferential sterile dressing. I use a Chick-Langren fracture table (Fig. 20.4).![]() Figure 20.4. Lateral decubitus positioning on a Chick-Langren table using a proximal tibial traction pin. A:
Figure 20.4. Lateral decubitus positioning on a Chick-Langren table using a proximal tibial traction pin. A:
Posterior view. Note that the perineal post between the legs supports
the proximal fragment and is positioned to allow the anterior-superior
iliac spine to contact the vertical component of the post. The
fractured femur is uppermost. B: Frontal view of the same setup. C: View from the head of the patient. (Disregard the dashed lines drawn on the patient.) -
Before moving the patient to the fracture
table, be certain that the table is level and properly located in the
room with reference to the anesthesia equipment and lights, and that
the C-arm has been placed on the appropriate side of the table. Make
sure that all appropriate equipment is mounted on the table and in the
appropriate position for the patient. Having everything “pre-prepared”
greatly facilitates positioning. -
While the anesthesiologist controls the
airway and positions the upper extremities, have an assistant control
both lower extremities, roll the torso, and secure the patient to the
table. -
Once the patient is in the lateral
position, place the T-shaped pelvic perineal post and secure it so that
the vertical portion lies just distal to the anterior superior iliac
spine (Fig. 20.4A). Elevate the perineal post
to help support the proximal fragment in a horizontal position and
allow the genitalia to drape below the post. Make sure the groin and
all bony prominences are well padded by the appropriate pads. Also be
certain that the greater trochanter on the down side is supported by
the table; the table is adjustable for this purpose. -
Secure the tibial pin into the tibial pin
traction holder attached to the traction arm of the fracture table, and
manually pull sufficient traction to stabilize the patient on the
pelvic perineal post and to bring the fracture out to length. In
transverse fractures, slight distraction is an advantage initially.
Place the femur parallel to the floor with the hip flexed approximately
20° to 25° and the hip internally rotated just enough to place the heel
slightly above the patella, which is about 10° to 15°. This compensates
for the fact that patients in the lateral decubitus position tend to
slump somewhat forward during the nailing, which can induce an external
rotation deformity. On the Chick-Langren table, the traction assembly
provides sufficient support that it is not necessary to support the leg
distal to the traction pin unless the bone quality is poor; in that
case, fashion a sling to the overhead arm of the table to support the
leg. Allow the knee to flex freely, as this permits flexion of the knee
as traction is applied, thereby avoiding stretch on the sciatic nerve. -
Never apply traction through the foot
with the knee extended and with the hip in the flexed position, because
this will cause a sciatic nerve stretch injury even if used for as
little as an hour. Excessive traction and inadequate padding cause
pudendal nerve palsy. Maintain traction on the femur only until the
guide pin is placed, and then loosen it as much as possible to avoid
this problem. -
Secure the lower, unoperated leg onto a
well-padded leg holder, placing the leg holder just proximal to the
knee to support it and padding the peroneal nerve well to avoid injury.
I prefer circumferential tape over a blanket into which the leg is
wrapped, as this provides good stability and can be a source of
traction in the event of bilateral femur fractures. Initially, position
the lower leg as close as possible to the upper, operated leg in all
planes to facilitate use of the C-arm. -
Secure the upper extremities to
double-airplane splints, securing the uppermost upper extremity to
stabilize the thorax in a directly vertical position. After positioning
the patient, check all bony prominences and neurovascular structures
with the anesthesiologist to be certain that everything is padded and
protected. -
Bring in the C-arm fluoroscope on the
anterior side of the patient. Place it exactly at right angles to the
femur and in a position where the entire length of the femur from the
hip to the knee can be seen easily on both the AP and lateral views
without repositioning the base of the C-arm. -
Prepare the injured thigh from the iliac
crest to the tibial pin circumferentially, and drape it so that the
buttocks and all but the most medial aspect of the thigh down to the
tibial pin are available. -
Under fluoroscopic control, extend the
down leg at the hip just enough so that the fracture site and proximal
femur can be clearly seen on the lateral view. Keeping the lower
extremities as close together as possible facilitates
P.681P.682
passage
of the C-arm from the AP to the lateral position. Extending the
uninvolved hip permits better visualization of the fractured femur on
the lateral view. The least extension is required for supracondylar
fractures, and the most for subtrochanteric fractures.
-
Place the patient in the supine position
on the fracture table and secure the tibial pin into the traction
apparatus on the table (Fig. 20.5). With the
perineal post in place, reduce the fracture and secure the patient’s
position on the table by applying manual traction. The difference from
the lateral position is that the thigh is slightly adducted to expose
the trochanter better (avoid excessive adduction, as this tightens the
iliotibial band, which produces valgus malalignment of the fracture)
and the leg is placed in neutral rotation. Raising the traction holder
to flex the hip 15° to 20° greatly facilitates access to the entry
site. To facilitate exposure of the hip, tilt the torso to the opposite
side by using either a kidney rest or a tape-and-bolster arrangement.
Avoid too much tilt, which also tightens the iliotibial band. On the
Chick-Langren table, the support under the buttocks is in three
sections, and the lateralmost section on the operative side can be
lowered out of the way to facilitate exposure. The key to this
positioning is the flexion of the hip, which allows the instrumentation
to pass beneath the patient rather than impinging on his side, as
occurs if the hip is left in full extension. Place the opposite leg in
a 90°-90° leg holder, making certain that the pelvis is stabilized to
the table or to the vertical post of the leg-holding device. Bring the
C-arm between the legs, and position it to be certain that AP and
lateral views from the hip to the knee can be acquired without moving
the base of the machine.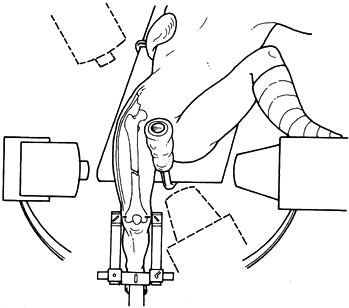 Figure 20.5. Supine positioning with use of a distal femoral traction pin.
 -
The knee can be left to flex freely, as
described for the lateral decubitus technique, or a small footstool can
be brought in to support the foot. Since it is dependent, apply an
elastic support hose. -
Prepare and drape the thigh free, as already described for lateral decubitus nailing.
-
Begin the incision at the tip of the
trochanter, and extend it proximally in line with the fibers of the
gluteus maximus and the femoral shaft (Fig. 20.6).
The length of the incision is determined by the soft-tissue thickness.
Continue dissection sharply through the gluteus maximus fascia, and
then split the gluteus fibers bluntly. Stay posterior to the gluteus
medius, palpate the trochanteric tip, and with your palm facing upward,
slide a finger down the posterior medial border of the trochanter. You
will encounter a sharp bump at the mid-portion of the trochanter. This
represents the old physeal line of the trochanter and is known as the
quadrate tubercle (Fig. 20.6A). Then slide your finger directly
P.683
forward into a fossa located at the junction of the femoral neck with
the underside of the posterior central aspect of the trochanter. By
common usage this is called the pyriformis fossa, which is actually
nearest to the insertion of the obturator externus. This is the usual
entry site for a femoral nail because it is directly over the medullary
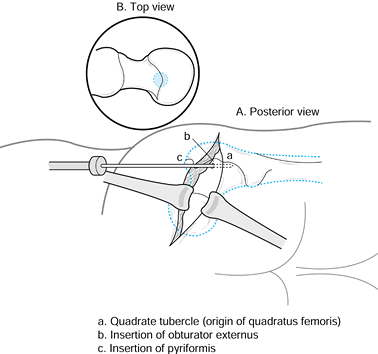
canal (Fig. 20.6B). (See the section on INTRAMEDULLARY NAILING in Chapter 11.)![]() Figure 20.6. A: Posterior view of the buttocks with the posterior aspect of the greater trochanter exposed. a, quadrate tubercle, the origin of quadratus femoris; b, insertion of the obturator externus tendon; c, insertion of the pyriformis tendon. B: Top view
Figure 20.6. A: Posterior view of the buttocks with the posterior aspect of the greater trochanter exposed. a, quadrate tubercle, the origin of quadratus femoris; b, insertion of the obturator externus tendon; c, insertion of the pyriformis tendon. B: Top view
of the femur. Note that the entry site is directly over the medullary
canal and tucked up under the greater trochanter, encroaching only
minimally on the femoral neck. -
In the past, a Küntscher awl was used to
penetrate the cortex at this point. Some surgeons still prefer it, but
most have now converted to using a guide pin over which is passed a
reamer. This procedure is easier, can be done percutaneously, and is
more accurate and easily visualized under fluoroscopy. The danger of
accidentally slipping off the posterior aspect of the trochanter into
vital structures such as the sciatic nerve is eliminated. Most any
guide pin combined with a reamer used for nailing hip fracture
suffices. I use the 3.2-mm guide pin for the Alta hip screw (Howmedica,
Rutherford, NJ) and drill over it with either a 14 mm or an 8 mm
reamer, depending on the size of the patient. -
Place the tip of the guide pin on the tip
of your finger, palpating the pyriformis fossa, and hold the tip upward
against the underside of the greater trochanter at its junction with
the femoral neck. Control the guide pin with a guide pin holder or a
T-wrench. The guide pin can be used to palpate the anterior and
posterior aspects of the neck to be certain that you are central or
slightly posterior. Then use a mallet to drive the guide pin into the
soft bone on the underside of the greater trochanter at its junction
with the neck. Do not drive it in more than 15–20 mm. Then visualize
the guide pin on a fluoroscope, confirming that the entry point is
directly over the medullary canal on both the AP and lateral views.
(See Hints and Tricks below.)
-
Reduce the fracture, and insert a long
ball-tipped reaming guide pin down the medullary canal to the
subchondral bone at the knee. Other than finding the appropriate
starting point, this can be the most difficult and challenging portion
of the procedure; it is described and illustrated in Chapter 11.
Many different methods have been advocated for reducing femur fractures
closed, many of which utilize various external manipulation devices,
such as mobile concentric rings or a crutch with a strap. The technique
described here utilizes manipulation of the proximal fragment with an
intramedullary device, makes reduction of the fracture far simpler than
by external manipulation, follows a logical progression, and minimizes
operating time and x-ray exposure (43). -
Key points are the positioning of the
distal fragment in a neutral position in both the lateral and supine
positions, as already described. Because of muscle pull, the proximal
fragment typically lies flexed and adducted, more so in proximal
fractures. Subtrochanteric fractures with the lesser trochanter intact
are externally rotated as well. The key to reduction is aligning the
proximal fragment with the distal rather than the reverse.
-
Driving the guide pin with a mallet is
superior to inserting it with a power drill, as drilling tends to cause
the guide pin to “walk” on the cortex and thereby presents the risk of
tearing your surgical glove. More important, the guide pin should drive
easily, demonstrating that it is on the thin cortex on the underside of
the greater trochanter. If hard cortical bone is encountered through
which the guide pin cannot be driven with the mallet, you are too far
medial on the femoral neck. This also minimizes the risk of injuring
the lateral epiphyseal vessels, which provide blood supply to the
femoral head. -
Although it is ideal to have the guide
pin directly in line with the femoral canal, this is difficult to do.
It is easiest to insert the guide pin at right angles to the slope of
the femoral neck at the insertion point. This means that the guide pin
will be inclined from posterior to anterior on the lateral view.
Because the overhanging trochanter forces the guide pin medially, it
often has a lateral to medial inclination on the AP view. This is not
important as long as the guide pin enters the neck at the appropriate
starting point and it has not been inserted more than 20 mm. -
Now, under fluoroscopic control, place
the appropriate-size reamer over the guide pin and ream through the
outer cortex into the medullary canal. As soon as the guide pin is
totally covered by the reamer, direct the reamer under fluoroscopic
control directly down the medullary canal as far as the lower edge of
the lesser trochanter. This will open the medullary canal and ensure
that the ball-tipped guide pin to be inserted next does not hang up on
cancellous bone in the proximal femur. Remove the reamer and guide pin.
-
Use a fracture reduction tool (Stryker, Osteonics, Howmedica, Rutherford, NJ) or a long, 11- to 12-mm-diameter
P.684
intramedullary nail inserted into the proximal fragment. Place into the
reduction tool the ball-tipped reaming guide pin. It is helpful to
place a gentle, smooth bend of 10° to 20° in the distal 2.5 cm of the
guide pin, as this facilitates manipulation of the guide pin around
corners. Attach a T-handle to the proximal end of the guide pin. -
Place this assembly into the proximal fragment, and manually, gently lodge the reduction tool into the proximal fragment.
-
Using the step image on the fluoroscope
to minimize radiation exposure, push your hand anteriorly, which
extends the proximal fragment, and bring it directly in line with the
end of the distal fragment on the lateral view. Place the guide pin at
the exit of the distal fragment, but do not cross the fracture site yet. -
Making certain that you do not change
position on the lateral view, now push your hand toward the floor,
which abducts the proximal fragment and brings it directly in line with
the distal fragment on the AP view. Place the guide pin directly in the
center of the medullary canal on this view, then push it 2–4 cm into
the proximal fragment. If your alignment is perfect, you will
immediately feel crepitus as the guide pin encounters the rough
endosteal surface of the medullary canal. With this feedback
demonstrating that the guide pin is in the medullary canal, insert it
down to subchondral bone at the knee, ensuring that it is in, on both
views. -
If you feel no crepitus or resistance to
penetration of the guide pin, then most likely it is out into the soft
tissues on the other view. In that case, realign the guide pin on the
view on which you are working, and repeat the procedure for the
following view. -
Perform the reduction maneuver and
insertion of the guide pin on step images, as this dramatically lowers
radiation exposure in comparison with live imaging. If you are
unsuccessful after two or three attempts to pass the guide pin, then it
is likely that there is a small fragment in the medullary canal, or
that there is some other reason, such as soft-tissue interposition,
that the guide pin is not passing. In this circumstance, try inserting
the guide pin under direct fluoroscopic control, and the image will
tell you what is occurring. -
If there is a small fragment in the canal, use hand T-reamers (AO Synthes, Paoli, PA) to clear the canal.
-
The usual cause of failure to enter the
distal fragment is losing the position on one view by inadvertent
movement of the hands when switching to the other view. This takes
practice, and after several nailings using the technique, this problem
nearly disappears. -
In rare fractures, some external
manipulation is necessary because of extreme swelling in the thigh or
other impediments to manipulating the proximal fragment. -
In supracondylar fractures of the femur,
where an anterior traction pin has not been placed in the distal femur,
the distal femoral fragment may remain quite flexed. Reduce this by
pushing on the posterior proximal end of the distal fragment to reduce
its flexed position and hold alignment while the guide pin is passed. -
Ideally, the guide pin should be directly
centered in the condyles of the femur on both AP and lateral views.
This is not critical, however; if reasonable alignment of the fracture
is maintained during reaming and if only the isthmus of the femur is
reamed, the position of the guide pin distally is irrelevant unless you
are nailing a very distal supracondylar fracture where there is a
tendency for the distal fragment to lie in valgus and flexion.
-
Ensure that the guide pin is distally
where you want the distal end of the nail to end. In most systems, nail
length is determined by placing an identical second guide pin at the
tip of the trochanter and then measuring from the top of the guide pin
in the femur to the top of the second guide pin. Make adjustments if a
shorter nail is desired. -
In the Alta system, the length of nail is
measured directly off the fracture reduction tool, which for the Alta
standard nail places the top of the nail flush with the top of the
femoral neck rather than even with the tip of the trochanter. This
allows for some adjustment of the position of the nail if a more
proximal position of the cross-locking screws is desired.
-
To minimize pressurization of the canal,
which leads to embolization of bone marrow, and to avoid overheating
and jamming of the reamers, it is important to use conical (as opposed
to cylindrical) reamer heads that have deep flutes to deliver reamings
proximally, and reverse cutting flutes. -
Run reamers at the highest available RPM
on a power reamer because this makes cutting most efficient, but push
the reamer slowly down the medullary canal to minimize pressurization.
Visualize the passage of the first couple of reamers across the
fracture site to be certain that everything is going smoothly.
Fluoroscopic imaging thereafter is usually not necessary unless
problems are encountered. -
Begin with the smallest reamer in the set
and progress in 1 mm increments until the first reamer contacts the
inner cortex of the canal. Then progress in 0.5 mm increments until the
desired diameter is reached. Once cortical contact is made, feel the
reamer head with your hand as it is removed after each pass to be
certain that it is not overheating. If you encounter hard reaming with
slow progress of the reamer, extract the reamer and clean the flutes of
cortical bone to increase cutting efficiency and to avoid jamming the
reamer when it is withdrawn. Do not allow the reamer to pull itself
distally
P.685
because
this may cause it to screw down the medullary canal, which inadequately
reams the canal and may make extraction of the reamer difficult. For
most reamed nailings, reaming of 2 mm after initial cortical contact
suffices. Most systems provide reamers from approximately 8 to 17 mm in
diameter. More reaming can be done if a larger nail is indicated. Do
not ream the metaphyseal cancellous bone distal to the isthmus, because
driving the rod into this bone increases the quality of fixation. In
supracondylar fractures, it is necessary to enter only the mouth of the
fragment to be certain that the nail will pass smoothly. Be certain
that the guide pins used are straight and are not nicked. Imperfect
guide pins can cause jamming between the guide pin and the reamer head
when it is withdrawn, causing inadvertent removal of the guide pin and
loss of reduction of the fracture.
-
Broken reamers or shafts are highly
unusual but are usually easily removed by extracting the bullet-tipped
guide pin along with the broken reamer. -
To ensure that the guide pin does not
accidentally withdraw, hold it in the femur with a lap tape over the
proximal end of the pin (do not use your gloved hand because, if the
wire starts to turn with the reamer, it will tear the glove). When the
back of the reamer obscures the guide pin, it may be necessary to
insert a second guide pin into the back of the reamer to hold the guide
pin in place. -
After the length of nail has been
measured, driving the guide pin farther with a mallet to lodge it into
the subchondral bone of the knee often prevents accidental removal.
This is particularly important in supracondylar fractures with a short
distal fragment. -
In fractures of the femur, venting of the
femur has not proven to be of any value, because during reaming the
medullary canal vents through the fracture site. -
At the completion of reaming, thoroughly
irrigate and clean the buttocks wound to minimize the risk of
heterotopic bone formation.
-
Now insert a plastic tube over the
reaming guide pin down the medullary canal, making certain that it is
across the fracture site, and exchange the reaming ball-tipped guide
pin for a driving guide pin.
-
In systems of reamed, locked nails
manufactured from titanium alloys, an 11-mm-diameter nail for women and
a 12-mm-diameter nail for men provide sufficient strength and
stability. In stainless-steel systems, some manufacturers recommend a
12 mm nail for women and a 13 mm nail for men. Smaller nails may be
necessary in very small people, and larger-diameter nails may be
necessary in large men or in the elderly, where the medullary canal
tends to be capacious. The relationship between the maximum diameter
reamed and the size of the nail is based on the manufacturer’s
recommendations, but in most cases overreaming by 1 mm provides a
suitable fit. Some manufacturers recommend overreaming even more,
particularly in femurs that have a fairly marked anterior bow. -
Assemble the nail on the driver and drive
the medullary nail down the medullary canal across the fracture site,
using the driver provided by the manufacturer. At this point, only
minimal traction should be necessary, and in fact, traction on the
extremity should have been released as soon as the fracture was reduced
and the guide pin passed, assuming that traction is not necessary to
maintain overall alignment or length. A nail that drives hard can be
the result of an eccentric entry site or insufficient reaming. Do not
persist in driving the nail because of the risk of nail incarceration
or comminution of the femur. Reassess the entry site; oval it in the
correct direction, if necessary, and consider reaming somewhat larger. -
In comminuted fractures where
determination of length may be difficult, a good guide is to
preoperatively measure the opposite extremity from the prominence of
the trochanter to the lateral epicondyle of the femur and relate this
to the length of nail to be used. -
Avoid distraction at the fracture site.
If distraction occurs when you drive the nail, then drive it slightly
deeper, cross-lock distally, and use the driver assembly to backslap
the nail to approximate the fracture ends; then lock proximally. In
supracondylar fractures, be certain to provide support beneath the
fracture site medially as the nail is driven to ensure that it is
centered in the distal fragment and that alignment is good. -
Visualize the nail as it passes into the
mouth of the distal fragment to ensure that it does not hook up on a
cortex and cause comminution. Most nails today have a bullet-nose
design, which minimizes the risk of comminution. -
Visualize the nail fluoroscopically to be
certain that it is in the appropriate location and that the fracture is
both rotationally and axially in good alignment.
-
In nearly all nail systems today, distal
cross-locking is best accomplished by freehand cross-locking under
fluoroscopic control (discussed in Chapter 11).
The jigs now available for distal cross-locking have had mixed success.
Hand-held fluoroscopic guides and laser-guided systems facilitate
freehand cross-locking. -
Proximal cross-locking can be done with a jig or guide system in all nails.
-
When cross-locking is completed, verify
on a lateral view that the screws have passed through the nail. They
can appear on the AP view to be in, and yet have missed the nail. -
If a screw misses the nail, then
correcting it can be quite difficult because the drill point or screw
tends to drop into the old screw hole. A quick and simple way to solve
this problem is to expose the screw hole, widen it with a larger drill
point so that the near hole in the nail is now exposed, and then insert
the screw under direct vision. This results in loss of purchase in the
near cortex, but, when combined with a second screw, it provides
adequate fixation on the opposite cortex as long as bone quality is
good. -
In osteoporotic bone, if fixation is too
distal, it will provide poor purchase because of the poor-quality
cortical and cancellous bone in the very distal regions of the femur.
In addition, very distal fixation may place the screws
intraarticularly, which can irritate the knee joint. In these
situations, use a shorter nail so that cross-locking occurs in the
better-quality bone of the more proximal metaphysis. -
It is almost always advisable to have
three to five threads of the screw extending through the opposite
cortex, because this greatly facilitates removing the medial section of
screw if the screw breaks. -
In osteoporotic bone, washers and backup nuts enhance fixation.
-
In stable patterns such as
Winquist-Hansen I and II, where there is good cortical contact at the
fracture, a single screw proximally and distally usually suffices. This
saves operating time and money. If single screws are used where two or
three cross-locking holes are available, always place the screw in the
hole closest to the fracture site to eliminate a stress riser effect in
the nail. This is particularly important in supracondylar fractures (15). -
If you are using percutaneous techniques,
measurement of screw length with the depth gauge through the nail can
be difficult. You can measure screw lengths directly off the
fluoroscope monitor screen by using the known width of the nail as a
reference for measuring the AP width of the cortex at the site of the
cross-locking screw in the femur. The only time this is not reliable is
when cross-locking distal to the epicondyle, where the sloping surface
of the distal femur may cause you to insert a screw that is too long. -
If the nail has a cap screw, insert this
to prevent bone growth into the nail and to make extraction of the nail
easier. In addition, it prevents the oozing of marrow contents out the
proximal end of the nail, which can lead to heterotopic bone formation. -
Thoroughly irrigate the wound, debride
any muscle injured by the procedure, and close the wounds in layers.
Confirm the quality of reduction and placement of the implants on final
AP and lateral radiographs before awakening the patient.
to that for lateral nailing, and the following guidelines are quite
useful:
-
When approaching the entry site for the
nail, do not use a direct mid-lateral incision, but use the same
incision as for lateral decubitus nailing, beginning at the tip of the
trochanter and passing proximally in line with the fibers of the
gluteus maximus. A direct lateral approach goes through the gluteus
medius, damaging it. The thick muscle envelope in this area makes
access to and visualization of the proper entry site extremely
difficult. In addition, entry this far superior makes it exceedingly
difficult to avoid injury to the base of the femoral neck because of
the overhanging trochanter. A more posterior approach is better. -
In extremely obese people or where the
greater trochanter overhangs significantly, entry into the pyriformis
fossa in the supine position can still be difficult. This is also a
challenge when there is a concomitant ipsilateral fracture of the
femoral neck, where the guide pin tends to enter the fracture site
rather than the pyriformis fossa, which is just a few millimeters
lateral to the fracture line. -
In these cases, place the guide pin
directly into the tip of the greater trochanter. Ream the entry site
into the greater trochanter and then use an instrument such as an
Army-Navy retractor to push or pull the reamer medially while reaming,
to create an oval entry hole that is centered directly over the
medullary canal. This oval hole is larger than is needed for the nail,
but I have seen no adverse consequences of this technique. -
Position the operating table as high as
is practical, and plan to have the instrumentation enter in line with
the femur, which is posterior to the side of the patient. Note that
this is nearly identical to the lateral decubitus position. This
greatly facilitates manipulation of instrumentation and reduction of
the fracture, as well as driving the nail. The only disadvantage is
that it is awkward because of the inclination of the instrumentation
toward the floor. -
Cross-locking distally in the supine
position can sometimes be difficult because the locks on the C-arm
prevent achieving appropriate alignment of the x-ray tube with the
cross-locking holes in the nail. As long as the fracture is well
impacted and rotationally stable, it is often easier to rotate the leg
to bring the cross-locking holes in line with the central beam of the
fluoroscope than to try to line it up using the fluoroscope mechanics.
-
Always examine patients carefully in the
operating room under anesthesia to be certain that alignment,
particularly rotation, has been restored. Always try to achieve perfect
alignment. Some asymmetry in rotation is acceptable as long as it does
not exceed 15° and the patient can rotate in both directions beyond
neutral. Shortening up to 10 mm is either asymptomatic or easily
compensated for by an in-the-shoe lift. Shortening of 15 mm or more,
although nicely corrected with a shoe lift, is quite noticeable to most
patients and is likely to be the source of complaints. Shortening over
20 mm is unacceptable to the vast majority of patients, and correction
is required in most patients who have shortening over 25 mm. Except in
distal supracondylar fractures of the femur, alignment in the sagittal
plane is nearly always guaranteed by the contour of the nail. The most
common malalignment in supracondylar fractures is recurvatum.
Recurvatum of up to 10° or so is acceptable in most patients as long as
they do not have lax joints or a preexisting hyperextension problem at
the knee. Try to avoid varus or valgus malalignment of over 5°. Over
10° often requires correction. -
As soon as the patient will tolerate it,
begin hip and knee range-of-motion and muscle-strengthening exercises
for the entire extremity. Do not forget the hip abductors; persistent
weakness in these due to the operative approach is common (3).
It usually takes 6 weeks to gain enough joint motion and muscle
rehabilitation that the patient can walk safely without assistive
devices. In Winquist I and II stable patterns, full weight bearing can
progress as quickly as possible, and most patients can bear full weight
without assistive devices by 6 weeks. In Winquist III and IV patterns,
bridging callus must be seen on two views before progression to full
weight bearing is acceptable.
 |
|
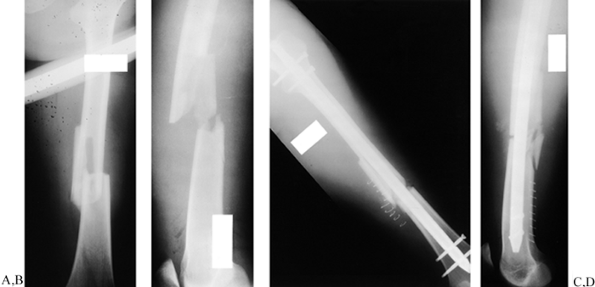
Figure 20.7. Femoral fracture treated with antegrade, closed, locked intramedullary nailing. A: AP radiograph showing fracture. B: Lateral radiograph. C:
Postoperative AP radiograph. Note the cross-locking screws about the lesser trochanter and, distally, the bicortical cross-locking screws. The fracture is in excellent alignment. D: Lateral radiograph. |
-
The lateral decubitus position with the
fractured femur uppermost is preferable, although some use the supine
position with bumps under the back and midsacrum to make the entry site
for the nail available. -
Prepare and drape the extremity completely free, including the buttocks for the entry site.
-
Reduce the fracture and perform antegrade nailing as described previously.
-
When you are cross-locking, the
distractor may be in the way, particularly distally. If the fracture is
sufficiently stable, remove the distractor and proceed with
cross-locking as usual. In cross-locking with the leg free on a
radiolucent table, it is useful to have the assistant position and
stabilize the leg for cross-locking rather than shift the head of the
C-arm to align it.
-
Position the patient in the supine
position on a fully radiolucent table. Place a 3–5 cm soft bump under
the ipsilateral buttocks and a large bolster under the knee and thigh
so that the knee sits flexed at approximately 45°. -
If a universal distractor will be used to
gain length and aid reduction, apply a Schanz pin proximally just above
the lesser trochanter and distally through the femoral condyles
posterior to the nail entry site, attach the distractor, and make
appropriate adjustments. Many fractures can be nailed without a
distractor, particularly if an unreamed technique is used, which is
discussed below. -
Make a midline longitudinal incision from
the inferior pole of the patella to the tibial tubercle. Split the
patellar tendon the full length of the incision, and reflect the fat
pad inferiorly. Identify the intercondylar notch. One centimeter
anterior to the anterior edge of the posterior cruciate ligament,
insert a guide pin under fluoroscopic control (Fig. 20.8).
On the AP view, make certain that this is in the midline and aligned
with the femoral canal. Laterally, the guide pin must be aligned with
the long axis of the distal fragment of the femur and be central in the
canal. (This usually results in an entry hole that is 50% on
nonarticular surface in the intercondylar notch and 50% into the
articular cartilage.) Over this pin, ream with an appropriate-size
end-cutting reamer. In most cases, this will remove a few millimeters
of articular cartilage at the superior edge of the intercondylar notch.
Ream until the medullary canal is entered. Use a protector to prevent
injury to the patellar tendon, and irrigate and suck during reaming to
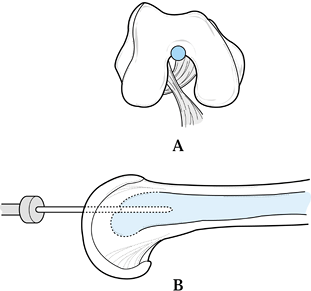
remove any loose reamings from the knee joint.![]() Figure 20.8. Entry site for retrograde femoral nailing. A: Placement of the guide pin for the reamer. B: Lateral view showing the guide pin directly in line with the medullary canal of the femur.
Figure 20.8. Entry site for retrograde femoral nailing. A: Placement of the guide pin for the reamer. B: Lateral view showing the guide pin directly in line with the medullary canal of the femur. -
For unreamed nailing, select the
appropriate diameter and length of nail. I prefer to use a standard
Alta medullary nail, which provides two transverse cross-locking screws
both proximally and distally. This is the same nail used for antegrade
nailing. For unreamed applications, I always try to insert a 10 mm nail
because it allows use of the 5 mm cross-locking screws, but a 9 mm nail
is acceptable. Although specially designed retrograde nails are
available at our institution, I prefer this nail because, when it is
fully inserted, the two distal cross-locking screws are at the
epicondyle and slightly above, placing them in cortical bone, which
provides better fixation than more distal locking. I prefer
medial-lateral rather than anterior-posterior locking proximally. I
select a nail that will place the two proximal cross-locking screws in
the region of the lesser trochanter, which is the safest zone for
neurovascular structures and avoids the problem of a stress riser in
the subtrochanteric area. -
Insert the unreamed nail up to the
fracture site, making certain that the fit is not too tight. With the
aid of an assistant, reduce the fracture and, using the nail as a lever
to assist, pass the nail across the fracture site and drive it into the
proximal fragment.
-
The most important and sometimes
challenging aspect of retrograde nailing is being certain that the top
of the nail is countersunk below the subchondral bone of the
intercondylar notch. It is important to understand the anatomy of your
nail and driver as seen on fluoroscopy, so that there is no question
where the most distal extent of the nail is. I always countersink the
nail at least 10 mm below the subchondral bone to allow room for the
cap screw and for any parallax error.
-
Nail length is critical because the nail
must be countersunk below the subchondral bone distally, the fracture
must be at appropriate length, and the proximal cross-locking should be
at the level of the lesser trochanter. -
First, cross-lock distally, using the
cross-locking guide, then impact the fracture and cross-lock
proximally, using either the Alta distal cross-locking guide or
freehand technique. -
With the other leg lying flat on the
table, visualization of the cross-locking holes at the lesser
trochanter is easy because the two thighs are at different levels. Even
if overlap occurs, with a good C-arm both femurs can be visualized and
the femur with the nail in it is easily identified and targeted. -
When using systems that provide a cap
screw, be certain to take this into account when setting the depth of
the nail at the knee (Fig. 20.9). Figure 20.9. Retrograde nailing of a femur fracture. A: AP radiograph showing a fracture of the shaft of the femur in a patient with multiple injuries. B:
Postoperative AP radiograph showing retrograde nailing through the
intercondylar notch of the knee with proximal and distal cross-locking.
C: Lateral radiograph. -
After completion of the nailing,
thoroughly irrigate the knee joint to remove any loose bone, do a
meticulous interrupted closure of the patellar tendon, and close the
subcutaneous fat and skin in a routine fashion.
operative fixation for most diaphyseal femoral fractures, there are
situations in which plate fixation is appropriate (7,47,48,55).
-
Place the patient in the supine or
lateral decubitus position on a radiolucent table. Make a midlateral
longitudinal incision over the fracture, and sharply incise the
iliotibial tract. Beyond this, the exposure is guided by the muscle
disruption and periosteal stripping that are already present. Carefully
clear the major fragment ends of soft tissue and the lateral or
anterolateral surface where the plate will be located. -
Reduce the fracture, typically by means
of traction on the distal fragment. Maintain the anterior bow by
placing a bolster posterior to the femur as distraction is applied.
This can be effectively accomplished by means of a femoral distractor,
as described by Mast (Fig. 20.3).
P.690
If small, comminuted fragments are present, do not strip them in an
attempt to produce an anatomic reduction. Tease them into the best
position possible, but do not worry about fixation. Fix large butterfly
fragments anatomically by means of lag screws. Maintain correct
rotation by using the linea aspera and fracture configuration as a
guide. -
Apply a single, broad plate to the
lateral or anterior surfaces, obtaining eight cortices of fixation in
both proximal and distal fragments, preferably augmented with lag-screw
fixation between the major fragments. Before fixation is completed,
obtain compression if there is good cortical contact by using an
articulated tensioning device. The resulting construct may leave
several plate holes unfilled and some comminuted fragments unreduced,
but it will have correct length and alignment (Fig. 20.10).![]() Figure 20.10. Plate fixation of a femur fracture. A:
Figure 20.10. Plate fixation of a femur fracture. A:
Lateral radiograph showing a comminuted mid-shaft grade IIIC open femur
fracture with an associated transection of the femoral artery. B:
Postoperative AP and lateral radiographs. The artery has been repaired,
and the femur has been fixed with interfragmentary screws and a broad
plate. -
Apply autologous cancellous bone graft
for medial comminution. If graft can be introduced through the fracture
to the medial cortex before final reduction, less stripping of bone is
required. Otherwise, carefully pack graft over the anterior cortex to
rest medially and wherever comminution is extensive. Close the wound in
layers over a suction drain. -
Postoperatively, begin immediate
active-assisted range-of-motion exercises and mobilization identical to
the postoperative program for patients with nailed fractures. Continue
touchdown weight bearing for 6 weeks, and then advance to partial
weight bearing once bridging callus seen on two views has developed.
Begin full weight bearing when the fracture has healed.
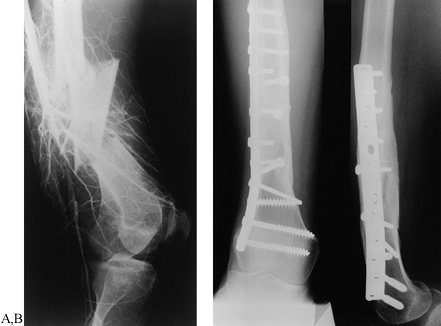
particularly if they engage in a sport or have a vocation in which
heavy stress on the femur or trauma may occur. Usually, we wait at
least 18 months after the time of plating, and remove the plate only if
the bone is solidly healed and the callus has remodeled. (See Chapter 11
for advice on plate removal.) After removal, patients can progress to
full weight bearing with crutches as soon as they can tolerate it, but
they must limit their activities to just walking and nonimpact
activities such as swimming and stationary bicycle until 6 months after
removal to prevent refracture.
-
Although not essential, the use of a
fracture table is quite helpful in the application of external
fixation. An image intensifier speeds up the procedure. Position the
patient and reduce the fracture with traction. It is important to
realize that, although small amounts of angular deformity can be
corrected after the pins have been placed, rotational correction may be
impossible to correct in some fixators. Therefore, the initial
reduction
P.691
should
be as close to perfect as possible and should not be made with the
expectation that the device can later be adjusted to compensate for an
inadequate reduction. -
For an AO or Wagner fixator, use Schanz
pins 6 mm in diameter, for which 4.5 mm holes are drilled in both
cortices. To minimize tie-down of the quadriceps, apply the fixator
laterally. Make a lateral stab wound over the femur at the level of the
lesser trochanter. Carry it down through the deep fascia, then use a
small elevator to slide posterior to the quadriceps and anteriorly to
the lateral intermuscular septum. Elevate a small area on the femur. -
Drill the femur through a drill guide
with a 4.5 mm drill point, and insert a Schanz pin bicortically. Place
the fixator over the pin, adjust the fixator for length and alignment,
and place the second Schanz pin through the distalmost hole of the
fixator or through a guide if one is provided by the manufacturer.
Place this pin at or just proximal to the lateral epicondyle. -
Adjust the fixator, confirm proper
position of the fracture, and insert the two innermost pins. Some
prefer to use three pins in each fragment. -
Achieve final reduction, lock the pin holders, and then apply compression across the fracture if possible.
-
Follow the instructions for pin care outlined in Chapter 11.
Regularly check the tightness of the clamps that secure the pins. Begin
partial weight-bearing and active range-of-motion exercises
immediately. At 8 to 12 weeks, the device may be replaced by a cast
brace if callus has appeared and the fracture location and pattern are
appropriate. Otherwise, the fixator can remain in place until the bony
union is strong enough to eliminate the need for a cast brace, which is
usually at least 4 months after fracture (Fig. 20.11) (26).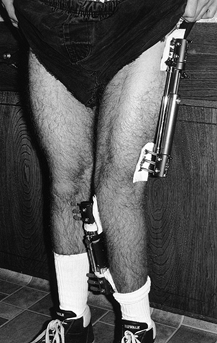 Figure 20.11. Femur and tibial shaft fractures treated in external fixation.
shaft are unusual and pose a difficult treatment problem. Most of these
are intracapsular fractures, with a high shear angle similar to a
Pauwels type III fracture of the femoral neck. However, the fracture
tends to begin distally in the base of the neck and extend across the
neck, exiting in a subcapital location. Many of these are initially
completely undisplaced and therefore are difficult to diagnose. In a
review of the literature, Swiontkowski et al. (71)
noted that in 10 articles on the subject, roughly one third of the
femoral neck fractures reported were not detected initially. Casey and
Chapman (18) postulated that most of the force
in an ipsilateral femoral neck and shaft fracture is dissipated in the
femoral shaft fracture, therefore often resulting in undisplaced or
minimally displaced fractures of the femoral neck, which therefore have
less soft-tissue damage and a much lower incidence of avascular
necrosis of the femoral head than would be expected.
ipsilateral fracture of the femoral neck must be ruled out. Routine
radiographs of the femur must include the hip joint with a good-quality
AP and cross-table lateral views. From a practical viewpoint, many of
these radiographs are taken in the emergency room under duress and do
not give an ideal view of the femoral neck. For that reason, it is
wise, prior to nailing a femoral-shaft fracture, to obtain a
good-quality AP radiograph of the hip while it is in internal rotation,
to throw the neck into full profile, with the patient on the fracture
table and under anesthesia. A good-quality lateral must be taken as
well, which the fracture table optimizes. If you detect a femoral neck
fracture, you may need to alter treatment plans. When nailings are
completed, repeat the radiographs of the hip, because hairline
fractures not seen on initial films may appear after the vigor of a
nailing. Any patient who has unexpected proximal thigh or hip pain in
the postoperative period should have these radiographs repeated because
these fractures may appear even up to 6 weeks later in spite of
good-quality initial films. Computed tomography, magnetic resonance
imaging, and bone scans are more sensitive than
routine
radiographs, but it is not practical and probably not economically
feasible to order one or more of these studies on every patient with a
femoral shaft fracture.
displaced, and is internally fixed in good position, the outcomes are
usually good. Union rates approaching 100% and rates of avascular
necrosis under 15% can be expected (71).
Because of the risk of displacement of these fractures, which worsens
the prognosis, they should be treated as surgical emergencies and
internally fixed as soon as possible. Most are either undisplaced or
can be reduced well on a fracture table with traction and gentle
internal rotation despite an unstable shaft fracture. For that reason,
fixation of the shaft is not always necessary to achieve a satisfactory
reduction of the femoral neck. One can choose between fixation of the
femoral neck or fixation of the shaft first, using independent fixation
or a single device that provides combined fixation of both fractures.
Alternatives for fixation include the following:
-
Combined fixation with a gamma nail or reconstruction type nail
-
Antegrade nailing of the femoral shaft
with a standard nail or the AO “miss a nail,” followed by fixation of
the femoral neck with independent screws in front of the nail (Fig. 20.12)![]() Figure 20.12. Independent fixation of an ipsilateral concomitant fracture of the femoral shaft and neck. A:
Figure 20.12. Independent fixation of an ipsilateral concomitant fracture of the femoral shaft and neck. A:
This basilar femoral neck fracture was not apparent on the initial
radiographs after locked nailing of the femoral shaft fracture. The
fracture subsequently displaced slightly, revealing its presence. The
fracture reduced anatomically with closed reduction. Fixation was
achieved with two cannulated screws placed in front of the
intramedullary nail. B: Lateral
radiograph. If this fracture had been noted at the time of initial
nailing, then fixation with a retrograde nail and independent screw
fixation would have been a better approach. -
Independent fixation of the hip with
multiple screws or a compression hip screw combined with independent
fixation of the femoral shaft with an intercondylar retrograde nail or
a plate -
Other possible combinations

combination can be quite challenging and requires considerable
experience. For surgeons without extensive experience with these
devices and this combination of fractures, independent fixation is
probably easier and more reliable. In undisplaced fractures, multiple
screw fixation, as described in Chapter 19 for the femoral neck, usually works
well. If fractures are displaced, they tend to be much more unstable,
and in young, vigorous individuals, a device such as a sliding
compression hip screw, which provides better purchase on the shaft of
the femur, may be indicated. In most cases, for the femoral shaft I now
recommend a retrograde nail through the intercondylar notch at the
knee, and occasionally plate fixation in select cases.
-
If the femoral shaft will be fixed first,
particularly with an antegrade nail such as a reconstruction nail,
achieve preliminary fixation of the femoral neck fracture with a
suitable-size, smooth Steinmann pin placed from the lateral cortex up
the femoral neck and head along the anterior cortex, where it will not
be in the way of the medullary nail. -
Do not fix fractures in nonanatomic
position, as this significantly increases the risk of nonunion and
failure. In displaced fractures that will not reduce, open the fracture
through a modified Watson-Jones approach to secure fixation in anatomic
position. -
When using independent fixation, try to fix the hip first.
-
When using intramedullary nails, overream
so that the nail can be driven gently, which avoids stressing the
femoral neck fracture.
femoral neck. This may require as long as 6 months, during which time
the patient must not bear more weight than the weight of the leg, using
assistive devices.
of injury or be completely detached from soft tissues at the time of
initial debridement. Remove contaminated free cortical fragments when
debriding open fractures, because they may become infected (Fig. 20.13).
Although shortening of as much as 1.5 cm is usually tolerated, avoid
larger discrepancies and maintain length with an interlocking nail.
Many femurs heal even with a gap of several centimeters, particularly
in patients under 20 years of age. Cortical losses of 3 cm or more are
more likely to not heal. The initial nailing is not definitive and may
be performed using a smaller-diameter nail with little reaming, because
little weight bearing will be permitted. Several weeks after healing of
the soft-tissue envelope, the patient may undergo a bone-grafting
technique described by Chapman (see Chapter 30) (Fig. 20.13).
Remove the initial nail and ream the canal to accept a larger nail of
appropriate diameter. Using a chest tube, pass a slurry of iliac crest
cancellous graft and reamings down the medullary canal into the
fracture site, followed by placement of a new statically locked nail.
The graft incorporates over several months, after which time weight
bearing is progressively increased. Another alternative is a
microvascularized fibula (40).
 |
|
Figure 20.13. A:
A grade III open fracture of the femur with approximately 10 cm of cortical loss at the scene of injury. The fracture was initially irrigated, debrided, and stabilized with a narrow-diameter, statically locked medullary nail. Local wound care consisted of dressing changes, with uneventful healing of the soft-tissue envelope. B: At 1 month from injury, the original nail was removed and the canal reamed to accept a 15 mm, statically locked nail. Simultaneously, a large amount of cancellous bone was harvested from the iliac crest and introduced into the fracture gap through a chest tube, using a technique described by Chapman (22). C: At 1 month from grafting, early callus can be seen forming across the fracture site. D: At 3 months from grafting, further callus formation is evident. E: At 15 months from fracture, the femur has completely reconstituted and hardware has been removed. |
nails and current methods for irrigation and debridement of open
fractures, the results in fractures of the shaft of the femur are truly
remarkable. In closed fractures utilizing closed intramedullary
techniques with reamed nails, reported union rates are from 98% to
100%, with infection rates only from 0% to 1% (4,6,12,17). In low-grade open fractures, Gustilo I through IIIA, comparable results are achievable (3). In grade IIIB open fractures, the infection rate after initial nailing approaches 11% (10). Therefore, a more sanguine and cautious approach is indicated for severe open fractures.
femur include malunion, nonunion, hardware breakage, infection,
neurovascular injury, avascular necrosis of the femoral head,
heterotopic ossification at the hip, and loss of joint motion.
vast majority of cases. Varus or valgus malunion is most common in high
subtrochanteric fractures, where varus is most commonly the result of
an eccentric entry point, which, when combined with a large medial bone
deficiency, results in loss of position of the proximal fragment during
the nailing. Be certain that the entry site is correct. In some cases,
it may be necessary to insert a Schanz pin into the proximal fragment
to control it during nailing, or to open the fracture to reduce and
stabilize it directly. In supracondylar fractures nailed in the lateral
position, valgus may occur because of the angulation induced by gravity
on the fracture, and recurvatum at the fracture can occur in the supine
position. Keeping the guide pin centralized, and controlling the distal
fragment as the nail is driven down into it, will usually prevent these
problems. Control with a Schanz pin on a T-handle or opening the
fracture may occasionally be necessary. Shortening most commonly occurs
when there is significant comminution, which makes judgment of length
difficult. Follow the recommendations in the section on “Selecting and Driving the Intramedullary Nail” to avoid leg-length discrepancy.
Preoperative evaluation of the range of motion of the opposite hip and
attention to the angle of progression of the
foot
when the patient is lying in the supine position on the operating table
often provides good guidelines as to how the rotational alignment of
the fractured limb should be set. Yang et al. (80)
recommend preoperative evaluation of the anteversion angle of the
intact femur to provide more accurate assessment of rotation. With the
advent of nonreamed small locked intramedullary nails, torsional
distortion of these nails has been a new and unexpected cause of
rotational deformity. This can be avoided by using stiffer nonreamed or
larger reamed nails (41). Careful postoperative
examination of the patient on the operating table usually reveals any
deformity, particularly in rotation. Plan to correct this at the time
of the initial surgery rather than having to bring the patient back for
repeat surgery or reconstructive surgery.
For the most part, nonunions occur in open fractures or in those with
significant comminution or segmental bone loss, particularly if they
are treated with small nonreamed nails. Any distraction in the fracture
site, despite the tremendous healing capability of the femur, can also
lead to nonunion. In segmental bone loss, early bone grafting, either
open or with closed intramedullary technique, is indicated as soon as
the soft-tissue envelope has recovered. In open fractures or where
nonreamed nails were used, when no callus has formed by 12 weeks after
injury, consider conversion to a large reamed locked nail. In delayed
unions or nonunions where the problem seems to be distraction in the
fracture site, dynamization may be sufficient if rotational stability
will be maintained. Otherwise, exchange reamed locked nailing and
compression are best.
nails that use small screws, and late in larger reamed nails when the
patient has continued to bear weight in the face of a nonunion. Removal
of the side of a screw where the screw head is, presents little
problem. Removal of the opposite segment of the screw may require an
independent medial approach and, occasionally, overreaming of the
screw. Removal of the proximal end of the nail with the extractor
presents few problems. Removal of the remainder of a cannulated nail
can be done in many ways, but I find that inserting a ball-tipped guide
pin through the tip of the nail and then jamming it with a
non-ball-tipped guide pin and extracting the nail with a T-handle on
the ball-tipped guide pin usually works best.
occurring within a few weeks after nailing, where the nail is stable
and there is no involvement of the medullary canal, may respond to
simple irrigation and debridement of the wound, delayed primary
closure, and intravenous antibiotics. When the medullary canal is
involved, particularly with more difficult or resistant organisms, nail
removal, debridement of the infected wound and medullary canal by
reaming, intravenous antibiotics, and placement of
antibiotic-impregnated beads into the medullary canal are usually
required. Stability can be maintained by either longitudinal traction,
if early renailing is anticipated, or external fixation. If the patient
responds quickly to antibiotics, then early renailing after resolution
of the infection may be possible. Otherwise, the fracture may need to
be managed definitively in an external fixator (see Chapter 135).
lower extremity can be avoided by using appropriate positioning and
padding. Pudendal nerve palsy is correlated with excessive traction;
you can minimize it by using a large, well-padded perineal post and
minimizing the amount and duration of traction used for intramedullary
nailing on a fracture table (9). Sciatic nerve
palsies usually present as a total common peroneal nerve palsy and
partial posterior tibial nerve palsy. Although direct surgical injury
of a nerve in the incision in antegrade nailing is possible, it is
exceedingly rare. In very small individuals, especially when the hip is
flexed 20° or more, the sciatic nerve may drift quite close to the
trochanter. If there is any question about the location of the sciatic
nerve, lengthen the wound and explore it before placing sharp
instruments for entering the proximal femur. In most cases, sciatic
nerve paresis is caused by a combination of traction and excessive
flexion of the hip with the knee in extension. Avoid this problem by
never putting the foot into a traction stirrup but rather applying
traction through a proximal tibial or distal femoral pin, allowing the
knee to flex freely to accommodate for stretch on the sciatic nerve.
antegrade femoral nailing is exceedingly rare but has been reported. It
is most likely caused by interruption of the blood supply to the
femoral head as a result of encroachment of the nail entry onto the
superior aspect of the femoral neck (2). Avoid
this complication by avoiding reamed nails in very small patients or in
children with open physes. If antegrade nailing is indicated, use of
flexible nails such as the Ender nail through the tip of the trochanter
provides a good alternative.
found an incidence of 26% of heterotopic ossification. They found that
irrigation with pulsatile lavage did not affect either this incidence
or the severity. Notably, the nail used in their study had an open top
that would permit the ooze of marrow contents into the hip region
postoperatively. It is rare that this heterotopic ossification is
sufficient to be symptomatic, but it is a significant impediment to
nail removal, and infiltration into the gluteus medius musculature can
result in significant damage to the muscle at the time of attempted
removal of the ossification or of a medullary nail. It has been my
experience that heterotopic ossification can be minimized by the
following:
-
Taking care to carefully protect the
gluteus maximus and medius as well as other soft tissues about the hip
during antegrade nailing -
Thoroughly irrigating and debriding the
wound at the terminus of the procedure, to remove any marrow contents
or bone that might predispose to heterotopic ossification -
Using an intramedullary nail that has a
cap screw that closes the nail off and prevents retrograde oozing of
marrow contents postoperatively. If the heterotopic ossification is
symptomatic, the treatment is removal of it after it has matured, which
is usually at least 1 year after injury.
the hip and knee after fractures of the shaft of the femur is uncommon
unless there is concomitant ipsilateral injury of these two joints. It
is important, however, to institute an early range-of-motion and
muscle-strengthening program because neglect of rehabilitation can lead
to stiffness and persistent weakness. A particular problem is weakness
of the abductors in antegrade nailing, apparently due to the traumatic
effect of the nailing on the gluteus medius and maximus muscles as well
as a tendency to neglect those muscles during rehabilitation. Always
include abductor strengthening exercises in the rehabilitation program.
above the lesser trochanter to 2.5 cm proximal to the lateral
epicondyle, and in both closed and open fractures grades I through
IIIA, my preferred treatment is reamed locked nailing with an Alta
titanium intramedullary nail—using an 11 mm nail in women and a 12 mm
nail in men—which provides two transverse cross-locking screws
proximally and distally. For routine diaphyseal fractures, I place two
proximal transverse cross-locking screws proximally and distally, with
two proximal transverse cross-locking screws at the level of the lesser
trochanter.
proximally, up to 1 cm proximal to the tip of the greater trochanter,
and cross-lock into the femoral neck. In grade IIIB open fractures,
when I feel that initial intramedullary nailing is the best approach, I
use a nonreamed nail, planning conversion to a reamed nail as soon as
the risk of infection has passed and the soft-tissue envelope has
recovered. When I believe the risk of infection is too high, I use
external fixation.
of the knee, I prefer to use a standard Alta nail rather than a special
retrograde nail, and I always try to use a nail 10 mm or larger so that
the largest transverse cross-locking screws can be used. This is now my
treatment of choice for patients with severe multiple injuries in whom
rapid atraumatic fixation of the fracture in the supine position on a
regular radiolucent table is necessary. I also prefer this technique
for fixation of shaft fractures below a femoral neck fracture, using
independent fixation of the femoral neck with either multiple screws or
a sliding compression hip screw, depending on the configuration of the
fracture. I rarely plate a diaphyseal fracture of the femur, reserving
this technique for patients in whom the configuration of the femur or
absence of a medullary canal precludes intramedullary nailing, or in
whom a vascular repair has been done that is least threatened by plate
fixation as opposed to nailing. I reserve single-plane half-pin
external fixation for grade IIIB (and higher) open fractures and the
occasional polytrauma patient in whom retrograde nailing is not
possible.
The overall prevalence is between 0.1% and 1.1% of total hip
prostheses. Periprosthetic fractures can occur acutely at the time of
initial implantation of the prosthesis or later. Factors that
predispose to periprosthetic fractures include the following:
-
Intraoperative creation of cracks, defects, or windows in the bone that are not bypassed with a stem of sufficient length
-
Extravasation of cement out of bone defects that results in an unhealed stress riser
-
Severe cortical erosion from a loose femoral component
-
Hip surgery prior to prosthetic replacement, because of weakening of the bone or because of holes left from previous implants
osteoporosis who have had total joint replacement of the hip or knee.
Because the bone is weak, and on one side of the fracture the medullary
canal is occupied by the prosthesis, internal fixation becomes a major
challenge. Many surgeons have recommended nonoperative treatment for
these fractures, but experience has shown that nonoperative treatment
leads to a high rate of local and systemic complications (38).
Local complications include fracture nonunion, femoral shortening,
femoral deformity, and prosthetic loosening. These complications
require major secondary surgery for correction. Prolonged bed rest and
immobilization can produce life-threatening complications. These risks
for nonoperative treatment, combined with the high likelihood of the
need for future revision arthroplasty, have led to a recommendation of
internal fixation for all displaced fractures associated with femoral
prostheses, whenever clinically possible.
femoral prosthesis can be classified on the basis of type and location
of prosthesis, the type and configuration of fracture line, and the
status of prosthesis fixation (i.e., whether it is stable or loose).
hip usually occur at the femoral neck just distal to the prosthesis.
Treat by converting the surface replacement to a standard total hip
replacement arthroplasty. In the unusual case in which a fracture
occurs at or distal to the intertrochanteric region, you may treat it
by the usual operative methods for similar fractures not associated with a prosthesis.
subdivided into those in which the femoral stem and cement, or the stem
alone occupies the entire medullary canal, and those in which the
femoral stem occupies only a portion of the medullary canal. In
fractures in which the entire medullary canal is filled with a
prosthetic stem, with or without cement, placement of a new prosthesis
with a longer stem provides intramedullary fixation (Fig. 20.14). An alternative method is to fix the fracture with a plate, supplemented with bone grafting (Fig. 20.15, Fig. 20.16).
Secure the plate with bicortical screws in the femur distal to the
prosthesis, and with unicortical or tangential screws proximally where
the medullary canal is filled by the prosthetic stem (Fig. 20.16). Another method of securing the plate proximally is to use cerclage wires or cable systems (Fig. 20.17).
If an uncemented stem occupies only a portion of the femoral canal, it
is sometimes possible to gain adequate fixation by passing small
flexible intramedullary rods, such as Ender or Rush rods, across the
fracture site and into the medullary canal adjacent to the prosthetic
stem (Fig. 20.18).
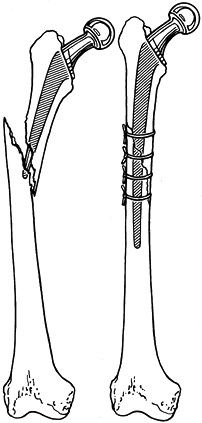 |
|
Figure 20.14. Use of a long-stemmed femoral prosthesis and cerclage wires to hold the reduction of a long oblique fracture.
|
 |
|
Figure 20.15. Plate and screw fixation of a fracture at the tip of a proximal femoral prosthesis.
|
 |
|
Figure 20.16.
Three possible methods of plate and screw placement to be used if the intramedullary stem prevents central bicortical screw placement. The goal is to obtain a solid purchase on eight cortices on each side of the fracture. |
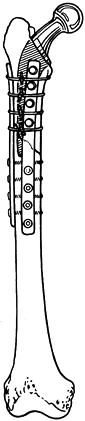 |
|
Figure 20.17. Use of cerclage wires to secure fixation of a plate to the proximal femur segment.
|
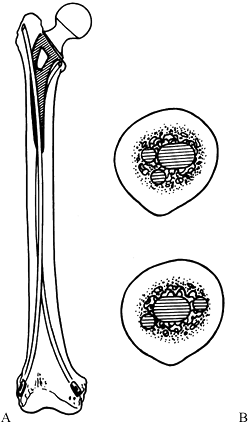 |
|
Figure 20.18. A:
Flexible small intramedullary rods are used to internally fix fractures of the femoral shaft distal to the tip of an uncemented proximal femoral prosthesis that fills the entire canal. B: Possible intramedullary placement if the prosthesis stem is not cemented and does not fill the entire canal. |
femoral prosthesis associated with knee replacement arthroplasty;
distal femoral surface replacement without a stem; cemented distal
femoral replacement with an intramedullary stem; and uncemented distal
femoral replacement with an intramedullary stem. Fractures of the
distal femur just proximal to a total knee replacement are most often
associated
with
anterior notching of the femur caused by poor placement of the cutting
guides during total knee arthroplasty. The notching causes weakening of
the femur just above the prosthesis, and delayed fracture propagating
from the stress riser is not an uncommon complication.
stem are essentially surface replacement prostheses. In fractures that
occur proximal to a nonstemmed prosthesis, alternatives include a
condylar blade plate or compression screw with side plate screws (Fig. 20.19), retrograde nails (Fig. 20.20), and antegrade nails (Fig. 20.21).
In fractures associated with a distal femoral prosthesis that has an
intramedullary stem, a revision can be done using a longer stem (Fig. 20.22) or a plate-and-screw fixation with tangential placement of the screws to avoid the stem.
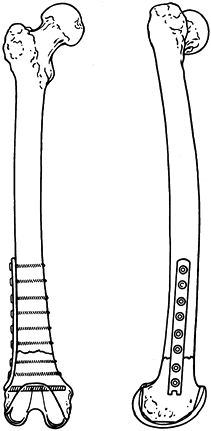 |
|
Figure 20.19. Blade plate and screw fixation above a distal femoral surface replacement.
|
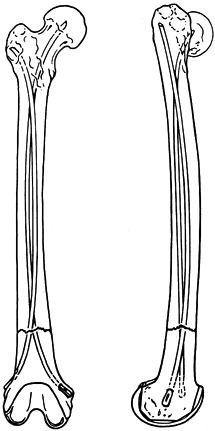 |
|
Figure 20.20. Ender or Rush rod fixation above a distal femoral surface replacement.
|
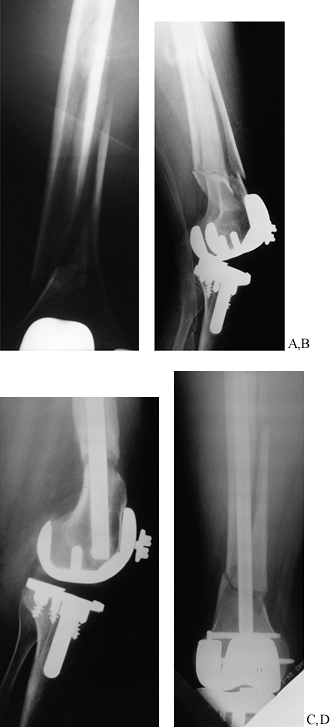 |
|
Figure 20.21. Antegrade closed nail fixation of a supracondylar fracture of the femur proximal to a total knee prosthesis. A: Preoperative AP radiograph showing the fracture. B: Preoperative lateral radiograph. C:
Postoperative lateral radiograph showing fixation with an antegrade Alta nail whose tip was cut off to allow more distal placement. D: AP radiograph. |
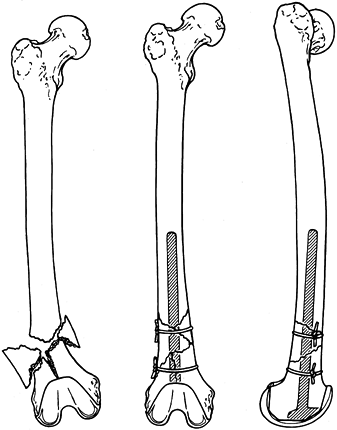 |
|
Figure 20.22.
A custom long-stemmed distal femoral component used to internally fix a comminuted distal femoral fracture above a short-stemmed distal femoral prosthesis. |
femoral prostheses are transverse or short oblique fractures at, or
proximal to, the tip of the femoral stem
[Johansson type I (38)].
Long oblique or spiral fractures in this location are less common. The
fractures usually result from trauma at a stress riser created by the
transition between the stiff one-prosthesis segment and adjacent, less
stiff bone. If the fracture is transverse or short oblique, there is a
high risk of displacement, shortening, and nonunion. Internal fixation
is recommended. If the fracture has a spiral or long oblique course,
displacement may be minimal, and if there is no associated loosening of
the prosthesis, treatment can be nonoperative, consisting of traction
followed by fracture bracing and crutches.
of the prosthesis must be loose. Johansson type II fractures occur
around the prosthesis and extend to beyond the distal tip of the
prosthesis with dislodgement of the stem from the distal canal. The
prosthesis may have been loose before injury, or the fracture itself
may break the prosthesis from its fixation to the surrounding bone. In
these situations, the fracture must be reduced and internally fixed,
and the prosthesis must be revised (Fig. 20.23).
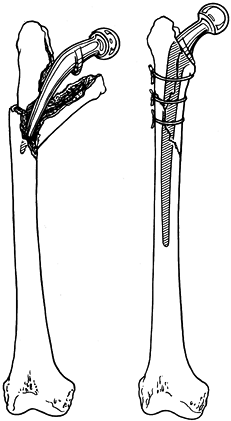 |
|
Figure 20.23. Use of a long-stemmed proximal femoral prosthesis with cerclage wires to contain fragments around the stem.
|
(Johansson type III) may be treated by plate fixation. However, the
interval of bone between the end of the plate and the tip of the
prosthetic stem is subject to high stresses and is a potential site of
future fracture.
aim fracture management at reestablishing bony alignment and achieving
union. If the prosthesis is loose, fracture fixation is necessary, and
the prosthesis must be reimplanted with a longer stem and recemented
or, if a porous-coated long-stemmed prosthesis is used, bone-grafted.
Frequently, cerclage wires or cables are required to “gather in” bone
fragments or to oppose oblique fractures around the prosthesis (Fig. 20.23). Chandler and Tigges (21)
recommend reinforcing the fracture site with allograft when a proximal
femoral fracture occurs at or distal to a well-fixed femoral stem, or
proximal to a well-fixed knee replacement. They recommend the following
technique.
-
Expose the fracture, reduce it anatomically, and temporarily stabilize it with cerclage wires or cables (Fig. 20.24A, Fig. 20.24B).
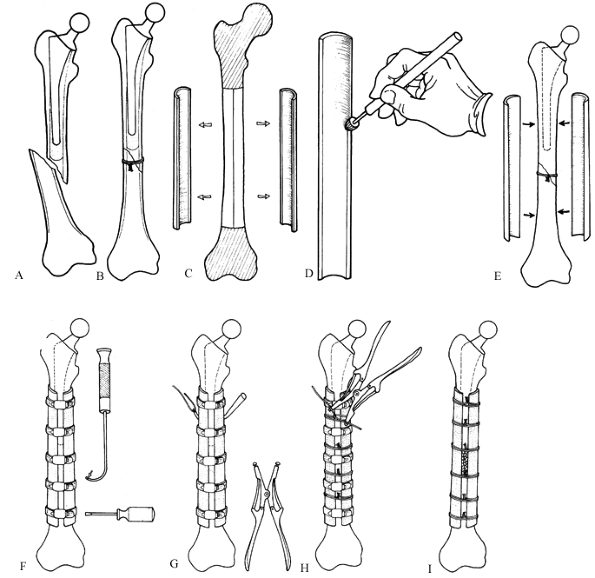 Figure 20.24. Allograft strut treatment for a proximal femoral fracture at the end of a prosthesis. A: Fracture of the femoral shaft just distal to the stem of a prosthesis. B: The fracture has been reduced and temporarily fixed. C: An allograft split into two equal pieces. D: Machining the endosteal surface of a graft. E: Placement of the two grafts on the femur. F: Use of hose clamps to secure the allografts to the femur. G: Passing the cerclage wires around the struts. H: Tightening the wires. I:
The hose clamps have been removed, and the autologous graft has been
applied. (Reproduced with permission from Chandler HP, Tigges RG. The
Role of Allografts in the Treatment of Periprosthetic Femoral
Fractures. In: Cannon WD, ed. Instructional Course Lectures, Vol. 47. Rosemont, IL: American Academy of Orthopaedic Surgeons, 1998.) -
Obtain an allograft femoral or tibial
shaft of appropriate size, harvest the diaphyseal portion, and split it
into two equal medial and lateral shells in the sagittal plane to
provide biological bone plates. Fresh frozen allografts are preferred,
but freeze-dried allografts are also thought to be effective (Fig. 20.24C). -
Machine the endosteal inside surfaces of
the grafts with a high-speed burr to conform them to the outside
contours of the recipient femur (Fig. 20.24D). -
Place these on the medial and lateral
sides of the femur, preserving the soft-tissue attachments to the linea
aspera, which contain the extraosseous blood supply to the femur. Make
the struts long enough to extend at least 10 cm beyond the fracture
both proximally and distally (Fig. 20.24E). -
Apply the allograft struts to the fracture, and compress them into place with commercial hose clamps (Fig. 20.24F).
-
With a wire passer, pass double #16 stainless-steel cerclage wires around the struts at 2–4 cm intervals (Fig. 20.24G).
-
Tighten the wires with a Harris wire tightener (Johnson & Johnson, Raynham, MA) (Fig. 20.24H). When the allograft has been secured with the wires, remove the hose clamps.
-
Graft the fracture with autologous cancellous bone from the iliac crest to hasten healing (Fig. 20.24I).
or proximal to a well-fixed knee replacement, Chandler and Tigges (21)
recommend retrograde intramedullary nails—assuming that the knee
prosthesis permits insertion of the nail, and recognizing that in total
hip replacement there is the potential for a stress riser between the
proximal end of the medullary nail and the distal end of the stem of
the prosthesis (21,56,65,70).
Pack autologous cancellous bone around the fracture site. However,
comminution and the osteopenic bone frequently found in this group of
patients result in poor screw fixation. To circumvent this problem,
harvest an allograft from either a tibia or a femur (probably better
from a comparable femur). Chandler and Tigges (21)
back up the plate on the opposite cortex with an allograft strut
harvested from the identical location on the allograft femur so that
the strut fits the host femur accurately (Fig. 20.25, Fig. 20.26). Their technique includes the following.
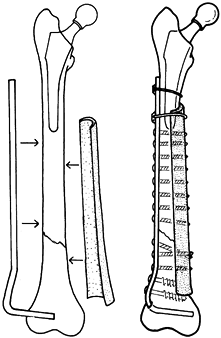 |
|
Figure 20.25.
An allograft shell placed on the opposite cortex to reinforce the fixation and provide a structural bone graft. (From Chandler HP, Tigges RG. The Role of Allografts in the Treatment of Periprosthetic Femoral Fractures. J Bone Joint Surg Am 1997;79:1422.) |
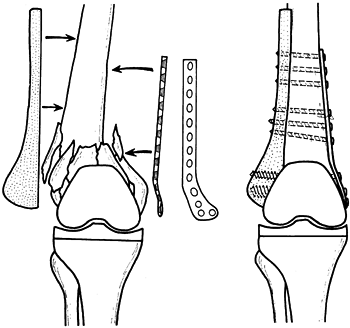 |
|
Figure 20.26.
The use of an allograft in combination with a buttress plate to reconstruct a comminuted supracondylar fracture of the femur immediately above a total knee prosthesis in an elderly patient whose bone quality precluded effective fixation with the screws. |
-
Expose the distal femur and total knee through a medial parapatellar incision.
-
Reduce the fracture, and temporarily hold
it reduced with cerclage wires or a K-wire while the plate is fitted to
one cortex and the allograft strut to the opposite cortex. -
Stabilize the plate and strut to the host
femur with cerclage cables or wires in the area of an intramedullary
stem, and use screws elsewhere (Fig. 20.17).
-
Type A: Trochanteric fractures
-
Type B: Fractures about the stem or tip
-
B1: Well-fixed stem
-
B2: Loose stem
-
B3: Associated bony deficiency or destruction
-
-
Type C: Fractures distal to the tip
-
Type A. Treat simple avulsion fractures
of the greater or lesser trochanter in the presence of a well-fixed
stem nonoperatively. For severe periprosthetic osteolysis, replace the
component that is the source of the microparticles. -
Type B1. These usually can be treated with internal fixation.
-
Type B2. Revise the loose component.
-
Type B3. Revise the component.
-
Type C. Internal fixation usually suffices.
emphasize that in all types of fractures associated with a loose
femoral component, the best treatment is revision unless medical
problems or advanced age contraindicates this extensive surgery.
long and difficult surgical cases requiring excellent support and
careful preoperative planning. If possible, have autogenous blood and a
cell saver available. A laminar flow unit or ultraviolet radiation may
reduce the infection rate.
-
Expose the proximal femur according to
your preference. If the proximal femoral prosthesis is to be revised,
trochanteric osteotomy greatly facilitates exposure and removal of the
prosthesis and cement. Extend the exposure distally to expose the
femoral shaft and the full extent of the fracture. This facilitates
fracture reduction, fixation, cementing, packing of bone graft, and
passage of the prosthetic stem across the fracture under direct vision. -
Occasionally, longitudinal splitting of
the proximal fragment by the fracture at the time of surgery can prove
to be an advantage, and by opening the proximal femoral segment “like a
book,” you can easily remove the prosthesis and cement. Repair the
split proximal fragment with cerclage wires or cables. -
It is best to approach distal femoral
prostheses associated with fractures by the anteromedial parapatellar
incision if the prosthesis is to be revised. If the prosthesis is tight
and there is enough bone stock proximal to the prosthesis to use
standard means of internal fixation, you may use lateral or combined
medial and lateral incisions over the distal femur for a blade plate or
condylar medullary rods. -
Occasionally, fractures proximal to a
total knee prosthesis can be managed by closed reduction on a fracture
table and either antegrade or retrograde fixation with a locked
medullary nail, utilizing closed technique (Fig. 20.20, Fig. 20.21). -
Since the procedure to replace the
femoral prosthesis in the presence of a fracture is essentially a
revision, the technique is very similar to revision arthroplasty, with
the exception of needing to address the fracture. The technical details
of revision arthroplasty for the hip are addressed in Chapter 106, and those for the fracture about the total knee, in Chapter 109. Specifics about the fixation have already been addressed in the preceding descriptions.
-
In revision arthroplasty when
intramedullary stem fixation alone may be adequate, custom prostheses
can be ordered that have cross holes in the distal stem through which
transverse cross-locking screws can be inserted. The only disadvantage
of this approach is that it creates a stress riser at the location of
the prosthesis for both the bone and the prosthesis. -
For combining cable fixation and plates,
special designs are now available in which the cable is accommodated by
modifications or additions to the plate, resulting in more secure
fixation than is provided by wrapping a cable around a standard plate. -
In repeat surgery of this type, and when
a loose prosthesis is present, infection is increased. Hold off on
preoperative antibiotics until cultures and specimens from the
prosthesis bed and fracture have been submitted to pathology. Then
administer appropriate bactericidal intravenous antibiotics, and
continue them until the cultures are reported to be negative. Positive
cultures require appropriate long-term intravenous antibiotic therapy.
that the patient can be out of bed and ambulatory by the 4th or 5th
postoperative day. In patients with good bone stock and strong
intramedullary fixation, weight bearing can progress as with any
fracture fixed with an intramedullary device. For patients who have had
a trochanteric osteotomy and reattachment, use at least 6 weeks of
touchdown weight bearing to avoid displacement of the trochanter. If
the femoral prosthesis has been exchanged, the usual postoperative
precautions associated with joint replacement to prevent dislocation
and other complications are necessary.
on 35 patients with 37 periprosthetic fractures following total hip
replacement after a follow up averaging 3.9 years (range, 2–9 years).
Their
results
were dismal, with unsatisfactory outcomes in 22 fractures (59%). The
most common problem was prosthetic loosening, which occurred in ten,
followed by malunion with loosening in three, nonunion in three,
massive heterotopic bone in one, infection in three, and two
unsatisfactory outcomes in primary Girdlestone resections. Seven
immediate postoperative fractures that were treated in traction all had
unsatisfactory results. Johansson et al. had a total of 30
complications (60%) in their 22 patients. Improvement in techniques to
handle these difficult problems have shown markedly improved results.
Chandler et al. (20)
in 1993 achieved anatomic union in 100% of periprosthetic fractures
treated with their technique of onlay grafting, with all returning to
their functional status prior to fracture. In a later report in 1996 (19), using the combination of a metal plate and an allograft strut, they achieved anatomic union in 21 of 22 patients.
analyzed outcomes in revision total hip arthroplasty for 97
postoperative periprosthetic femoral fractures in 94 patients, with an
average followup of 5 years (range, 2–14 years). Eighty-five percent of
the fractures healed, but stable long-term fixation of the femoral stem
was achieved in less then 50% of the hips. Overall, 20% had only
minimal symptoms in spite of the radiographic evidence of loosening;
however, 33% had loosening with severe pain. Use of a proximally
porosis-coated implant without cement was associated with the poorest
results. An important observation in their series was the occurrence of
a spontaneous fracture, in the absence of a traumatic event, in more
the 50% of their patients who had Vancouver type B3 fractures in which
the bone loss and comminution were severe. This points out that a
periprosthetic fracture is a very serious occurrence in the typical
elderly patient with a total hip or total knee arthroplasty. Although
nonoperative care for minimally displaced acute periprosthetic
fractures in traction has reasonably good outcomes, nearly all of these
require major surgery, with significant risks and a high rate of
complications. Although much progress has been made toward solving this
problem in the last 20 years, more is needed.
with femoral prostheses usually stem from difficulties of cement and
prosthesis removal or inadequate preoperative planning. A variety of
prosthetic alternatives, including cemented and uncemented devices of
various stem sizes and lengths, must be available to deal with
unexpected technical problems.
intramedullary reamers and curets for removal of cement. It is
important to know the techniques for removal of broken hardware from
the medullary canal, including the use of an image intensifier, to
avoid cortical perforation during reaming. Preoperative planning should
include careful silhouetting of the femur and fracture with appropriate
templates to determine prosthesis size and to match components for the
revision. Appropriate plates, screws, and intramedullary rods must be
available. It is not uncommon to change techniques from those planned
because of intraoperative findings at the time of surgery. Multiple
options must be open to achieve optimal fixation.
inadequate prosthetic fixation or refracture. If cement fixation is
insufficient, the prosthesis will become loose, particularly in
patients in whom the original prosthesis loosened because of
periprosthetic cortical lysis. In patients in whom a prosthesis is left
in place and plates and screws or cerclage techniques are used to
stabilize the fracture, fixation is always less then ideal. Take care
to delay weight bearing until the fracture has united, because
excessive and premature weight bearing may lead to loss of fixation,
displacement, and nonunion, requiring reoperation. Patients who have a
stress riser between the end of the prosthesis and an adjacent plate
are always at risk of refracture and must be cautioned to avoid trauma
to the leg.
Sigvard T. Hansen, Jr., and David W. Lhowe. Portions of their original,
excellent chapter are included here.
scheme: *, classic article; #, review article; !, basic research
article; and +, clinical results/outcome study.
DJ, Wilber JH Scoles PV. Avascular Necrosis of the Capital Femoral
Epiphysis after Intramedullary Nailing for a Fracture of the Femoral
Shaft. A Case Report. J Bone Joint Surg Am 1995;77:1092.
F Sr, Baixauli EJ, Sanchez-Alepuz E, Baixauli F Jr. Interlocked
Intramedullary Nailing for Treatment of Open Femoral Shaft Fractures. Clin Orthop 1998;350:67.
O, Varjonen L, Vainionpaa S, et al. Incidence of Local Complications
after Intramedullary Nailing and after Plate Fixation of the Femoral
Shaft Fractures. J Trauma 1989;29:639.
RJ, Reilly JP, Poka A, et al. Intramedullary Nailing of Femoral Shaft
Fractures. Part I: Decision-making Errors with Interlocking Fixation. J Bone Joint Surg Am 1988;70:1441.
RJ, Uwagie-Ero S, Lakatos RP, et al. Intramedullary Nailing of Femoral
Shaft Fractures. Part II: Fracture-healing with Static Interlocking
Fixation. J Bone Joint Surg Am 1988;70:1452.
RJ, Wells JD, Lakatos R, et al. Heterotopic Ossification about the Hip
after Intramedullary Nailing for Fractures of the Femur. J Bone Joint Surg Am 1990;72:1067.
RW, Ross RW, Lawrence KL. Fatigue Fracture of the Interlocking Nail in
the Treatment of Fractures of the Distal Part of the Femoral Shaft. J Bone Joint Surg Am 1987;69:1391.
MS, Brumback RJ, Ellison TS, et al. Interlocking Intramedullary Nailing
for Ipsilateral Fractures of the Femoral Shaft and Distal Part of the
Femur. J Bone Joint Surg Am 1991;73:1492.
HP, Danylchuk K. Treatment of Distal Femoral Fractures Proximal to a
Total Knee Replacement or Distal to the Stem of a Total Hip Replacement
in Osteopenic Patients. Presented as a poster exhibit at the annual
meeting of the American Academy of Orthopaedic Surgeons, Atlanta,
Georgia, February 25, 1996.
HP, King D, Limbird R, et al. The Use of Cortical Allograft Struts for
Fixation of Fractures Associated with Well-fixed Total Joint
Prostheses. Semin Arthroplasty 1993;4:99.
HP, Tigges RG. The Role of Allografts in the Treatment of
Periprosthetic Femoral Fractures. An Instructional Course Lecture. J Bone Joint Surg Am 1997;79:1422.
AW, Schemitsch EH, Richards RR. Femoral and Cruciate Blood Flow after
Retrograde Femoral Reaming: A Canine Study Using Laser Doppler
Flowmetry. J Orthop Trauma 1998;12:253.
RE, Paiement GD, Green HD, Coughlin RR. Treatment of Supracondylar
Femoral Fractures with a Retrograde Intramedullary Nail. Clin Orthop 1996;332:90.
CJ, Lindsey RW, Noble PC, et al. Optimal Location of a Single Distal
Interlocking Screw in Intramedullary Nailing of Distal Third Femoral
Shaft Fractures. J Orthop Trauma 1998;12:267.
P, DiCicco J, Karpik K, et al. Ipsilateral Fractures of the Femur and
Tibia: Treatment with Retrograde Femoral Nailing and Unreamed Tibial
Nailing. J Orthop Trauma 1996;10:309.
PD, Bicknell HR Jr, Bronson WE, et al. The Use of One Compared with Two
Distal Screws in the Treatment of Femoral Shaft Fractures with
Interlocking Intramedullary Nailing: A Clinical and Biomechanical
Analysis. J Bone Joint Surg Am 1993;75:519.
HMJ, Stockman B, Van Damme G, et al. The Retrograde Intramedullary
Nail: Prospective Experience in Patients Older Than Sixty-five Years. J Orthop Trauma 1998;12:330.
KD, Tencer AF, Blumenthal S, et al. Biomechanical Performance of Locked
Intramedullary Nails in Comminuted Femoral Shaft Fractures. Clin Orthop 1986;206:151.
RF, Schaffhausen JM, Bechtold JE. Biomechanical Characteristics of
Interlocking Femoral Nails in the Treatment of Complex Femoral
Fractures. Clin Orthop 1991;267:169.
SE, Seligson D, Henry SL. Intramedullary Supracondylar Nailing of
Femoral Fractures. A Preliminary Report of the GSH Supracondylar Nail. Clin Orthop 1993;296:200.
GJ, Robinson CM, Singer BR, Christie J. Results of an Operative Policy
in the Treatment of Periprosthetic Femoral Fracture. J Orthop Trauma 1997;11:170.
BR, Watson JT. Retrograde Intramedullary Nailing, without Reaming, of
Fractures of the Femoral Shaft in Multiply Injured Patients. J Bone Joint Surg Am 1995;77:1520.
GA, Nunley JA. Interlocked Supracondylar Intramedullary Nails for
Supracondylar Fractures after Total Knee Arthroplasty. A New Treatment
Method. J Arthroplasty 1995;10:37.
J, Tornetta P III, Ritter C, Geller J. Neurologic and Vascular
Structures at Risk during Anterior-posterior Locking of Retrograde
Femoral Nails. J Orthop Trauma 1998;12:379.
AG, Rodriguez AJ, Mino GL, Sanmartin RM. Treatment of the Femoral and
Tibial Fractures with Grosse and Kempf Locking Nails. Clin Orthop 1992;283:86.
WJ, Martin SL, Mabrey JD. Use of Supracondylar Nail for Treatment of a
Supracondylar Fracture of the Femur following Total Knee Arthroplasty. J Arthroplasty 1996;11:210.
P III, Tiburzi D. The Treatment of Femoral Shaft Fractures Using
Intramedullary Interlocked Nails with and without Intramedullary
Reaming: A Preliminary Report. J Orthop Trauma 1997;11:89.
PR, McCarty EC, Shyr Y, Johnson KD. Length of Operative Procedures:
Reamed Femoral Intramedullary Nailing Performed with and without a
Fractures Table. J Orthop Trauma 1998;12:485.