Cole & Sekiya: Surgical Techniques of the Shoulder, Elbow and Knee in Sports Medicine, 1st ed.
Copyright ©
2008 Saunders, An Imprint of Elsevier
CHAPTER 56 – Osteochondral Allografting in the Knee
Andreas H. Gomoll, MD,
Brian J. Cole, MD, MBA
Osteochondral allografting in the knee has been used for more than 20 years to reconstruct osteochondral defects resulting from trauma, malignant disease, and developmental disorders. In current practice, osteochondral allografts are most commonly used for the treatment of symptomatic osteochondritis dissecans and other chondral lesions that have failed primary treatment, such as internal fixation of osteochondritis dissecans fragments, marrow stimulation, mosaicplasty, and autologous chondrocyte implantation. Increasingly, allografts are now also being used as the primary treatment in situations in which other restorative procedures have demonstrated limited success, such as in the very large or uncontained defect and in the older population of patients. Initially limited by the low number of available grafts, fresh allograft tissue is becoming increasingly available as a result of improved harvesting and storage protocols, but the supply is still outpaced by a rapidly increasing demand.
Osteochondral allografting is indicated in two distinctive populations: those with a history of osteochondritis dissecans and those with chondral defects of other, often traumatic causes. Patients with osteochondritis dissecans often report a history of failure of other treatment modalities, such as immobilization, open reduction and fixation of the fragment, and simple excision. The onset of symptoms is mostly insidious, with no distinctive trauma. Conversely, chondral defects often result from athletic injuries that lead to tears of the anterior cruciate ligament or the meniscus, which in turn result in acute or secondary damage to the articular surface.
| • | Prior knee injury or surgery | |
| • | Activity-related knee pain and swelling | |
| • | Mechanical symptoms, such as locking, catching, and giving way |
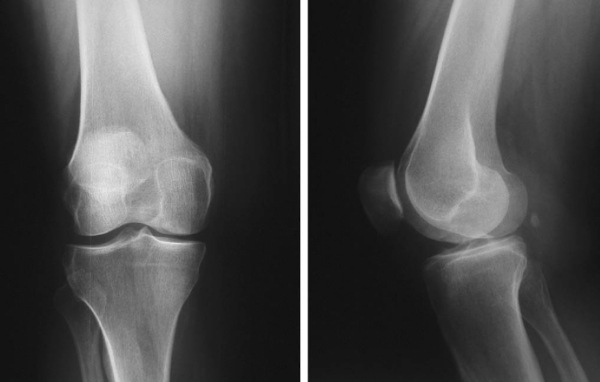
Radiography (
Fig. 56-1
)
|
|
|
|
Figure 56-1 |

Magnetic resonance imaging is the “gold standard” for osteochondral lesions (
Fig. 56-2
). Fluid or edema behind the lesion is suggestive of an unstable fragment.
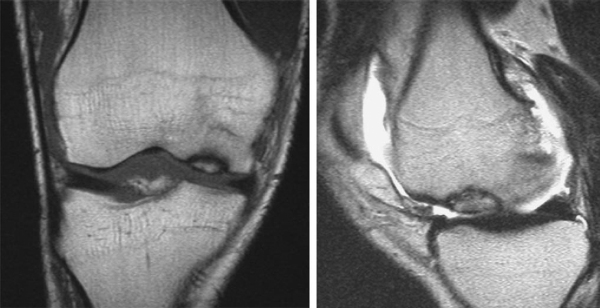
Evaluate the extent and depth of osseous involvement. Beware of high sensitivity for subchondral edema, which leads to false positives for osseous disease.
Indications and Contraindications
The typical candidate for osteochondral allografting presents with a large full-thickness chondral defect; prior procedures, such as the repair of an unstable osteochondritis dissecans lesion, microfracture, osteochondral autograft transfer, and autologous chondrocyte implantation, have failed. Some lesions preclude the use of other cartilage repair procedures because of their large size, specific location, or associated deep osseous defects. Localized unipolar lesions larger than 2 to 3 cm2 provide an optimal environment for osteochondral grafting.
Comorbidities that must be addressed either before or at the time of the osteochondral allografting procedure include malalignment, ligament deficiency, and meniscal insufficiency. Bipolar lesions present a relative contraindication and result in less predictable outcomes. Both lesions should be treated concomitantly; the larger and deeper defect is commonly allografted, and the kissing lesion is often amenable to microfracture.
On the basis of the preferences of the surgeon, anesthesiologist, and patient, the procedure can be performed under general, spinal, or regional anesthesia or a combination thereof. Before induction of anesthesia, the surgeon must ensure that the fresh graft is size and side matched and of sufficient quality. The patient is positioned supine on a standard operating table with a thigh tourniquet. Especially in posterior lesions of the femoral condyle, a leg positioning device is helpful to stabilize the knee in hyperflexion.
Surgical Landmarks, Incisions, and Portals
| • | Patella | |
| • | Patellar tendon | |
| • | Tibial tubercle |
| • | Anterior midline or paramedian skin incision | |
| • | Medial or lateral peripatellar arthrotomy, subvastus or midvastus approach |
| • | Infrapatellar branch of the saphenous nerve | |
| • | Articular surfaces (at risk during arthrotomy) | |
| • | Patellar tendon (risk of avulsion with vigorous retraction) | |
| • | Menisci |
Examination Under Anesthesia and Diagnostic Arthroscopy
Examination under anesthesia should reveal stable ligaments and full range of motion. Although it is not mandatory, diagnostic arthroscopy as an initial staging procedure is helpful to better assess the extent of the chondral lesion as well as to rule out associated pathologic change, such as ligamentous or meniscal insufficiency.
Specific Steps (
Box 56-1
)
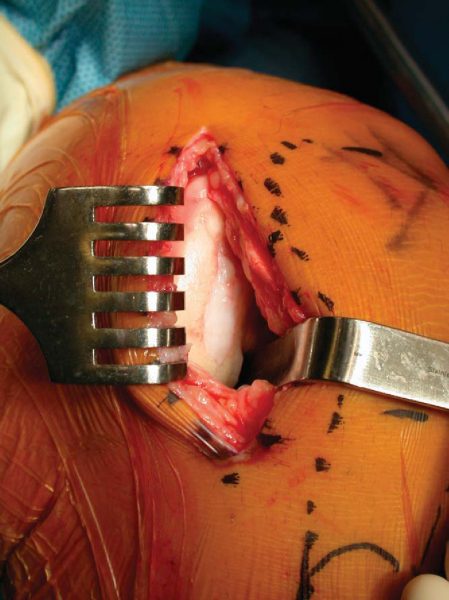
Osteochondral allografting is an open procedure requiring the use of an arthrotomy sized to be consistent with the location and extent of the lesion. Most commonly, an anterior midline incision is made from the proximal pole of the patella to the tibial tubercle, but medial or lateral paramedian incisions can be used as well. The incision is carried down to the capsule; then full-thickness skin flaps are raised to make a mobile window. A medial or lateral peripatellar capsulotomy is performed from the superior pole of the patella to the tibial tubercle. More limited incisions, such as the subvastus and midvastus approaches, have recently gained popularity, and we think that these approaches allow accelerated postoperative quadriceps rehabilitation. The patella is retracted with either a Z or bent Hohman retractor placed into the notch. We have found it helpful to release the fat pad and to dissect the anterior meniscal horn from the capsule for better exposure, especially with small incisions.
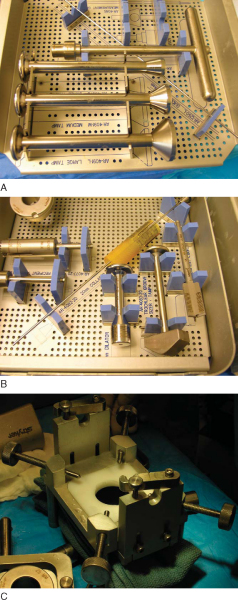
The most commonly used technique is the press-fit plug technique; several proprietary systems have been developed to facilitate graft sizing and preparation (
Fig. 56-4
). For comprehensiveness, we also discuss the shell graft technique, which is technically more challenging but allows the treatment of very large and irregularly shaped defects not amenable to the plug technique.
|
|
|
|
Figure 56-4 |
2a. Preparation of the Recipient Site
Once the lesion is exposed, the abnormal cartilage is identified. It is of utmost importance to reconstruct the normal geometry of the articular surface with the donor graft.
The axis of the recipient hole is matched with the axis of the donor plug:
| 1. | Place a cylindrical sizing guide over the defect to determine the optimal plug diameter ( Fig. 56-5 ). |
|
| 2. | A circumferential mark is made around the guide, followed by a mark at the 12-o’clock position of the recipient cartilage. | |
| 3. | A guide pin is placed into the defect to a depth of 2 to 3 cm. | |
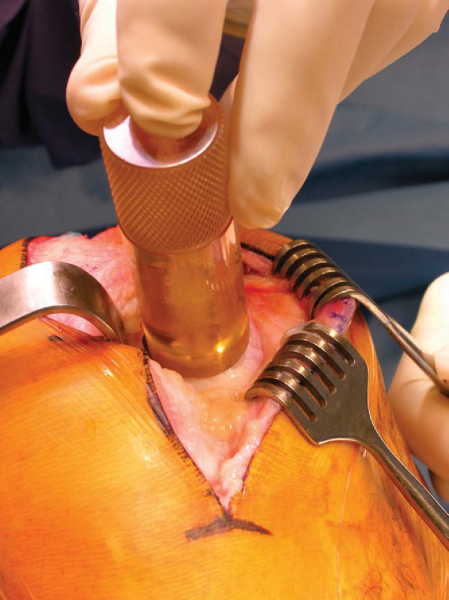
| 4. | A counterbore reamer is used to make a recipient socket with a depth of 6 to 8 mm ( Fig. 56-6 ). |
|
| 5. | The depth of the cylindrical defect is measured in all four quadrants. |
2b. Preparation of the Donor Graft
| 1. | Identify and outline the appropriate donor site. | |
| 2. | Secure the donor condyle in the allograft workstation. | |
| 3. | The bushing with the appropriate graft size diameter is placed in the workstation over the marked allograft and set to the appropriate angle to match the contour of the recipient site ( Fig. 56-7 ). |
|
| 4. | A donor harvester is passed through the proximal graft housing and used to drill through the entire depth of the donor condyle. | |
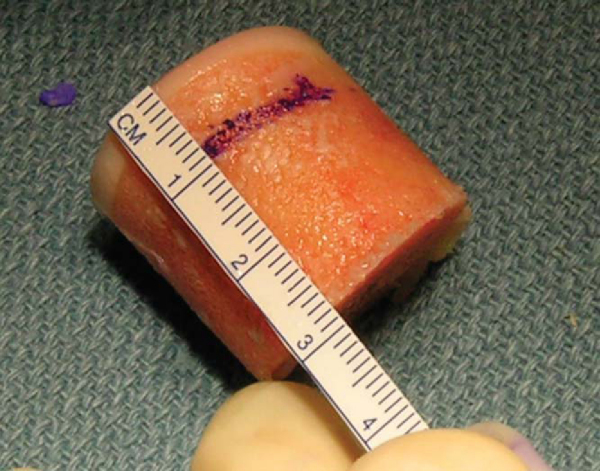
| 5. | After extraction of the graft from the donor harvester, the depth measurement guide is used to mark out the four quadrants of the graft to match the depths recorded from the recipient site ( Fig. 56-8 ). The graft is also marked at the 12-o’clock position to match the one made at the recipient site. |
|
| 6. | The allograft is held with the allograft forceps and trimmed down with a saw. |
|
|
|
|
Figure 56-7 |

|
|
|
|
Figure 56-8 |
2c. Graft Insertion and Fixation
| 1. | An additional 0.5 mm of dilation is achieved by inserting a calibrated dilator into the recipient site. | |
| 2. | The graft’s corners may be beveled to assist insertion. It is generally preferable to trim the graft slightly and to use supplemental fixation, rather than to use excessive force to press fit the graft, which will lead to chondrocyte injury and death. | |
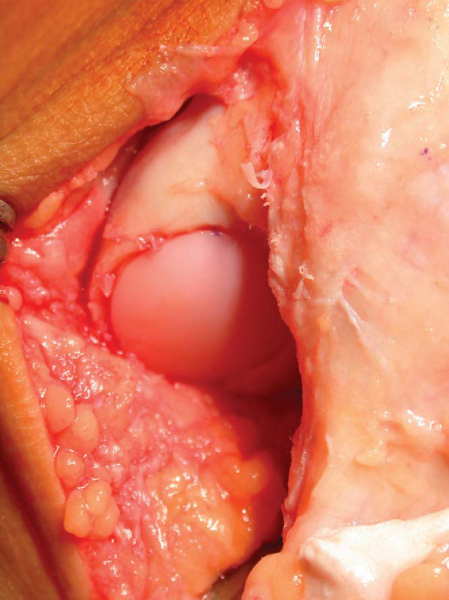
| 3. | The graft is press fitted into the recipient defect while matching the markings made on both the graft and recipient site ( Fig. 56-9 ) |
|
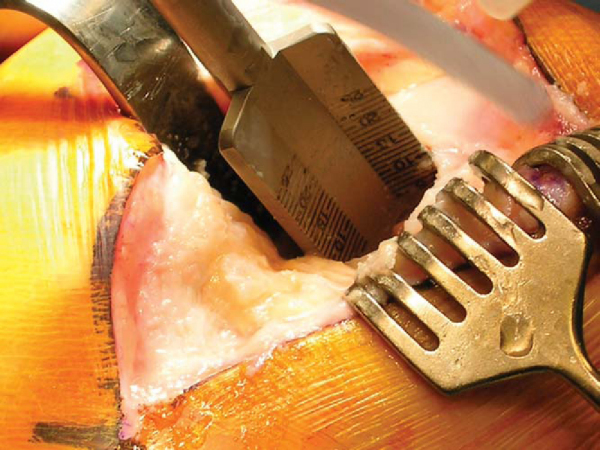
| 4. | An oversized tamp is then used to make the graft surface flush with the surrounding native cartilage. It is preferable to recess the graft rather than leaving it proud ( Fig. 56-10 ). |
|
| 5. | If fixation is deemed necessary, absorbable polydioxanone pins may be used. |

2a. Preparation of the Recipient Site
| 1. | The lesion is outlined with a surgical pen. | |
| 2. | A No. 15 blade is then used to cut the borders of the lesion. | |
| 3. | A 4-mm bur and sharp curets are used to débride the defect down to a depth of 4 to 5 mm. |
2b. Preparation of the Allograft
| 1. | The matched allograft is marked with a surgical pen to match the shape of the recipient site. The markings made on the allograft may be slightly larger than the ones made on the recipient site to facilitate multiple trial fittings. | |
| 2. | A shell graft is cut out with 4 to 5 mm of subchondral bone. |
2c. Graft Placement and Fixation
| 1. | Place graft flush with articular surface of recipient site. | |
| 2. | Fixation is established with bioabsorbable pins or compression screws. |
The graft may be trimmed down if it causes impingement. The knee is taken through a full range of motion to ensure that the graft is stable and does not cause catching or obstruction. The arthrotomy is closed per the surgeon’s preference with interrupted or running heavy suture. Skin closure is performed in several layers with subcuticular resorbable sutures or staples.
General rehabilitation guidelines are described in
Table 56-1
. The benefit of continuous passive motion after osteochondral allografting is less clear than after marrow-stimulating techniques or autologous chondrocyte implantation because fully formed cartilage is transplanted that does not require stimulation to enhance maturation. It may be useful, however, to improve range of motion and to reduce the risk of postoperative stiffness.
| Modality | Time Frame |
|---|---|
| Continuous passive motion | 6-8 weeks (optional but desirable) |
| Brace | 6-12 weeks (patellofemoral or tibial-femoral grafts) |
| Weight-bearing status | Toe-touch weight bearing or non–weight bearing for 6-12 weeks (based on size of graft) |
| Closed chain exercises, straight-leg raises | Immediately postoperatively |
| Stationary cycling | Beginning at 4-8 weeks postoperatively |
| Light recreational sports | Consider at 4-6 months postoperatively |
| High-impact sports | Consider at 6 months postoperatively for smaller lesion; not recommended for larger lesions |
Full range of motion is allowed unless patients have had other concomitant procedures (i.e., meniscus transplantation, osteotomy, ligament repair) that would dictate otherwise. After the first postoperative visit at 1 week, patients start supervised physical therapy for range-of-motion exercises along with quad sets and patellar mobilization. During this period, the patients remain non–weight bearing. At 6 weeks, weight-bearing status is gradually advanced to full weight bearing; brace use is discontinued once quad control is re-established, and closed chain strengthening exercises are added to the rehabilitation protocol. By 3 months, patients are expected to have regained full and pain-free range of motion with nearly normal quadriceps strength, and recreational sports may be resumed at 6 months postoperatively. However, the patient should avoid excessive impact loading of the allograft during the first year.
| • | Infection | |
| • | Disease transmission | |
| • | Graft nonunion, fragmentation, or collapse (months to years postoperatively) | |
| • | Immune response | |
| • | Stiffness | |
| • | Reflex sympathetic dystrophy |
| PEARLS AND PITFALLS | ||||||||||||||||||||||||
|
After osteochondral allograft transplantation, good to excellent results are achieved in nearly 85% of cases, and patients demonstrate a measurable decrease in pain and increase in activity level (
Table 56-2
). The degree of graft incorporation can be assessed on followup radiographs (
Fig. 56-11
).
| Author | No. of Patients | Mean Age | Location | Mean Followup | Results |
|---|---|---|---|---|---|
| Myers et al[12] (1989) | 39 | 38 years | F, T, P | 3.6 years | 78% success |
| 22% failure | |||||
| Garrett[8] (1994) | 17 | 20 years | F | 3.5 years | 94% success |
| Ghazavi[10] (1997) | 123 | 35 years | F, T, P | 7.5 years | 85% success |
| Chu et al[6] (1999) | 55 | 35 years | F, T, P | 75 months | 76% good–excellent |
| 16% failure |
|
|
|
|
Figure 56-11 |