
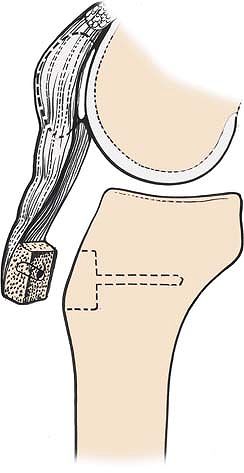
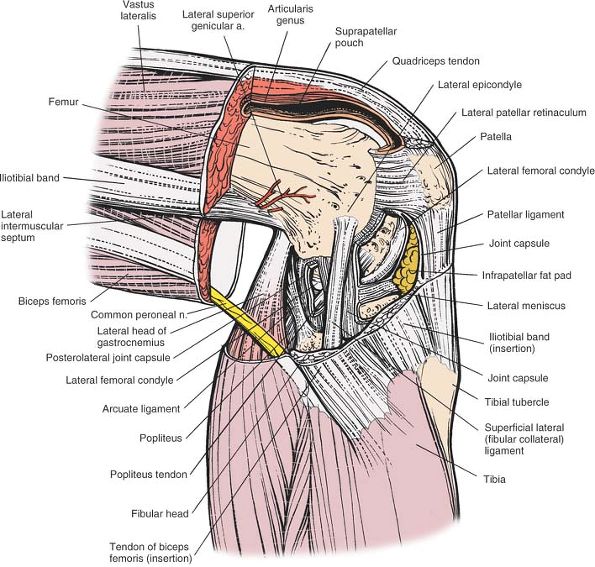
stabilized by powerful muscular and ligamentous forces. It is
superficial on three sides (anterior, medial, and lateral), and
approaches to it are comparatively straightforward. Because the knee
joint is only covered by skin and retinaculae on three of its four
sides, the joint is ideal for arthroscopic approaches. Arthroscopy of
the knee is also facilitated by the large size of the joint cavity.
Arthroscopic approaches have largely replaced open surgical approaches
for the treatment of meniscal pathology, anterior cruciate ligament
reconstruction, and removal of loose bodies.
approaches are useful where arthroscopic equipment is not available.
They are also of great importance when dealing with trauma of the knee
joint associated with open wounds. Because the major neurovascular
structures of the leg all pass posterior to the joint, the posterior
approach is used mainly for exploration of these structures.
the most common knee incision, can be used for a variety of procedures.
The length of the incision depends on the pathology to be treated; when
it is used fully, this approach gives an unrivaled exposure of the
whole joint. It is suitable for total joint replacement.
affords easier access to the medial supporting structures of the knee.
Because of its slightly more posterior placement and the curving nature
of the approach, a flap can be developed that allows better
visualization of the posteromedial corner of the joint.
is used for ligamentous reconstruction of the knee’s lateral supporting
structures. The anatomy of the knee’s lateral side is considered after
these two approaches are outlined.
an adjunct to the medial parapatellar incision, is used for repairs of
ruptured anterior cruciate ligaments. The approach enters the
intercondylar notch from behind, allowing reattachment of the distal
stump of a torn anterior cruciate ligament or the insertion of a graft.
It usually is used in conjunction with an anteromedial approach to the
knee.
the knee is performed rarely, and when it is, it is usually for the
repair of neurovascular structures. Its anatomy is considered after
this approach is described.
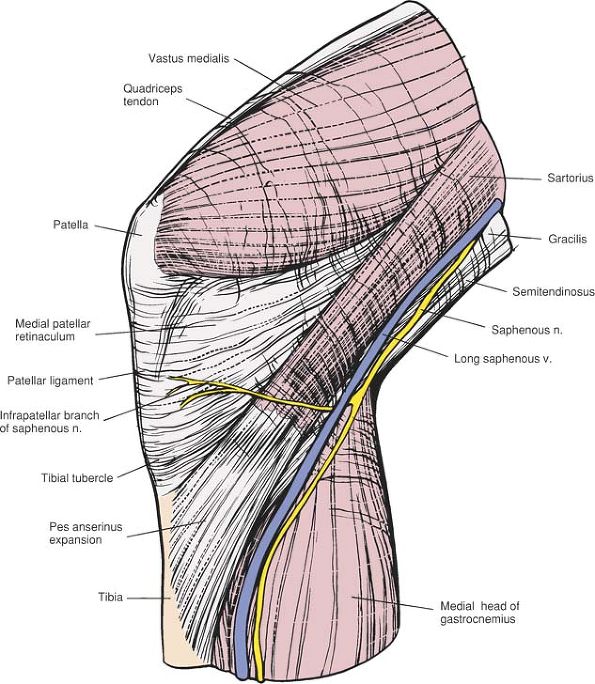
often described as subcutaneous. Its anteromedial and anterolateral
coverings consist largely of fibrous tissue—the patellar retinaculum
and joint capsule (see Figs. 10-40, 10-54). Incisions through these coverings can be safely made without endangering any vital structures.
-
Meniscal resection or repair
-
Removal of loose bodies
-
Anterior or posterior cruciate ligament reconstruction
-
Synovial biopsy
-
Synovectomy
-
Debridement of early osteoarthritic knees, including microfracture
-
Treatment of osteochondritis dissecans
for diagnostic purposes; it is nearly always used in conjunction with
the anteromedial portal. The combination of these approaches allows the
use of the arthroscope along with arthroscopic instrumentation. Usually
the arthroscope is inserted via the anterolateral portal and
instruments are inserted via the anteromedial portal. However, either
portal can be used for either purpose. These two approaches are
described in this section.
 |
|
Figure 10-1
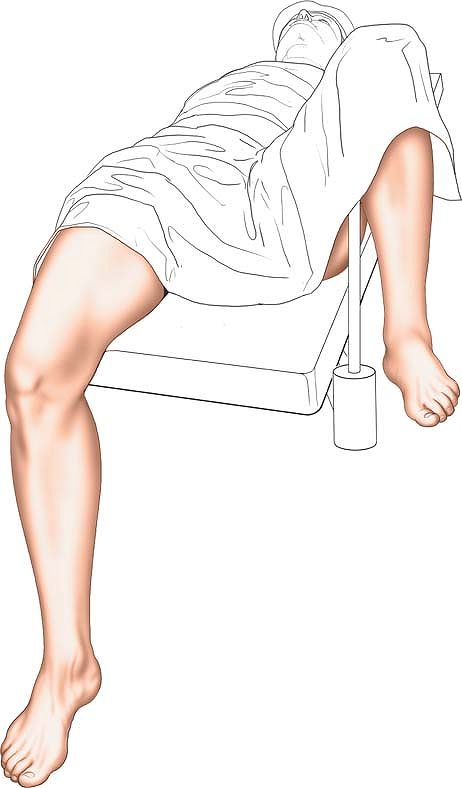
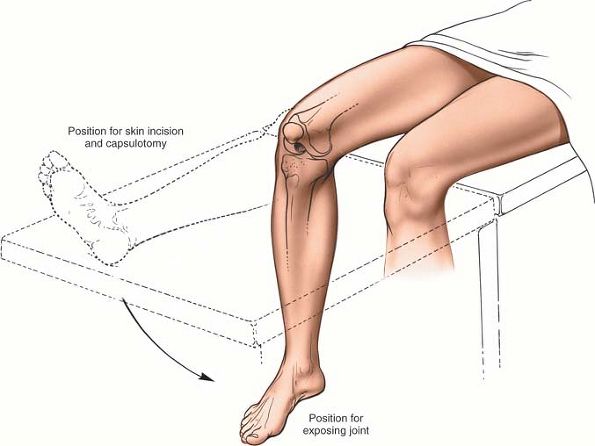
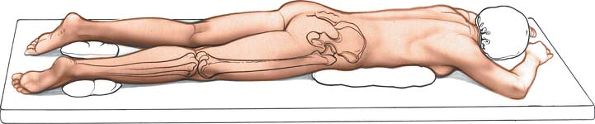
Place the patient supine on the operating table. Remove the end of the table so that you are able to manipulate the knee during surgery. |
well-padded tourniquet to the mid-thigh. Exsanguinate the limb and
inflate the tourniquet. Remove the end of the table (Fig. 10-1; see Figs. 10-9 and 10-41). Prep and drape the limb so that you
are able to manipulate the knee during surgery. The use of an
arthroscopic clamp placed around the tourniquet allows the surgeon to
apply a valgus and external rotation force to the knee, facilitating
access to the medial compartment. The use of a clamp, however, makes it
more difficult to place the knee in the figure-of-eight position
(placing the lateral malleolus of the involved extremity on the
opposite thigh; see Figs. 10-8, inset, and 10-42)
to allow access to the lateral compartment of the knee. If a surgical
assistant is available to provide the appropriate forces, the use of a
clamp is not indicated.
 |
|
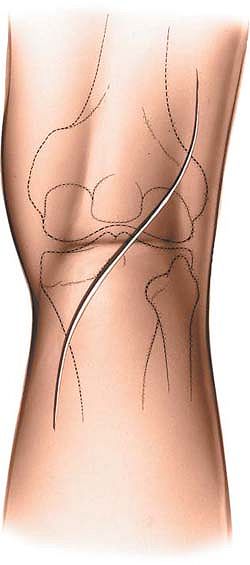
Figure 10-2
Lateral incision: make a small 8-mm transverse stab incision 1½ cm above the lateral joint line. Medial incision: make an 8-mm stab incision 1½ cm above the medial joint line. |
forefinger in the recess created by the lateral border of the patellar
tendon and the lateral joint space. This is the so-called soft spot.
Make an 8-mm transverse stab incision approximately 5 mm proximal to
your finger, 1 cm to 1½ cm above the joint line (Fig. 10-2).
Place your finger in the medial soft spot, and make an 8-mm stab
incision some 1½ cm above the joint line. Note that because the lateral
tibial plateau is slightly lower than the medial plateau, the lateral
incision will be slightly lower than the medial one (see Fig. 10-2).
approaches, which consist of incisions made in the medial and lateral
patellar retinacula and joint capsule. No major nerves are present in
these areas.
skin incision using a sharp-ended blade. As you incise the retinaculum,
you will suddenly feel a decrease in resistance. Withdraw the blade and
insert the arthroscopic sheath and blunt trochar. Push the sheath and
trochar into the anterolateral portion of the knee, taking care not to
hit the underlying femur; then carefully extend the knee while
advancing the arthroscopic sheath up into the suprapatellar pouch.
Remove the trochar. Insert the 30° arthroscopic telescope. Switch on
the irrigation fluid before switching on the light source to avoid
thermal damage to the synovium.
discovery of pathology within the knee, it is important to ensure that
each arthroscopic exploration examines all portions of the knee and not
merely the site of the presumed pathology.
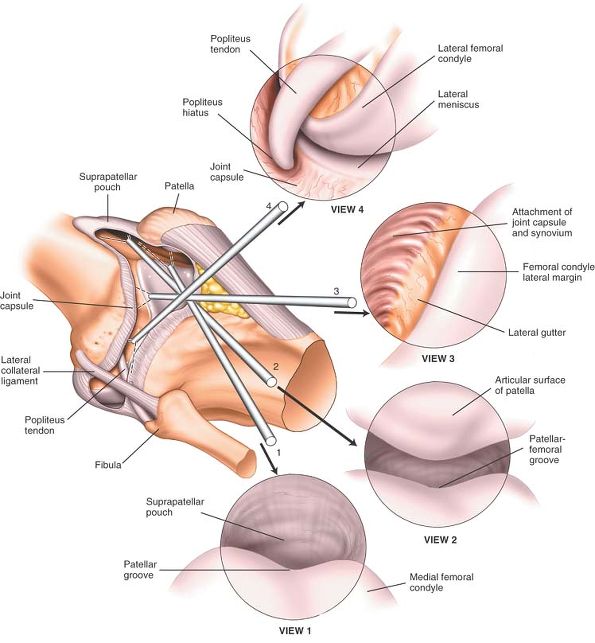
The arthroscope should be easily mobile, allowing you to examine all
portions of the suprapatellar pouch, noting especially the synovium and
checking for the presence of any loose bodies.
arthroscope into the patellofemoral joint, rotating the telescope to
allow examination of both the femoral and patellar aspects of the joint
(see Fig. 10-3, view 2). Manipulating the patella medially and laterally facilitates this procedure.
arthroscope into the lateral recess or gutter of the knee, passing the
scope between the lateral aspect of the femur and the lateral capsule
of the joint (see Fig. 10-3, view 3). Observe the lateral surface of the femur, and ensure that you can see the insertion of the popliteus muscle (see Fig. 10-3, view 4). The popliteal hiatus is a common recess for the presence of loose bodies.
arthroscope into the lateral portion of the knee, observing the
anterior part of the lateral meniscus (Fig. 10-4, view 5).
Pass the arthroscope medially, and rotate the scope so that you are
looking posteriorly. This will allow you visualization of the medial
femoral recess or gutter (see Fig. 10-4, view 6).
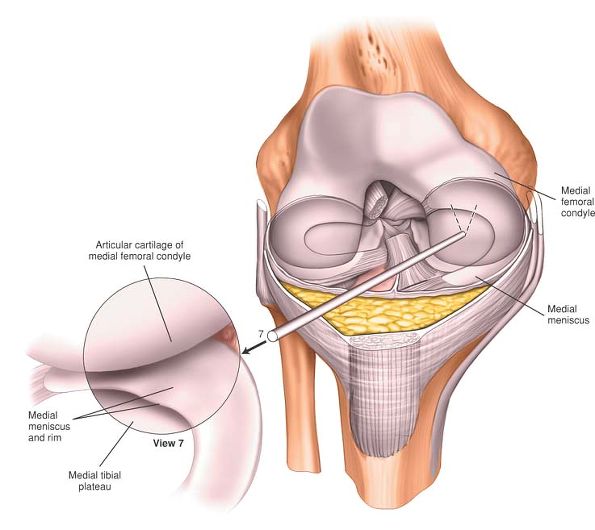
gently flex to 90°, allowing the tip of the arthroscope to enter the
medial compartment of the knee. Observe the articular cartilage of the
medial femoral condyle and medial tibial plateau. Also observe the
medial meniscus and meniscal rim (Fig. 10-5, view 7).
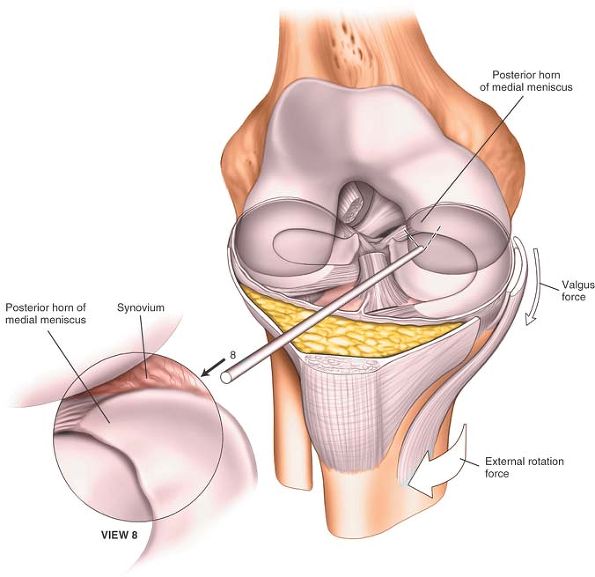
Apply a valgus and external rotation force to the knee, and rotate the
scope so that it is looking laterally, to allow examination of the
posterior horn of the medial meniscus (Fig. 10-6, view 8).
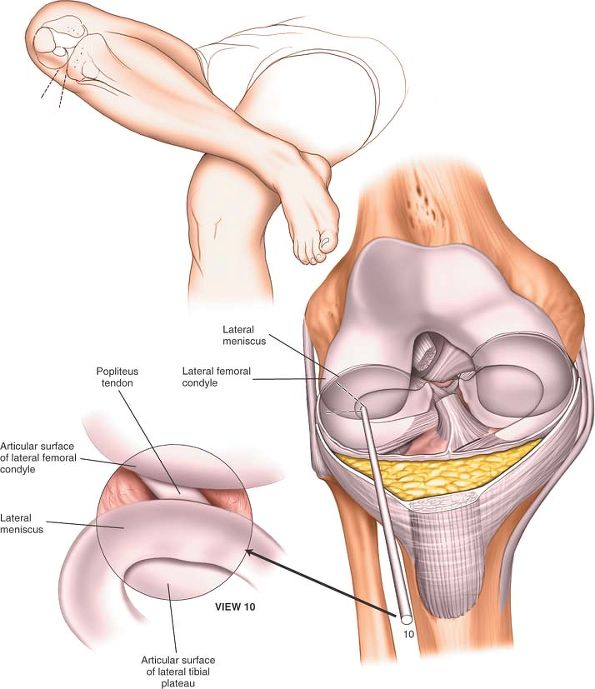
notch, flex the knee to just over 90°, abduct the hip, and place the
lateral malleolus of the operative side on the anterior aspect of the
contralateral knee (see Fig. 10-42). This is known as the figure-of-eight position and allows arthroscopic inspection of the entire lateral compartment (Fig. 10-8, inset).
Observe the articular surfaces of the lateral femoral condyle and
lateral tibial plateau. Examine the lateral meniscus in its entirety
(see Fig. 10-8, view 10).
 |
|
Figure 10-3 (View 1) Begin with the arthroscope in the suprapatellar pouch and observe the synovium, checking for the presence of loose bodies. (View 2)
Withdraw the arthroscope into the patellofemoral joint. To observe the full extent of the joint, rotate the scope in both directions and move the patella medially and laterally. (View 3) Slide the scope into the lateral recess of the knee and observe the lateral aspect of the lateral femoral condyle. (View 4) Advance the arthroscope into the lateral gutter to view the insertion of the popliteal muscle. |
 |
|
Figure 10-4 (View 5)
With the knee in full extension, sweep the arthroscope into the lateral portion of the knee and observe the anterior horn of the lateral meniscus and the anterior part of the lateral femoral condyle. (View 6) Advance the arthroscope medially and rotate it to look posteriorly. Observe the medial femoral recess. |
 |
|
Figure 10-5 (View 7)
Withdraw the arthroscope into the center of the joint, and then flex the knee to allow the arthroscope to enter the medial compartment. Observe the rim of the medial meniscus, the medial femoral condyle, and the medial tibial plateau. |
 |
|
Figure 10-6 (View 8)
Apply a valgus/external rotation force to the knee, and rotate the arthroscope so that it is looking laterally. Observe the posterior horn of the medial meniscus. |
 |
|
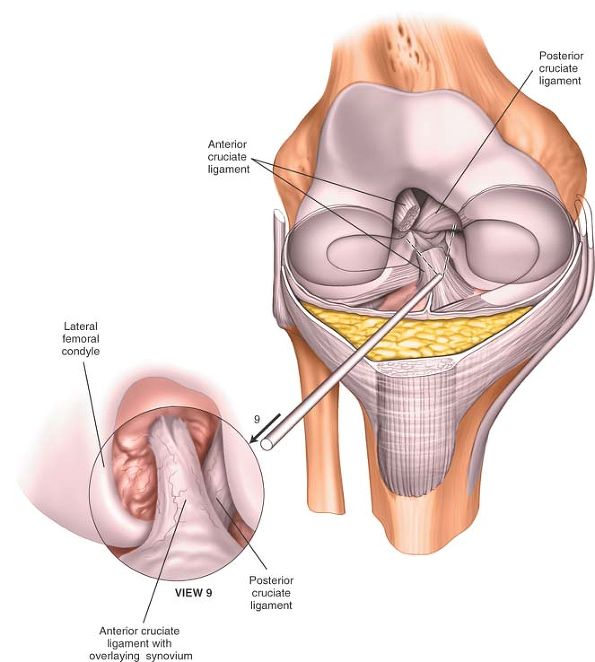
Figure 10-7 (View 9) Withdraw the arthroscope into the intercondylar notch to observe the cruciate ligaments.
|
 |
|
Figure 10-8 (Inset)
Flex the knee 90° above the hip, and place the lateral malleolus of the operative side on the anterior aspect of the contralateral knee (figure-of-eight position). (View 10) Advance the arthroscope into the lateral compartment of the knee to observe the lateral meniscus in its entirety. |
and to assess the integrity of the cruciate ligaments, insert the
arthroscopic hook through the anteromedial portal and use it under
direct vision of the arthroscope to palpate these structures.
the knee may be damaged at two stages during arthroscopy: by the
incision or by the forceful insertion of an arthroscope. If the
incision is made carefully, this problem should not occur. Remember
that if you meet with resistance when manipulating the arthroscope
within the knee, then it is certain that you are damaging the articular
cartilage. More posteriorly based incisions on the medial side may
easily damage the articular surface of the medial femoral condyle if
performed blind. Therefore, it is recommended that more posterior
medial or lateral incisions, if needed, should be made under direct
arthroscopic control. Ten seconds of careless use of an arthroscope
within the knee may create the equivalent of 10 years of wear in that
joint.
visualizing all portions of the joint. To allow complete inspection of
the knee, apply a valgus external rotation force to assess the
posterior aspect of the medial compartment of the knee. You will also
need to apply a varus internal rotation stress to examine the lateral
portions of the knee. Remember that the telescope you use is angled at
30°. Changing the direction of the telescope will therefore
significantly change the view that you obtain (see Figs. 1-68, 1-69 and 1-70). This is most important when examining the posterior third of the medial compartment of the knee.
is the workhorse approach to the knee. Extended to its full length, it
allows excellent access to most structures. Portions of the incision
can be used to gain access to the supra-patellar pouch, the patella,
and the medial side of the joint. When a straight, midline,
longitudinal skin incision is used in conjunction with a medial
parapatellar capsular approach, the incision offers an exposure large
enough for total knee arthroplasty.
insertion of total knee replacements where the patella is not
dislocated. Such approaches may significantly reduce the damage done to
the extensor mechanism by the surgery and reduce the amount of
postoperative scarring that occurs in the suprapatella pouch. Such
approaches, however, limit visualization of the distal femur, making
accurate positioning of implants more difficult. Additional imaging,
especially computer-assisted surgery, may be helpful if these
approaches are used for total knee replacement.
-
Synovectomy4,5
-
Medial meniscectomy
-
Removal of loose bodies6
-
Ligamentous reconstructions
-
Patellectomy
-
Drainage of the knee joint in cases of sepsis
-
Total knee replacement7,8,9,10,11,12,13,14
-
Repair of the anterior cruciate ligament (see the section regarding the lateral approach to the distal femur)
-
Open reduction and internal fixation of distal femoral fractures when a medial plate is to be used
table. The approach can be made with or without the use of a
tourniquet. Operating without a tourniquet slows the surgical approach,
but bleeding points are easy to pick up in the superficial surgical
dissection. If you are using a tourniquet, it will need to be removed
prior to closure of the wound to allow you to obtain hemostasis of the
wound. If you are using a tourniquet, exsanguinate the leg by applying
a compressive bandage or by elevating the limb for five minutes; then,
inflate a tourniquet (Fig. 10-9).
supports the heel when the knee is flexed to 90°. This sandbag will
help maintain the knee in
a
flexed position during joint replacement surgery. Position a table
support on the outer aspect of the upper thigh to prevent the leg from
falling into abduction when the knee is flexed.
 |
|
Figure 10-9
Position of the patient for the medial parapatellar approach. Begin with the straight leg position, and then flex the knee for the deeper dissection. |
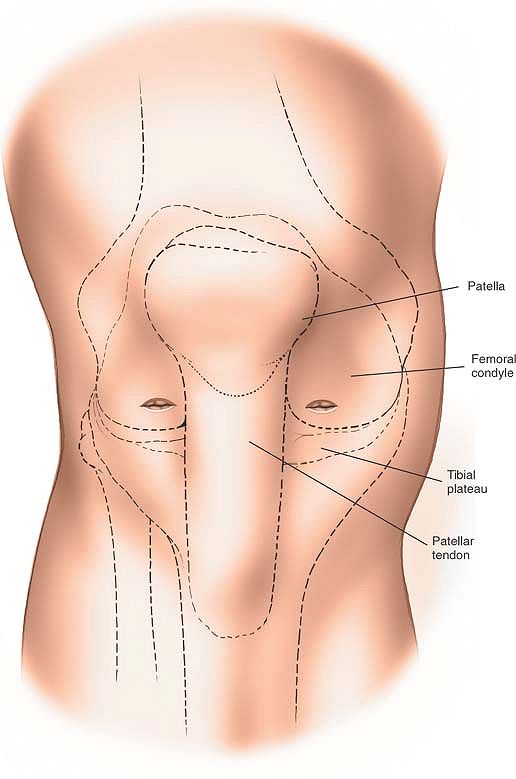
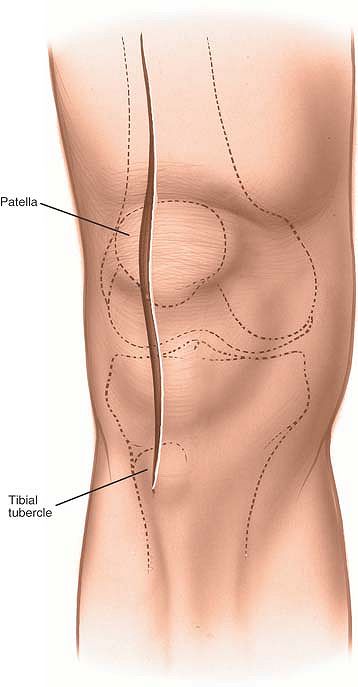
(ligamenta patellae), which runs from the inferior border of the
patella and is palpable to its insertion into the tibial tubercle.
from a point 5 cm above the superior pole of the patella to below the
level of the tibial tubercle (see Fig. 10-10).
when the incision is extended superiorly into the intermuscular plane
between the vastus medialis and rectus femoris muscles. Both of these
muscles are supplied by the femoral nerve well proximal to this
dissection, leaving the plane safe for knee surgery.
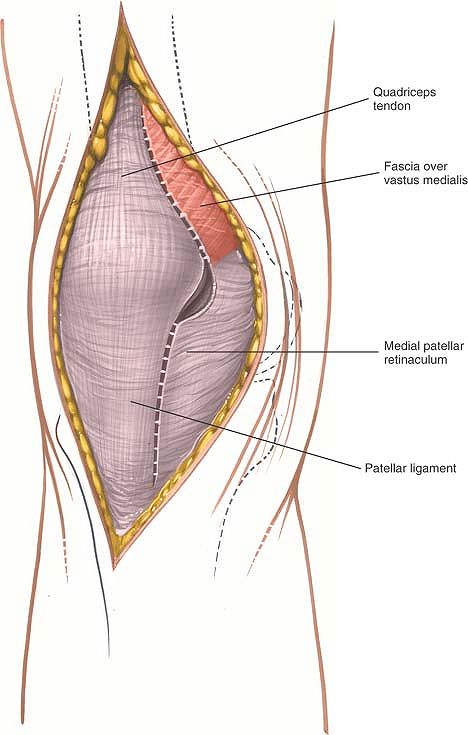
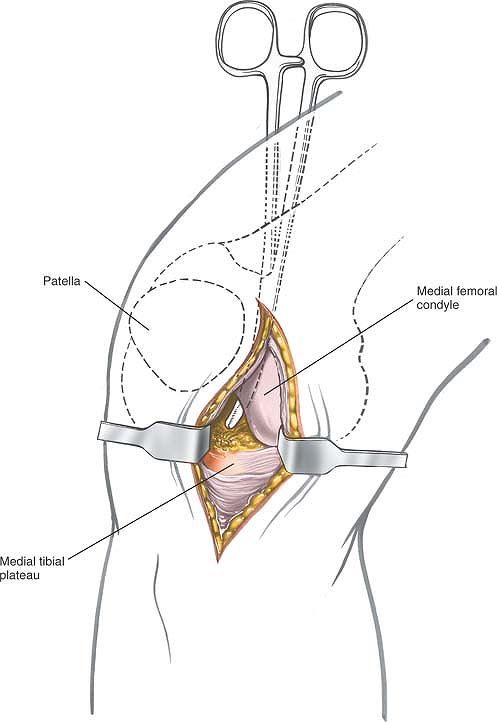
incision, ensuring hemostasis. Develop a medial skin flap to expose the
quadriceps tendon, the medial border of the patella, and the medial
border of the patellar tendon. Enter the joint by cutting through the
joint capsule. Begin on the medial side of the patella, taking care to
leave a cuff of capsular tissue medial to the patella and lateral to
the quadriceps muscle to facilitate closure. Divide the quadriceps
tendon in the midline to enter the suprapatellar pouch. Finally,
complete the capsule incision by dividing the fibrous tissue on the
medial aspect of the patellar tendon. The capsular incision will almost
certainly also cut through the synovium, since the capsule and synovium
are intimately related.
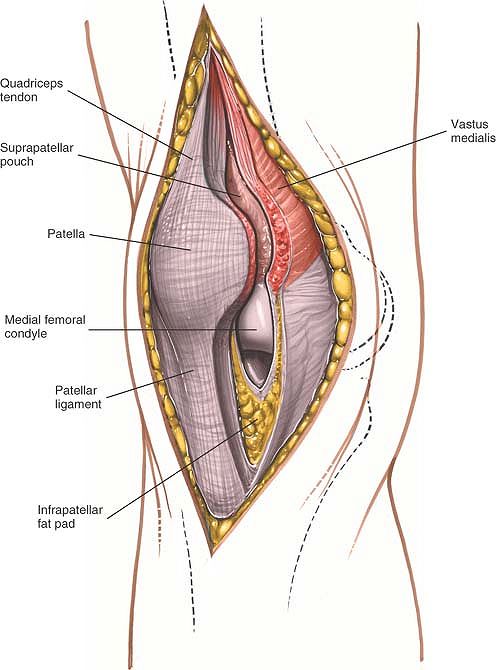
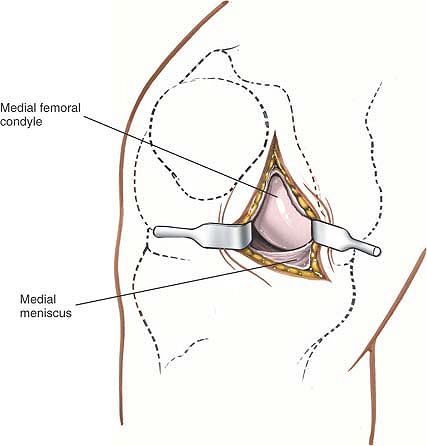
exposure requirements. As the joint line is approached, care should be
taken not to damage the anterior insertion of the medial meniscus
unless the approach is being used for joint replacement surgery (Figs. 10-10, 10-11 and 10-12).
 |
|
Figure 10-10 Make a longitudinal, straight, midline incision.
|
 |
|
Figure 10-11 Make a medial parapatellar capsular incision.
|
 |
|
Figure 10-12
Continue the incision through the joint capsule and along the patellar ligament and quadriceps tendon to gain access to the joint. |
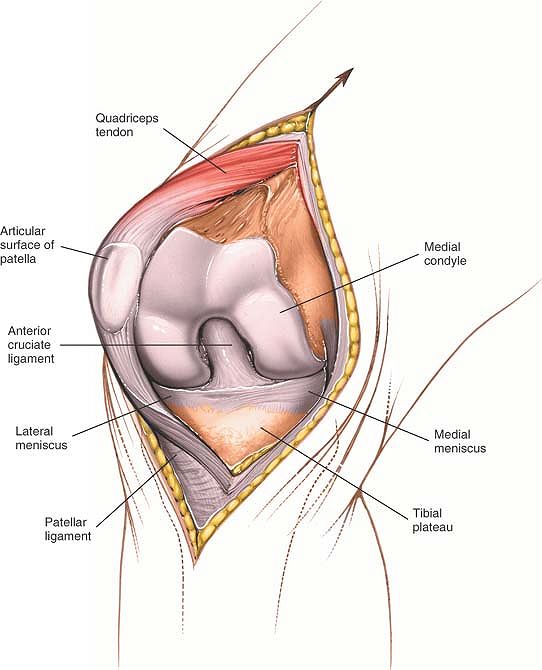
Try to avoid avulsion of the patellar ligament from its insertion on
the tibia as the patella is dislocated, because reattaching the tendon
to the bone is difficult. If the patella does not dislocate easily, it
can be given added mobility by extending the skin incision superiorly
over the interval between the rectus femoris and vastus medialis
muscles. Continue the dissection deeper, splitting the quadriceps
tendon farther just lateral to its medial border (see Fig. 10-13).
is reduced in size or may actually be obliterated. Careful sharp
dissection through the scar tissue may significantly improve the
mobility of the patella, which allows greater flexion of the knee and
eversion of the patella.
 |
|
Figure 10-13 Dislocate the patella laterally, and flex the knee to 90°.
|
dislocate, carefully remove the patellar ligament attachment with an
underlying block of bone. The bone makes subsequent reattachment easier
(Fig. 10-14). Be aware that the tibial
components of many knee replacements incorporate a central peg that
makes reattachment of a bone block impossible if a screw is to be used.
In such cases, a staple fixation may be indicated.
fully, this incision provides the widest possible exposure of the
entire knee joint.
 |
|
Figure 10-14 Detach the patellar ligament attachment with an underlying block of bone.
|
often is cut during this approach. The major danger in cutting the
nerve is the development of a postoperative neuroma. Because the area
of anesthesia produced usually is not troublesome, do not repair the
nerve if it is cut. Instead, resect it and bury its end in fat to
decrease the chances that a painful neuroma will form (see Figs. 10-32 and 10-35).
the approach proximally between the rectus femoris and vastus medialis
muscles. Then, split the underlying vastus intermedius muscle to expose
the distal two thirds of the femur. Stay in the distal third of the
thigh; more proximally, the branches of the femoral nerve may become
involved, resulting in partial denervation (see Anteromedial Approach to the Distal Two Thirds of the Femur in Chapter 9, see Figs. 9-16, 9-17, 9-18, 9-19 and 9-20).
Mobilize the upper part of the attachment of the patellar ligament to
the tibia or remove the patellar ligament with an underlying block of
bone. This extension may be useful in dealing with complex
intraarticular fractures of the knee joint. (See the section detailing
the lateral approach to the distal femur for combined use in repair of
the cruciate ligament.)
is a common formal incision for the knee. It is quite flexible, with
several acceptable locations for incision and many different ways to
position the patient. Some surgeons advocate a transverse skin incision
over the joint line; although this limits the view of the knee, it
provides better access to the meniscus itself. Others prefer
longitudinal or oblique incisions, which offer a better view of such
other intraarticular structures as the cruciate ligaments. Although
operative arthroscopy has reduced dramatically the need for this
approach, it remains a useful one in those many parts of the world
where arthroscopy is not available.
-
Medial meniscectomy
-
Partial meniscectomy
-
Removal of loose bodies
-
Removal of foreign bodies
-
Treatment of osteochondritis of the medial femoral condyle6
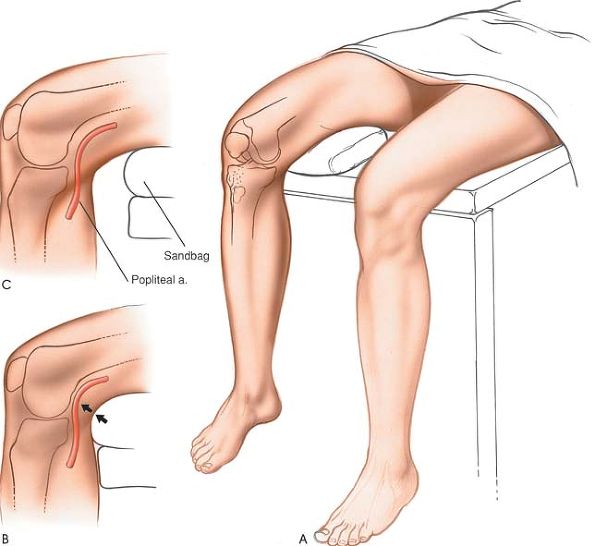
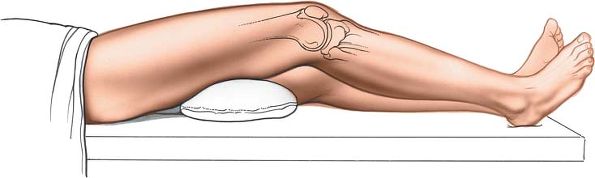
operating table. Place a sandbag under the affected thigh, taking care
that it is not directly beneath the popliteal fossa, where it will
compress the popliteal artery and posterior joint capsule against the
back of the femur and tibia, increasing the risk of accidental injury
during excision of the posterior third of the meniscus (Fig. 10-15). Remove the end of the table so that the knee can be flexed beyond a right angle.
meniscus can be seen during surgery. The light must be adjusted
continually to keep it shining directly into the depths of the wound. A
headlamp is the best light source.
 |
|
Figure 10-15 (A) Position of the patient for medial meniscectomy. (B) Improper placement of the sandbag pushes the popliteal artery against the posterior joint capsule. (C) Proper placement of the sandbag under the affected thigh.
|
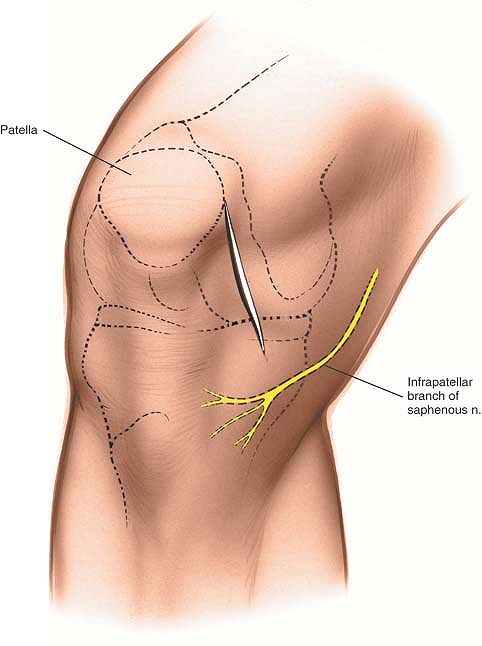
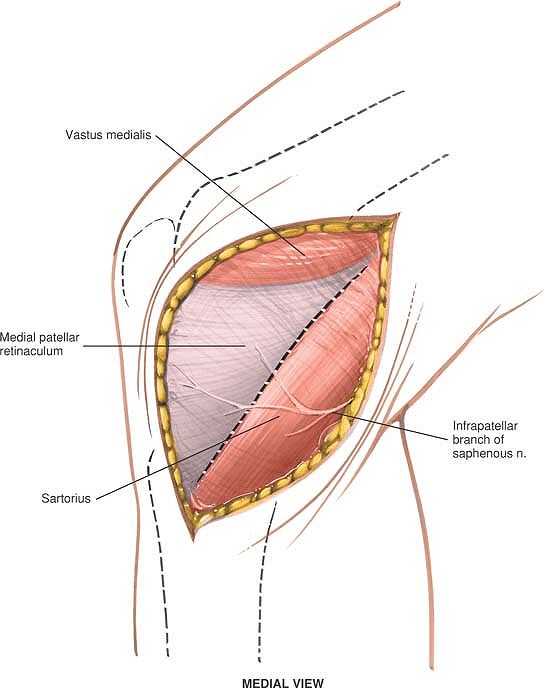
be identified, because incisions easily can be made too high. Flexion
and extension of the knee allows the line to be palpated with certainty.
below the joint line. Incisions continued farther inferiorly can cut
the infrapatellar branch of the saphenous nerve as it traverses the
upper leg (Fig. 10-16).
 |
|
Figure 10-16 Incision for anteromedial approach for medial meniscectomy.
|
 |
|
Figure 10-17 Incise down to the anteromedial aspect of the joint capsule.
|
 |
|
Figure 10-18 Incise the joint capsule in line with the incision to reveal the extrasynovial fat.
|
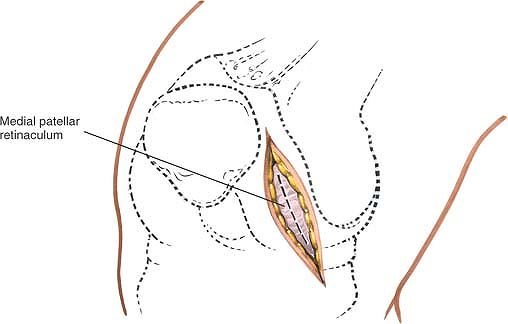
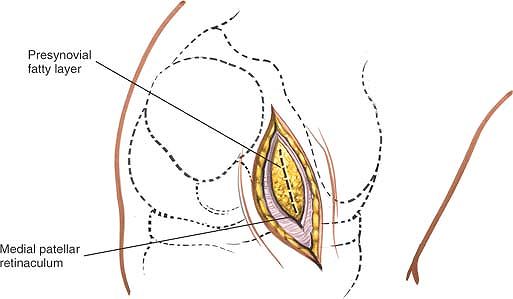
the deep incision is made through the medial patellar retinaculum and
joint capsule.
the anteromedial aspect of the joint capsule, the true joint capsule,
which is reinforced by the medial retinaculum of the patella (Fig. 10-17). Incise the capsule in line with the skin incision, which also is in line with the capsular fibers (Fig. 10-18).
 |
|
Figure 10-19 Incise the synovium to gain access to the joint.
|
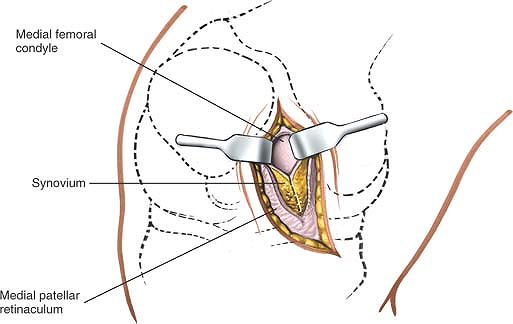
well above the joint line to gain access to the anteromedial portion of
the joint (Fig. 10-19). Opening the joint above the joint line avoids damage to the intrasynovial fat pad, medial meniscus, and coronary ligament (Figs. 10-20 and 10-21).
 |
|
Figure 10-20 Open the joint capsule and synovium to the joint line to prevent damage to the meniscus and synovial fat pad.
|
is immediately behind the posterior joint capsule, any injury to the
posterior joint capsule may damage the artery. If the knee is flexed,
the posterior joint capsule falls away from the tibia and femur, taking
the artery with it. A sandbag placed directly under the popliteal fossa
prevents the capsule from moving posteriorly and must be avoided at all
costs (see Fig. 10-15B,C).
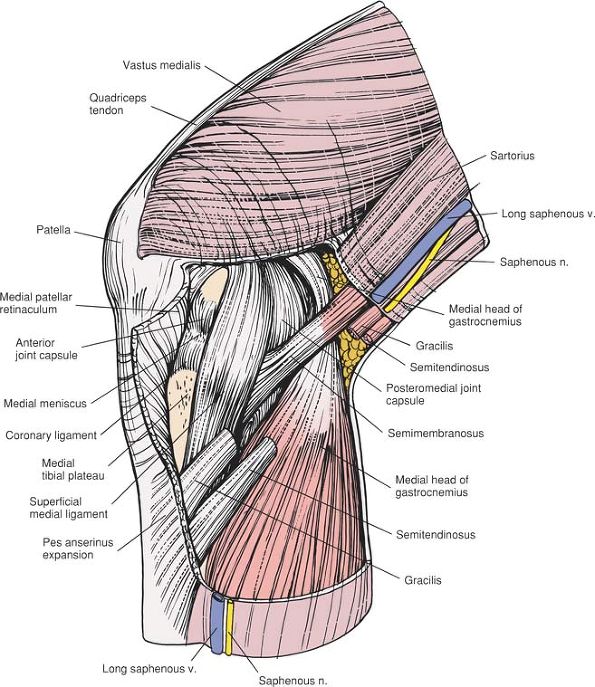
meniscotibial element of the deep medial ligament) connects the
periphery of the meniscus with the joint capsule and tibia, and may be
damaged if the incision through the synovium is made at the joint line
(see Figs. 10-33 and 10-34).
(the tibial collateral ligament) as it runs from the medial epicondyle
of the femur to its insertion on the tibia under cover of the pes
anserinus (see Figs. 10-27 and 10-28).
amounts of the anterior portion of the knee joint and should not be
damaged. Damage may produce adhesions within the joint and, in theory,
can interfere with the blood supply to the patella (see Fig. 10-12).
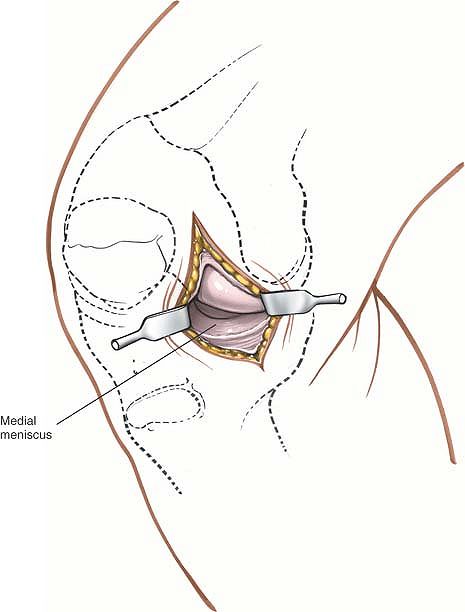 |
|
Figure 10-21 Flex the knee and use retractors to gain further access to the meniscus.
|
-
Retraction. Retractors must be positioned and repositioned carefully to ensure the best possible view of the intraarticular structures.
-
Position of light.
Light should shine directly into the wound, usually from over the
surgeon’s shoulder. Constant readjustment is necessary, and the use of
a headlamp is invaluable. -
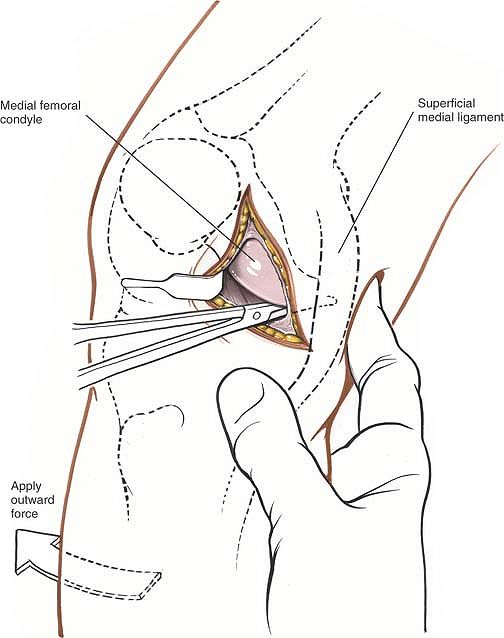
An outward stress will open up the medial
side of the joint. Flexion of the knee allows better access to the back
of the medial side of the joint. If the posterior horn of the medial
meniscus must be seen, however, a better view is obtained by putting
the leg into full extension and applying distraction and outward force.
However, visualization of the peripheral parts of the posterior horn is
always very limited in this surgical approach.
dissection is limited posteriorly by the superficial medial ligament,
which crosses the joint just in front of the midpoint of the femur. For
better access to the posterior half of the joint, a second incision
must be made behind this ligament. This is usually only required for
excision of a retained posterior horn.
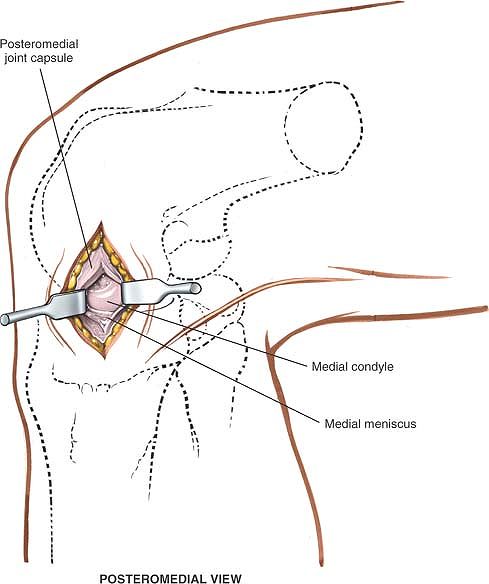
slowly backward, running along the inside of the medial joint capsule
at the level of the joint itself. As the instrument is pushed, the
superficial medial ligament will be sensed; from inside the knee, it
feels like a firm structure beneath the tip of the instrument. As the
instrument is passed posteriorly,
there will be a give in the resistance corresponding to a point just posterior to the superficial medial ligament (Fig. 10-22). At that point, make a second longitudinal posterior incision through the skin and knee joint capsule (Fig. 10-23).
 |
|
Figure 10-22
Insert a blunt instrument into the joint, and push it backward along the inside of the medial joint capsule. Palpate posteriorly until the instrument can be felt beneath the skin. |
extend the incision superiorly, continue incising the skin along the
medial border of the patella. Then, incise the medial patellar
retinaculum and the underlying joint capsule in the same line to reach
the back of the patella. Further superior extension exposes the
suprapatellar pouch, which is a frequent site of loose bodies in the
knee.
the muscular plane between the vastus medialis and rectus femoris
muscles, exposing the distal two thirds of the femur.
 |
|
Figure 10-23 Make a second longitudinal posterior incision to enter the posteromedial aspect of the joint.
|
provides the widest possible exposure of the ligamentous structures on
the medial side of the knee. Although it is used mainly for the
exploration and treatment of damage to the superficial medial
(collateral) ligament and medial joint capsule, the approach also can
be used for a medial meniscectomy in conjunction with ligamentous
repair and for the repair of a torn anterior cruciate ligament. (See
the section regarding the lateral approach to the distal femur.)
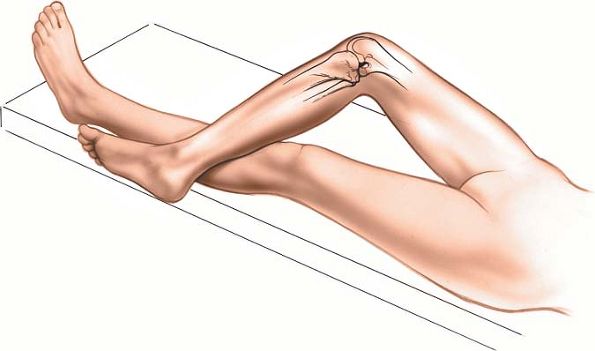
the affected knee to about 60°. Abduct and externally rotate the hip on
that side, placing the foot on the opposite shin. Then, use a
tourniquet after exsanguinating the limb. Various thigh rests have been
designed to make it easier to maintain this position (Fig. 10-24).
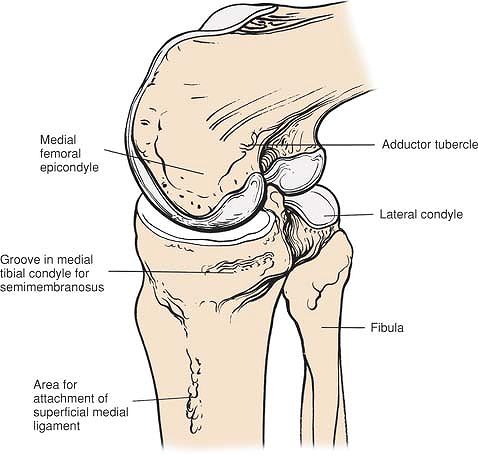
on the medial surface of the medial femoral condyle. It lies on the
posterior part of the condyle in the distal end of the natural
depression between the vastus medialis and hamstring muscles.
 |
|
Figure 10-24 Position for the medial approach to the knee.
|
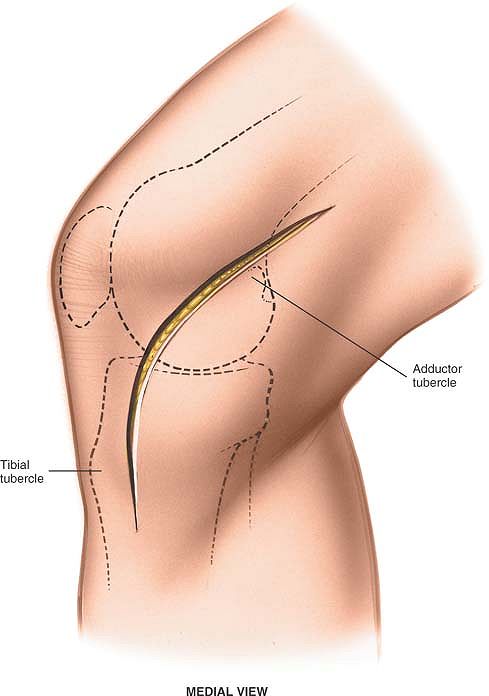
proximal to the adductor tubercle of the femur. Curve it
anteroinferiorly to a point 6 cm below the joint line on the
anteromedial aspect of the tibia. The middle of this incision runs
parallel to the medial border of the patella about 3 cm medial to it (Fig. 10-25).
Because the nerves at the level of the knee pass posterior to the
approach in the popliteal fossa, dissection is quite safe. The only
cutaneous nerve that may be damaged is the saphenous nerve and its
branches.
should extend from the midline anteriorly to the posteromedial corner
of the knee posteriorly (Fig. 10-26).
the operative field transversely and is sacrificed; however, the
saphenous nerve itself, which emerges from between the gracilis and
sartorius muscles, must be preserved, as must the long saphenous vein
in the posteromedial aspect of the dissection. (The infrapatellar
branch of the saphenous nerve should be cut and the end buried in fat
to diminish the chances of the formation of a painful neuroma.)
incising the layers that cover them, either in front of or behind the
superficial medial ligament (the medial collateral ligament). These
separate incisions provide access to the anterior and posterior parts
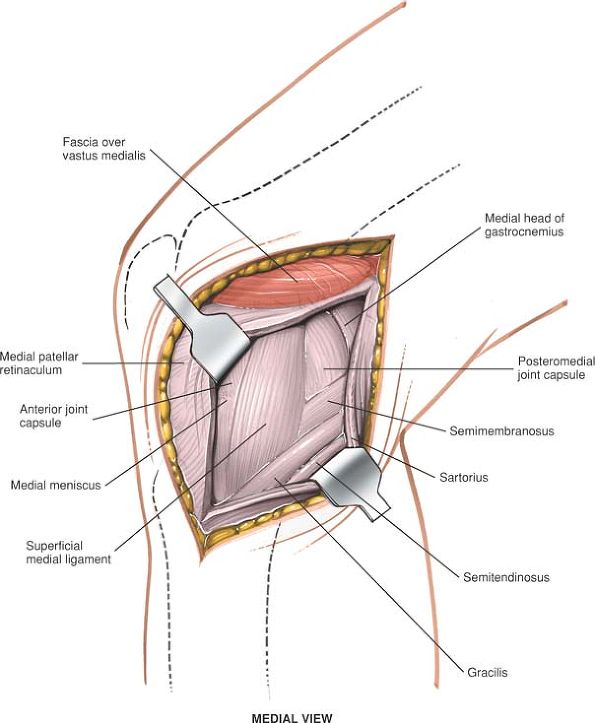
of the medial side of the joint, respectively.
medial ligament, the anterior part of the medial meniscus, and the
cruciate ligament.
sartorius muscle in line with the muscle’s fibers, starting from its
attachment to the subcutaneous surface of the tibia and extending
proximally to a point 5 cm above the joint line (see Fig. 10-26). The anterior
border of the sartorius is hard to define at the level of the knee
joint, so it should be sought either at the muscle’s tibial insertion
or at the proximal end of the wound. Now, flex the knee further to
allow the sartorius muscle to retract posteriorly, uncovering the other
two components of the pes anserinus, the semitendinosus and gracilis
muscles, which lie beneath and behind the sartorius (Fig. 10-27).
 |
|
Figure 10-25
Make a long, curved incision. The middle of this incision runs parallel and about 3 cm medial to the medial border of the patella. |
 |
|
Figure 10-26
Retract the skin flaps to expose the fascia of the knee. Note that the infrapatellar branch of the saphenous nerve crosses the operative field transversely. Incise the fascia along the anterior border of the sartorius. |
 |
|
Figure 10-27 Flex the knee and retract the sartorius posteriorly to uncover the remaining components to the pes anserinus.
|
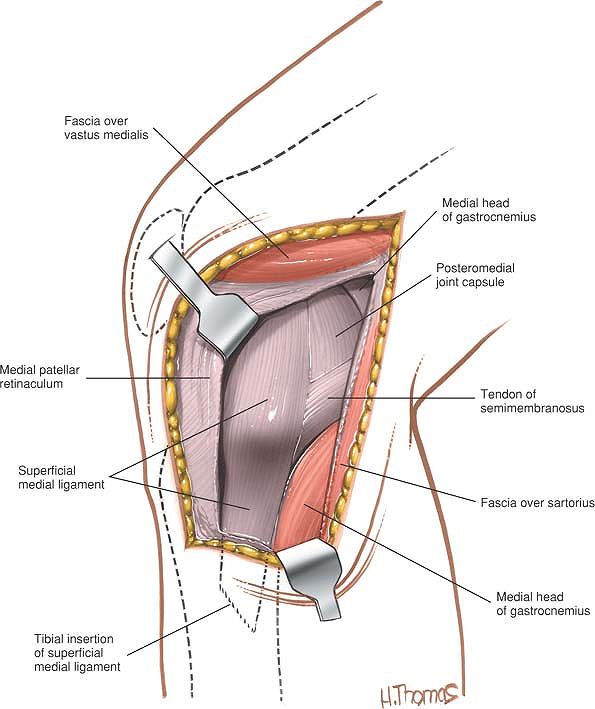
tibial insertion of the superficial medial ligament, which lies deep
and distal to the anterior edge of the sartorius. Note that the
ligament inserts some 6 to 7 cm below the joint line, not close to it (Fig. 10-28).
Apply gentle traction to the superficial medial ligament to reveal its
point of injury. Alternatively, apply a strong outward force to the
knee,
which will make obvious the site of the ligamentous disruption.
 |
|
Figure 10-28
Retract all three muscles (sartorius, semitendinosus, and gracilis) posteriorly to expose the tibial insertion of the superficial medial ligament. |
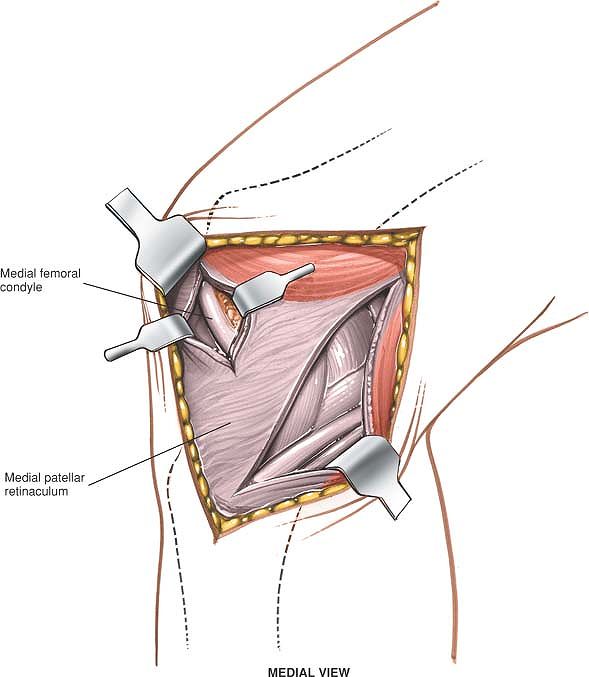
access to the inside of the front of the joint. To avoid damage to the
underlying medial meniscus, begin the incision well above the joint
line and cut down carefully (Fig. 10-29).
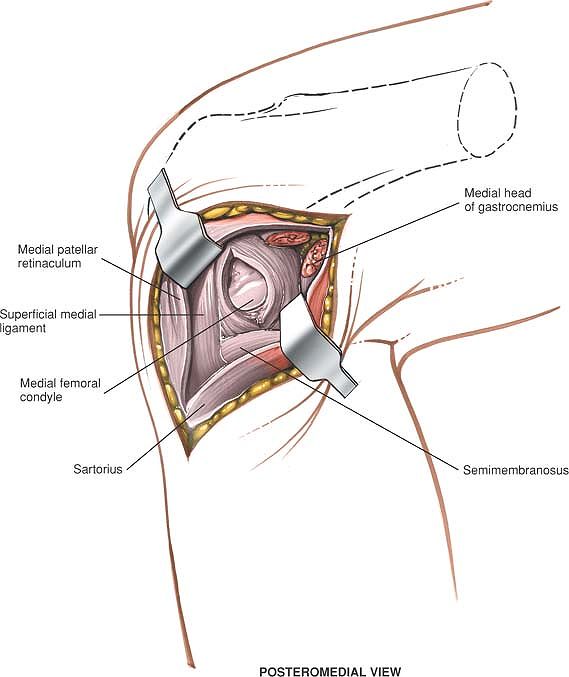
together with the semitendinosus and gracilis muscles (Fig. 10-30).
In cases of damage to the posteromedial joint capsule, the back of the
medial femoral condyle usually will be seen, with its underlying
meniscus visible through the torn posteromedial joint capsule. If the
capsule is intact, expose the posteromedial corner of the joint by
separating the medial head of the gastrocnemius muscle from the
semimembranosus muscle. Although both muscles are supplied by the
tibial nerve, this intermuscular plane is a safe area for dissection,
because the semimembranosus receives its nerve supply well proximal to
the approach and the gastrocnemius receives it well distal.
 |
|
Figure 10-29 Make a longitudinal medial parapatellar incision to gain access to the inside of the front of the knee joint.
|
muscle from the posterior capsule of the knee joint almost to the
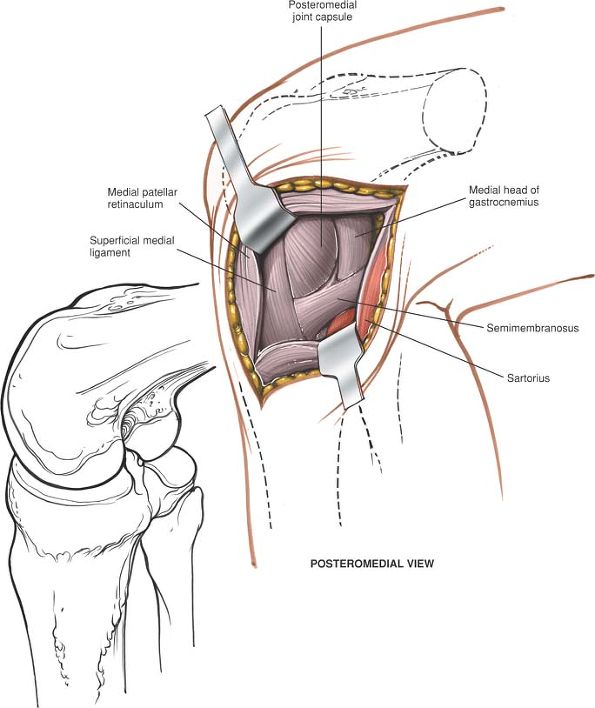
midline by blunt dissection (Fig. 10-31). Full exposure allows the posteromedial
corner of the capsule to be inspected for damage. A second arthrotomy
posterior to the superficial medial ligament (the tibial collateral
ligament) permits inspection or treatment of posterior intraarticular
or periarticular pathology (see Fig. 10-31). Repair of the posteromedial comer of the joint also is possible.
 |
|
Figure 10-30
Retract the sartorius, semitendinosus, and gracilis posteriorly to expose the posteromedial corner of the joint. Orientation of the knee (inset). |
 |
|
Figure 10-31
Expose the posteromedial corner of the knee joint by first separating the gastrocnemius muscle and the posterior capsule of the joint, and then performing a capsulotomy posterior to the tibial collateral ligament. |
and sartorius muscles, and runs with the long saphenous vein. It
provides sensation for some of the non–weight-bearing portions of the
foot and should be preserved (Fig. 10-32; see Fig. 10-35).
in the posterior corner of the superficial dissection. Because it may
be required for future vascular procedures, it should be preserved (see
Fig. 10-35).
curves around the upper end of the tibia. It may be damaged when the
medial belly of the gastrocnemius muscle is lifted off the posterior
capsule: the damage may go unnoticed until the wound is closed and the
tourniquet is released (see Figs. 10-38 and 10-39).
against the posterior joint capsule in the midline and is adjacent to
the medial head of the gastrocnemius muscle. Take care to avoid
injuring the vessel during separation of the
gastrocnemius from the joint capsule (see Figs. 10-58 and 10-61).
 |
|
Figure 10-32 The outer layer of the anteromedial aspect of the knee joint.
|
postoperatively can cause skin necrosis. Therefore, the large skin
flaps that are created in this approach should be drained well.
all the medial structures of the knee, and cannot be extended usefully
in either direction. (For repair of the anterior cruciate ligament, see
the section describing the lateral approach to the distal femur.)
medial side of the knee are merely “condensations within tissue planes.”17
They blend with each other at various points, making definition of each
layer difficult, especially in cases of trauma, when bleeding and edema
can complicate the problem further. For this reason, it is important to
have an understanding of the normal anatomy and supporting structures
on the medial side of the knee.
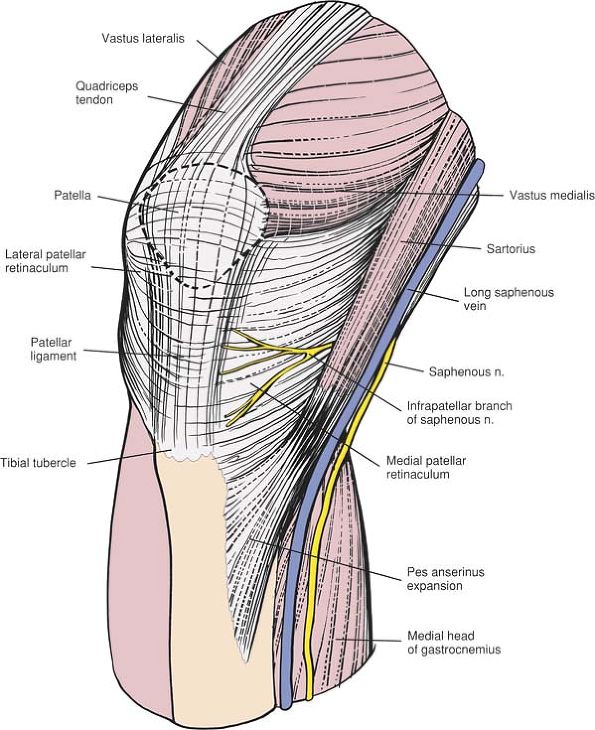
the deep fascia of the thigh. It encloses the sartorius muscle, whose
fibers blend with the fascial layer before they insert into the tibia.
derived from the vastus medialis muscle to form the medial patellar
retinaculum. Posteriorly, the layer is continuous with the deep fascia,
which covers the gastrocnemius muscle and the roof of the popliteal
fossa (Fig. 10-35; see Fig. 10-32).
ligament (the tibial or medial collateral ligament), which is attached
superiorly just below the adductor tubercle of the femur. The ligament,
which is quadrangular, fans out as it travels down to insert into the
subcutaneous border of the tibia some 6 to 7 cm below the knee joint.
It lies behind the axis of rotation of the knee (Figs. 10-33 and 10-34).
from the middle layer passes to the medial side of the patella, forming
the medial patellofemoral ligament (see Fig. 10-34).
fibrous tissue of the middle layer merges with that of the true joint
capsule (deep layer) and the tendon of the semimembranosus muscle (Fig. 10-36).
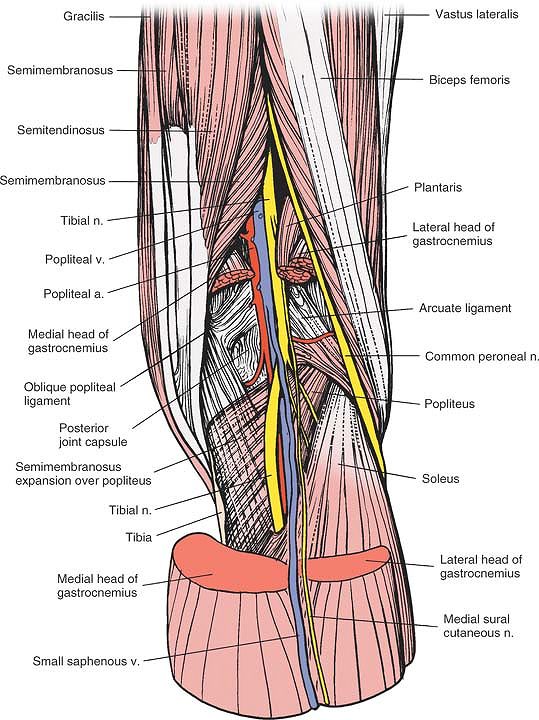
popliteal fossa before it inserts into the back of the medial condyle
of the tibia. Three expansions of fibrous tissue come from the muscle’s
tendon to reinforce the supporting structures of the knee. The tough oblique popliteal ligament,
one of the expansions, crosses the popliteal fossa, extending upward
and laterally before attaching to the lateral femoral condyle (Fig. 10-38).
Another expansion of the tendon of the semimembranosus muscle passes
forward along the medial surface of the tibial plateau and under the
superficial medial ligament before attaching to bone (Fig. 10-39).
The expansion lies below the inferior attachment of the joint capsule
(in the deep layer). A third, thin expansion passes over the popliteus
muscle (see Fig. 10-38). These muscular
insertions are thought to be very important for the dynamic
stabilization of the knee. In cases of damage to the posteromedial
corner of the knee, they should be reattached in their anatomic
position, if possible.
muscles run between the superficial and middle layers of the supporting
structures of the knee. They insert into the tibia under the tendon of
the sartorius muscle (in the outer layer), where they become part of
the outer layer (see Figs. 10-34 and 10-36).
it attaches just above and below the margins of the articular surfaces
of the tibia and femur. Anteriorly, the true capsule lies over the fat
pad; it is not part of the medial retinaculum that covers it.
medial side of the knee: by the deep medial ligament, which extends
from the medial epicondyle of the femur to the medial meniscus. The
deep medial ligament is deep to and separate from the superficial
medial ligament. In addition, the deep layer anchors the meniscus to
the tibia (the coronary ligament). This results in the limitation of
meniscal motion, which may be a factor in the genesis of meniscal tears
(see Figs. 10-34 and 10-39).
transversely across the knee joint. Therefore, the more transverse the
incision, the more cosmetic the resulting scar. Longitudinal incisions,
such as those that are used for the medial parapatellar approaches,
often leave broad, obvious scars, which are distressing, especially in
young women.
 |
|
Figure 10-33
The sartorius and the medial patellar retinaculum (outer layer) have been resected to reveal the superficial medial ligament of the middle layer. The true joint capsule (deep layer) also is exposed. |
 |
|
Figure 10-34 The joint cavity of the knee, with all the more superficial structures removed.
|
 |
|
Figure 10-35
The outer layer of the medial aspect of the knee joint consists of the sartorius, the fascia of the thigh, and the medial patellar retinaculum. |
 |
|
Figure 10-36
The outer layer has been resected to reveal the intermediate layer, consisting of the superficial medial ligament. Between the superficial and medial layers run the semitendinosus and gracilis muscles. The deep medial ligament (meniscofemoral ligament) of the deep layer is visible. The true joint capsule anterior to the superficial medial ligament also is visible. |
 |
|
Figure 10-37
A more posteromedial view of the knee joint. The sartorius, the deep fascia of the outer layer, the gracilis, the semitendinosus, and the semimembranosus have been resected to reveal the superficial medial ligament (middle layer), the posteromedial joint capsule (deep layer), and the medial head of the gastrocnemius. |
 |
|
Figure 10-38 The medial head of the gastrocnemius has been resected to reveal the three expansions of the semimembranosus.
|
 |
|
Figure 10-39
The posterior aspect of the superficial medial ligament (middle layer) has been excised to reveal the true joint capsule and its thickening, the deep medial ligament (the meniscofemoral ligament and the coronary ligaments). The posteromedial joint capsule has been excised to reveal the corner of the joint. The insertion of the semimembranosus and a portion of its expansion are visible. |
-
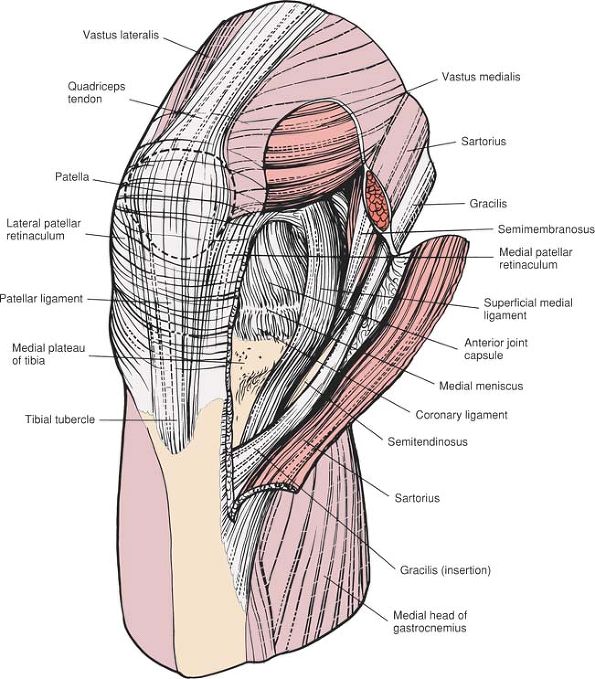
Medial exposure of the knee and its supporting structures
-
With anterior arthrotomy
-
The outer layer is incised in front of the sartorius muscle for exposure of the middle and deep layers (see Fig. 10-35).
-
Retraction of the sartorius muscle
posteriorly uncovers the two structures lying between the superficial
and middle layers: the semitendinosus and gracilis muscles (see Fig. 10-36). -
Retraction of all three muscles of the pes anserinus reveals the middle layer, the superficial medial ligament (see Fig. 10-36).
-
Vertical incision through the medial patellar retinaculum exposes the thin underlying capsule, the deep layer (see Fig. 10-36).
-
Incision of this capsule makes accessible the intraarticular structures of the anterior half of the joint (see Fig. 10-34).
-
-
With posterior arthrotomy
-
Incision of the outer layer
anterior to the sartorius muscle (and posterior retraction of this
muscle, the semitendinosus muscle, and the gracilis muscle) reveals the
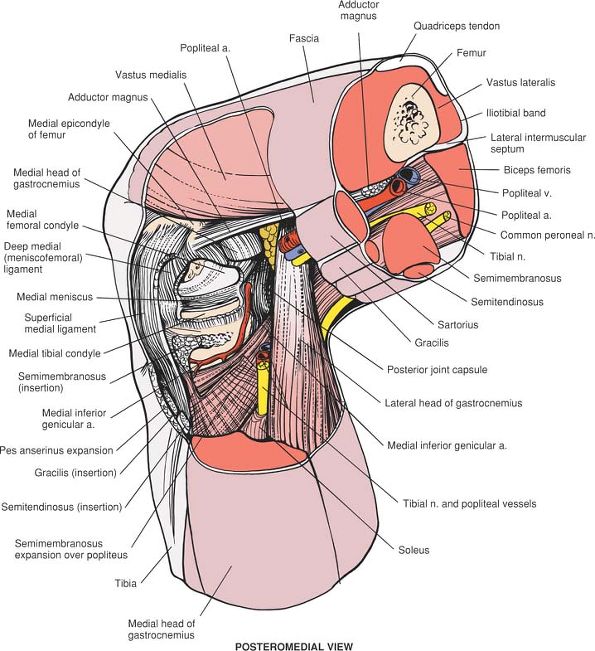
superficial medial ligament (see Fig. 10-37).![]() Figure 10-40 Osteology of the posteromedial aspect of the knee joint.
Figure 10-40 Osteology of the posteromedial aspect of the knee joint. -
Further posterior retraction brings the
posteromedial corner of the joint into view. The cover consists of
fibrous tissue derived from the semimembranosus muscle (the middle layer), which has fused with the true joint capsule (the deep layer; see Fig. 10-38). -
Covering the medial side of the posterior
joint capsule is the medial head of the gastrocnemius muscle. This head
can be reflected backward off the capsule to extend the exposure
posteriorly (see Figs. 10-37 and 10-39). -
Arthrotomy posterior to the superficial
medial ligament consists of incising the deep and middle layers
together, exposing the intraarticular structures in the posterior half
of the joint (Fig. 10-40; see Fig. 10-39).
-
-
-
Approach for medial meniscectomy
-
Incising the medial patellar retinaculum exposes the true capsule of the joint, which is very thin at this point.
-
The true capsule of the joint, incised with the synovium, allows access to the anteromedial portion of the joint (see Figs. 10-33 and 10-34).
-
-
Medial parapatellar approach to the knee
-
The joint is dissected through the same fascial layers as in the approach for the medial meniscus.
-
gracilis, insert into the upper part of the subcutaneous surface of the
tibia. Each muscle has a different nerve supply: the sartorius is
innervated by the femoral nerve, the semitendinosus by the sciatic
nerve, and the gracilis by the obturator nerve. In addition, each
muscle crosses both the hip and the knee.
other, more powerful, muscles. At their pelvic origins, the three
attach to three points on the bony pelvis that are separated as widely
as the pelvis allows: the anterior superior iliac spine (sartorius),
the ischial tuberosity (semitendinosus), and the inferior pubic ramus
(gracilis). With these origins and insertions, the muscles are arranged
ideally to stabilize the pelvis on the leg.
types of incisions. Longitudinal and oblique incisions provide better
access to other structures within the joint, whereas a transverse
incision provides limited access to the knee, but excellent exposure of
the meniscus itself. All incisions enter the lateral compartment of the
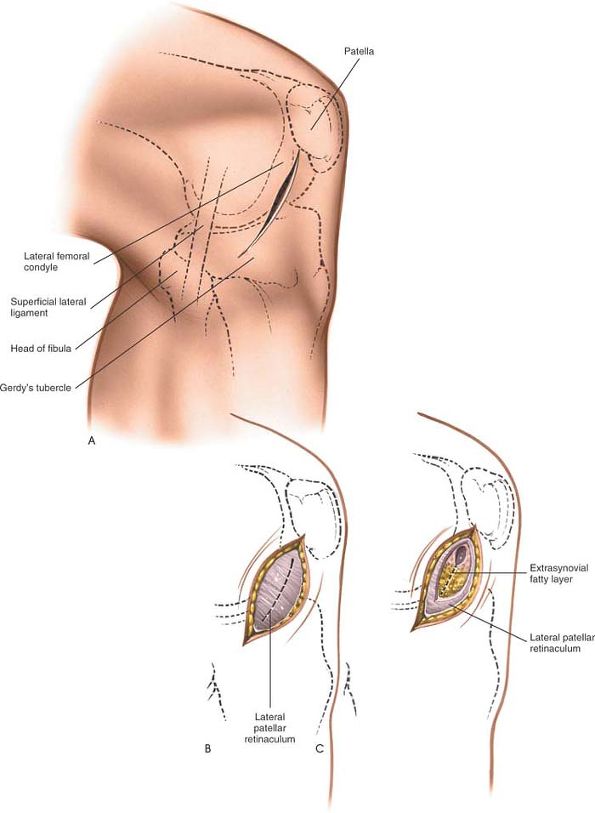
knee anterior to the superficial lateral ligament.
now largely confined to parts of the world where arthroscopic equipment
is not available.
-
Lateral meniscectomy, total and partial18
-
Removal of loose bodies
-
Removal of foreign bodies
-
Treatment of osteochondritis of the lateral femoral condyle
-
The sandbag must be placed under the
thigh, not under the knee, to keep the popliteal artery and the
posterior capsule from being compressed against the back of the femur
and tibia. -
The knee should be free to flex more than 90° to allow the best possible access to the back of the joint (Fig. 10-41).
the end of the table so the knees can flex. Then, place the calf of the
affected side over the opposite thigh to flex the affected knee and
abduct and externally rotate the hip. Now, place the table in 45° of
Trendelenburg to bring the lateral side of the knee up to eye level.
Finally, flex the head of the table up so that the patient does not
slide backward (Fig. 10-42).
elevating it for 2 minutes or by applying a soft rubber bandage. Next,
inflate a tourniquet.
situated at about the same level as the tibial tubercle. From the
lateral femoral epicondyle, move a thumb inferiorly and posteriorly
across the joint line to find it.
lateral collateral ligament), cross the patient’s leg so that his or
her ankle rests on the opposite knee. When the knee is flexed to 90°
and the hip is abducted and externally rotated, the iliotibial tract
relaxes and makes the superficial lateral ligament easier to isolate.
The ligament stands away from the joint itself, stretching from the
fibular head to the lateral femoral condyle.
meniscectomy and for other intraarticular procedures, should they prove
necessary. To make the incision, start at the inferolateral corner of
the patella and continue downward and backward for about 5 cm. The cut
should remain considerably anterior to the superficial lateral
ligament, which lies under a line drawn vertically up from the head of
the fibula to the lateral femoral condyle (Fig. 10-43A).
 |
|
Figure 10-41 Position for the lateral approach to the knee.
|
 |
|
Figure 10-42
With the patient supine on the operating table, drop the end of the table so the knee can flex. The crossed-leg position allows a direct approach to the lateral aspect of the knee. |
 |
|
Figure 10-43 (A)
Incision for the lateral approach to the knee. The incision should remain considerably anterior to the superficial lateral (fibular collateral) ligament. (B) Incise the knee joint capsule in line with the skin incision. (C) Incise the synovium and extrasynovial fat pad to enter the joint. Avoid damaging the underlying meniscus. |
consists mainly of incisions of the lateral patellar retinaculum and
the joint capsule. No major nerves are located in or near the area.
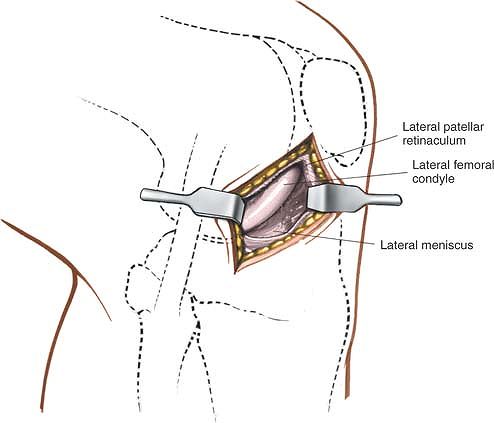
joint in line with the incision to open the anterolateral portion of
the joint. To avoid damaging the underlying meniscus, begin the
incision well above the joint line and cut down carefully (Fig. 10-44; see Fig. 10-43C).
 |
|
Figure 10-44 Expose the meniscus. Place retractors to allow maximum exposure of the joint.
|
runs around the upper part of the tibia. The artery lies next to the
peripheral attachment of the lateral meniscus; it may be damaged if the
meniscus is detached along with a portion of the capsule during
meniscectomy, leading to massive postoperative hemarthrosis. It is not
in danger during the approach (see Fig. 10-50).
(fibular collateral ligament) limits posterior extension at the
incision. If it is cut and not repaired, it may affect lateral
stability. Its position may be estimated by a line drawn from the head
of the fibula to the lateral femoral condyle (see Fig. 10-50).
inside of the joint because of the relative immobility of the
structures that are incised and the difficulty in retracting them. The
exposure may be improved in three ways without extending the incision:
-
Retraction. Retractors should be readjusted frequently to allow the best possible view.
-
Position of the joint.
An inward stress opens up the lateral side of the joint (one advantage
of the crossed-leg position), which automatically puts an inward stress
on the knee. Flexion of the knee allows better access to the back of
the lateral side of the joint. If the very back of the joint must be
seen, however, the best view may be obtained by putting the knee into
extension and applying distraction and inward force. -
Lights. The
direction of the light should be adjusted frequently so that it shines
into the depths of the wound. A headlamp can be used to advantage for
lateral meniscectomy.
extend the incision superiorly, incise the skin and lateral patellar
retinaculum along the lateral border of the patella, increasing access
to the back of the patella. To widen the exposure still further, extend
the incision superiorly and open the plane between the posterior border
of the vastus lateralis muscle and the lateral intramuscular septum.
Extending this approach into a posterolateral approach to the femur
offers the theoretic possibility of extending the exposure as far as
the greater trochanter (see Posterolateral Approach in Chapter 9).
This extended exposure is very useful in the treatment of supracondylar
fractures of the femur with intraarticular components.
extend the incision inferiorly, incise the skin vertically downward,
staying lateral to the tibial tubercle and running vertically down the
leg about 1 cm from the subcutaneous border of the tibia. Incise the
lateral patellar retinaculum, then carefully detach part of the origin
of the tibialis anterior muscle from the lateral border of the tibia.
This will allow access to the upper third of the tibia and good
visualization of the inside of the joint. This extension can be used
for the internal fixation of lateral tibial plateau fractures. In these
fractures, it is critically important to achieve good visualization of
the articular surface of the lateral tibial condyle to allow anatomic
reconstruction of this surface.
supporting structures on the lateral side of the knee. It may be
extended for intraarticular exploration of the knee’s anterior and
posterior structures as well.
single surgical procedure. Its major use is in the assessment of
ligamentous damage, a type of pathology that is more common on the
medial side because outward stress is more common than inward stress.
sandbag under the buttock of the affected side. This position rotates
the leg medially to expose better the lateral aspect of the knee. Flex
the knee to 90°. Exsanguinate the limb either by elevating it for 3 to
5 minutes or by applying a soft rubber bandage then inflate a
tourniquet (see Fig. 10-41).
lateral tubercle of the tibia), a smooth, circular facet on the
anterior surface of the lateral condyle of the tibia, marks the
inferior attachment of the iliotibial band. Palpate it just lateral to
the patellar ligament.
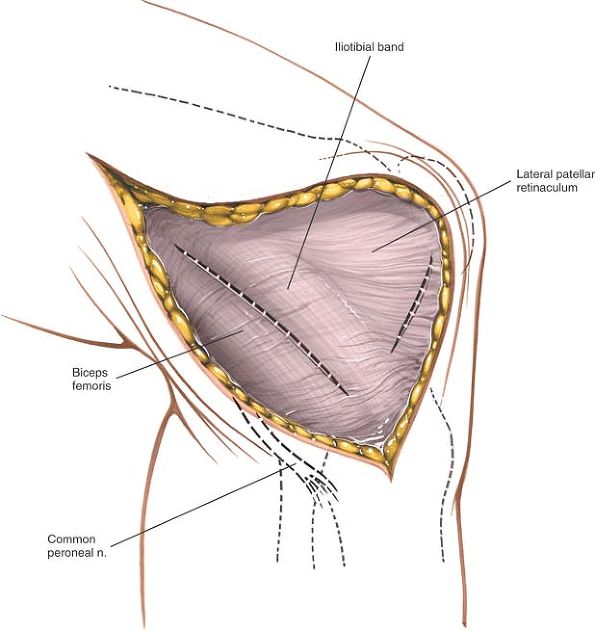
of all the lateral structures of the knee. Begin the incision at the
level of the middle of the patella and 3 cm lateral to it. With the
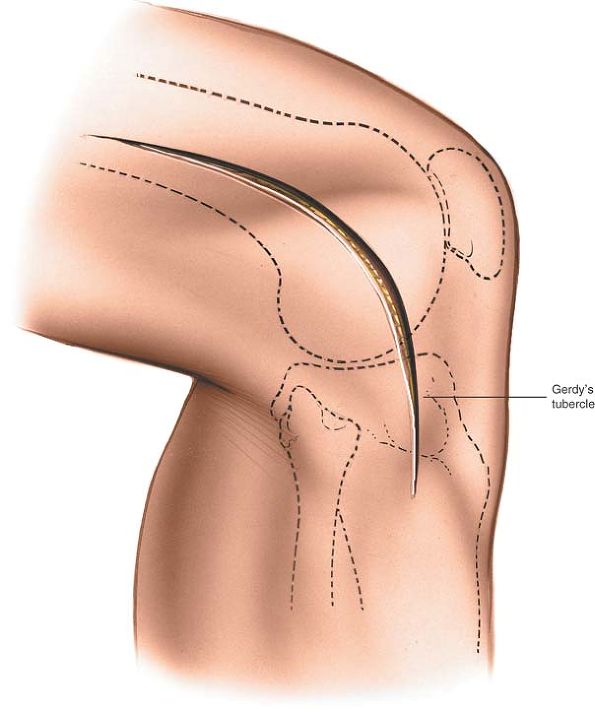
knee still flexed, extend the cut downward, over Gerdy’s tubercle on
the tibia and 4 to 5 cm distal to the joint line. Complete the incision
by curving its upper end to follow the line of the femur (Fig. 10-45).
 |
|
Figure 10-45 Incision for the lateral approach to the knee joint. The incision should be made with the knee flexed.
|
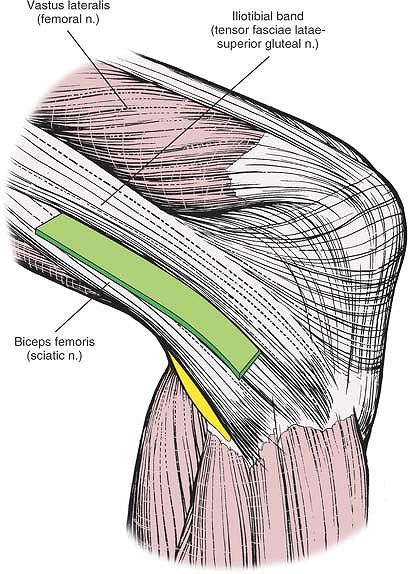
muscle. The iliotibial band is the fascial aponeurosis of two muscles,
the gluteus maximus and the tensor fasciae latae, both of which are
supplied by the superior gluteal nerve. The biceps femoris is supplied
by the sciatic nerve. Although the iliotibial band itself has no nerve
supply,
the plane between it and the biceps femoris can be considered an internervous one because of the band’s muscular origin (Fig. 10-46).
 |
|
Figure 10-46 Internervous plane between the iliotibial band (which is supplied by the superior gluteal nerve) and the biceps femoris (which is supplied by the sciatic nerve).
|
structures: the iliotibial band, sweeping down to attach to the
anterolateral border of the tibia and Gerdy’s tubercle, and the biceps
femoris muscle, passing downward and forward to attach to the head of
the fibula. Both these structures may be avulsed from their insertions
during severe inward stress to the knee.
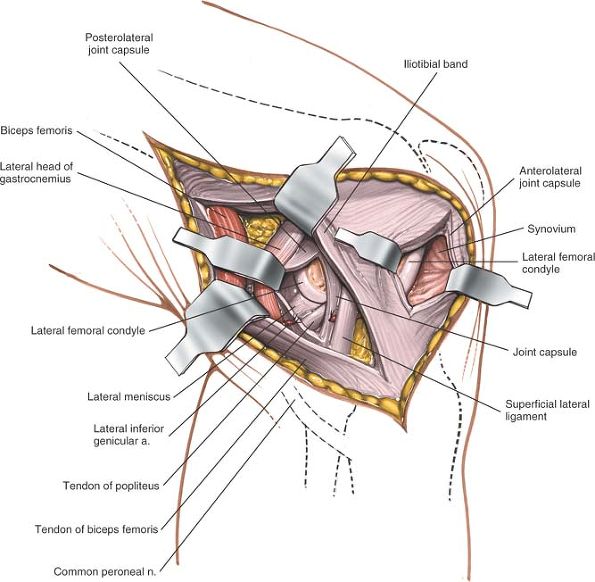
band and the biceps femoris muscle, avoiding the common peroneal nerve
on the posterior border of the biceps tendon (Fig. 10-47).
Retract the iliotibial band anteriorly and the biceps femoris muscle
(with the peroneal nerve) posteriorly, uncovering the superficial
lateral ligament (fibular collateral ligament) as it runs from the
lateral epicondyle of the femur to the head of the fibula. The
posterolateral corner of the knee capsule also is visible (Fig. 10-48).
 |
|
Figure 10-47
Incise the fascia in the interval between the iliotibial band and the biceps femoris to uncover the superficial lateral (fibular collateral) ligament and the posterior joint complex. Make a separate fascial incision anteriorly to create a lateral parapatellar approach. |
 |
|
Figure 10-48
Make an incision into the joint capsule anterior to the superficial lateral ligament for a standard anterolateral approach. To enter the posterior portion of the joint, retract the iliotibial band anteriorly and the biceps femoris posteriorly, revealing the superficial lateral ligament and the posterolateral aspect of the joint. Incise the joint capsule posterior to the ligament to reveal the contents of the joint. |
capsule in front of the ligament. Make a separate fascial incision to
create a lateral parapatellar approach. To avoid incising the meniscus,
begin the arthrotomy 2 cm above the joint line (see Fig. 10-47).
find the lateral head of the gastrocnemius muscle at its origin at the
back of the lateral condyle of the femur. Dissect between it and the
posterolateral corner of the joint capsule. The lateral superior
genicular arteries are in this area; they must be ligated or coagulated.
way of a tendon that lies inside the joint capsule; the posterolateral
corner of the knee may be hidden by
the popliteus and its tendon. In cases of trauma, the dissection in this area already may have been done.
the arthrotomy well above the joint line to avoid damaging the meniscus
or the tendon of the popliteus. An arthrotomy of the posterior half of
the joint capsule must be performed carefully to avoid damaging the
popliteus tendon, which lies outside the meniscus. The arthrotomy
allows inspection of the posterior half of the lateral compartment
behind the superficial lateral ligament (see Fig. 10-48).
the structure most at risk during this approach. It lies on the
posterior border of the biceps tendon and must be found early in the
approach, as the supporting structures of the lateral side of the knee
are being dissected; thereafter, it must be protected, because it is
easy to damage. The nerve should be identified proximal to any damage
and traced from a normal area into an abnormal one (Fig. 10-49).
runs between the lateral head of the gastrocnemius muscle and the
posterolateral capsule, and requires ligation for full exposure of that
corner of the joint (Fig. 10-51). Because this
vessel may cause a significant postoperative hematoma if it is not
ligated adequately, it is advisable to remove the tourniquet before
closing the incision.
risk as it travels within the joint before it attaches to the posterior
aspect of the meniscus and the femur. Take care when opening the
posterior half of the knee joint capsule to avoid cutting the tendon
(see Fig. 10-51).
knee fall into three layers. Because the anatomy can be distorted in
pathologic states, a clear understanding of the normal anatomy is
required before explorations19 are carried out.
the aponeurotic tendon of the tensor fasciae latae and gluteus maximus
muscles, is a thickening in the deep fascia of the thigh. Its fibers
run longitudinally.
surface of the lateral condyle of the tibia that is known as Gerdy’s
tubercle. It also sends fibers into the deep fascia of the leg and
reinforces the lateral patellar retinaculum. In injuries to the knee
involving severe inward stress, its insertion may be avulsed. When the
knee is in extension, the iliotibial band is anterior to the axis of
rotation and maintains extension. With the knee flexed to 90°, it moves
behind the axis of rotation and can act as a flexor. This variable
relationship to the axis of rotation may be a feature in the genesis of
the pivot shift test for a torn anterior cruciate ligament.20
ligament) runs from the lateral epicondyle of the femur to the head of
the fibula. The lateral inferior genicular vessels run between the
ligament and the joint capsule itself. Because the ligament is attached
to the femoral condyle behind the axis of rotation, it is tight in
extension.
When the ligament is damaged, subsequent functional problems are
minimized by the existence of other supporting structures on the
lateral side of the knee, especially the iliotibial band (Fig. 10-50).
 |
|
Figure 10-49
A slightly anterolateral view of the outer layer of the knee. The lateral patellar retinaculum, the biceps femoris, and the iliotibial band constitute the outer layer. |
joint, the fibrous tissue attached just above and below the articular
surfaces of the knee. Two other structures run with the capsule:
-
The popliteus
muscle originates from the popliteal surface of the tibia above the
soleal line. Its tendon, which lies within the joint capsule, attaches
to the lateral condyle of the femur and the posterior aspect of the
lateral meniscus.P.563![]() Figure 10-50
Figure 10-50
The lateral patellar retinaculum, the iliotibial band, and the deep
fascia (outer layer) have been excised to reveal the superficial
lateral ligament (middle layer) and the joint capsule (deep layer).
Note that the lateral inferior genicular artery runs along the joint
line between the middle and deep layers. -
The short lateral ligament
(deep lateral ligament) is a thickening in the true capsule of the
knee. The ligament is developed poorly; it runs underneath the
superficial lateral ligament (fibular collateral ligament), from the
lateral femoral condyle to the head of the fibula. Unlike the medial
ligament, the lateral ligament does not attach to the meniscus. That is
why the lateral meniscus can move far more freely than can its medial
counterpart (Fig. 10-51).
 |
|
Figure 10-51
A true lateral view of the knee joint. The biceps femoris, iliotibial band, and vastus lateralis have been excised to reveal the deeper layers. The joint capsule has been excised anterior and posterior to the superficial lateral ligament (fibular collateral ligament) to expose the intraarticular structures, notably the popliteus tendon and the lateral meniscus. |
-
Approach for lateral meniscectomy
-
Incise the superficial and deep layers, cutting the lateral patellar retinaculum (see Fig. 10-50).
-
The true capsule of the joint is very thin at this point. Incise it with its synovium to gain access to the joint surface.
-
-
Lateral exposure of the knee and its supporting structures
-
Open the superficial layer in the plane between the biceps femoris muscle and the iliotibial band (see Fig. 10-50).
-
Incise the joint either in front of or behind the superficial lateral ligament, the middle layer of the lateral side (see Fig. 10-51).
-
Incise the capsule of the joint (the deep layer)
in front of or behind the superficial lateral ligament. Do not damage
the tendon of the popliteus muscle, which lies between the outer border
of the lateral meniscus and the capsule of the joint (see Fig. 10-51).
-
is primarily a neurovascular approach. Orthopaedically, it rarely is
needed because the medial and lateral approaches each provide good
access to half the posterior capsule. Its uses include the following:
-
Repair of the neurovascular structures that run behind the knee in cases of trauma
-
Repair of avulsion fractures of the site of attachment of the posterior cruciate ligament to the tibia
-
Recession of gastrocnemius muscle heads in cases of contracture
-
Lengthening of hamstring tendons
-
Excision of Baker’s cyst and other popliteal cysts
-
Access to the posterior capsule of the knee
at their origin on the posterior femoral surface just above the medial
and lateral condyles. They are not as easy to feel as the hamstring
tendons just above them.
on the medial border of the popliteal fossa. The semitendinosus feels
round; the semimembranosus is deeper and remains muscular to its
insertion.
 |
|
Figure 10-52 Position of the patient on the operating table for the posterior approach to the knee.
|
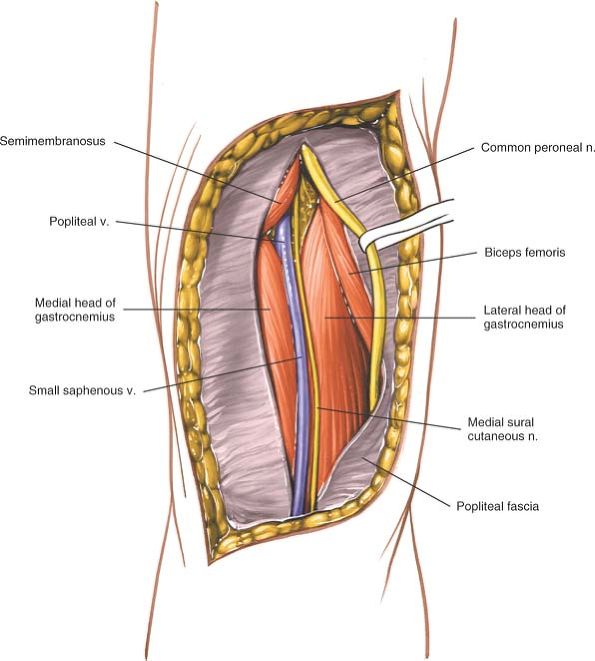
biceps femoris muscle, and bring the incision obliquely across the
popliteal fossa. Turn downward over the medial head of the
gastrocnemius muscle, and run the incision inferiorly into the calf (Fig. 10-53).
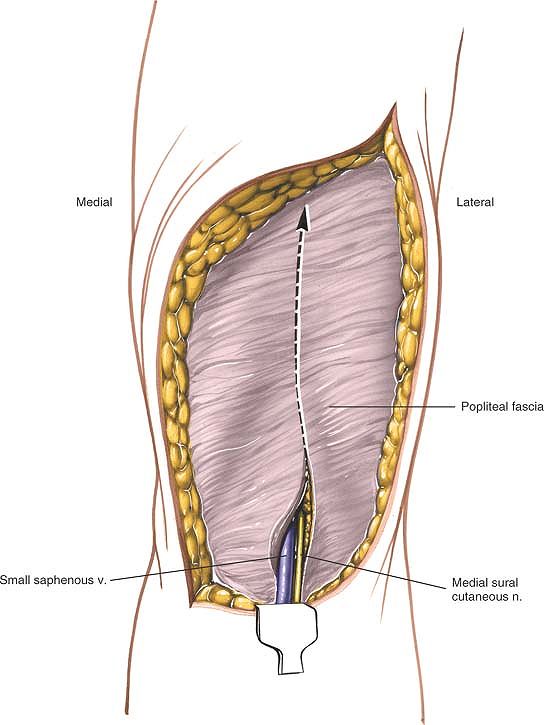
which exposes the contents of the popliteal fossa by incising the deep
fascia over it and pulling apart the three muscles that form its
boundaries.
fat. The vein is easier to identify if the leg is not exsanguinated
fully before the tourniquet is applied. Running on the lateral side of
the vein is the medial sural cutaneous nerve. The small saphenous vein
can be used as a guide to the nerve, and the nerve can be used as a
guide to dissecting the popliteal fossa. The nerve, which continues
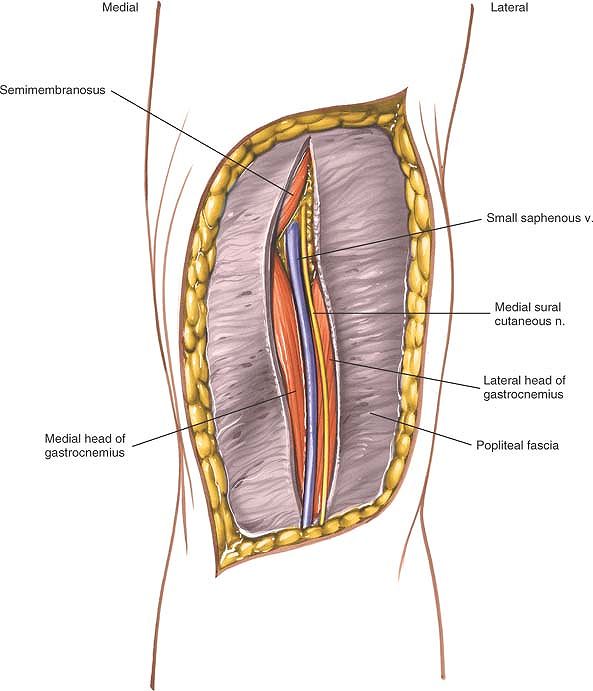
beneath the deep fascia of the calf, is a branch of the tibial nerve (Fig. 10-54; see Fig. 10-57).
the small saphenous vein. Trace the medial sural cutaneous nerve
proximally back to its source, the tibial
nerve. Dissect up to the apex of the popliteal fossa, following the tibial nerve (Fig. 10-55).
 |
|
Figure 10-53
Make a curved incision over the popliteal fossa. Start laterally over the biceps femoris, and bring the incision obliquely across the popliteal fossa. Turn the incision downward over the medial head of the gastrocnemius. |
 |
|
Figure 10-54
Reflect the skin flaps. Identify the small saphenous vein as it passes upward in the midline of the calf. On the lateral side of the vein is the medial sural cutaneous nerve. Incise the fascia of the fossa just lateral to the small saphenous vein. |
semimembranosus muscle on the medial side and the biceps femoris muscle
on the lateral side. Roughly at the apex, the common peroneal nerve
separates from the tibial nerve. Dissect out the common peroneal nerve
in a proximal to distal direction as it runs along the posterior border
of the biceps femoris muscle (Fig. 10-56; see Fig. 10-59).
The artery has five branches around the knee: two superior, two
inferior, and one middle genicular artery. One or more of these
branches may have to be ligated if the artery needs to be mobilized
(see Fig. 10-60).
 |
|
Figure 10-55
Incise the fascia of the popliteal fossa. Trace the medial sural cutaneous nerve proximally, back to its source, the tibial nerve. |
enters the popliteal fossa from below. Then it curves, lying directly
posterior to the artery while in the fossa. Above the knee joint, it
moves to the posterolateral side of the artery. Be very careful in
mobilizing this structure. Intimal damage may cause thrombosis.
 |
|
Figure 10-56
Dissect out the common peroneal nerve in a proximal to distal direction as it runs along the posterior border of the biceps femoris muscle. |
 |
|
Figure 10-57
The popliteal vein lies medial to the artery as it enters the popliteal fossa from below. Then it curves, lying directly posterior to the artery while in the fossa. |
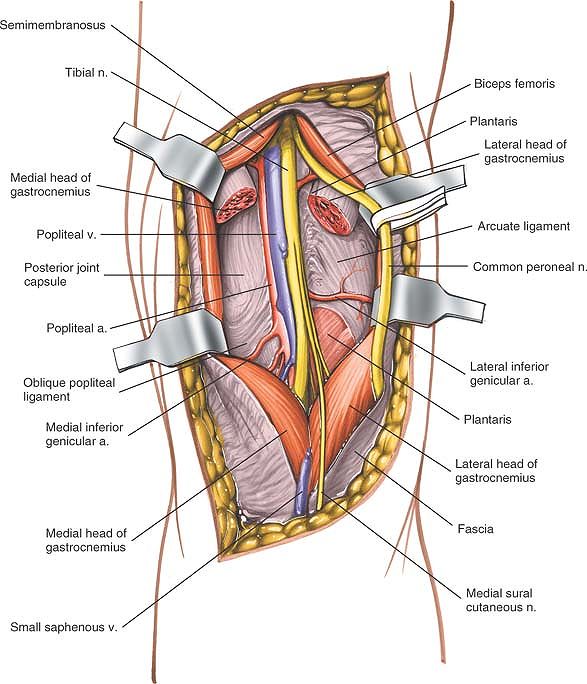
popliteal fossa exposes various parts of the posterior joint capsule.
There are two ways to gain greater access to the joint if this is
necessary:
-
Posteromedial joint capsule. Detach the
tendinous origin of the medial head of the gastrocnemius muscle from
the back of the femur. Retract the head laterally and inferiorly,
pulling the nerves and vessels out of the way to reach the
posteromedial corner of the joint. The exposure now is the same as that
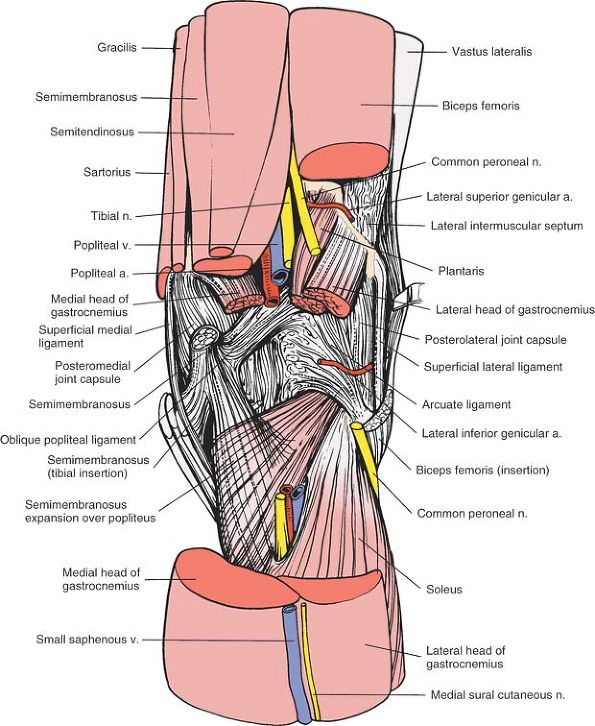
achieved by posterior extension of the medial approach to the knee (Fig. 10-58; see Fig. 10-57). -
Posterolateral corner of the joint.
Detach the origin of the lateral head of the gastrocnemius muscle from
the lateral femoral condyle. Develop the
P.571P.572
interval between it and the biceps femoris muscle, creating the same exposure as in the lateral approach to the knee (see Figs. 10-57 and 10-58).
 |
|
Figure 10-58
Retract the muscles that form the boundaries of the popliteal fossa, exposing the various parts of the posterior joint capsule. Detach the tendinous origin of the medial head of the gastrocnemius in the back of the femur to expose the posteromedial portion of the joint capsule. Detach the origin of the lateral head of the gastrocnemius from the lateral femoral condyle to expose the posterolateral corner of the joint capsule. |
lateral and medial approaches in dealing with pathology of the
posteromedial and posterolateral corners of the knee joint. It should
be used mainly for exploring structures within the popliteal fossa and
for reattaching the avulsed tibial insertion of the posterior cruciate
ligament.
to the vein, therefore, will preserve the nerve. Cutting the medial
sural cutaneous nerve may produce a painful neuroma, but the resulting
anesthesia usually is not significant (Fig. 10-59; see Fig. 10-54).
damaged in the popliteal fossa. Damage to the nerve at this level
produces paralysis of all the flexors of the toes and feet (Fig. 10-60; see Fig. 10-58).
also is susceptible to damage in the popliteal fossa. Damage to the
nerve at this level produces paralysis of the extensors and the
evertors of the foot (see Figs. 10-58 and 10-59).
contents of the popliteal fossa. Retracting the muscles of the fossa
improves the view. To expose the knee capsule itself, detach one or
both of the heads of the gastrocnemius muscle.
trifurcation of the popliteal artery. At that point, the anterior
tibial artery passes forward above the upper border of the interosseous
membrane into the extensor compartment of the leg. This pattern makes
it difficult to mobilize the artery; anastomoses in these areas are
quite challenging.
live patients, the lower “V” of the diamond (the gap between the two
heads of the gastrocnemius muscle) is nonexistent until the heads are
retracted from one another.
semimembranosus and semitendinosus muscles medially and by the biceps
femoris muscle laterally. Its inferior boundaries are the two heads of
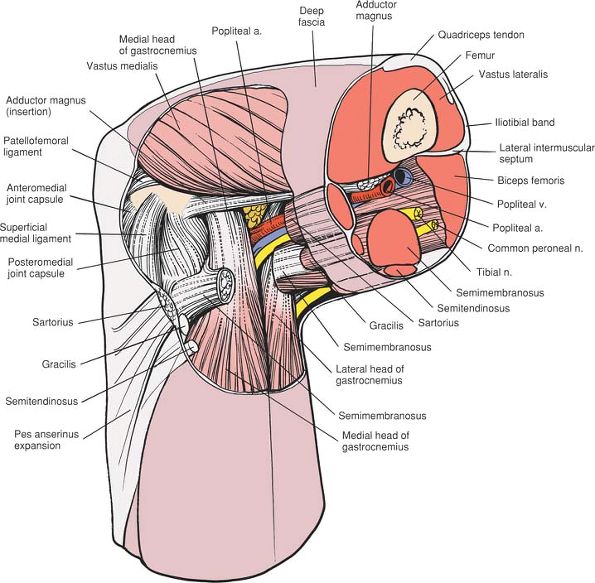
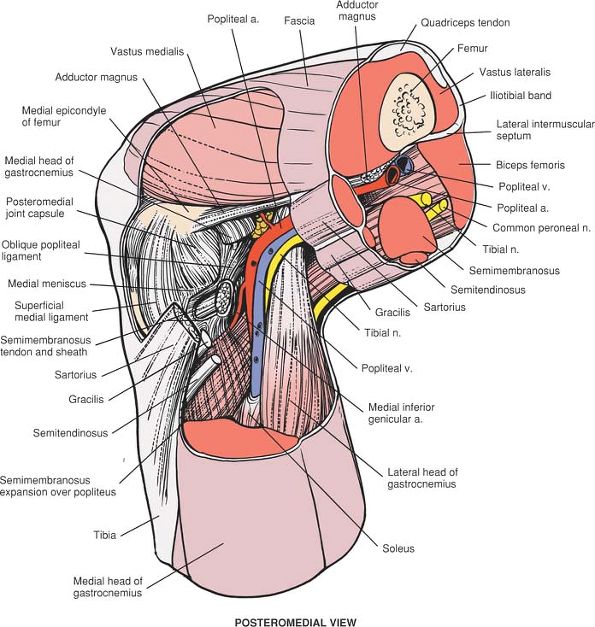
the gastrocnemius muscle. The roof of the fossa is the popliteal
fascia, which is formed by the outer layer of the knee’s supporting
structures. The floor is the posterior aspect of the distal end of the
femur, the posterior capsule of the joint, and the popliteus muscle,
which overlies the proximal tibia (see Fig. 10-59).
transversely across the back of the knee joint. The curved incision
described, therefore, has a variable relation to these lines. The
resultant scar usually is cosmetically acceptable.
of the knee, but because the incision is almost parallel to the skin
crease at this level, a flexion contracture of the knee does not occur
when the wound heals.
roof of the popliteal fossa, using the small (short) saphenous vein and
the medial sural cutaneous nerve of the calf as guides.
 |
|
Figure 10-59
View of the superficial structures of the knee. Note the centrally located small (short) saphenous vein and medial sural cutaneous nerve. |
fossa consists of the popliteal fascia, a continuation of the deep
fascia of the thigh, and part of the outer layer of the knee. Two key
structures pierce it to form the basis for the dissection of the fossa
itself:
-
The small (short) saphenous vein
arises in the foot and runs behind the lateral malleolus into the back
of the calf. It travels roughly along the midline of the calf and
penetrates the popliteal fascia before joining the popliteal vein.![]() Figure 10-60 The gastrocnemius and the plantaris have been resected to reveal the neurovascular bundle in the popliteal fossa.
Figure 10-60 The gastrocnemius and the plantaris have been resected to reveal the neurovascular bundle in the popliteal fossa. -
The medial sural cutaneous nerve
also runs in the midline of the calf beneath the deep fascia, just
lateral to the small saphenous vein. This nerve, which is a branch of
the tibial nerve, supplies varying amounts of skin on the back of the
calf.
continuation of the sciatic nerve, is lateral to the popliteal artery
as it enters the popliteal fossa. Then, at the midpoint of the fossa,
it crosses the artery and lies medial to it as they leave the fossa
together. The tibial nerve passes vertically downward in the fossa,
giving branches to the plantaris, gastrocnemius, soleus, and popliteus
muscles. Its sole cutaneous branch, the sural nerve, is of surgical
interest in nerve grafting. The tibial nerve leaves the fossa between
the two heads of the gastrocnemius muscle. Tibial nerve palsy affects
the plantar flexors of the toes and ankle (see Fig. 10-60).
slopes downward across the fossa, running laterally toward the medial
side of the tendon of the biceps muscle. It disappears into the
peroneus longus muscle, usually under a fibrous arch, where it may be
entrapped before it winds around the fibula. Because patients naturally
lie with their legs externally rotated, the head of the fibula often is
in contact with the bed and compression palsy of the nerve can occur.
For this reason, it is critically important to pad the head of the
fibula when the patient is placed on the operating table in such a
position that the head of this bone may come in contact with the
operating table surface. Its division into deep and superficial
peroneal nerves occurs within the substance of the peroneus longus
muscle. Common peroneal nerve palsy affects all the extensors and
evertors of the foot (see Figs. 10-23, 10-25, and 10-60).
The popliteal artery runs obliquely through the fossa after entering on
the medial side of the femur. It lies directly behind the posterior
capsule of the knee joint, dividing into its terminal branches, the
posterior tibial, anterior tibial, and peroneal arteries, behind the
gastrocnemius muscle. In the fossa, it gives off five branches:
encircle the lower end of the femur. The lateral artery requires
ligation in the posterolateral approach to the knee. The medial artery
requires ligation if the medial head of the gastrocnemius muscle has to
be detached from the femur to expose the posteromedial corner of the
knee.
passes forward in the knee and supplies the cruciate ligaments.
Traumatic rupture of the cruciate ligaments, therefore, is associated
with brisk intraarticular bleeding that usually manifests as an
immediate posttraumatic effusion. The artery holds its parent trunk
firmly to the posterior capsule of the joint. For this reason, it can
be damaged easily in dislocations of the knee during trauma or surgery.
It also may be damaged as the posterior structures in the knee are
dissected out from medial or lateral approaches. To avoid endangering
the artery, flex the knee to allow the joint capsule to fall away from
the back of the femur and tibia.
(medial and lateral) encircle the upper end of the tibia, passing deep
to the medial and lateral superficial ligaments. The lateral artery is
the most commonly damaged structure during lateral meniscectomy; it
runs right at the level of the joint line and, therefore, is vulnerable
in cases in which the meniscus is detached too far laterally (see Fig. 10-60).
between the popliteal artery and the tibial nerve. The small saphenous
vein pierces the popliteal fascia to enter the popliteal vein within
the fossa.
sometimes, mobilizing the boundaries of the popliteal fossa. These
boundaries are formed by the semimembranosus and semitendinosus muscles
superomedially, by the biceps femoris muscle superolaterally, by the
medial head of the gastrocnemius muscle inferomedially, and by the
lateral head of the gastrocnemius muscle inferolaterally (see Fig. 10-60). For more information on these muscles, see Applied Surgical Anatomy of the Thigh in Chapter 9 and Posterolateral Approach to the Tibia in Chapter 11.
one of the few muscles in the body whose origin is distal to its
insertion. The tendon enters the joint by passing through a gap in the
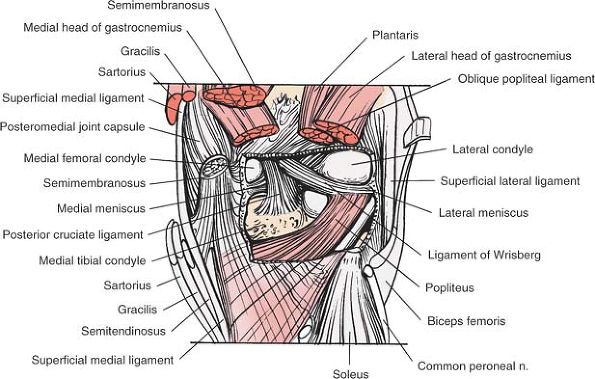
posterolateral capsule, beneath the arcuate ligament (Figs. 10-61 and 10-62).
extended (screw home) position. It also draws the lateral femoral
condyle backward on the tibia and pulls the lateral meniscus back,
preventing it from being trapped between the tibia and femur. The
convex rounded posterior aspect of the lateral tibial plateau allows
this movement to take place.
 |
|
Figure 10-61
The medial and lateral hamstrings and the neurovascular bundle have been resected to reveal the posterior joint capsule of the knee. Note the three expansions of the semimembranosus sheath. |
 |
|
Figure 10-62
The posterior joint capsule of the knee has been resected to reveal the intraarticular structures of the posterior aspect of the knee, most notably the posterior cruciate ligament and the popliteus. Popliteus. Origin. Popliteal surface of tibia above soleal line. Insertion. Lateral epicondyle of femur and posterior aspect of lateral meniscus. Action. Rotates femur laterally on tibia. Nerve supply. Tibial nerve.
|
“over-the-top” approach, is used in conjunction with the medial
parapatellar approach for repair or reconstruction of the anterior
cruciate ligament (see the section regarding the medial parapatellar
approach). Therefore, it is not used as an isolated incision. The
approach exposes the posterior aspect of the intercondylar notch by
passing over the top of the posterior aspect of the lateral femoral
condyle.
access to the lateral aspect of the lateral femoral condyle so that
drill holes can be made in the condyle (if they are needed) for
reattachment of the femoral end of the anterior cruciate ligament or
attachment of the femoral end of an anterior cruciate substitute.
under the thigh so that the knee rests in 30° of flexion. Place a
tourniquet high on the patient’s thigh and exsanguinate the leg using a
compression bandage or prolonged elevation before the tourniquet is
inflated (Fig. 10-63).
 |
|
Figure 10-63 Position for the lateral approach to the distal femur.
|
 |
|
Figure 10-64 Make an incision 10 cm long parallel to and over the indentation between the biceps femoris and the iliotibial band.
|
intermuscular septum, in line with the skin incision. The incision is
slightly anterior to the skin incision itself (Fig. 10-65).
 |
|
Figure 10-65 Incise the iliotibial band just anterior to the lateral intermuscular septum, in line with the skin incision.
|
intermuscular septum, and retract it anteriorly and medially. Below the
muscle lies the lateral superior genicular artery; it must be ligated (Figs. 10-66 and 10-67).
Using cautery, incise the periosteum at the junction of the shaft and
flare of the femur. Pass a small clamp or a small Cobb elevator behind
the posterolateral flare of the lateral femoral condyle, staying in a
subperiosteal plane. Carefully carry the dissection distally and
medially over the top of the lateral femoral condyle until the
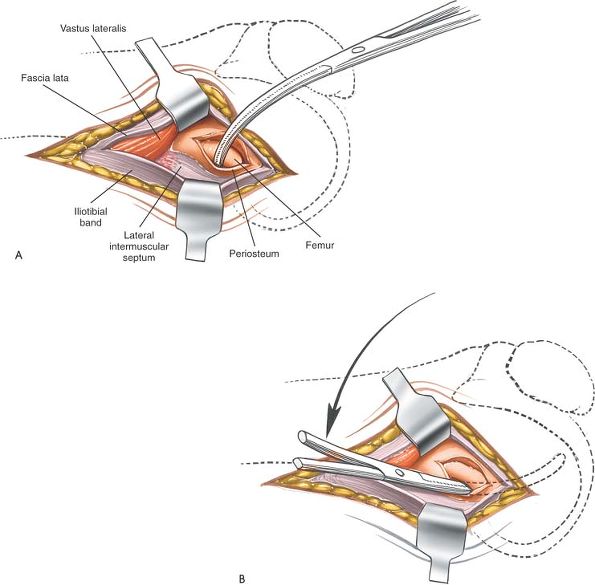
instrument can be felt to enter the intercondylar notch (Fig. 10-68).
Sticking to bone, pass the tip of the instrument anteriorly until it is
visible in the knee, as viewed from the anteromedial incision (medial
parapatellar) (Fig. 10-69).
 |
|
Figure 10-66
The vastus lateralis anterior to the intermuscular septum is retracted anteriorly and medially. Identify the lateral superior genicular artery. |
 |
|
Figure 10-67
Retract the muscles further, ligate the lateral superior genicular artery, and incise the periosteum at the junction of the shaft and the flare of the femur. |
 |
|
Figure 10-68 (A) Pass a small instrument behind the posterolateral flare of the lateral femoral condyle deep to the periosteum. (B)
Continue passing the instrument distally and medially over the top of the lateral femoral condyle until it can be felt entering the intercondylar notch. |
 |
|
Figure 10-69 Advance the tip of the instrument anteriorly until it is visible in the knee as viewed from the anteromedial incision.
|
injured if the surgical plane does not remain subperiosteal. As the
intercondylar notch is felt, bend the knee to 90° to allow the
popliteal artery to fall posteriorly with the joint capsule.
WN, Insall JN, Kelly MA: Arthroscopy and meniscectomy; surgical
approaches, anatomy and techniques. In Surgery of the Knee, edited by
J.N. Insall, R.E. Windsor, W.N. Scott, M.A. Kelly, and P. Aglietti. Ed.
2, Vol 1, pp 165–215. New York, Churchill Livingstone, 1993
MB, Upshaw JE, Riley LH et al: Geometric total knee arthroplasty, 1:
conception, design, indications, and surgical technic. Clin Orthop
94:171, 1973
DB, James SL, Larsen RL et al: Late reconstruction of ligament injuries
to the medial compartment of the knee. Clin Orthop 118:63, 1976
EG, Osgood RB: The popliteal incision for the removal of “joint mick”
in the posterior capsule of the knee joint: a report of cases. Boston J
Med Surg 165:975, 1911