
Supine, with head and neck slightly rotated to the opposite side. The
arm and shoulder are placed caudad (toward the feet) to widen the space
between the neck and shoulder.
30 to 40 mL initially 0.5% ropivacaine, followed by either a continuous
infusion of 8 to 10 mL/hour or a patient-controlled infusion of 0.2%
ropivacaine (5 mL/hour basal, 3 to 4 mL bolus, with a lockout period of
20 minutes).
The sternocleidomastoid (SCM) muscle, the clavicle, and the anterior
and middle scalene muscles as well as the cricothyroid membrane (C6).
With the head and neck rotated to the opposite side, the patient is
asked to lift the head slightly off the bed (contracting and
accentuating the SCM muscle). The lateral border of the SCM muscle is
identified and marked. Next, two fingers are placed on the posterior
edge of the muscle, and the patient is asked to relax the neck.
The
fingers are gently slid posteriorly and the first bandlike muscle is
the anterior scalene muscle. The next muscle is the middle scalene
muscle. The interscalene groove is marked. The site of needle
introduction is the intersection between the horizontal line drawn at
the level of the cricothyroid membrane and the interscalene groove. The
insulated Tuohy needle connected to a nerve stimulator (1.5 mA, 2 Hz,
0.1 ms) with the bevel oriented to the axilla is introduced through the
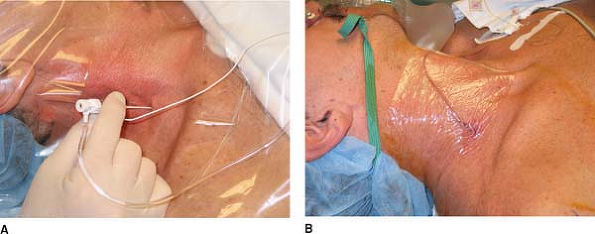
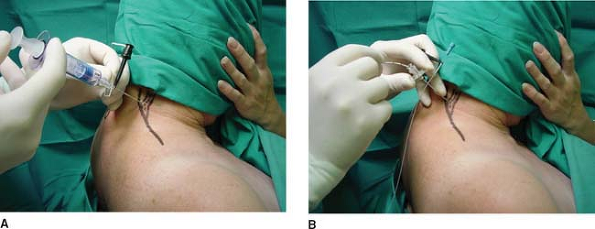
skin and directed medially, slightly caudad, and posterior (Fig. 26-1A)
at approximately 30° to the skin. As the needle punctures the fascia,
there is a subtle “click” and sudden motor movement, which helps
confirm proper placement. The position of the needle is adjusted to
produce a motor response distal to the shoulder, which is maintained
with a current less than 0.5 mA. After negative aspiration for blood,
the local anesthetic is slowly injected with repeated aspiration for
blood. Maintaining the introducer-insulated needle in the same
position, the catheter is threaded 3 to 5 cm beyond the needle tip. The
introducer needle is removed, and the catheter is secured in place with
Steri-Strip (3M, St. Paul, MN) and covered with a transparent dressing (Fig. 26-1B).
 |
|
Figure 26-1. Interscalene block—classic approach.
|
-
To increase operator steadiness, the bed may be raised to chest height with the operator’s forearms resting on the bed.
-
The introducer needle should be manipulated cautiously.
-
The interscalene groove is subtle and
narrow. It should not be confused with the groove between the SCM
muscle and the anterior scalene muscle. -
A pre-hole with a sharp 18-gauge needle helps reduce pressure on the neck while introducing the dull insulated Tuohy needle.
-
Avoid aggressive searching with the 18-gauge needle. If necessary, find the plexus first with a 22-gauge insulated needle.
-
Seek a stimulus distal to the shoulder with the lowest achievable current (<0.5 mA).
-
If a deltoid stimulus is obtained, this
may be acceptable, but make sure it is not pectoralis or suprascapular
stimulation, since these nerves usually have already separated from the
main plexus. -
Phrenic stimulation (diaphragm contraction) indicates that the needle is >1 cm too far anterior.
-
A pectoralis muscle stimulation indicates that the needle is slightly (<0.5 cm) anterior.
-
A suprascapular muscle (posterior shoulder) stimulation suggests that the needle is slightly (<0.5 cm) posterior.
-
If subtle redirection produces constant
anterior/posterior stimulus but not arm movement, consider moving the
entry point caudad. -
There is slight resistance as the
catheter passes the needle tip, but afterward it should pass easily.
After 3 to 4 cm in the sheath, resistance is typically encountered.
Gradually withdraw the needle and advance the catheter another 3 to 4
cm in the subcutaneous tissue. This tunnels the catheter and helps
secure it. -
Careful attention should be paid to securing the catheter. Subcutaneous tunneling is helpful.
A, Tewes E, Biasca N, et al. Patient-controlled interscalene analgesia
with ropivacaine after major shoulder surgery: PCIA vs PCA. Br J Anaesth 1998;81:603–605.
F, Seguy S, Gouverneur J. Interscalene brachial plexus analgesia after
open shoulder surgery: continuous versus patient-controlled infusion. Anesth Analg 1999;89:1216–1220.
M, Haasio J, Hekali R, et al. Continuous interscalene brachial plexus
block: clinical efficacy, technical problems and bupivacaine plasma
concentrations. Acta Anaesthesiol Scand 1989;33:84–88.
30 to 40 mL initially 0.5% ropivacaine, followed by either a continuous
infusion of 8 to 10 mL/hour or a patient-controlled infusion of 0.2%
ropivacaine (5 mL/hour basal, 3 to 4 mL bolus, with a lockout period of
20 minutes).
The sternal and clavicular heads of the SCM as well as the midclavicle
are located and marked. The puncture site is situated one fingerbreadth
above the clavicle, between the heads of the SCM, medial to the
clavicular head. Next, the puncture site is pre-incised with an
18-gauge needle to facilitate the penetration of the introducer needle
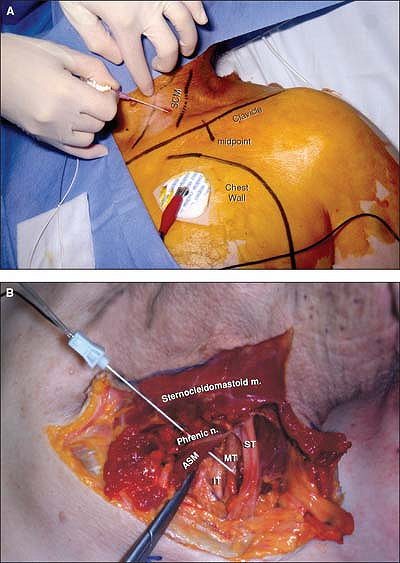
or catheter (Fig. 26-2A).
The introducer needle connected to a nerve stimulator (2 mA, 2 Hz, 0.1
ms) is introduced, initially at a 45° angle from the table plane and
15° from (almost parallel to) the posterior border of the clavicular
head of the SCM and advanced laterally, posteriorly, and caudally
aiming at a point 1 cm posterior to the
midclavicle. This initial orientation leads to stimulation of the lateral border of the superior trunk (Fig. 26-2B)
which is lateral to the rest of the brachial plexus and produces
glenohumeral coaptation and contraction of the supraspinatus muscle.
From this initial position lateral to the brachial plexus, the needle
can be slightly walked medially and inferiorly to seek for stimulation
of the middle trunk. The following motor responses help identify which
part of the brachial plexus is being stimulated:
 |
|
Figure 26-2. Intersternocleidomastoid approach.
|
-
The superior trunk frontally—contraction of the biceps brachii muscle with elbow flexion.
-
The superior trunk medially—contraction of the deltoid with abduction of the arm.
-
The middle trunk—contraction of the triceps and elbow extension.
-
The inferior trunk frontally—contraction of the pectoralis major muscle, ulnar inclination of the wrist, and flexion of the fourth and fifth fingers.
same motor response to be maintained with a current less than 0.5 to
0.6 mA, and after negative aspiration for blood, the local anesthetic
solution is injected slowly, 5 mL at a time, with aspiration in between.
the introducer needle. The introducing cannula is removed, and the
catheter is secured in place with Steri-Strip and covered with a
transparent dressing.
-
In the intersternocleidomastoid block,
the brachial plexus can be reached at the level of the superior,
middle, or inferior trunk when the needle is directed into the
supraclavicular area. The brachial plexus will be contacted at a depth
varying from 3 to 8 cm, depending on needle direction and the size of
the patient. -
Catheter insertion seems to be easier
following stimulation of the middle trunk than following stimulation of
the superior trunk. -
This approach minimizes the risk for inadvertent spinal injection of anesthetics and pleural puncture.
-
This approach does not require tunneling the catheter because it approaches the brachial plexus from a distance.
-
The rotation of the neck should be
moderate to avoid distortion of the anatomic landmarks, particularly in
patients with long necks. -
The presence of fat may obscure the SCM
triangle. Asking the patient to elevate the head and breathe deeply
allows easier palpation of the muscles. -
Compressing the SCM triangle above the
clavicle with the forefinger helps to determine the puncture site,
raise the clavicular head of the SCM, and facilitate the passage of the
needle behind the clavicular head. -
To prevent misdirection of the needle,
which may result in pleural puncture, it is recommended to mark the
superior border of the chest wall, and keep the needle lateral and away
from the dome of the pleura. -
To avoid a puncture of the internal
jugular vein, especially during the local infiltration, the needle
should be directed in the same direction as described in the
intersternocleidomastoid technique. Such an infiltration provides more
comfort during insertion of the introducer needle. -
The introducer needle may transmit an
arterial pulsation, indicating proximity to the subclavian artery. In
this case, the needle is withdrawn and directed slightly more posterior
to prevent puncture of the subclavian artery. -
To minimize the risk for associated
diaphragmatic palsy, the tip of the catheter should be placed in an
infraclavicular position. -
Movements of the abdomen (contraction of
the diaphragm) can be seen in response to stimulation of the phrenic
nerve. Since the phrenic nerve is anterior to the scalene muscle and
medial to the brachial plexus, these stimulations require withdrawal
and redirection of the needle. -
The position of the catheter can be
controlled radiologically before starting the infusion. The use of a
stimulating catheter may also increase the likelihood of an appropriate
placement. -
Complications of these techniques include
the risk for internal jugular puncture (during local anesthesia of the
region) and subclavian artery puncture (in the case of misdirection of
the needle), pleural puncture (misdirection of the needle), associated
diaphragmatic palsy, Horner syndrome (uncomfortable for the patient),
and recurrent laryngeal nerve palsy due to catheter misplacement.
C, Mayfield JB. Evaluation of a new supraclavicular brachial plexus
catheter technique for shoulder surgery anesthesia and analgesia. Anesthesiology 2000;93:A849.
F, Pham Dang C, Dupas B, et al. Diaphragmatic excursion after
intersternocleidomastoid block depending on the site injection. Ann Fr Anesth Reanim 2000;19:517–522.
Shoulder surgery, including arthroscopic procedures. Continuous
interscalene infusions are typically used to allow aggressive
postoperative physical therapy and to maintain joint range of motion.
20 mL 0.5% ropivacaine followed by continuous infusion at the rate of 8
to 14 mL/hour 0.2% ropivacaine starting within 1 hour of loading. A
patient-controlled analgesic technique for continuous interscalene
block has also been described.
SCM muscle and interscalene groove. The patient is positioned supine
with the head turned to the contralateral side. The interscalene groove
is located by rolling the index finger laterally across the belly of
the anterior scalene muscle to determine the groove between the
anterior and middle scalene muscles. The needle insertion site is high
in the interscalene groove, at the level of C6.
The modified perivascular technique allows easy catheter advancement
because the needle approach is parallel to the brachial plexus sheath.
However, the clinician must be able to visualize the nerves of the
brachial plexus as they travel from the cervical foramen, through the
interscalene groove, and posteriorly to the midpoint of the clavicle,
where they form terminal nerves at the level of the axilla. The needle
is inserted high in the interscalene groove and advanced parallel to
the long axis of the body. A paresthesia or nerve stimulator response
usually occurs at a depth of approximately 2.5 cm (Fig. 26-3).
The catheter is advanced 5 cm into the sheath. The introducer needle is
removed, and the catheter is secured in place with Steri-Strip and
covered with a transparent dressing.
-
A marked rotation of the patient’s head results in distortion of the anatomic landmarks and relationships.
-
Continuous interscalene block is best
suited for shoulder surgery. High volumes of local anesthetic are
required to reliably block the elbow, forearm, or hand. -
Accurate identification of the
interscalene groove is essential to both single-injection and
continuous interscalene techniques. Do not be confused by the groove
between
P.223
the
SCM and anterior scalene muscles. If the correct groove has been
identified, the pulsation of the subclavian artery may be palpated.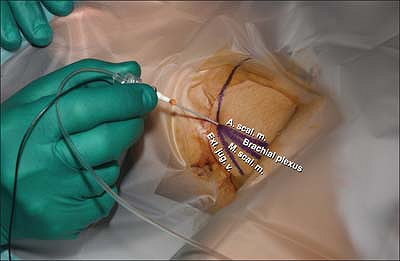 Figure 26-3. Parascalene approach.
 -
Continuous catheter techniques often use
large-gauge, blunt needles. Generous subcutaneous infiltration of local
anesthetic increases patient comfort. -
A shallow angle of needle insertion, with an approach parallel to the brachial plexus sheath, facilitates catheter placement.
-
An alternate classic approach to the
perivascular technique uses a needle insertion angle and site identical
to those with the single-dose interscalene block. (The needle is
directed perpendicular to the skin, with a slightly caudal and
posterior angulation.) However, catheter advancement may be difficult
because the needle approaches the brachial plexus at a right angle,
forcing the catheter to turn 90°. Proximal advancement may result in
cannulation of the epidural or intrathecal spaces. -
The brachial plexus is near significant
vascular and neural structures at the interscalene level. Meticulous
regional technique must be used to avoid subarachnoid, epidural, and
intravascular injection and cannulation. -
Although there is a possibility of
pneumothorax with the perivascular approach, this complication may be
avoided by limiting the depth of needle insertion. -
Phrenic nerve paralysis should be
expected in all patients with a continuous interscalene infusion.
Concentrations as low as 0.125% bupivacaine still result in a
significant decrease in diaphragmatic motion and ventilatory function,
which persists for the duration of the block. -
This technique should not be used in patients who are unable to tolerate a 25% reduction in pulmonary function.
-
The high mobility of the cervical spine
makes catheter dislodgment a common complaint. The perivascular
approach allows catheter advancement of 5 to 10 cm, whereas only 2 to 3
cm may be possible with the classic approach. The improved catheter
placement with the perivascular technique makes it the superior
approach. -
The stiff tip of the indwelling catheter
combined with cervical and upper extremity movement may result in
plexus irritation. Patients should be observed for new (nonsurgical)
pain or neurologic complaints.
P. The effect of continuous interscalene brachial plexus block with
0.125% bupivacaine plus fentanyl on diaphragmatic motility and
ventilatory function. Reg Anesth 1993;18:93–97.
FC, Georgousis H, Bertram R, et al. Plexus irritation caused by
interscalene brachial plexus catheter for shoulder surgery. Anesth Analg 1996;82:870–872.
M, Haasio J, Hekali R, et al. Continuous interscalene brachial plexus
block: clinical efficacy, technical problems and bupivacaine plasma
concentrations. Acta Anaesthesiol Scand 1989;33:84–88.
A 17-gauge Tuohy needle, a 19-gauge catheter with a steel spring
conducting electrical impulses to its distal uncovered end (a
“stimulating catheter”), and a loss-of-resistance syringe.
30 to 40 mL 0.5% ropivacaine, followed by either a continuous infusion
of 8 to 10 mL/hour or a patient-controlled infusion of 0.2% ropivacaine
(5 mL/hour basal, 3 to 4 mL bolus, with a lockout period of 20 minutes).
The brachial plexus (BP), the anterior (AS) and middle (MS) scalene
muscles, the vertebral artery (VA) guarded by the bony structures of
the vertebrae, the trapezius muscle (TM) and levator scapulae muscles
(SM), the phrenic nerve (PN), the internal jugular vein (IJV), the
carotid artery (CA), and the trachea (T) (Fig. 26-4).
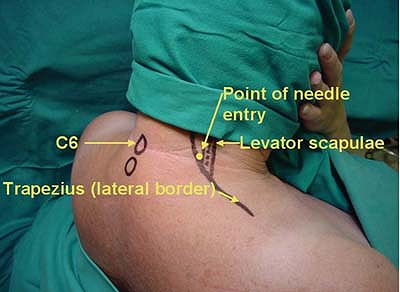
The lateral border of the trapezius muscle and the medial border of the
levator scapula muscles are located and marked. The site of Tuohy
needle introduction is located immediately superior to the apex of the
“V” formed by the intersection between the lateral border of the
trapezius muscle and the medial border of the levator scapula muscle (Fig. 26-5).
The insulated introducer Tuohy needle, with the bevel oriented
laterally and connected to a nerve stimulator (1.5 mA, 2 Hz, 0.2 ms)
and to a loss-of-resistance syringe, is introduced through the skin in
an anterior, slightly caudal, and medial direction toward the
suprasternal notch until contact is made with the transverse process of
C6. Next, the needle stylet is removed and replaced with a syringe
(loss-of-resistance device) containing 2 to 3 mL air. The needle is
then walked laterally off the transverse process and slowly advanced
anteroinferiorly (Fig. 26-6A).
When the needle enters the cervical paravertebral space, there will be
a sudden loss of resistance to air followed immediately by a
stimulation of the brachial plexus resulting in related muscle
responses. Next, the nerve stimulator is disconnected from the
introducing Tuohy insulated needle and connected to the stimulating
catheter. The stimulating catheter is introduced into the Tuohy needle,
which results in a motor response similar to the one initially obtained
with the introducer needle (Fig. 26-6B). The catheter is then gradually advanced beyond the needle tip by 3 to 5 cm. After negative blood aspiration, the local
anesthetic solution is injected slowly with repeat negative blood aspiration every 5 mL (Fig. 26-7A).
 |
|
Figure 26-4. Anatomic landmarks for paravertebral approach.
|
 |
|
Figure 26-5.
The site of the Tuohy needle introduction is located immediately superior to the apex of the “V” formed by the intersection between the lateral border of the trapezius muscle and the medial border of the levator scapula muscle. |
 |
|
Figure 26-6. A: The needle is then walked laterally off the transverse process and slowly advanced anteroinferiorly. B:
The stimulating catheter is introduced into the Tuohy needle, which results in a motor response similar to the one initially obtained with the introducer needle. |
-
This block can also be performed with the patient in the lateral decubitus position.
-
The catheter should always be withdrawn
entirely into the needle before the needle is repositioned. Catheter
withdrawal should be done carefully to prevent damage to the catheter. -
The presence of significant paresthesia during catheter advancement should be carefully evaluated before advancing the catheter.
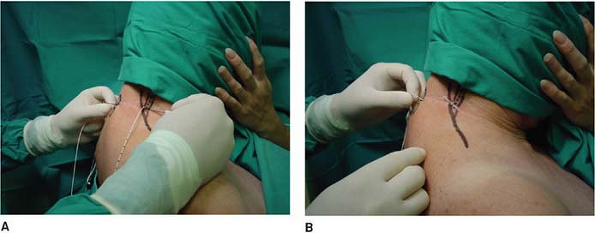 Figure 26-7. A: The local anesthetic solution is injected slowly with repeat negative blood aspiration every 5 mL. B: The catheter is tunneled posteriorly.
 -
Conditions such as existing brachial
plexitis or pre- or subclinical complex regional pain syndromes should
be specifically documented before any brachial plexus block is
administered. Patients with bona fide shoulder joint pathology present
with shoulder pain but very infrequently with pain distal to the elbow.
Pain distal to the elbow is usually an indication of a neurologic
condition. -
Be suspicious of intraperineural needle
or catheter placement if brisk muscle twitches are present with nerve
stimulator settings less than 0.2 mA (except in children). -
This block is almost always associated
with a Horner syndrome. Reassurance of patients is all that is required
if this syndrome occurs.
AP, Berry AR, Nell ML, et al. A comparison of propofol and remifentanil
for sedation and limitation of movement during peri-retrobulbar block. J Clin Anesth 2001;13:422–426.
Continuous infraclavicular blocks are indicated for surgery of the
forearm, wrist, hand, and distal part of the humerus because it covers
all sensory territories of the distal part of the upper limb with only
one puncture.
The patient lays supine with the head turned to the side opposite to
that on which the block is to be performed. The relevant shoulder is
depressed and the arm abducted approximately 45° from the chest wall.
The main anatomic landmark is the coracoid process of the scapula. From
the center of the coracoid process mark a point that is exactly 2 cm
caudal and 1 cm medial as per Whiffler or 2 cm medial as per Wilson.
This point represents the site of introduction of the needle.
The direction of the puncture is oriented toward the patient’s axilla
and the long axis of the needle perpendicular to the gurney in all
planes. Directing the needle tip out of the paramedian sagittal plane
must be avoided because it increases the risk of pneumothorax.
A point bisecting a line joining the ventral acromial process of the
scapula (lateral landmark) and the incisura jugularis sternii (medial
landmark) is marked. To identify these landmarks, the patient lies
supine with the arm in a neutral position along the body. The point of
emergence of the axillary artery at the fossa axillary is next
identified.
To perform the block, the patient’s head is slightly turned away from
the arm to be anesthetized, the arm being abducted to 90° and elevated
by approximately 30°.
The whole length of the clavicle is marked after palpation. A skin
wheal is raised 1 cm caudal below the inferior border of the clavicle
at its central point. The needle is directed laterally between 45° and
60° to the skin toward the emergence of the axillary artery in the
fossa axillary as close as possible to the lateral border of the
pectoralis major muscle.
standardized procedure by using a nerve stimulator, connected to a
cannula over the needle. Start with a modus of stimulation from 1.4 mA
current and an impulse duration of 0.1 ms. The placement of the needle
is successful when a muscle distal to the deltoid is stimulated with a
threshold intensity of the current ≤0.3 mA and an impulse duration of
0.1 ms. The aim is to elicit a distal response of the hand to predict a
successful infraclavicular block (flexion or extension of the fingers
or the wrist, for example flexor carpi radialis or ulnaris). The best
response is finger or wrist extension (posterior cord stimulation).
introduced perpendicular to the cord, while with the modified approach
of the Raj the direction of the needle is tangential to the cords,
leading to an easier catheter placement. For the catheter placement,
the cannula over needle technique is used with a plastic cannula and a
catheter with a stylet. The catheter is threaded no more than 2 to 3 cm
distal to the end of the cannula. After subcutaneous tunneling, the
catheter is fixed with adhesive tape.
-
After identification of the landmarks—the
central point between the ventral acromial process of the scapula and
the incisura jugularis sternii—the skin is extensively disinfected and
the puncture point is surrounded by an aseptic “cover” (Figs. 26-8, 26-9). -
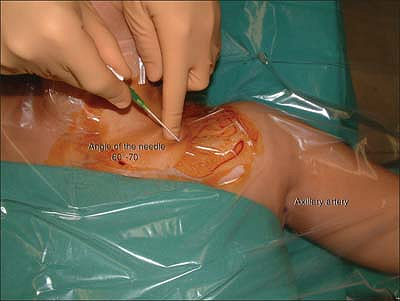
Insert the needle at an angle between 60°
and 70° to the skin toward the emergence of the axillary artery in the
fossa axillary with an initial nerve stimulation intensity of 1.4 mA,
an impulse duration of 0.1ms, and frequency of stimulation of 2 Hz. The
first motion elicited often results from direct stimulation of the
major and minor pectoral muscles. The needle must be advanced further
in order to elicit a good distal answer of the hand (Fig. 26-9). -
Decrease the stimulation intensity from 1.4 mA to 0.6 mA, always maintaining a good muscle response, or “twitch.”
-
When 0.6 mA is achieved, insert the
cannula over the needle. When the cannula is inserted until the marked
point of the needle is reached, it means that the tip of the cannula
coincides with the tip of the needle. Continue to reduce the
stimulation intensity to 0.3 to 0.2 mA, looking for the minimal current
able to elicit a twitch. -
Withdraw the needle, hold the cannula and
insert the catheter (resistance may be sometimes felt at the beginning
of catheter insertion) (Fig. 26-10). -
After catheter placement, withdraw
carefully the cannula over the catheter. The aim is to position the tip
of the catheter 2 to 3 cm distal to the end of the cannula (e.g., if
the depth of the nerve is 5 cm, catheter discharge from the skin is 7
cm).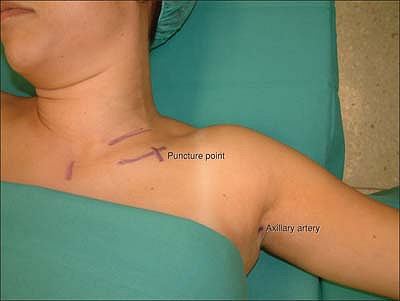 Figure 26-8. Anatomic landmarks.P.230
![]() Figure 26-9. The needle must be advanced further to elicit a good distal answer of the hand.
Figure 26-9. The needle must be advanced further to elicit a good distal answer of the hand.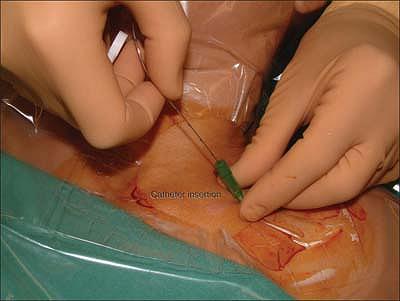 Figure 26-10. Withdraw the needle, hold the cannula, and insert the catheter.P.231
![]() Figure 26-11. Subcutaneous tunneling to secure the catheter against dislocation with an I.V. 18-gauge catheter.
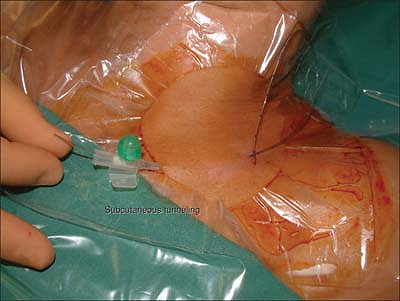
Figure 26-11. Subcutaneous tunneling to secure the catheter against dislocation with an I.V. 18-gauge catheter. -
Subcutaneous tunneling to secure the catheter against dislocation with an I.V. 18-gauge catheter (Fig. 26-11).
-
Drug application: LA application should
follow the basic safety rules: slow administration with repeated
aspiration—every 5 ml. The administration of the first 2 to 3 mL are
crucial. They must be given very slowly. At the same time, the patient
should be asked about pain level and special attention should be paid
to any resistance when administrating the local anesthetic. -
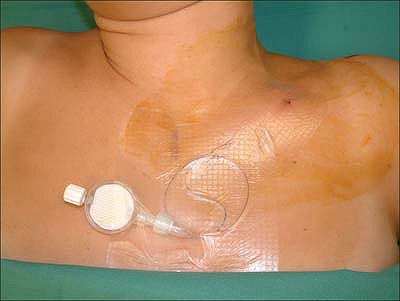
At the end of the procedure disinfect the
point of puncture and the exit of the tunnel with antiseptic and fix
the catheter with moisture-responsive cannula dressing (Fig. 26-12).
procedure a complete block of the brachial plexus with good muscular
relaxation is necessary. To achieve this aim, an initial bolus of 40 mL
ropivacaine 0.5% over the catheter is recommended. The onset time with
ropivacaine 0.5% is on average 15 to 30 minutes.
-
First 24 hours: 0.3% ropivacaine with
patient-controlled analgesia (PCA). (Standard dosage is 8 mL ground
infusion, 5 mL bolus, lockout time 20 minutes.) -
Afterwards: 0.2% ropivacaine with the same standard-dosage PCA.
procedure (combined regional and general anesthesia), an initial bolus
of 20 to 30 mL ropivacaine 0.5% is sufficient.
 |
|
Figure 26-12.
Disinfect the point of the puncture and the exit of the tunnel with antiseptic and fix the catheter with moisture-responsive cannula dressing. |
the arm after some surgeries. In this context the infraclavicular
catheter is placed before surgery but activated only after neurological
control has been performed by the surgeon.
-
At the infraclavicular level the cords can be separated by large amounts of connective tissue.
-
The best response is a distal response of
the posterior cord (for example, distal response of the radial nerve;
muscle of extensor carpi radialis or extensors of the fingers). -
Correction for musculocutaneous response:
redirect the needle slightly more caudal and posterior in order to
elicit a distal radial response. -
Correction for deltoid response: redirect the needle more anterior and caudal in order to elicit a distal radial response.
-
Two types of situations may be encountered:
-
First: the cords are surrounded by more or less well-organized connective tissue → short onset time will occur.
-
Second: the cords are surrounded by large amounts of disorganized connective tissue → longer onset time will occur.
-
-
Light/short sedation is recommended
during performance of the infraclavicular catheter (e.g.,
remifentanil/propofol), as going through the pectoralis muscle may be
painful. -
It is preferable to first place the catheter and then perform the block.
-
Deformity of the thorax
-
A healed dislocated fracture of the clavicle
-
A foreign body in the field of puncture (Pacemaker, Port-à-cat)
-
Any coagulation dysfunction