
Cole & Sekiya: Surgical Techniques of the Shoulder, Elbow and Knee in Sports Medicine, 1st ed.
Copyright ©
2008 Saunders, An Imprint of Elsevier
CHAPTER 55 – Osteochondral Autograft for Cartilage Lesions of the Knee
Kenneth G. Swan Jr., MD,
Eric McCarty, MD
Articular cartilage is arguably the most precious body tissue to the orthopedic surgeon and his or her patients. Be it orthopedic trauma or sports medicine, the management goal is often similar: restoration or maintenance of the articular cartilage. Isolated cartilage defects can occur secondary to acute trauma or be atraumatic in nature. The atraumatic defect is often in the form of osteochondritis dissecans, the etiology of which is not fully understood, and can be found in juveniles or adults. The distinction here is important because patients with open physes have a much better prognosis with nonoperative treatment.[5]
Patients with symptomatic focal cartilage defects are candidates for operative treatment to relieve symptoms and also potentially to prevent subsequent arthritic changes.[15] Of the treatment possibilities available, none of which is ideal, osteochondral autograft transplant surgery may be the best option in appropriately selected cases. Several different transplant systems are available, but the concept remains the same: the transplantation of full-thickness osteochondral bone plugs from an area of the knee that is non–weight bearing or with low contact pressures to the osteochondral defect of the ipsilateral knee.
Patients with focal osteochondral lesions typically present with pain and swelling that is intermittent in nature. The history may mimic that of meniscal disease.
| • | Effusion | |
| • | Relatively preserved range of motion | |
| • | Joint line tenderness (±) | |
| • | Patellar instability, apprehension (±) |
Factors Affecting Surgical Planning
| • | Limb malalignment (may compromise repair, require realignment procedure) | |
| • | Concomitant ligamentous injury (may require prior or concomitant reconstruction) |
| • | Standard anteroposterior and lateral knee views | |
| • | Sunrise patellofemoral view to visualize patellar and trochlear lesions | |
| • | Notch view may be best to visualize lateral aspect of medial femoral condyle (typical location of osteochondritis dissecans)[17] | |
| • | Mechanical axis view if malalignment is suspected |
| • | Magnetic resonance imaging is necessary to best evaluate location and size of articular cartilage lesions. It is also important for evaluation of menisci, ligaments, and the remainder of the articular cartilage. | |
| • | Bone scans, computed tomography, and tomography are not as useful as magnetic resonance imaging for evaluation of osteochondritis dissecans lesions and the remainder of the knee. | |
| • | Contrast arthrography (intraarticular or intravenous) may prove to be more sensitive than magnetic resonance imaging alone, which can have a high false-negative rate.[23] | |
| • | Arthroscopy remains the “gold standard” for evaluation of articular cartilage lesions. |
Indications and Contraindications
The indications for osteochondral autograft transplant surgery are narrow. The patient generally has a small, isolated lesion in an otherwise healthy knee. However, concomitant ligament, meniscus, or alignment disease may be present and can be addressed simultaneously or with a staged procedure.
Typically, during concomitant procedures, the surgeon performs autologous osteochondral grafting and anterior cruciate ligament reconstruction or high tibial osteotomy. During anterior cruciate ligament reconstruction, the osteochondral grafting should proceed after meniscal or cartilage disease is addressed and notchplasty has been performed but before anterior cruciate ligament graft fixation. Similarly, the osteochondral grafting should be done before the high tibial osteotomy is performed. If the procedures are staged, the osteochondral grafting surgery should be done first.
We prefer to use single-plug autograft transplants on defects 1 cm2 in diameter or smaller; allograft transplants are used for larger defects. However, some authors perform autograft transplantation on defects as large as 4 cm2, with good results[8] with use of multiple plugs.
| • | Generalized arthritis | |
| • | Inflammatory arthritis | |
| • | Lesions >1 cm2 for single plugs | |
| • | Lesion >3 cm2 for multiple plugs | |
| • | Uncorrected malalignment or knee instability |
Osteochondral defects are frequently diagnosed in the office after the history, physical examination, and interpretation of radiographs and magnetic resonance imaging scans. The patient and surgeon might then plan for single-stage surgery with arthroscopic examination of the knee to assess the defect. If it is applicable, autograft transplantation with single or multiple plugs can be performed. The number and size of osteochondral plugs required cannot be determined until the defect is thoroughly examined by arthroscopy. Defects that are discovered to be excessively large may require allograft transplantation, which must be anticipated and planned for. This is typically performed as a second procedure.
At times, osteochondritis dissecans lesions are not appreciated preoperatively and are discovered during routine knee arthroscopy. The morbidity of the procedure and its rehabilitation process are different from those of a standard knee arthroscopy. These patients usually require a second procedure for definitive treatment at a later date unless the surgeon and patient have discussed this possibility preoperatively.
The short surgical steps for osteochondral autograft transfer are listed in
Box 55-1
.
Three different systems are commercially available in the United States. All three are similar but differ in the available graft sizes and minor variations of technique. This is shown in
Table 55-1
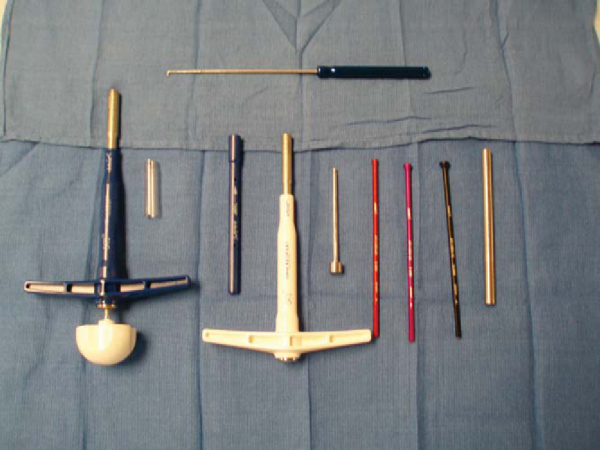
. An example of the necessary equipment is shown in
Figure 55-1
.
| System | Graft Sizes (Diameter) | Specific Technical Differences | Comments |
|---|---|---|---|
| Single-use OATS (Arthrex, Inc., Naples, Fla) | 6-, 8-, and 10-mm plugs | Disengagement of graft from bed requires 90-degree rotation from starting position | Must “lever” graft from donor bed |
| COR repair system (DePuy-Mitek, Norwood, Mass) | 4-, 6-, and 8-mm plugs | Disengagement of donor grafts from bed requires two complete turns with T-handle | “Toothed” harvester allows undercutting of donor graft from donor bed |
| MosaicPlasty systems (Smith & Nephew, Inc., Andover, Mass) | 2.7, 3.5, 4.5, 6.5, and 8.5-mm plugs | “Toggle” graft to remove from donor bed | Dilator used in recipient site to compact surrounding bone; smaller grafts available |
The patient is placed in the supine position with a lateral post, and a sandbag is taped to the bed to facilitate a fixed 90-degree flexion of the knee. The surgeon should be able to flex the knee to 120 degrees with ease. A sliding footstep may be used to allow different angles of knee flexion. Alternatively, an arthroscopic leg holder may be used per the surgeon’s preference. We typically do not drop the foot of the bed. A tourniquet is applied but not elevated, and the operative site is prepared and draped. The tourniquet may be inflated if arthroscopic visualization becomes difficult from intraarticular bleeding.
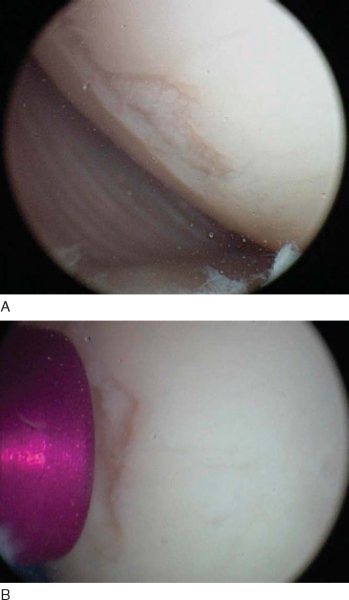
The surgeon performs a diagnostic arthroscopy of the knee. Portal sites can be varied to maximize perpendicular access to the donor and recipient sites. This can be performed with spinal needles before the portals are made. A central patellar tendon portal can provide good access to the medial surfaces of the medial and lateral femoral condyles.[11] The defect site is identified, and loose debris, cartilage flaps, and superficial fibrocartilage are removed with a mechanized resector. A thorough evaluation of the patellofemoral joint is performed with consideration for donor site grafting ramifications. The knee is carefully inspected for loose bodies, with examination of the lateral and medial gutters and posterior medial and lateral recesses.[20] Examination of the condyles in full flexion is performed to identify any other defects of the weight-bearing surface. The defect is measured by use of measurement probes or size-specific cannulas that vary with the particular system (
Fig. 55-2
). The surgeon at this time should evaluate the curvature of the surrounding articular cartilage and plan the number and size of grafts to be used. We routinely use an all-arthroscopic technique, but depending on the defect’s size and the surgeon’s preference, a mini-arthrotomy (1 to 2 cm) may be used for both harvest and implantation. We routinely do not inflate the tourniquet throughout the procedure.
Available donor sites include the lateral femoral condyle above the sulcus terminalis, the peripheral aspect of the medial femoral condyle, and the lateral superior aspect of the intercondylar notch. The medial aspect of the medial femoral condyle can be easier to access during graft harvest because the intraarticular distention can push the patella laterally.[11] Contact pressures may be lower in donor sites from the distal medial trochlea. [1] [7] The central condylar notch is routinely removed during notchplasty (roofplasty) in anterior cruciate ligament reconstruction, but the curvature is generally concave and has poorer congruity with typical recipient sites on the lateral and medial femoral condyles.[3] We routinely use the superior medial aspect of the medial femoral condyle as a donor site. The largest size amenable to single-plug harvest is 1 cm2 in diameter, as discussed before. Multiple plugs should be harvested for defects between 1 and 3 cm2 in diameter.
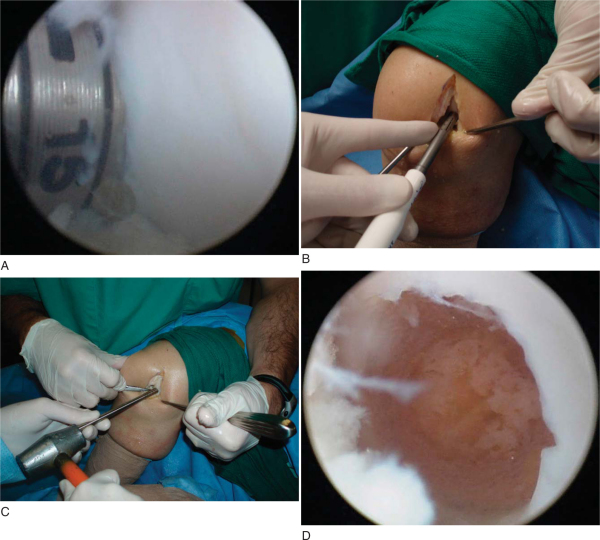
Each system has a T-handle instrument that must be assembled at the back table and varies with the graft diameter that is to be used. This donor harvester is then inserted into the knee perpendicular to the articular surface and held firmly against the cartilage during the extraction. Holding the donor harvester firmly against the surface ensures that a cylindrical (not “crooked”) graft is harvested and helps prevent loss of the graft in the joint during extraction. The donor harvester is impacted with a mallet to the desired depth of penetration, usually 15 mm. The different systems then recommend different techniques to extract the graft from the surrounding bed. The Osteochondral Autograft Transfer System (OATS) employs a 90-degree rotation both clockwise and counterclockwise from the starting position. The COR system has a “tooth” at the distal aspect of the harvester; when the desired depth is achieved, the T-handle is rotated two full revolutions to undercut the graft, minimizing leverage against the native bone. The MosaicPlasty system recommends “gentle toggling” to break the deep subchondral bone before graft removal (
Fig. 55-3
).
|
|
|
|
Figure 55-3 |
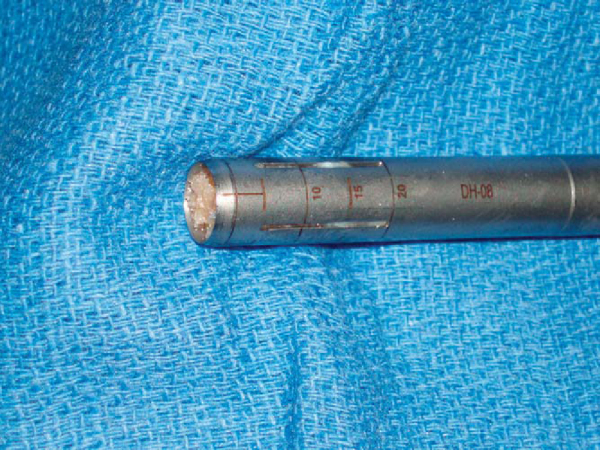
Measure the graft length after removal to plan defect drilling. This is performed either through reference lines on the exterior of a clear sheath holding the graft or by placing the graft on the back table in a moist sponge, depending on the system used. Reinsertion of the plunger into the donor site defect can also assist with measurement of the depth (
Fig. 55-4
).
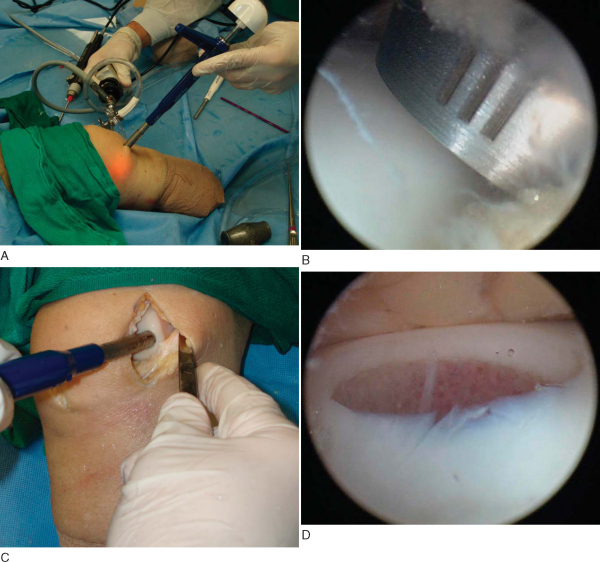
At this point, the surgeon should have a clear plan for number of grafts, placement of specific graft plugs, and depth of each plug. The knee can now be further flexed if needed to ensure perpendicular drilling of the defect. The diameter of the reamer used should correspond to the diameter of the graft taken. The appropriately sized reamer can now be used to drill the recipient hole. Each recipient hole should be separated from adjacent holes with at least a 1- to 2-mm bridge. The depth of each recipient hole should be 1 to 2 mm deeper than the measured plug. This reduces resultant force during impaction[24] and can minimize intraosseous pressure. The MosaicPlasty system recommends dilation of the recipient hole before insertion. All loose cartilage and bone fragments can be safely removed with a small curet (
Fig. 55-5
).
|
|
|
|
Figure 55-5 |
At this time, the graft should be in the delivery tube. The delivery tube is seated perpendicular to the reamed hole of matching size and held firmly against the surface. Graft implantation is achieved by gentle tapping of the impactor (plunger) with a mallet. The use of excessive force and large blows should be avoided.[24] Once the graft is almost fully seated and stable in the hole, the delivery tube is removed (
Fig. 55-6
). Care should be taken not to shear off the cartilage cap of the graft when the insertion tube is removed.[20] Gentle impaction with a plastic rod or impactor is performed until the surface of the graft is flush with the level of surrounding articular cartilage. The graft should not be left proud. This can result in increased contact pressures[25] or increased gap formation at the graft-tunnel junction with perigraft fissuring, fibroplasia, and subchondral cavitations.[19] If the graft is accidentally impacted deeper than the surrounding surface, the surgeon may drill an adjacent small recipient hole and elevate the graft with an arthroscopic probe to the desired level.[11]
|
|
|
|
Figure 55-6 |

Several pitfalls are encountered in addressing large defects. First, achieving good surface congruity is more difficult. The surgeon should ream recipient sites perpendicular to the surface in the central areas while increasing obliquity 10 to 15 degrees inward toward the periphery.[20] In addition, care must also be taken not to violate adjacent recipient holes during reaming. The sequence of graft harvest, reaming, and implantation should be performed for each individual hole in a step-by-step manner until the defect is covered.[11] The spacing of 1 to 2 mm between grafts in the recipient site should be similar to the spacing of grafts in smaller defects. The surgeon should not obtain all grafts and then ream all recipient holes.
The knee is cleared of all debris and irrigated. Standard wound closure is performed over suction drains.
| PEARLS AND PITFALLS | |||||||||||||||||||||||||||||||||
|
Pearls
Pitfalls
|
| • | The patient is observed in postoperative recovery. | |
| • | Drains are removed before discharge. | |
| • | The operative dressing is changed at 48 hours. | |
| • | Perioperative antibiotics are instituted at the surgeon’s preference. | |
| • | Continuous passive motion is begun on the first postoperative day. |
| • | Infection | |
| • | Hematoma formation | |
| • | Poor motion | |
| • | Thromboembolic events | |
| • | Reflex sympathetic dystrophy | |
| • | Loose body formation | |
| • | Dislodgement or loosening of the graft | |
| • | Donor site morbidity | |
| • | Progression of osteoarthritis | |
| • | Continued symptoms from the affected region |
| • | Non–weight bearing is maintained for 6 weeks. | |
| • | Toe-touch weight bearing is continued until 8 to 12 weeks to ensure full graft maturation. | |
| • | Continuous passive motion is prescribed for 4 to 6 weeks, 4 hours per day. | |
| • | Active and passive range of motion is instituted as the patient can tolerate motion. | |
| • | High-impact activities are avoided until 16 to 20 weeks. |
The results in the literature are generally good for patients with small defects. The results in the literature are difficult to interpret because of differences in operative technique, defect size, and donor site location. In addition, the majority of published reports are less than optimal in that they are of level IV evidence. Results are summarized in
Table 55-2
. Three of the more significant studies are described here.
| Author | Number | Followup | Results | Scoring System | Type of Study | Level of Evidence |
|---|---|---|---|---|---|---|
| Hangody and Fules[10] (2003) | 831 | 10 years | 92% good–excellent (femoral condyles) | Bandi | Case series Mosaicplasty | IV |
| Horas et al[12] (2003) | 40 (20 OATS vs. 20 ACI) | 24 months | Lysholm lower at 6, 12, 24 months for ACI | Lysholm | Prospective, randomized | II |
| Tegner equal at 24 months | Tegner | OATS (multiple plugs) vs. ACI | ||||
| Gudas et al[8] (2005) | 57 (28 OATS vs. 29 microfracture) | 37.1 months | 96% good–excellent with OATS | HSS | Prospective, randomized | II |
| 52% good–excellent with microfracture | ICRS | OATS (multiple plugs) vs. microfracture | ||||
| Chow et al[6] (2004) | 30 | 45.1 months | 83% good–excellent, Lysholm | Lysholm | Case series | IV |
| 87% “normal knee,” IKDC | IKDC | Multiple plugs | ||||
| Koualis et al[13] (2004) | 18 | 27.2 months | 12 “normal” | ICRS | Case series | IV |
| 6 “near normal” | Mosaicplasty | |||||
| Andres et al[2] (2003) | 19 (22 knees) | 24 months | 88% of mosaicplasty with osteoarthritis “improved” | WOMAC | Comparative case series | III |
| SF-36 | Mosaicplasty in osteoarthritis | |||||
| VAS | ||||||
| Outerbridge et al[18] (2000) | 16 (18 knees) | 7.6 years | 83% good | Cincinnati | Case series with patella donor graft, single graft | IV |
| Laprell and Petersen[14] (2001) | 29 | 8.1 years | 26/29 “normal” or “nearly normal” | ICRS | Case series (one or two plugs) | IV |
| Ma et al[16] (2004) | 18 | 42 months | 89% good–excellent | Lysholm | Case series (multiple plugs) | IV |
| Tegner | ||||||
| Bobic[4] (1996) | 10 | 2 years | “Promising results” | Case series | IV | |
| OATS (multiple plugs) + ACL reconstruction | ||||||
| Sharpe et al[22] (2005) | 13 | 3 years | 10/13 with “significant improvement” | KSS | Case series | IV |
| OATS (multiple plugs) + ACI | ||||||
| Sanders et al[21] (2001) | 21 | 22 months | Maximum signal intensity of grafts at 4-6 weeks | Case series of magnetic resonance imaging results, multiple plugs | IV |
|
ACL, autologous chondrocyte implatation; ACL anterior cruciate ligament; HSS, Hospital for special Surgery; ICRS, International Cartilage Repair Society; IKDC, International Knee Documentation Committee; KSS, Knee Society Score; SF-36, short from 36 health survey; VAS visual analogue scale; WOMAC, Western Ontario and McMaster Universities Osteoarthritis Index. |
Hangody and Fules[10] reported the most extensive experience in the literature, with 831 patients with autologous osteochondral transplantation (mosaicplasty) at 10 years, with 92% good to excellent results for femoral condyle implantations. The results significantly decreased for tibial plateau defects (87%) and patella-trochlea defects (79%); donor site disturbances were identified in 3% of the patients.
Horas et al[12] reported a prospective, randomized study comparing 40 patients who underwent either autologous chondrocyte implantation (20) or OATS (20) for lesions 3.2 to 5.6 cm2 at 2 years of followup. The postoperative Lysholm scores were lower at 6, 12, and 24 months in the autologous chondrocyte–implantation group; the Meyers and Tegner scoring systems were equal in the two groups at 24 months.
Gudas et al[8] published a prospective randomized study comparing arthroscopic mosaic osteochondral autologous transplantation (28) with microfracture (29) in 57 femoral condyle lesions smaller than 4 cm2 at 37.1 months. The authors reported 96% good to excellent results in the osteochondral autologous transplantation group compared with 52% for the microfracture group with the Hospital for Special Surgery and International Cartilage Repair Society scoring systems.
There are several options for the orthopedic surgeon in addressing the patient with a focal cartilage defect of the knee. Osteochondral autografting with either single or multiple plugs provides the surgeon with a viable solution to the defect smaller than 3 cm2. Single plugs are appropriate for defects smaller than 1 cm2, whereas multiple plugs are appropriate for defects smaller than 3 cm2. This technique can be used in combination with other knee procedures, such as anterior cruciate ligament reconstruction and high tibial osteotomy. The procedure is straightforward and supported by the published literature to be as good as if not superior to other techniques, such as microfracture and autologous chondrocyte implantation, for defects in this size range. Further research must be explored to better define its place in cartilage restoration surgery. We recommend that the articular cartilage surgeon become familiar with all available techniques to provide the best care to the patient.