
VIII – THE SPINE > Principles and Anatomy > CHAPTER 138 –
SURGICAL APPROACHES TO THE SPINE
patients, were severely limited in the options available to them for
surgical treatment. The source of this limitation was a combination of
technology and the experience in surgical approaches. Very few spinal
surgeons had the ability to approach every aspect of the spine with the
optimal exposure. Spinal access surgeons were few and far between. The
microscopic and endoscopic approaches that protect normal tissue and
speed recovery were scarcely available to unavailable. The evolution of
spinal surgery now allows the surgeon to approach their pathology so as
to optimize the resection of a pathologic lesion and reconstruct the
spine to optimal biomechanical advantage. Perfecting the approach is
the first step to perfecting the surgery and a major step in protecting
the patient.
-
For the posterior cervical exposure of
any level, position the patient’s head in the self-retaining
neurosurgical head fixation device that is attached to the surgical
table. Attach the drapes to the patient’s neck with stay sutures. Neck
flexion will increase exposure, but flexion is limited by the type of
pathologic process present, usually to a neutral, slightly flexed
position. In the presence of spinal instability, confirm the position
of the spine with radiographs. -
Incise the skin and subcutaneous tissue
in the midline to the fascia, and obtain hemostasis with rapid
application of hemostats and electrocautery. Insert self-retaining
retractors. -
Deepen the incision with the cautery
knife, staying within the thin white median raphe; avoid cutting muscle
tissue. The medial raphe of the cervical spine is a
P.3634
tortuous
structure that does not follow a straight path. Open the median raphe
to the spinous processes of C-2 and C-3, the occiput, or any level
needed. In children, expose no spinal levels unnecessarily to avoid
spontaneous fusion at adjacent levels, including the occiput. -
With a #15 blade or cutting cautery,
expose the bulbous bifid tips of the spinous processes. The ligamentous
attachments to C-2 are very prominent. The large spinous process of C-7
and T-1 can be identified. Identify any spina bifida of the cervical
spine on preoperative radiographs and be aware of these areas at
surgery. Insert the Cobb elevator, first facing up to elevate the tip
of the spinous process subperiosteally, then facing down to complete
the subperiosteal elevation from medial to lateral for a width of
approximately 1 inch (2.5 cm) at each level. At levels below C-2,
identify the medial edge of the facet joint at the base of the lamina
and pack each level as it is exposed. When necessary, expose the
occiput with elevators. Insert the self-retaining retractors to expose
the base of the skull and the dorsal spine of C-2. The area in between
will contain the ring of C-1. This is often very deep compared with the
spinous process of C-2. -
Maintaining firm lateral retraction of
the wound, identify the posterior tubercle of C-1 longitudinally in the
midline by probing with a sharp Cobb elevator. Begin the subperiosteal
dissection to expose the bone. -
Often the C-1 ring is very thin, and
direct pressure can fracture it or cause the instrument to slip off the
ring and penetrate the atlantooccipital membrane. Elevation on this
ring can be very dangerous if there is subluxation with constriction of
the posterior dura under this ring. The dura may be vulnerable on both
the superior and inferior edges of the ring of C-1. -
At the level of C-1, dissect laterally
only approximately 1.5 cm. The second cervical ganglion is an important
landmark on the ring of C-1 laterally; it lies approximately 1.5 cm
laterally on the lamina of C-1 in the area of the groove for the
vertebral artery. Carefully identify the most medial aspect of the
groove for the vertebral artery and vein on the superior border of the
C-1 ring. The bluish color of the vein is visualized first. By seeing
the initial ridge or the vein, damage to the artery can be avoided.
There is seldom any indication for dissection lateral to the groove of
the vertebral artery on C-1. The vertebral artery and vein are
vulnerable in the groove; in addition, as the artery passes from the
foramen transversarium of C-2 to that of C-1, it is in close proximity
laterally and posteriorly to the joint (29) (Fig. 138.1 and Fig. 138.2).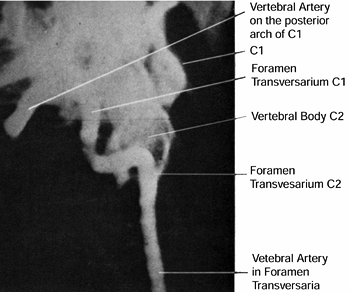 Figure 138.1.
The course of the vertebral artery is from the foramen transversarium
of C-1 posteriorly in the region of the C1–C2 articulation through the
transversarium of C-1, then posteromedially to the posterior rim of C-1.![]() Figure 138.2.
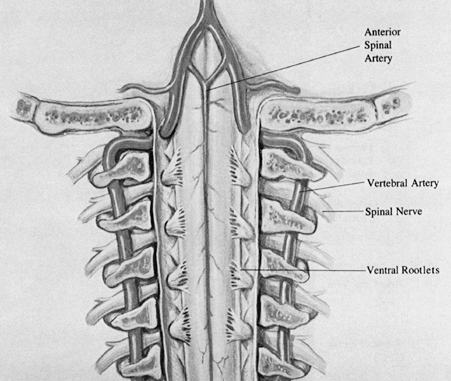
Figure 138.2.
The anterior view without vertebral bodies emphasizes the formation of
the anterior spinal artery. There are numerous variations in this
formation, ranging from a unilateral vertebral artery contribution to
no contribution. -
The vertebral artery enters the foramen
transversarium at the sixth vertebra and progresses cephalad. It exits
through the foramen transversarium of C-1 and progresses posteriorly as
well as medially in the groove of the superior border of C-1 toward the
midline, then turns cephalad along the spinal cord to enter the foramen
magnum. The vertebral artery can be damaged by penetrating the
atlanto-occipital membrane off the superior border of the ring of C-1
more lateral than the usually safe 1.5 cm from the midline. -
Following exposure of the ring of C-1 and
exposure to bone of the posterior occiput, different operative
procedures require exposure of the dura under the edge of the foramen
magnum (17,25,26).
Never attempt to decompress the posterior fossa under the edge of the
foramen magnum without sufficient visualization of the area cephalad to
the foramen. This is best accomplished by placing two burr holes just
off the midline of each side of the skull (Fig. 138.3).
The caudal extent of the holes is usually determined by the angle of
the drill on the skull as limited by the patient’s shoulders.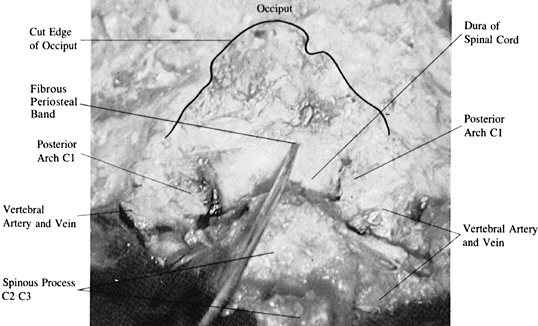 Figure 138.3. Posterior approach to the foramen magnum.
 -
In the posterior approach to the foramen
magnum, first place burr holes in the occiput above the foramen magnum.
Two parasagittal holes allow removal of bone from the dura with a
Harrison-type rongeur. Careful dissection medially from the burr holes
provides protection from the often significant fragile venous sinus,
and dissection caudally approaches the foramen magnum. After removal of
the occiput including the bony rim of the foramen magnum, which is a
sharp-lipped structure projecting directly anterior in the transverse
plane, the fibrous attachment of the inner periosteum of the skull to
the dura at the rim of the foramen magnum is encountered. When a
transverse venous sinus in this area
P.3635P.3636
is
torn, bleeding can be significant. Attachment to the dura in this area
produces a dural leak unless the area is carefully dissected. -
Penetrate to the inner periosteum and the
bone edge with a small dissector. Expand the hole caudally to the
foramen with rongeurs. The edge itself curves under and projects
anteriorly. The periosteum of the skull at this point is often
conjoined with the dura of the spinal cord. There is a median venous
sinus in the midline, and the fascial attachment of the periosteum of
the skull to the dura often contains a transverse sinus as well. -
Passing instruments under the edge of the
foramen can produce dangerous bleeding in the posterior fossa with no
means of control. Therefore, resect the bone down to this edge from
above. -
For a more lateral approach to the C1–C2
facet joint, the vertebral artery between C-1 and C-2 must be
identified. In rotatory dislocations of C1–C2, the artery is stretched
tightly across the joint on the side that C-1 is anterior to C-2, and
it is easily damaged (29). -
For nerve root exposure below C-2,
identify the junction of the lamina and the inferior facet. Then
identify the junction of the interlaminar area and the facet joint.
Expanding these areas with a burr or a micro-Kerrison rongeur allows
entry into the intervertebral foramen and exposure of the nerve root.
Use standard prophylactic antibiotics because no special antibiotic
coverage for normal oral flora is needed. I do not use preoperative
antiseptic gargles or tetracycline (7).
-
Position the patient supine with the head
slightly flexed on occipital pads, or put the head into a halo. A more
upright position can be used with certain precautions. -
The Boyle-Davis or McIver ear, nose, and
throat (ENT) retractor allows depression of the tongue and
self-retaining retraction of the mouth. The lips and teeth should be
adequately padded. -
Incise the soft palate with a curvilinear
incision around the uvula, and retract the cut edges with stay sutures
to the lateral walls of the oropharynx or to an especially bent,
blunt-tipped Gelpi retractor (7,14). Prep the oropharynx with povidone-iodine (Betadine) solution and reculture it. -
Enhanced hemostasis by injecting the posterior pharyngeal tissue with a solution of 5% lidocaine and 1:500,000 epinephrine.
-
After palpation and radiographic
confirmation of the ring of C-1, make a vertical incision from
approximately 1 cm cephalad to the tip of the odontoid to 2 cm distal
to the anterior tubercle of C-1. Incise the four layers (posterior
pharyngeal mucosa, superior constrictor muscle of the pharynx, the
prevertebral fascia, and the anterior longitudinal ligaments) directly
to the bone. -
Bluntly dissect the soft tissue off the body of C-2 below the odontoid and off the anterior tubercle of C-1.
-
Caution: The longus
colli muscle inserts on the anterior tubercle of C-1, and sharp
dissection may be needed to remove it. Venous bleeding may arise from
the recesses just lateral to the base of the odontoid. -
When necessary, the lateral masses of C1–C2 can be exposed by bluntly dissecting the bone both transversely and vertically.
-
Caution: Avoid
plunging lateral to the facet joints. To avoid damage to the internal
carotid, do not pass a stay suture too deeply into the lateral
pharyngeal wall. -
Remember, this is a deep wound, requiring
long instruments with fine tips. Most operations done with this
exposure require use of the microscope for lighting and magnification. -
After the bony work is completed and good
hemostasis is obtained, close the posterior pharynx in a single layer
with interrupted absorbable sutures.
-
Position the patient supine with the
appropriate support for the cervical spine mentioned earlier. For two
levels of pathology, it is a transverse incision, one fingerbreadth
medial to the medial border of the sternocleidomastoid. Open layers in
a fashion similar to that used with the standard cervical approaches. -
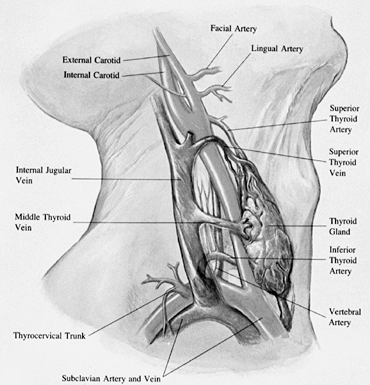
For higher anterior approaches to C-1,
C-2, and C-3, identify the superior thyroid artery and vein. The
superior thyroid artery arises from the external carotid artery at
approximately the level of the hyoid bone. It crosses through the
carotid triangle, arches deep to the strap muscles, and enters the
lateral superior aspect of the thyroid gland. Retract the superior
thyroid artery and vein inferiorly. -
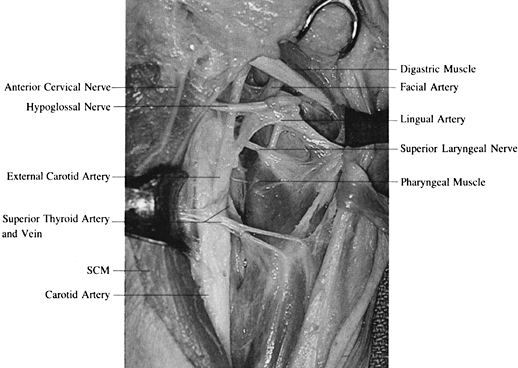
Identify and retract the hypoglossal
nerve. The hypoglossal nerve is found passing from lateral to medial
superficial to the external carotid, lingual, and facial arteries (Fig. 138.4).
It exits the skull in close proximity to the vagus nerve and courses
beneath the internal carotid artery and internal jugular vein, becoming
superficial at the angle of the mandible. After the usual point of
identification of the hypoglossal nerve over the arteries, it passes
deep to the tendon of the digastric muscle and stylohyoid muscle for
distribution to the muscles
P.3637
of the tongue. Retract the hypoglossal nerve cephalad; usually, the superior thyroid artery and vein are retracted caudad.![]() Figure 138.4.
Figure 138.4.
Dissected anatomy of the carotid triangle and area just below
emphasizes the importance of identification of the hypoglossal nerve
before ligation of the arterial structures in this area. The most
common approach is cephalad to the superior thyroid artery and caudad
to the digastric muscle. SCM, sternocleidomastoid. -
Be certain of the identification of the
hypoglossal nerve before ligating any structure. It is a superficial
structure, first coursing vertically and parallel to the carotid
sheath, then horizontally, crossing medially over the carotid and its
branches. -
Identify the lingual artery, which arises
from the external carotid. From the level of the hyoid, it crosses
under the digastric and stylohyoid muscles in its ascent to the oral
pharynx. -
Identify and ligate the facial artery.
The facial artery next leaves the external carotid artery, coursing
under the ramus to the mandible within the carotid triangle. It passes
deep into the digastric muscle and enters the face at the anterior edge
of the mastoid after crossing on the submandibular gland. -
Identify the digastric muscle. This
muscle is easily retracted cephalad with the hypoglossal nerve. When
necessary, divide the stylofascial band running from the stylohyoid
process to the posterior pharynx. -
Difficulties may be encountered with the
superior laryngeal nerve, both external and internal branches, and the
pharyngeal branches of the vagus nerve. These nerves should be
identified and retracted, but they frequently suffer from the
retraction. Continue to use finger palpation to identify the spine and
the carotid artery. -
Retract the carotid sheath and the
ligated stumps of the lingual and facial arteries laterally, and
retract the musculovisceral column medially with deep right-angle,
hand-held blunt retractors. -
With a Kittner dissector, make a careful, blunt dissection at this point, to identify the prevertebral fascia.
-
Elevate the fibers of the longus colli
muscle and fascia off the vertebral body in a lateral and cephalad
direction. Insert the sharp claw blades of the Cloward retractor under
the longus colli. The smooth-tipped blades can be used if firm fixation
cannot be obtained under the longus colli (3). Deep hand-held retractors are also quite effective (Fig. 138.5).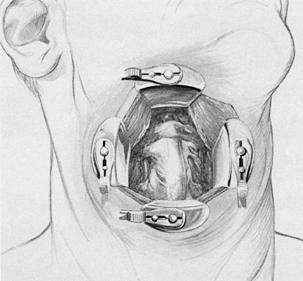 Figure 138.5. The spine is exposed with deep retractor blades.
the fascial covering of the visceral structures of the neck (10).
This investing layer of cervical fascia is attached inferiorly to the
acromion, clavicle, and manubrium of the sternum in an outer and inner
layer superiorly to the hyoid bone, posteriorly to the mandible and
mastoid processes, and superior to the nuchal line. The interval
between the two laminae of the external investing fascia is called the
suprasternal space, or the space of Burns. This space, which contains
the anterior jugular veins and sternal head of the sternocleidomastoid,
is referred to as the cul-de-sac of Bruger. Communication between the
anterior and external jugular veins is channeled through this inner
laminar area.
sheath and joins the external investing fascia at the posterior border
of the sternocleidomastoid muscle. Inferiorly, the middle cervical
fascia attaches to the posterior surface of the sternum, as do the
muscles that they cover. It is the middle cervical fascia that attaches
to the clavicle and forms the loop for the inferior belly of the
omohyoid muscle.
endothoracic fascia caudally, and laterally it covers the levator
scapulae and splenius muscles. It extends posteriorly to attach to the
spinous processes of the vertebrae. In the neck and throughout the
spinal column, it covers the longus colli and capitus muscles and is
secured to the tips of the transverse processes.
anterior tubercles of the transverse processes of C-3, C-4, C-5, and
C-6. It inserts into the scalene tubercle on the inner border of the
first rib and into the ridge on the cranial surface of the rib ventral
to the subclavian groove. The scalenus medius originates from the
posterior tubercle of the transverse processes of the last six cervical
vertebrae and inserts into the first rib.
Sibson’s fascia. These fascial connections and the scalenus minimus
connect the transverse processes of the seventh cervical vertebra to
the first rib. Sibson’s fascia, as a portion of the prevertebral
fascia, becomes continuous with the endothoracic fascia on the inner
surface of the first rib. Extending medially between the anterior
scalene muscle and the spine is the all-important retropharyngeal
fascial cleft. This is the space beneath the visceral structures,
superficial to the prevertebral fascia; it is in this space that
retraction and work on the anterior portion of the spine takes place.
-
Position Gardner-Wells tongs or
headhalter traction for cervical traction. Position the head in slight
extension and rotation to the right. Contour a small, curved sand bag
under the neck to support the spine. Drape off the entire neck with
adhesive towel drapes. Select the level of the skin incision.
Superficial landmarks are used to determine the appropriate placement
of the skin incision over the appropriate level of the spine. For
approaches to C-1, C-2, and C-3, start the incision midline extended to
the lateral border of the carotid sheath, one fingerbreadth below the
angle of the madible. For approaches to C2–C3 start the incision at the
midline and extend it to the lateral border of the sternocleidomastoid
at the level of the cephalad margin of the thyroid cartilage. For
C4–C5, start the incision at the midline and extend it to the medial
border of the sternocleidomastoid at the level half way between the
cricoid cartilage and the superior border of the tyroid cartilage. For
C5–C6, start the incision at the midline on the cephalad margin of the
cricoid cartilage and extend it to the medial border of the
sternocleidomastoid. For C6–C7, start the incision at the midline of
the caudal margin of the cricoid cartilage and extend it to the medial
border of the sternocleidomastoid. For C7–T1, start the incision at the
midline; extend it just lateral of the medial border of the
sternocleidomastoid, halfway between the cricoid cartilage and the
clavicle. We prefer the midline starting point, because retraction of
the medial muscular visceral column is the strongest structure
requiring retraction. Having the skin open to the midline eases that
retraction. The self-retaining retractor is
P.3639
placed in the midline. Having the skin open to the midline aids in that retraction. -
After making a transverse skin incision at the appropriate level (Fig. 138.6),
dissect through the subcutaneous tissue to the platysma muscle. Elevate
the platysma muscle with Adson forceps, and open it carefully, in the
line of the fibers, when possible. Beware of damage to veins and the
sternocleidomastoid muscle (2,21). Insert a spring retractor.![]() Figure 138.6.
Figure 138.6.
The more cosmetically suitable transverse incision is made at the
appropriate level and should allow exposure of up to two discs and
three vertebrae. A vertical incision can be used for an even greater
exposure. -
Open the superficial cervical fascia and identify the medial border of the sternocleidomastoid muscle (25).
The first key to successful exposure is adequate identification of the
medial border of the sternocleidomastoid so that it may be retracted
laterally (23) (Fig. 138.7).
With identification of this medial border, bluntly develop the interval
between the sternocleidomastoid muscle and the sternohyoid muscles.
Retract the posterior cutaneous nerves. Bluntly dissect the soft tissue
and spread it vertically in this interval. Figure 138.7.
The key to the dissection at this point is to identify the medial
border of the sternocleidomastoid muscle. With lateral retraction of
the sternocleidomastoid, the interval between this muscle and the
medial strap msucles is delineated. -
Retract the sternocleidomastoid laterally
and the strap musculature medially with angled retractors. Identify the
middle cervical fascia. The omohyoid muscle crosses from proximal
medial to lateral distal through the middle cervical fascia at C6–C7.
Retract the omohyoid; when necessary, divide it and later repair it in
its midportion. -
After retracting the sternocleidomastoid
muscle laterally and the strap musculature medially, identify the
arteriovenous structures of the middle cervical fascial layer (Fig. 138.8).
Palpate the carotid pulse. Open the midline cervical fascia medial to
the carotid artery. Ligate and tie the medial thyroid vein. Retract
cephalad the superior thyroid artery and retract caudad the inferior
thyroid artery to expose the midcervical spine.![]() Figure 138.8. Arteriovenous structures of the middle cervical fascial layer.
Figure 138.8. Arteriovenous structures of the middle cervical fascial layer. -
Spread the middle cervical fascia just medial to the carotid sheath (23), with finger dissection spreading vertically and horizontally (3).
Identify the inconstant middle thyroid vein crossing at approximately
C-5, and ligate and divide it when needed. Identify the spine with
finger palpation of the anterior surface of the vertebral body. Insert
a blunt, nonlipped Cloward hand-held retractor into the wound directly
down to the spine. Hold the retractor on the right longus colli. Beware
of entering the tracheoesophageal groove (and thereby damaging the
recurrent laryngeal nerve with the retractor tip) (19). -
Distally retract the inferior thyroid
artery and vein at the C6–C7 level, and proximally retract the superior
thyroid artery and vein with the superior laryngeal nerve at C3–C4. -
Do not mistake the transverse process for
the anterior surface of the vertebral body because an incision deep in
this area will damage the longus colli, the sympathetic chain, and
possibly the vertebral artery. An incision into the longus colli
produces bleeding. -
Palpate a disc in the midline of the
spine and open the prevertebral fascia with a small dissector
longitudinally until the disc can be identified. If the finger dissects
directly to the spine and the retractor is then inserted, the esophagus
cannot be seen. The empty esophagus is only a soft, flat ribbon-like
structure simulating the musculature over the anterior portion of the
spine. Always use either an esophageal stethoscope or a nasotracheal
tube to identify the esophagus. -
Insert a needle into a disc for lateral radiographic confirmation of the level.
-
Retract the esophagus, trachea, and
anterior strap muscles medially and the carotid sheath and
sternocleidomastoid muscle laterally. -
Incise the prevertebral tissue in the
midline on the disc. Use a bipolar coagulator along the medial edge of
the longus colli as needed. Using sharp periosteal elevators, fashion a
flap of muscle under which the retractor can be inserted laterally from
the midline. Insert the clawed blades of the Cloward deep
self-retaining retractor under the longus colli on both sides of the
spine. To expose the desired disc, use the blunt-tipped Cloward
retractor vertically (3). -
Insert the clawed retractor first. Hold
it down on the spine while inserting the near retractor. The Cloward
curved periosteal elevator can lift up the flap for insertion of the
blade retractor. -
After hemostasis has been achieved, close
the deep wound by removing the retractors. Use subcuticular skin
closure, and always use a closed suction wound drainage system.
-
Place the patient in the supine position
with the neck slightly hyperextended and rotated away from the side of
the approach. Use an inflatable cervical pillow for support; a small
roll under the shoulder often helps to extend the neck. -
Caution: Location of
the thoracic duct and recurrent laryngeal nerve becomes even more
important at this level. Approaches from the left for C6–T2 are
directly in the vicinity of the thoracic duct. Identify the thoracic
duct when possible and protect it. A large fatty meal the day before
surgery will help. If the thoracic duct is inadvertently divided,
double ligate both ends well. The approach to the right definitely
requires identification and protection of the recurrent laryngeal
nerve. I recommend the left supraclavicular approach to avoid risk to
the recurrent laryngeal nerve. -
Make a transverse incision approximately
one fingerbreadth above the clavicle from the midline to the posterior
border of the sternocleidomastoid muscle. After the skin and
subcutaneous tissue are divided and small skin self-retaining
retractors are placed, incise the playtsma muscle in the line of the
incision. As in the higher approaches, identification of the medial
border of the sternocleidomastoid muscle is imperative. -
In addition, identify and define the
anterior and posterior borders of the sternocleidomastoid muscle. The
external jugular vein, although somewhat variable, is usually directly
in the operative field, and the anterior jugular vein is positioned
more medially. Divide it, if necessary. -
Incise the external investing fascia.
Pass a probe or finger laterally from the medial border of the
sternocleidomastoid to clear off the venous structures underneath the
clavicular head of the sternocleidomastoid. -
Divide the sternocleidomastoid laterally to medially 1 inch from its insertion, watching for the internal jugular vein (12).
If required for visualization, remove the sternal head of the
sternocleidomastoid muscle in the same fashion. Eventual reattachment
depends on suturing the fascial covering of the muscle. -
Retract the divided sternocleidomastoid
in a cephalad-caudad direction with self-retaining blunt retractors.
The floor of the incision, at this point, consists of the middle
cervical fascia, which contains the omohyoid and the sternohyoid
muscles. -
Enter the middle cervical fascia lateral
to the carotid sheath. Bluntly dissect to the surface of the anterior
scalene muscle. The superficial surfaces of the anterior scalene are
composed of the outer layer of prevertebral fascia, which is the third
and deepest of the fascial layers dealt with in this approach. Lying on
the surface of the anterior scalene muscle is the phrenic nerve. The
phrenic nerve crosses from lateral to medial, and cephalad to caudad.
Retract the phrenic nerve medially after freeing it from the surface of
the anterior scalene muscle. Identify the large internal jugular vein
medially and feel for the carotid pulse. Although retraction of the
carotid sheath is possible laterally, attempt to retract the internal
jugular vein and carotid sheath medially (24).
Retract the phrenic nerve to obtain good visualization of the anterior
scalene, which is between the phrenic nerve and the middle scalene. The
brachial plexus and suprascapular nerves are more superficial at the
lateral border of the anterior scalene. -
Delineate the medial and lateral borders
of the anterior scalene muscle. The fascia on the deep surface of the
anterior scalene is Sibson’s fascia, a continuation of the prevertebral
fascia that encloses this muscle. The apex of the parietal pleura and
lung form the undersurface of Sibson’s fascia. -
Retract the anterior scalene laterally.
Now carry out blunt dissection medially under the retracted carotid
sheath. Stay on the prevertebral fascia of the spine. -
If more exposure is needed, carefully
approach under the anterior scalene without violating the major
portions of Sibson’s fascia, and divide the anterior scalene muscle.
The scalene can be retracted cephalad to caudad with self-retaining
blunt retractors. Sibson’s fascia now makes up the floor of the wound;
the large internal jugular vein and the carotid sheath are located
medially; the apex of the lung is beneath Sibson’s fascia in the floor
of the wound; and laterally, the brachial plexus courses superficial to
the scalenus medius. The proximal portion of the anterior scalenus
muscle may be dissected from the anterior tubercle of the transverse
processes to allow greater exposure of the spine or brachial plexus (22). -
Incise Sibson’s fascia at the transverse
processes and bluntly retract it inferiorly. This retracts the pleura
of the lung, which is usually at the T-1 level. Mobilize the recurrent
laryngeal nerve medially with the carotid sheath and medial visceral
column. Expose the spine by opening the fascia in the midline over the
body. The transverse processes and rib heads can be exposed (18). -
Dissect to the second and third rib
heads. This produces a rather lateral exposure of the spine. From the
rib heads, dissect medially to enter the retropharyngeal fascial cleft
on the anterior surface of the spine without having to dissect the
longus colli muscle. Identify the vertebral artery entering the spine
at C-6. The subclavian vein courses on the floor of the wound. -
If the approach is done from the left,
the junction of the internal jugular veins and the subclavian veins
will contain the thoracic duct. Identify the thoracic duct. In case of
damage, double ligate it proximally and distally. Chylothorax can be
prevented with proper ligation.
P.3642
Often,
a more judicious approach involves blunt dissection, progressing
cephalad to caudad, as has been described for the transverse processes
of C-5, C-6, and C-7, to the rib head of the first rib down on the
spine. This will sweep most of these structures cephalad to caudad. The
danger, of course, lies in cutting restraining structures that cross
the field. The sympathetic chain (stellate ganglion at C-7) lies on the
rib heads in a lateral position. Avoid damage by dissecting more
medially.
approach to the T1–T4 area. Resection of the third rib allows greater
spreading of the intercostal area than does second rib resection (13).
The cephalad extension of the exposure is enhanced with kyphosis
deformity of the cervicothoracic junction area. The second rib can be
removed if the operative exposure is inadequate.
-
Place the patient in the lateral
decubitus position, with the left side up. Prep and drape the entire
left upper extremity in a sterile manner (Fig. 138.9).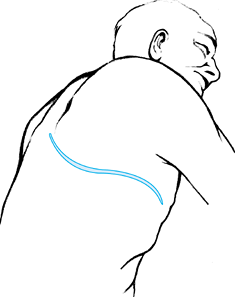 Figure 138.9. Skin incision for third rib resection for the transthoracic approach.
 -
Incise the skin and subcutaneous tissue
from the lateral paraspinous area at T-2, along the medial caudal
border of the scapula, under the axilla to the costal cartilage of the
third rib. -
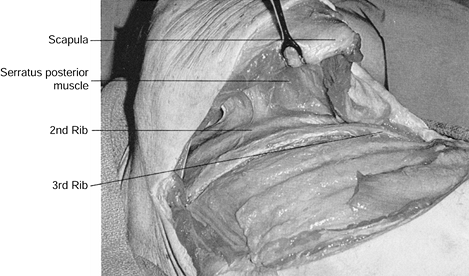
Carefully divide each subsequent muscle
layer down to the level of the rib, sectioning portions of the
trapezius, latissimus dorsi, rhomboid major, and serratus posterior as
needed. Careful dissection with electrocautery and meticulous
cauterization of each muscle bleeding point allows exposure to the
outer periosteum of the third rib with a minimal amount of bleeding. As
the muscle layers are divided, retract the scapula cephalad and
medially to tense the muscle tissue for easier cutting. Palpate the
chest wall cephalad for identification of the third rib. Remember that
the first rib is situated inside the second; this is important for
reaching the correct rib level (Fig. 138.10).![]() Figure 138.10. Elevation of the scapula aids in the division of the muscles attached to the scapula and allows visualization of the third rib.
Figure 138.10. Elevation of the scapula aids in the division of the muscles attached to the scapula and allows visualization of the third rib. -
Dissect the external periosteum off the third rib with periosteal elevators. Excise the third rib from the angle
P.3643
of the rib to the costal cartilage. Open the rib bed as in the standard thoracotomy approach (Fig. 138.11).
The rib bed consists of periosteum, endothoracic fascia, and parietal
pleura. Incise the parietal pleura, carefully avoiding damage to the
underlying lung. Pick up the inner periosteum of the rib bed with Adson
forceps and open the rib bed with scissor tips or fine dissection with
a knife blade. To avoid lung and pleural adhesions just under the rib,
complete the opening of the rib bed with semiclosed scissors, using a
finger to clear lung from the undersurface.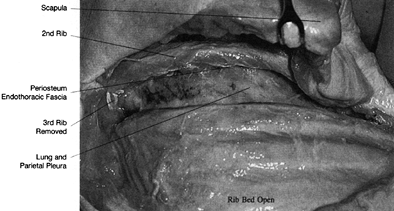 Figure 138.11. Excise the third rib from the angle of the rib to the costal cartilage.
 -
Use the Feochetti rib spreader to open the intercostal area. Deflate or retract the lung with a spatula-type retractor (Fig. 138.12).
![]() Figure 138.12. With the rib bed open, place the Feochetti rib-separating retractor and retract the lung with a spatula lung retractor.
Figure 138.12. With the rib bed open, place the Feochetti rib-separating retractor and retract the lung with a spatula lung retractor. -
Identify the aorta, spine, ribs, parietal
pleura, and veins under the parietal pleura in the wound. The highest
intercostal vein is usually seen. -
Use an Adson forceps and Metzenbaum scissors to open the parietal pleura delicately over the costovertebral articulations.
-
Identify the prominent soft or white
tissue of the intervertebral disc. This is a relatively avascular,
safer plane for dissection than the surface of the vertebral body. Make
an intraoperative radiograph to verify the level. -
Dissect each intercostal vessel, tying
and ligating it over the vertebral body. Bluntly dissect the soft
tissue from the vertebral body (Fig. 138.13). Figure 138.13.
After the parietal pleura is opened, bluntly dissect its edges off the
spine with a “peanut” or sponge. The parietal pleura may be sutured
back laterally with stay sutures when necessary for continued
retraction. -
Fully expand the lung and visualize in
all areas before closure. Close the parietal pleura over the spine
whenever possible. Place the chest tube through a separate aperture,
preferably in the ninth intercostal space. Protect the lung during
closure. Close the chest with the rib approximator. Close the rib bed
with interrupted permanent braided Dacron sutures. The chest tube can
usually be removed within 48 to 72 hours, depending on drainage and
expansion of the lung.

exposure of vertebral levels T-2 to L-2. Rib selection depends on the
location and extent of the pathologic process. Anatomic variations at
the cervicothoracic and thoracolumbar junction dictate the rib to be
taken. Choose the rib to be resected for a certain vertebral level by
one of two methods:
-
When the pathology dictates a direct
anterior approach to the vertebral column (e.g., kyphotic tuberculous
abscess), choose the rib directly horizontal to the vertebral level at
the midaxillary line in an anteroposterior chest radiograph. The rib
removed must be cephalad to the lesion to give adequate proximal
exposure of the lesion (13). -
When direct access to the spinal canal is
needed at one disc (e.g., ninth rib to the T8–T9 disc), use a left
approach because it is much easier to deal with the aorta and the
segmental vessels from the left side. For patients with a large abscess
in the right chest or in other circumstances that dictate a right
thoracic approach, be prepared to mobilize the vena cava and associated
veins from that side.-
Place the patient on the bean bag. Use a
double-branched endotracheal tube into the right and left mainstem
bronchi to allow selective collapse of the left lung. Center the
midthorax of the patient over the break in the table. Pad the dependent
axilla, and pad and protect the left arm. Stabilize the pelvis with a
strap to the table. Place a pillow between the legs, and pad all the
bony prominences. Flex the table to allow better exposure. -
Open the skin and subcutaneous tissue
from the lateral border of the paraspinous musculature to the
sternocostal junction over the rib to be resected. Inject the incision
with 1:500,000 epinephrine. Place the thoracotomy incision slightly
tangential to the rib to be resected, allowing easier resection of more
than one rib if necessary. -
After inserting the self-retaining
retractors, extend the wound with the electrocautery down through the
muscle layers to the thorax. When necessary for full exposure, the
latissimus dorsi, trapezius, and rhomboid major and minor muscles can
be sectioned. -
After the chest wall is exposed, count
the ribs from the twelfth up to the appropriate rib or from the first
rib downward. The first rib appears to be inside the second when one is
palpating from this angle, and it is often difficult to find. Each rib
articulates with the superior portion of the body in the area of the
disc space of the level above. Therefore, the twelfth rib inserts
closer to the T11–T12 intervertebral disc space. Confirm identification
of the rib with a radiograph. -
Expose the outer periosteum of the rib
with the electrocautery and cut directly to the bone through the
periosteum from the angle of the rib to the costal cartilage. Elevate
the periosteum off the outer rib surface. Use the curved-tip rib
elevator to strip the superior and inferior borders of the rib,
maintaining an intact elevated periosteum. Elevate the inner periosteum
of the undersurface of the rib with the Doyen elevator. -
Caution: Avoid
damaging the intercostal vessels that course on the inferior surface of
the rib. Elevate the periosteum of the rib by cutting with the elevator
directly on bone. Avoid plunges that might inadvertently enter the
pleura. -
With the intact periosteum freed from the
rib, cut the rib with the rib cutter as far posteriorly as necessary
between the costotransverse joint and the angle of the rib and
anteriorly at the costal junction. Remove the rib and save it for bone
graft. Lightly wax the bone on the end of the rib after rasping to make
sure there are no ragged edges. Tie a sponge on the tip of the stump to
protect the surgeon during the procedure. -
Pick up the inner periosteum of the rib
bed with Adson forceps and open the rib bed with scissor tips. Avoid
lung and pleural adhesions. Complete the opening of the rib bed with a
semiclosed scissors after using a finger to clear lung from the
undersurface. When pleural adhesions exist, first attempt to dissect
the adhesions bluntly with the finger or sponge stick. If necessary,
sharply dissect dense adhesions and ligate vascular structures. -
Retract the lung medially with a spatula
lung retractor or deflate it. Retraction of the lung should be removed
at least every 20 minutes to allow adequate expansion of the lung and
to prevent postoperative atelectasis. Insert the Feochetti separator in
the rib resection defect, with moist lap sponges over the edges. Expand
the Feochetti separator to allow adequate visualization inside the
thoracic cavity. Flexion of the table may be of benefit. -
The anatomy of the spine at this point is
obscured by the reflection of the parietal pleura as it covers the
soft-tissue structures over the spinal column. Elevate the parietal
pleura with Adson forceps and open it with Metzenbaum scissors. Extend
the opening of the parietal pleura cephalad and caudad on the spine by
cutting over a peon dissected under the pleura. The presence of a large
paravertebral abscess at this point means only that the abscess should
be exposed just as the spine would be. When an abscess is present, cut
its outer wall longitudinally and approach the spine through the
abscess. -
The disc is the more prominent, softer,
white structure of the spine. The discs are relatively avascular and a
much safer area for dissection. An intercostal vein and artery cross
the midportion of each vertebral body. -
Bluntly dissect the edges of the parietal
pleura off the spine with a Kittner dissector or sponge. Elevate the
pleura on the discs and lift it off the vessels on the vertebral body.
Dissection begun over the disc is less likely to cause bleeding. Make a
radiograph at this point to verify the level. After the parietal pleura
is opened, it may be sutured back on itself laterally with two stay
sutures. -
Separate, sever, and ligate each of the
intercostal vessels over the vertebral body. If a large paravertebral
abscess is present, the arteries enter the abscess. Take care to avoid
clamping segmental arteries too close to the aorta so as to lose the
tie or too close to the intervertebral foramen. Tie arteries and veins
separately or together, depending on their size. Pass a right-angled
clamp under the vessels, and use a braided 2-0 suture in a free tie to
tie off first the medial and then the lateral exposed vessels; use
vascular clamps in a similar fashion. -
Caution: Take care
to dissect adequately under the vessels. A common mistake is to have
both ligature sutures in the same place under the vessel and not have
adequate room for cutting between them. Handle every segmental vessel
in the area of where bony work will be done in this manner. Paralysis
due to ligation of a segmental artery on the vertebral body has not
been a problem (13). -
Caution: Do not dissect into the intervertebral foramen.
-
Bluntly expose the outer surface of the
spine after division of the segmental vessels. When bone and disc
exposure is needed, cut with the cautery directly to bone. Use the
periosteal elevator to dissect the annulus off the disc and the
periosteum off the bone medially and laterally, exposing the entire
disc and vertebral column. The tendency is not to dissect the soft
tissue laterally enough off the spine. The rib head articulates with
the cephalad half of its appropriate vertebral body and the disc space
above. Access to the posterior disc and spinal column can be gained by
resecting the rib head (Fig. 138.14). Removal
of the head of the rib and its articulation allows excellent exposure
of the posterolateral aspect of the intervertebral disc. After the rib
head and disc are removed, identify the intercostal nerve, dural sac,
posterior vertebral body wall, and spinal canal. The costal vertebral
articulation is a major stabilizing structure in the thoracic spine.
Identifying the left pedicle in a left-sided approach helps locate the
spinal canal for orientation. The vertebral body can be completely
exposed by resecting the disc above and below to identify the posterior
body wall and spinal canal and dissected laterally to identify the
pedicle and spinal canal.![]() Figure 138.14.
Figure 138.14.
The rib articulates with the cephalad half of its appropriate numbered
vertebral body and with the disc space above. Therefore, the tenth rib
articulates at T9–T10. -
Visualize the lung fully expanded in all
areas before closure. Close the parietal pleura over the spine whenever
possible. Place the chest tube through a separate aperture, preferably
in the ninth intercostal space. Protect the lung during closure. Close
the chest with the rib approximator. Close the rib bed with interrupted
P.3646
permanent
braided Dacron sutures. The chest tube connects to the water seal. With
the lung re-expanded, the chest tube can usually be removed within 48
to 72 hours, depending on drainage and expansion of the lung.
P.3645 -

thoracolumbar junction are much the same as in the rest of the thoracic
spine. Hodgson and Rau (13,14) recommend a ninth rib resection for T10–L1. Dwyer et al. (6)
recommend a tenth rib resection with the standard thoracolumbar
approach for the T10–L1 area. For exposure of the T12–L1 area, Perry (19)
recommends a tenth rib resection. Ideally, choosing the rib in the
midaxillary line opposite the lesion or the apex of a curve allows
adequate proximal exposure for working “down” or caudad on the lesion.
for maximum exposure of T11–T12. A tenth rib thoracoabdominal approach
is preferred for exposure of the T12–L1 area. Both techniques involve
detaching the diaphragm at its circumference. A twelfth rib approach is
used in cases in which less exposure is needed or when it is imperative
that the diaphragm not be taken down. A twelfth rib extrapleural
retroperitoneal approach is recommended for exposure of L1–L2.
approach with less expansive exposure, is the highest practical,
extrapleural, retroperitoneal anterior approach for the exposure of the
T10–L2 area. It is ideally used in severely ill patients in whom
avoiding opening the pleural cavity and cutting the diaphragm is an
advantage. Another alternative for limited extrapleural exposure with
low morbidity is the posterior costotransversectomy approach. The
vertebral body and spinal canal can be exposed by following the twelfth
subcostal nerve to T12–L1. Unless at least two levels are exposed with
the approach, the visualization necessary to perform total discectomy,
vertebrectomy, and strut grafting is extremely poor compared with the
anterior approach.
is the tenth rib thoracolumbar approach for long exposures of the
thoracic and lumbar spine. This approach allows proximal and distal
extension for multilevel operations and optimum exposure for bony work.
-
Place the patient in the lateral
decubitus position. Make the approach from the convexity of the
scoliosis or from the left side, when possible (Fig. 138.15).
A left-sided approach is preferred because of ease of mobilization of
the aorta compared with the vena cava and because splenic retraction is
easier than hepatic reconstruction. Open the skin and subcutaneous
tissue from the lateral
P.3647
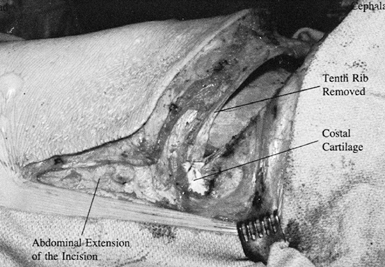
border of the paraspinous musculature over the tenth rib to the junction of the tenth rib and costal cartilage (20).
Curve the incision anteriorly from the tip of the tenth rib to the
lateral rectus sheath and distally down the edge of the sheath as far
as necessary for exposure. Use electrocautery to slowly extend the
incision through each muscle layer while an assistant aggressively
picks up bleeders with two Adson forceps.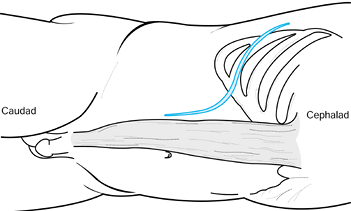 Figure 138.15. Skin incision for a tenth rib thoracoabdominal approach.
 -
Open the superficial periosteum of the
tenth rib to the costal cartilage. Use the sharp, curved periosteal
elevator to remove the superficial and deep periosteum off the rib.
Take care to avoid the neurovascular bundle on the inferior surface of
the rib. Cut posteriorly at the angle of the rib, and cut at the
junction of the rib and costal cartilage. Remove the rib. On opening
the pleural space, retract the lung and fully open the rib bed with
scissors (Fig. 138.16). At this point, the intrapleural cavity is opened and the retroperitoneal cavity is still closed.![]() Figure 138.16. With the rib removed, carefully delineate the costal cartilage.
Figure 138.16. With the rib removed, carefully delineate the costal cartilage. -
Split the costal cartilage with a knife
along its length. Open the undersurface of the costal cartilage and
retract the two tags of cartilage (5,6,20) (Fig. 138.17).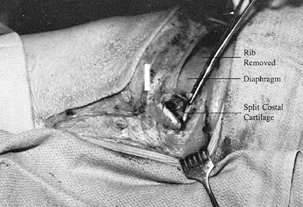 Figure 138.17.
Split the costal cartilage. Open the most superficial layer of soft
tissue under the costal cartilage enough to allow retraction of the
cartilage tips. -
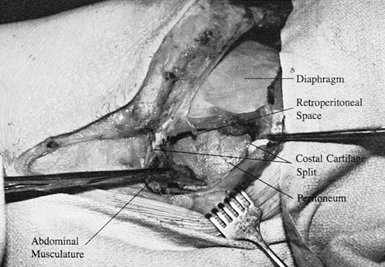
Identify the peritoneum and
retroperitoneal space by blunt dissection under the retracted split
tips of the costal cartilage. The guide to the retroperitoneal space is
the light areolar tissue of the retroperitoneal fat (Fig. 138.18).![]() Figure 138.18.
Figure 138.18.
Retract the split tips of costal cartilage. Identify the insertion of
the diaphragm into the cephalad cartilage tip and the insertion of the
abdominal musculature into the caudad cartilage tip. -
Bluntly dissect the peritoneum off the inferior surface of the diaphragm (Fig. 138.19).
The peritoneum is swept, using a sponge, first from the undersurface of
the diaphragm, then from the transversalis fascia, and finally from the
abdominal wall. Figure 138.19. Bluntly dissect the periosteum off the inferior surface of the diaphragm.
 -
After the peritoneum is retracted,
carefully open the abdominal musculature (the external oblique, the
internal oblique, and the transversus abdominis) one layer at a time,
with complete hemostasis. At this point the chest and retroperitoneal
space are open and the diaphragm is the intervening structure in the
wound. -
Incise the diaphragm from inside the
chest with clear visualization under the diaphragm in the
retroperitoneal space. Extend the incision in the diaphragm
circumferentially, 1 inch from its peripheral attachment to the chest
wall (28). Use marker clips throughout the take-down of the diaphragm to allow accurate reapproximation. -
For work on T2–L1, resect the diaphragm
to the spine. Cut the crus of the diaphragm and elevate it off the
spinal column. Use protected Deaver retractors to retract the
peritoneal sac anteriorly. Identify the psoas muscle with its most
cephalad attachment to the transverse process of L, and protect the
muscle because the lumbosacra plexus is under it. With a large rib
retractor, such as the Feochetti, open the tenth rib incision in the
chest. The spine will be visualized from approximately T-6 as far
distally in the lumbar spine as necessary. In the lumbar spine, remove
the crus of the diaphragm and the attachments of the psoas muscle, if
needed, for proper visualization of the spine. In the thoracic spine,
the parietal pleura is opened as in a standard thoracotomy approach.
Tie and ligate the intercostal artery and vein to allow mobilization of
the major vascular trunks. If it is identified as in the operative
area, the thoracic duct, which usually crosses right to left around
T4–T5, is tied off. Avoid the sympathetic plexus. After the intercostal
vessels are removed, cut directly to the spine. Dissection is carried
out on the spine, and soft tissue is removed laterally. -
The key to closure is the reapproximation
of the costal cartilage. After the diaphragm is resutured with multiple
interrupted sutures and the split cartilage is reapproximated, insert
the chest tube in the eighth intercostal
P.3649
space
and pass it posterosuperiorly. Attached to the cephalad half of the
costal cartilage is the insertion of the diaphragm and the
interthoracic fascia. Inserting into the distal split of costal
cartilage is the transverse abdominal fascia and attachment for the
abdominal musculature. With the costal cartilage reapproximated, the
layers of the abdominal musculature are better defined. Close each
layer of the abdominal wall separately when possible, and close the
chest as in a standard thoracotomy.
-
Position the patient supine on the table with the lower lumbar spine at the level of the kidney rests.
-
Make a lower abdominal pararectus
incision through the skin and subcutaneous tissue. The most immediate
layers are those of the external oblique with its transition into the
linea semilunaris, which leads to the fascia of the rectus sheath. The
linea semilunaris is composed of the aponeurosis of the three layers of
the abdominal musculature and their fascia. -
Incise the fibers of the external
oblique, the internal oblique, and the small thin layer of transversus
abdominis muscles laterally to the semilunaris in line with the skin
incision. -
Identify the transversalis fascia, which
is the internal investing fascial layer of the abdominal cavity.
Dissect the outer surface of the transversalis fascia to the edge of
the rectus sheath. The transversalis fascia splits at this point to
form the lamina of the rectus sheath. The posterior lamina of the
rectus sheath forms the endoabdominal fascia in this area. -
Carefully incise the transversalis fascia laterally to the linea semilunaris, and identify the peritoneum through the incision.
-
Begin the incision in line with the skin
incision. Dissect the peritoneum with a sponge or gloved hand off the
undersurface of the transversalis fascia. Open the abdominal wall after
the peritoneum has been identified and cleared. -
Bluntly dissect the peritoneum from the
lateral abdominal wall, progressing posteriorly. Identify the psoas
muscle, as in any retroperitoneal approach to the spine. Retract the
peritoneum off the left iliac artery and vein by use of the surgeon’s
hand, a padded deaver retractor, or sponge sticks. Sweep the peritoneum
with the ureter from left to right, and expose the left common iliac
artery and vein. Insert Freebody pins or special retractors. -
Palpate and identify the intervertebral
disc. Remember that this is a relatively avascular area. With any
approach to the L4–S1 area, identify the left iliolumbar vein and
ligate it when necessary. Dissection within the bifurcation of the
aorta should be blunt and as avascular as possible. Remember, the left
common iliac vein lies in the bifurcation over the L4–S1 disc. The
variation in inferior vena cava and lumbar veins often dictates the
exact approach from this point. -
Bluntly retract and protect the hypogastric plexus.
-
Allowing the peritoneal sac to fall into
place, close the muscle layers with a running suture. The transversus
abdominis and the internal oblique may be closed together.
anterior pararectus vertical incision, a J-shaped renal incision, or a
horizontal lateral abdominal incision can be used (Fig. 138.20). I prefer the horizontal oblique incision.
 |
|
Figure 138.20.
For retroperitoneal exposure of the lumbar spine, an anterior pararectus vertical incision, a J-shaped renal incision, or a horizontal lateral abdominal incision can be used. |
-
Place the patient in the supine position
over the kidney rests. For patients with a large abdominal pannus, the
left lateral decubitus position can be used. In the lateral position,
too much hip flexion at this point will limit the operative exposure
anteriorly. -
Start the incision equidistant between
the lowest rib and the superior iliac crest in the midaxillary line,
and extend it approximately to the edge of the rectus sheath. The level
of the incision varies according to the level of the spine approached:
L5–S1 is in the lower half of the distance between umbilicus and
symphysis, L4–5 is in the upper half, L3–4 is at the umbilicus, and
L2–3 is above the umbilicus. The length of the incision can vary
according to the surgeon’s experience, the exposure needed, and the
operation to be done. -
Muscle relaxation allows greater mobility to the abdominal
P.3650
wall and decreases the contractility of the muscle as it is incised.
First, open the muscle layers as laterally as possible because they are
thicker here and there is less chance of penetrating the peritoneum.
The muscle layers thin out, and the layers of the fascia become almost
joined medially. The peritoneum is very superficial. Inadvertent
penetration of the peritoneum is most likely just lateral to the rectus
sheath. Dissect through the external oblique and the internal oblique
muscle. Inferior to the internal oblique is the transversus abdominis.
Use care in inserting self-retaining retractors into the muscle layers
so as not to damage the peritoneum. Often, the transversus abdominis
muscle is a very thin or absent muscle layer. Bluntly spread this thin
muscle in line with its fibers to expose the transversalis fascia. -
Open the transversalis fascia in the lateral portion of the wound (Fig. 138.21).
Lift the transversalis fascia with Adson forceps and carefully open it
with blunt scissors. The retroperitoneal fat allows room to enter the
extraperitoneal space.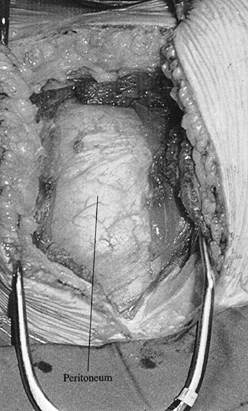 Figure 138.21.
Open the transversalis fascia in the lateral portion of the wound. Lift
it with Adson forceps and carefully open it with blunt scissors. -
Enter the retroperitoneal space
laterally. Identify the peritoneum and the fat of the peritoneal space.
Remove the peritoneum from the remaining transversalis fascia with
blunt dissection. Extend the incision after the peritoneum has been
safely removed. The sheath may be incised for added exposure. Torn
peritoneum should be repaired promptly (19). -
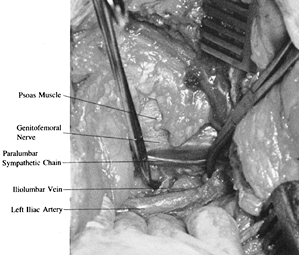
Identification of the psoas muscle is the
key to the retroperitoneal approach. Pass your hand directly to the
psoas. Avoid opening the retropsoas space, which is a blind pouch. The
genitofemoral nerve can be identified on the psoas. The spine is
immediately medial to the psoas and can be partially obscured by it.
Palpate and identify the psoas muscle, the intervertebral disc, the
aorta, and the vertebral body. The paravertebral sympathetic chain lies
medial to the psoas muscle. The ureter will be reflected medially with
the undersurface of the peritoneum. If a retroperitoneal abscess is
well developed, open it and dissect inside the abscess to the spine. -
The key at this point is to identify the
raised, white, softer disc by direct palpation with the finger, as
opposed to the lower, concave vertebral body, where the lumbar vessels
are found. The discs are the hills, and the vertebral bodies are the
valleys. The vessels are in the valleys. -
Once the lumbar disc can be identified,
insert a blunt elevator or padded small retractor to sweep the soft
tissue from left to right across the disc space. The lumbar veins are a
horizontal tether. Variations in formation of the inferior vena cava
and lumbar veins are the rule rather than the exception (11).
The most important of these veins is the iliolumbar vein, which crosses
the body of L-5 from right to left and ascends in the left paraspinous
area (13). This vessel is a direct tether to the left-to-right retraction of the aorta off the spine and is very vulnerable to avulsion. -
For operations on the L4–L5 disc space, identify the iliolumbar vein early in the dissection (Fig. 138.22).
Ligate it after clamping the vein with angled tonsil clamps and passing
two or three ligatures around the vein. These ligatures should not be
tied too close to the vena cava because a sidewall injury can occur.
Transect the vein after securing the permanent ties. Greater
mobilization of the vena cava and venous structures, left to right, is
thereby obtained. The iliolumbar vein consistently requires ligation.![]() Figure 138.22. For operations on the L4–L5 disc space, identify the iliolumbar vein early in the dissection.
Figure 138.22. For operations on the L4–L5 disc space, identify the iliolumbar vein early in the dissection. -
Lumbar veins of varying sizes at various
positions are always present. Some may be directly posterior to the
vena cava and of quite large diameter. Dissection on the anterior spine
consists of gentle stretching and pulling of the structures, blunt
dissection, direct pressure over many small bleeding areas with a
sponge, and a minimum of electrocautery. The paraspinous sympathetic
plexus between the spine and the psoas muscle
P.3651
varies
in size and number of fibers. Branches course between the preaortic and
paraspinous chains. Preserve paraspinous sympathetic fibers that do not
impede dissection. -
Dissect with the fingertip and blunt
elevators all the vascular structures from left to right to give
adequate visualization of the end plate of the vertebral body above the
disc (27). -
Use malleable Deaver-type retractors or
blade spike retractors around the disc space. Alternatively, prepare
four Freebody Steinmann pin retractors with rubber sleeves and mount
them in a Steinmann pin holder (9). For any
sharp stay-retractor that is driven into the body, stabilize the pin on
the finger and engage the tip into the vertebral body under direct
vision. The assistant taps the pin into the body while the surgeon
maintains control of the pin. Avoid the tendency for the pin to enter
the disc space by directing the tip of the pin horizontal to the disc
space. Allow a sufficient distance from the endplate to allow work on
the disc space without dislodging the pin. Place the superior and
inferior right-sided pins before placing the left-sided pins. -
Expose the annulus of the disc (Fig. 138.23).
There should have been minimal sharp dissection and cautery in this
area. Now prepare the disc for the operative procedure. The vena cava
and iliac artery and vein are held by the retractors.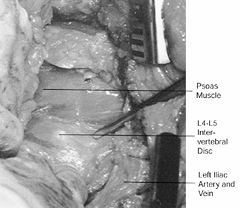 Figure 138.23. Expose the annulus of the disc.
 -
Special curved or malleable retractors can be used between the stay retractors for protection of the vena cava.
-
Extract the retractors with the same
amount of care as when they were inserted. The sheath and a finger must
guard the tip; otherwise the vena cava will be torn as the sharp tip
passes the vessel that is tented around it. -
Remember:
-
When making the incision, follow the skin guidelines for optimum spine exposure.
-
Achieve careful hemostasis in the muscle layers.
-
Incise the transversus abdominus muscle layer and the transversalis fascia in the lateral portion of the wound.
-
Beware of thinning muscle layers and the peritoneum’s superficial position medially near the rectus sheath.
-
Pass directly to the psoas muscle.
-
Identify the raised, soft, white disc.
-
Identify, ligate, and divide the iliolumbar vein.
-
Sweep prevertebral tissue left to right across the disc.
-
Insert the Steinmann pin after placing it directly on bone with the fingertip.
-
Retract the Steinmann pin, again with the fingertip preventing the tip of the pin from damaging the left iliac artery.
-
-
Palpate the spine with a finger and find
a disc for orientation. Usually, it is the L4–L5 disc. With
identification of the L4–L5 disc, palpate the pulse of the left common
iliac artery and the aortic bifurcation. The bifurcation of the aorta
is critical in determining the exact approach
P.3652
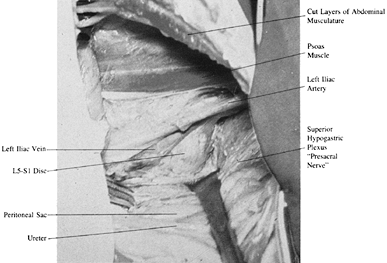
from this point. The usual bifurcation at the L4–L5 disc level was present in 69% of anatomic dissections performed by Harmon (11), but great variation exists. -
Palpate the left common iliac artery and
pass over it medially to the L5–S1 disc. By placement of the finger and
a subsequent blunt retractor such as a sponge-covered elevator, develop
a plane just to the right of the left common iliac artery. -
The left iliac vein lies within the
aortic bifurcation. It often courses directly on the surface of the
L5–S1 disc and may be flattened against the disc or L-5 body, with its
venous character obscured. Mobilize it to the left and cephalad with
the left iliac artery. -
The middle sacral artery and veins are
present in the bifurcation. The key to handling these structures is
blunt dissection just to the right of the left common iliac artery,
sweeping from left to right the prevertebral tissue, including the
middle sacral vessels and superior hypogastric plexus, off the
lumbosacral disc. Occasionally, the middle sacral vessels are of
formidable size, but seldom do they have to be ligated (4). -
An additional structure in the bifurcation is the superior hypogastric sympathetic plexus.
-
The thoracolumbar sympathetic chain
extends down anterior to the aorta and vertebral bodies in the
retroperitoneal space as the preaortic sympathetic plexus. At
approximately the L3–L4 level, the inferior hypogastric plexus extends
to L4–S1 as the superior hypogastric plexus (Fig. 138.24).
The structure of the superior hypogastric plexus varies considerably
because the preponderance of the superior hypogastric plexus fibers is
usually closer to the left iliac artery as they arch over the L5–S1
disc in the bifurcation of the aorta (Fig. 138.25) (16).
There may be multiple strands or one predominant large simple nerve
trunk. The superior hypogastric plexus contains the sympathetic
function for the urogenital system. The S1–S4 nerve roots that
contribute to the pelvic splenic nerves provide parasympathetic
function for the urogenital system. The pudendal nerve covers somatic
function from S-1, S-2, S-3, and S-4.![]() Figure 138.24.
Figure 138.24.
Sweep the prevertebral tissue bluntly off the front of the L5–S1 disc.
The superior hypogastric plexus may be a diffuse plexiform nerve
formation that is retracted with the other tissue, or it can be a
discrete well-defined presacral nerve.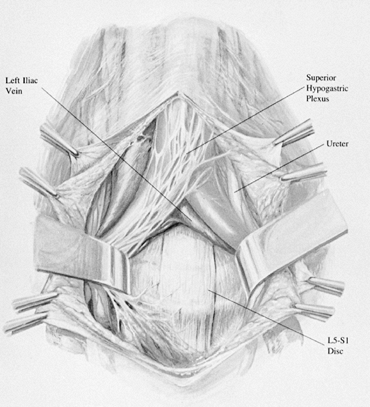 Figure 138.25. The superior hypogastric plexus is within the bifurcation of the aorta.
 -
Ejaculation is predominantly a
sympathetic function, whereas through control of the vasculature of the
penis, erection is predominantly a parasympathetic function. Retrograde
ejaculation and sterility result from disruption to the sympathetic
plexus. The main effect of damage to the superior hypogastric plexus is
improper closing of the bladder neck, with resultant retrograde
ejaculation, although the sympathetic fibers also have some effect on
the motility of the vas deferens, which is important in the
transportation of the spermatozoa from the epididymis to the seminal
vesicle (15). -
The prognosis for recovery from retrograde ejaculation is good (8).
Sperm can be obtained in refractory cases by bladder aspiration
techniques. Damage to the superior hypogastric plexus should not
produce impotence or failure of erection. Avoid damaging the
hypogastric plexus by doing the following (4):-
For the transperitoneal midline approach,
carefully open the posterior peritoneum and bluntly dissect the
prevertebral tissue from left to right (9). -
Visualize and retract the prevertebral
tissues by opening the posterior peritoneum higher over the bifurcation
and then extending the opening down over the sacral promontory (4,8,9,15). -
Remove the prevertebral tissue from the L5–S1 disc with blunt dissection, retraction, and spreading.
-
Attempt to retract the middle sacral
artery and vein without electrocautery by spreading and blunt
dissection. Use vascular clips or tie ligation when this vessel is of
considerable size. -
Until the annulus of the disc is clearly exposed, make no transverse scalpel cuts on the front of the L5–S1 disc.
-
Do not use electrocautery within the aortic bifurcation.
P.3653 -
-
The key to avoid damaging the superior
hypogastric plexus is to avoid transverse cuts on the face of the disc
until all the prevertebral tissue has been elevated from the annulus
and to avoid electrocautery on the surface of the L5–S1 disc. Small
bleeding points are encountered when doing this dissection, but they
are usually easily controlled by direct finger pressure or packing with
hemostatic gauze. Usually, the left iliac artery and vein will be
retracted to the left, but it may require retraction to the right on
occasion. -
Locate and ligate the iliolumbar vein before any mobilization of the left iliac artery to the right.
-
Always obtain radiographic confirmation
of the level. It can be done easily by inserting a #22-gauge spinal
needle and taking a radiograph. Because the L5–S1 disc and the sacrum
are often angled very horizontally, the body of L-5 can be mistaken for
the sacrum. -
Insert appropriate Freebody Steinmann pin stay-retractors, blade-point retractors, or hand-held retractors.
-
For the transperitoneal exposure, use
either a vertical midline incision or a transverse “smile” incision.
The “smile” is better cosmetically and gives excellent exposure, but it
requires transection of the rectus abdominus sheath. Identify and open
the rectus sheath, and transect the rectus abdominus muscle. The
posterior rectus sheath, the abdominal fascia, and the peritoneum are
conjoined in this area. Carefully open the posterior rectus sheath and
abdominal fascia to the peritoneum. -
Palpate the aorta and both iliac vessels through the posterior peritoneum. Feel the softer texture of the L5–S1 disc.
-
Inject the retroperitoneal space with saline to achieve separation of the peritoneum from the vascular structures.
-
Pick up the peritoneum with Adson forceps; handle it delicately.
-
Avoid use of the electrocautery anterior
to L5–S1 to prevent damage to the superior hypogastric plexus, despite
the fact that there is bleeding in this area. The left common iliac
vein often lies as a flat, white, bloodless ribbon across the L5–S1
disc within the aortic bifurcation. -
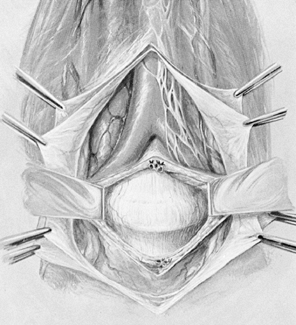
After the left common iliac artery and
left common iliac vein are identified, use blunt dissection to the
right of the left iliac artery and hypogastric plexus and soft tissue,
moving from left to right (Fig. 138.26).![]() Figure 138.26. Exposure of the L5–S1 disc. See text for a description of the technique.
Figure 138.26. Exposure of the L5–S1 disc. See text for a description of the technique. -
Bluntly dissect the middle sacral artery
and vein from left to right without sacrifice at this point.
Longitudinal blunt dissection allows better mobilization of these
vascular structures. When bleeding is encountered, use direct finger
and sponge pressure for a short time, followed by blunt dissection.
Control hemorrhage with packing and pressure. Divide and tie the middle
sacral artery and vein, if necessary.
-
Position the patient to allow full chest
excursion, to maintain the neck in a safe position, and to allow the
abdomen to hang completely free of pressure. Flex the hips and knees
enough to relieve nerve root tension but not so much as to obstruct
arterial flow to the legs or to produce any abdominal pressure. I
prefer the Andrews frame. -
Obtain a skin marker radiograph by
inserting two #20-gauge spinal needles perpendicular to the skin
approximately three fingerbreadths lateral to the spine. Using the
alignment of the needles, put the skin incision in the midline over the
disc space. Paraspinous needles allow a more accurate skin incision
than a spinous process marker. -
Use a skin marking pencil to draw a
vertical, midline skin incision relative to the two needles over the
disc space. Make a dermal skin incision only. The average length is 3.2
cm for a one-level microscopic discectomy, longer for a more extensive
decompression. Inject 25 to 50 ml 1:500,000 epinephrine through the
dermal incision into the subcuticular tissue and directly down to the
lamina into the paraspinous muscle mass. Cut with a scalpel directly to
the fascial layer. Preserve the lumbodorsal fascial attachments to the
spinous process, the interspinous ligament, and the supraspinous
ligaments by making a paraspinous fascial incision that can be sutured
at closure without tension. This is preferable to removing all
soft-tissue fascial attachments from the spinous process, unless a
total laminectomy is to be done, in which the fascia is totally removed
from the spinous process and lamina with the electrocautery. -
The lumbodorsal fascia is critical for
stability of the spine. Maintaining the fascial attachments to the
spine is important and should be done when possible. The abdominal,
trunk, and gluteal muscles contract and tense the lumbodorsal fascia;
the fascia attachment to the spine allows these muscles to stabilize
the spine. -
Make an incision into the lumbodorsal
fascia just lateral to the bulbous tips of the spinous processes.
Lengthen the fascial incision. Insert a Cobb elevator, with the tip
turned upward, onto the spinous process just under its bulbous tip, and
start the subperiosteal dissection. Then turn the elevator bevel down.
Dissect, identify by touch the cephalad and then the caudad lamina, and
clear the interlaminar area. Take care not to cut through the outer
cortex of the lamina. Sweep the superficial soft tissue off the
interlaminar area laterally out to the facet joint capsule. Do not
damage the capsule. Protect the facet joint capsule. Remember that the
two laminae and their interlaminar areas are the only areas that need
be exposed for an operation on one intervertebral disc. -
Following exposure of the intralaminar
area, place a Williams self-retaining retractor with the blade
retracting laterally over the facet joint capsule with the pointed tip
placed medially. For larger, bilateral exposures, I use the Wiltse
retractors with both sides exposed similarly. -
The superficial ligamentum flavum blends
laterally into the facet joint capsule. Incise the superficial
ligamentum flavum with the #15 blade or electrocautery laterally or at
the junction of the superficial ligamentum flavum and the facet joint
capsule. Use a curet to elevate the superficial ligamentum flavum from
the deep ligament moving from lateral to medial. Remove the superficial
ligament with a pituitary rongeur. The vertical striations of the
yellow deep ligamentum flavum can be seen in the depths of the
interlaminar area. Use an angled curet to clear under the caudal edge
of the cephalad lamina and a straight curet to define the ligamentum
flavum attachment to the caudad lamina (Fig. 138.27). Expose the deep portion of the ligamentum flavum’s vertical striations.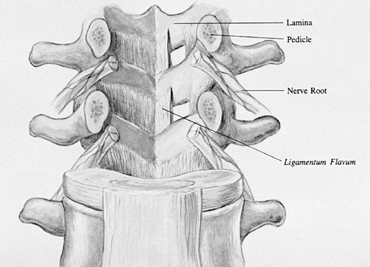 Figure 138.27.
This underview of the posterior elements from the intervertebral canal
demonstrates the ligamentum flavum and its insertion on the lamina. -
Several factors concerning the anatomy of the ligamentum flavum are important:
-
It has a deep and superficial portion.
-
It blends with the facet joint capsule laterally.
-
It inserts over the caudal 50% of the undersurface of the cephalad lamina.
-
It inserts on the cephalad edge of the caudad lamina.
-
Its undersurface is the ideal dural covering.
-
It has a vertical, parasagittal
orientation deep in the lateral recess under the superior facet that
may contribute to lateral recess stenosis. -
It is the main stabilizing ligament of
the posterior column, and preservation of as much of it as possible
will benefit spine stability at that motion segment. -
It is the soft-tissue roof of the intervertebral foramina.
-
-
Perform as much of the lateral wall
resection and laminectomy as possible before opening the ligamentum
flavum. Estimate the size of the interlaminar area that will be needed
for correcting the pathologic process. A portion of the caudad edge of
the cephalad lamina can be removed if it is believed that exploration
of the spinal canal will require greater cephalad exposure. The walls
of the interlaminar area may be the area to be removed. Progressing
from dorsal to ventral, the lateral wall of the interlaminar area is
composed of the facet joint capsule, the inferior facet, the
intra-articular space of the facet joint, the superior facet, the deep
capsule and ligamentum flavum, the nerve root, the blood vessels, and
the floor of the canal. The preoperative CT scan should determine the
amount of lateral recess stenosis and how much of a medial facetectomy
is needed. Remove as much bone as necessary. For a standard L5–S1
discectomy, I seldom remove any bone. At L3–L4, a centimeter of
cephalad lamina is often removed. Evaluate the CT scan for cephalad
migration of a disc fragment that would require the removal of more
lamina. To allow a more lateral approach to a larger extruded disc
fragment, remove a small portion of the medial facet. More extensive
exposure may be required depending on the pathology. -
For a discectomy, make an incision with a
#15 blade into the deep portion of the ligamentum flavum, approximately
50% of the width of the interlaminar area. Incise the ligamentum flavum
by feathering the knife blade, allowing one to see the edge of the
knife cutting into the ligamentum flavum. Make the incision by long
cuts into the ligamentum flavum reaching from lamina to lamina with
careful observation for any sign of the white undersurface of the
ligamentum flavum, followed by the bluish hue of the dura. Once the
undersurface is reached, use the handle of the knife or a Penfield 4
elevator to open the last few underlayers of the ligamentum flavum. Use
the Penfield 4 elevator to separate the entire length of the ligamentum
flavum. Under the ligamentum flavum is usually a layer of epidural fat
over the dura, but with a large space-occupying lesion in the canal,
the dura may be immediately adjacent to the undersurface of the
ligamentum flavum. Pass the Penfield 4 elevator under the lateral leaf
of the ligamentum flavum, and retract the dura medially away from the
lateral leaf of the ligamentum flavum. A cottonoid can be placed under
the lateral leaf of the ligamentum flavum. With a Kerrison rongeur
angled 40° in the dominant hand and the Penfield 4 elevator in the
other hand, pass the Kerrison rongeur under the lateral ligamentum
flavum and remove the lateral ligamentum flavum. -
The epidural fat, the dura, the nerve
root, and the longitudinal blood vessels in the lateral recess can
usually be identified after the lateral half of the ligamentum flavum
is removed. The deep portion of the ligamentum flavum runs vertically
in the lateral recess and attaches to the facet joint capsule. Position
the cottonoid or Penfield 4 elevator between this portion of the
ligament and the underlying nerve root. This stage of entering the
canal is often an anxious one because of fear of bleeding and damaging
the nerve root. The more delicate the approach, the less bone that is
cut, and the less vigorous the removal of the lateral ligamentum
flavum, the less bleeding there will be. Magnification is of tremendous
value in identifying vessels and allowing safe, accurate retraction and
bipolar coagulation, if needed. Removal of fat causes bleeding and
later scarring. Bleeding often starts when exposing the disc or nerve
root. When lateral exposure is obtained out to the pedicle, the
longitudinal vessels lateral to the root can be identified and
cauterized with the bipolar cautery. Cottonoids placed laterally at the
cephalad and caudad extremes of the exposure can collapse the vessels
and allow work in the area between the cottonoids. -
A transverse or horizontal vascular
supply exits each intervertebral foramen. The most consistent vascular
leash is found just caudad to the nerve root exiting in the caudal
portion of the intervertebral foramen at the cephalad portion of the
disc. For large exposures, when the dural sac needs to be retracted to
the midline, identify and coagulate the vascular leash with a bipolar
cautery. Minimize the use of electrocautery because the more that is
used, the more scarring there will be. The use of cottonoids, Surgicel,
and thrombin-soaked Gelfoam retards bleeding. I prefer not to leave
Gelfoam and Surgicel packing in the spinal canal. Cottonoids remove
epidural fat and should be used judiciously. -
The surgeon needs to know where the disc and root are without undue exploration. The key to intracanal anatomy is the pedicle (Fig. 138.28).
The pedicle is deep to the caudad third of the inferior facet. After
the ligamentum flavum is removed, palpate into the canal with a nerve
hook or dental tool. Often, the pedicle is lateral
P.3657
under
an overhanging roof of superior facet. In fact, the superior facet may
be mistaken for the pedicle. To remove the roof of the lateral recess
and to relieve lateral recess stenosis, remove the facet joint with the
Kerrison rongeur medially to the parasagittal plane of the medial
border of the pedicle.![]() Figure 138.28.
Figure 138.28.
The pedicle is the key to the intracanal anatomy. Identification of the
pedicle will lead to the location of the disc and nerve root. -
Knowing the location of the pedicle tells you the following:
-
The disc space is less than 1 cm cephalad to the pedicle. It often appears to be immediately cephalad adjacent to the pedicle.
-
The intervertebral foramen above the
pedicle is for the exiting nerve root and the intervertebral foramen
below the pedicle is the foramen for the transversing nerve root. -
Dorsal and immediately cephalad to the
pedicle is the superior facet. The superior facet is the roof of the
intervertebral foramen for the exiting nerve root. -
Just medial to the pedicle is the traversing nerve root.
-
-
Extensive probing should not be done in
the medial pedicular area because the pedicular plexus will bleed.
Remember, at higher lumbar levels, the disc is farther cephalad
relative to the interlaminar space. Therefore, the L5–S1 disc is
approximately at the level of the interlaminar space between L-5 and
S-1. The L2–L3 disc space is well cephalad under the lamina of L-2
rather than at the level of the interlaminar space between L-2 and L-3.
The ligamentum flavum covers the interlaminar area. -
Often, it is imperative to expose the
disc space. The disc is a raised, white, soft structure that may be
covered by epidural fat, veins, and the nerve root. Feel for the disc
using the Penfield 4 elevator. It causes little bleeding and allows for
palpation of the disc with the tip of the instrument. Reach out
laterally and feel for the floor of the canal. Gently retract medially
with the Penfield 4 elevator. Feel for obstruction to this medial
retraction. Do not retract against a major obstruction. Retract gently,
and insert the microsucker retractor. Lift the root up and medial with
the nondominant hand; expose the disc with the Penfield 4 elevator in
the dominant hand. -
When there is difficulty in finding the
disc or retracting the nerve root, several methods have been used to
prevent damage to the nerve root. Knowing the location of the pedicle
in the canal is probably the most significant way to avoid major damage
to the nerve root. Find the pedicle. The transversing nerve root is
adjacent medially to the pedicle. Identify the nerve root medial to the
pedicle. If the root cannot be retracted because it is tightly against
the medial wall of the pedicle, proceed cephalad to a point slightly
lateral to the medial wall of the pedicle. The transversing nerve root
should not be lateral to the medial wall of the pedicle. Exposing the
disc cephalad to the pedicle and lateral to the medial wall of the
pedicle can avoid nerve damage. The nerve root exiting in this
intervertebral foramen cephalad to the pedicle will usually be further
cephalad, just under the pedicle above. The exiting nerve root runs
obliquely across the intervertebral disc laterally in or lateral to the
intervertebral foremen. The farther lateral on the intervertebral disc,
the more likely the cephalad exiting nerve root is reached. A lateral
disc herniation may trap the exiting nerve root in the intervertebral
foramen. A conjoined root may totally fill the entire foramen from
pedicle to pedicle. An exiting conjoined nerve root limits exposure of
the disc. It can usually be identified preoperatively on the myelogram
and contrast CT scan. The key to avoiding damage to a conjoined nerve
root is recognition. This is facilitated by lateral exposure of the
traversing root shoulder. -
For further exposure of the disc,
determine the amount of tension in the nerve root. Do not retract the
root against a solid obstruction. If it can be retracted easily,
retract it medially with the nerve root retractor. If it is tight, it
will feel like you are retracting against a solid wall.There are five common methods of dealing with a tight nerve root:-
Explore the axilla of the transversing
root with the Penfield 4 elevator. The axilla is in the caudal part of
the exposure between the root and the dural sac. If a fragment is
found, remove it with the nerve hook. Bleeding may be encountered. -
Obtain more lateral exposure. Be sure you
have identified the pedicle and have exposure lateral to the medial
wall of the pedicle. The traversing nerve root should not be lateral to
the medial wall of the pedicle. -
Enter the disc space lateral to the root,
and try to decompress the disc and pull disc material from under the
root through the disc space. -
Be sure that the root is free cephalad to
the disc and that the ligamentum flavum or undersurface of the cephalad
lamina is not a factor. Remove enough lamina and ligament cephalad to
expose the shoulder of the nerve root. -
The nerve root may be tethered caudally
in the foramen below the pedicle. Remove the roof (the junction of the
caudad lamina and the superior facet) over the transversing root as it
exits around the pedicle. A foraminotomy of the foramen below may allow
better retraction of the root.
-
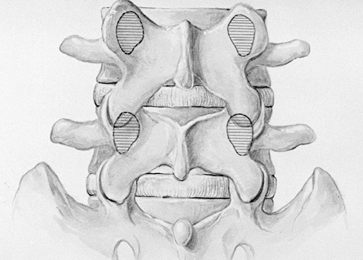
-
Gently lift and retract the nerve root
with a sucker retractor in the nondominant hand and explore the disc
area with a nerve hook in the dominant hand. Take great care not to
stretch the nerve root. Exploration underneath the dural sac may reveal
a large fragment
P.3658
of
herniated disc that can be pulled out from under the nerve root with
the nerve hook. The lateral exposure allows this fragment of disc to be
pulled laterally rather than vertically. Removing the fragment
laterally from under the nerve root will decrease the nerve root
tension and allow better visibility and protection for the nerve root.
Large dilated vessels often decrease in size and not bleed when the
fragment is removed, relieving vascular distention. -
Expose the annulus with the Penfield 4
elevator. Determine the texture of the annulus, amount of bulge,
presence of herniation, or presence of a hole in the annulus, and
perform a discectomy. -
More exposure is needed for significant spinal stenosis or central, lateral recess or foraminal stenosis.
-
When a total laminectomy is needed to
expose the dura and nerve roots, remove the fascia entirely from the
tip of the spinous process bilaterally. Extend the exposure laterally
from the spinous process to the lamina with the Cobb elevators.
Carefully protect the facet joint capsule. The exposure may be to the
tips of the transverse processes if a fusion is to be done. -
Note: The
most important structure that must be exposed and clearly seen is the
pars interarticularis. Identification of the pars is imperative to
prevent its transection with subsequent spinal instability. By
continually visualizing the pars, removal of the lamina can be done
quickly and safely. The bone cutters remove the spinous process. I
prefer to use the Midas Rex AM1 (Medix Rex Pneumatic Tools, Inc., Fort
Worth, TX) to remove all of the lamina over the ligamentum flavum and
down to a 1 mm thin shell over the dura. Alternatively, I use the Luxel
rongeur by inserting it under the caudad edge of the cephalad lamina
and rotate the instrument cephalad, rolling a bite of lamina off. This
allows visualization under the instrument to see a possible inadvertent
dura pinch early. Before using the Midas Rex tool, I expose the pars by
curetting the caudal tip of the inferior facet. Seeing the articular
surface of the superior facet and the pars at each level allows full
removal of lamina and medial portion of the facet without danger of
cutting the pars. Identify the pedicle as soon as possible to avoid
removing too much facet. -
To expose the lateral portion of the
spinal canal, remember that the lateral wall may protrude significantly
into the spinal canal. If the partial medial facetectomy is to be done,
use the Midas Rex AM1 or AM3, the Kerrison rongeur, the Cloward chisel,
or the Pheasant discotome. Starting medially on the lamina, cut the
caudal portion of the lamina and continue laterally onto the inferior
facet. The amount of inferior facet removed varies according to the
pathology. If the chisel is used, insert it to remove the appropriate
amount of the medial portion of the inferior facet and twist the
chisel, removing the bone medially. This allows visualization of the
facet join space and the superior facet. The shiny cartilaginous floor
is the superior facet. The ligamentum flavum inserts on the superior
facet. The nerve root may be under this superior facet. -
The ligamentum should be opened at this
point by one of numerous methods. Use the curet to detach the lateral
ligamentum flavum from the edge of the superior facet. Position the
Penfield 4 elevator, Penfield 3 elevator, or the cottonoid under the
superior facet to protect the nerve. Use the Kerrison rongeur to remove
the medial portion of the superior facet and the most lateral
ligamentum flavum. The chisel is quite safe on the inferior facet
because the superior facet provides a guard from possibly injuring the
nerve root. With skill and experience, the superior facet likewise can
be removed with a chisel by cutting over the pedicle with the Penfield
elevator, protecting the nerve. With lateral recess stenosis, remove
the medial facet to the parasagittal level of the medial wall of the
pedicle. -
I prefer to use the Midas Rex bone cutter
because it causes less splintering. Cut the lamina down centrally with
the AM1. With the AM3, extend the bone removal laterally over the
ligamentum flavum and foramen. -
After the lamina is burred down to a thin
layer over the dura and totally off the ligamentum flavum, open the
ligament with a Penfield 3 elevator and clasp it with a ligamentum
flavum clamp. Pass a cottonoid between the ligament and the dura.
Remove the major portion of the ligament with a large, straight curet
from the opposite side of the table. The most lateral ligament is
removed by undercutting with the angled kerrison chisel from across the
table. Position the cottonoid and have the assistant remove the
ligamentum flavum with a 45° Kerrison rongeur from the other side of
the table. Remove the medial edge of the superior facet with the
lateral-most ligamentum flavum. The assistant on the opposite side of
the table also can position this cottonoid very effectively using the
sucker and the bayonet. Use the 90° Kerrison rongeur to remove this
lateral portion of the ligamentum flavum. -
The ligamentum flavum can be detached
with a curet from its caudad and lateral attachments, and a curved
osteotome can be used to free the cephalad attachment of the ligamentum
flavum from the undersurface of the cephalad lamina. Use a nerve hook
to pull the detached cephalad edge of the ligamentum flavum into the
intralaminar area. Use a straight curet to detach the caudad edge of
the ligamentum flavum from the edge of the caudad lamina and an angled
curet to detach the lateral ligamentum flavum. With this detaching
method, the ligamentum flavum can be retracted intact with a medial
P.3659
attachment
to the ligamentum flavum from the opposite side, allowing access to the
spinal canal without excision of the ligamentum flavum. Although the
ligamentum flavum, being elastic, will shrink from its original
attachment, it will still provide an excellent dural covering when
reapproximated on closing. There is some danger in detaching this
ligamentum flavum in the lateral recess because of the nerve root. Be
careful over the “critical angle,” which is the junction of the base of
the superior facet and the caudad lamina, because the nerve root exits
under this angle.
-
The key to a safe, effective foraminotomy
is to expand the intervertebral foramen without damaging the pars
interarticularis or the facet joint. A foraminotomy begins after
removal of the lateral recess, identification of the pedicle, and
identification of the pars interarticularis. The medial caudal aspect
of the pedicle is the beginning of the intervertebral foramen. The pars
forms part of the bony roof of the intervertebral foramen. The root
exits around the pedicle, and it is the roof over that root as it exits
that must be expanded first. I use the Midas Rex AM3 or M8 to an arc
over the root, leaving a thin shell of bone over the root and plenty of
the facet undersurface. Then insert the Kerrison rongeur on the root
and remove the bone touching the nerve and any ligamentum flavum
attached to it. Probe the foramen until it is clear. I use gallbladder
probes up to 5 mm in diameter or a Woodson probe. Often, the tip of the
superior facet compresses the nerve root from below. I routinely remove
the cephalad tip of the superior facet with the Cloward chisel. The
curved Kerrison rongeur removes more of the roof of the foramen
laterally. Protect the pars. A portion of its undersurface can be
carefully expanded to open the intervertebral foramen. -
Uncinate ventral spurs may arise from the
caudal vertebral body, caudal to the pedicle, at the edge of the disc
space below; they are seen on CT foraminal reconstructions. The root
can be tented over the spur and tethered laterally by foraminal
ligaments. Removing the roof is not enough to relieve this nerve root
tension. The spur under the root should be removed. Although these
spurs can be removed from cephalad to caudad by putting a chisel under
the root, they are more easily approached from the level below.
Remember, these spurs are under the annulus of the disc below and
covered with soft tissue, making removal with a chisel more difficult.
Putting a knife under the nerve root is dangerous. -
Expose the disc below. Working from
caudad to cephalad, identify the exiting root. Open the disc with a
knife laterally. Use the chisel and curet to burrow under the spur and
then the endplate of the vertebra. Hollow out a space. Insert an angled
curet between the root and the annulus-covered spur, and knock the spur
into the hole. Leave it in the hole or remove it. It is safer to remove
it after the root tension is relieved. -
The foraminotomy can be performed from
the “outside in.” Move to a paraspinous position through the same
incision. Identify the superior facet and transverse processes above
and below the pars. Several tacks can be taken from this point. One is
to remove the intertransverse ligament, identify the nerve, and follow
it back into the canal, removing any obstructions for a foraminotomy. I
prefer to expose the caudal surface of the pedicle above, using the
pars and transverse process as guides. Identify the nerve there and
expand the intervertebral foramen. If there is a foraminal herniated
nucleus pulposus, expose the cephalad surface of the pedicle below, and
work cephalad to identify the disc, the nerve, and the herniation. -
After the discectomy, the delicacy of the
approach will determine how much fat is left covering the nerve root.
Supplement this procedure with a free fat graft taken from the layer
above the fascia in the caudal portion of the wound. When fat is not
available, I use Depo-Medrol–soaked Gelfoam. -
After closing any dead space left by the
fat graft, close the fascia with interrupted 0 Vicryl. When midline
fascial structures have been removed from the spinous process, reattach
them. The layers above the fascia are closed with multiple layers of
interrupted 2-0 Vicryl. Close the subcutaneous fat in at least two
layers, tacking each layer to the lower layer. I usually drain both the
subfascial and suprafascial layers. Close the subcutaneous layer
immediately adjacent to the subcuticular layer. Close the skin with
subcuticular sutures, benzoin, and Steristrips. Retract and cut off the
sutures after the Steristrips are applied.
-
Position the patient on a standard operating frame.
-
Use skin-marking needles to identify the
pedicles of the involved segment with a lateral radiograph. For L4–L5,
align the needle markers over the pedicle at L-4 and the pedicle at
L-5. Make the incision one fingerbreadth lateral to the spinous
process, spanning between the pedicles of the involved segment (Fig. 138.29).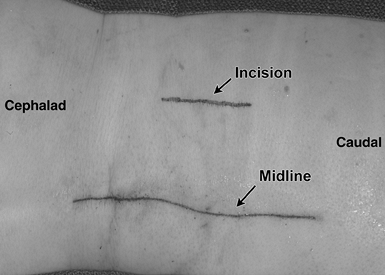 Figure 138.29. Make the incision one fingerbreadth lateral to the spinous process, spanning between the pedicles of the involved segment.
 -
Carry the incision through the skin and
subcutaneous tissue. Open the fascia enough to admit an index finger
that dissects down in a muscle-splitting dissection to the cephalad
transverse processes. Use a Penfield 1 instrument or a small Cobb
elevator to identify the transverse processes, but do not carry out
vigorous muscle dissection at this point. Use your finger to palpate
medially
P.3660
on
the cephalad-transverse process to the area of the pars
interarticularis, just cephalad to the facet joint. Rest the Penfield 1
on the more cephalad transverse process and position the McCulloch
blade-spike retractor by placing the blade laterally against the soft
tissue, then placing the spike medially just dorsal to the pars
interarticularis. Do not hook it under the pars interarticularis. -
By opening the retractor, visualize the
transverse process. Obtain a lateral radiograph with a needle on the
transverse process to confirm levels. -
Use the Bovie and curet to dissect the soft tissue off the pars interarticularis and the base of the transverse process.
-
It is important to see the bone of the
pars interarticularis. Too often, the dissection is carried out too far
laterally. The transverse process is cleared off, but the actual
location of the pedicle is more medial, and too much time is wasted in
a more lateral position. Identify the pars and follow the bone of the
transverse process back to the dorsal surface of the pedicle. At this
point, there are times when a portion of the cephalad facet joint, or
cephalad lateral portion of the inferior facet, has to be removed with
Kerrison rongeur to provide proper exposure of the intertransverse
area. For better exposure, laterally retract the muscle off the
intertransverse ligament and hold it with the lateral blade retractor (Fig. 138.30).![]() Figure 138.30.
Figure 138.30.
For better exposure of the intertransverse area, laterally retract the
muscle of the intertransverse ligament. (Note: The illustration depicts
a larger field of visualization than actually performed.) After opening
the fascia, use finger dissection to clear the transverse process.
Insert the retractor. -
Using a straight and an angled curet,
detach the intertransverse ligament from the cephalad-transverse
process, the dorsal surface of the pedicle, and the lateral surface of
the pars interarticularis. Identify this ligament, hook it with a blunt
nerve hook, pull it laterally, and free it up with the small Kerrison
rongeur under direct visualization. -
Caution: Sometimes, distinguishing the ligament from the nerve is not easy. Proceed carefully.
-
Identify the nerve as it exits around and just caudal to the cephalad pedicle (Fig. 138.31).
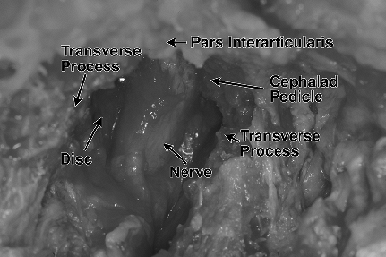 Figure 138.31.
Identify the cephalad transverse process, then expose the part
interarticularis medially. Detach the intertransverse ligament.
Identify the pedicle, then the nerve exiting just caudal to the
pedicle. The disc is caudal to the nerve. -
Use the Penfield 4 elevator to palpate
gently cephalad to the nerve, starting at the medial wall of the
pedicle and progressing laterally. Beware of bleeding in this area. -
Identify the caudal aspect of the nerve and use the microsucker retractor to retract the nerve cephalad. Using
P.3661
the Penfield 4 elevator, identify the disc caudal to the nerve. Be
aware that the dorsal ganglion of the nerve may feel like a disc
fragment under the nerve. Carefully identify the nerve and the disc (Fig. 138.31). Follow the nerve laterally to insure removal of any lateral disc fragments. -
Remember:
-
Identify the cephalad transverse process.
-
Identify the pars interarticularis to stay medially.
-
The pedicle is the key landmark.
-
Laterally retract the intertransverse ligament.
-
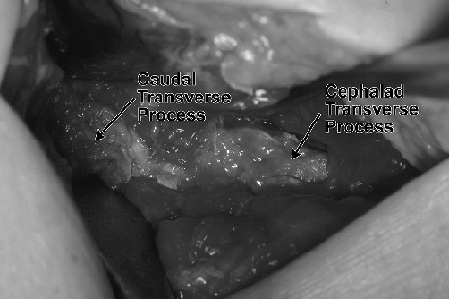
scheme: *, classic article; #, review article; !, basic research
article; and +, clinical results/outcome study.