
Cole & Sekiya: Surgical Techniques of the Shoulder, Elbow and Knee in Sports Medicine, 1st ed.
Copyright ©
2008 Saunders, An Imprint of Elsevier
CHAPTER 53 – Primary Repair of Osteochondritis Dissecans in the Knee
Osteochondritis dissecans is a rare pathologic process affecting subchondral bone and overlying articular cartilage. It probably represents a common end point for multiple possible pathways of injury, including traumatic, ischemic, endocrine, and genetic predisposition. With respect to the knee, the lateral posterior portion of the medial femoral condyle is most commonly affected, representing 70% of occurrences, and has been referred to as the classic lesion.[1] Overall, an estimated 80% of lesions arise in the medial femoral condyle, 15% in the lateral femoral condyle (inferocentral), up to 5% in the inferomedial portion of the patella, and 1% to 2% within the femoral trochlea. [1] [3]
Regardless of etiology or location, however, the essential lesion in osteochondritis dissecans remains injury to the subchondral plate with resultant destabilization of overlying articular cartilage and increased susceptibility to stress and shear. Eventual fragmentation and loss of articular integrity can occur, leading to early degenerative changes and loss of function in the affected compartment. Because this process is osteochondral rather than purely chondral in nature, primary repair by rigid, compressive fixation of unstable lesions offers an attractive and, as the literature suggests, effective means of treatment.
One must ascertain the degree of fragment stability as accurately as possible before being able to select the appropriate treatment. Modalities tend to fall into one of two categories. On the one hand, strategies such as nonoperative activity modification, trans-lesion marrow stimulation, and primary repair through fragment reduction and rigid, compressive fixation attempt to restore native subchondral bone to a healthy state, thereby preserving native articular cartilage. On the other hand, strategies such as autologous cultured chondrocyte implantation, autologous osteochondral transfer, and allogeneic osteochondral grafting attempt to replace an osteochondral defect with hyaline or hyaline-like articular cartilage, thereby re-establishing articular congruity. The latter techniques can be viewed as salvage procedures, however, as in these cases a decision has been made that the native articular surface cannot be preserved.
| • | Antalgic gait pattern | |
| • | Wilson sign: ambulation with the affected leg maintained in a position of relative external rotation to avoid discomfort caused by impingement of the medial tibial eminence on a classic lesion[17] | |
| • | Wilson test: reproduction of pain through internal rotation of the tibia between 30 and 90 degrees of flexion and relief with subsequent external rotation. This test has low sensitivity, but if the result is positive initially, it reliably becomes negative with healing of the lesion. [4] [17] | |
| • | Effusion | |
| • | Limited range of motion | |
| • | Quadriceps atrophy: indicative of duration of symptoms | |
| • | Focal tenderness to palpation at the site of the lesion (Axhausen sign): suggestive of subchondral instability. This has also been recommended as a simple means of monitoring resolution of the condition. |
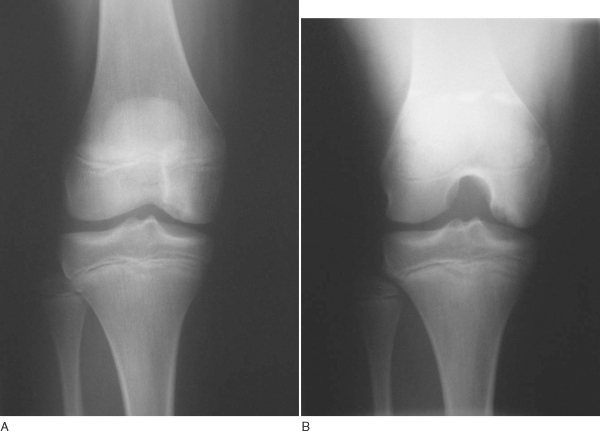
Plain film radiography remains an important first step in imaging of osteochondritis dissecans lesions. The following views are recommended:[13]
| • | Weight-bearing anteroposterior radiograph in full extension | |
| • | Weight-bearing posteroanterior radiograph in 30 degrees of flexion (tunnel view): particularly useful for visualizing classic lesions along the lateral posterior aspect of the medial femoral condyle ( Fig. 53-1 ) |
|
| • | Non–weight-bearing 45-degree flexed lateral view | |
| • | Axial view of the patellofemoral joint |
|
|
|
|
Figure 53-1 |
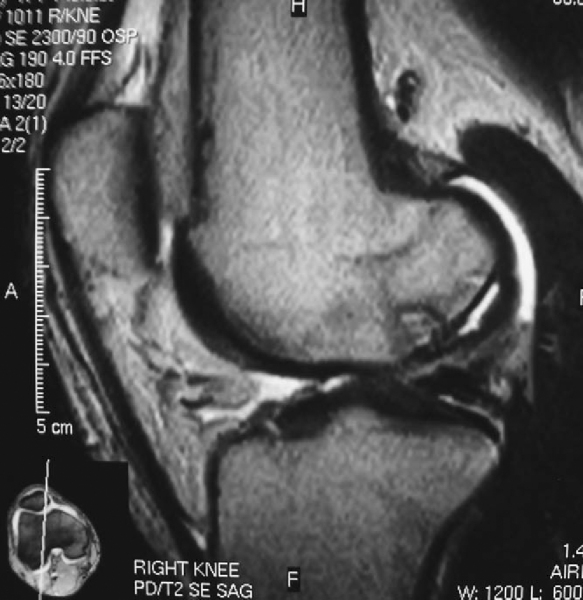
Standard (nonarthrographic) magnetic resonance imaging is the most informative imaging modality in the preoperative work-up. It reliably indicates lesion location, size, depth, and, most important, stability. The presence of one or more of the following four magnetic resonance criteria has been shown to offer up to 97% sensitivity and 100% specificity in predicting lesion stability. High signal is defined as signal intensity equal to that of fluid and greater than the signal intensity of adjacent fat. [6] [7] [8]
| • | Thin, ill-defined or well-defined line of high signal intensity 5 mm or more in length at the interface between the osteochondritis dissecans lesion and the underlying bone ( Fig. 53-2 ) |
|
| • | Discrete, round area of homogeneous high signal intensity 5 mm or more in diameter beneath the lesion (i.e., cyst) | |
| • | Focal defect with a width of 5 mm or more in the articular surface of the lesion (i.e., articular gap) | |
| • | High signal intensity line traversing the articular cartilage and subchondral bone plate into the lesion (i.e., discrete break in articular surface extending into the lesion) |
|
|
|
|
Figure 53-2 |
Indications and Contraindications
Careful attention must be given to the presenting symptoms, size, location, and stability of a juvenile osteochondritis dissecans lesion in weighing nonoperative versus operative treatment options. Nonoperative treatment consisting of close observation, activity modification, and a variable period of restricted weight bearing serves as an appropriate first line of treatment in many cases of juvenile osteochondritis dissecans. The patient and parents should understand that 12 to 18 months of activity modification may be required for complete healing of the lesion. Furthermore, certain sites have been observed to have a much lower rate of spontaneous resolution than others. Lesions in the classic location have proved to be particularly problematic, with spontaneous resolution rates as low as 30%, versus those in inferocentral medial or lateral sites, for which 88% to 100% healing rates have been reported with nonoperative treatment. Results have been uniformly poor with nonoperative treatment of symptomatic adult osteochondritis dissecans, however, and one should therefore follow a more aggressive, operative tactic in approaching symptomatic lesions in this population.
The ideal osteochondritis dissecans lesion for primary repair is the unstable lesion in situ in an active, symptomatic patient who acknowledges and is willing to comply with postoperative weight-bearing and activity restrictions and who understands the need for a second procedure for implant removal. In addition, patients who fail to demonstrate symptomatic or radiographic improvement after 6 months of appropriate nonoperative therapy should also be considered for surgical treatment. Primary repair is not recommended in the case of grossly unstable lesions that have produced a loose body with less than 3 mm of subchondral bone remaining on the fragment. These cases may be treated with excision of the loose body and either marrow stimulation or one of a variety of secondary salvage cartilage restoration techniques (e.g., osteochondral autograft transfer, osteochondral allograft, autologous chondrocyte implantation), depending on the size and depth of the lesion.
With a congruent reduction of the osteochondral flap, primary repair of an osteochondritis dissecans lesion may be performed either arthroscopically or with use of a small parapatellar arthrotomy. A noncongruent reduction with articular step-off, however, typically requires open technique to permit autogenous bone grafting at the base of the lesion. Reduction and fixation of suitable fragments that are detached and loose inside the joint also generally require open technique, permitting the fragment to be recontoured and fixed appropriately.
Depending on the preferences of the patient, surgeon and anesthesiologist, one of several anesthesia options can be used: general, spinal, regional, or a combination thereof. The patient is positioned supine on a standard operating-room table with a padded thigh tourniquet, and the affected extremity is secured in a standard leg holder placed around the proximal thigh to permit broad access to the knee. The contralateral extremity may be positioned in an obstetric-type leg holder. When this type of device is used, care should be taken to provide adequate padding around the common peroneal nerve, as the leg has a tendency to externally rotate, putting pressure on the region around the fibular head. The bed is placed in 15 to 20 degrees of reflex to take the lumbar spine out of extension. The foot of the operating room table is dropped completely. An additional advantage of this type of positioning is ease of access should one wish to confirm the placement of implants by intraoperative fluoroscopy.
Surgical Landmarks, Incisions, and Portals
| • | Joint line | |
| • | Patella | |
| • | Patellar tendon | |
| • | Tibial tubercle |
Portals (Arthroscopic Technique)
| • | Meniscus (during open approach) | |
| • | Patellar tendon (during open approach) | |
| • | Infrapatellar branches of the saphenous nerve |
A standard examination under anesthesia documents range of motion and ligamentous stability.
Specific Steps (
Box 53-1
)
Key surgical steps for primary repair remain essentially the same whether the lesion is approached in open or arthroscopic fashion.
A complete, systematic arthroscopic evaluation of each compartment and its structures is performed to identify any additional sources of intraarticular disease.
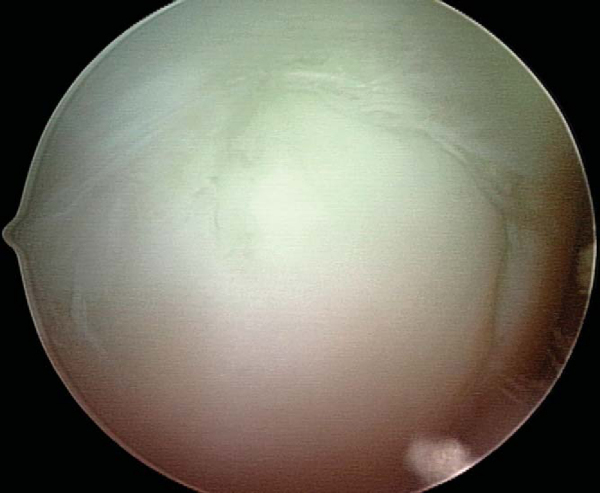
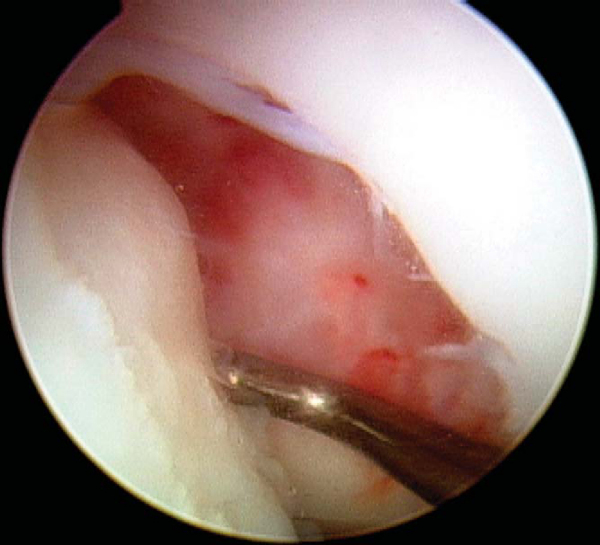
2. Identification and Assessment of Lesion Stability
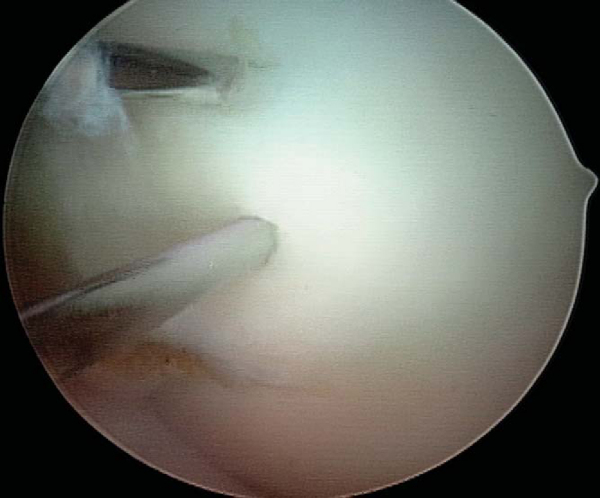
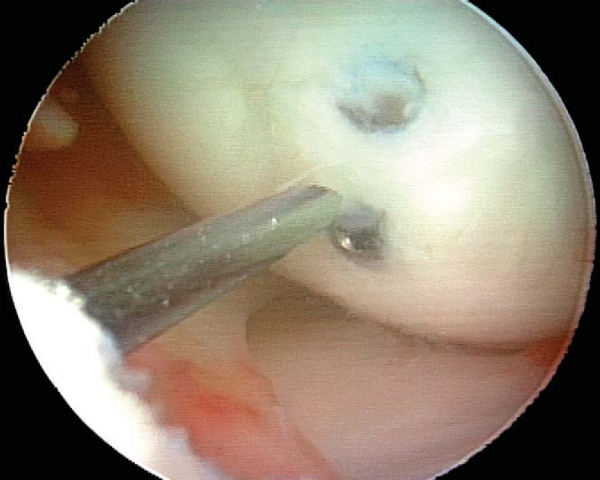
With use of the elbow of a standard arthroscopic probe, the boundaries and stability of the lesion are assessed. In many cases, the borders of the lesion are obvious, with fissuring, fibrillation, and even gross gapping in the articular surface (
Fig. 53-3
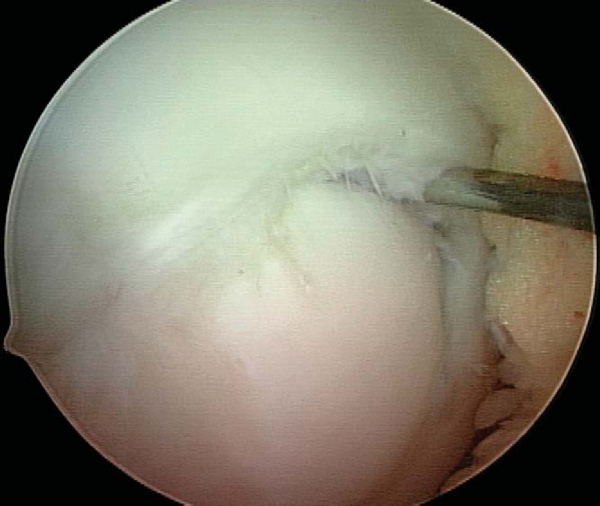
). However, definition of the lesion can be more subtle in some cases. Nevertheless, even without obvious visual clues, a distinct transition from firm to soft or the ballottement of a segment of articular cartilage can typically be appreciated as one moves the elbow of the probe from normal cartilage to that overlying an osteochondritis dissecans lesion. The tactile feedback received is that of the elbow of the probe falling into a small crevasse as the lesion boundary is crossed (
Fig. 53-4
). In the rare case that the lesion cannot be identified through visualization and tactile feedback, intraoperative fluoroscopy can confirm the lesion’s location.
|
|
|
|
Figure 53-3 |
|
|
|
|
Figure 53-4 |
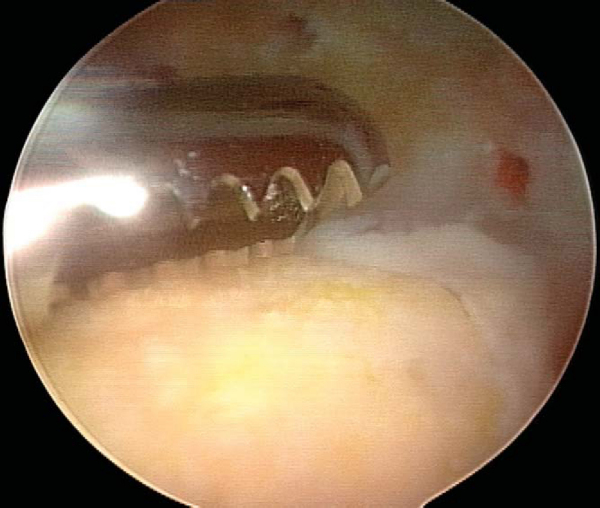
3. Débridement of Lesion Bed and Undersurface of the Fragment
Any disruption in the articular surface or observation of ballottement with palpation confirms instability and indicates a need to expose and to débride the lesion. Careful manipulation of the lesion boundary with a probe will typically reveal a tendency for the lesion flap to hinge open in one particular direction (
Fig. 53-5
). For those lesions bordering on the intercondylar notch, the general tendency is for the lesion to hinge on the intercondylar side. A 15-degree arthroscopic Bankart elevator can be useful in opening the lesion. Once the osteochondral flap has been opened, a curet is used to débride the base of the lesion of any granulation tissue or sclerotic bone, and then an aggressive mechanized shaver or spherical bur (4 to 4.5 mm; angled may be useful and should be available) to “freshen” the undersurface of the osteochondral flap and further débride the base of the lesion (
Fig. 53-6
).
|
|
|
|
Figure 53-5 |
|
|
|
|
Figure 53-6 |
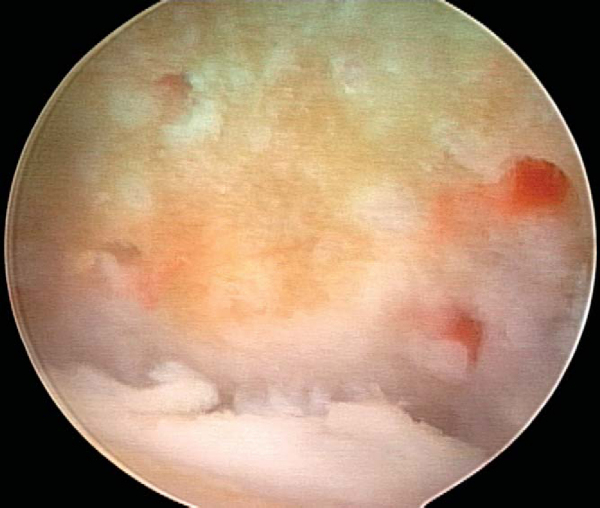
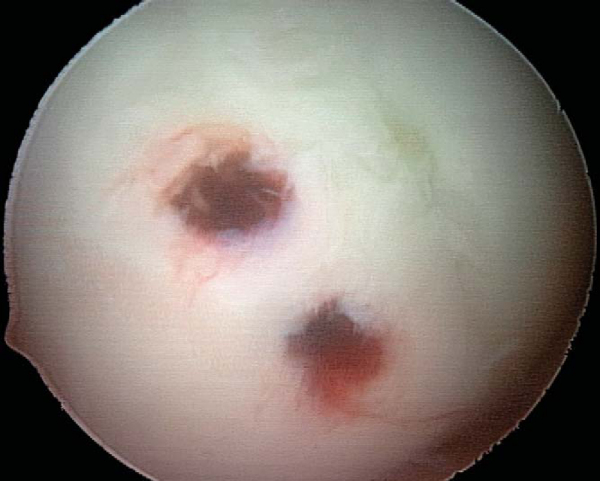
4. Microfracture of Lesion Bed with Further Débridement as Needed and Assessment of Fragment Reduction
A standard set of microfracture awls is used to penetrate the base of the lesion at 5-mm intervals. Inflow should be shut off after microfracture to confirm efflux of marrow elements from the base of the lesion (
Fig. 53-7
). If the process of microfracture generates an uneven surface that may impede congruent reduction, a small bur may be used to smooth the lesion bed. The osteochondral fragment is then reduced and held firmly in place with the elbow of a probe. Attention is given to the congruency of the reduction. Any step-off greater than 1 mm suggests the need for autogenous bone grafting to the bed of the lesion.
|
|
|
|
Figure 53-7 |
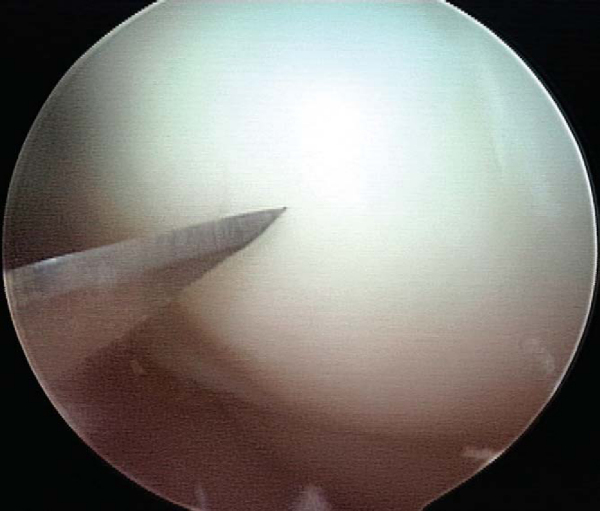
By spinal needle localization technique, a line orthogonal to the plane of the lesion is established and an accessory portal made (
Fig. 53-8
). This is an extremely important step; application of compressive force along a nonorthogonal vector can produce shear and nonanatomic reduction of the osteochondral fragment.
|
|
|
|
Figure 53-8 |
A variety of implants can be used for fixation. I currently prefer a nonabsorbable, cannulated, headless, variable-pitch compression screw because of the rigidity of fixation provided and compatibility with arthroscopic technique. Cannulated implants are recommended for open technique as well, however, as the placement of implant guide wires helps maintain reduction during fixation. Although success has been reported with bioabsorbable implants, they must be viewed with caution owing to their potential to generate sterile effusions, to be absorbed and dissociate at the shaft-head junction (producing intraarticular loose bodies), and to loosen and back out (causing injury to the opposing articular surface). [10] [15]
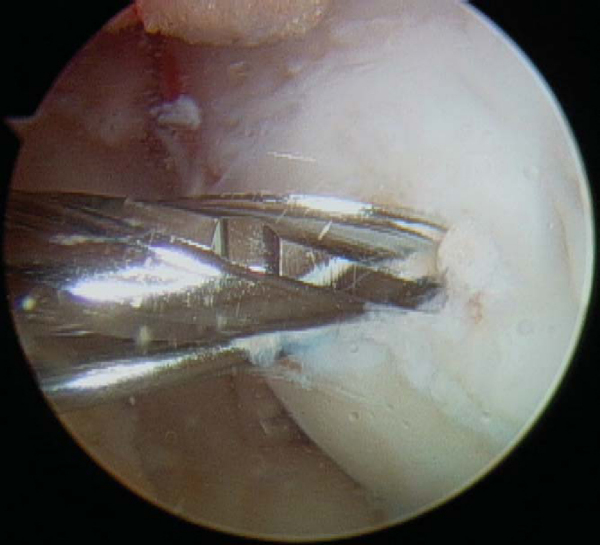
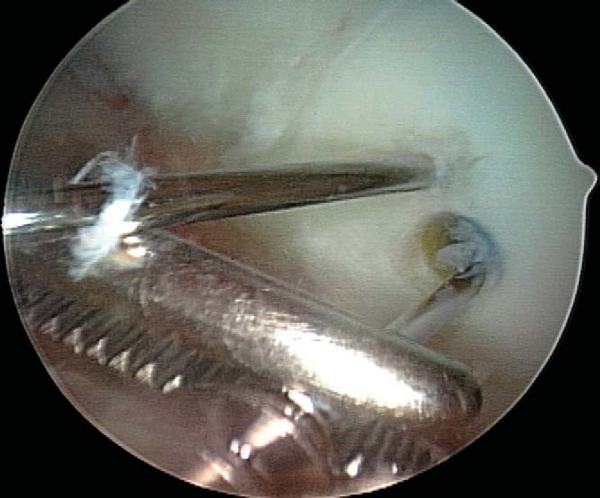
With use of an ipsilateral viewing portal, a guide wire is introduced through the accessory instrumentation portal and drilled into the lesion (
Fig. 53-9
). A second guide wire is then placed to provide countertorque during drilling and placement of the first screw (
Fig. 53-10
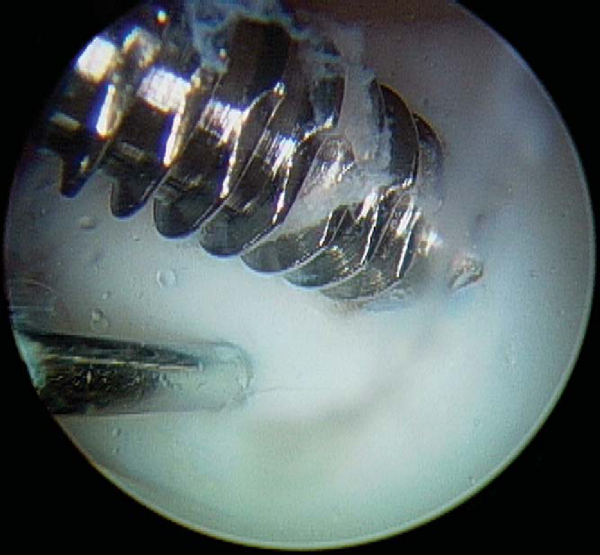
). Small lesions may permit use of a single screw for adequate fixation, but larger lesions may require two or even three screws, and careful consideration should be given to the spacing of implants to avoid crowding and fracture of the osteochondral flap. As these lesions occur in a younger population with excellent bone quality, implants will typically obtain tremendous purchase and can easily generate excessive compression at the lesion site, fracturing the osteochondral flap if overtightening is allowed (
Fig. 53-11
). Slight overdrilling is necessary at times to avoid overtightening. When cannulated implants are used, it is helpful to remove the guide wire once the screw has been seated two thirds of the way and to finish seating the screw with a noncannulated screwdriver. This avoids difficulty in removing the guide wire and eliminates the fracture risk to a cannulated screwdriver tip by the torque generated by the compression screw. Implants are countersunk to permit range of motion without risk of injury to the opposing articular surface. After fixation, the lesion is probed for stability and observed through several cycles of flexion-extension for flap motion (
Fig. 53-12
).
|
|
|
|
Figure 53-9 |
|
|
|
|
Figure 53-11 |
For lesions requiring autogenous bone grafting, adequate cancellous graft can be obtained from Gerdy’s tubercle with minimal additional morbidity. If it is available, an 8-mm diameter harvesting trocar for osteochondral autograft transfer can be used to harvest the bone graft in a minimally invasive fashion. A 1-cm vertical incision is made overlying Gerdy’s tubercle. A subperiosteal flap is elevated, and the harvesting trocar is introduced with slight distal and medial angulation. Depending on the size of the lesion, one or two plugs will provide sufficient graft. Alternatively, a slightly longer incision can be made over Gerdy’s tubercle, a 1-cm cortical window made with an osteotome, and a curet used to remove cancellous autograft. The cortical flap is then replaced, and the incision is irrigated and closed in layers. Cancellous autograft is then tamped into the base of the lesion until a congruent reduction can be obtained. Fixation is applied as described.
6. Implant Removal (for Nonabsorbable Implants, 3 to 4 Months after Fixation)
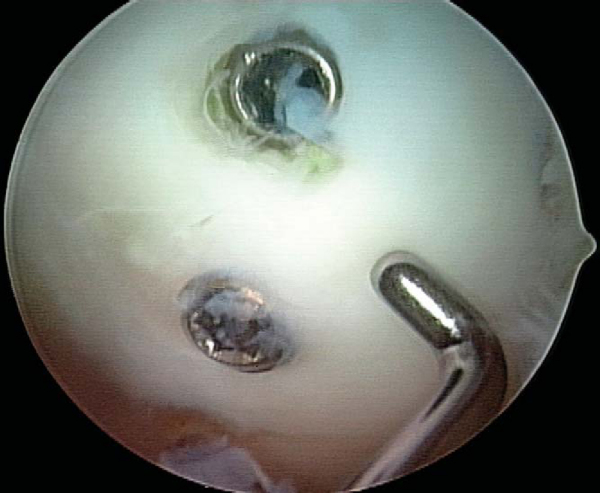
Use of nonabsorbable fixation typically requires a second procedure for implant removal. Implant removal can almost always be accomplished arthroscopically, regardless of whether initial fixation was obtained by open or arthroscopic technique. A diagnostic arthroscopy is performed to re-evaluate the joint and to assess healing of the lesion by arthroscopic visualization and palpation. Spinal needle localization is used to establish the appropriate vector for implant removal (
Fig. 53-13
). A noncannulated screwdriver is used to initiate screw removal because a sufficient amount of torque may be applied during this process to fracture the tip of a cannulated screwdriver. Once the screw has been backed out over several turns, a guide wire is threaded down the shaft of the screw and a cannulated screwdriver completes removal. Once the tip of the screw has been disengaged from the articular surface, the guide wire is clamped with a hemostat at a point distal to the tip of the screw to prevent loss of the screw in the joint or extra-articular soft tissue (
Fig. 53-14
). The lesion should then be probed for stability and the knee brought through a cycle of flexion-extension (
Fig. 53-15
).
|
|
|
|
Figure 53-13 |
|
|
|
|
Figure 53-14 |
| • | At 7 to10 days for suture removal and postoperative non–weight-bearing anteroposterior and lateral radiographs |
Radiographs should be repeated at regular 4- to 6-week intervals until healing of the lesion is observed.
| • | Patients treated with nonabsorbable implants are kept non–weight bearing until implant removal. | |
| • | Continuous passive motion is prescribed for 4 to 6 weeks, followed by active range of motion. | |
| • | Heel slides, quadriceps sets, straight-leg raises, and ankle pumps are initiated immediately postoperatively. | |
| • | Repeat films every 4 to 6 weeks until consolidation is evident. |
| • | Failure of the lesion to heal | |
| • | Injury to opposing articular surface by implants used for fixation | |
| • | Synovitis from bioabsorbable implants | |
| • | Infection | |
| • | Iatrogenic fracture of the osteochondral flap during implant placement | |
| • | Implant complications (e.g., fracture of cannulated screwdriver tip during implant removal, shearing off of guide wire during drilling process) |
Results after primary repair of appropriately selected osteochondritis dissecans lesions in the knee have typically been reported as excellent, with fragment union reported in 72% to 100% of cases (
Table 53-1
). [2] [5] [9] [11] [12] [14] [16] [18]
| Author | Mean Followup | Lesion Location (No. of Knees) | Implant | Outcome |
|---|---|---|---|---|
| Nakagawa et al[14] (2005) | 5 years | MFC (4), LFC (1), T (3) | PLLA (7), bone peg (1) | Healing in 7 of 8 knees |
| Larsen et al[11] (2005) | 2.6 years | MFC (7) | PGA-PLLA copolymer | Healing in 6 of 7 knees |
| Makino et al[12] (2005) | 4.2 years | MFC (14), LFC (1) | Metallic VPCCS | Healing in 14 of 15 knees; 13 of 15 knees “normal” by IKDC score |
| Dervin et al[9] (1998) | 2.75 years | MFC (9) | PLLA | Healing in 8 of 9 knees |
| Zuniga et al[18] (1993) | 1.3 years | MFC (11) | Metallic VPCCS | Healing in 8 of 11 knees |
| Cugat et al[5] (1993) | 3.5 years | MFC (14), T (1) | Metallic CCS | Healing in 15 of 15 knees |
| Anderson et al[2] (1990) | 6 years | MFC (17) | Threaded Kirschner wire | Healing in 16 of 17 knees |
|
CCS, cannulated compression screw; IKDC, International Knee Documentation Committee; LFC, lateral femoral condyle; MFC, medial femoral condyle; PGA, polyglycolic acid; PLLA, poly-L-lactic acid; T, trochlea; VPCCS, variable pitch cannulated compression screw. |
| PEARLS AND PITFALLS | ||||||||||||||||||
|