
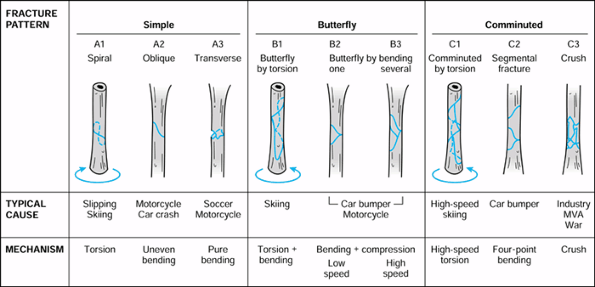
II – FRACTURES, DISLOCATIONS, NONUNIONS, AND MALUNIONS > Patella and
Tibia > CHAPTER 24 – FRACTURES OF THE SHAFTS OF THE TIBIA AND FIBULA
highest incidence of diaphyseal fractures. These fractures are often
caused by high-energy trauma. Because the shaft of the tibia is
subcutaneous throughout its length and may have a diminished blood
supply, severe complications and major disability are common outcomes,
particularly when the fractures are open.
completely undisplaced fractures with minimal soft-tissue damage, to
traumatic amputations. For this reason, the decision tree for treatment
is complex. It must take into account many factors, including the
patient’s overall health, associated injuries, and the multiple factors
bearing on the fracture itself, including the extent of soft-tissue
injury, associated injuries of the thigh, knee, and foot, and the
pattern of injury to the bone itself. Treatment is equally varied,
ranging from simple walking-cast immobilization through complex
procedures required to replace lost bone, soft tissues, and
neurovascular structures.
to explicate all available techniques, but the general principles of
soft-tissue management, closed treatment, external fixation,
intramedullary nailing, and plate and screw fixation will be covered in
such a way that the reader will be able to pursue other variations in
treatment not discussed in this text. There is much material available
in other chapters in Orthopaedic Surgery, as will be noted.
shaft of the tibia and fibula, patients and physicians would like to
achieve complete union in a reasonable period of time (less than 6
months) without complications. Alignment should be maintained. In
nearly all patients, as much as 1 cm of shortening and 5° or less of
angular deformity or malrotation are not significant. Preexisting tibia
vara or valgum or toe-in or toe-out influence the significance of
greater degrees of malalignment. External rotation is better tolerated
than internal rotation.
in a long-term follow-up (average, 29 years) of fractures of the tibial
and fibular shafts, found no predisposition to arthritis in the knee or
ankle, regardless of the degree of residual angulation. As the location
of the deformity approaches the ankle or knee, however, malalignment
results in maldistribution of articular surface pressures that may
predispose a patient to premature osteoarthrosis (137,138).
trauma below the threshold of injury required for fracture, resulting
in a stress (fatigue) fracture (see Chapter 96).
They can also be a result of amputations caused by massive, high-energy
direct trauma, such as occurs in motorcycle accidents. Fractures can be
caused by indirect trauma, where the force is transmitted through the
bone by twisting or bending, or by direct forces from direct impact
against an object or from a penetrating missile.
soft-tissue injury as by the type of fracture, and both depend on the
amount of energy absorbed by the limb at the time of injury. Most
fractures from indirect trauma, such as twisting injuries occurring in
sports, generally result in low to medium absorption of energy, whereas
high-speed motor-vehicle accidents and high-velocity missiles cause
direct trauma and severe injury due to the high absorption of energy.
injuries and result in limited soft-tissue injury and simple fracture
patterns. High rates of loading result in more energy absorption prior
to fracture, thereby leading to explosive-type fractures that cause
much more soft-tissue trauma and resultant severe comminution.
Combinations of loading mechanisms can occur. In nearly all cases,
direct trauma results in worse injuries than indirect trauma. If it is
possible to obtain a good history, a thorough knowledge of the
mechanism of injury is important in classifying the fracture, which may
bear directly on the choice of treatment.
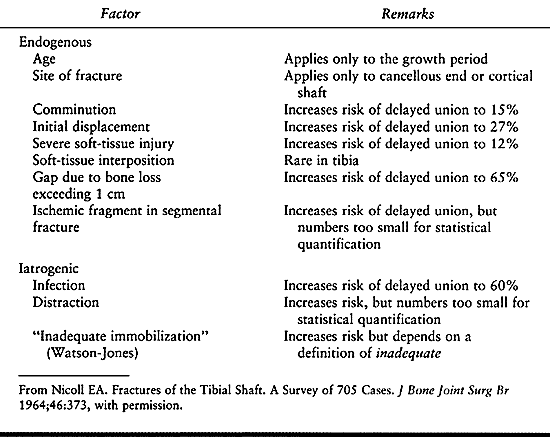
torsion, such as occurs in skiing. These are generally low-energy
injuries with a good prognosis. High-energy, high-velocity torsional
injuries result in comminution, which signals a worse prognosis,
particularly if marked displacement is present. Short oblique and
transverse fractures are generally caused by bending, which requires
direct contact with the bone at or near the fracture site. These
generally are worse injuries than spiral fractures and are often the
result of high-energy trauma.
accidents or in the case of pedestrians being struck by vehicles are
nearly always high-energy injuries with severe soft-tissue injury and
severe comminution. In the absence of a good history, the mechanism of
injury can often be inferred by the pattern of the fracture. Transverse
or short oblique fractures, or comminuted fractures associated with
fractures of the fibula with wide displacement, indicate disruption of
the interosseous membrane and severe soft-tissue injury (22).
communicate more accurately with each other and to make better
diagnostic and therapeutic decisions, and they facilitate comparison of
clinical and laboratory research results.
The
difficulty with classification schemes is that to be truly useful they
must take into account many different and occasionally unrelated
factors, some of which may be difficult to quantify. More important,
interobserver reliability is questionable, making the comparison
between studies somewhat unreliable (21).
fractures, probably the most widely understood and accepted
classification for fractures in the world today, Brumback (21)
asked the attendees at the 1992 meeting of the Orthopaedic Trauma
Association (OTA), a group of highly experienced and skilled trauma
surgeons, to classify 12 open tibial fractures. The interrater
reliability was only 60%. It is useful to keep this fact in mind while
reviewing various classification schemes.
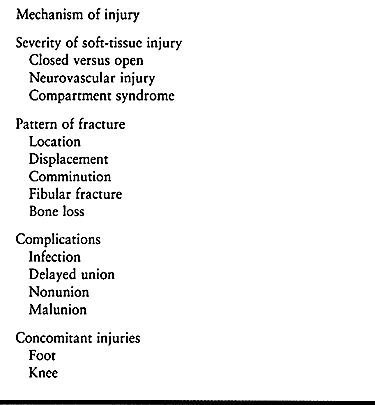
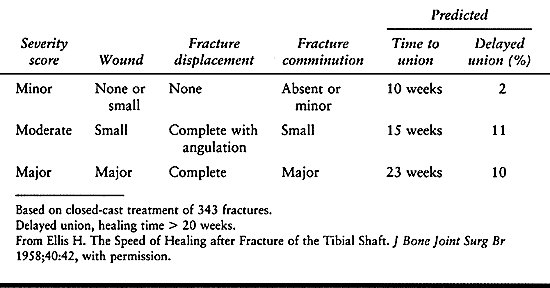
in 1964 both used a number of these factors to establish simple
classification systems that predicted the time of union and incidence
of delayed union and nonunion (Table 24.2, Table 24.3). They, as well as Edwards (35),
identified the severity of the soft-tissue injury as probably the most
important prognostic factor in the outcome of fractures of the tibia
and fibula.
 |
|
Table 24.1. Factors Important to Treatment and Outcomes in Tibial Fractures
|
 |
|
Table 24.2. Ellis Classification
|
 |
|
Table 24.3. Factors Affecting Rate of Union, Used by Nicoll for Classification
|
I disagree somewhat with Henley’s recommendations in that fracture
types I, II, and III all have the propensity to be rotationally
unstable and to require static locking. In addition, undetected
hairline fractures can become displaced, resulting in an unstable
pattern that can either shorten or cause malrotation. This issue is
addressed in more detail in the discussion under intramedullary nails
in this chapter.
 |
|
Figure 24.1. Classification of tibial shaft comminution. (From Henley MB. Intramedullary Devices for Tibial Fracture Stabilization. Clin Orthop 1989;24, with permission.)
|
severity of soft-tissue injury (Fig. 24.2). This classification was applied primarily to open reduction with plate and screw fixation.
 |
|
Figure 24.2.
Johner and Wruhs’ classification system for tibial shaft fractures. (From Johner R, Wruhs O. Classification of Tibial Shaft Fractures and Correlation with Results after Rigid Internal Fixation. Clin Orthop 1983;178, with permission.) |
found that initial displacement was unreliable, as the first
radiography was often done after initial reduction and splinting of the
fracture, whereas the fracture pattern and degree of comminution had
significant influence. Spiral fractures were found usually to be due to
lower-velocity indirect injuries and therefore were associated with
less soft-tissue injury, whereas bending fracture patterns tended to be
associated with higher-energy direct trauma with worse soft-tissue
injury. Oni (105) confirmed these observations in a study of manually produced fractures in the rabbit tibia.
published their classification, which is required for articles
published in the Journal of Orthopaedic Trauma (106).
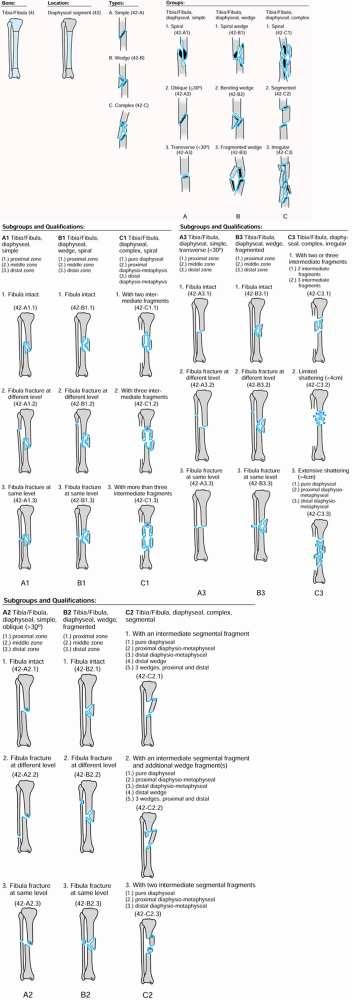
In the OTA classification, the tibia is divided into its proximal,
middle, and distal thirds, and a distinction is made between articular
and extraarticular fractures (Fig. 24.3).
 |
|
Figure 24.3.
OTA classification of tibial fractures. (From Orthopaedic Trauma Association Committee for Coding and Classification: Fracture and Dislocation Compendium. J Orthop Trauma 1996;10(suppl 1):45, with permission.) |
Their classification system is critical to understanding the treatment
of open fractures of the tibia and is discussed in detail in Chapter 12.
Grading of the degree of soft-tissue injury in closed fractures of the
tibia is equally important, because the deep soft-tissue injury may be
much more severe in a fracture, as a result of crushing of the midshaft
tibia, compared with a minor type I open fracture occurring from
indirect trauma, such as a spiral fracture in skiing. Tscherne
and Gotzen (144)
developed a classification of closed injuries, which is helpful in
looking for potential complications and in deciding treatment (Table 24.4).
 |
|
Table 24.4. Classification of Soft-tissue Injuries
|
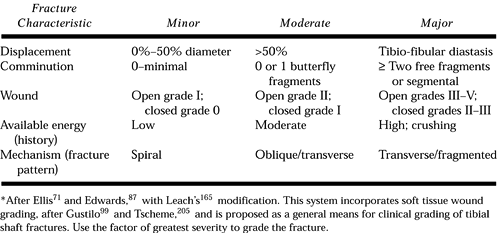
pull all of these classifications together into a simple system that
incorporates nearly all factors. To make it easy to use and clinically
practical, he modified the systems of Ellis (36) and Edwards (35) with Leach’s (77) modification and incorporated the soft-tissue grading systems of Gustilo (48) and Tscherne and Gotzen (144) (Fig. 24.4).
This classification has not been verified by published clinical trials.
Prior to surgery, it is often difficult to determine the soft-tissue
grade; displacement of the tibial fracture itself is not reliable, as
has already been pointed out. The pattern of fracture, however, is
highly suggestive of the category in which Trafton would classify the
fracture. This finding correlates rather well with expected problems or
success in healing (Fig. 24.5).
 |
|
Figure 24.4.
Trafton classification of tibial fractures (From Trafton PG. Tibial Shaft Fractures. In: Browner BD, Jupiter JB, Levine AM, Trafton PG, eds. Skeletal Trauma. Philadelphia: WB Saunders, 1992:1771, with permission.) |
 |
|
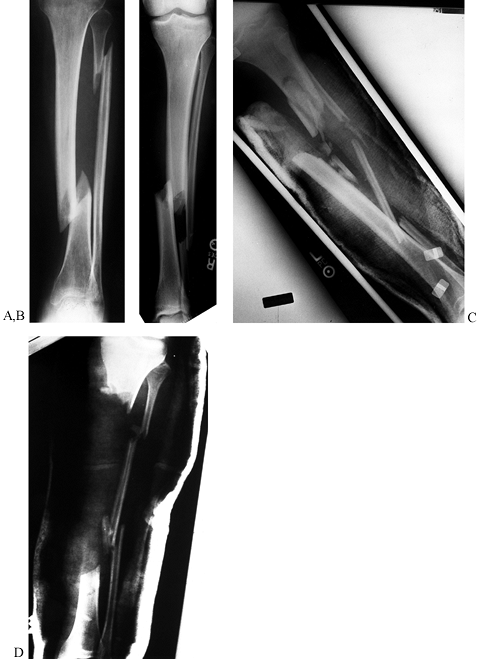
Figure 24.5. Radiographic examples of the four grades of tibial fracture severity. A: Minor severity: spiral fracture caused by a simple slip and fall. B: Moderate severity: transverse fracture in a pedestrian struck by slowly moving vehicle. C: Major severity: comminuted fracture with tibial-fibular diastasis caused by a high-velocity motorcycle crash. D: Major severity: near amputation caused by a high-speed motorcycle accident; with segmental bone loss.
|
treatment are available. They can be used in isolation or in
interesting combinations involving two or more methods, depending on
the particular fracture at hand, the age and health of the patient, and
other imperatives that might be imposed by associated injuries (Table 24.5).
 |
|
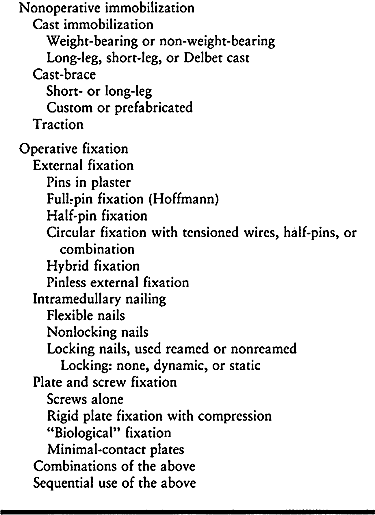
Table 24.5. Methods for Treating Fractures of the Tibia and Fibula
|
 |
|
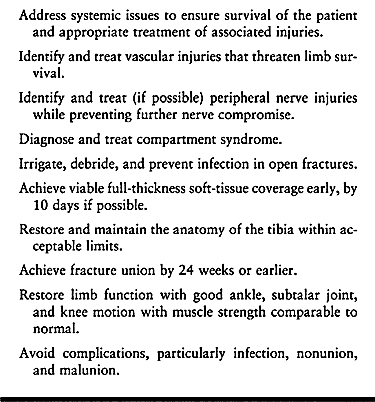
Table 24.6. Treatment Goals
|
 |
|
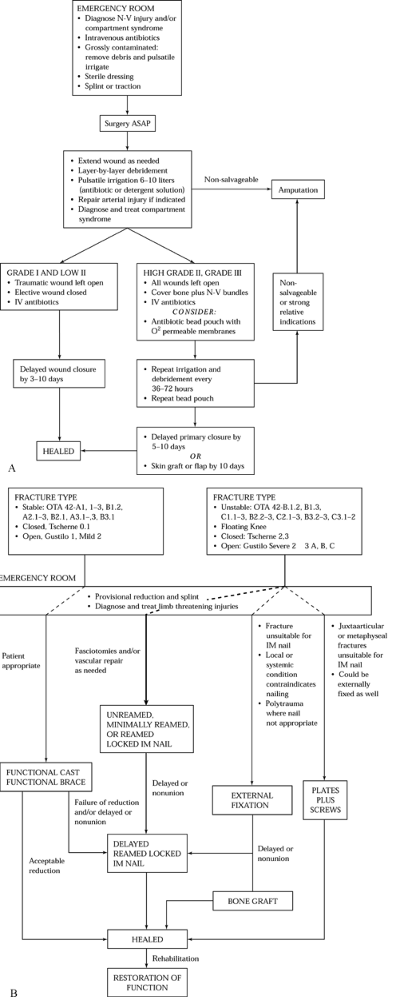
Figure 24.6. A: Management of soft tissues in open tibial fractures. B: Stabilization of adult fractures of the shafts of the tibia and fibula.
|
application of various types of casts or fracture braces, either with
or without regional or general anesthesia (60,63).
Pins in plaster can be included, although functionally this method is a
form of external fixation. Ten key articles are detailed in Table 24.7.
|
Table 24.7. Results of Treatment of Open and Closed Fractures of the Tibia and Fibula
|
the tibia with early weight bearing and joint range-of-motion and
muscle-strengthening exercises began with experiences of the military
during and after the Korean War. Dehne (27,28,29 and 30) and Brown and Urban (20)
advocated early weight-bearing treatment of both closed and open
fractures of the tibial shaft, applying a total-contact, well-molded,
long-leg, weight-bearing cast. Sarmiento (120,121,122,123,124,125 and 126)
recognized the advantages of the total-contact socket used for
below-knee prostheses and applied these principles to fracture
treatment, thus allowing early use of a cast that does not immobilize
the knee. He further refined his method to employ custom-built and
subsequently off-the-shelf prefabricated fracture braces that could be
applied early in stable fractures and later in treatment of less stable
patterns.
treating 943 closed tibial shaft fractures with functional braces: He
had only a 1% rate of nonunion and a 10% incidence of malunion. Other
investigators (Table 24.7) showed nonunion
rates of 0% to 4% and malunion rates of only 4% to 5%. This experience
confirms closed reduction as the treatment of choice for stable
fractures of the tibia (Fig. 24.6B).
recent comparative studies between closed treatment and intramedullary nailing (Table 24.7) show superior results with locked intramedullary nailing (18,57). Bone et al. (18)
in 1997, in a prospective randomized series, showed only a 2% incidence
of nonunion and malunion in their nailing group as compared with 10%
nonunion and 26% malunion rates in their cast group. Hallmarks of
instability that would favor locked intramedullary nail fixation in
adults and external fixation in children include comminution precluding
less than 50% contact between the ends of the proximal and distal
fragments, diastasis of the tibia and fibula indicating complete
rupture of the interosseous membrane, widely displaced segmental
fractures, and fractures with segmental bone loss (Fig. 24.5).
high risk for operative intervention, however, or those who could not
be expected to cooperate in postoperative care—in particular those who
have fracture patterns that preclude external fixation without bridging
the knee—may be best treated by nonsurgical means. Most grade I open
fractures with stable patterns can be treated with casts, as care of
the wound does not require the access permitted by internal or external
fixation.
brace management is as demanding of the surgeon as operative treatment,
and it requires a cooperative patient (108). Frequent follow-up with radiography and frequent cast adjustments or changes may be necessary to permit
healing with acceptable alignment and minimal shortening. The details
of closed treatment are outlined later in this chapter and in Chapter 10.
the treatment of tibial fractures throughout most of the 20th century.
Refinements in external-fixation pin technique, and frame designs with
improved mechanics made it popular beginning in the late 1960s through
the middle to late 1980s. During that period, external fixation was the
stabilization method of choice for open fractures of the tibia (1,11,19,26,32,33,34 and 35,37,38 and 39,42,45,67,68,69 and 70,72,84,87,102,109,110,128,130,136,145,146,148).
In the 1990s, however, locking intramedullary nailing has surpassed
external fixation as the treatment of choice for unstable fractures of
the tibia, particularly open fractures, where unreamed nailing has been
found to provide superior results.
showed in prospective comparative studies that infection rates were
similar, but union was delayed in the external fixators. The most
significant difference, however, was an
increased rate of malunion with external fixation treatment (Table 24.7).
The primary reason for malunion is late angulation of the fracture
after removal of the external fixator. Additionally, soft-tissue
reconstructive procedures such as flaps are easier if there are no
external fixation pins to contend with.
diaphyseal fractures of the tibia and fibula today include the
following: more severe open fractures; in children, fractures with
unstable patterns that are not manageable in a cast; in adults,
unstable grade II or worse open fractures of the tibia that have
fracture patterns unsuitable for locked intramedullary nailing;
conditions in which intramedullary nailing is contraindicated, such as
previous active infection in the injured area; or systemic problems
such as insulin-dependent diabetes mellitus associated with severe
peripheral vascular disease.
locked unreamed intramedullary nailing is the better method of
stabilization for severe grade IIIB or C fractures. The survey of the
literature in Table 24.7 shows a high rate of
complications with these severe injuries, many of which are
near-amputations. The incidence of problems in more recent studies,
however, seems to be about the same in the two methods. The
decision-making cascade as illustrated in Figure 24.6
will most likely be driven by a combination of factors including the
need for local or free microvascular flaps, when a nail may be
preferable to external fixation, or fracture combinations such as
proximal or distal intraarticular fractures, when nail fixation is not
possible.
fixation such as interfragmentary screws or wires, or cerclage wires or
cables (19) (Table 24.7).
In some cases, reduction and maintenance of position of the fracture
are required before the external fixator is applied. Segmental or large
butterfly fragments, unless managed with additional pins on the
external fixator, may not lie in good apposition to other bone
fragments. For that reason, limited internal fixation may be of help.
Unless inserted percutaneously, these techniques may result in
additional soft-tissue stripping of the fracture fragments, resulting
in devascularization and nonunion.
interfragmentary screw fixation with external fixation is losing the
ability to know when fracture union has occurred—knowledge that is
essential for timing the removal of the external fixator. In addition,
the presence of interfragmentary screws rules out early weight bearing,
which many types of external fixation today allow. With
interfragmentary screw fixation, the micromotion usually seen in
external fixation alone does not occur, and therefore periosteal callus
formation is suppressed. Union takes longer, and a useful guideline to
fracture healing—the radiographic appearance of bridging periosteal
callus—is unavailable. In addition, when the time approaches for
removal of the external fixation, it is common to remove the fixator,
leaving the pins in place, to test the clinical stability of the
fracture site. This additional clinical information is lost because of
the rigidity provided by the interfragmentary screw fixation.
after the fracture, when the external fixator is removed and the
patient is allowed to put weight on the site, either in or without a
cast. The fracture, which has not yet healed, becomes displaced and
often the screw breaks or the fracture becomes distracted, resulting in
nonunion and frequently malposition. This situation then requires
operative intervention. Therefore, I try to avoid combining
interfragmentary screw fixation with external fixation in diaphyseal
fractures. Early weight bearing is possible and the surgeon can use
both radiographic and clinical criteria to judge when the external
fixator can safely be removed.
conversion to a plate as well. The authors of these studies show that
early conversion of external fixation to reamed intramedullary nailing,
particularly in severe grade III open fractures, may offer particular
advantages over external fixation, or unreamed or reamed intramedullary
nailing alone.
fixation causes less soft-tissue injury and avoids the potential
contamination of the intramedullary canal and devascularization of the
cortex associated with intramedullary nailing. Once the continuity of
the soft-tissue envelope has been restored and the initial
contamination eliminated, intramedullary nailing can be carried out,
thus avoiding the late complications of external fixation and realizing
the advantages of internal fixation.
that might be imposed by the external fixator in initial soft-tissue
management and the necessity for a second operative procedure. Blachut
et al. (13), with early conversion of external
fixation to reamed intramedullary nailing in predominantly grade II and
grade III open fractures, experienced only a 5% incidence of infection
and 5% nonunion and malunion rates.
demonstrated the superiority of external fixation with conversion to an
intramedullary nail within 4 weeks of fracture, to external fixation
alone, or conversion to a plate where much higher incidences of
infection, nonunion, and malunion were encountered. Maurer et al. (85) and Johnson et al. (65)
showed advantages and disadvantages of late conversion of external
fixation to reamed intramedullary nailing after failure of the
former.
Maurer et al. do not recommend this technique, because 7 of the 24
patients acquired deep infection. It is important to point out,
however, that five of these patients had had a previous pin-track
infection.
experienced no difficulties. The lesson to be learned here is that
conversion from external fixation to an intramedullary nail should be
done early, before pin-track infection occurs. If deep infection does
occur at a pin site, then the risk of infection after intramedullary
nailing becomes very high and may be a contraindication to conversion
to a nail. Tornqvist (140) had similar problems
treating nonunions after external fixation with intramedullary nailing,
where he experienced a 67% infection rate.
(Hoffmann) fixators, unilateral (AO half-pin), multiplanar (Fischer),
and Ilizarov-type fixators. Although external fixation has been used in
one form or another for most of the 20th century, the Hoffmann external
fixator using multiple full pins inserted through the tibia was the
device that popularized external fixation for fracture management in
the 1970s and 1980s. Although the results from these types of fixators,
as shown in Table 24.7, were quite acceptable, I am not aware that any of them continue to be used to any extent today.
frames has relegated full-pin fixators to special uses such as the
double delta frame for pylon fractures (see Chapter 11).
The primary disadvantage of full-pin fixators is that the pins require
insertion through the muscles of the anterior compartment, therefore
precluding functional use of these muscles. In addition, the multiple
pins in a single plane make it difficult to do plastic reconstructive
procedures. Unilateral half-pin fixators can be applied in combinations
in the anterior, posterior, and medial/lateral planes. They offer
superior mechanical strength and rigidity compared with full-pin
frames, but also versatility in half-pin placement to facilitate
reconstructive soft-tissue procedures.
Simple, inexpensive, single-bar fixators, such as the AO, use half-pins
with simple universal clamps and a single carbon-fiber bar.
Sophisticated fixators, such as the Hoffman II and the Monotube (both
Howmedica, Rutherford, NJ) and the Orthofix (Orthofix, Richardson, TX),
offer universal adjustable pin clamps that permit the frame to be
applied before the fracture is anatomically reduced. These devices also
enable the patient to put weight on the fracture site with controlled
displacement and resistance to compression; this set of circumstances
has been shown to enhance fracture healing. In addition, these modern
half-pin fixators are adaptable for the management of combination
fractures of the articular surfaces of the tibia and fractures of the
diaphysis.
wires is more complex to apply than simple uniplanar fixators, but it
offers particular advantages in the management of complex associated
fractures of the joint surfaces, metaphysis and diaphysis in
particular, where the same fixator may be used to accomplish
reconstructive procedures such as segment transportation to replace
lost bone. These procedures are discussed in more detail in Chapter 23, Chapter 25, and Chapter 32.
that the technique was more widely used. Their results were remarkably
good, with acute infection rates of only 3%, and a low incidence of
nonunions (2% to 2.5%). Because the Lottes nail could not be locked,
fixation was always supplemented by a long-leg cast, and in spite of
that, D’Aubigne reported a 16% incidence of malunions—the main reason
the Lottes nail did not gain widespread use.
to the excellent results with the Lottes nail in open fractures until
Velazco et al. (147) showed a remarkably low acute infection rate of only 2% in 50 consecutive fractures, of which 65% were grade III (Table 24.7).
developed by Ender for the femur were downsized and applied to the
tibia. The Ender nail experienced brief popularity and is still used by
some (86,92,152).
The advantage of the Ender nail over the Lottes nail is that its
smaller cross section, shape, and flexibility allow it to be more
easily inserted, and the nail can be used to reduce the fracture.
Because two nails are typically introduced, one from medial and one
from lateral, and they are spread in a similar fashion distally, they
offer better rotational control than the Lottes nail.
nails to be superior to plaster-cast treatment in preventing varus
deformity in tibia fractures with an intact fibula. Holbrook et al. (56),
in a prospective randomized study that compared Ender nails to external
fixation in the treatment of open fractures of the tibia, found Ender
nails to be as effective as external fixation in types I and II open
fractures. In a similar retrospective study, Whitelaw et al. (149) found Ender nails to be superior in a similar group of fractures.
combined with plaster cast or cast-brace immobilization in unstable
fracture patterns. I no longer use Ender nails in adults, however,
because they do not provide the stability of locked intramedullary
nails, and most fractures
heal
with some posterior angulation. Although they can be locked on one end
by inserting screws through the hole in the nail provided for the
inserter, they do not provide adequate control against shortening. We
keep a set of tibial Ender nails in our operating room for the rare
situation when we want to place an intramedullary nail in a child with
an open fracture of the tibia for which external fixation is not
suitable, or in the occasional extremely unstable fracture for which
external fixation is not suitable. With careful technique, the nail can
be inserted without injury to either the proximal or the distal growth
plates.
the tibia is indicated, the fixation of choice today is a locked
intramedullary nail (54,134,153).
In closed fractures, most surgeons prefer to place a nail that uses
transverse cross-locking screws of 4.5 mm or larger. Nails generally
must be 10 mm or larger in diameter; reaming is often necessary. In
open fractures, most surgeons prefer to use nails that do not require
reaming, because in severe open fractures, the soft-tissue envelope
around the tibia has been stripped and the outer cortex devascularized.
Reaming has been demonstrated to devascularize the inner two thirds of
the cortex or more (71,73,111).
reaction, which in experimental animals reaches a level several times
normal by 2–4 weeks after fracture (41,107).
This revascularization of the diaphysis by reversal of the normal
centrifugal blood supply of the cortex to a centripetal blood supply
depends on the adequacy of blood supply from the periosteum and
surrounding soft-tissue envelope, which is compromised in open
fractures. This situation may predispose patients to infection and
failure to heal the fracture.
an intramedullary nail. Nails that fit tight against the cortex
interfere with revascularization, whereas fluted nails, or
small-diameter nails that have limited contact with the endosteal
cortex, allow more complete and rapid reestablishment of the blood
supply to the cortex (43,44,62,107,143).
larger cross-locking screws, gentle reaming with one or two reamers has
been advocated. Hupel et al. (61) in a canine
fracture model demonstrated that overall tibial blood flow was reduced
by 63% with limited reaming, as opposed to 83% with full reaming. All
blood flow normalized by 11 weeks after reaming. In animal models,
osteotomy of the tibia as well as reaming increase blood flow in the
muscle and skin surrounding the fracture (4,6). Richards et al. (112,113)
in a canine model showed that muscle flaps significantly increase blood
flow, cortical porosity, and intracortical formation of new bone. They
also increase strength of union in an osteotomy. In the nailing of open
fractures, early full-thickness soft-tissue coverage, preferably with
muscles, is therefore of great value.
shows that the results with nonreamed locked intramedullary nails are
excellent, but that delayed union rates are as high as 48%. For the
most part, this delay results from the fact that these series involve
high-energy open fractures, and unreamed nails tend to be flexible and
relatively weak. Comparisons to use of external fixation, however, in
particular the series of Santoro et al. (119) and Tornetta et al. (139),
show results comparable or superior to those of external fixation.
Unreamed or minimally reamed locked nails are therefore preferable to
external fixation in open fractures. The major disadvantage of unreamed
locked nails is that because they are small, there is an increased
incidence of delayed union and broken hardware. Secondary procedures to
convert to larger reamed locked nails or bone graft occur in 10% to 20%
of fractures.
excellent. Rates of infection, delayed union, nonunion, and malunion
are low, with the best series reporting rates of less than 3% for all
of these complications. Because acute reamed nailing of open fractures
has higher rates of infection, however, initial nonreamed nail fixation
or external fixation with subsequent conversion to a reamed nail, as
discussed previously, is preferable in high-grade open fractures.
advocated open reduction and the use of interfragmentary lag-screw and
compression-plate fixation in displaced fractures of the tibia and
fibula. Rüedi et al. (116) reported good to
very functional results in 98% of 323 closed fractures. There was less
than a 1% incidence of late osteomyelitis and a similarly low incidence
of nonunion. There were three fixation failures and one refracture.
Plate and screw fixation of open fractures is far more hazardous, as
reflected by results in 101 open fractures, in which the overall rate
of complications was 32%, including a 12% incidence of infection and a
7% incidence of nonunion (23,100,101,103).
complications of infection can be devastating, leading to osteomyelitis
and even amputation. Since the development of closed intramedullary
nailing with locking screws, the indications for plate fixation for
diaphyseal fractures are rare. Fractures at the metaphyseal–diaphyseal
junction are difficult to treat with intramedullary nails. Lange et al.
(74), in 32 extraarticular fractures of the
proximal third of the tibia treated with locked intramedullary nails,
reported 84% with greater-than-acceptable angulation and advise
consideration of plating or external fixation for these fractures. I
often plate unstable fractures in the proximal third or distal fourth
of the tibia when nonoperative treatment does not suffice.
surgeons involve the tibia and fibula (which are often crushed in
high-speed motor-vehicle accidents). It is extremely important to
follow all the basic principles in the treatment of open fractures
outlined in Chapter 12, including appropriate
emergency care, early administration of appropriate intravenous
bactericidal antibiotics, meticulous layer-by-layer wound irrigation
and debridement, appropriate fracture stabilization, delayed wound
closure, and early full-thickness soft-tissue coverage (66,75,88). Figure 24.6A presents the protocol for management of the soft tissues in open tibial fractures, and Figure 24.6B the protocol for stabilization of open tibial fractures.
published, numerous trauma centers were just beginning to use nonreamed
intramedullary nailing. It has now become the stabilization method of
choice for grades I, II, and IIIA open fractures. As noted in Table 24.7,
it can be satisfactory for grade IIIB and C open tibial fractures as
well, but the risk of infection is significant. For that reason, some
surgeons still prefer initial external fixation for high-grade open
tibial fractures. As discussed earlier in this chapter, many now have
adopted the practice of passing one or two reamers gently to increase
the medullary canal size to allow insertion of a 10 mm nail, which
permits the use of larger transverse cross-locking screws. Laboratory
evidence indicates that this method has less impact on the circulation
to bone than full reaming, and clinical outcomes appear to be
acceptable.
placement of small, unreamed locked nails or external fixation. In the
case of the former, many fractures will go on to successful union, but
delayed union with early failure of screws, and occasionally nails, can
occur in up to 48% of cases (17). In fractures
fixed with unreamed nails less than 10 mm in diameter, I delay weight
bearing and keep a close watch on the fracture. If by 12 weeks there is
no callus formation or evidence of progression toward union, or if
there is evidence of impending hardware failure, I convert to a larger
reamed locked intramedullary nail, on occasion combining its use with
an open bone graft if there is segmental bone deficiency.
tolerates the fixator well and there are no significant pin
complications, the fracture can often be followed until union in the
external fixator, particularly if the fixator allows early joint
motion, muscle rehabilitation, and weight bearing. On occasion, I
convert external fixation to a reamed intramedullary nail if the
patient is unable to tolerate the external fixator or if there are
socioeconomic reasons. I will not make this conversion in the case of
pin-track infection. In most cases, I remove the external fixator and
place the leg in a cast until pin-track healing has occurred, usually
in 2–3 weeks, and then carry out nailing.
if by 12 weeks there is evidence of delayed union, I intervene
surgically to hasten union. Choices include conversion to a large
reamed intramedullary nail, or bone grafting of the fracture in the
fixator, usually through a posterolateral approach, except in proximal
fractures, where a posteromedial approach is utilized. I handle
fractures with segmental bone deficiency in a similar manner by doing
large posterolateral bone grafts spanning from tibia to fibula to
produce a tibial–fibular synostosis, effectively bypassing the area of
missing bone.
full-thickness soft-tissue envelope. I make liberal use of local muscle
flaps and free microvascular flaps to achieve muscle coverage of the
fracture by 10 days, if possible.
external fixation to reamed locked medullary nailing in high-grade open
fractures to comment; the articles listed in Table 24.7, however, support this as an alternative and effective technique.
Ilizarov-type ring fixation with half-pins, tension wires, or
combinations thereof. I have used Ilizarov-type fixation in cases that
called for primary shortening of the limb through the fracture site to
achieve bone apposition and early soft-tissue closure (utilizing
proximal or distal distraction osteogenesis to restore length to the
limb). I also have used this method where the normal length of the limb
has been maintained and a segment has been transported to fill a bone
defect. These techniques are discussed in more detail in Chapter 32.
Sacramento region, I have not found Ilizarov techniques to be as
suitable for our patients as the other methods discussed. The patients
are often quickly transferred to other surgeons after their initial
care, or they live a considerable distance from my hospital. For that
reason, if I feel that an Ilizarov methodology is applicable, I am more
likely to apply a simple unilateral fixator initially and then later
convert the patient to an Ilizarov device when it is apparent that I
will be carrying out the full course of treatment and the patient is an
appropriate candidate for the method selected. In addition, I find the
use of circular external fixators time consuming and technically
demanding and therefore difficult to use in emergency situations,
particularly in patients with multiple injuries. I find it better to
apply these devices on an elective basis.
It is destructive and wasteful to invest two or more years in an
attempt to salvage a limb that is finally amputated because it is
painful and dysfunctional. Over the past decade or so, clinical
researchers in major trauma centers
dealing
with massively traumatized limbs have attempted to develop scoring
systems to assist clinicians and patients and their families in the
decision-making process. The surgeon and patient must decide whether
early amputation is indicated for a mangled limb, or whether the major
repeated surgeries required to salvage the limb would leave the patient
with an extremity more useful than a below-knee prosthesis (Table 24.8).
 |
|
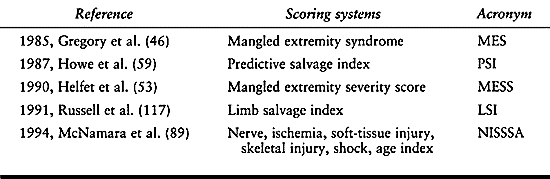
Table 24.8. Mangled Limb Scoring Systems
|
most recent and most complete is the NISSSA (for nerve injury,
ischemia, soft tissue injury, skeletal injury, shock, and age of
patient) (Table 24.10).
The literature on the reliability of these indices is mixed, however.
In looking at the outcomes of free microvascularized flaps to the
tibia, Laughlin et al. (76) in 14 open
fractures, 8 grade IIIB, and 6 grade IIIC, experienced one related
death and four early amputations. Of the remaining nine, six became
infected, but all cleared with treatment and all of the fractures
healed. Eight of the nine patients eventually returned to work, six to
their preinjury occupations.
 |
|
Table 24.9. Mangled Extremity Severity Score
|
 |
|
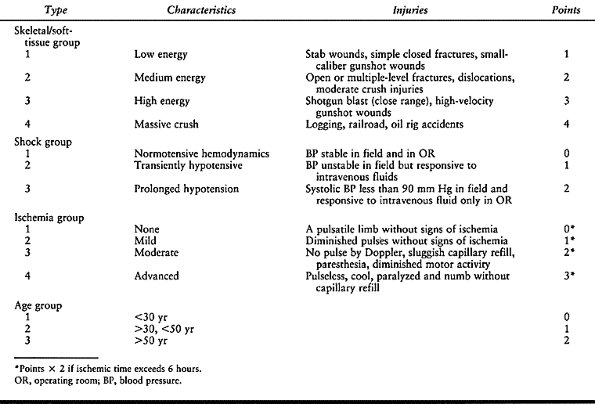
Table 24.10. NISSSA Rating Criteria
|
study of 45 grade III open tibial fractures, performed free flaps in
78% with a 97% success rate of the flaps and overall salvage rate of
98%. There is little question that most limbs are salvageable using
modern surgical techniques. Slauterbeck et al. (133),
in a retrospective study of 43 severe open fractures, found the MESS to
be accurate, as all nine limbs with a MESS greater than 7 went on to
amputation and 34 with a score of less than 7 were salvaged.
retrospective review of 152 open fractures, also found the MESS to be
accurate in predicting the need for amputation but found that the score
was not as reliable in predicting outcomes in young people with
moderate injuries who had experienced no shock and who had an arterial
injury requiring repair. Survival of the limb in this group was higher
than the score would predict.
compared 16 limbs salvaged with a free flap, with 18 that were treated
early with below-knee amputation. In the salvaged group, he found an
increased incidence of complications, an increased number of operative
procedures, and an increased length of stay in the hospital.
Furthermore, these patients were more likely to report themselves as
severely disabled, and they reported less satisfactory performance in
their occupational and recreational activities. Bonanni et al. (15)
did a retrospective review of 89 severe open tibial fractures of which
58 were salvaged and 31 went on to primary amputation. They evaluated
the MES, MESS, predictive salvage index (PSI), and limb salvage index
(LSI) and found no predictive value in any of these measuring tools. Of
the 58 that were salvaged, 31% eventually went on to delayed amputation.
room, or for that matter at the time of initial surgery, the full
extent of injury to a limb. For that reason, I prefer to follow the
simple guidelines of Lange et al. (74), erring
on the side of preservation rather than amputation unless the limb is
obviously nonsalvageable, or unless the limb presents a threat to the
patient’s life. It is critical, however, to take an early second look
at the limb, at which time a definitive decision can usually be made.
It is important to involve patients and their families as much as
possible in this decision-making process.
a patient from initial admission with a severely mangled limb that in
the long run is not going to be salvageable or function better for the
patient than a below-knee prosthesis. Lange et al. (74)
have developed guidelines for primary amputation. In type IIIC
fractures (i.e., those with a vascular injury requiring repair),
primary amputation is indicated when the posterior tibial nerve is
transected, or in crush injuries where the warm ischemia time is
greater than 6 hours. Relative indications are serious associated
polytrauma, severe ipsilateral foot trauma, or an anticipated
protracted course to obtain soft-tissue coverage or tibial
reconstitution. Consider primary amputation if one of the absolute
indications or two or three of the relative indications are present.
These criteria and the decision-making variables are listed in Table 24.11.
 |
|
Table 24.11. Amputation versus Limb Salvage
|
emphasized the importance of making the decision to amputate early.
They eventually amputated in the cases of seven of nine type IIIC open
fractures because of pain, sepsis, nonunion, or failure of the vascular
repair. The results in the two that were salvaged were poor.
-
After addressing life- or
limb-threatening emergencies, take a complete history and perform a
physical examination. Carefully examine the involved extremity. In
particular, look for any evidence of open injury, compromise of
neurovascular function, or evidence of impending compartment syndrome.
Record your findings. -
Gently restore the leg to grossly normal
alignment, control hemorrhage from wounds with a compression dressing,
and dress all open wounds with povidine-soaked sterile dressings. Apply
a long-leg, well-padded splint. -
Elevate the limb on a pillow 10 cm above
the level of the heart. Take anteroposterior (AP) and lateral
radiographs that include the knee and ankle.
Traction may be indicated to overcome unacceptable shortening that
cannot be corrected by closed reduction, particularly in neglected
fractures, although modern external fixators that provide distraction
have limited the usefulness of this technique. Traction is most
commonly used to maintain length when severe soft-tissue injury or
other considerations make immediate incorporation in a cast or splint
or performance of internal fixation impossible. Because traction may be
followed by internal fixation, it is important to avoid pin-track
complications.
-
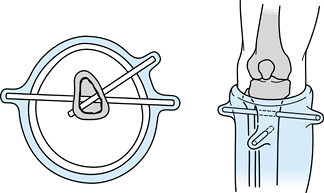
Place a transverse, smooth, Kirschner wire through the distal tibia (Fig. 24.7).
Place povidine-soaked or dry sterile × gauze pads over the wire, using
enough to prevent the wire from sliding. If internal fixation of the
tibia is planned, place the wire in a similar fashion through the
calcaneus.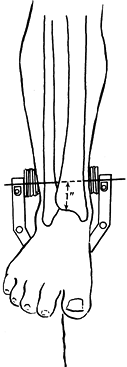 Figure 24.7.
Kirschner wire traction for fractures of the tibia and fibula. (From
Chapman MW. Fractures of the Tibial and Fibular Shafts. In: Evarts CM,
ed.Surgery of the Musculoskeletal System. New York: Churchill-Livingston, 1983, with permission.) -
Apply a traction bow that is large enough to fit around the foot.
-
Support the fracture on a Böhler-Braun frame, a suspended Thomas splint, or a pillow (see Chapter 10).
movement of the ankle and avoid equinus contraction. Isometric
exercises of the muscles in the lower extremity and limited knee motion
are often possible in traction. As soon as length is regained or the
soft-tissue problem is resolved, discontinue traction and implement
other methods of stabilization.
is the most commonly used method for treating fractures of the tibia
and the fibula. Weight-bearing methods were popularized by Dehne (27,28 and 29), Brown (20), and Sarmiento (120,121,122,123,124,125 and 126).
I almost never use non-weight-bearing casts. The technique of applying
an immediate weight-bearing cast is demanding and requires as much
motor skill as internal fixation.
cast or brace as soon as early axial and translational stability are
present, usually about 4–6 weeks after injury. Use a Sarmiento cast
initially in stable fractures in the distal half of the tibia.
require a regional or general anesthetic if the patient is cooperative.
Medicate him well, and use local anesthesia. Place a padded crutch or
board beneath the thigh and secure it to the table. Gently place hand
traction on the leg and position it as illustrated in Figure 24.8.
 |
|
Figure 24.8.
Position for application of a Sarmiento, short-leg, or the initial portion of a long-leg plaster cast for a fracture of the tibia. (From Chapman MW. Fractures of the Tibial and Fibular Shafts. In: Evarts CM, ed.Surgery of the Musculoskeletal System. New York: Churchill-Livingston, 1983, with permission.) |
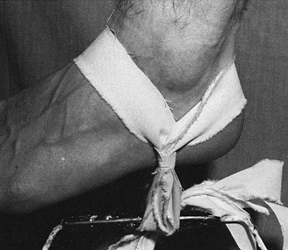 |
|
Figure 24.9. Removable ankle traction bandage. (From Chapman MW. Fractures of the Tibial and Fibular Shafts. In: Evarts CM, ed.Surgery of the Musculoskeletal System. New York: Churchill-Livingston, 1983, with permission.)
|
-
Cut a strip of muslin 65 cm in length and 2.5 cm wide, and bring the ends together. Make a second strip.
-
Place one strip over the instep and one
over the heel, and connect them with 12 mm tape level with the bottom
of the foot. Locate the junction of the strips directly below the
malleoli. Apply a thin layer of petroleum jelly beneath each strip to
ease removal. -
Tie a bucket of water to the strips or
use a foot loop. Apply enough traction (add water or increase foot
pressure) to stabilize the fracture and achieve alignment. -
After cast application, cut the tape,
remove the strips completely, and seal the cast. Do not leave the
traction bandages in the cast, as they can cause pressure sores.
 |
|
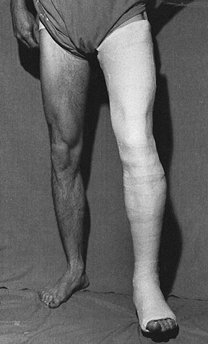
Figure 24.10. Long-leg weight-bearing cast. (From Chapman MW. Fractures of the Tibial and Fibular Shafts. In: Evarts CM, ed.Surgery of the Musculoskeletal System. New York: Churchill-Livingston, 1983, with permission.)
|
-
Apply the short-leg section first up to the mid patella.
-
Place a 15–20 cm piece of tubular stockinet at each end of the cast for trimming.
-
Apply a double layer of cast padding with a triple layer over bony prominences. It must be free of wrinkles.
-
Dip one 10 cm roll and three 15 cm rolls
of plaster into 72°F water. Apply the 10 cm roll about the foot and
ankle and follow with the 15 cm rolls. Apply rapidly and smoothly.
Place tucks posteriorly. -
Mold the cast as it sets. Mold in the
transverse and longitudinal arches of the foot and about the malleoli.
The malleolar molding produces a posterior bulge for the Achilles
tendon. Smooth the cast along the entire anteromedial border of the
tibia. As the plaster sets, mold posteriorly to push the leg anteriorly
to fit against the smooth anterior aspect of the cast. The cast should
assume a triangular shape with a slight bulge for the sharp anterior
border of the tibia and relatively flat surfaces over the posterior and
anterior compartments and medial surface. Fit the cast to the medial
and lateral flares of the proximal tibia. -
When the cast has set, extend the knee. Remove the ankle bandage. Trim the proximal end of the cast.
-
Apply the thigh portion of the cast.
Support the cast at the fracture site with the foot against an
assistant’s chest (or use a leg holder). Keep the knee flexed 5° short
of full extension. Wrap on two layers of cast padding. Apply three or
four 15 cm rolls of plaster. Extend proximally to the greater
trochanter. -
Mold the cast above the medial and
lateral epicondyles. This molding technique causes posterior bulging,
which creates a channel for the hamstring tendons. Proximally, mold the
cast over the anterior and lateral surfaces to produce a quadrilateral
socket. This molding produces a snug fit over the greater trochanter
and femoral triangle, which creates a channel for the adductor and
hamstring tendons. -
Trim the ends of the cast, reinforce the foot, and apply a walker or walking boot.
-
In acute fractures where swelling is a
risk, place a single longitudinal cut along the full length of the
anterior aspect of the cast over the muscle of the anterior compartment
and spread the cast as needed. Reseal when the swelling resolves.
-
After applying the below-knee cast as
just described, carry the padding and plaster 5 cm proximal to the
patella. Mold the leg portion of the cast and extend the knee to 45° of
flexion. -
Mold the plaster to the flares of the
tibia and over both femoral epicondyles. Mold the cast to gently grip
the epicondyles, thereby creating an anterior channel for the patella
and patellar tendon and a posterior channel for the hamstrings. Flatten
the popliteal fossa to keep the leg against the anterior aspect of the
cast. -
Trim the cast (Fig. 24.11).
Notice that it is above the patella to avoid patellar impingement and
give good support. Trim out the popliteal fossa to allow the amount of
flexion desired. You may choose to limit flexion to 45° initially and
then gradually increase it as fracture stability increases.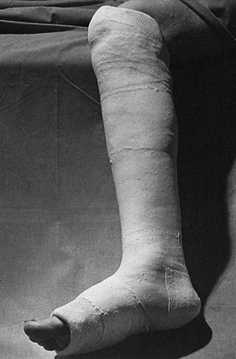 Figure 24.11. Sarmiento type cast. (From Chapman MW. Fractures of the Tibial and Fibular Shafts. In: Evarts CM, ed.Surgery of the Musculoskeletal System. New York: Churchill-Livingston, 1983, with permission.)
to be out of bed within 1–2 days and to bear weight as tolerated. The
typical patient requires at least 3 weeks and up to 6 weeks to achieve
full, unsupported weight bearing. The patient should strive to be
independent of crutches by 6 weeks. Begin isometric exercises for all
muscle groups
immobilized
in the cast. It is important to follow the patient at weekly intervals
for the first 4–6 weeks when weight-bearing methods are used. Loss of
reduction must be corrected early to avoid malunion.
stability of the fracture. Stable fracture patterns and those that gain
stability early may be converted to a Sarmiento cast or fracture-brace
as early as 4 weeks. Protect tibial fractures for at least 12 weeks.
The average healing time is 16–24 weeks. Fracture instability after 24
weeks is considered a delayed union.
 |
|
Figure 24.12.
Sarmiento type fracture brace with free ankle hinge. (From Chapman MW. Fractures of the Tibial and Fibular Shafts. In: Evarts CM, ed.Surgery of the Musculoskeletal System. New York: Churchill-Livingston, 1983, with permission.) |
fixators, I almost never use the pins-and-plaster technique. When pins
in plaster are used, at least three pins, two of which must be full
pins, are required. External fixation requires only four half-pins and
is much quicker and more versatile, so there is no reason to use pins
in plaster. However, as it is a simple and inexpensive method, it
continues to enjoy wide use, particularly in underdeveloped countries (5). I prefer a three-pin technique using a short-leg cast (Fig. 24.13).
 |
|
Figure 24.13. Pins in plaster—two pin technique. (From Chapman MW. Fractures of the Tibial and Fibular Shafts. In: Evarts CM, ed.Surgery of the Musculoskeletal System. New York: Churchill-Livingston, 1983, with permission.)
|
-
When pins are used in plaster, at least
two proximal pins are needed to control the proximal fragment, and then
only a short-leg cast is needed. -
Insert one large transverse Steinmann pin
just distal to the tibial tubercle. Insert a second pin from anterior
to posterior, slightly distal to the first pin. Engage the posterior
cortex, but do not penetrate the soft tissues because of the risk of
neurovascular injury. Leave the pins protruding 5 cm, and incorporate
them into the cast. Use a distal transverse pin if necessary for the
distal fragment.
so weight bearing is usually contraindicated. Some patients can perform
partial weight bearing with crutches if a distal pin is not used. If a
distal pin is used, weight bearing is contraindicated. When this method
is properly applied, and in the absence of complaints from the patient,
inspection of the pin sites is unnecessary until cast removal. In
stable patterns with rapid healing, remove the pins by 4–6 weeks and
convert to a weight-bearing cast. In unstable patterns, prolonged
immobilization may be necessary. Prolonged immobilization in pins and
plaster is often complicated by delayed union and nonunion, and it may
necessitate bone grafting.
basic principles of insertion of external fixation pins and application
of simple fixators, as well as pin care and the general postoperative
regimen for external fixation. The focus in this section will be on
external fixation of the shaft of the tibia.
proximal quarter of the tibia or the ankle joint may require special
fixators, especially those using tensioned wires or hybrid fixators
(see Chapter 23 on fractures of the tibial plateau, and Chapter 25 on ankle fractures). Other than Ilizarov fixators (Chapter 32),
the most commonly used external fixators for the diaphysis of the tibia
are those in which half-pins are inserted along a rigid, single-piece
bar or tube, or into which pins are inserted either individually or as
clusters through articulated pin holders that are mounted on an
adjustable tube or bar or series of bars. Many interesting and useful
combinations are commercially available.
Hoffmann-type external fixators, which used through-and-through pins in
clusters of up to four. Modern external fixators make such pin designs
obsolete and therefore will not be described here. I still use some
through-and-through pin fixator configurations for the tibia—in
particular, a type of delta frame for pylon fractures (Chapter 25).
versatile. With their components, complex fixators can be built to meet
almost any challenging combination of problems. The major disadvantage
of fixators where the half-pins are mounted on a single bar is that the
fracture must be nearly anatomically reduced during the application of
the fixator; after application, there is minimal opportunity to make
adjustments and achieve anatomic position. In addition, it is very
difficult to “dynamize” these fixators when weight bearing across the
fracture site becomes desirable.
fixation rods, assuming more than one were initially applied, or by
removing frames in other planes, assuming more than one plane was used.
Adjusting the pin length also can achieve some element of dynamization,
but the result is a type of cantilevered motion. The most recent
designs, based mostly on tubes, incorporate mechanisms for allowing
controlled dynamization of the fracture site over given amounts of
compression at different spring-loads.
through cortical bone. For biomechanical reasons, it is desirable to
have one set of pins in the proximal and distal fragment, as far from
the fracture as practical, and a second set as close to the fracture
site as practical. In the former, I always try to keep the pin at the
metaphyseal–diaphyseal junction, so that the pin is transgressing some
cortical bone rather than being placed in pure cancellous bone.
pins approximately 25–30 mm away from the fracture site or the area of
nearest fracture line, to avoid accidentally inserting the pin through
an unseen crack, and to minimize the risk of communication of the pin
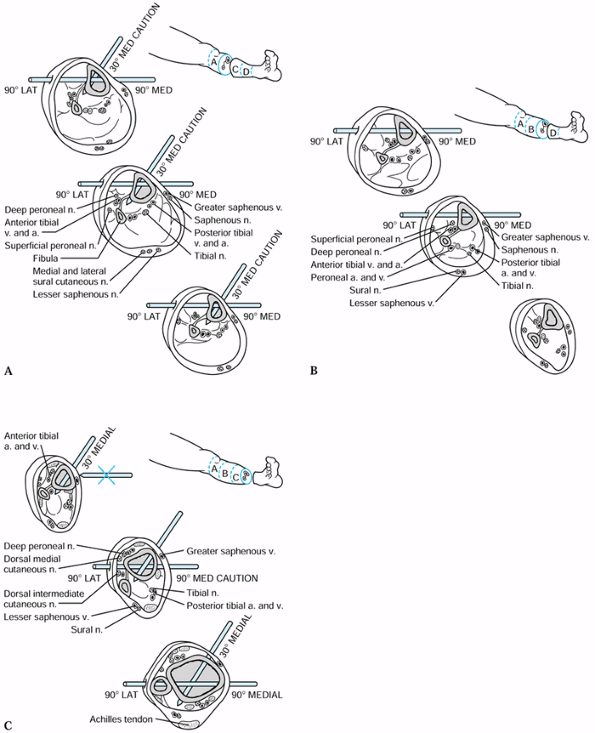
with the fracture hematoma. Because of the neurovascular structures in
the leg, it is important to be aware of the safe anatomic corridors of
pin insertion along the length of the tibia. These have been well
described by Stuart Green (45), who divides the leg into four segments—A, B, C, and D—each representing a quarter section of the leg (Fig. 24.14).
 |
|
Figure 24.14. Cross-sectional anatomy of the leg for external fixator pin placement, zones B, C, and D illustrated here. (From Green SA. External Skeletal Fixation: Causes, Prevention, and Treatment. Springfield, IL: CC Thomas, 1981, with permission.)
|
-
In zone A, the risk of injury to nerves
and vessels is small, as they lie posterior to the tibia. The common
peroneal nerve divisions and anterior tibial artery and vein lie close
to the fibula. -
In zone B, pin placement in the usual
locations does not threaten the neurovascular bundles unless the soft
tissues are penetrated too deeply posteriorly or the pin angle is
incorrect. Be cautious with 30° medial half-pins. -
In zone D, the anterior tibial artery and
nerve are closely applied to the tibia and pass from mid tibia to
anterior tibia as they travel distally. Transverse pins in the proximal
third of this section are contraindicated. Place other pins with
caution.
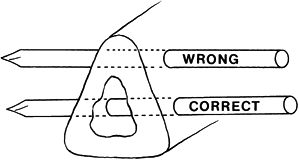
Driving pins through the solid anterior cortex can cause overheating
and bone necrosis, which is often followed quickly by pin-loosening
infection and osteomyelitis.
 |
|
Figure 24.15.
Location for full and half pin placement: Avoid the anterior cortex, and place pins through the middle of the medullary canal. (From Chapman MW. Fractures of the Tibial and Fibular Shafts. In: Evarts CM, ed.Surgery of the Musculoskeletal System. New York: Churchill-Livingston, 1983, with permission.) |
selection of the frame. The configuration must offer sufficient
strength to adequately immobilize the fracture and should use the least
injured soft tissue and bone for the pin sites. The frame must be
constructed to allow optimal access for subsequent surgical
debridements and reconstructive procedures, such as local, rotational,
or free soft-tissue flaps.
pointed out that the sagittal bending moments in the leg are about two
to five times larger than those in the coronal plane. For that reason,
the primary frame is best located as close as possible to the
anterior–posterior plane. To maximize the initial stiffness of the
frames, they advise increasing the spread of pins in each main
fragment, reducing the distance between the bone and longitudinal rod,
adding a second rod to the same pins, or adding a second half-frame as
close as possible to 90° to the plane of the first frame.
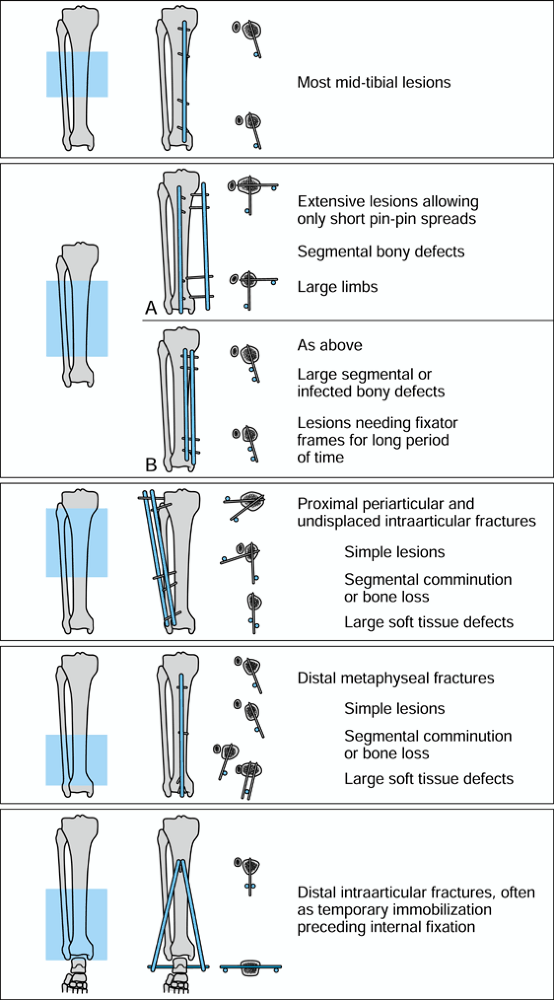
fractures, of which 54 were open, and found that simple, one-plane
frames were adequate for over 80%. In their series, 5 mm
stainless-steel pins were used. Further stiffness can be obtained by
using 6 mm pins. They encouraged their patients to try early partial
weight bearing, progressing to full weight bearing as the fracture
healed. They increased the load transmission across the fracture by the
techniques previously described, including loosening the central pin
articulations in their half-frames.
 |
|
Figure 24.16.
Behrens and Searls’ recommendations for different frame configurations based on location and type of fracture. (Redrawn from Behrens F, Searls K. External Fixation of the Tibia, Basic Concepts and Prospective Evaluation. J Bone Joint Surg Br 1986;68;246, with permission.) |
unilateral plane and Delta frame fixator; the basic principles of these
frames apply to many similar frames. I also describe the application of
one of the more modern, sophisticated articulated frames that permit
controlled dynamization. Again, the general principles are applicable
to many others. Be sure to refer to the manufacturer’s instruction
manual for the specific frame you use.
-
With the single-bar frame, place the pins
at right angles to the subcutaneous surface of the tibia, through the
center of the bone. At the junction of the middle and distal thirds,
avoid injury to the anterior tibial neurovascular bundle. If two
half-pin frames will be used, place the first frame about 1 cm
posterior to the anterior ridge of the tibia and close to the sagittal
plane. Place the second frame 1 cm anterior to the posterior border of
the tibia in the lateral plane. The angle between these two frames will
be 60° to 90°. -
Place the first pin just distal to the tibial tubercle using appropriate technique with predrilling as described in Chapter 11. (For purposes of this discussion, assume the fracture is mid diaphyseal.)
-
Reduce the fracture. Precise reduction is not required, but the rotational alignment must be nearly normal.
-
Insert the distalmost pin about 5 cm proximal to the ankle joint, in alignment with the proximal pin.
-
Assemble four universal pin holders on
the appropriate-length AO carbon fiber bar and secure the outermost
holders to the two pins in place (Fig. 24.17).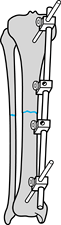 Figure 24.17.
Application of anteromedial half-pin single-plane AO external fixator.
All four universal clamps are on the fixator bar. Place the most
proximal and distal Schanz screws first. Align the fractures. -
Anatomically reduce the fracture. Secure
the bar to the pins with the bar about 2.5 cm from the skin, unless
greater distance is needed for wound care. -
While maintaining reduction, insert a
second pin into the proximal fragment and the last pin into the distal
fragment. Insert the pins through the universal pin holders, which act
as guides, using the drill sleeve assembly. Place the pins about 2.5 cm
from the fracture site, assuming there are no bone or skin problems to
contraindicate this location. -
If the reduction is imperfect, loosen all
universal clamps slightly and achieve a reduction as close to anatomic
as possible. Tighten the pin clamps. -
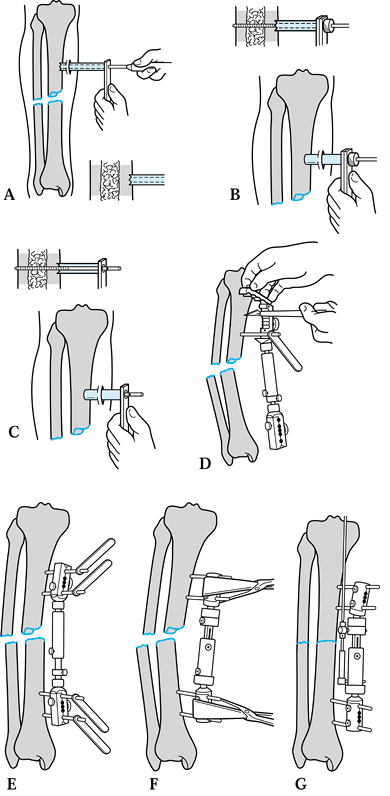
If the fracture configuration allows, place it in compression, using hand pressure or the compression device (Fig. 24.18).
Once the first half-pin frame is in place, application of a second
frame is far simpler, because the fracture is already reduced. Follow
the same technique. When two frames are used, use bars that are long
enough to attach cross-connecting bars at each end.![]() Figure 24.18.
Figure 24.18.
Final configuration of single-plane AO external fixator. Place the two
additional Schanz screws using the universal pin clamps as guides.
Achieve compression across the fracture if possible.
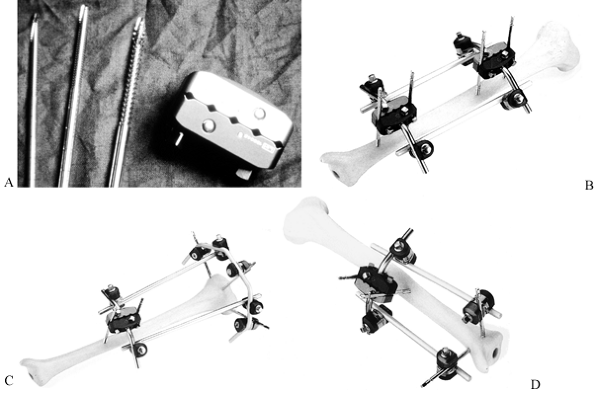
of external fixation frames from the original design to a more
sophisticated system. It allows use of single pins or clustered pins in
almost any arrangement. Although it is always a good idea to have the
limb roughly aligned as the initial fixator is applied, the frame
allows reduction of the fracture after application of the fixation
pins. Fracture manipulation tools are provided that apply to the frame (Fig. 24.19).
 |
|
Figure 24.19. Hoffmann II (Howmedica, Rutherford, NJ) external fixator. See text for details. A: Apex one-step pins and pin clamp. B: Unilateral fixation frame. C: Semicircular fixation frame for proximal tibial shaft fractures. D:
Independent pin placement frame for distal tibial shaft fractures. (Photos courtesy of Stryker Osteonics Howmedica, Rutherford, NJ.) |
5 mm, self-drilling, self-tapping pins, and 6 mm blunt pins that
require predrilling. A pin-to-rod coupling provides connection to the
frame for a single pin with allowances for full three-dimensional
rotation, and it accommodates 4 and 5 mm Apex pins. The spring-loaded
mechanism allows snap-fit fixation and attaches to 8 mm rods. The pin
coupling is locked through an easily accessible four-sided bolt mounted
on its end. The pin clamp shown holds multiple pins, as in the original
Hoffmann system.
-
Open the rod-to-rod and pin-to-rod
couplings until the mechanical stop is reached, to guarantee proper
snap fit of the component. -
Face all 7 mm square-head screws upward or to the outside of the fixator to facilitate adjustment.
-
Do not bend connecting rods.
-
Always use Apex pins with this device.
-
Carefully think through the frame
configuration to be used before applying it. Take into consideration
the size of the patient, bone quality, fracture configuration, and need
for soft-tissue reconstructive procedures.
two pin-clamp assemblies without posts, four 30° posts, four 8 mm
rod-to-rod couplings, and four 5 mm one-step Apex pins (Fig. 24.19B).
-
Obtain and maintain approximate alignment of the fracture.
-
Insert the most proximal and most distal
5 mm pins through a small stab wound on the anterior surface of the
tibia, as close as possible to the AP plane. Avoid the thick anterior
ridge of the tibia. -
Insert the pins with the hand-powered
drill brace and appropriate-sized chuck. Use firm pressure; avoid
excessive insertion speed to avoid overheating the pin and bone. -
Apply a pin clamp assembly to the
proximal pin. Use it as a guide to insert the second pin as close as
practical to the fracture site through the outside pin site. -
Repeat this procedure on the distal fragment.
-
Insert 30° angled posts in an inverted V position (they can be assembled before you apply them to the pins).
-
Connect the two pin-clamp assemblies
together using four rod-to-rod couplings and 8 mm connecting rods of
appropriate lengths and material. -
Hint: Keep rod-to-rod couplings on the
inside of the frame and connecting rods as short as possible to
increase stability of the frame. -
If the fracture is not anatomically
reduced or not in the desired position, the rod-to-rod couplings can
now be loosened and final position obtained either by direct
manipulation of the fracture or with the use of the reduction wrench.
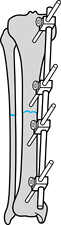
is applicable to fractures of the proximal shaft at the
metaphyseal–diaphyseal junction, where an array of pins parallel to the
tibial plateau and at different angles is desired to improve the
strength of proximal fixation.
semicircular rod; two 8 mm connecting rods; three 8/4, 5 mm pin-to-rod
couplings; four 8/8 mm rod-to-rod couplings; one pin clamp assembly
with no post; two 30° angled posts; and five 5 mm one-step Apex pins.
-
Using the semicircular rod as a guide, insert three pins into the proximal tibia in a unilateral bicortical fashion.
-
Connect the single pins to the semicircular rod using the pin-to-rod couplings.
-
Place a classical parallel pin assembly with two 30° angled posts in an inverted V position as illustrated in Figure 24.19C and as described for the previous unilateral frame.
-
Reduce the fracture and connect the
pin-clamp assembly to the semicircular aluminum rod using four
rod-to-rod couplings and manipulating the fracture either directly or
with the assistance of the reduction wrench.
recommended for extraarticular fractures of the shaft at the
metaphyseal–diaphyseal junction (Fig. 24.19D).
one pin-clamp assembly with no post, two 30° posts, two 8/8 rod-to-rod
couplings, two 5 mm 8/4 pin-to-rod couplings, and four 5 mm pins.
-
Achieve approximate reduction of the fracture.
-
Place a classical parallel pin assembly in the proximal fragment as illustrated in Figure 24.19D and as described previously.
-
Independently, insert a 5 mm Apex pin
into the medial surface of the tibia in the transverse plane, proximal
and parallel to the ankle joint. Place a similar pin in the AP plane. -
Connect the proximal pin clamp assembly
to the distal pins using pin-to-rod couplings and rod-to-rod couplings;
use connecting rods of appropriate length and material. -
Achieve final reduction of the fracture if necessary by loosening the couplings to the rods and retightening after reduction.
(DAF) has been employed widely for limb lengthening as well as fracture
fixation. It uses half-pins for cortical and cancellous bone, with
tapered threads that are designed to offer more uniform fixation in
both the near and far cortex. Pins are inserted in parallel arrays
through clustered pin holders like those the Hoffmann II uses, and the
body of the fixator has ball joints for reduction of the fracture and
final alignment. It provides for distraction and compression and
dynamization as well. The pins can be placed transversely for the
management of fractures at either end of the shaft of the tibia with
the potential configurations seen in Figure 24.20. The components and instrumentation are illustrated in Figure 24.21.
 |
|
Figure 24.20. Configurations for Orthofix Dynamic Axial Fixator (DAF). See text for details. A: Proximal tibial fracture using the T-pin clamp proximally. B: Midshaft tibial fracture with standard DAF. C: Pylon fracture of the distal tibia and ankle joint with articulated pin holder using pins in the talus and calcaneus. D: Severely comminuted fracture of the tibial plateaus with a fixator bridging the knee joint.
|
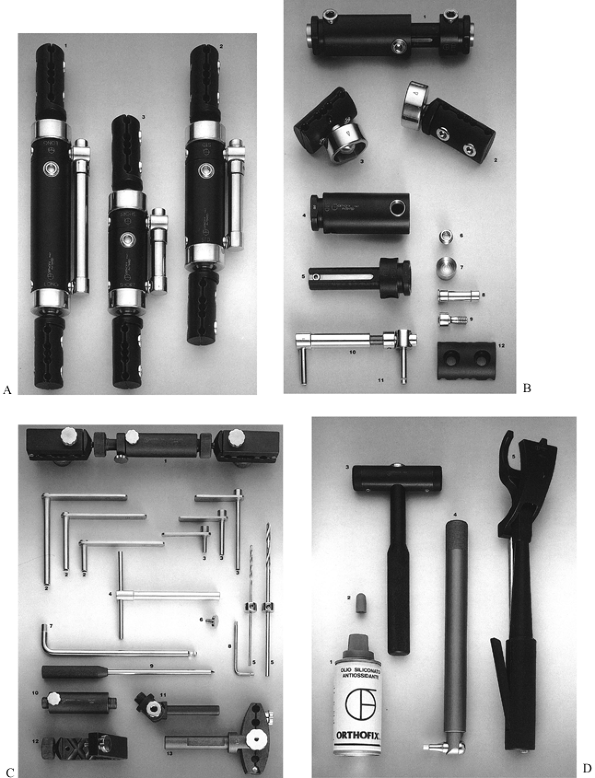 |
|
Figure 24.21. A: Standard (2), long (1), and short (3) dynamic axial fixators (DAFs). B: DAF components. Central body (1). Straight-pin clamp (2). T-pin clamp (1). Component parts of the DAF (4–9). Distraction/compression module (10,11). Pin clamp cover (12). C: DAF instrumentation and components. Assembly guide template (1). Screw guide (2). Screw guide (3). T-wrench (4). Drill bits (3.2, 4.8 mm) (5). Template locking screw (6). 6 mm polyhedral Allen wrench (7). 3 mm Allen wrench (8). Tapered trocar (9). Template body for short fixator (10). Template accessory for articulated bodies (11). Angled template clamp (12). Template accessory for articulated body (13). D: DAF instrumentation. Silicone oil aerosol (1). Sterilizable screw covers (2). Interchangeable head hammer (3). Torque wrench (4). Fixator self-locking manipulation forceps (provided as a pair) (5). (Courtesy of Linda Krugman, Orthofix, Richardson, TX.)
|
-
Obtain approximate reduction of the
fracture and lay a template or fixator along the subcutaneous border of
the tibia to determine the approximate location of the
P.790
incisions
for the screws, in particular to locate the most proximal screw, which
will be placed first. Orient the fixator into either the anterior or
medial/lateral plane as desired. -
At the location of the proximal screw,
make a longitudinal incision sufficient to accept the screw guide. Cut
down to the periosteum, and gently elevate it at the screw site with a
small elevator. -
Insert a trocar into the correct-length
screw guide under fluoroscopic control, making sure that the guide is
perpendicular to the longitudinal axis of the bone. Make a pilot notch
with the trocar. Withdraw the trocar from the guide, maintaining
pressure on the screw guide handle. Using a mallet, tap the screw guide
lightly to engage the cortex with its teeth (Fig. 24.22A).![]() Figure 24.22. Application of dynamic axial fixator (DAF). See text for full details. A: Insertion of the drill guide and trocar. B: Drilling the hole for a screw. C: Insertion of the screw. D: Application of the template to the first screw. E: Insertion of the remaining screws. F: Application of the DAF and reduction of the fracture. G: Compression of the fracture. (Courtesy of Linda Krugman, Orthofix, Richardson, TX.)
Figure 24.22. Application of dynamic axial fixator (DAF). See text for full details. A: Insertion of the drill guide and trocar. B: Drilling the hole for a screw. C: Insertion of the screw. D: Application of the template to the first screw. E: Insertion of the remaining screws. F: Application of the DAF and reduction of the fracture. G: Compression of the fracture. (Courtesy of Linda Krugman, Orthofix, Richardson, TX.) -
Remove the drill bit and drill guide
while maintaining pressure on the screw guide handle. Insert the
selected screw into the screw guide using the T-wrench.
Under fluoroscopic control, insert the screw until at least two threads
protrude beyond the second cortex. Since these screws are tapered, they
cannot be repositioned by turning counterclockwise without loosening
the screw (Fig. 24.22C). -
Leave the screw guide on the screw and apply one end of the template using the most external hole (Fig. 24.22D).
-
Adjust the template body to the correct
length and place drill sleeves into the second hole to be used in the
proximal template clamp and into two holes in the distal. Place the
screws as widely separated as the clamps will allow. In good-quality
bone where the fixator will be reasonably close to the limb, two screws
are usually enough. A third screw can be added when bone quality is
poor or the fixator body is to be mounted at a significant distance
from the limb. Note that to permit final adjustment at the fracture
site, the body of the fixator must not be either fully compressed or
fully extended. Although the ball joints of the fixator allow for final
adjustment of position, and the body allows for additional compression
or distraction, it is important to reduce the fracture as close to
anatomic as possible while applying the fixator. Adjustments will be
easiest if the body is kept parallel to the long axis of the diaphysis (Fig. 24.22E). -
Next, insert the most distal screw and then the two inner screws using the technique just described.
-
Remove the template and attach the
Orthofix DAF. Be certain that the body-locking screw is on the outside.
Have the dot and arrow on the cam mechanism and the screws on the
clamps facing upward to facilitate adjusting and locking the fixator.
Position the fixator at least 1 cm from the skin and tighten the clamp
screws using the Allen wrench (Fig. 24.22F). -
Achieve final reduction using the
manipulation forceps, and then lock the cams and body-locking screw.
Final locking of the cams employs the torque wrench that should be
turned until the first click (Fig. 24.22F). -
Compression and distraction can be achieved by using the compressor distractor unit (Fig. 24.22G).
as the pins remain tight in bone, and skin necrosis does not occur,
infection rarely becomes a problem. When swelling decreases, skin
tension will sometimes develop on one side of a pin. Incise the skin on
the tension side (where the skin is gathered against the pin) to
relieve pressure. Dress the pins with sterile dressings. Light pressure
on the skin limits skin motion and decreases the infection rate.
them to wash the frame and skin around the pin sites daily with mild
soap, using a soft toothbrush on the skin around the pin sites and a
soft surgical brush on the frame. All exudate must be removed from the
skin. After showering, they should dry the frame and skin with a
freshly laundered towel and then place ×-inch dressings on the pin
sites with clips to minimize skin motion on the pins (Chapter 11). Advise patients to wear pants to protect the frame and skin.
achieved, the patient can begin partial weight bearing with crutches.
Start with the weight of the leg. Once some fracture stability is
achieved, usually between 6 and 12 weeks, allow the patient to progress
to full weight bearing if the fracture and type of fixator permit. If
weight bearing is permitted, frequent follow-up is necessary to ensure
that the frame and pins remain tight and no displacement of the
fracture occurs. Give your patients a wrench and ask them to check all
fittings on a daily basis.
contact, as well as those that have been bone-grafted, can be expected
to unite in the external fixator. As fracture stability increases,
alter the frame design or use adjustments allowed by the frame design
to reduce its stiffness to allow more weight bearing through the bone.
In double half-pin fixators, the most medial frame can often be removed
in 6–12 weeks. The same is true for delta frames, which can be reduced
to the single anterior frame. Initially, a second bar can be mounted on
the single-bar frame to increase its rigidity; the second bar is
removed
later. Further flexibility can be achieved by moving the bar farther away from the skin.
the fracture for stability at 4- to 6-week intervals. When clinical
stability is present, remove the fixator and place the patient in a
short-leg fracture brace. If you question the adequacy of stability,
leave the pins in place and the frame off for 1 week to be certain the
fracture does not change position. Reapply the frame if it does.
Patient preference and pin problems can also precipitate early removal.
If the fracture is unstable at the time of removal, shortening and
deformity are common. Good immobilization in an appropriate cast or
brace is important. In some cases, conversion to internal fixation may
be desirable, but be advised that the infection rate is higher when
internal fixation is preceded by external fixation.
nails and closed technique. In these cases, remove the fixator,
immobilize the fracture with a cast until the pin tracks are clean and
dry, and then proceed with internal fixation. Do not use intramedullary
nailing if the external fixator pins have been infected. Some surgeons
advocate using external fixators only until soft-tissue problems in
open fractures are resolved with early conversion to an intramedullary
nail (Table 24.7).
pin-track drainage or infection. If a pin persistently drains, or is
painful, most likely it is infected and loose. Loosen the clamp holding
the pin and gently wiggle the pin back and forth. Usually it is loose
in the near cortex. A radiograph may show a radiolucent zone around the
pin.
least 15 mm away from the loose pin. If you cannot do so, try to get
along with fewer pins, or remove the frame. If the pin is tight, then
soft-tissue care with debridement, drainage, and local antibiotics or
antiseptics is appropriate. Oral antibiotics are occasionally useful as
well.
positions used are similar. I prefer to use a fracture table with
skeletal traction through the calcaneus. This setup (Fig. 24.23)
offers the best opportunity to reduce the fracture before inserting the
nail. More important, it allows the reduction to be maintained during
the procedure. It also facilitates fluoroscopic visualization of the
extremity.
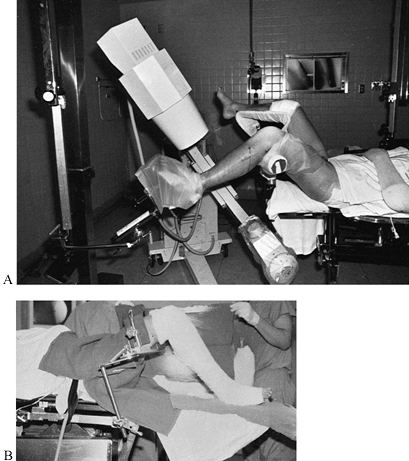 |
|
Figure 24.23. Setup for intramedullary nailing of the tibia. A:
Chick-Langren fracture table set up for tibial nailing. The foot is in a foot holder. The thigh bolster is above the popliteal fossa. B: Setup on a regular radiolucent operating table using an arthroscopic leg holder. |
-
On a Chick-Langren fracture table
(Kirshner Medical, Greenwood, SC), place the uninjured lower extremity
in a well-padded leg holder with the hip and knee flexed to 90° and
abducted to give access for the C-arm. -
Position the injured extremity over a
well-padded thigh support placed on the distal thigh. Avoid the
popliteal fossa to avoid neurovascular injury. -
Secure the foot in a well-padded foot
holder, if distal cross locking is not to be done. Alternatively, place
it into a tibial pin traction device attached to a quarter-inch
threaded Steinmann pin. The pin is placed transversely under sterile
conditions through the calcaneus to permit adequate access to the
distal tibia for cross locking. -
Bring the C-arm into place (Fig. 24.23A).
It must be able to rotate unhindered from the AP to the lateral
position, and you must be able to visualize the full length of the
tibia. -
Prepare and drape the tibia so that full
access is available from the knee joint to the ankle joint with the
sheets draping down from the leg to cover the lower head of the C-arm.
When the C-arm is brought into the lateral position, the head should
remain beneath the drapes, preserving the sterile field. Sterilely
drape the uppermost head of the C-arm.
radiolucent top) is used, three alternatives are available for
positioning and maintaining reduction. Using any of these positions,
either open or closed nailing can be carried out with all of the
intramedullary nails with which I am familiar. If closed nailing is to
be carried out, I highly recommend the use of a fracture table.
-
You may place an arthroscopic leg holder
about the thigh and position it to support the lower extremity, with
the knee flexed to 90° and the foot supported on the operating table (Fig. 24.23B). -
Alternatively, abduct the thigh, flexing
the knee to 90°, allowing the foot and tibia to hang vertically off the
side of the operating table. If you use this method, pump the table up
so that the foot is just below your waist. -
The third alternative is to prepare and
drape the extremity and then place a large sterile bolster under the
thigh. Insert one transverse Schanz pin into the proximal tibia and a
second one into the distal tibia or calcaneus. Attach to these an AO
distractor and use it to apply traction to align the fracture.
-
Position the patient and drape the limb in the usual manner for lower extremity surgery. A tourniquet can be used.
-
Make a 5 cm longitudinal incision,
beginning at the level of the tibial tubercle, one fingerbreadth medial
to the tubercle, and extend it proximally to the joint line. Split the
patellar tendon or go to its medial side. Directly beneath this
incision, expose the cortex of the tibia. Perforate the cortex with
either a Küntscher awl or a half-inch drill point just proximal to the
tibial tubercle. Avoid encroaching on the tibial tubercle or the
articular surface. Lottes advocates a large drill point, but I have
found it easier to use Küntscher awls. The disadvantage of the awl is
that in a young patient with dense cancellous
P.795
bone,
sometimes the hole cannot be placed deep enough to actually enter the
medullary canal, and a drill or a reamer may be necessary. -
Direct the entry hole straight down the
medullary canal. The most common mistake is to perforate posteriorly.
Press the handle of the awl or drill against the knee to achieve
alignment with the medullary canal (Fig. 24.24). In the medial-lateral plane, follow the line of the anterior crest of the tibia.![]() Figure 24.24. Entry site for intramedullary nailing of the tibia.
Figure 24.24. Entry site for intramedullary nailing of the tibia. -
Next, select the appropriate-size Lottes
nail. Although it is possible to determine the size preoperatively by
measuring radiographs, it is unnecessary to do so unless the patient is
unusually small or large. Determine nail length by laying the nail on
the leg. Place the proximal end of the nail against the entry site. The
distal end should be within 2.5 cm of the ankle joint, depending on the
level of fracture being treated. Of the two diameters available, 5/16 inch (8 mm) and 3/8 inch (9.5 mm), select the appropriate diameter based on appraisal of the radiographs. -
Flex the knee to 90° or greater. With an
assistant supporting the leg, drive the rod into the proximal fragment,
taking care to maintain proper alignment. -
Avoid perforating the posterior cortex.
The nail must move easily with each blow of the mallet. Impending
impaction of the nail in the proximal fragment is characterized by an
increase in the pitch of the sound of the mallet and by lack of forward
movement of the nail. In the event of impaction, extract the nail and
use a smaller nail. -
Drive the nail until it is at the
fracture site. Ensure that the fracture is well reduced, and drive the
nail into the distal fragment (Fig. 24.25).
Drive the nail until the proximal end is level with bone. Because of
the subcutaneous location of the entry site, too long a nail will
result in a painful bursa. If a nail is found to be too short, extend
it by adding the appropriate-size extension [3/8 inch (13 mm), ¾ inch (19 mm), or 1 inch (25 mm)].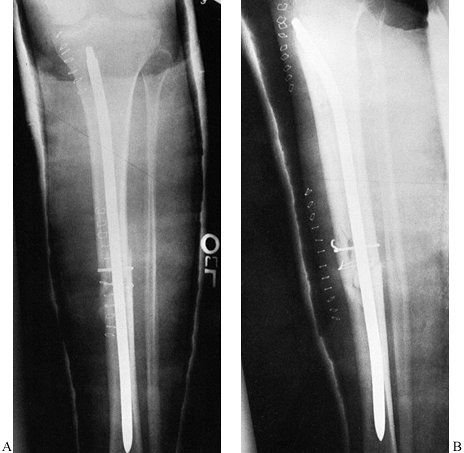 Figure 24.25. AP (A) and lateral (B)
radiographs of a Lottes nail fixing an open Gustilo grade II fracture
of the tibia. Circlage wires were used to secure a butterfly fragment.
This further devascularizes the fracture and is best avoided if the
fragment is in reasonable apposition. -
Next, complete impaction of the fracture
and examine for stability. If the fracture is unstable, additional
stability can be obtained by plating a fracture of the fibula
P.796
(Fig. 24.26) (94).
Some surgeons feel that plating promotes delayed union of the tibia,
but my experience with this combination in open fractures has been
reasonably good, with results comparable to those with external
fixation.![]() Figure 24.26.
Figure 24.26.
AP and lateral radiographs of a Lottes nail fixing an unstable fracture
of the tibia. The fibula has been plated to gain additional stability.
Plating of the fibula may lead to delayed union of the tibia. Consider
early bone graft of the tibia if callus formation is delayed. -
After wound closure, place the extremity
in long-leg, well-padded splints to maintain the knee in 15° of flexion
and the ankle at a right angle. See Figure 24.25 and Figure 24.26 for sample cases.

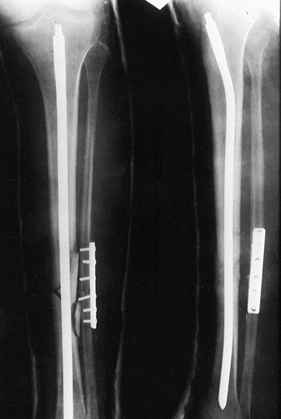
postoperatively, remove the splints and apply either a long-leg cast,
Sarmiento cast, or functional brace, depending on the stability of the
fracture. If axial stability is present, allow weight bearing;
otherwise, delay weight bearing until 6 weeks. In most cases, by 6
weeks there is enough stability that immobilization is no longer
necessary and the patient can continue with crutches and weight bearing
as tolerated. Continued instability at 6 weeks may necessitate further
immobilization and delayed weight bearing. Begin joint and muscle
rehabilitation as soon as possible.
Ender nails is identical to that for Lottes nailing. The Ender tibial
nail is 4.0 mm in diameter. At least two nails are necessary for
adequate stability; if the canal will accept more, they can be placed.
-
Insert the Ender nails through 2.5 cm
stab wounds located about 2 cm medial and lateral to the patellar
tendon on the proximal tibial flare, about 2 cm below the joint line. -
Perforate the cortex with a Küntscher awl
or a drill point. Insert the medial or lateral nail first, depending on
the configuration of the fracture. If the fracture tends to angulate
into varus, place the lateral nail first. In difficult fractures, it is
sometimes helpful to drive both nails simultaneously, alternating the
driving from one side to the other. -
The nail can be used to reduce the
fracture. More or less curve can be bent into the tip to facilitate the
reduction. Use the bend of the nail to fish the tip into the mouth of
the distal fragment by twisting the nail, and then use the nail to
reduce the fracture. -
Then drive the nails to the subchondral bone of the tibia distally, spreading the tips.
-
Leave the flat of the proximal end of the nail lying against the cortex above the entry hole (Fig. 24.27).
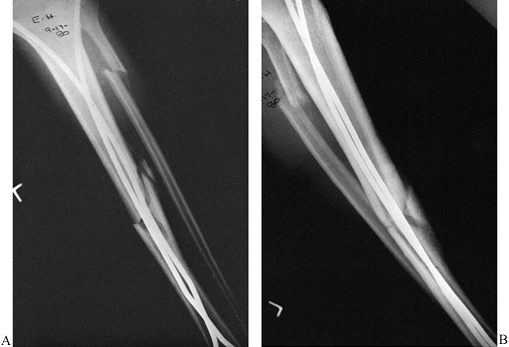 Figure 24.27. AP (A) and lateral (B)
radiographs of a fracture of the tibia and fibula stabilized with Ender
pins. Notice the mild posterior angulation on the lateral view. This is
a common problem with Ender nails. (From Chapman MW. Fractures of the
Tibial and Fibular Shafts. In: Evarts CM, ed.Surgery of the Musculoskeletal System. New York: Churchill-Livingston, 1983, with permission.) -
Insert both Ender and Lottes nails with
closed technique. If necessary, the fracture can be opened, but opening
is discouraged as it increases the risk of infection and the rate of
delayed union. In comminuted fractures, avoid the temptation to place
cerclage wires for butterfly fragments, which would further
devascularize the fragments and is nearly always unnecessary. -
Postoperative care is identical to that described for Lottes nails.
locking, nonlocking nails are now obsolete. Except for the
cross-locking procedure, the techniques for all nails are nearly
identical.
the world today has a locking nail for the tibia. Nails vary in the
curvature, cross-sectional shape, cannulation, longitudinal curvature,
and configuration of the cross-locking screws; but the general
principles in their insertion and application are very similar. Cross
locking is offered with round holes, which provide rigid locking, and
oval
holes with the capability for spontaneous compression at the fracture site while maintaining rotational control.
Rutherford, NJ) offer add-on tabs or extensions at the proximal end of
the nail. These extensions provide the opportunity to vary the length
of the nail. They also allow for the addition of extra cross-locking
screws in a very proximal location, which may be useful for high
proximal fractures and undisplaced fractures of the tibial plateaus
where proximal fixation is desired.
are similar, only the technique for the Alta system will be described.
The nail can be inserted as a reamed or an unreamed nail.
on a fracture table. It is possible to perform reamed nailing on a
regular operating table, but it is more difficult to pass the guide
pin, and radiologic control is poorer. Refer back to the discussion on
positioning the patient; the position for reamed intramedullary nailing
of the tibia on the fracture table is shown in Figure 24.23A.
tendon or medial to the tendon. I much prefer to go through the tendon,
as I have seen no significant morbidity from splitting the tendon, and
positioning the nail is greatly simplified (Fig. 24.28).
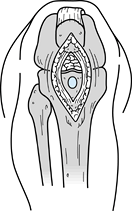 |
|
Figure 24.28. Surgical approach and entry hole for intramedullary nailing of the tibia. See the text for a full description.
|
-
If you choose to go through the tendon,
make a longitudinal skin incision from 1 cm proximal to the distal pole
of the patella, to 1 cm proximal to the tibial tubercle. Reflect the
infrapatellar fat pad in a proximal direction. Perforate the cortex
with a Küntscher awl just above the tibial tubercle. Maintain good
alignment with the intramedullary canal of the tibia, taking care not
to angulate posteriorly or laterally. Avoid impingement on the
articular cartilage of the tibial plateau. -
Penetrate the cancellous bone of the
metaphysis into the medullary canal. Insert the reaming ball-tipped
guide pin into the proximal fragment, reduce the fracture by manual
manipulation, and pass it into the distal fragment. Manipulation of the
fracture is greatly assisted by placing a manipulator into the proximal
fragment; this technique usually eliminates the need for an assistant.
With appropriate-size reamers, ream the medullary canal throughout its
isthmus to the size appropriate for the nail to be used. Usually 1.0 mm
of overreaming is necessary. -
Determine nail length by comparative measurement of two identical guide pins, or measure directly by laying a nail on the tibia.
-
Use a plastic tube to exchange the reaming guide pin for a driving guide pin.
-
Select a nail of the appropriate length
and diameter, and drive it into position, taking care to maintain good
fracture alignment. In most cases, select the nail that will reach to
within 1 cm of the ankle joint and will sit slightly below the level of
the cortex at the entry point. This technique, using Alta
instrumentation, is shown in Figure 24.29.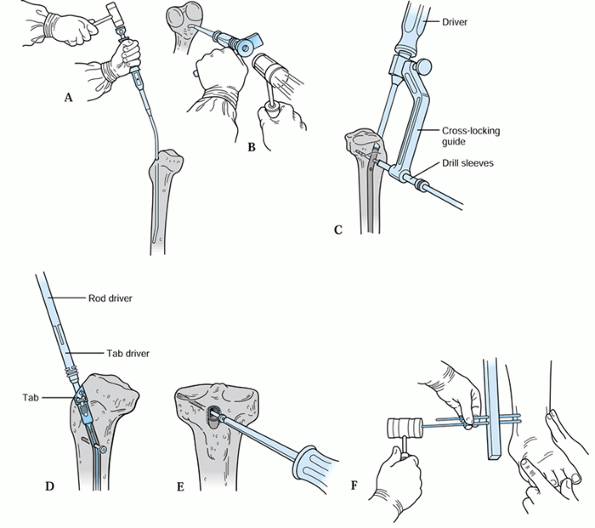 Figure 24.29. Reamed intramedullary nailing using the Alta system. A,B: Driving the Alta tibial nail using the anvil as a crossbar to control rotation. C:
Proximal cross locking with a jig. Insert drill sleeves down to bone
(usually medially). Tap an appropriate-size drill point into the bone
with a mallet to anchor its point and then drill through the nail and
opposite cortex. Measure for screw length with a depth gauge off the
outer drill sleeve. Then insert a transverse cross-locking screw
through the sleeve. D: In the Alta system a tab (shown here)
or cylindrical extender can be attached to the top of the rod. These
provide holes for cross locking with up to two additional screws under
direct vision. They are angled at 45° to the sagittal plane. Here the
tab is secured to the nail with a screw. E: Transverse cross-locking screw being inserted into the tibia through one of the holes in a tab. F:
Distal cross locking of a tibial nail is most easily accomplished from
medial to lateral. Freehand technique is commonly used. (Courtesy of
Howmedica, Rutherford, NJ.) -
If indicated, perform distal and proximal
cross locking with the special guides provided, or by using freehand
technique. The Alta nail is supplied in diameters from 6 to 14 mm. The
6 and 7 mm nails are solid and cannot be locked. The 8 and 9 mm nails
are solid but have holes for cross locking with 3.7 mm transverse
cross-locking screws. The 10 to 14 mm nails are cannulated for a guide
pin and take 5 mm locking screws. (Fig. 24.30, Fig. 24.31, Fig. 24.32 and Fig. 24.33 demonstrate sample cases.)![]() Figure 24.30. Alta locked intramedullary nailing using closed technique. A: Lateral radiograph of a transverse displaced tibial shaft fracture. B:
Figure 24.30. Alta locked intramedullary nailing using closed technique. A: Lateral radiograph of a transverse displaced tibial shaft fracture. B:
Postoperative AP radiograph showing anatomic reduction and static
locking with a reamed nail. Since there was 100% cortical contact in
compression, the patient was permitted to bear weight as tolerated. C: Lateral view.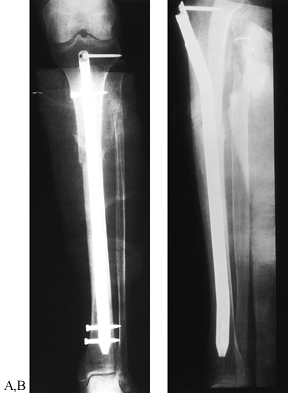 Figure 24.31. Proximal shaft fracture of the tibia fixed with an Alta nail using the tab. A:
AP radiograph showing a fracture in the proximal third. This fracture
requires at least two screws in the proximal fragment to achieve
adequate stability. Since this earlier design of the nail had only one
proximal cross-locking hole, the tab and screw were added. B: Lateral radiograph.![]() Figure 24.32. Comminuted segmental fracture of the tibia treated with a locked Alta intramedullary nail and supplemental plate proximally. A: AP and lateral radiographs of a multisegmental fracture. B:
Figure 24.32. Comminuted segmental fracture of the tibia treated with a locked Alta intramedullary nail and supplemental plate proximally. A: AP and lateral radiographs of a multisegmental fracture. B:
Postoperative AP radiograph. On this film it can be seen that there
were four separate fracture sites resulting in five major fragments.
The proximal fracture was opened medially and stabilized with a 3.7 mm
reconstruction plate, and the remainder of the fractures were
stabilized by closed intramedullary nailing with static cross locking.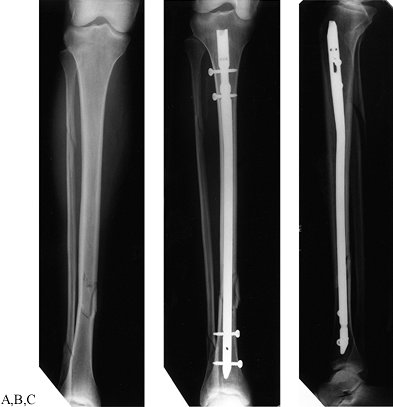 Figure 24.33. Distal-third fracture of the tibia treated with a statically locked AO nail. A: AP radiograph showing the fracture. This could have been treated in a Sarmiento cast or cast-brace as well. B: AP radiograph taken postoperatively. C: Lateral radiograph.
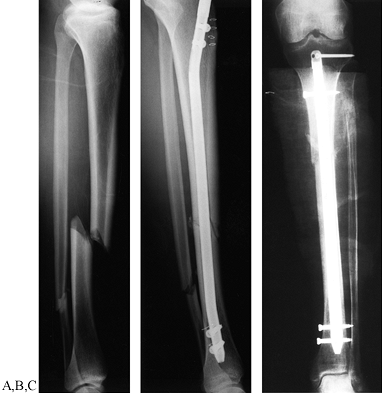
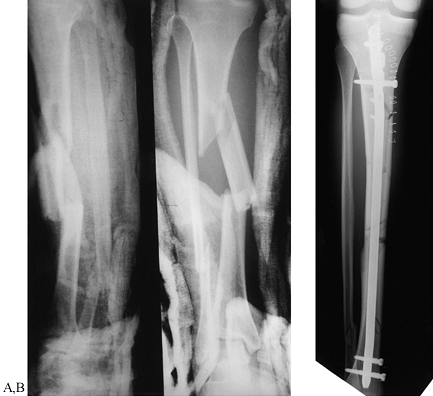
will fit into the medullary canal and can be driven with reasonable
ease.
-
Position the patient, reduce the
fracture, prepare and drape the leg, and perform the surgical exposure
and create the entry site for the nail as described for reamed nailing. -
Use sounds or a tibial nail to determine the diameter of the canal.
-
Select a nail equal to, or 1 mm in
diameter smaller than, the largest sound that will pass easily through
the isthmus of the canal. -
Insert the nail while pressing the driver
toward the knee to ensure proper alignment of the nail; direct the nail
down the canal until it is at the distal end of the proximal fragment. -
Using the nail and driver as a lever, and
with an assistant directly manipulating the fracture, drive the nail
across the fracture into the distal fragment. Drive the nail to
approximately 15–20 mm proximal to the ankle joint. -
The remainder of the procedure, such as cross locking, is identical to that for reamed nails.
-
When locking, I usually cross-lock
distally first, then adjust the position of the fracture by
back-slapping on the driver to be certain that the bone fragments are
in good contact. Then I lock proximally.
patients wiggle their toes and begin isometric exercises in the splint.
Three to 7 days after surgery, remove the splint and begin full
rehabilitation.
rigorous physical therapy program. Use of a cast-brace that prevents
equinus or a removable posterior night splint may be necessary in the
first few weeks after surgery.
allow the patient to progress to full weight bearing, with or without a
brace, as tolerated. With static cross locking in stable patterns, I
like to impact the fracture intraoperatively with the driver. In these
cases, full weight bearing is usually possible immediately. In unstable
fracture patterns, delay full weight bearing until callus can be seen
bridging the fracture on radiographs.
cross-locking screws 4 mm or less in diameter. Incidence of screw
fracture with weight bearing on unstable fractures is as much as 30%.
Removal of cross screws to dynamize the nail is usually necessary only
in delayed unions with short oblique fractures.
fixation are limited. The most common indication is a spiral or oblique
fracture in the distal third of the tibia with an intact fibula, where
unacceptable varus angulation of the distal fragment is present. These
types of fractures are very difficult to control by closed means and
respond well to interfragmentary screw fixation.
using cannulated screws. Intramedullary locking nails can often be used
as well. The length of the fracture must be at least 3 times the
diameter of the tibia at the level of the fracture. Approach the tibia
through an anterior longitudinal incision, 1 cm lateral to the anterior
crest of the tibia. Expose only the edges of the fracture fragments by
subperiosteal dissection. Perform lag screw fixation with three or more
screws.
be seen in the proximal third of the tibia, with or without an intact
fibula, which may have persistent gapping and unacceptable angulation.
Treat it in a similar manner. Interfragmentary screw fixation alone
rarely provides sufficient stability; external protection is always
necessary. In both of these fractures, a functional non-weight-bearing
brace is recommended. Because these fractures are through cancellous
bone, bone grafting is usually unnecessary.
fractures is rarely, if ever, indicated. These fractures are better
treated with a locked intramedullary nail. An occasional type I or
low-grade type II open fracture with exposed fracture fragments will
benefit from screw fixation. The fracture must be oblique or spiral and
must be three times in length the width of the tibia at the site of the
fracture (Fig. 24.34). In this circumstance,
interfragmentary screw fixation combined with a single-bar external
fixator might be indicated. Precise technique is critical. Details for
this technique are discussed in Chapter 11.
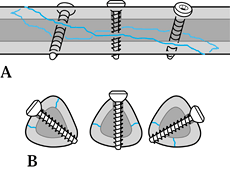 |
|
Figure 24.34. A:
Interfragmentary lag-screw fixation. The fracture is at least three times as long as the diameter of the bone. Insert three 4.5 mm cortical screws to lag the fracture together using a gliding hole in the near cortex. B: Keep the screws at right angles to the fracture. Accurate placement is guaranteed by using gliding-hole-first and threaded-hole-first techniques (see Chapter 11). |
fractures, metaphyseal fractures requiring a buttress or neutralization
plate to support interfragmentary screw fixation, and an occasional
diaphyseal fracture for which intramedullary nailing or external
fixation is not feasible (12). Because of the
risk of infection, soft-tissue complications, and delayed union, plate
fixation of fractures of the diaphysis of the tibia is the treatment of
last choice. Broad or narrow 4.5 mm plates can be used, but the narrow
plates are preferable (Fig. 24.35). Semitubular plates are too weak. Specialized L and T plates and spoon plates are available for the metaphyseal/epiphyseal regions.
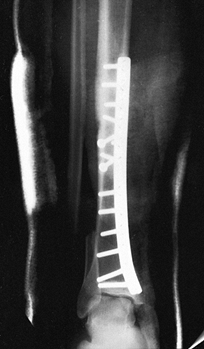 |
|
Figure 24.35.
Plate fixation of the tibia. A comminuted intra-articular fracture of the tibia and fibula seen on an AP radiograph showing plate and screw fixation. |
anteromedial subcutaneous border of the tibia. This is the location of
highest risk, as skin problems or infection may result
in
exposure of the plate. It is much safer but technically more difficult
to place plates on the lateral surface of the tibia. Plates may also be
placed posteriorly on the tibia, but this approach is reserved for
severely injured extremities, where the anterior soft tissues are
unsuitable for surgery. The techniques are the same as those described
in Chapter 11.
I routinely bone-graft all diaphyseal fractures of the tibia subjected
to plate fixation to accelerate and ensure union. With excessive
swelling, do not close the deep fascia; in some cases, fasciotomy may
be indicated. Skin closure must be without tension and atraumatic.
Robert Jones dressing with splints. Elevate it on two pillows with the
knee flexed to help control edema. As rigid internal fixation is
usually achieved with plate and screw fixation, immediate touch-down
weight bearing, mobilization, and rehabilitation of joints and muscles
is possible. Weight bearing must be delayed until fracture union occurs.
union may be difficult to judge, as minimal or no callus may form.
Fractures of the diaphysis in adults rarely heal well enough to sustain
weight bearing before 16 weeks. At 16 weeks or later, take AP, lateral,
and two oblique radiographs to establish the presence of union. If
union is judged to be present, begin careful, progressive weight
bearing with crutches, and monitor frequently, to ensure that
displacement does not occur.
complications than in any other long bone of the body and are discussed
in detail in multiple chapters. The most common acute complications
directly related to the injury are infection (Chapter 132 and Chapter 135), loss of skin and soft tissues (Chapter 8 and Chapter 35), neurovascular injury, compartment syndrome (Chapter 13), and amputation (Chapter 120). Also discussed elsewhere are late complications such as delayed union, nonunion, and malunion (Chapter 31), and sympathetic dystrophy (Chapter 7).
be recognized early, and irrigation and debridement must be done as
expeditiously as possible. It is far better to explore a few too many
suspicious-looking wounds than to miss an acute infection. Stability of
the fracture is critical, and in most cases best achieved with external
fixation. If plate and screw fixation is stable, leave it in place; it
can be removed after union occurs.
the tibia convert to external fixation. In mild infection with
sensitive organisms, it is worthwhile in some cases to debride the
tibia with reaming and to replace the nail with a larger one. In
general, however, this method works best in the femur and does not have
a high success rate in the tibia. It has been suggested that cannulated
intramedullary nails may harbor organisms in their interiors, but a
study by Singer and Seligson (132) showed that this is not true. Antibiotic-impregnated beads are useful.
open fractures of the tibia. The skin and soft-tissue injury in closed
fractures can be substantial as well. Progressive necrosis can lead to
loss of both skin and underlying soft tissue, particularly if
compartment syndrome intervenes. Early full-thickness soft-tissue
coverage is important to
reduce
the incidence of infection and delayed union. At the time of original
debridement of an open fracture, do not close the traumatic wound.
are certain that further necrosis will not occur and infection is not
present. Skin defects without exposed bone or major neurovascular
structures can be handled either by primary closure or by
split-thickness skin grafting. If periosteum is present,
split-thickness skin grafting can be done directly on the periosteum.
Although direct split-thickness grafting provides early coverage, it
often does not provide durable long-term coverage, and replacement with
full-thickness tissue is often necessary.
of the tibia, swing the medial head of the gastrocnemius muscle on its
vascular pedicle for coverage. Apply split-thickness skin-grafts to the
muscle pedicle as necessary.
local tissue is more difficult. In the middle third, the soleus will
suffice. In the distal third, the flexor digitorum longus makes a good
pedicle graft. In this region, however, free microvascularized pedicles
are often necessary. We no longer use cross-leg pedicle flaps.
common peroneal nerve. This nerve injury is most often the result of
the original trauma and is usually a neuropraxia or axonotmesis due to
stretch. It can be difficult to detect in the limb with severe muscle
injury. Direct severe injury to muscle looks similar. Examine the limb
carefully at the time of initial injury, recording any evidence of
sensory loss or motor weakness. Frequent repeat examinations are
important. A laceration directly over the main bundle of the nerve
requires exploration; otherwise, treatment is limited to observation,
prevention of an equinus contracture, and muscle rehabilitation.
to the knee, vascular repair of a single artery laceration is rarely
necessary. The limb does fairly well with just a posterior tibial
artery, and in most healthy limbs, with just an anterior tibial and
peroneal artery. If only the anterior tibial or peroneal artery is
functional, some late symptoms caused by lack of blood supply to the
posterior compartment muscles may occur. For that reason, lacerations
of the posterior tibial artery are often repaired, particularly if the
fate of the two other arteries is unknown. Good arteriography is
necessary to establish the patency of these arteries in severely
injured legs.
tibiofibular joints, fractures of the fibula accompanying a tibial
fracture require no special treatment other than that described for the
tibia. Isolated shaft fractures are usually the result of direct
violence. Although treatment can be symptomatic, most such fractures
are painful and do better if immobilized in a long-leg walking cast for
2–3 weeks, followed by a brace or Sarmiento-type cast until 6 weeks. If
symptoms allow, a soft supportive dressing and crutches may be
adequate. Always look carefully for associated disruptions of the
proximal and distal tibiofibular joints.
less than 1 cm of shortening, minimal displacement, and 50% or more
cortical contact between the main proximal and distal fragments, I
prefer closed reduction, application of either a Sarmiento or long-leg
cast, and early weight bearing with a vigorous rehabilitation program.
Unless there is a contraindication, I treat all other unstable
fractures of the tibia with reamed, statically locked intramedullary
nailing using a fracture table. I use a medullary nail 10 mm or larger
in diameter so that I can take advantage of large transverse
cross-locking screws.
splint for symptomatic relief and to protect against an equinus
contracture. I start the patient on a vigorous joint and muscle
rehabilitation program. Because the majority of these fractures have
unstable patterns, I delay weight bearing, other than the weight of the
leg, until I see bridging callus on at least one view. I progress
toward full weight bearing depending on the progression of healing. I
persist with nonoperative treatment when there is a systemic or local
contraindication to nailing.
nailing is a displaced fracture of the tibia at the proximal
metaphyseal—diaphyseal junction. If for some reason this fracture is
treated with intramedullary nail fixation, I take special precautions
to be certain that the fracture remains anatomically reduced during the
nailing. I may add extra fixation screws or a small unicortical plate,
applied with minimal dissection, to prevent displacement of the
fracture (Fig. 24.32).
fractures of the distal tibia within 5–7 cm of the ankle joint. These
are often better handled by either external fixation or open reduction
and plate fixation, but they can be treated with locked intramedullary
nails as an extended indication if special precautions are taken as
described previously.
locked intramedullary fixation in all fractures at the time of initial
debridement. To avoid premature nail or screw failure, I always try to
use a 10 mm or larger titanium nail, which permits insertion of the
strong 5 mm transverse cross-locking screws. In smaller patients, I may
have to pass one or two reamers gently to get up to 10 mm. I find this
technique to be acceptable in the majority of cases. I leave the
traumatic wound open in all cases and try to achieve full-thickness,
good-quality soft-tissue closure by 10 days.
occasion for closed fractures in the presence of multiple injuries
where external fixation is more practical and expedient. I often
convert these to reamed nailing early. In high-grade contaminated grade
IIIB and C open fractures, I often begin with external fixation. After
successful soft-tissue closure, and in the absence of any evidence of
infection, I convert to a reamed intramedullary nail. In fracture
patterns unsuitable for intramedullary nailing, I continue with the
external fixator until fracture union.
fixation alone for a fracture of the diaphysis of the tibia in the past
10 years. In fractures that can be reduced anatomically closed, or with
minimal open incisions, I use interfragmentary cannulated screws in the
cancellous bone of the metaphysis, or epiphyseal region, which are not
suitable for nailing.
the proximal and distal ends of the tibia and for an occasional
metaphyseal fracture that is not suitable for nailing or external
fixation. I place the vast majority of plates on the lateral border of
the tibia to take advantage of the better soft-tissue coverage. I take
great pains to protect the blood supply to bone using “biological”
fixation techniques. I use a much larger number of plates for the
treatment of nonunions of the tibia, which I apply posteriorly along
with a bone graft. This technique is discussed in Chapter 31.
In treating compartment syndrome of the tibia, I always use
single-incision, lateral four-compartment fasciotomy rather than dual
lateral and medial incisions.
scheme: *, classic article; #, review article; !, basic research
article; and +, clinical results/outcome study.
AJ, Nieminen SJ, Nylamo EI. External Fixation by Hoffmann-Vidal-Adrey
Osteostixis for Severe Tibial Fractures: Treatment Scheme and Technical
Criticism. Clin Orthop 1983;181:154.
A, Benterud JG, Høgervold HE, et al. Comparison of Functional Bracing
and Locked Intramedullary Nailing in the Treatment of Displaced Tibial
Shaft Fractures. Clin Orthop 1992;277:243.
GP, Evans NT, Roeda D, et al. Measurement of Blood Flow in Tibial
Fracture Patients Using Positron Emission Tomography. J Bone Joint Surg Br 1992;75:673.
A, Massaferro J, Dubra A, et al. The Dynamic AFIS-BM Tubular External
Fixator in the Treatment of Open Fractures of the Shaft of the Tibia. Injury 1992;23:461.
F, Comfort TH, Searls K, et al. Unilateral External Fixation for Severe
Open Tibial Fractures: A Primary Report of a Prospective Study. Clin Orthop 1983;178:111.
LB, Kassman S, Stegemann P, France P. Prospective Study of Union Rate
of Open Tibial Fractures Treated with Locked, Unreamed Intramedullary
Nails. J Orthop Trauma 1994;8:45.
LB, Sucato D, Stegemann PM, Rohrbacher BJ. Displaced Isolated Fractures
of the Tibial Shaft Treated with Either a Cast or Intramedullary Nail. J Bone Joint Surg Am 1997;79:1336.
MJ, Staeheli JW, Reinert CM. Treatment of Unstable Tibial Diaphyseal
Fractures with Minimal Internal and External Fixation. J Orthop Trauma 1989;3:223.
Outer AJ, Meeuwis JD, Hermans J, Zwareling A. Conservative versus
Operative Treatment of Displaced Noncomminuted Tibial Shaft Fractures. Clin Orthop 1990;252:231.
CC, Simmons SC, Browner BD, Weigel MC. Severe Open Tibial Fractures:
Results Treating 202 Injuries with External Fixation. Clin Orthop 1988;230:98.
E, Burri C, Claes HL, et al. Treatment by External Fixation of Open
Fractures Associated with Severe Soft-Tissue Damage of the Leg:
Biomechanical Principles and Clinical Experience. Clin Orthop 1983;178:80.
GA, Bang RL, Conrah MS, et al. The Value of the Hoffmann Skeletal
Fixation in the Management of Cross Leg Flaps, Particularly Those
Injuries Complicated by Open Fractures of the Tibia. Injury 1979;11:110.
DA. Skeletal Stabilization with a Multiplane External Fixation Device:
Design Rationale and Preliminary Clinical Experience. Clin Orthop 1983;180:50.
GM, Behrens FF, Joyce MJ, et al. Open Tibial Fractures with Severe
Soft-Tissue Loss. Limb Salvage Compared with Below-the-Knee Amputation.
J Bone Joint Surg Am 1993;75:1431.
L. Arterial Changes in Experimental Fractures of the Rabbit’s Tibia
Treated with Intramedullary Nailing. A Microangiographic Study. Acta Chir Scand 1960;120:289.
RT, Gould RJ, Peclet M, et al. The Mangled Extremity Syndrome (M.E.S.):
A Severity Grading System for Multisystem Injury of the Extremity. J Trauma 1985;5:1147.
RB, Mendoza RM, Williams DN. Problems in the Management of Type III
(Severe) Open Fractures: A New Classification of Type III Open
Fractures. J Trauma 1984;24:742.
K. The Treatment of Unstable Fractures of the Tibia and Fibula with
Flexible Medullary Wires: A Review of 235 Fractures. J Bone Joint Surg Am 1981;63:921.
DL, Howey T, Sanders R, Johansen K. Limb Salvage versus Amputation.
Preliminary Results of the Mangled Extremity Severity Score. Clin Orthop 1990;256:80.
JL, Swiontkowski MF, Sanders R. Treatment of Open Fractures of the
Tibial Shaft: Ender Nailing versus External Fixation. J Bone Joint Surg Am 1989;71:1231.
HR Jr, Poole GV Jr, Hansen KJ, et al. Salvage of Lower Extremities
following Combined Orthopedic and Vascular Trauma. A Predictive Salvage
Index. Am Surg 1987;53:205.
TM, Aksenov SA, Schemitsch EH. The Effect of Limited and Standard
Reaming on Cortical Bone Blood Flow and Early Strength of Union
Following Segmental Fracture. Presented at the Annual Meeting of the
Orthopaedic Trauma Association, October, 1997.
WD, Fischer DA. Skeletal Stabilization with a Multiplane External
Fixation Device: Biomechanical Evaluation and Finite Element Model. Clin Orthop 1983;180:34.
G, Olerud S. Stable External Fixation of Open Tibial Fractures: A
Report of 5 Years of Experience with the Vidal-Adrey Double-Frame
Method. Orthop Rev 1977;6:25.
MP, Rahn BA, Frigg R, et al. Reaming versus Non-reaming in Medullary
Nailing: Interference with Cortical Circulation of the Canine Tibia. Arch Orthop Trauma Surg 1990;109:314.
RT, Smith KL, Russell RC, Hayes JM. Late Functional Outcome in Patients
with Tibia Fractures Covered with Free Muscle Flaps. J Orthop Trauma 1993;7:123.
JL, Nepola JV, Wuest TK, et al. Unilateral External Fixator until
Healing with the Dynamic Axial Fixator for Severe Open Tibial
Fractures. J Orthop Trauma 1991;5:341.
DJ, Merkow RL, Gustilo RB. Infection after Intramedullary Nailing of
Severe Open Tibial Fractures Initially Treated with External Fixation. J Bone Joint Surg Am 1989;71:835.
MG, Heckman JD, Corley FG. Severe Open Fractures of the Lower
Extremity: A Retrospective Evaluation of the Mangled Extremity Severity
Score (MESS). J Orthop Trauma 1994;8:81.
BR, Strom DE. Compartment Syndrome after Closed Intramedullary Nailing
of the Tibia: A Canine Model and Report of Two Cases. J Orthop Trauma 1991;5:71.
KM, Ebraheim NA, Southworth SR, et al. Plating of the Fibula: Its
Potential Value as an Adjunct to External Fixation of the Tibia. Clin Orthop 1991;266:209.
OOA, Stafford H, Gregg PJ. An Experimental Study of the Patterns of
Periosteal and Endosteal Damage in Tibial Shaft Fractures Using a
Rabbit Trauma Model. J Orthop Trauma 1989;3:142.
W-K, Chow S-P, Fran D, Leong JCY. A Study of Function and Residual
Joint Stiffness after Functional Bracing of Tibial Shaft Fractures. Clin Orthop 1991;267:157.
RR, Orsini EC, Mahoney JL, et al. The Influence of Muscle Flap Coverage
on the Repair of Devascularized Tibial Cortex: An Experimental
Investigation in the Dog. Plast Reconstr Surg 1987;79:946.
RR, Schemitsch EG. Effect of Muscle Flap Coverage on Bone Blood Flow
following Devascularization of Segment of Tibia: An Experimental
Investigation in the Dog. J Orthop Res 1989;7:550.
R, Jersinovich I, Angelen J, et al. The Treatment of Open Tibial Shaft
Fractures Using an Unreamed Interlocked Intramedullary Nail. J Orthop Trauma 1994;8:504.
V, Henley M, Benirschke S, Mayo K. Preoperative Comparison of Unreamed
Interlocking Intramedullary Nails versus Half-Pin External Fixation in
Open Tibial Fractures. J Orthop Trauma 1991;5:238.
A, Sharpe FE, Ebramzadeh E, et al. Factors Influencing the Outcome of
Closed Tibial Fractures Treated with Functional Bracing. Clin Orthop 1995;315:8.
JR, Bretton C, Moneim MS, Clevenger FW. Mangled Extremity Severity
Score: An Accurate Guide to Treatment of the Severely Injured Upper
Extremity. J Orthop Trauma 1994;8:282.
RR, Resnick CT, Wagner KS, Sarmiento A. Changes in Tibiotalar Joint
Contact Areas Following Experimentally Induced Tibial Angular
Deformities. Clin Orthop 1985;199:72.
AJ, Tarr RR, Sarmiento A, et al. The Role of Subtalar Motion and Ankle
Contact Pressure Changes from Angular Deformities of the Tibia. Foot Ankle 1987;7:290.
J, Buscayret C, Connes H, et al. Guidelines for Treatment of Open
Fractures and Infected Pseudoarthroses by External Fixation. Clin Orthop 1983;180:83.
PA, Russell TA, Taylor JC, LaVelle DG. Treatment of Open Fractures of
the Tibial Shaft with the Use of Interlocking Nailing without Reaming. J Bone Joint Surg Am 1992;74:1162.
RA, Hansen ST Jr, Clawson DK. Closed Intramedullary Nailing of Femoral
Fractures: A Report of Five Hundred and Twenty Cases. J Bone Joint Surg Am 1984;66:529.