CHAPTER 10 –
Cole & Sekiya: Surgical Techniques of the Shoulder, Elbow and Knee in Sports Medicine, 1st ed.
Copyright ©
2008 Saunders, An Imprint of Elsevier
CHAPTER 10 – Arthroscopic Treatment of Internal Impingement
Craig D. Morgan, MD
The term internal impingement was initially used by Walch[8] to describe contact of the undersurface of the rotator cuff with the posterior superior labrum in the abducted and externally rotated position. Jobe[5] described progressive internal impingement due to repetitive stretching of anterior capsular structures as the primary cause of shoulder pain in overhead athletes. Our treatment of disability in the throwing shoulder is predicated on the inciting lesion being an acquired contracture of the posteroinferior capsule.[2] The posteroinferior capsular contracture alters the biomechanics of the joint and leads to a progressive pathologic cascade observed in the disabled throwing shoulder.
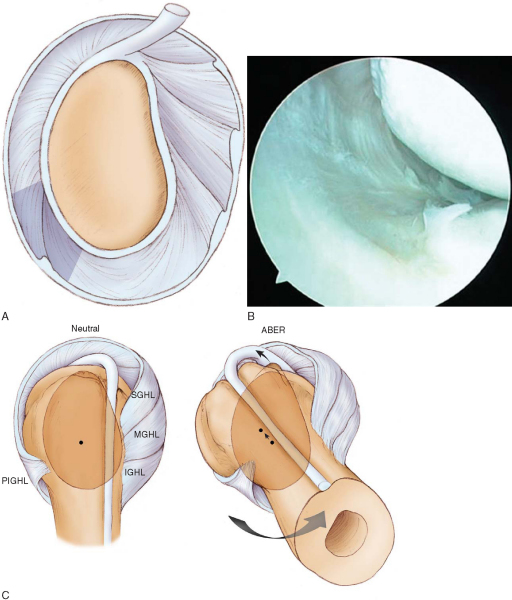
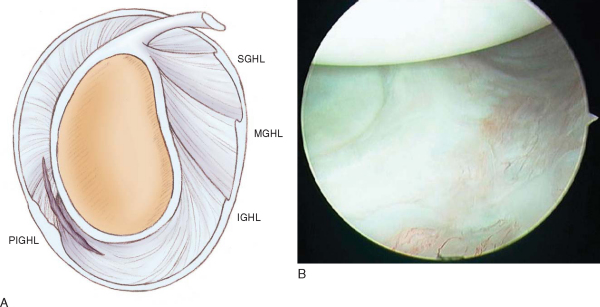
Due to repetitive overuse, throwers are susceptible to the development of posterior shoulder muscle fatigue and weakness, including the scapular stabilizers and rotator cuff. Posterior muscle weakness leads to failure to counteract the deceleration force of the arm during the follow-through phase of throwing. In the healthy throwing shoulder, a glenohumeral distraction force of up to 1.5 times body weight is generated during the deceleration phase of the throwing motion. This distraction force is counteracted by violent contraction of the posterior shoulder musculature at ball release, which protects the glenohumeral joint from abnormal forces and prevents development of pathologic changes in response to these forces. In the presence of posterior muscle weakness, as seen initially in the disabled thrower, the distraction force becomes focused on the area of the posterior band of the inferior glenohumeral ligament (PIGHL) complex because of the position of the arm in forward flexion and adduction during the follow-through phase of throwing. Fibroblastic thickening and contracture of the PIGHL zone occur as a response to this distraction stress (
Fig. 10-1A and B
). PIGHL contracture causes a shift of the glenohumeral contact point posteriorly and superiorly in the abducted and externally rotated position[4] (
Fig. 10-1C
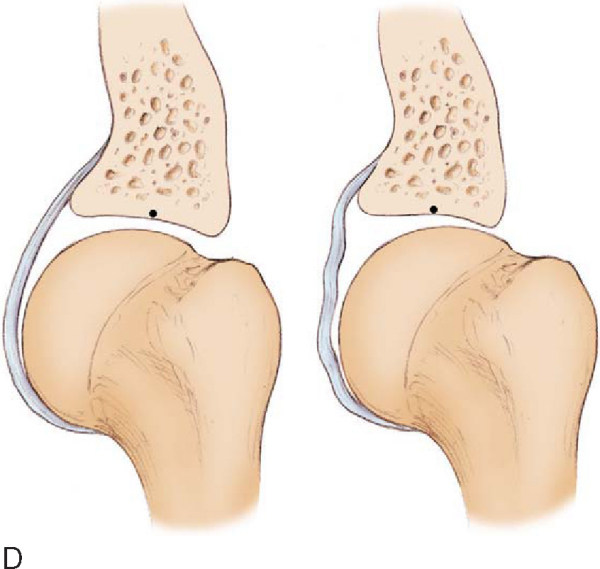
). This shift allows clearance of the greater tuberosity over the posterosuperior glenoid rim, enabling hyperexternal rotation (unlike normal internal impingement). In addition, the posterosuperior shift causes a relaxation of the anterior capsular structures, which manifests as anterior “pseudolaxity” and allows even further hyperexternal rotation around the new glenohumeral rotation point (
Fig. 10-1D
).
High-level throwing athletes need to achieve extreme external rotation of the humerus in the late cocking phase to maximize the throwing arc in order to generate maximal velocity at ball release. This maneuver creates an abnormal and posteriorly directed force vector on the superior labrum through the long head of the biceps tendon as well as torsion at the biceps anchor. With repetitive stress in the hyperexternally rotated position, the labrum fails and “peels back” from the glenoid rim medially along the posterior superior scapular neck. Failure of rotator cuff fibers in this position can occur through abrasion but, more important, due to twisting and shear failure, which is most pronounced on the articular side of the cuff tendons. Tension failure may ultimately occur in the anterior capsule, causing anterior instability that in our view is a tertiary event and has been erroneously identified as the primary lesion in the disabled thrower.
The collection of symptoms observed in the disabled throwing shoulder has been termed the dead arm syndrome. Essentially, the athlete is unable to throw with premorbid velocity and control because of pain and subjective discomfort in the shoulder. Five pathologic components contribute to symptoms in the dead arm syndrome:
| 1. | Posterior muscle weakness, demonstrated by scapular asymmetry | |
| 2. | PIGHL contracture, the inciting lesion; manifested as a glenohumeral internal rotation deficit (GIRD) in the throwing shoulder versus the nonthrowing shoulder | |
| 3. | Superior labral anterior-posterior (SLAP) tear, type II, typically the anterior and posterior or posterior subtype (the “thrower’s SLAP”)[6] | |
| 4. | Rotator cuff failure, generally partial undersurface and, occasionally, full-thickness tearing in the posterosuperior cuff; and | |
| 5. | Anterior instability (anterior capsular attenuation or capsulolabral injury), in approximately 10% of cases. |
|
|
|
|
Figure 10-1 |
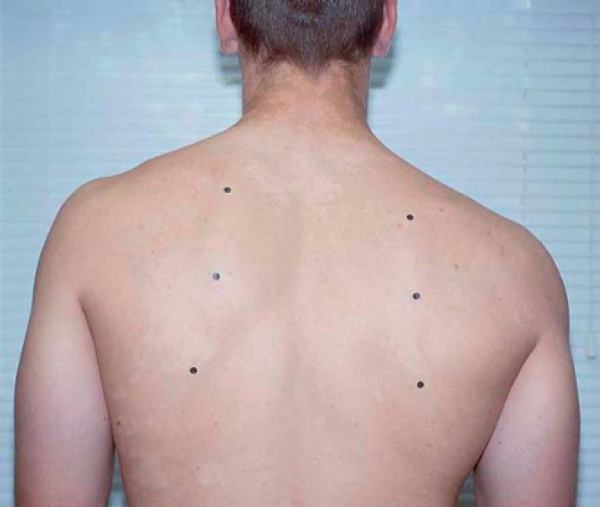
| • | Both exposed shoulder girdles are inspected from behind. | |
| • | Note asymmetry in both shoulder height and scapular position. | |
| • | The superior and inferior medial scapular angles are marked as a visual reference. | |
| • | Dropped position of the acromion and elevation of the inferomedial angle of the scapula from the chest wall signify scapular protraction and antetilt and are evidence of scapular muscle weakness ( Fig. 10-2 ). |
|
|
|
|
Figure 10-2 |
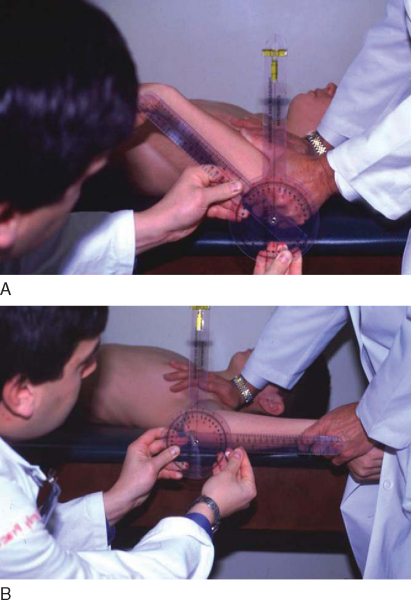
| • | Measurements are made in the supine position with the scapula stabilized by anterior pressure on the shoulder against the examining table. A goniometer is used with carpenter’s level bubble chamber attached. | |
| • | The arm is abducted 90 degrees to the body, scapular plane; internal rotation and external rotation are measured from a vertical reference point (perpendicular to floor) ( Fig. 10-3 ). |
|
| • | The throwing shoulder is compared with the nonthrowing shoulder. | |
| • | Internal rotation, external rotation, total motion arc, and GIRD of the throwing shoulder versus the nonthrowing shoulder are recorded. Specificity of clinical tests for type II SLAP tears in these athletes has been determined.[6] |
|
| • | Modified Jobe relocation test: specific for posterior SLAP lesions (the thrower’s SLAP) | |
| • | Speed test and O’Brien test: specific for anterior SLAP tears |
|
|
|
|
Figure 10-3 |
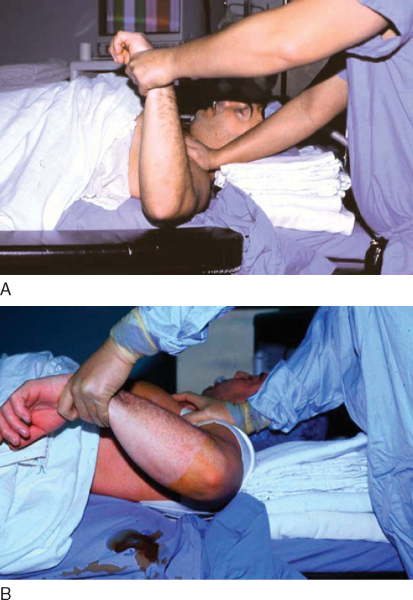
The Jobe relocation test is performed by placing the arm in maximal abduction and external rotation. Throwers with a posterior SLAP tear will experience pain in this position as a result of the unstable biceps anchor falling into the peel-back position. The discomfort is relieved with a posteriorly directed force to the front of the shoulder, which has been shown under direct arthroscopic visualization to reduce the labrum into the normal position.[1]
Factors Affecting Surgical Planning
| • | Anteroposterior, scapular lateral, and axillary views to reveal bone abnormalities (e.g., Bennett lesion) |
Magnetic Resonance Arthrography
Indications and Contraindications
Arthroscopic evaluation and treatment are indicated for throwing athletes who present with a history of pain and mechanical symptoms as described earlier with pathologic findings on magnetic resonance arthrography. Once the pathologic cascade has progressed to actual injury to labral and cuff structures, regaining premorbid function is not possible without surgical repair of these structures.
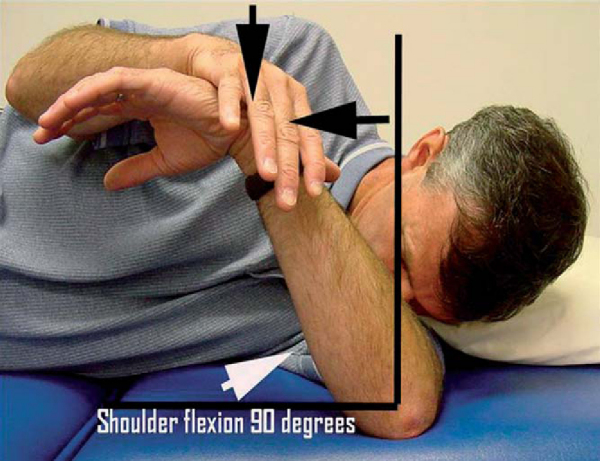
Patients start internal rotation “sleeper stretches” preoperatively for assessment of the extent of PIGHL contracture (
Fig. 10-4
). In general, 90% of patients with severe GIRD (>25 degrees) are able to decrease their internal rotation deficit to less than 20 degrees with 10 to 14 days of focused stretching. The remaining 10% are stretch “nonresponders” and are generally older athletes with long-standing GIRD and substantial thickening of the posteroinferior capsule. In these patients, a posteroinferior capsulotomy is indicated to increase internal rotation at the time of surgery.
|
|
|
|
Figure 10-4 |
Contraindications to the procedure are similar to those for other elective arthroscopic shoulder procedures, such as infection and concomitant medical illness.
Before the procedure is begun, it is important to have all anticipated instruments and materials needed for the surgery available and on the surgical field so that the procedure can be performed without unnecessary intraoperative delays (
Table 10-1
). Efficient performance of the procedure will avoid the dreaded scenario of attempting an arthroscopic repair in the distended, “watermelon” shoulder that can severely compromise the quality of the surgery. This cannot be overemphasized. As a general guideline, the type of repair described here should be accomplished in 20 to 40 minutes, depending on the associated pathologic processes. Superior labral tears in throwers may be associated with rotator cuff and anterior capsulolabral pathology. Treatment of these associated pathologic processes must be anticipated at the time of surgery.
Table 10-1
— Recommended Instruments for Arthroscopic Treatment of Pathologic Processes in the Throwing Shoulder
| Instrument | Use |
|---|---|
| Camera | |
| 30-degree lens | |
| Shoulder arthroscopy set (Arthrex) | Labral detachment |
| Arthroscopic rasp | |
| Arthroscopic elevator | |
| Arthroscopic cannulas | |
| 8 mm | Anterior working portal |
| 5 mm | Anterior accessory portal |
| Motorized shaver | Débridement |
| Full-radius blade (Stryker) | |
| Motorized burr | Preparation of glenoid rim |
| Protective hood; SLAP bur (Stryker) | |
| Arthroscopic bovie | Posterior capsulotomy |
| Long handle, hook tip (Linvatec) | |
| BioSuture Tak anchors (Arthrex) | Labral fixation |
| No. 1 PDS suture | SLAP fixation |
| Free suture: capsular plication | |
| Lasso suture passer device (Arthrex) | Suture passage: superior labrum |
| Right-angled | |
| BirdBeak suture retrievers (Arthrex) | Suture passage |
| 45-degree | Posterior superior labrum |
| 22-degree | Anterior superior labrum |
| Suture passer set (e.g., Spectrum) | Suture passage |
| Straight | Longitudinal rotator cuff tear |
| 45-degree curved hook (left and right) | Capsular plication |
Patients are administered general anesthesia after placement of an intrascalene nerve block that greatly assists with postoperative pain control.
We perform all arthroscopic repairs in the lateral decubitus position. Positioning is controlled with a beanbag brought to the level of the axilla. The operative extremity is secured in 30 to 40 degrees of abduction by a pulley device with 10 pounds hung to counterweight the arm. The patient is administered antibiotic prophylaxis for skin flora, and the skin is painted with povidone-iodine (Betadine).
Surgical Landmarks, Incisions, and Portals
Repairs in throwing athletes are performed through the following portals:
| • | Posterior: viewing portal | |
| • | Anterior: main working portal; anchor placement in anterior labrum, knot tying | |
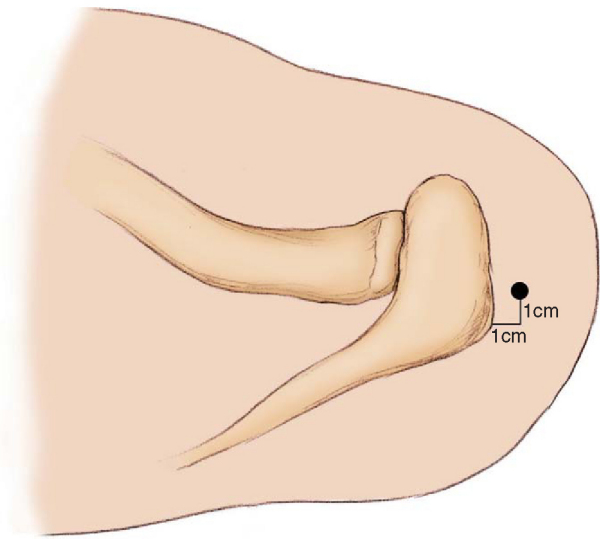
| • | Posterolateral (portal of Wilmington): anchor placement and suture passage in posterior labrum ( Fig. 10-5 ) |
|
| • | Anterosuperior: accessory portal; viewing and suture passage in anterior labrum or capsule (depending on associated pathologic changes) |
|
|
|
|
Figure 10-5 |
The posterolateral border of the acromion is marked, and a posterior portal is established approximately 2 cm medial and 2 or 3 cm inferior to the corner of the acromion. The blunt camera trocar is directed through the posterior capsule just above the level of the equator of the humeral head. Both the anterior portal and the portal of Wilmington are established by an outside-in technique with an 18-gauge spinal needle.
Diagnostic Arthroscopy and Surgical Tactic
Routine diagnostic arthroscopy is performed to ensure that all portions of the joint are inspected and no pathologic lesion is overlooked. In the disabled throwing shoulder, areas requiring particular attention include
| • | Superior labrum and biceps anchor | |
| • | Rotator cuff insertion | |
| • | Anterior labrum and capsuloligamentous structures | |
| • | Posterior capsule |
Evidence of labral injury must be assessed carefully as findings may be subtle (
Box 10-1
). An assessment is quickly made of the pathologic areas to be addressed, and a plan is made for the completion of the repair (
Box 10-2
).
| Recommended Sequence for Arthroscopic Repairs in Throwing Shoulders with Multiple Pathologic Sites | ||||||||||||||||||
|
Before other cannulas or instruments are introduced, an assessment is made of laxity in the joint by testing for the drive-through sign. In a normal shoulder, capsular restraints prevent passage of the arthroscope from posterior to anterior at the midlevel of the humeral head or sweeping of the scope from superior to inferior along the anterior glenoid rim. The drive-through sign may be present in patients with a SLAP tear because of pseudolaxity from the loss of labral continuity around the glenoid rim.[7]
The peel-back test is performed by removing the arm from traction and placing it into the abducted and externally rotated position. With a posterior SLAP lesion, the labrum can be observed to fall medially along the glenoid neck during this maneuver (
Fig. 10-6
). Anterior SLAP lesions will have a negative result of the peel-back test. After assessment of the biceps anchor, the probe is used to assess the undersurface of the rotator cuff and to estimate depth of partial-thickness tears, to determine the stability of the anterior inferior labrum, and to identify any redundancy in the anterior capsule.[3]
|
|
|
|
Figure 10-6 |
Specific Steps (
Box 10-3
)
1. Placement of Secondary Portals
An 8-mm cannula is used as a primary anterior working portal. An 18-gauge spinal needle is used to localize the cannula so that it can accommodate all necessary repairs, including anterosuperior anchor placement in the labrum and tying of posterosuperior anchor sutures. The cannula is readied near the skin surface, the spinal needle is used as a guide to the proper insertion angle, the spinal needle is withdrawn, and the cannula is inserted. An accessory 5-mm anterior portal may be placed, depending on the location of associated pathologic lesions requiring treatment.
| Surgical Steps | |||||||||||||||||||||
|
2. Probing of Intra-Articular Structures
A probe is introduced in the anterior cannula for more careful assessment of stability of intraarticular structures. Normally, a sublabral sulcus with healthy-appearing articular cartilage can be seen extending up to 5 mm beneath the labrum. An unstable biceps root can easily be displaced with the probe medially along the glenoid neck[3] (
Fig. 10-7
; see also
Box 10-1
).
|
|
|
|
Figure 10-7 |
3. Intra-Articular Débridement
A full-radius blade motorized shaver is used to gently débride loose and frayed tissue to prevent snagging of tissue with joint motion or potential loose bodies.
4. Preparation of Superior Labral Bone Bed
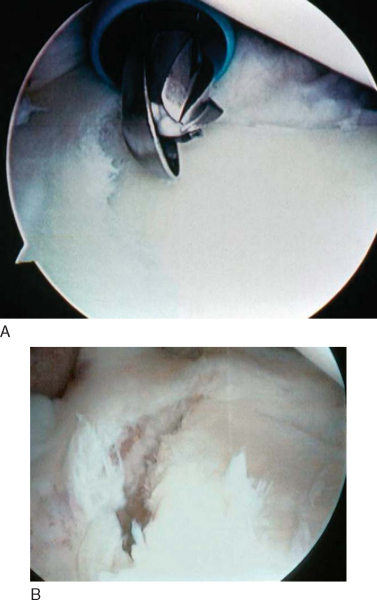
An arthroscopic rasp is used to completely separate any remaining attachments in the injury area. A rasp is used because there is less risk of causing intrasubstance injury in the labrum than with an elevator. On occasion, some tenuous attachments from the labrum may be present medially, but the biceps anchor is still unstable. In these cases, we routinely complete the lesion by removing these loose attachments before repair. All loose soft tissue is removed from the repair site carefully with the shaver.
An arthroscopic burr is then used to remove cartilage along the superior glenoid rim to make a bleeding bone bed for labral repair (
Fig. 10-8
). This step is crucial to allow subsequent healing of the labrum back to the glenoid rim. We prefer a burr with a protective hood that is specifically designed to prevent damage to labral tissue during this step (SLAP burr-stryker Endoscopy, San Jose, CA). No suction is used while the burr is on to ensure that tissue is not inadvertently sucked into the instrument.
|
|
|
|
Figure 10-8 |
5. Anchor Placement, Suture Passage, and Knot Tying
The portal of Wilmington is used for posterior anchor placement. Only small-diameter instruments are passed through this portal. No cannulas are placed in this portal to prevent damage to the rotator cuff tendons. A spinal needle again is used to localize the portal, which is approximately 1 cm anterior and 1 cm lateral to the posterolateral acromial margin (see
Fig. 10-5
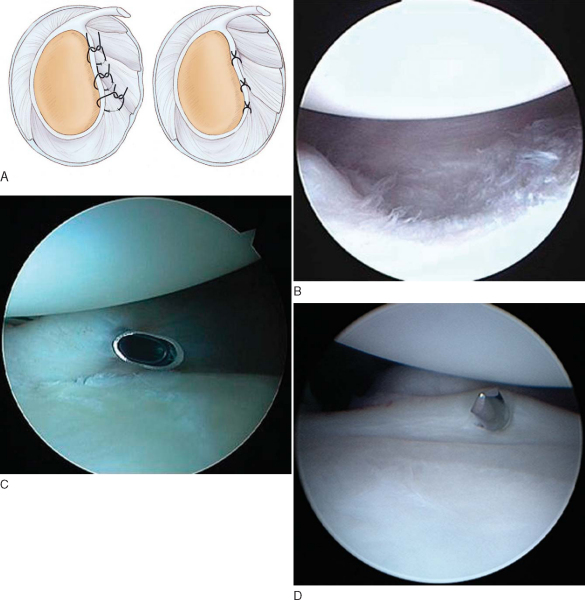
). The angle of approach for the portal must provide for orientation of the anchor insertion device at 45 degrees to the glenoid rim to ensure solid anchor placement. We prefer to use a biodegradable, tap-in type anchor for superior labral repair (Bio-Suture Tak; Arthrex, Inc., Naples, Fla).
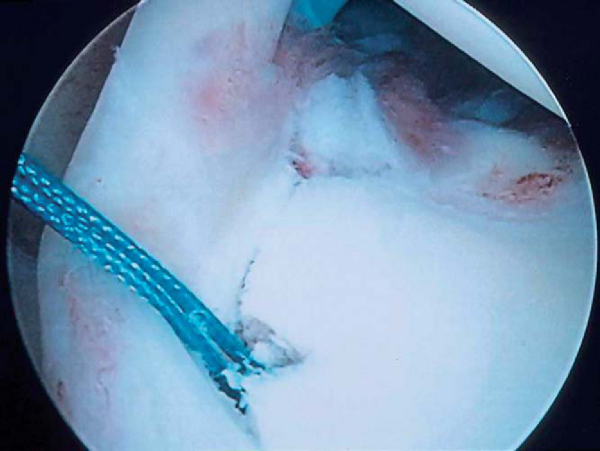
After skin incision, the Spear guide (3.5 mm; Arthrex) is brought into the joint through the portal of Wilmington as described previously for anterior cannula placement. The guide enters medial to the musculotendinous junction of the infraspinatus with minimal damage given its small diameter. The number of anchors to be placed is somewhat subjective but must be sufficient to neutralize peel-back forces.[3] The Spear guide is brought immediately onto the glenoid rim in the area of the previously prepared bone bed. The sharp obturator is removed after proper localization, and a hole is drilled for anchor insertion. The angle of approach of the Spear guide must be meticulously maintained during drilling and subsequent anchor placement to ensure adequate fixation in the bone. We insert anchors until the hilt of the anchor insertion handle abuts the handle of the Spear guide. Gentle twisting in line with the anchor is often needed to remove the insertion handle in dense bone (
Fig. 10-9
). The Spear guide is removed, and both ends of the suture are brought through the anterior cannula using a looped grasper instrument.
|
|
|
|
Figure 10-9 |
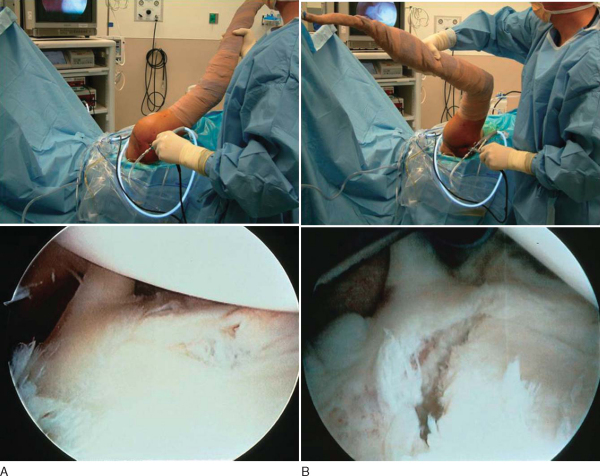
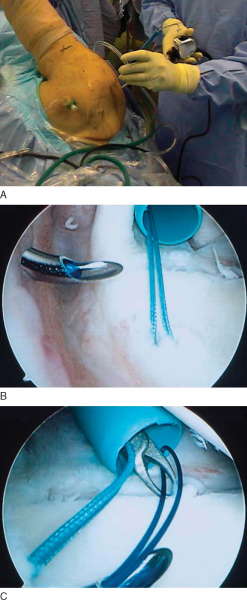
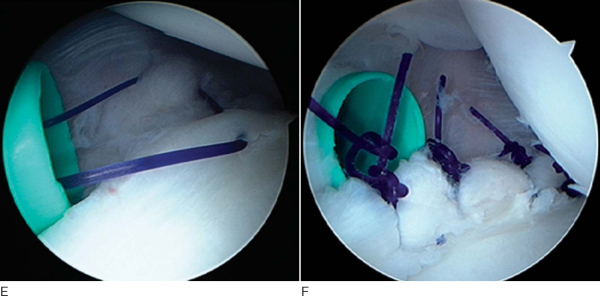
For passage of a suture limb through the labrum, we use a small-diameter, pointed suture-passing device with a wire loop (Lasso Suture Passer; Arthrex). The passing device is brought through the portal of Wilmington without a cannula (again to minimize cuff damage) and into the joint through the muscle rent made by the Spear guide (
Fig. 10-10A and B
). The passer is brought through the labrum from superior to inferior, achieving a solid bite of labral tissue, and carefully advanced over the rim to the glenoid face. The wire loop is extended and brought out the anterior cannula (
Fig. 10-10C
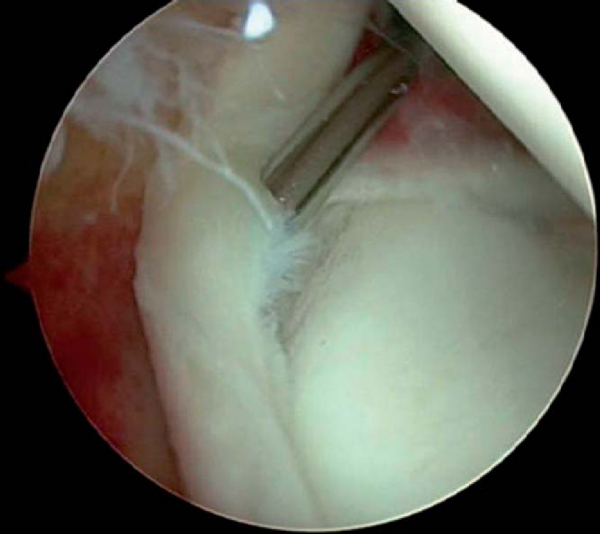
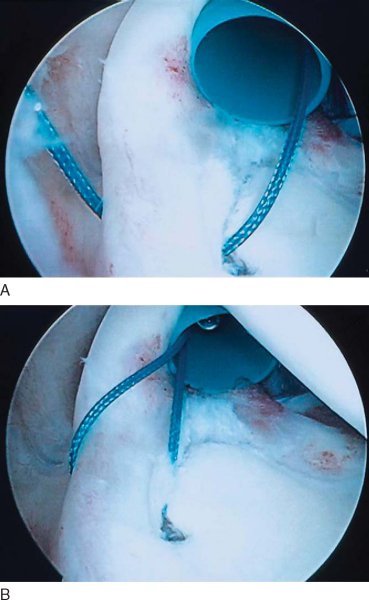
). Next, the suture limb that is closest to the labrum at the anchor site is identified and passed through the wire loop outside the cannula. The wire loop and suture lasso are then carefully removed from the portal of Wilmington, and one of the suture limbs is brought through the labrum and out the portal (
Fig. 10-11A
). The suture limbs around the anchor are carefully observed as the suture is passed to ensure that no tangling has occurred. Next, the suture that has been passed through the labrum and is now out the portal of Wilmington is brought out the anterior cannula and becomes the post limb of the arthroscopic knot (
Fig. 10-11B
). Posterior anchors are tied through the anterior portal either medial or lateral to the biceps tendon. Additional suture anchors are placed posterior or anterior to the biceps anchor until it is secure. Posterior anchors are most easily placed through the portal of Wilmington as described before. Anterior anchors may be placed through the anterior cannula. Although we prefer the lasso suture passer for passing sutures, BirdBeak suture retrievers (Arthrex) may alternatively be used, depending on the surgeon’s preference. The 45-degree BirdBeak is ideal for passing sutures in the posterior labrum through the anterior superior cannula; the 22-degree BirdBeak works well for the anterior labrum.
|
|
|
|
Figure 10-10 |
|
|
|
|
Figure 10-11 |
6. Dynamic Assessment of Repair
After labral repair, the peel-back and drive-through signs are again assessed to confirm that they are negative and that the pathologic process has been corrected. The peel-back maneuver can be performed for dynamic assessment of whether forces at the biceps anchor have been neutralized (
Fig. 10-12
). The drive-through sign is performed to assess for additional anterior laxity that may require correction by capsular plication techniques.
|
|
|
|
Figure 10-12 |
7. Treatment of Associated Disease
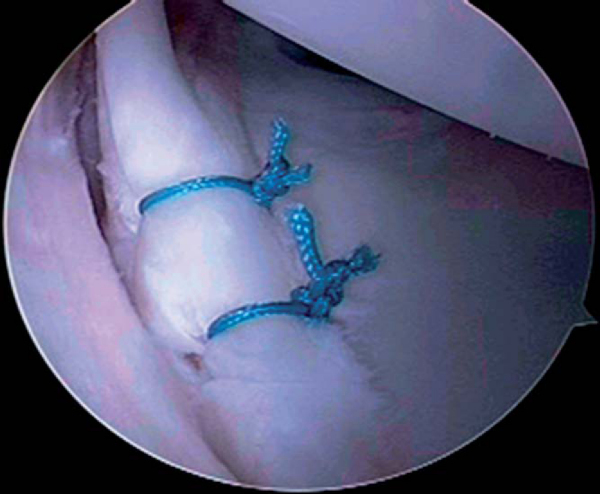
We generally perform a mini-plication in the anterior capsule when there is a persistent drive-through sign, evidence of anterior capsular tissue attenuation, or more than 130 degrees of external rotation in the 90-degree abducted position. The anterior capsular tissue to be plicated is first abraded with a rasp or “whisker” shaver. Capsular redundancy is then obliterated by suturing a lateral portion of the capsule to the glenoid labrum. The amount of tissue plicated depends on the amount of redundancy observed on arthroscopic examination (
Fig. 10-13
). Rarely, a discrete capsulolabral avulsion in the anteroinferior glenoid needs to be repaired as described elsewhere in this text.
|
|
|
|
Figure 10-13 |
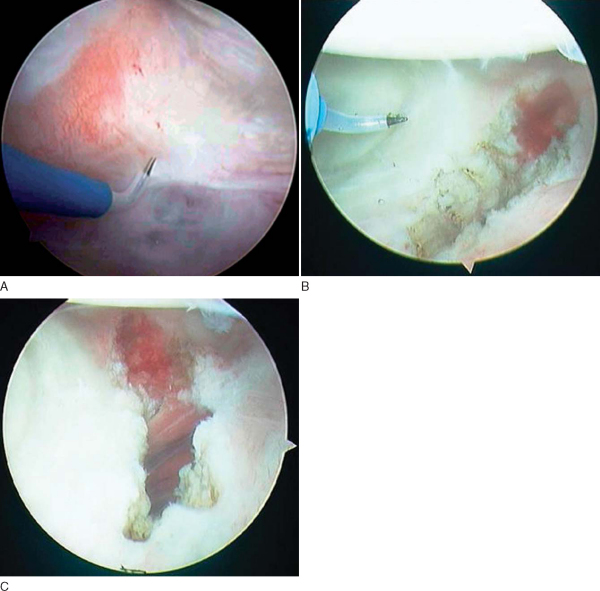
A posteroinferior capsulotomy is performed in patients who are selective stretch nonresponders. The response to stretching is assessed preoperatively as outlined earlier. A posterior capsular release is rarely required as part of the treatment of the disabled throwing shoulder. However, for restoration of full motion, the procedure is indicated for patients who display little or no response to stretching. Arthroscopic findings consistent with a pathologic posteroinferior capsular contracture include inferior recess restriction and a thickened PIGHL complex, which can be up to ½-inch thick in some cases (
Fig. 10-14
). Biopsy of the capsule in these cases reveals hypocellular and disorganized fibrous scar tissue similar in appearance to end-stage adhesive capsulitis.
|
|
|
|
Figure 10-14 |
Posteroinferior capsular release may be performed by one of two methods:
| 1. | Scope in the anterior portal and instrumentation in the standard posterior portal; or | |
| 2. | Scope in the standard posterior portal and instrumentation in the posterosuperior portal (portal of Wilmington). |
We prefer method 2 as it allows better direct visualization of the capsule during release.
The procedure is performed with electrocautery in a nonparalyzed patient. During the capsulotomy, any twitching of the shoulder musculature will alert the surgeon that the procedure is being performed too close to the axillary nerve, thus placing the nerve at risk for injury. If this occurs, the capsulotomy should be moved to a more superior or medial portion of the capsule or abandoned altogether if no safe zone can be found. A hooked-tip arthroscopic bovie (meniscal bovie; Linvatec, Largo, Fla) with a long shaft is used. The capsulotomy is full thickness and made ¼-inch peripheral to the labrum in the posterior inferior quadrant (6-o’clock to 3- or 9-o’clock). A sweeping technique is used to gently section progressively deeper layers of the capsule under direct visualization (
Fig. 10-15
). The capsulotomy typically results in a 50- to 60-degree increase in internal rotation immediately (
Fig. 10-16
).
|
|
|
|
Figure 10-15 |
|
|
|
|
Figure 10-16 |
All procedures are performed on an outpatient basis. Patients are typically seen 1 day after surgery for dressing change. At 1 week, sutures are removed, and self-directed range of motion is begun under specific guidelines. Patients are seen at regular intervals during the rehabilitation phase to monitor progress with motion and to advance therapy as appropriate.
| • | Immediate: Passive external rotation with arm at the side (not in abduction); flexion and extension of the elbow. Patients undergoing posterior inferior capsulotomy begin internal rotation sleeper stretches on postoperative day 1. | |
| • | Weeks 1 to 3: Pendulum exercises. Passive range of motion is begun with a pulley device in forward flexion and abduction to 90 degrees. Shoulder shrugs and scapular retraction exercises are begun in the sling. The sling is worn when the arm is not out for exercises. | |
| • | Weeks 3 to 6: The sling is discontinued after 3 weeks. Passive range of motion is advanced to full motion in all planes. Sleeper stretches are started in patients not undergoing capsulotomy. | |
| • | Weeks 6 to 16: Stretching and flexibility exercises are continued. Passive external rotation stretching in abduction is begun. Strengthening for rotator cuff, scapular stabilizers, and deltoid is initiated at 6 weeks. Biceps strengthening is begun at 8 weeks. Continue daily sleeper stretches indefinitely. | |
| • | 4 months: Interval throwing program is started on level surface. Stretching and strengthening are continued with emphasis on posterior inferior capsular stretching. | |
| • | 6 months: Pitchers start throwing full-speed, depending on progression in interval throwing program. Continue daily sleeper stretches indefinitely. | |
| • | 7 months: Pitchers are allowed full-velocity throwing from the mound. Continue daily sleeper stretches indefinitely. |
Complications are similar to those of other procedures involving arthroscopic shoulder reconstruction, including a rare incidence of infection, failed repair, painful adhesion formation, and stiffness. Physicians and therapists working with throwing athletes must be vigilant for the development of postoperative shoulder stiffness through regular followup and a directed therapy program. All athletes are instructed to continue daily internal rotation stretches indefinitely to prevent recurrence of the pathologic cascade that will place stress on the repair.
In 182 baseball pitchers (one third professional, one third college, one third high-school) treated during an 8-year period, 92% resumed pitching at the preinjury performance level or better. UCLA scoring averaged 92% excellent results at 1 year and 87% excellent results at 3 years. Pitchers undergoing posteroinferior capsulotomy had an average GIRD reduction of 31 degrees at 6 months and 30 degrees at 2 years and an average increase in fastball velocity of 11 mph at 1 year after the procedure. Results of GIRD reduction for patients treated with SLAP repair with capsular stretching and SLAP repair with capsulotomy are shown with combined UCLA scores in Tables 10-2 to 10-4 [2] [3] [4].
| Preoperative | 1 Year | 2 Years | |
|---|---|---|---|
| GIRD (average degrees) | 46 | 13 | 15 |
| TMA (throwing shoulder) | 120 | 148 | 146 |
| TMA (nonthrowing shoulder) | 158 | 160 | 159 |
| Preoperative | 1 Year | 2 Years | |
|---|---|---|---|
| GIRD (average degrees) | 42 | 12 | 12 |
| TMA (throwing shoulder) | 114 | 147 | 147 |
| TMA (nonthrowing shoulder) | 158 | 160 | 157 |
| 1 Year (182) | 2 Years (124) | 3 Years (86) | |
|---|---|---|---|
| Excellent | 92% | 90% | 87% |
| Good | 8% | 10% | 13% |
| Fair | 0% | 0% | 0% |
| Poor | 0% | 0% | 0% |
| PEARLS AND PITFALLS | |||||||||||||||||||||||||||||||||||||||||||||
Steps to avoid operating in the distended shoulder
|
1.
Burkhart SS. Arthroscopically-observed dynamic pathoanatomy in the Jobe relocation test. Presented at the symposium on SLAP lesions, 18th open meeting of the American Shoulder and Elbow Surgeons; Dallas, Texas; February 16, 2002.
2.
Burkhart SS, Morgan CD, Kibler WB: The disabled throwing shoulder: spectrum of pathology. Part I: pathoanatomy and biomechanics.
Arthroscopy 2003; 19:404-420.
3.
Burkhart SS, Morgan CD, Kibler WB: The disabled throwing shoulder: spectrum of pathology. Part II: evaluation and treatment of SLAP lesions in throwers.
Arthroscopy 2003; 19:531-539.
4.
Grossman MG, Tibone JE, McGarry MH, et al: A cadaveric model of the throwing shoulder: a possible etiology of superior labrum anterior-to-posterior lesions.
J Bone Joint Surg Am 2005; 87:824-831.
5.
Jobe CM: Posterior superior glenoid impingement: expanded spectrum.
Arthroscopy 1995; 11:530-537.
6.
Morgan CD, Burkhart SS, Palmeri M, et al: Type II SLAP lesions: three subtypes and their relationship to superior instability and rotator cuff tears.
Arthroscopy 1998; 14:553-565.
7.
Panossian VR, Mihata T, Tibone JE, et al: Biomechanical analysis of isolated type II SLAP lesions and repair.
J Shoulder Elbow Surg 2005; 14:529-534.
8.
Walch G, Boileau J, Noel E, et al: Impingement of the deep surface of the supraspinatus tendon on the posterior superior glenoid rim: an arthroscopic study.
J Shoulder Elbow Surg 1992; 1:238-243.

