
occurring distal to the insertion of the flexor and extensor tendons.
They are the most common injuries of the hand and can lead to a
significant functional and cosmetic deficit if they are not treated
appropriately. The fingertip is the end organ for touch and is richly
supplied with special sensory receptors that enable the hand to relay
the shape, temperature, and texture of an object. The glabrous skin of
the fingertip is specially adapted for pinch and grasp functions. Its
volar surface consists of a fatty pulp covered by highly innervated
skin. The skin of the fingertip is firmly anchored to the underlying
terminal phalanx by multiple fibrous septa that traverse the fatty pulp.
stable skin coverage, and adequate padding are the goals of
reconstruction. There are many treatment options, which range from
allowing the wound to heal by secondary intention to flap coverage or
revision amputation. No single procedure can be recommended, but each
case must be individualized depending on the needs of the patient and
the type of injury (19,32).
Patient-related factors that should be considered include age,
occupation, avocation, and general health. Injury-related factors
include associated nail bed injuries, angle of injury, bone exposure,
digit injured, and concomitant injuries.
this injury. It discusses the indications, advantages, and
disadvantages of each procedure, along with a treatment algorithm.
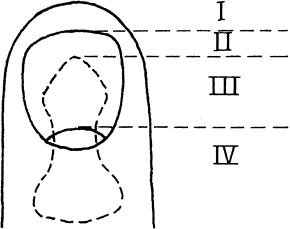
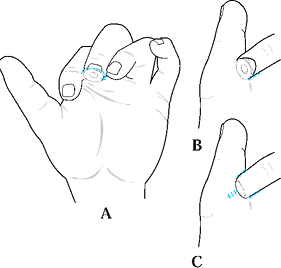
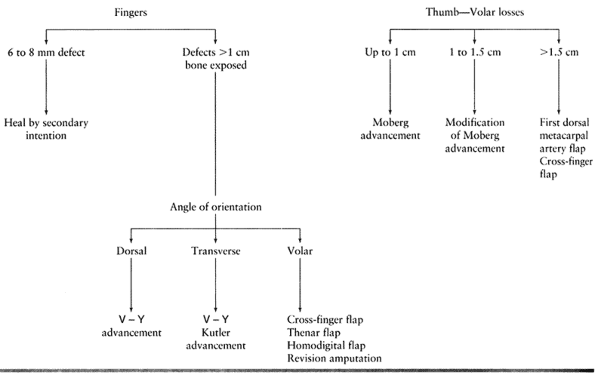
Type 1 injuries involve only the pulp, and type 2 injuries involve the
pulp and nail bed. Type 3 injuries include partial loss of the distal
phalanx, whereas type 4 injuries are proximal to the lunula. This
classification is useful because it allows the surgeon to help organize
treatment options (Fig. 38.1). For example,
type 1 injuries may heal quite well by secondary intention. In
contrast, types 3 and 4 often require some type of flap coverage.
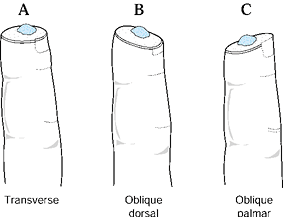
Injuries must also be thought of in terms of whether bone is exposed
and the angulation of injury. There are three general terms used to
describe the angulation of injury—dorsal oblique, transverse, and volar
oblique (Fig. 38.2). In general, dorsal oblique
and transverse injuries are more suited to local flaps. Volar oblique
flaps often require a regional flap. By considering all of these
factors for each patient, a rational treatment plan can be initiated.
 |
|
Figure 38.1. The classification of injuries is illustrated.
|
 |
|
Figure 38.2. The angles of injury are shown.
|
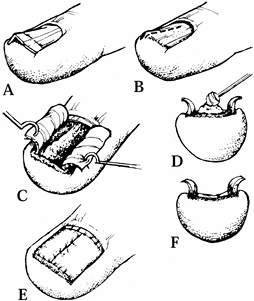
the wound to heal by secondary intention. This method relies on
reepithelialization and contracture to provide wound closure. It is
reserved for small defects (6 to 8 mm) without exposed bone and with
minimal loss of pulp tissue. In young children this method provides
good results even if bone is exposed.
-
Begin treatment with a thorough debridement of the wound, which can be performed under local anesthesia in the emergency room.
-
Perform local wound care two to three
times daily with dressing changes. Healing is usually completed by 3 to
6 weeks depending on the size of the defect.
They noted that very few patients had pain or limited range of motion
at 6 months from injury, although there was a 27% incidence of nail
deformity. Other complications of this treatment method include delayed
healing, pyogenic granuloma, cold intolerance, and stump tenderness.
One should realize that the missing tissue is replaced by scar. Owing
to the deficient tissue, the tip can become quite sensitive and
therefore patients who use their fingertips repetitively during work
are poor candidates for this technique.
adequate integrity, use the part for soft-tissue coverage. If there is
no exposed bone, defat the skin and suture it into the defect. The
defatting is extremely important, because this piece will now act as a
free skin graft. Minimize its thickness to enhance its chances of
“taking.” This skin, however, may necrose and then would serve as a
biologic dressing. The chance of success with this treatment is greater
when used in children.
This is because children of this age have the extraordinary ability to
heal these injuries. Elsahy reattached amputated fingertips without a
microvascular anastomosis in 35 patients; subsequent survival was
correlated with the level of injury (11). Tip
amputations without nail bed involvement (Allen Type 1) survived in
four of five patients. In contrast, only 2 of 10 amputations proximal
to the lunula (Allen Type 4) survived. The major complication of this
procedure
is the necroses of the composite graft. If the finger is amputated 2 mm
proximal to the lunula, then replantation can be considered.
Microvascular anastomosis is difficult at this level. This procedure
can give better cosmetic and functional results when compared with
terminalization and revision amputation.
digit or revision amputation. This procedure is indicated in situations
in which minimal bone is exposed and the angle of the injury is such
that other options are not appropriate. Take care to limit loss of
length, particularly in treating the thumb. This procedure can be
performed under local anesthesia in the emergency room if minimal bone
shortening is required. Develop the flaps to cover the tip of the
digit, preferably with volar skin. Use the volar skin rather than the
dorsal skin to provide a more padded and durable soft tissue cover for
the fingertip. Patients can return to their activities as tolerated
when the soft tissues have healed.
loss but adequate subcutaneous tissue is present with no exposed bone.
The lack of exposed bone is paramount, because skin grafts will not
“take” on bone. Use this technique for injuries with skin loss of
greater than 1 cm. In cases of smaller skin defects, allow the wound to
heal by secondary intention, as previously described. Skin grafts can
be divided into split thickness or full thickness. Full-thickness
grafts provide better sensibility and durability, as well as a better
cosmetic result. On the other hand, split-thickness skin grafts have a
greater likelihood of “taking.” Idler and Strickland recommend
split-thickness grafts because of their ability to contract and draw in
normal tissue with a greatly reduced size of the defect (19).
Take split-thickness skin grafts of 0.012 to 0.015 inches thick.
Harvest smaller split thickness grafts free hand from the glabrous skin
of the hypothenar eminence. Take larger grafts from the thigh or
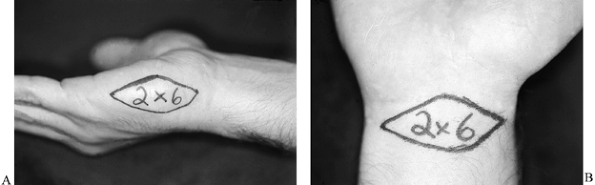
buttocks. Harvest full-thickness skin grafts locally from the palmar
wrist crease or from the hypothenar area (Fig. 38.3A, Fig. 38.3B).
The palmar wrist crease provides an area of approximately 2 × 6 cm,
whereas the hypothenar skin provides an area of 2 to 2.5 cm in width by
6 to 8 cm in length. Harvest larger amounts of full-thickness skin
grafts from distant sites such as the hairless area of the groin. The
donor site in a full-thickness graft is typically closed primarily.
Excellent hemostasis of the injury site must be obtained to avoid the
postoperative complication of hematoma formation. Secure the graft with
a bolus stent type of dressing that is left undisturbed for 5 to 7
days. Start therapy after the dressing is removed.
 |
|
Figure 38.3. A: The area to be taken for a hypothenar skin flap is shown. B: The skin that can be harvested from the palmar wrist crease is illustrated.
|
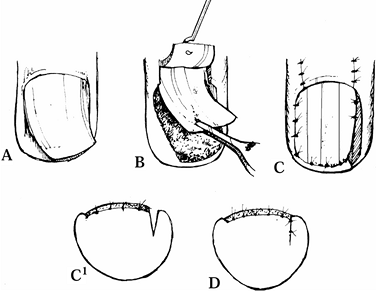
subcutaneous tissue and normal sensory end organs to cover defects.
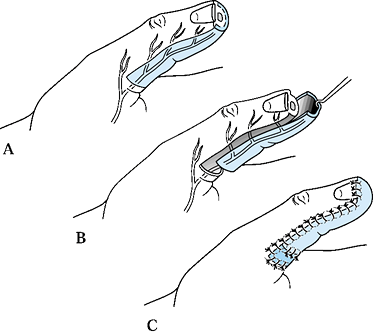
There are two common advancement flaps used for fingertip injuries.
Both share similar principles in that a V incision is made adjacent to
the defect. Atasoy and colleagues popularized the V-Y advancement flap
in which the incision is made palmar, and Kutler described a similar
flap in which the incisions are made laterally (2,22). The skin and subcutaneous tissues are advanced forward, and the proximal defect is closed end to end. After closure, the
proximal portion of the wound forms the vertical line of the Y. Range
of motion therapy is started 7 to 10 days following either local
advancement flap as the wound permits. Another local flap is the
homodigital triangular flap, which is dissected more proximally and the
digital artery is included within the flap. Lanzetta et al. have
recently described good results using this technique for volar oblique
amputations (23).
It can be used for transverse amputations, although it is more
difficult in this setting. The procedure is, however, contraindicated
in palmarly angulated injuries.
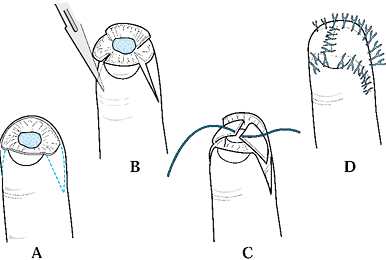
-
Make the incisions with the apex of the V
at the midpalmar distal interphalangeal joint and the arms of the V
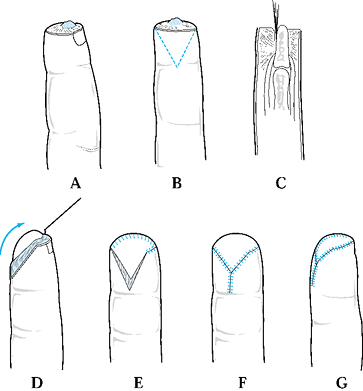
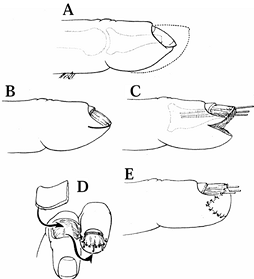
extending to the widest portion of the amputation (Fig. 38.4B).![]() Figure 38.4. A: A V-Y advancement flap, most useful in patients with a dorsal oblique type of injury, is shown. B: This is the approach for a planned incision. C: An incision to the fibrous septal attachments at the bony phalanx is shown. D: The septae are released; traction is placed distally. E: Tension is released. F,G: The wound is closed.
Figure 38.4. A: A V-Y advancement flap, most useful in patients with a dorsal oblique type of injury, is shown. B: This is the approach for a planned incision. C: An incision to the fibrous septal attachments at the bony phalanx is shown. D: The septae are released; traction is placed distally. E: Tension is released. F,G: The wound is closed. -
Incise the skin, leaving the subcutaneous tissues intact.
-
Release the fibrous septa connecting the
flap to the underlying bone. This allows maximum mobilization and keeps
the flap’s blood and nerve supply intact. -
Use gentle traction with skin hooks to advance the flap into the defect.
-
Release all tension so that suturing the
distal margin of the flap is done without blanching (use small
monofilament surture, 6-0 or 7-0). This avoids potential tip necrosis. -
Close the remaining donor defect side to side. This flap provides like tissue with good color and sensory characteristics.
flap, hypesthesias, dysesthesias, impaired sensation, and cold
intolerance.
The design of this flap is similar to the V-Y advancement flap in that
the apex is at the distal interphalangeal (DIP) joint and the base at
the amputation site, although in this procedure the flap is placed
laterally. The flaps can be elevated on one or both sides of the digit.
Care again must be taken to divide the fibrous septa and preserve the
neurovascular supply of the flap (Fig. 38.5).
 |
|
Figure 38.5. Kutler flaps are shown. A: This is the method used for bilateral flaps. B: The incision with traction is illustrated. C,D: The wound is closed.
|
-
Plan bilateral flaps with the apices of the triangles in the midlateral line of the distal interphalangeal flexion crease.
-
Make the incisions to the level of the
fibrous septal attachments at the bony phalanx, using traction distally
with a skin hook to release proximal septa so flaps advance to the
midline (Fig. 38.5B). -
Begin tension-free closure with small (6-0 or 7-0) nonabsorbable monofilament suture.
-
Complete closure with several interrupted absorbable sutures at the amputated nail bed margin (Fig. 38.5D).
and the resultant suture line lies over the pulp. This factor has
likely led to the hypersensitivity noted by some patients. The two
advancement flaps have similar complications including numbness, cold
intolerance, and dysesthesias.
parts of the hand that do not use tissue adjacent to the defect. This
section discusses the cross-finger and thenar flap, which are
considered for injuries not amenable to local flaps. They are well
suited for volar oblique type injuries. The cross-finger flap can also
be used in treating more proximal soft-tissue injuries of the finger.
Owing to the postoperative immobilization required, the procedures are
discouraged in patients predisposed to finger stiffness. This includes
patients older than 50 years of age, patients with rheumatoid
arthritis, and patients with multiple injured digits. These flaps are
also not well suited for young children because of lack of compliance
and simpler methods are usually adequate.
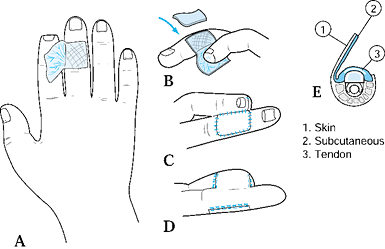
from the dorsum of the adjacent finger to resurface a palmar defect. Do
not use this flap in patients with vasospastic disorders including
Buerger’s disease and Raynaud’s phenomenon (6,8,17).
-
Create a template for the defect, drawing
the pattern on the dorsum of the adjacent digit over the middle
phalanx. Base the flap on the lateral aspect of the adjacent finger.
The flap may be dissected from the midlateral line of the lateral
aspect of the adjacent finger to the midlateral line medially as
required to encompass the size of the defect. -
Carry down the dissection through the
subcutaneous tissues, taking care not to disturb the paratenon of the
extensor mechanism. Leave the paratenon intact to allow skin grafting
of the donor site. -
Also leave undisturbed the dorsal veins within the flap.
-
Cleland’s ligaments, however, may need to
be divided to provide full mobility. An innervated flap can be
accomplished by including a dorsal cutaneous nerve branch, which is
then sutured to the proper digital nerve. -
After the flap is raised, deflate the tourniquet. Obtain hemostasis to prevent hematoma formation.
-
Inset the flap and trim appropriately (Fig. 38.6).
Suture the flap into the recipient finger defect, using an interrupted
half-buried mattress monofilament suture (6-0 or 7-0). Cover the donor
site with a full-thickness skin graft that is sutured to the hinged
portion of the flap. Secure the skin graft with a bolster dressing and
immobilize the digits in a position that places the least tension on
the flap. This is usually in the intrinsic plus position. Kirschner
wires are rarely needed to maintain this position.![]() Figure 38.6. A dorsal cross-finger flap is shown. A: This is the method for a planned incision. B: A full-thickness skin graft is sutured and secured. C: The flap is sutured. D: The palmar view of the repair is shown. E: A cross section of the donor finger is shown.
Figure 38.6. A dorsal cross-finger flap is shown. A: This is the method for a planned incision. B: A full-thickness skin graft is sutured and secured. C: The flap is sutured. D: The palmar view of the repair is shown. E: A cross section of the donor finger is shown. -
Divide the flap and inset at 10 to 14
days postoperatively. Begin therapy soon after flap division. Be
careful not to divide the flap too close to the recipient side in order
to allow the flap to be inset more easily. This is a reliable flap, but
there is usually a color mismatch at both the donor and recipient
sites. One can expect protective sensation postoperatively, with
two-point discrimination often twice normal.
-
Design the flap with its base at the midaxial line of the middle phalanx of the donor finger.
-
Elevate the skin of the donor finger as a
full-thickness skin graft and separate from the subcutaneous tissues.
The base of this skin is opposite to the defect. Elevate the
subcutaneous tissue on the dorsum of the donor finger as a flap, with
its base hinged adjacent to the defect, leaving the paratenon again
intact. -
Inset this flap into the defect and sew
the skin back over the donor site. Then create a skin graft for the
flap of subcutaneous tissue that has been transferred to the recipient
finger defect. -
Apply a bolus stent-type dressing.
-
Place the skin graft over the transferred subcutaneous tissue (Fig. 38.7).
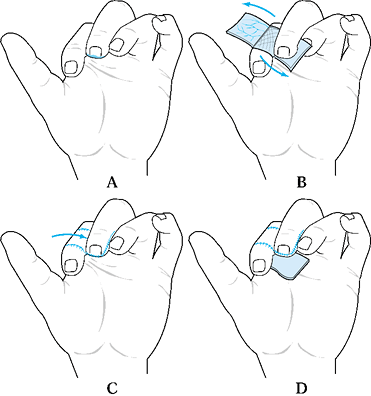 Figure 38.7. A reverse cross-finger flap is shown. See the text for details. A: Design of the skin flap. B: Elevate the subcutaneous flap. C: Donor skin is sutured. D: The subcutaneous flap is sutured, and the skin is grafted.
flap, a defect located on the palmar aspect of the long finger could be
treated with a standard cross-finger flap. The donor finger would be
the ring finger, and the flap would be hinged radially. The donor site
would then be skin grafted. If the defect of the long finger was
dorsal, a reverse cross-finger flap would be performed. The donor
finger, however, would be the index finger and the flap would be hinged
ulnarly. In this procedure, the recipient finger requires skin grafting.
contraindications as the cross-finger flap. The procedures are best
suited for volar fingertip defects.
-
Elevate this random pattern flap from the
thenar eminence and hold the involved finger in flexion for insetting
of the flap. Placing the flap ulnarly on the thenar eminence has been
associated with scar tenderness. Base the flap proximally, distally, or
radially dependent on the defect (Fig. 38.8A).
The distal border should be parallel and adjacent to the
metacarpophalangeal (MP) joint crease. The flap should be 1.5 times the
width of the defect. This allows the soft tissue of the finger to
assume a more rounded and normal appearance.![]() Figure 38.8. A thenar flap is shown.
Figure 38.8. A thenar flap is shown. -
Once the flap is outlined, dissect the skin and subcutaneous tissues off the thenar musculature.
-
Take care not to injure the radial digital nerve or recurrent branch of the median nerve.
-
Close the flap donor site primarily in a
linear fashion with interrupted monofilament sutures, or cover with a
full-thickness skin graft (Fig. 38.8B, Fig. 38.8C). Smith and Albin described an H-type thenar flap (40). In this procedure, fill the donor defect by advancing the remaining half of the H (Fig. 38.9). Approximate the raised flap to the amputation site by palmarly abducting the thumb
P.1253
and flexing the MP joint and the distal interphalangeal joint of the
recipient finger. This minimizes the amount of proximal interphalangeal
(PIP) flexion required for immobilization to less than 40° to 50° and
decreases the risk of a PIP flexion contracture.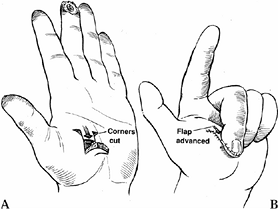 Figure 38.9. A:
A modification of the technique described by Smith and Albin is to
incise two flaps in an H shape with small Burow’s triangles cut at the
base of the distal flap. B: The proximal
flap is turned in a standard fashion to cover the fingertip, while the
distal flap is advanced proximally to close the donor defect at one
operation. (From Calkins ER, Smith DJ. The Cross Finger Flap. In: Blair
WP. Techniques in Hand Surgery. Baltimore: Williams and Wilkins,
1996:58. -
Divide the flap at 10 to 14 days
postoperatively. The base of the pedicle on the thenar eminence may be
trimmed of excessive tissue, but usually neither the donor site nor the
recipient finger requires further insetting. -
Start active flexion and extension exercises immediately.
PIP flexion contracture and tenderness at the donor site. Melone et al.
analyzed 150 cases and recommended designing the flap high on the
thenar eminence and not on the palmar aspect of the hand (26).
In Melone’s series, the average 2-point discrimination was 7 mm. In
addition, the donor site was an infrequent source of pain. Only 4% of
patients developed a flexion contracture, none of which were believed
to be related to the procedure.
of the body other than the injured limb. These procedures are
considered in hand injuries with large soft-tissue defects and provide
thick, fatty coverage with little sensibility. The flaps can be
developed from the chest, abdomen, groin, or opposite arm.
involved in 50% of the function of the hand. Preservation of length of
the thumb is more important functionally than in any other digit.
Procedures used for thumb coverage described in this section include
the Moberg advancement flap, cross-finger flap, palmar cross-finger
flap, and neurovascular island flaps.
volar skin with its subcutaneous tissues and neurovascular bundles
distally into a thumb tip defect (27,30).
The unique anatomy of the thumb makes this flap more suitable for the
thumb than the other digits. There is a risk of a flexion contracture
postoperatively, but the thumb has only one interphalangeal joint, and
a flexion deformity of this joint causes little functional deficit. The
fingers, however, have two interphalangeal joints, and a flexion
contracture of the proximal interphalangeal joint imparts a significant
disability. Other differences between the thumb and fingers include
their respective blood supplies. A component of the blood supply to the
thumb arises from the first dorsal metacarpal artery. The thumb is less
dependent on the volar blood supply. In contrast, the fingers rely more
on the volar blood supply and, therefore, risk tip necrosis with this
flap. The volar advancement flap has many advantages over other local,
regional, and distant flaps. It provides immediate restoration of
essentially normal sensation with preservation of length. It can be
done in a single stage with low donor site morbidity. The pulp contour
is restored, and the rehabilitation time is relatively short. In
contrast to a neurovascular island flap, no cerebral cortical
programming is needed.
-
This flap is well suited to the volar
oblique amputation of the thumb that is 1 to 1.5 cm in length. The
surgical technique involves skin incisions on both the radial and ulnar
midaxial lines. Make these incisions dorsal to the neurovascular
bundles. Extend the incision proximally to the MP flexion crease or
proximal phalanx (Fig. 38.10A). The incision can be extended further proximally to the thenar eminence for larger defects.![]() Figure 38.10. A palmar advancement flap is shown. A: This is the method for a planned incision. B: Palmar soft tissue is advanced. C:
Figure 38.10. A palmar advancement flap is shown. A: This is the method for a planned incision. B: Palmar soft tissue is advanced. C:
Suture the flap into place distally, using a small (6-0 or 7-0)
monofilament suture without tension. It may be necessary to flex the
interphalangeal joints to achieve tension-free closure. Place a
full-thickness skin graft over the donor defect. -
Elevate the flap from the flexor sheath
and flex the thumb at the interphalangeal and MP joints to allow
coverage of 1 cm defects (Fig. 38.10). Contour
the flap when insetting it. The flap may be sutured to the nail. If the
skin blanches, more proximal dissection is needed.
a V-Y advancement at the base or bilateral Z-plasties along the
longitudinal incisions (10). In addition, Dellon has described a modification that can be made up to 3 cm in length by using rotational flaps proximally (9).
Results of the Moberg advancement flap have shown excellent return of
sensitivity within two-point discrimination with 2 mm of the
contralateral fingertips.
using a number of variations. This includes a standard cross-finger
flap, a cross-finger flap including a branch of the superficial radial
nerve with or without neurorrhaphy, and a palmar cross-finger flap. In
treating thumb injuries, the index finger is used as the donor site for
the standard cross finger flap and the long finger is used for the
palmar cross finger flap (3,18,43,44).
The importance of a sensate thumb tip has led to the use of innervated
flaps. One option is a cross-finger flap that includes a branch of the
superficial radial nerve.
-
Raise the flap from the dorsal aspect of
the proximal phalanx of the index finger. Dissect the superficial
radial nerve branches and protect them proximally. -
Make a V-type incision with one limb
along the radial midlateral line of the index finger and extending
proximally along the second metacarpal. -
Make the other limb of the incision from
the ulnar side of the defect of the thumb. Inset the flap and transfer
the sensory nerve branches to the thumb incision. -
Use a full-thickness graft to resurface the donor site.
-
Detach the flap at 3 weeks.
One can modify this procedure by transecting the dorsal radial sensory
nerve branch more proximally and performing a neurorrhaphy with the
ulnar digital nerve of the thumb. These procedures have the obvious
advantage of bringing an innervated pedicle to the thumb. In Walker’s
series, all had cortical adaptation, but when carefully asked three of
five patients had sensation referred to the dorsal index finger. They
found that most patients had good sensation that may have been a
combination of median and radial nerve sensation. They also found that
the ulnar aspect of the flap had better sensory recovery than the
radial aspect.
injuries of the distal thumb. The surgical technique is similar to the
standard cross-finger flap except the palmar skin is elevated for the
flap. When used for the distal thumb, the long finger is often the
donor site.
-
Design the flap on the palmar surface of the middle phalanx. Its base should lie along the ulnar border in the midaxial line (Fig. 38.11A).
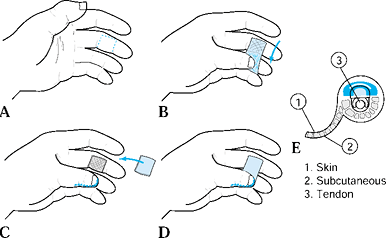 Figure 38.11. A palmar cross-finger flap is shown. A: This is the flap design. B: The flap is elevated. C: The flap is inset, and the donor site skin is grafted. D: The repair is completed. E: A schematic cross section of the donor finger illustrates the proper plane of dissection.
 -
Elevate the flap just superficial to the
flexor sheath, taking care to preserve the ulnar neurovascular bundle
and to not separate the flap from the radial neurovascular bundle (Fig. 38.11B). -
Suture the flap into place with a fine
monofilament suture and suture a full-thickness skin graft over the
donor middle phalanx. Apply a bolus dressing. -
Complete the repair.
al., include better quality of skin because it is taken from the palmar
surface (43). In addition, both digits are
positioned in a more comfortable posture, which may decrease PIP joint
stiffness. Cosmesis is also improved because the scar is on the palmar
surface as compared with the more obvious dorsal surface of the donor
digit. The risks of this procedure include exposing the tendon flexor
sheath, stiffness, a painful donor site, and the potential for
neurovascular injury. These complications have limited its use.
of the border of a finger with its neurovascular bundle to the thumb.
This technique sacrifices sensation in a finger of less importance to
transfer sensate soft tissue to the thumb. It can be performed as a
primary or reconstructive procedure. The donor site is often the ulnar
border of the
long finger, although one may also use the ulnar or radial aspect of the ring finger (24).
-
Preoperatively, it is important to assess
the arterial flow of the donor finger and the digit adjacent to the
flap because the adjacent vessel is ligated. After the recipient site
is prepared, dissect the digital nerves of the thumb to the muscle
bellies of the flexor pollicis brevis and transect at this point. The
deep location of the nerves helps prevent neuroma formation. -
Outline the donor site flap 3 to 4 mm
proximal to the midline of the nail plate. The more distal the flap on
the donor finger, the better the sensitivity in the recipient thumb.
Carry the incision proximally along the midlateral line and palmar
aspect of the hand. The distal margin of the flexor retinaculum marks
the proximal portion of the incision. If the anatomy is normal, dissect
from proximal to distal. -
Confirm that the common digital artery
arises from the superficial arch and not the deep arch. Take care not
to skeletonize the neurovascular bundle but, rather, take the
neurovascular bundle as a unit with the subcutaneous tissue. This
minimizes the risk of injury to the vessels. -
Ligate the digital artery branch to the
adjacent finger and longitudinally separate the common digital nerve of
the web space. Continue to dissect proximally to the superficial palmar
arch. Then pass the neurovascular bundle beneath the digital nerve and
transfer it to the thumb. -
Make a wide tunnel superficial to the
palmar fascia. Then place a penrose drain from the thumb and passing
into the palmar defect. Place the flap inside the penrose drain and
transfer to the thumb. -
After suturing the flap into place,
assess its viability. If flow is not adequate, ensure that there is no
kinking of the vascular pedicle. -
Treat the donor site defect with a combination of primary closure and full-thickness skin graft (Fig. 38.12).
![]() Figure 38.12. An island flap is shown. A:
Figure 38.12. An island flap is shown. A:
Design the flap over the ulnar border of the long finger. It should be
of the size necessary to match the recipient defect. Take care not to
detach the neurovascular bundle from the undersurface of the flap. Use
Brunner incisions to mobilize the donor vessels back to the palmar
arch. B: Use sutures for traction as flap elevation and mobilization proceed. C: Make a generous tunnel beneath the palmar skin to allow the tension-free passage of the flap into the recipient defect. D: Complete the repair with a full-thickness skin graft placed onto the donor defect. Apply a bolus dressing.
authors have reported a deterioration of two-point discrimination with
time. Others believed that this deterioration can be minimized with
meticulous technique (41). The flap requires some cortical reorientation, which is not always complete.
to the volar thumb in a one-stage procedure without the need for
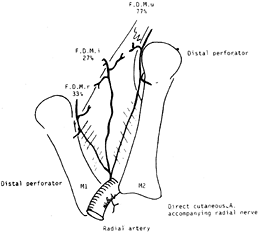
microvascular repair. Sherif has reviewed the anatomy of the first
dorsal metacarpal artery (FDMA) and found the artery present in all
cases (38) (Fig. 38.13).
The artery originates from the radial artery, just distal to the
extensor pollicis longus before the radial artery dips in between the
two heads of the first dorsal interosseous muscle. He also found that
the FDMA gave off three consistent branches: a radial branch, an ulnar
branch, and an intermediate branch. Furthermore, a cutaneous branch was
always present and originated from either the radial artery or the
first dorsal metacarpal artery. The FDMA is superficial
to
the dorsal interosseous fascia and is covered by some fibers of this
layer. Before making the incision, a Doppler scan may be used to
identify the FDMA.
 |
|
Figure 38.13. The FDMA and its three fascial branches. The incidence of it being a large vessel is marked near each artery.
|
-
Elevate the flap from the dorsal aspect at the base of the index finger. It can be extended to the PIP joint distally (14,31,38,39). If additional width of the flap is needed, expand it toward the third metacarpal to avoid a first web space contracture.
-
Expose the FDMA distally to proximally and raise the aponeurosis with the perivascular fat as a pedicle (Fig. 38.14). The artery is usually superficial to the fascia, and a branch of the superficial radial nerve is included in the pedicle.
![]() Figure 38.14. The design of various flaps in the first web space is shown. A:
Figure 38.14. The design of various flaps in the first web space is shown. A:
Proximally based flaps are based on one of the FDMA branches. The
island flap pedicle includes the FDMA and its branches, the first DIO
fascia, subcutaneous tissue and veins, as well as the radial nerve
branches and the accompanying artery. B: The distally based flap is based on one of the distal perforators (arrows). C: A double flap from the web space: The fascial flap is based on FDMA (marked in the drawing by a hook), and the cutaneous flap is based on the artery accompanying the radial nerve (dotted line). -
Take care to stay superficial to the
extensor tendon paratenon. Rotate the proximally based flap around the
point of origin of the artery at the base of the first interosseous
space. During the dissection, there is often a large perforator near
the second metacarpal neck that must be ligated. -
Once the pedicle is raised, tunnel it
subcutaneously to the thumb without kinking. The flap can be used to
cover thumb defects, either palmarly or dorsally, and can reach from
the proximal portion of the thumb almost to its tip.
adults, we assess the injury-related factors as well as patient-related
factors such as age, occupation, general medical health, hand
dominance, compliance, and associated injuries (Table 38.1).
For small defects (less than 8 mm) with no exposed bone, we prefer to
let these injuries heal by secondary intention. We have found that the
cosmesis and sensitivity are adequate. If the defect is larger or has
exposed bone, then we try to use a local flap. The flap required is
dependent on the angulation of injury. For transverse or dorsal oblique
injuries, we prefer a local V-Y advancement. We also use a lateral V-Y
advancement for transverse defects. If the defect is oriented volarly,
we perform a cross-finger flap or a thenar flap. Both require patient
compliance, a second surgical procedure, and postoperative
rehabilitation. For larger defects, we consider distant flaps and
revision amputation. If there is a minimal portion of the nail bed
remaining or no bone to support the nail bed, than a revision
amputation is performed with ablation of the nail germinal matrix.
 |
|
Table 38.1. Management of Thumb and Fingertip Injuries in Adults
|
volar injuries, we prefer the Moberg advancement flap. For larger
defects, we use a first dorsal metacarpal or a cross finger flap.
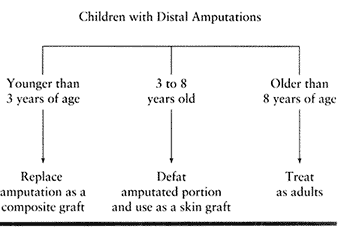
amputated portion as a composite graft. In the 3- to 8-year-old age
group, we defat the amputated part and use it as a free skin graft.
Patients older than 8 years of age are treated as adults (Table 38.2).
 |
|
Table 38.2. Children with Distal Amputations
|
believes that the deficit in sensitivity, hypesthesias, dysesthias, and
cold intolerance in distal tip amputations may be primarily related to
the injury and not to the treatment.
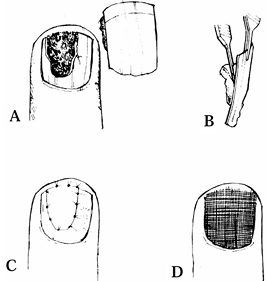
has four components: the nail plate, the nail bed, the perinail soft
tissues, and the underlying bone and ligamentous support. The nail has
multiple functions, including supporting and protecting the fingertip.
It also plays a role in sensation of the digit in that if the nail is
lost two-point discrimination of the finger decreases (45).
Nail growth is dependent on several factors including age of the
patient, injury pattern, and seasonal changes. On average, growth is
approximately 0.1 mm per day. After loss of a nail, it takes
approximately 3 to 6 months for a new nail to grow in completely, and
nail growth is not normal for the first 100 days (5).
The nail fold is the most proximal portion of the nail complex. It
consists of two parts, which include the dorsal roof and germinal
matrix. The dorsal roof of the nail fold forms the cells that
contribute to the shine of the dorsal nail surface. The nail bed also
consists of two components. The most proximal portion is the germinal
matrix. It is located along the proximal ventral floor of the nail fold
and extends to the lunula. This is the area of the nail bed epithelium
where nail plate production begins, and it is critical to nail growth (Fig. 38.16). The sterile matrix is the distal portion of the nail bed and extends
from the lunula to the hyponychium. The sterile matrix acts as a road
map for growth of the advancing nail and functions to keep the nail
adherent to the underlying epithelium (Fig. 38.17).
The eponychium is the distal portion of the nail fold that attaches to
the dorsal surface of the nail. The lunula is the white arc just distal
to the eponychium that parallels the natural distal shape of the nail.
Distally, the hyponychium is the area of junction of the nail bed and
the fingertip skin. It functions as a protective barrier and prevents
bacteria from migrating beneath the nail.
 |
|
Figure 38.15. The anatomy of and terminology for the distal segment of the fingernail are shown.
|
 |
|
Figure 38.16. With the eponychium reflected, the germinal matrix and complete extent of the nail are visible (GM). The central slip (CS) is inserting at the base of the nail matrix.
|
 |
|
Figure 38.17. Longitudinal drawing shows the terminology of the anatomy of the nail bed.
|
nail bed injuries and had very similar findings. The majority of these
injuries occurred from a closing door, a machine injury, a saw injury,
or by being crushed between two objects (Table 38.3) (16,48).
 |
|
Table 38.3. Causes of Nail Bed Injuries
|
utmost importance to prevent a nail deformity. Treatment of a nail
deformity often requires a reconstructive procedure that is technically
demanding, and the results are typically less than optimal. One problem
facing the surgeon evaluating the injured nail is obscured
visualization due to a subungual hematoma. In general, subungual
hematomas encompassing greater than 50% of the nail have a higher
likelihood of being associated with a displaced nail bed injury. In
this situation, one should consider removing the nail and exploring the
nail bed. Injuries with a subungual hematoma of less than 50% of the
nail are less likely to have a repairable nail bed injury and should be
treated nonoperatively. Patients may experience pain from the pressure
related to a subungual hematoma. Making a
small
hole in the nail with a microophthalmic cautery can relieve the
pressure. Drain the hematoma while taking care to not injure the
underlying nail bed.
involve the germinal matrix or sterile matrix. In general germinal
matrix injuries are more serious. Nail formation starts and is
predominantly from the germinal matrix; therefore an injury in this
region has a higher likelihood of permanently affecting nail growth.
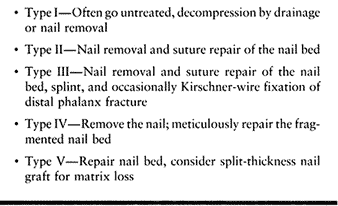
Van Beek et al. have further classified acute fingernail injuries, as
outlined below (42).
Obtain radiographs to evaluate for a displaced distal phalanx fracture.
Treat grade I injuries nonoperatively unless they are painful, for
which decompression or nail removal can be performed.
 |
|
Table 38.4. Treatment of Nail Bed Injuries
|
-
Treat grade II, III, and IV injuries by
first carefully removing the nail. An adherent nail may indicate a
grade I injury with limited nail bed involvement. -
Facilitate nail removal with a freer
elevator by exploiting the plane between the nail and the nail bed. Be
careful when removing the nail so as not to injure the nail bed. -
Clean the nail and debride the nail bed
if necessary. There is little advancement possible of the nail bed, so
limit debridement to contaminated or devitalized tissues. -
Repair the nail bed under loupe magnification using 6-0 or 7-0 chromic suture.
-
If the proximal germinal matrix is
injured, visualization may be obscured by the nail fold. Make skin
incisions at 90° to the nail fold along the lateral border of the nail.
Then elevate the nail fold to evaluate the extent of injury fully. -
Most distal phalanx fractures are treated
with a splint. A displaced fracture may cause displacement of the nail
bed, and occasionally Kirschner wire fixation is required. -
After repair, replace the nail beneath
the nail fold. Replacement of the nail has several important functions:
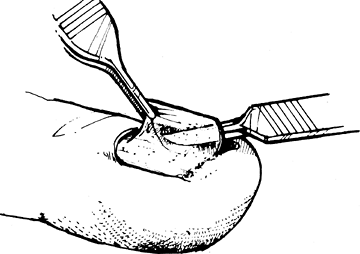
(a) it serves as a template for the new growing nail; (b) it serves as
a splint for fractures, (c) it provides a biologic dressing for the
nail bed, and (d) it prevents scarring of the nail fold to the nail bed. -
Suture the nail in place with 4-0 or 5-0
nylon sutures. Place two horizontal mattress sutures proximally both
radially and ulnarly to prevent injury to the germinal matrix. One or
two simple sutures may be placed in the distal aspect of the nail and
pulp to further secure the nail. -
If the nail is fragmented or not available, an artificial nail, Silastic sheet, or nonadherent gauze can be used.
-
Bandage the finger to protect the digit and restrict motion for 7 to 10 days. Leave the replaced nail in place for 2 weeks.
sterile matrix. Similar to nail bed lacerations, the majority of
avulsions occur in the distal aspect of the sterile matrix. Nail bed
avulsions account for approximately 15% of all traumatic injuries to
the nail (36). If the nail bed is allowed to heal by granulation, the resultant scar may cause a nail deformity or nonadherence.
Often, the nail bed is attached to the nail plate. A decision must be
made whether to separate the nail bed from the nail plate or suture the
nail bed and plate as one unit. If the pieces are small, we tend to
suture the nail bed and plate as one segment. If the fragment of the
avulsed nail bed is large, it is carefully separated from the nail
plate (Fig. 38.18). The nail bed can be sutured directly onto bone, as outlined by both Zook and Shepard (36,47).
 |
|
Figure 38.18. A: A nail bed avulsion is shown. B: The matrix is attached to the plate. C: The avulsed segment is sutured. D: The nail plate is replaced.
|
-
Many times, inspection in these
situations reveals that the nail matrix is still attached to the
avulsed nail plate. If the segment of nail matrix is large, shave it
away for use as a free graft (Fig. 38.18B). -
Properly align the avulsed segment and suture it to the defect with 6-0 or 7-0 chromic suture.
-
Replace the avulsed nail to cover the defect (Fig. 38.18D). If the nail plate is badly damaged, the dressing should be fine mesh gauze or other nail substitute.
-
Use half-buried horizontal mattress
sutures in conjunction with nail roof elevation to anchor a displaced
nail plate or nail bed, or both, into the proximal nail fold (Fig. 38.19).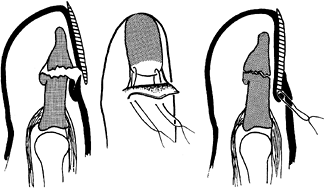 Figure 38.19. The nail plate is sutured.
 -
The skin remnants can be sewn to the surrounding skin with 6-0 nylon suture.
germinal matrix. A bending force through the distal phalanx is
transmitted proximally to avulse the germinal matrix and displace the
nail from beneath the nail fold. In the past, the distal nail was left
in place and the proximal avulsed nail bed was reapproximated (34). At present, elevation of the entire nail to ascertain the degree of injury and repair is recommended (Fig. 38.19) (36).
amenable for repair, alternative treatment methods are necessary. In
the past, treatment involved split-thickness skin grafts, dermal
grafts, and healing by secondary intention. Zook and Shepard have used
split-thickness nail bed grafts with good success (37,47).
The preferred donor site is the injured nail, although grafts have been
described from the great or second toe. Full-thickness grafts are
discouraged due to the associated donor site morbidity.
-
Harvest a split-thickness graft from
adjacent tissue for coverage. A split-thickness nail matrix graft from
a great toe can be used if insufficient tissue is presented on the
digit of the avulsion. -
When taking a split-thickness nail graft,
keep in mind that the thickness of the nail sterile matrix is only 240
to 990 µm (30 to 40 thousandths of an inch) and that the grafts are 165
to 240 µm (7 to 11 thousandths of an inch) (Fig. 38.20). Use a microscope to facilitate harvesting the graft.![]() Figure 38.20.
Figure 38.20.
In harvesting a split-thickness skin graft, an attempt is made to keep
the graft so thin that the point of the knife can be seen through the
graft. In practicality, the thickness of the graft varies from 7 to 10
thousandths of an inch. -
Create a template of the defect with a
rubber glove and outline on the donor tissue. The tip of the scalpel
should be seen at all times when harvesting the graft. Not visualizing
the tip of the blade will likely lead to a graft that is too thick. -
Once the graft is procured, sew it into the defect with 7-0 chromic suture (Fig. 38-21).
A linear avulsion may be treated with a bipedicle graft as an
alternative. This technique fills the defect by advancing the nail bed
from either side.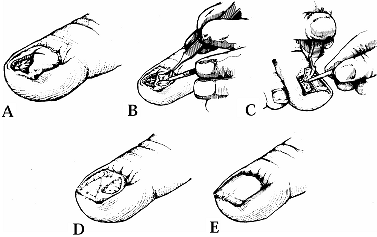 Figure 38.21. A: A deep avulsion of the sterile matrix is shown. B: An adjacent matrix graft is harvested. C: A matrix graft from the great toe is shown. D: The graft is sutured. E: The graft is covered. (From Shepard GH. Treatment of Nail Bed Avulsions with Split-Thickness Nail Bed Grafts. J Hand Surg 1983;8:49.)
 -
The ideal dressing is the removed nail plate covered with a firm dressing.
abnormalities. Typical deformities include nonadherence, split nails,
linear ridging, crooked nails, and hooked nails. Nonadherence
after
trauma is the most common nail deformity. Distal nonadherence can be
problematic due to dirt becoming lodged underneath the nail. Proximal
nonadherence is more troublesome because the nail can become unstable
and tear loose when picking up small objects. Nonadherence occurs when
the nail does not adhere to the abnormal scar that has formed within
the injured nail bed. Scar excision and primary repair has been
performed. Although Zook and Russell believe that primary closure of
the nail bed leads to excessive tension with resultant increased scar,
they have recommended split-thickness nail grafting (20,37,47).
germinal or sterile matrix. The nail, therefore, grows on either side
of the scar in the germinal matrix. The scar in the sterile matrix
leads to nonadherence, and increased stresses in the nail causes the
split or crack. Reconstructing a split nail is similar in principle to
treating nonadherence. If the split is in the sterile matrix or distal
germinal matrix region, the scar is excised and replaced with a
split-thickness matrix graft. A split nail due to an abnormality in the
germinal matrix requires a germinal matrix graft, which can be
harvested from another finger or toe. Both have the complications of
persistent deformity and donor site morbidity (Fig. 38-22).
 |
|
Figure 38.22. A: A split nail following a 3 mm punch biopsy for the diagnosis of a ganglion. B: The defect at the base of the nail measures exactly 3 mm in diameter. C: After removal of the nail, the scar at the distal border of the germinal matrix is seen. D: A split-thickness nail graft is removed from the dorsum of the nail bed. E: The split-thickness nail bed graft is sutured in place with 7-0 chromic sutures. F: The patient’s nail is shown 1 year later.
|
beneath the nail bed. As described by Kleinert, the treatment in this
setting involves incising the nail bed over the involved area (20).
An ostectomy is performed, and the nail bed reapproximated. Shepard has
reported good results in six patients with this technique (Fig. 38.23) (37).
If the etiology is due to scar from an injury to the sterile matrix,
one can excise the scar and replace it with a split-thickness nail bed
graft. For defects in the germinal matrix, one may be forced to use a
full-thickness graft with
its
associated donor site complications. Linear ridging may be related to
compression of the germinal matrix from a mucous cyst arising from the
DIP. These cysts often arise in association with an osteophyte of the
DIP related to degenerative joint disease. The deformity may progress
from ridging to a split nail. Aspiration of the cyst often leads to
recurrence. The surgical management involves excision of the osteophyte
and cyst, including the stalk from the DIP. Gingrass et al. have
reported a low rate of cyst recurrence with this technique (15). Progression of the nail deformity is prevented, but the deformity is likely to persist.
 |
|
Figure 38.23. A: A linear defect with nail ridging is shown. B: A linear incision was made over the bone protrusion. C: Matrix flaps are reflected away, revealing defect. D: Protruding bone is filed away. E: A slight overcorrection of the bony defect is encouraged to prevent thickening with callous formation. F: The nail matrix is sutured over the corrected bone.
|
Rather than rotating a portion of the nail bed into the defect, the
recommended management involves elevation of the entire nail bed and
placing it in a straight position (Fig. 38.24).
 |
|
Figure 38.24. A: Longitudinal curvature of nail is shown. B: A full thickness flap of matrix is illustrated. C: The epidermis is excised, and the flap is rotated. D: The wedge is sutured.
|
-
After removal of the nail plate, create a
full-thickness flap of sterile and germinal matrix down to the bone,
with the only attachment being the proximal portion of the germinal
matrix. -
Excise the epidermis between the nail bed and nail fold in the direction of rotation of the flap.
-
Rotate the flap into the correct longitudinal position.
-
Suture the wedge excision primarily, creating a straight nail.
aspect of the nail. It can be due to a malunited fracture or a
deficiency of skin of the digital pulp. Atasoy et al. have described an
“antenna” procedure for correcting the deformity (Fig. 38-25) (4). The procedure involves freeing
the tethered pulp and nail bed, splinting the freed nail bed, and reconstructing the soft-tissue defect of the pulp.
 |
|
Figure 38.25. A: A hook-nail deformity and normal contour of fingertip (dotted line) are shown. B: This is the procedure for removal of nail plate and skin marking. C:
The pulp is reflected, the full-thickness of the nail matrix is elevated, and the nail matrix is splinted with three small Kirschner wires, like antennae. D: Coverage of the defect with a cross-finger flap is shown. E: Appearance after division of flap (2 weeks after surgery). (From Atasoy E, Godfrey A, Kalisman M. The “Antenna” Procedure for the Hook-Nail Deformity. J Hand Surg 1983;8:55.) |
-
Elevate the curved nail plate from the nail bed along its length and discard the portion of the nail plate distal to the lunula.
-
Incise the pulp skin along the
hyponychium and extend it on both sides of the pulp. Deepen the
incision to reflect the pulp skin in a normal contour. Elevate the
full-thickness nail bed to the level where the nail bed is straight. -
Insert two or three 0.028 Kirschner wires into the distal phalanx to splint the nail bed.
-
Cover the pulp defect with a cross-finger
flap. Shepard has recommended reconstructing the pulp defect with a
lateral V-Y advancement flap and skin graft rather than a cross-finger
flap (37). Bone grafting of the elevated
portion of the distal phalanx has been discouraged by Zook due to the
likelihood of bone graft resorption (46). -
An alternative treatment method involves
shortening the nail bed, thereby allowing the nail to be supported by
bone. A hook nail may be prevented while treating the initial injury by
shortening the nail bed 2 mm greater than the distal phalanx (21). Both procedures are simple solutions but leave one with a shortened nail.
grafting, nail prosthesis, or total nail reconstruction. Total nail
reconstruction involves transfer of the nail bed as a free or
vascularized nail graft. The free graft can be taken by elevating the
nail plate and harvesting the nail bed and matrix as far as the
proximal end of the nail matrix (29,33).
In free nail grafts, Shepard notes the importance of taking the
proximal nail fold. All patients in his series in which this was not
incorporated would have failed. When the proximal nail fold was
incorporated, he had a 50% success rate (37). The lateral edge of the great toe is often the donor site. The donor site is covered with a split-thickness skin graft.
flaps transfer a free nail with the advantage of better biologic
adherence and viability. They are technically more difficult and take
much longer to perform (12). Three types of
vascularized grafts have been described. The first type is a long
pedicle vascularized nail flap. This flap entails an 11 cm incision in
which the digital artery and vein are used for anastomosis. A venous
flap allows for a shorter incision, with the venous anastomosis
proximal to the interphalangeal joint. The disadvantage of this flap is
the concern of the existence of venous valves. The last flap is the
short pedicle vascularized nail flap, which represents a combination of
the above two flaps.
which the severity is often overlooked. It is imperative that these
injuries be treated accurately initially to prevent a nail deformity.
Nail bed injuries should be repaired anatomically and may require
fixation of a displaced distal phalanx fracture. If it is available,
the nail or substitute is replaced beneath the nail fold. Limiting a
nail deformity may preclude the need for one of the technically
demanding reconstructive procedures.
scheme: *, classic article; #, review article; !, basic research
article; and +, clinical results/outcome study.
MK, Brown RE, Zook EG. Treatment of Fingernail Deformities Secondary to
Ganglions of the Distal Interphalangeal Joint. J Hand Surg 1995;20A:502.
M, Mastropasqua B, Chollet A, Brisebois N. Versatility of the
Homodigital Triangular Neurovascular Island Flap in Fingertip
Reconstruction. J Hand Surg 1995;20B:824.
JE, Tsai T, Li Y, Kleinert HE: The Repair of Nail Deformities with the
Nonvascularized Nail Bed Graft: Indications and Results. J Hand Surg 1990;15A:466.