
-
Plaster (1,2)
-
Plaster bandages and splints are made by impregnating crinoline with plaster of paris [CaSO4)2H2O].
When this material is dipped into water, the powdery plaster of paris
is transformed into a solid crystalline form of gypsum, and heat is
given off:
-
The amount of heat given off is determined by the amount of plaster applied and the temperature of the water (3,4).
The more plaster and the hotter the water, the more heat is generated.
The interlocking of the crystals formed is essential to the strength
and rigidity of the cast. Motion during the critical setting period
interferes with this interlocking process and reduces the ultimate
strength by as much as 77%. The interlocking of crystals (the critical
setting period) begins when the plaster reaches the thick creamy stage,
becomes a little rubbery, and starts losing its wet, shiny appearance.
Cast drying occurs by the evaporation of the water not required for
crystallization. The evaporation from the cast surface is influenced by
air temperature, humidity, and circulation about the cast. Thick casts
take longer to dry than thin ones. Strength increases as drying occurs. -
Plaster is available as bandage rolls in widths of 8, 6, 3, and 2 inches and splints
in 5- × 45-inch, 5- × 30-inch, and 3- × 15-inch sizes. Additives are
used to alter the setting time. Three variations are available.
Extra-fast setting takes 2 to 4 minutes, fast setting takes 5 to 6
minutes, and slow setting takes 10 to 18 minutes.
-
-
Fiberglass cast.
In recent years, a number of companies have developed materials to
replace plaster of paris as a cast. Most of these are a fiberglass
fabric impregnated with polyurethane resin. The prepolymer is methylene
bisphenyl diisolynate, which converts to a nontoxic polymeric urea
substitute. The exothermic reaction does not place the patient’s skin
at risk for thermal injury (2,5,6).
These materials are preferred for most orthopaedic applications except
in acute fractures in which reduction maintenance is critical.
Fiberglass casts do not provide higher skin pressure when compared to
plaster casts when properly applied (7).-
Advantages.
These materials are strong, lightweight, and resist breakdown in water;
they are also available in multiple colors and patterns. -
Disadvantages.
They are harder to contour than plaster of paris, and the polyurethane
may irritate the skin. Fiberglass is harder to apply, although the
newer bias stretch material is an improvement. Review in detail the
instructions from each manufacturer before using the casting materials.
Patients are commonly under the impression that fiberglass casts can be
gotten wet. This is incorrect; if submerged, they need to be changed to
avoid significant skin maceration.
-
-
The water.
Warm water causes more heat to be given off and affords faster setting.
Cold water allows for less heat and for slower setting. Plaster of
paris in the water
P.102
bucket
from previously dipped plaster accelerates the setting time. The water
used for dipping should be deep enough to cover the material rolls
standing on end. -
Cast padding
-
Webril has a
smooth surface and less tendency for motion within the thickness of the
padding than some of the other padding materials. It requires the most
practice to achieve a smooth application, however. -
Specialist is
softer than Webril and contains wood fiber. It has a corrugated
appearance, and there is more tendency for sliding to occur within the
material. It is easier to apply without wrinkles than Webril, but it
becomes very hard if caked with blood. -
Sof-Roll is a
soft padding similar in appearance to Webril but slightly thicker. It
has greater tear resistance and is therefore easier to stretch. -
Stockinet
-
Bias-cut
stockinet may be used under a cast as a single layer. It is easy to
apply without wrinkles and is better than tubular stockinet if there is
a large difference in the maximum and minimum diameters of the
extremity. Bias-cut stockinet can be made snug throughout, in contrast
to tubular stockinet, which can be snug in the large diameter of the
extremity but very loose in the narrow diameter. Plaster sticks to the
stockinet, so there is no sliding between the cast and the stockinet
padding. -
Tubular stockinet is made of the same material as the bias-cut type and is available in varying tube sizes from 2 to 12 inches.
-
-
Felt or Reston
should be used to pad bony prominences and for cast margins. When
padding over bony prominences, such as the anterior superior iliac
spine, make a cruciate incision in the felt for better contouring. -
Moleskin adhesive can be used to trim cast margins.
-
-
Adherent materials.
Adherent substances (such as Dow Corning medical adhesive B) are
applied to prevent slipping and chafing between the skin and the
padding. They can contribute, however, to an increased amount of
itching inside the cast. Tincture of benzoin compound should not be
used in this situation because of fairly frequent skin reactions.
Commercial adhesive removers are available. -
Equipment
-
Use a clean bucket. Plaster residue and other particles in the water can alter the setting time.
-
Gloves keep
hands clean and prevent dry skin if one applies many casts. They also
make a smoother finish than is achieved by bare hands. They are
mandatory for working with fiberglass materials. -
Shoe covers and aprons or gowns keep shoes and clothes clean to prevent one from appearing sloppy in plaster-covered attire.
-
Use appropriate draping to maintain the dignity of the patient as well as to keep plaster off all areas not casted.
-
Cast cutters
-
The cast-cutting electric saw
has an oscillating circular blade that cuts firm rigid surfaces, such
as casts or bony prominences. When lightly touched, the skin vibrates
with the blade but the blade does not cut. If the blade is firmly
pressed against the skin or dragged along it, then it will cut. The saw
is noisy and causes considerable anxiety, especially in children.
Therefore, it is wise to show younger patients that cast saws are safe
by touching the blade to the palm of the hand. The cast saw causes dust
to fly; consequently, use of this tool is best avoided in clean
operating rooms. In addition, cast saws can cut skin if applied with
excessive force, so it is unwise to use them on anesthetized patients. -
Hand cutters
are useful when a saw is not available or to avoid frightening a child
with the noise of the saw, to lessen the amount of plaster dust in the
operating room, and to remove damp plaster.
-
-
Cast spreaders
are used to open the cut edges of a cast for access to underlying cast
padding, which is then cut with scissors. Spreaders come in various
sizes for large and small casts. -
Cast knives
have sharp blades, and preferably have large handles for better
control. Sharp blades are essential; therefore, most practitioners
prefer to use no. 22 disposable surgical blades. -
Cast benders adjust cast edges to relieve skin binding and pressure.
-
Cast dryers
blow warm to hot air around a plaster cast. They are generally not
necessary. An exposed cast and a fan work just as well and are safer.
Cast dryers can burn skin and tend to hasten the drying time of the
outer layers only.
P.103 -
-
Casts are used for the following purposes:
-
To immobilize
fractures, dislocations, injured ligaments, and joints; to provide
relief from pain caused by infections and inflammatory processes; and
to facilitate healing -
To allow earlier ambulation by stabilizing fractures of the spine or lower extremities
-
To improve function
by stabilizing or positioning a joint, such as for wrist drop after a
radial nerve injury, which also allows more useful hand function -
To correct deformities, as in serial casting for clubfoot or joint contractures
-
To prevent deformity resulting from a neuromuscular imbalance or from scoliosis
-
-
Principles.
Although plaster of paris has been used extensively in the treatment of
fractures for more than 100 years, there is no unanimity of opinion as
to the best technique for application. It can be safely concluded that
even the tightest of skintight casts allows some motion at the fracture
site, whereas a loosely fitted, well-padded cast with proper
three-point fixation can provide satisfactory immobilization. Three
points of force are produced by the practitioner, who molds the cast
firmly against the proximal and distal portions of the extremity (two
of the points) and locates the third point directly opposite the apex
of the cast, as shown in Fig. 7-1.
Periosteal or other soft-tissue attachments usually are required on the
convex side of the cast to provide stability. In this way, a curved
cast can provide straight alignment of the extremity within it.
Charnley has stated, “If a fracture slips in a well-applied plaster,
then the fracture was mechanically unsuitable for treatment by plaster,
and another mechanical principle should have been chosen.” Another
method for providing immobilization by plaster is based on hydraulics.
Fractures of the tibia do not shorten significantly when placed in a
“total contact” cast. The leg is a cylinder containing mostly fluid,
and when this water column is encased in rigid plaster, the cylinder
does not shorten in height because tissue fluid is not compressible. -
The following application techniques have been satisfactory in our hands:
-
The patient is informed of the procedure and instructed in whatever cooperation is necessary.
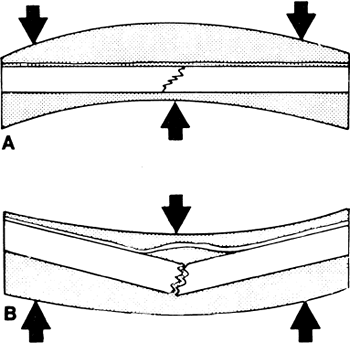
![]() Figure 7-1. A:
Figure 7-1. A:
Three-point plaster fixation will stabilize a fracture when the soft
tissue bridging the fracture acts as a hinge under tension. B: If the three forces are applied in the wrong direction, the fracture displaces. -
The surgeon or cast technician must have clearly in mind what to do and what will be required
(the position of the patient and assistants, how many rolls of plaster
will be needed, tools to trim the cast edges, etc.). All material and
equipment required to do the job properly should be assembled. (Once
cast application starts, it is difficult to stop and obtain something
that was forgotten.) The patient’s position must be comfortable and
must allow the surgeon and assistant to apply the cast expeditiously.
Special maneuvers required to perform and hold the reduction are
rehearsed. -
A circular cast should not be used in fresh trauma or postoperatively when one anticipates swelling, unless the cast is bivalved or split initially and provisions are made for adequate observation.
-
Adequate observation
means an examination by a competent observer at least once hourly until
any swelling begins to recede. Signs of compartmental syndrome, in
order of importance, are the following: increasing pain and discomfort
in the extremity, increasing tenseness or tenderness in the involved
compartment, pain with passive range of motion of the muscle in the
involved compartment, decreasing sensation—especially to two-point
discrimination and light touch—in the distribution of the nerves that
travel through the involved compartment, increasing peripheral edema,
and, finally, decreasing capillary filling. Good peripheral circulation with distal arterial pulses is no assurance that a compartmental syndrome is not developing (see Chap. 2, III). -
An excellent alternative to plaster casts in this situation is a Jones compression splint, as described in Chap. 6, III.B and C.
-
-
If unexpected swelling occurs in a circular cast, bivalve or split the cast immediately all the way to the patient’s skin as described in IV.B and C.
-
Unless specifically contraindicated, clean
the part to be casted with soap and water, then dry it with alcohol.
Apply the cast over a single layer of cast padding with edges of the
material minimally overlapping. Protect unusual bony prominences with a
1/4-inch felt or foam rubber padding. -
Dip the plaster or fiberglass rolls in water
by placing them on end, which allows air to escape and results in
complete soaking of the plaster. The bandages are sufficiently soaked
when the bubbling stops. They can be left in the water up to 4 minutes
without decreasing the strength of the cast, but the setting time
decreases the longer they are immersed. Therefore, for maximum working
time, remove bandages soon after the bubbling stops. Lightly crimping
the ends of the plaster bandages helps prevent telescoping of the roll. -
Except for very large casts (e.g., body casts, spicas), all plaster bandages should be dipped and removed from the water at the same time.
Thus, all the plaster in the cast is at the same point in the setting
process. This scheme maximizes the interlocking of the crystals between
the layers of plaster, thereby maximizing the strength of the cast. In
addition, delamination between the bandages is decreased. -
Use cool water for larger casts when more time is needed to apply all the plaster or fiberglass, and use warm water for smaller casts or splints. Never use hot water because enough heat can be generated to burn the patient (8).
Similarly, do not place limbs with fresh casts onto plastic-covered
pillows; these tend to hamper heat dispersion significantly and may
result in burning. If the patient complains of burning, it is prudent
to remove the cast immediately and reapply using cooler water. -
Keep the plaster bandage on the cast
padding, lifting it off only to tuck and change directions—that is, to
push the plaster roll around the patient’s body or extremity. Use the
largest bandages, usually 4- and 6-in. bandage rolls, that are
consistent with smooth, easy applications. Using large bandages allows
the fastest application of plaster and provides sufficient time for
molding before the critical setting period. Six or seven layers of plaster
or two to three layers of fiberglass usually are sufficient, except in
individuals who are particularly hard on casts. The cast should be of
uniform thickness (seven layers or
P.105
1/4
in.). Avoid concentrating the plaster about the fracture or the middle
of the cast. Avoid placing two circumferential rolls directly on top of
each other while wrapping the plaster on the patient’s extremity.
Reinforce casts where they cross joints by incorporating plaster or
fiberglass splints longitudinally. Incorporate reinforcing plaster
splints into body and spica casts as described later in this chapter (III.B and C). -
During application of the cast, turn the padding back at the edges of the cast and incorporate it.
Another method of finishing the edges is to turn back the padding after
the cast has set and to hold the padding down with a single, narrow,
plaster splint; a row of ordinary staples; or moleskin. -
Apply all the material rapidly
so there is time to work and mold it before the critical setting
period. The cast should have a sculptured look, not only for cosmetic
reasons but also for comfort. If the fracture is to be stabilized by
the three-point fixation principle, it is more important to maintain
the three forces of pressure on the cast during the critical setting
period than to have a perfectly smooth surface on the cast. This step
is more difficult for fiberglass casts. -
Once the critical period of interlocking of crystals begins, molding and all motion should stop until the material becomes rigid. Otherwise, the cast is weakened considerably.
-
After the cast sets and becomes rigid, trim the edges
using a plaster knife or cast saw. Use the knife by supporting the
cutting hand on the cast and pulling the portion of the plaster to be
trimmed up against the knife blade rather than blindly cutting through
the plaster and possibly cutting the patient. If the cast is too thick
or hard, an oscillating cast saw is preferred. -
Apply forearm casts to allow full 90 degrees flexion of all metacarpophalangeal joints and opposition of the thumb to the index and little fingers.
-
Extend leg casts
to support the metatarsal heads but not to interfere with flexion and
extension of the toes. This rule is invalid when the toes need support
(as with fractures of the great toe or metatarsals) or when there is a
motor or sensory deficit. In these situations, the cast is extended as
a platform to support and protect the toes. Place a 1/2-inch piece of
sponge rubber beneath the toes and incorporate it into the plaster for
walking casts, or supply the patient with a commercial cast shoe. -
Immobilize as few joints as possible, but as a general rule, one immobilizes the joint above and below a fresh fracture.
-
Instruct the patient regarding
-
Signs and symptoms of compression from swelling within the cast
-
Elevation of the injured part above the level of the heart for 2 to 3 days after the injury
-
How soon to walk on the cast (never sooner than 24 hours)
-
Instructions for weight bearing and ambulation; this should include crutch or walker training
-
How to exercise joints not incorporated in plaster
-
Date of the next appointment
-
Person to call in case of cast problems or evidence of a compression syndrome
-
P.104 -
-
Use plaster splints when rigid immobilization is not required or when significant swelling of the extremity is anticipated.
-
Upper extremity
-
Usually splint the wrist
dorsally by applying a 3-in.-wide plaster splint over cast padding from
the metacarpophalangeal joints to the proximal forearm. While the
plaster is still wet, wrap the arm with bias-cut stockinet or a single
layer of an elastic bandage so that the plaster conforms to the
extremity as it hardens. A dorsal splint may be preferable to a volar
splint because it allows easier finger and hand function. Combined
dorsal and volar splints are frequently used together; this is
preferred and gives better support of the limbs. -
Splint the elbow
with 5- × 30-in. plaster wraps applied posteriorly with enough distal
extension to support the wrist. The splint should not go further
distally than the distal palmar crease in order to facilitate
metacarpal-phalangeal motion. Apply 3-in. plaster strips medially and
laterally across the elbow for reinforcement. Wrap the arm and plaster
splint with bias-cut stockinet or a single layer of an elastic bandage
while the plaster is wet.
P.106 -
-
Lower extremity.
Usually make posterior plaster splints in the lower extremity by
applying a standard cast (knee cylinder, short-leg, or long-leg, cast,
as described in III. D, E, F)
and then bivalving the cast and retaining only the posterior shell.
Hold the posterior splint to the leg with bias-cut stockinet or an
elastic bandage wrap. Alternatively, use 5- × 30-in. posterior and
medial/lateral splints, leaving the anterior aspect of the leg covered
only by soft roll.
-
-
Body casts
-
Apply the basic body jacket
over large tubular stockinet. Place 1/8- to 1/2-in. felt pads over the
shoulders (if suspenders are used), costal margins, iliac crests
including anterior iliac spine, and the dorsal spine. Make a cruciate
cut in the felt placed over the crests to distribute pressure uniformly
over the bony prominence. Apply a single layer of plaster snugly over
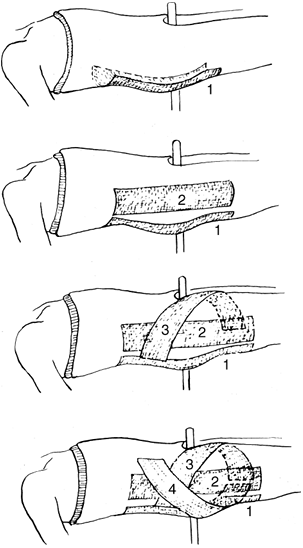
the padding. Splints may be used, as shown in Fig. 7-2.
If suspenders are required, make a “V” with 5- × 30-in. splints. Place
the point of the “V” between the scapulae and bring the ends over the
shoulders. Snugly apply rolled plaster over the splints and mold.
Usually extend the jacket posteriorly from the top of the sacrum to the
inferior angle of the scapulae and anteriorly from the symphysis pubis
to the sternal notch. Body jackets may be applied with the lumbar spine
in flexion or extension as well as the neutral position. For
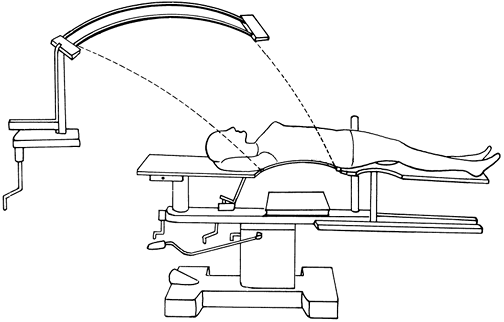
hyperextension body jackets, often used in thoracolumbar fractures, use
the Goldwaithe iron apparatus for positioning, as in Fig. 7-3.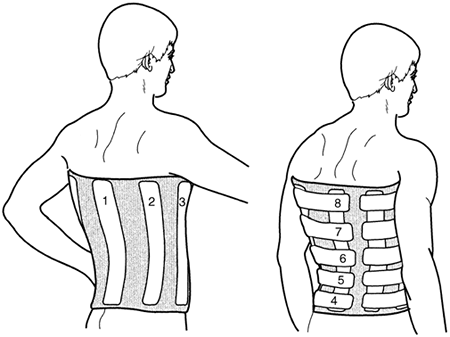 Figure 7-2.
Typical application of plaster splints for a body jacket. The splints
are placed closer together in the lower aspect of the body jacket. The
splints are numbered in order of application.![]() Figure 7-3. Goldwaithe irons, used to make a hyperextension plaster body jacket. The irons are removed after the cast is set.
Figure 7-3. Goldwaithe irons, used to make a hyperextension plaster body jacket. The irons are removed after the cast is set. -
The Minerva body jacket
is named after the goddess Minerva, who sprang forth from Jupiter’s
head when it was cleaved by Vulcan in an attempt to relieve Jupiter’s
headaches. Minerva appeared chanting a triumphant song and wearing a
large metal headdress. The Minerva body jacket incorporates the skull
and is used to immobilize the cervical spine; its most frequent
application is in children. This type of jacket is applied in the same
manner as the body jacket but also calls for the following steps. Place
a fluted felt pad around the entire neck, with the neck halter traction
over the padding. Tie the halter straps at ear level to prevent the
halter’s slipping off the head. Place another felt pad along the length
of the spine and the occiput. Wrap the rest of the head with 3-in.
sheet cotton padding. At least two operators are necessary for even
application of the plaster, one for the head and one for the body. Roll
3-in. plaster bandages about the head and neck. Apply narrow splints
around the chin, neck, occiput, and forehead. Use wide splints all the
way from the sacrum to the occiput, with another wide splint extending
from the chest to the chin. Incorporate these splints into the cast by
snugly wrapping plaster bandages over them. Then mold together the
plaster about the head, neck, and body at the same time. Carefully mold
beneath the mandible. Cut the plaster in a “V” to release the chin and
also cut out about the ears and the face (Fig. 7-4,
inset). Trim the plaster above the jaw line and leave the eyebrows
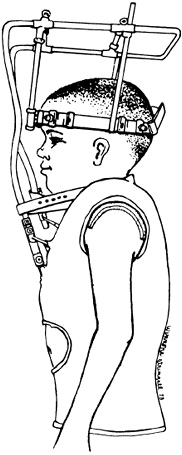
exposed. A Minerva body jacket is useful in children and when cervical
or halo vests (Fig. 7-4) orthoses are not appropriate. -
Other types of body jackets
-
A Risser localizer cast
is occasionally used for scoliotic spines or for patients with
thoracolumbar fractures. Apply a pelvic plaster mold first; then attach
pelvic and head halter traction. Make a pressure pad with felt backed
by four to six layers of plaster. Produce or hold correction of the
scoliosis by applying this pad against the apical ribs and
incorporating it into the body jacket that incorporates the jaw, neck,
and occiput, but not the head. Make the surface of the pressure area
large enough to avoid local necrosis of the skin.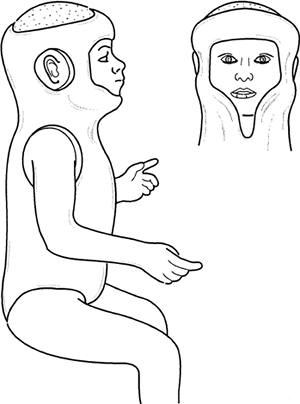 Figure 7-4. Completed Minerva body jacket.
 -
Halo traction
can be incorporated into a plaster or fiberglass body jacket with
suspenders, and it provides continuous or fixed cervical traction (Fig. 7-5).
The halo traction is more commonly incorporated into a sheepskin-lined
plastic body jacket, which is more lightweight and comfortable (Fig. 7-6).
P.108 -
P.107 -
-
Spica
is a Latin word that means “ear of wheat,” because a spica wrap was
used to wrap sheaves of wheat in the fields. The same type of wrap is
used to
P.109
immobilize proximal joints with the spica cast. Various types of spica casts are described here.![]() Figure 7-5. Halo traction cast. (From Bleck EE, Duckworth L, Hunter N. Atlas of plaster cast techniques, 2nd ed. Chicago: Year Book, 1978, with permission.)
Figure 7-5. Halo traction cast. (From Bleck EE, Duckworth L, Hunter N. Atlas of plaster cast techniques, 2nd ed. Chicago: Year Book, 1978, with permission.)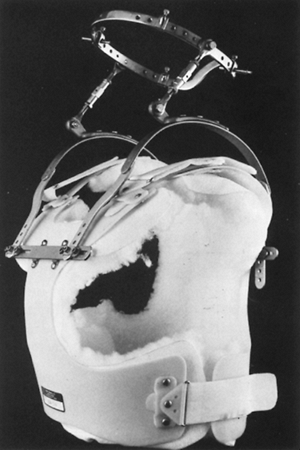 Figure 7-6.
A commercially available malleable polyethylene jacket may be
substituted for the plaster cast for use with the halo apparatus.
Patients report this is significantly more comfortable than the plaster
jacket.-
Pad a bilateral short-leg (panty) spica
in much the same way as for the body jacket but include the legs. These
casts are generally applied on fracture tables (adults) or spica boards
(children). Use tubular or bias-cut stockinet. Pad bony prominences
with 1/8- to 1/2-in. felt with cruciate incisions. Apply plaster or
fiberglass to the upper portion of the cast as is done with the body
jacket. Reinforce the hips with splints as shown in Fig. 7-7.
Apply plaster or fiberglass well next to the perineal post under the
sacrum to avoid weakness in the area (the intern’s triangle). Snugly
tie the splints in with plaster or fiberglass bandage rolls extending
to the supracondylar portion of the femurs. Mold the material well over
the iliac crests. The patient may be lifted from the table with the
sacral rest still in the plaster. Turn the patient on his or her
abdomen and cut out the sacral rest. Trim the edges of the cast in the
usual manner. -
Examples of long-leg hip spicas are shown in Fig. 7-8.
Apply the leg portion of the cast like any other long-leg cast, using
the special splints about the hips as described for the short-leg
spica. Support the casted extremities with struts. These are usually
made of wooden stakes (1/4 × 2 in. or 3/4 × 1/2 in.) or
P.110
dowels.
Cover with plaster or fiberglass and attach them to the casted
extremity by wrapping a bandage in a cordlike figure-of-8 fashion about
the strut and cast; then roll the bandage around the strut and cast to
create a well-molded cast. Sedate or anesthetize infants and small
children before spica cast application; they are generally applied in
the operating suite.![]() Figure 7-7. Plaster splints to reinforce hip spicas, in addition to those used in the body jackets.
Figure 7-7. Plaster splints to reinforce hip spicas, in addition to those used in the body jackets. -
Apply the shoulder spica
with the patient standing or supine on a spica table that has a
metallic backrest. The arm may be supported with finger traps, or, with
a cooperative patient in the sitting or standing position, the cast may
be applied while an assistant holds the arm. The principles of padding
and cast application for body jackets and long-arm casts are combined
to produce a shoulder spica. In addition to the splints normally used
for body and long-arm casts, apply a wide splint from the lateral
chest, up under the axilla, to the medial side of the arm. Place other
splints across the posterior aspect of the arm, over the shoulder, to
the opposite side. Tie in the splints with rolled plaster or fiberglass
and place a strut between the arm and trunk.
-
-
Knee cylinder casts.
Remove all hair from the medial and lateral aspects of the lower leg.
Spray the leg with a nonallergenic adhesive. Place medial and lateral
strips of self-adhering foam, moleskin adhesive, or adhesive tape on
the skin with 6 to 12 in. of the material extending distal to the
ankle. Then place a cuff of 1/4-in. sponge rubber or felt padding
measuring 1 in. in width over the strips just above the malleoli. When
the strips are turned back and incorporated into the fiberglass or
P.111P.112
plaster,
they suspend the cast, and with the thick padding, they prevent
pressure on the malleoli. Wrap the leg with a single layer of cast
padding and apply the plaster with the knee flexed 5 degrees. Extend
the cast proximally as far as possible and distally to just above the
flare of the malleoli; the length of the cast provides for lateral and
medial stability. Mold the plaster or fiberglass medially and laterally
above the femoral condyles to help prevent the cast from sliding
distally.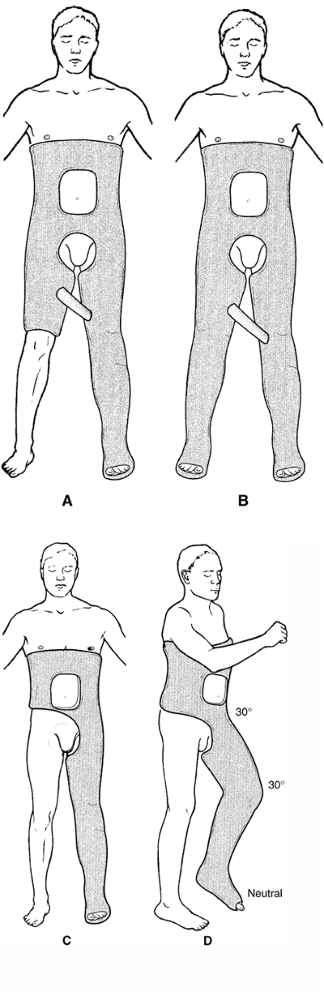 Figure 7-8. Long-leg hip spicas. A: One and one-half spica. B: Double spica. C:
Single spica. For all long-leg spica casts, it is important to keep the
hip and knee gently flexed for patient comfort and ease of positioning.
The ankle must be kept in neutral dorsiflexion (D). In children, it is often advisable to stop the cast at the malleoli distally, leaving the foot free. -
Short-leg casts
-
Apply the short-leg cast
with the patient sitting on the end of a table with the knee flexed 90
degrees. Alternatively, apply it with the patient supine, the hip and
knee flexed 90 degrees, and the leg supported by an assistant. The type
of padding matters little, except that Webril and stockinet tend to
shear less and therefore may allow for a tighter cast over a longer
period of time. Use only one layer of padding except over the malleoli,
where extra padding frequently is required. For most casts, have the
ankle in a neutral position. Two plaster bandages usually are required,
and the width selected (3, 4, or 6 in.) varies with the size of the
patient. Fold 4-in. splints longitudinally in half, and place one
splint on all four sides of the ankle for reinforcement before applying
the second plaster bandage. Extend the cast distally from the
metatarsophalangeal joints and proximally to one finger breadth below
the tibial tubercle. Trim the edges and pad as previously described. -
If desired, a walking cast
may be made with either a rubber rocker walker or a stirrup walker.
Place either one in the midportion of the longitudinal arch of the foot
in line with the anterior border of the tibia. With a rocker walker,
the medial longitudinal arch is filled with plaster splints to make a
flat base. Then the walker is secured with a third plaster bandage.
Commercially available walking shoes (or boots), which fit over the
casted foot, are more widely used. A flat plaster base on the plantar
aspect of the cast is required for these shoes. If the ankle must be
held in equines (such as required for cast treatment of an Achilles
tendon rupture), a stirrup walker is advantageous, and the patient’s
opposite shoe should be adjusted to the appropriate height for walking.
All walking casts should dry for at least 24 hours prior to weight
bearing.
-
-
Long-leg casts
-
First apply a short-leg cast as described earlier (III.E).
Then extend the knee to the position desired and continue the cast
padding to the groin. Two 6-in. plaster or fiberglass bandages usually
are required for the upper portion of this cast except in patients with
heavy thighs. After the first bandage is applied, fold 4- or 5-in.
splints longitudinally and place them medially and laterally across the
knee joint for reinforcement. After the second plaster or fiberglass
bandage is applied, mold the cast medially and laterally in the
supracondylar area to help prevent the cast from slipping distally when
the patient begins to stand. -
The long-leg walking cast is made as described in III.E.2, but the knee must be flexed no more than 5 degrees.
-
-
Casting techniques of Dehne and Sarmiento
-
The cast treatment programs made popular by Dehne and Sarmiento (see Selected Historical Readings)
are designed to allow early weight bearing of a fractured tibia. The
affected leg is placed in a very snug cast that maintains the tissue
and fluids of the leg within a rigid container. Shortening is prevented
by the hydraulic principle that fluids are
not compressible. Thus, the patient can bear weight soon after a
fracture without excessive further shortening, and fracture healing is
benefitted by the improved vascularity derived from ambulation. The
advocates of these casting techniques describe a “total contact cast.”
The authors believe, however, that all casts to the lower extremities
should be total contact casts. -
The long-leg total contact cast as described by Dehne is applied like a long-leg walking cast with only minor modifications.
-
Cast the knee in extension. Some patients, however, find this position uncomfortable and may require a position with 3 to 5 degrees of flexion.
-
This cast may need to be wedged
to correct angular deformities of the fracture site. For this reason,
apply one or two extra layers of the Webril at the fracture site.
P.113 -
-
The below-the-knee total contact, or patellar tendon-bearing, cast is applied much as a regular short-leg walking cast is, with the following modifications (Fig. 7-9):
-
Keep the affected limb in a long-leg cast or a Jones compression splint until the swelling subsides (2–4 weeks).
-
Apply the cast padding to the lower leg and extend to 2 in. proximal to the superior pole of the patella.
-
First apply a short-leg cast and extend it to just inferior to the tibial tubercle. Sarmiento suggests molding the cast into a triangular shape,
with the sides of the triangle formed by the anterior tibial surface,
the lateral peroneal muscle mass, and the posterior aspect of the leg. -
Then have the assistant position the knee
in 40 to 45 degrees of flexion. The quadriceps muscles must be
completely relaxed. Use a 4-in. bandage of plaster to extend the cast
to the superior pole of the patella. Mold carefully
P.114
over
the medial tibial flare as well as into the patellar tendon and the
popliteal fossa. The lateral wings should be as high as possible. Trim
the posterior portion of the cast to one fingerbreadth or 1/2 in. below
the level of the cast indentation that was made anteriorly into the
patellar tendon. The posterior wall of the cast should be low enough to
allow 90 degrees of knee flexion without having the cast edge rub on
the hamstring tendons. These casts generally require the use of plaster
because of the critical molding involved, which is difficult with
fiberglass.![]() Figure 7-9. Completed below-the-knee total contact cast.
Figure 7-9. Completed below-the-knee total contact cast. -
If angulation
occurs at the fracture site with this cast, replace rather than wedge
the cast. If the patient ambulates well enough to maintain muscle bulk,
the original cast may not need to be replaced. -
Do not switch from a below-the-knee total contact cast to a regular short-leg cast
at some point midway in the healing phase of the fracture, because a
regular short-leg cast offers no rotational stability. Recent evidence
has shown that this type of cast is no more effective in immobilizing
tibia fractures than a standard short-leg cast (9).
-
-
The authors believe
that a long-leg weight-bearing cast is easier and safer (in regards to
skin and fracture complications) for most individuals to apply than the
below-the-knee total contact cast. Comparing the treatment
results published in the literature provides no evidence that one
technique is superior to the other. The theoretic advantage of
providing knee motion with the Sarmiento technique is offset by the
expertise required to apply this cast properly. -
Begin weight bearing
at 24 to 36 hours after plaster cast application when the patient can
tolerate it; patients with fiberglass casts can be encouraged to weight
bear 3 to 6 hours after casting.
-
-
Knee cast-brace
-
A cast-brace
is a casting device for the treatment of fractures of the distal femur
or tibial plateau, which are not considered appropriate for operative
management, generally in high-risk patients. Occasionally a cast-brace
is applied after 1 to 3 weeks of traction, with the patient remaining
in the hospital for a short period after the brace is applied. Thus,
the hospital stay can be as long as 2 to 4 weeks. In addition, this
technique allows mobility of the knee during the healing phase, so less
physical therapy is needed to regain knee motion when the fracture is
healed. These devices have generally been replaced by commercially
available hinged knee braces. -
Technique
-
Two people are required for application.
After the patient is lightly sedated, roll an elastic tubular stockinet
over the leg. While an assistant holds the leg, apply plaster over the
thigh to within 2 1/2 cm of the ischial tuberosity and the perineum.
Extend the plaster distally to the superior pole of the patella but
with enough clearance for full knee extension and flexion to 70
degrees. Then apply a short-leg cast. Make the plantar aspect of the
cast flat for ambulation in a walking shoe. -
Position two polycentric or cable knee hinge joints
2 cm posterior to the midline of the limb at the level of the abductor
tubercle. Use large hose clamps to secure the hinge joints to the cast
temporarily. A jig is helpful to keep these joints parallel. Evaluate
knee motion and make adjustments before securing the uprights with
plaster.-
If the roentgenograms show satisfactory alignment
of the fracture, start the patient on progressive ambulation with
“touch down” weight bearing. If a knee effusion develops, instruct the
patient to elevate the limb for 15 minutes of every hour. Once adequate
fracture consolidation is demonstrated, the patient can be encouraged
to bear weight. -
If the alignment of the fracture is not satisfactory,
remove the cast-brace and temporarily reinstitute traction treatment.
Consider continuing standard traction therapy, reattempting a
cast-brace again in 2 to 3 weeks, or performing internal fixation.
-
-
-
-
General techniques
-
In removing or splitting casts, use the oscillating saw.
Reassure the patient by giving a cast saw demonstration before actually
cutting the cast. Stabilize the hand holding the electric saw on the
cast, and push the blade through just the plaster with short repetitive
strokes, as shown in Fig. 7-10. Avoid bony prominences as the cast saw can cut into the skin over them. -
Windows may
be cut from the cast to expose wounds. The windows must be replaced,
however, and rewrapped with either a new plaster or an elastic bandage
to prevent local edema.
-
-
Should unexpected swelling occur, bivalve the cast. Bivalving is superior to simply splitting the cast.
The technique consists of cutting the plaster as well as the cast
padding on both sides of the extremity. The anterior and posterior
parts of the cast can be held in place with bias-cut stockinet or an
elastic bandage. Advantages of this technique are that the anterior
half of the cast may be removed to inspect the compartments and that
complete anterior, posterior, and circumferential compression is
relieved. -
Splitting
a cast requires cutting a 1/2-in. strip of plaster from the full length
of the cast; otherwise, the proximal aspect of the plaster may act as a
circumferential tourniquet (2). Again, divide
the plaster and padding down to the skin because soft dressing might
also cause constriction. In the case of the lower extremity, the cast
is split anteriorly with a diamond-shaped section of plaster removed
from the anterior aspect of the ankle. Spread the cast for relief of
the symptoms. Pad the area with felt where the strip of plaster was
removed and overwrap with a rubber elastic bandage to avoid local
edema. This technique is not as satisfactory as bivalving a cast but is often appropriate for managing postoperative swelling.
-
Terminology
-
Use adhesive strapping
(taping) for the possible prevention and treatment of athletic
injuries. Use strips of adhesive tape instead of one continuous winding. -
Bandaging
(wrapping) uses nonadhesive materials (gauze, cotton cloth, and elastic
wrapping) in the treatment of athletic injuries. Employ one continuous
unwinding of material.
-
-
Adhesive strapping
-
Purposes of strapping
-
To protect and secure protective devices
-
To hold dressings in place
-
To limit motion
-
To support and stabilize
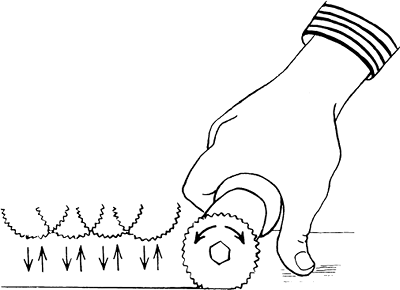 Figure 7-10. Saw-cutting technique that avoids skin laceration.
-
-
Construction factors
-
Tape grade
(backing material). Heavy backing materials have 85 longitudinal fibers
per square inch and 65 vertical fibers per square inch. Lighter grades
have 65 longitudinal fibers per square inch and 45 vertical fibers per
square inch. Store the tape in a cool, dry place. Keep the tape standing on end and not on its side. -
Adhesives.
Use a rubber-based spray-on adhesive primarily with athletes because
strength of backing, superior adhesion, and economy are needed. Use
acrylic adhesives in surgical dressing applications because a high
degree of backing and superior adhesion are not the primary
requirements.
-
-
Application and removal
-
Preparation
-
Clean the skin with soap and water and dry.
-
Remove all hair to prevent irritation.
-
Treat all cuts and wounds.
-
Apply a nonallergic skin adherent.
-
Position properly.
-
-
Size of tape
-
Use 1/4- to 1-in. tape on fingers, hands, and toes.
-
Use 11/4- or 11/2-in. tape on ankles, lower legs, forearms, and elbows.
-
Use 2- or 3-in. tape on large areas, knees, and thighs.
-
-
Rules of application
-
Avoid continuous strapping because this causes constriction. Use one turn at a time and tear after overlapping the starting end of the tape by 1 in.
-
Smooth and mold the tape as it is laid on the skin.
-
Overlap the tape at least one half its width over the tape below.
-
Allow the tape to fit the natural contour of the skin—that is, let it fall naturally and avoid bending around acute angles.
-
Keep the tape roll in one hand and tear it with the fingers.
-
Keep constant and even unwinding tension.
-
For best support, strap directly over the skin.
-
-
Techniques for removal
-
Remove the tape along the longitudinal axis rather than across it. If near a wound, pull toward the wound, not away from it.
-
Peel the tape back by holding the skin taut and pushing the skin away from the tape rather than by pulling the tape from the skin.
-
-
-
Skin reactions. Most tape reactions are mechanical,
not allergic. Allergic reactions are characterized by erythema, edema,
papules, and vesicles. Test for an allergic reaction by patch testing.
If the test is positive, the above signs manifest themselves within 24
to 48 hours.-
Mechanical irritation
is produced when tape is removed from the skin. It frequently occurs as
a result of shearing the skin when the tape is applied in tension or
used for maintaining traction. Such application induces vasodilation
and an intense reddening of the skin, which disappears shortly after
tape removal. The reaction is due to simple skin stripping—that is,
direct trauma to the outer skin layers resulting in loss of cells. -
Chemical irritation
occurs when components in adhesive mass or the backing of the tape
permeate the underlying tissues. This irritation is largely eliminated
through tape construction. -
Another irritative effect is localized inhibition of sweating, which is corrected by the use of nonocclusive (porous) tape.
-
P.116 -
-
Bandaging
-
Purposes of bandaging
-
Materials
-
Gauze, which holds dressings in place over wounds or acts as a protective layer for strapping
-
Cotton cloth for support wrapping or dressing
-
Elastic wrapping for compression wrapping or dressing
-
-
-
Medicated bandage
-
The medicated bandage (Unna boot) contains zinc oxide, calamine, glycerine, and gelatin and usually is indicated
for lower extremity areas of skin loss that require protection and
support. This type of support dressing prevents edema and allows
ambulation in patients with known venous conditions at the time of cast
removal. -
Application
-
Cleanse the area and position the ankle at a right angle.
-
Make a circular turn with the medicated bandage around the foot and direct the bandage obliquely over the heel. Then cut the bandage. This procedure ensures a flat surface.
-
Repeat until
the heel is adequately covered. Make the first layer snug and apply the
roll in a pressure-gradient manner; that is, apply the greatest
pressure distally with progressively diminishing pressure over the
upper leg. -
Do not reverse any turns
because the ridges formed may cause discomfort as the bandage hardens.
Overlap each turn one half of a preceding turn. Avoid winding the
bandage on too tightly. -
Cover the leg
approximately three times and extend the bandage 1 to 2 in. below the
knee; otherwise, the bandage may slip toward the ankle. Allow the
bandage to harden. Prevent soiling of clothing with gauze or stockinet
over the medicated bandage. Leave the bandage on for 3 to 7 days, and
repeat treatment if necessary.
-
-
-
Following cast removal
-
While the cast is still on,
range-of-motion exercises of the adjacent joints not immobilized and
isometric exercises for the immobilized muscles (e.g., weight bearing
in a cast) serve both to improve nutrition and to decrease atrophy of
articular cartilage, bone, and muscle. Edema and the rehabilitation
required after cast removal are also minimized. -
Warn the patient that after removal of any cast from a lower extremity, some swelling is normal.
-
Once the cast is removed, an elastic stocking or bandage is desirable for support.
-
Prescribe a specific exercise program to increase range of motion. Moist heat, such as a bath or whirlpool, may help mobilize the joint.
-
If swelling appears to be a problem, contrast baths
may be indicated (the 3-3-3 treatment): rest 3 minutes in cool water,
exercise 3 minutes in warm water, repeat 3 times; follow with 30
minutes of elevation. Repeat the entire process three times daily. -
Active exercise
is the key to success. Passive range-of-motion exercise too frequently
becomes a repeated manipulation. Manipulation under anesthesia is
occasionally necessary, but this should be followed with an aggressive
inpatient therapy program.
-
-
-
It is not always true that the sooner joints adjacent to a fracture are mobilized, the better the range of motion obtained. The following factors must be considered:
-
Fractures not involving articular surfaces
-
Joint movement is slow to return and poor in range if attempted movement produces pain, associated muscle spasm, and involuntary splinting.
-
Early joint movement can delay fracture healing if fixation is not rigid.
-
A normal joint tolerates longer periods of immobilization. The “safe” period of immobilization coincides well with the normal time necessary for
P.118
adjacent fracture healing. Only in the older patient with degenerative
changes in the joint is there a likelihood of intraarticular adhesions
and periarticular stiffening, even with short periods of immobilization. -
Some joints may tolerate immobilization better than others, but this presumption is not well documented.
-
Postinjury or postcasting edema is “glue.”
The area is soon infiltrated with young fibroblasts. Excessive
formation of collagen causes early and frequent permanent stiffness,
especially when collateral ligaments are immobilized in a shortened
position (e.g., metacarpophalangeal joints). -
Isometric exercises within the cast are recommended. Allow the muscles to move within the limits of the cast.
-
-
Fractures involving articular surfaces
-
Reduce intraarticular fractures anatomically if possible.
If operative intervention is indicated, then a goal of internal
fixation is to allow range-of-motion exercises or continuous passive
motion within the first 2 or 3 days postoperatively. -
If anatomic restitution cannot be achieved,
then early motion may allow mobile fragments to be molded into a better
position. This motion should improve the potential of fibrocartilage
resurfacing. Early movement is difficult to define, but some movement
should be started within the first week.
-
-
Between these two groups
is a considerable degree of overlap. If it is anticipated that a
complicated and often incomplete open reduction and internal fixation
is not secure enough to allow early movement of the joint, then it may
be better to treat the fracture nonoperatively. The objective is the best possible final range of movement.
-
JR, Frick SL, Skewes E, et al. Skin surface pressure beneath an
above-the-knee cast: plaster casts compared with fiberglass casts. J Bone Joint Surg (Am) 1997;79:565–569.