
The indications for placement of a prosthesis are (a) 4-part fractures
and fracture dislocations, (b) head-splitting fractures, (c) impression
fractures involving more than 40% of the articular surface, and (d)
selected 3-part fractures in older patients with osteoporotic bone. The
majority of severely displaced, proximal, humeral fractures occur in
the older population, with predominance in women. Other methods of
treatment, including closed reduction, open reduction-internal
fixation, head excision, and fusion, have been reported to have a high
percentage of unsatisfactory results.
are active soft-tissue infection, chronic osteomyelitis, and paralysis
of the rotator-cuff muscles. Deltoid paralysis is not a
contraindication: Adequate yet compromised function can be achieved in
such a shoulder.
an adequate clinical evaluation of the injured limb may be difficult
because of pain and swelling. It is important to establish whether the
patient has lost consciousness or has had a seizure. Neurovascular
status should be assessed with a high index of suspicion for injuries
to the axillary nerve and artery. Injuries to the axillary artery are
limb threatening and should be evaluated with emergency arteriography
and a vascular surgery consultation. Injuries to the brachial plexus or
peripheral nerves are often overlooked initially. The vast majority of
these are treated conservatively. Electromyographic analysis should be
planned 3 to 4 weeks after injury to help clarify the extent of the
injury. A neurologic deficiency should not delay definitive management
of the fracture. Most injuries are neurapraxias and will resolve over
time sufficiently to allow adequate function. If the neurologic status
does not improve, any needed procedure to the axillary nerve can be
done within 3 months of injury without compromise.
best treatment option for a displaced, proximal, humeral fracture, the
fracture pattern must be clearly delineated. In the majority of cases,
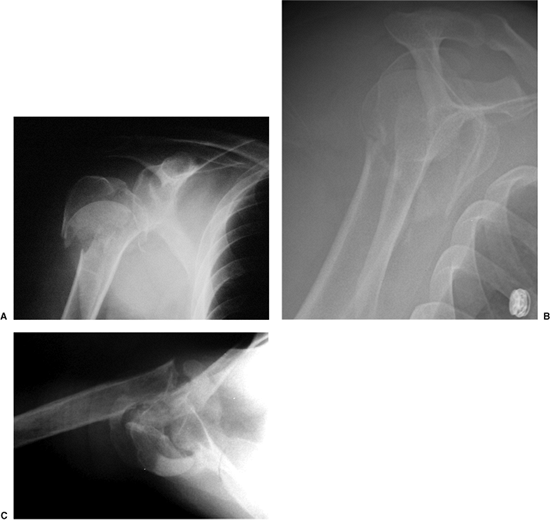
this can be achieved with a trauma series (Fig. 4.2).
This includes a true anteroposterior (AP) view of the scapula (taken 30
to 40 degrees oblique to the coronal plane of the body), a
transscapular lateral or Y view, and an axillary view. The axillary
view is taken by abducting the arm 20 to 30 degrees and placing the
tube in the axilla with the radiographic plate above the shoulder;
there is no need to abduct the arm fully. Often the surgeon must
position the arm because of pain. Alternately, a Velpeau axillary view
can be obtained, with the patient remaining in the sling and leaning
back over the plate and the tube directed downward. If displacement
cannot be determined, or if the articular surfaces of the humeral head
or glenoid are not clearly visualized, then a computed tomography (CT)
scan also may be used to clarify the situation. Use of a preoperative
scanogram of both the involved and the uninvolved arm often helps
establish the proper length of the prosthesis relative to the remaining
humeral shaft.
 |
|
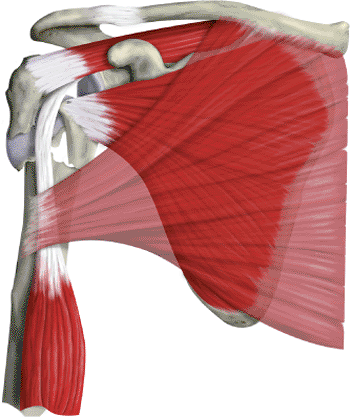
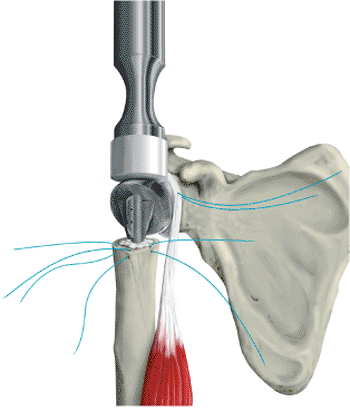
Figure 4.1.
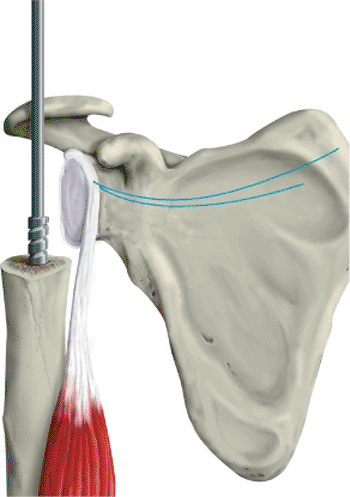
A four-part fracture of the proximal humerus. The humeral head is free floating and displaced from both tuberosities and the shaft. The lesser tuberosity fragment is pulled medially by the subscapularis; the greater-tuberosity fragment is pulled posteriorly and superiorly by the supraspinatus and infraspinatus; the shaft fragment is pulled medially by the pectoralis major. |
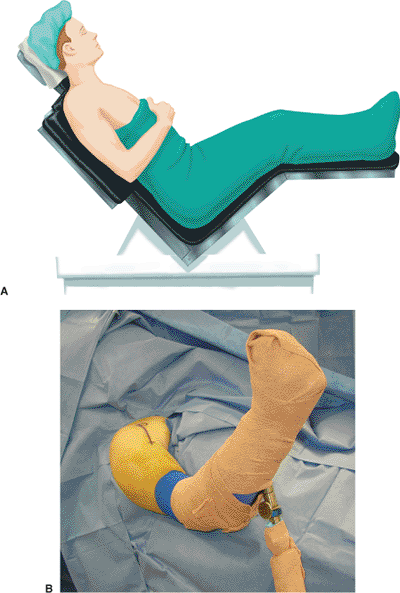
successful procedure, and its importance cannot be overemphasized. The
goal is to have global access to the shoulder. This is achieved by
having the involved shoulder elevated from the table and properly
supported. We prefer a table with a cutaway section at the shoulder
that allows greater access posteriorly and has an attached pneumatic
arm positioner (Spider, Tenet Medical, Calgary,
Alberta, Canada) (Fig. 4.3).
Our anesthetic of choice is an interscalene regional block because it
provides excellent muscle relaxation, which facilitates exposure. Two
small towels are placed under the medial border of the scapula to
negate any retraction. The head is secured in a positioner in neutral
rotation and flexion with respect to the cervical spine. The operating
table should then be placed in a modified beach-chair position. The
patient is first flexed fully at the hips, and the foot of the table is
lowered to slightly flex the knees. The back of the operating table is
then elevated so that the patient sits up at an angle of approximately
45 to 50 degrees. Surgical drapes are used to isolate the operative
field superiorly to the midclavicle and inferiorly below the axilla so
that the arm can be draped free and is able to be moved throughout the
surgery.
 |
|
Figure 4.2. A. AP radiograph of a 4-part fracture. B. Lateral view in the scapular plane. C. Axillary view.
|
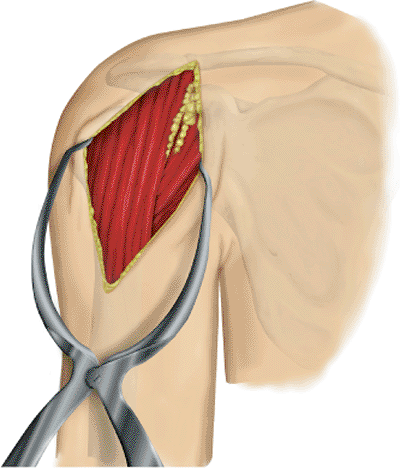
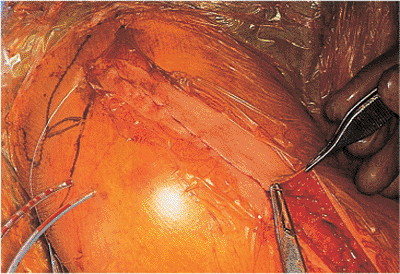
just below the clavicle and extending over the lateral aspect of the
coracoid to the deltoid insertion on the humeral shaft (Fig. 4.4).
Large Gelpi retractors can be placed in the skin to provide exposure.
The cephalic vein is identified in the deltopectoral interval and is
usually retracted laterally. There are fewer tributary veins on the
medial side than on the lateral side, so retracting the vein laterally
decreases bleeding. Often, however, there is a large crossover vein
superiorly, which should be cauterized so that superior exposure is not
compromised. It is important to preserve the deltoid origin
on
the clavicle and acromion. Rarely is the deltoid origin removed. If
more exposure is needed, the deltoid insertion may be partially
elevated; however, the proximal third of the pectoralis insertion is
usually detached from its humeral attachment (Fig. 4.5).
This should be tagged with a suture and reattached during closure. At
this stage, the coracoid and coracoid muscles should be identified. The
coracoid is the lighthouse to the shoulder, and dissection should not
be medial to this structure (Fig. 4.6). A
broad retractor is placed beneath the lateral borders of the coracoid
muscles. The coracoid muscles should not be cut nor the coracoid
process osteotomized because they provide a barrier to protect the
neurovascular bundle. The anterior portion of the leading edge of the
coracoacromial ligament can be resected to facilitate exposure. The
bulk of this ligament should remain intact to avoid any compromise in
superior stability. Another retractor is placed underneath the deltoid
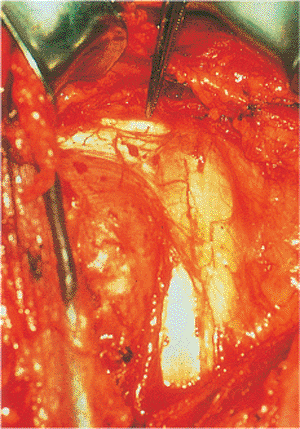
and the muscle is retracted laterally. The long head of the biceps
should be identified distally and followed proximally, as this is an
important structure that will lead to the center of the shoulder at its
glenoid insertion (Fig. 4.7).
 |
|
Figure 4.3. A.
The patient is placed in a modified beach-chair position with the back flexed approximately 40 to 50 degrees, and the lateral border of the scapula is at the edge of the table. B. A pneumatic arm positioner can be used for hands-free universal positioning of the upper limb during the procedure. |
 |
|
Figure 4.4.
A long deltopectoral approach starts just below the clavicle and extends over the lateral aspect of the coracoid to the deltoid insertion on the humeral shaft. |
 |
|
Figure 4.5. The superior insertion of the pectoralis major is usually detached and tagged to allow improved exposure.
|
 |
|
Figure 4.6.
The coracoid should be readily identified (tip of clamp), and dissection should not proceed medial to it. The leading edge of the coracoacromial ligament may be resected to improve exposure of rotator cuff muscles. |
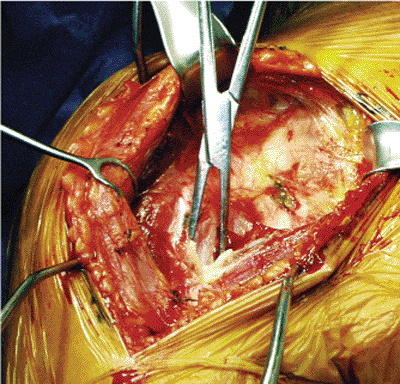
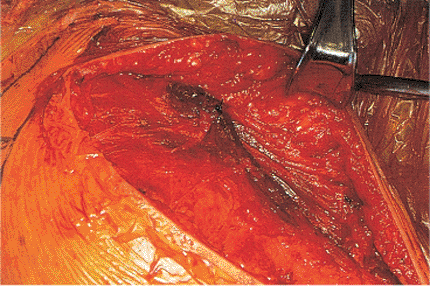
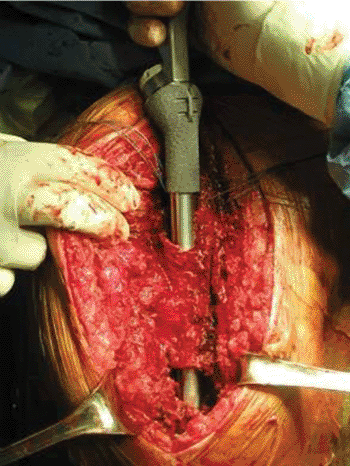
position, hemorrhagic bursa and fracture hematoma can be identified and
gently removed.
It
is important not to remove large pieces of bone that may be used later
to support the prosthesis on the deficient proximal shaft. The key to
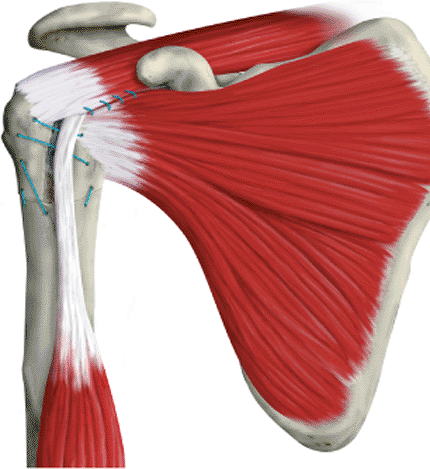
recognizing the various components of the fracture is the long head of
the biceps. As the biceps is followed proximally, the lesser tuberosity
is on the medial side, and the greater tuberosity is usually on the
lateral side (see Fig. 4.1).
of the bicipital groove, as this is often fractured. This split can be
carried proximally to help identify and mobilize the supraspinatus and
subscapularis because they attach to the greater and lesser
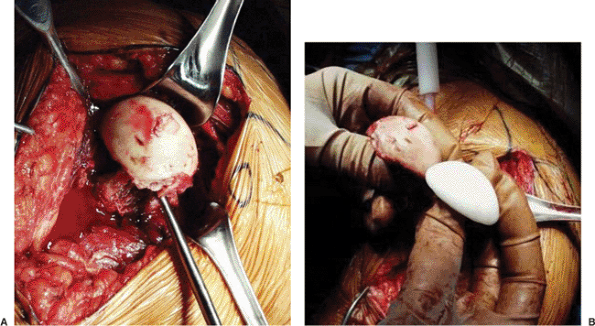
tuberosities, respectively. The interval is repaired later. The head
usually lies between the tuberosities and is removed and used for
sizing of the prosthetic head (Fig. 4.8).
and lesser tuberosities act almost as a hood and can be elevated
intact. In this situation, the head can be extracted and the prosthesis
can be placed without disturbing the rotator interval,
greater-tuberosity, or lesser-tuberosity fragments. Generally, however,
the interval must be opened in the area of the bicipital groove. Once
again, it is important to preserve any loose fragments and pieces of
bone to be used later in the procedure.
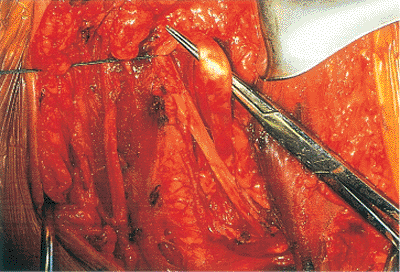
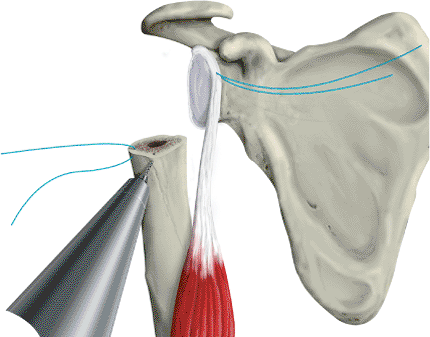
nonabsorbable suture. Both tuberosities are then mobilized and tagged
with a no. 2, heavy, nonabsorbable suture. We prefer to use swedged-on
needles and place them into the tendon at the tuberosity insertion.
This preserves the integrity of the remaining bone attached to the
tendon and avoids fragmentation of the tuberosity. Thorough
mobilization superiorly and medially is important to allow secure
fixation of the tuberosities, though this is often a tedious process as
a significant amount of hemorrhagic subacromial bursa often obscures
the tuberosities and rotator cuff. Often, superior exposure may be
limited by the leading edge of the anterior fascicle of the
coracoacromial ligament which, as mentioned previously, can be resected.
 |
|
Figure 4.7.
The tendon of the long head of the biceps should be identified and followed proximally because this will help to differentiate between the lesser and greater tuberosities and the area of the rotator interval. If possible, the long head of the biceps should be preserved to act as a head depressor. |
 |
|
Figure 4.8. A.
The humeral head is usually a free-floating fragment that can easily be removed by using a metal finger. It is important to evaluate the head for any soft-tissue insertion. B. A relatively intact head can be used to size the prosthetic head. The head may also be used as bone graft if needed or to support the prosthesis. |
subacromial impingement. If there is a large subacromial spur in the
ligament, or if the patient has an impingement configuration of the
acromion, it may be worthwhile to perform an anterior acromioplasty.
This is not a routine part of the procedure. Also at this stage, the
rotator cuff should be examined for tears. Generally, the rotator cuff
is intact in patients with subacromial impingement.
below the coracoid and under the coracoid muscles, this should be
slowly and carefully dissected, especially if there has been more than
a week’s delay in performing the procedure. Significant adhesions and
scarring are invariably present and the sharp edges of the fractured
head have the potential to injure the vital structures in this region
if extraction is forceful or blind. In this instance, very gentle blunt
dissection should be done from lateral to medial. Avoid placing any
sharp instruments medial to the head without direct visualization. We
prefer to use blunt retractors in this situation to avoid injuring the
neurovascular bundle. If the head segment has been displaced
posteriorly, the shaft and greater tuberosity are gently and laterally
retracted so that the head can be removed. If the head is scarred
posteriorly, it may need to be osteotomized into segments to facilitate
removal.
in a very gentle manner. The bone is often osteoporotic, and there may
be a nondisplaced fracture of the shaft, which should not be disturbed.
If a shaft component to the fracture is found, it is important to
secure the shaft before prosthesis placement. This can usually be
achieved with a cerclage wire and heavy nonabsorbable sutures. Canal
preparation and stem implantation are carefully performed to avoid
disrupting the repaired shaft. Successful placement of the humeral
component supplements the shaft fixation and yields a solidly fixed
construct.
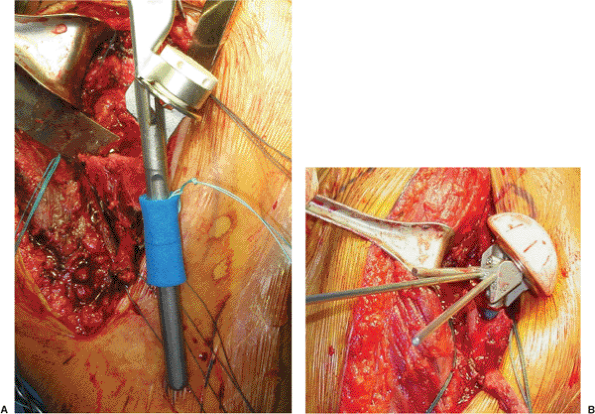
into extension and external rotation, delivering the shaft into the
wound. The medullary canal is prepared with rasps and reamers (Fig. 4.9). In most general situations, there is not sufficient bone stock distally or support
proximally to allow a press fit and cement is therefore necessary. In
addition, with both tuberosities fractured, rotational stability of the
implant is lost. The proximal part of the humerus should be prepared
with drill holes to allow tuberosity fixation with heavy, nonabsorbable
sutures. Three or 4 holes should be placed in the area of the greater
tuberosity (Fig. 4.10).
We like to place no. 2 or no. 5 sutures with a swedged-on needle
through the shaft. These sutures are then tagged with a clamp.
 |
|
Figure 4.9. The medullary canal is prepared with rasps and reamers for cement fixation.
|
configuration. This involves three components: retroversion, height,
and head size. Men tend to require a larger head size, and women, a
smaller head size. We use the Bigliani/Flatow prosthesis (Zimmer, Inc.,
Warsaw, IN), which has multiple sizes with a choice of either standard
or offset heads. We prefer the offset head because the humeral canal
(and therefore the humeral implant) is offset from the center of the
native head and better reproduces normal anatomy. Head size may be
gauged by taking a radiograph of the contralateral shoulder or by using
the head that was removed (if intact) for measurement. It is important,
however, not to overstuff the joint as this may result in stiffness or
subscapularis rupture.
placed against the remaining proximal shaft because such a placement
will usually decrease the length of the humerus and effectively shorten
the deltoid. In most general circumstances, the humeral head should be
elevated above the proximal shaft to a position that will allow space
for both the greater and the lesser tuberosities to be placed
underneath the head. This is crucial. The system has sponges of
different diameter that can be placed around the stem to support the
shaft in the canal. Then a fin clamp is attached to the anterior fin of
the prosthesis and securely holds it at the desired height and rotation
on the shaft by way of metal pins or an outrigger that projects off the
clamp (Fig. 4.11). This height is determined
either by preoperative templating against the contralateral limb or by
using intraoperative soft-tissue tension as a guide. The tension on the
biceps tendon, if the tendon has been preserved, can act as a guide to
the proper tension of the entire myofascial sleeve. If the prosthesis
is inserted so deeply that the biceps is very slack in its anatomic
position, then often the prosthesis has been placed too deeply into the
medullary canal. A biceps tendon that is excessively taut usually
indicates that the prosthesis is too proud. If the tuberosities are not
placed below the head
of
the prosthesis, impingement will occur. Also, these tuberosities must
be attached to the proximal shaft. If extra bone has been saved, it
should be used between the prosthesis and the shaft before cementing.
 |
|
Figure 4.10. Drill holes should be placed in the proximal shaft for attachment of the tuberosities before
cementing in the prosthesis. Three to 4 drill holes are placed in the greater tuberosity, and 1 to 2 holes in the lesser tuberosity. |
 |
|
Figure 4.11. A.
Sponge placed around the stem of the prosthesis will support the implant in the canal allowing for assessment of height and version. B. The fin clamp is attached to the prosthesis and the outrigger maintains the prosthesis at the desired height. The outrigger also can be attached by way of metal pins (not pictured). |
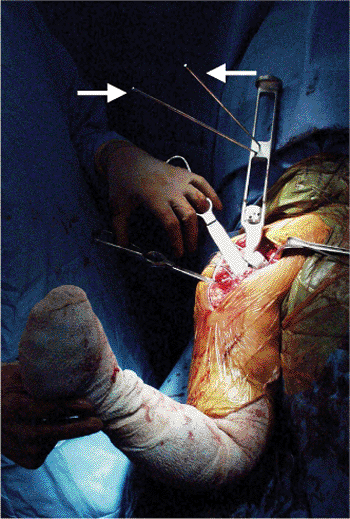
the proper amount of retroversion. A rule of thumb is that the lateral
fin of the prosthesis should be in the area of the bicipital groove.
Often the majority of the bicipital groove is not present in fractures,
but sometimes the distal part of the groove may be identified. Version
rods can be attached to the humeral insertion tool or to the fin clamp
(see Fig. 4.11). These can be used as
reference for the forearm with the elbow flexed to 90 degrees, and in
most patients, 30 degrees of retroversion is appropriate (Fig. 4.12).
The fin clamp is used to hold the prosthesis at the desired height and
rotation during the trial reduction. The head of the prosthesis is
reduced on the glenoid to allow internal and external rotation to be
assessed. If the prosthesis appears to be stable with 40 to 50 degrees
of external rotation and internal rotation with the arm at the side,
then the retroversion is adequate. If there has been a
posterior-fracture dislocation, then the retroversion may be decreased
by 5 to 10 degrees. If there is an anterior-fracture dislocation, then
the retroversion may be increased by 5 to 10 degrees. Therefore, as a
rule, the retroversion should never be less than 20 or more than 40
degrees. At this stage, the prosthesis can be cemented into place with
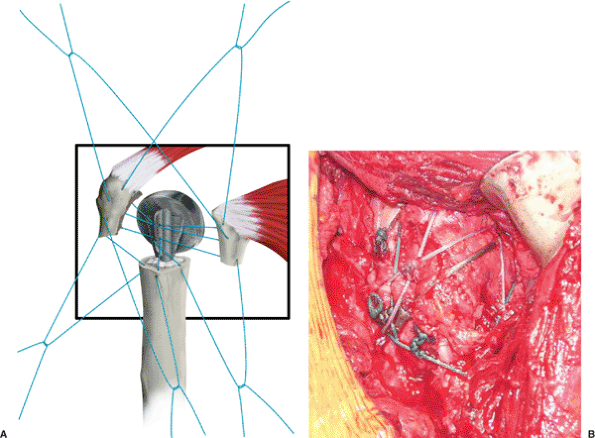
the shaft properly supported (Fig. 4.13). It is important to make sure that the nonabsorbable sutures are through the holes in the proximal shaft prior to cementing.
migration is one of the most common causes of failure of the procedure.
The tuberosities must be attached to both the fin of the prosthesis and
to the shaft of the proximal bone (Fig. 4.14).
The nonabsorbable sutures that have been placed proximal to the
tuberosities in the tendon can be used to mobilize the tendons and
bring them forward. We generally reattach the greater tuberosity first,
using 3 to 4 heavy nonabsorbable sutures. Next, the lesser tuberosity
is fixed with two heavy sutures. The two sutures are placed through the
fin of the prosthesis to both tuberosities and tightened. The arm
should be supported in a slightly flexed and abducted position. The
biceps tendon that has been preserved is now placed in its groove. The
rotator interval that has been opened is now closed above the biceps
tendon, so that the biceps tendon comes out at the distal aspect, which
is now the bicipital groove (Fig. 4.15). At
this point, the arm is gently internally and externally rotated and
flexed to test the stability of the tuberosity repair. The proximal
humerus and tuberosities should be moving as a single unit.
 |
|
Figure 4.12.
Version rods attach to the insertion device and reference off the forearm. One rod corresponds to 20 degrees of retroversion with the other at 40 degrees. Typically, the forearm should be oriented between these 2 rods to achieve 30 degrees of retroversion. |
 |
|
Figure 4.13. The stem is cemented into place to provide axial and rotational support.
|
residual bleeding. These should exit laterally in the proximal deltoid
to avoid injury to the axillary nerve. Drains are usually removed on
the first postoperative day. The insertion of the pectoralis major
should be repaired (Fig. 4.16). Multiple sutures should then be placed in the deltopectoral interval, and the skin is closed in a subcuticular fashion (Fig. 4.17). Steri-Strips are used to promote a cosmetic scar.
adequate motion of the shoulder is required for optimal function. The
patient’s ability to participate in the physical therapy and to
understand the restrictions on activity are crucial. In general, the
goals are to perform early passive motion until the fracture has healed
and then to begin strengthening exercises. Radiographs should be taken
in the recovery room, at 1 week, 6 weeks, 3 months, and 1 year.
 |
|
Figure 4.14. Tuberosity repair is an essential part of the procedure. A. Both tuberosities should be attached to the shaft and also to each other through the fin of the prosthesis. B. The tuberosities should move as a unit with the shaft after final repair.
|
postoperative day. Based on the intraoperative assessment of stability
after the tuberosity reconstruction, the surgeon determines the limits
of early motion. Consideration is given to the quality of bone, the
status of the rotator cuff muscles and the deltoid, and the strength of
the tuberosity fixation to the shaft and the prosthesis. On the first
day, the surgeon usually passively elevates the arm in the scapular
plane to approximately 80 to 90 degrees. On the second day,
gravity-assisted pendulum exercises are done first to allow warm-up and
obtain the patient’s confidence. After this, passive forward elevation
and supine external rotation with a stick are performed. The patient,
after gaining some early motion with the help of a therapist, may lie
supine and raise the arm by using the uninvolved contralateral arm.
These 3 exercises are generally done for the first 6 weeks until
adequate tuberosity healing has occurred. The
goal
before discharge from the hospital should be 130 degrees of forward
elevation in the scapular plane and 30 degrees of external rotation.
 |
|
Figure 4.15. The biceps tendon should be preserved and placed in the rotator interval area.
|
 |
|
Figure 4.16. A meticulous deltoid closure with repair of the pectoralis major insertion should be performed.
|
that tuberosity displacement has not occurred. Furthermore, radiographs
should be repeated at 6 weeks to assess tuberosity healing. When
evidence of tuberosity healing is found at approximately 6 to 8 weeks,
active assistive elevation with a pulley and isometric strengthening
exercises for the rotator cuff and deltoid are initiated. Two to 3
weeks after this, progressive resistive and strengthening exercises are
added. Activities of daily living such as personal hygiene and eating
are allowed, and these help to build early muscle strength and
endurance. Gentle strengthening is an important part of the prolonged
physical therapy program. The patient is encouraged to perform the
exercises on a daily basis for at least 6 months, preferably 1 year, to
achieve optimal results.
 |
|
Figure 4.17. A subcuticular skin closure is performed.
|
humeral fractures depends on proper evaluation, surgical technique, and
rehabilitation. If proper steps are followed, this procedure is highly
successful, with a large percentage of satisfactory results. In a
series of humeral head replacements performed at our hospital, 95% of
patients had adequate pain relief, with 73% being essentially pain
free. Overall, 82% of patients had a satisfactory result, and 18% had
an unsatisfactory result. The impact on favorable or unfavorable
results depends predominantly on the range of motion achieved by the
patient rather than the degree of pain. The majority of failures
reflected weakness and inability to raise the arm above horizontal. In
addition, the single most important variable in a patient’s ability to
achieve a satisfactory result was found to be patient compliance in the
postoperative rehabilitation program. Thus, that at the end of 1 year
after prosthetic insertion for a 4-part fracture, most patients will be
free of pain but will have variable range of motion and strength, often
dependent on the adequacy of their rehabilitation.
uncommon and in most instances can be directly related to failure of
technique. Among the most common complications reported are tuberosity
displacement, prosthesis problems, stiffness, and infection.
than is the lesser tuberosity, and it is most often found in older
patient with osteopenic bone. Greater-tuberosity displacement is much
more problematic because the attached supraspinatus, infraspinatus, and
teres minor are critical for satisfactory motion and strength in the
shoulder. In addition, with superior displacement of the greater
tuberosity, motion may be mechanically blocked because the tuberosity
occupies a portion of the subacromial space. If migration of the
greater tuberosity happens postoperatively, then consideration should
be given to early reattachment and regrafting. Although displacement of
the lesser tuberosity occurs, it is not so problematic because other
muscles can compensate for associated weakness of the subscapularis.
Significant displacement can result in a mechanical block because the
arm is internally rotated. In addition, wide displacement of the lesser
tuberosity with the attached subscapularis may result in postoperative
anterior instability.
displacement is healing of the tuberosity to the shaft of the humerus.
In patients adequately protected from postoperative active motion,
secure fixation of the greater tuberosity to both the prosthesis and
the shaft of the humerus, combined with bone graft between the
tuberosity and shaft, will maximize the potential for tuberosity-shaft
healing. We have recently used a trabecular metal (TM) proximal-humeral
fracture prosthesis. The TM prosthesis features a metal surface
designed for bony ingrowth in the proximal metaphysis including the
sites of tuberosity attachment (Fig. 4.18). We
have had excellent results using this in revisions for tuberosity
nonunions and malunions, and we have also begun using it for primary
proximal-humeral replacements in patients with marked osteopenia.
of motion and strength, malunion of the greater tuberosity, either
superiorly or posteriorly, frequently results in pain, either from
impingement in the subacromial space or from the mechanical block
caused by the displaced tuberosity. If the patient is symptomatic and
malunion exists, strong consideration should be given to osteotomy and
repositioning of the tuberosity.
ideal because of osteopenia. With loss of the rotational stability of
the implant because of loosening, the version of the prosthesis may
have changed and secondary pain, instability, or destruction of the
previously
normal glenoid. Whereas loosening caused by poor bone stock in an
uncemented implant could have been avoided if cement had been used at
implantation, loosening also may occur with a cemented implant. Because
aseptic loosening of the humeral component is rare, the workup should
include examination for infection. Revision of the prosthesis should be
considered in the event of symptomatic loosening.
 |
|
Figure 4.18. The TM humeral prosthesis has a proximal metal surface that promotes ingrowth of tuberosities.
|
proud prosthesis, or an abnormal depth of prosthesis. Mistakes made by
cementing the implant in abnormal version are common because the
landmark for correct version, the bicipital groove, is usually involved
in the fracture. Three basic guides can be used to place the prosthesis
in the proper amount of retroversion (20 to 40 degrees):
-
The prosthetic fin should be placed just lateral to the bicipital groove.
-
The prosthetic fin should be 20 to 40
degrees retroverted relative to the forearm, as judged by version rods
on the prosthesis inserter corresponding to 20 and 40 degrees. -
With the elbow bent 90 degrees and the
arm at the side in 0 degrees of internal or external rotation, the
implanted humeral head should face directly toward the glenoid fossa.
impingement against the residual glenoid fossa may be found. If the
humeral head is inserted too deeply into the intramedullary canal,
instability of the humeral head may result because of inadequate
tension of the deltoid. In addition, an overly deep insertion of the
prosthesis makes the greater tuberosity relatively proud and may result
in greater-tuberosity impingement on the acromion.
because it is almost entirely preventable. Attention to the details of
surgery, early, postoperative, passive motion, and patient cooperation
with rehabilitation all play critical roles in avoiding postoperative
stiffness. It must be emphasized to the patients that lack of
compliance or understanding of the postoperative rehabilitation program
is the single most common factor associated with rehabilitation failure
and postoperative stiffness.
significant problems and a long treatment course before resolution. The
final result after treatment of an infected prosthesis is frequently
less than optimal.
MH, Obata WG. Diagnosis of posterior dislocation of the shoulder with
use of Velpeau axillary and angle-up roentgenographic views. J Bone Joint Surg Am 1967;49:943–949.
AM, Bigliani LU. Humeral head replacement for four-part proximal
humerus fractures. In: Levine WN, Marra G, Bigliani LU, eds. Fractures of the shoulder girdle. New York: Marcel Dekker; 2003.
CS II, McIlveen SJ. Remplacement de la tete humerale avec
reconstruction des tuberosities et de la coiffe dans les fractures
desplacees a 4 fragments. Resultats actuels et techniques. Rev Chir Orthop 1988;74(SII):31–40.