
widely available to the orthopedist only during the past 15 to 20
years. With major advances in technique andequipment over the decade of
the 1990s, ankle arthroscopy has proved to be an indispensable tool for
the surgeon to both diagnose and treat pathology of the ankle (59).
Takagi, who used a cystoscope to examine the intra-articular anatomy of
a cadaveric knee (71). Kreuscher (45),
in 1925, was the first American to report the use of an arthroscope in
the knee. These early cystoscopes were cumbersome for articular use,
with diameters of nearly 8 mm. Arthroscopy was considered not to be
applicable to the ankle given the large diameter of these early
instruments. However, a 3.5 mm arthroscope was invented in 1931. Soon
after, in 1939, Takagi (71) published a
standard arthroscopic examination of the ankle. Arthroscopy remained
dormant, however, until the advent of fiberoptics, which aforded
improved visualization potential. Watanabe (75) described the first ankle portal anatomy and portal placement in 1972 following 28 ankle arthroscopies. Chen (14,15)
conducted the first large study with 67 clinical and 17 cadaveric ankle
arthroscopies, including detailed descriptions of surgical anatomy.
Drez, Guhl, Andrews, Parisien, Ferkel, and others, and owing in part to
the rapid advances in fiberoptics and
general
arthroscopic technology, ankle arthroscopy and its applications have
advanced exponentially during the past 15 years. Small-joint
arthroscopy and instrumentation have made the clinical application of
ankle arthroscopy safer, more reproducible, and more widely accepted as
a standard of care for certain disorders of the ankle. The advantages
of direct visualization of intra-articular anatomy and treatment of
pathology via percutaneous incisions about the ankle are numerous and
potentially include decreased pain and morbidity, faster
rehabilitation, and an earlier return to activities of daily living and
athletics.
a narrowed differential diagnosis. Common descriptions include pain,
catching, grinding, giving way, and swelling. It is essential to decide
whether the problem is acute or chronic, because this feature directly
affects evaluation and treatment. If possible, attempt to define the
etiology; unfortunately, this can be vague for chronic injuries. Find
out what exacerbates or improves the symptoms. The type of shoewear
that was worn at the time of injury or during the onset of a more
insidious problem is important. Prior history, including prior ankle
injuries, as well as a general medical history, can lead to a
particular diagnosis. A family history may raise suspicion for certain
congenital anomalies.
specific areas, and note its association with particular maneuvers. In
the lateral ankle, for example, differentiate between the pain at the
syndesmosis, anterior talofibular ligament, or sinus tarsi.
are two very separate entities. Locking generally indicates a
mechanical block to motion secondary to a loose body, scarring,
osteophyte, or some other abnormal intra-articular component. Catching
generally indicates a tendon or cartilage abnormality affecting supple
joint motion. Most important, give the patient the opportunity to tell
you thoroughly in his or her own words what the chief problem is and to
what extent this is incapacitating him or her.
shoes. Note any limp or asymmetry, and attempt to establish at what
point in the gait cycle these abnormalities occur. Examine the general
alignment of the lower extremities. Inspect the patient’s shoes and the
wear of the sole. Check carefully foot and ankle alignment while weight
bearing and look for pes cavus or pes planus.
swelling, contusion, or erythema. Palpate to elicit focal pain or
tenderness. In chronic ankle sprains, look for tenderness at the
syndesmosis, lateral ligaments, lateral gutter, or sinus tarsi.
Posterior ankle pain is sometimes difficult to reproduce on
examination; however, palpation can often differentiate between
posteromedial osteochondral lesions of the talus and injuries to the
Stieda process or the os trigonum. Assess both passive and active range
of motion with comparison to the opposite side. Normal motion is
approximately 20° of dorsiflexion and 50° of plantarflexion. The normal
range of subtalar motion noted by Isman and Inman (43)
in cadaver specimens varied from 20° to 60° of total motion.
Clinically, subtalar motion is very difficult to isolate and determine (50).
If limits in dorsiflexion are noted, remember to flex the knee to
determine the source of the limitation. Examine the heel and heel cord.
Achilles tendon problems are common and may be noted on palpation by
nodular thickening, as in patients with chronic tendinosis. Assess
muscle function.
Place the foot in plantarflexion, and invert the hindfoot while
palpating the joint line to determine joint displacement and test the
anterior talofibular ligament. Place the foot in dorsiflexion, and then
invert the foot again while palpating the joint line for displacement
to test the calcaneofibular ligament. Always compare with the
contralateral side to determine if the laxity is pathologic or not.
neutral and, with the tibia secured, pull the heel forward and
internally rotate it while palpating the joint line. Anterior
displacement greater than 4 mm indicates a tear of the anterior
talofibular ligament and may even indicate a double ligament tear,
which includes the calcaneofibular ligament (27).
difficult to detect unless you have a high index of suspicion and
specifically examine this structure. Perform the “squeeze test” by
gripping the leg just above the midportion of the calf and squeezing on
the fibular shaft. If distal pain is noted, then suspect an injury to
the interosseous ligament and syndesmosis. Perform the “external
rotation test” by applying an external rotation force to the ankle with
the patient seated, with knees and ankles at approximately right
angles. A syndesmosis injury results in pain over the anterior inferior
tibiofibular ligaments or the inferior portion of the interosseous
ligament.
(AP), lateral, and mortise (20° internal oblique) views. On the AP
view, the fibula should overlap the tibia approximately 6 mm. On the
mortise view, look for widening of the medial clear space of more than
3 mm.
mechanical device, or jig. Comparison x-ray studies are essential
because there is a large variation in normal ligamentous laxity. We use
the Telos device to generate a reproducible amount of stress. Sauser et
al. (67) as well as Chrisman and Snook (17),
using the Telos device, found that a talar tilt of 10° or more when
compared with the opposite normal side was associated with a lateral
ligament instability in 99 percent of cases. Normal values of talar
tilt range from 5° to 23° (65).
that an increase of 4 mm in the anterior drawer test showed instability
in the anterior talofibular ligament, whereas Laurin et al. (46)
consider an increase of more than 9 mm to be abnormal. In general, an
anterior drawer of 5 mm is normal; 5 to 10 mm may be within normal,
whereas over 10 mm is definitely abnormal.
nonunions, or the presence of arthrodesis. However, with improved
computerized tomography, plain tomograms are used far less. Arthrograms
can be useful occasionally, but these images have been supplanted by
magnetic resonance imaging (MRI) to evaluate ligament disruption.
Ultrasound has limited applications to the ankle; however, it is an
evolving technology that is useful for delineating cystic versus solid
masses, and for locating foreign bodies and tendon tears (73).
and relatively low cost, which make them a useful screening tool for
enthesopathies, stress fractures, occult trauma, delayed unions, and
any other pathology causing increased bone turnover. Gallium-67 and
indium-111 may be useful in the detection of infection (30).
cortical outlines and changes in bony densities, and to detect
osteochondral lesions, loose bodies, coalitions, and fractures of the
hindfoot. Both feet can be imaged simultaneously to help determine
asymmetry, however anatomy is better defined when only one extremity is
imaged at a time.
the ankle and to evaluate bone and soft tissue tumors, ischemic
necrosis, infection, and ligament and tendon injuries. Controversy
exists over the best imaging technique for osteochondral lesions of the
talus. CT is better for cortical anatomy; however, MRI provides an
accurate assessment of the cartilage (30).
unexplained pain, swelling, stiffness, instability, hemarthrosis,
locking, and popping. Therapeutic indications for ankle arthroscopy
include articular injury, soft-tissue injury, bony impingement,
arthrofibrosis, fracture, synovitis, loose bodies, osteophytes,
osteochondral defects, arthrodesis, ankle instability, and ankle
fractures.
moderate to severe degenerative joint disease with restricted range of
motion, significantly reduced joint space, severe edema, and tenuous
vascular status. The absolute contraindications for ankle arthroscopy
include localized soft-tissue infection and severe degenerative joint
disease.
adapted from knee arthroscopy, and shares similar equipment. However,
the ankle joint is much smaller and tighter than the knee joint, which
necessitates smaller instruments and a method of distracting the joint
to maximize the working area. We prefer a 2.7 mm video arthroscope
using both the 30° and 70° oblique lenses. With this setup, a
lightweight chip camera is screwed directly onto the arthroscope. This
method shortens the overall length of the videoscope and minimizes the
levering effect on structures during surgery. The 30° obliquity has a
superior field of vision; however, the 70° obliquity can be helpful for
visualizing over the medial and lateral domes of the talus and into the
gutters. An interchangeable cannula system is critical to allow
changing the arthroscope and instruments to each portal while
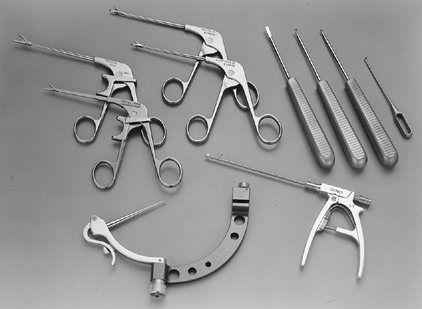
minimizing the risks of reentry. Standard instruments can be used;
however, small-joint instruments are preferred. These instruments
include 2.9 mm and 3.5 mm shavers and burrs, 3.5 mm and 4.5 mm ring and
cup curets, 1.5 mm probes, 2.9 mm and 3.5 mm graspers and baskets,
small osteotomes, rongeurs, and banana blades (Fig. 93.1 and Table 93.1).
 |
|
Figure 93.1.
Ankle arthroscopy instruments are both shorter and smaller than large joint instruments. Various biters, graspers, curets, probes, suction punches, and small joint drill guides (as shown here) have been developed for the ankle and are essential to the ankle arthroscopist. See Table 93.1 for a complete listing of instruments needed for the majority of arthroscopic ankle procedures. |
 |
|
Table 93.1. Ankle Arthroscopy Instruments
|
system in ankle arthroscopy without the added risks of a pump. This can
be obtained with a gravity flow system using a third portal in the
posterolateral position. A pump system can be used with caution, if
necessary, to help with hemostasis and distention for visualization.
Fluid extravasation can occur rapidly in the ankle, causing rapidly
increased compartment pressure, particularly in the anterolateral
compartment of the leg.
arthroscopy to maximize the working area and ability to visualize the
entire joint. Methods may be either invasive or noninvasive. Invasive
distractors use pins in the tibia and hindfoot for mechanical
distraction. These pins have fallen out of favor owing to the
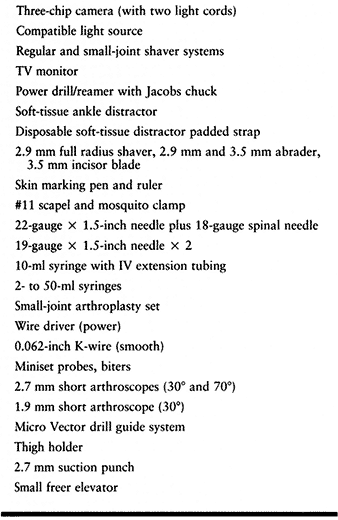
development of improved noninvasive distraction devices. At present,
sterile disposable straps attach to a distraction system hooked to the
operating table and provide excellent access to the ankle (Fig. 93.2).
 |
|
Figure 93.2. The operative setup for ankle arthroscopy using soft-tissue distraction.
|
-
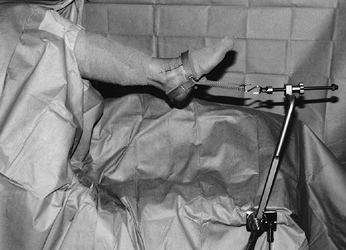
Place the patient in the supine position
with the hip flexed 45° to 50°, using a nonsterile thigh support and a
tourniquet, which is used at the surgeon’s discretion. Place a post
against the greater trochanter to prevent external rotation of the hip (Fig. 93.3).
With this setup, both anterior and posterior portals can easily be
accessed without further manipulation of the patient’s extremity.![]() Figure 93.3.
Figure 93.3.
The patient is secured in a thigh holder that is well padded with
additional foam pads anterior as well as posterior. A side bolster is
used just proximal to the thigh support to minimize external rotation. -
Outline the dorsalis pedis artery,
saphenous vein, and anterior tibial and peroneus tertius tendons on the
surface of the ankle with a marking pen. -
Attempt to mark the superficial peroneal
nerve and its branches as it crosses the joint while holding the foot
and toes in plantar flexion and inversion (Fig. 93.4).
The superficial peroneal nerve is the structure most at risk during
ankle arthroscopy. It divides into the intermediate and medial
dorsocutaneous branches approximately 6.5 cm proximal to the tip of the
fibula. The intermediate dorsocutaneous branch passes the joint line
just anterior to the common extensors of the fourth and fifth digits.
The medial dorsocutaneous nerve crosses superficial to the common
extensor tendons, parallel to the extensor hallucis longus tendons. Figure 93.4.
By inverting and plantarflexing the foot, the superficial peroneal
nerve can be palpated and the location noted. (Copyright 1996 by
Lippincott-Raven Publishers. From Ferkel RD. Arthroscopic Surgery: The Foot and Ankle. Philadelphia: Lippincott-Raven Publishers:107, with permission. Illustration by Susan Brust.) -
Mark out the joint line and exsanguinate
the extremity. Use a noninvasive ankle distractor, which is placed
sterilely after prep and draping (Fig. 93.2). -
Do not overdistract the ankle, and
remember to release the distraction partially after 1 hour to minimize
the risk of nerve injury. -
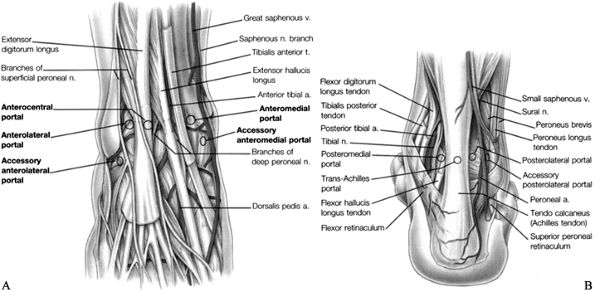
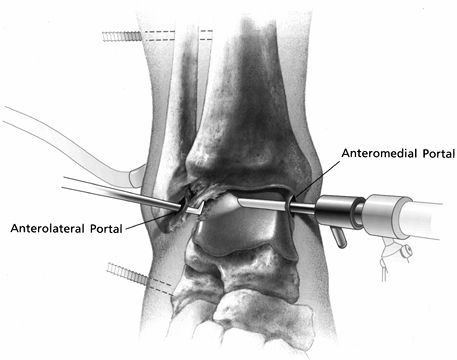
See Figure 93.5A and Figure 93.5B for the standard portal placement.
![]() Figure 93.5. Portals for ankle arthroscopy. A: Anterior anatomy and portals. The anterolateral and anteromedial are routinely used. B:
Figure 93.5. Portals for ankle arthroscopy. A: Anterior anatomy and portals. The anterolateral and anteromedial are routinely used. B:
Posterior anatomy and portals. The posterolateral portal is routinely
used. (Copyright 1996 by Lippincott-Raven Publishers. From Ferkel RD. Arthroscopic Surgery: The Foot and Ankle. Philadelphia: Lippincott-Raven Publishers, 1996:104 and 106, with permission. Illustration by Susan Brust.) -
Distend the joint with sterile saline and
insert an 18-gauge needle through the anteromedial portal. The greater
saphenous vein is 9 mm medial and the greater saphenous nerve is 7.4 mm
medial to the anteromedial portal (20). -
Use a #11 scalpel to make a vertical stab
wound while palpating the anterior tibial tendon. Dissect with a
mosquito clamp through the subcutaneous tissues and capsule. -
Distend the ankle with normal saline in a 50 ml syringe attached by intravenous (IV) tubing to the arthroscopic cannula.
-
Establish the anterolateral portal next
under direct vision, using an 18-gauge spinal needle. Branches of the
superficial nerve that are most at risk average 6.2 mm away from this
portal (20). The incision is usually lateral to
the tendon of the peroneus tertius, but placement can vary depending on
the pathology to be addressed. Transillumination can help avoid injury
to the underlying structures. -
Establish the posterolateral portal in
the soft spot just lateral to the Achilles tendon, approximately
0.5-inch above the tip of the fibula. This portal is made under direct
vision using an 18-gauge spinal needle placed through the
posterolateral portal under the transverse ligament. -
Make a stab incision and insert a blunt
trochar at approximately 45° toward the medial malleolus, entering
inferior and slightly medial to the transverse tibiofibular ligament.
The lesser saphenous vein and sural nerve are at risk when establishing
this portal. The sural nerve is posterior to the lesser saphenous vein
and generally 6 to 9 mm anterolateral to this portal (20). -
Attach the inflow to the posterolateral portal initially and outflow through the arthroscopic cannula and IV tubing.
-
The anterocentral, posteromedial, and trans-Achilles portals are not used due to the increased morbidity associated with them (20).
-
Transmalleolar and transtalar portals can be used for arthroscopic drilling or for screw insertion.
-
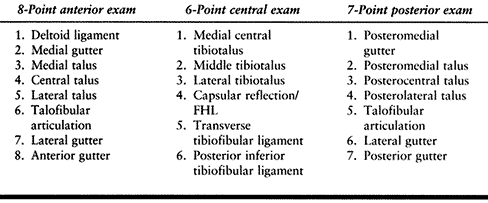
Perform a 21-point examination.
confusing and disorienting. The 21-point examination was developed by
Richard D. Ferkel (22) to establish a
reproducible and thorough intra-articular examination of the ankle. It
consists of an 8-point anterior examination, a 6-point central
examination, and a 7-point posterior examination (Table 93.2).
View initially via the anteromedial portal. Use switching sticks to
view the ankle from all three portals to provide a complete
examination. This method also provides the arthroscopist with a
reproducible means of documenting pathology found at time of
arthroscopy (Fig. 93.6, Fig. 93.7 and Fig. 93.8; see COLOR FIG. 93.6B, COLOR FIG. 93.7B and COLOR FIG. 93.8B).
 |
|
Table 93.2. The 21-Point Arthroscopic Ankle Exam
|
 |
|
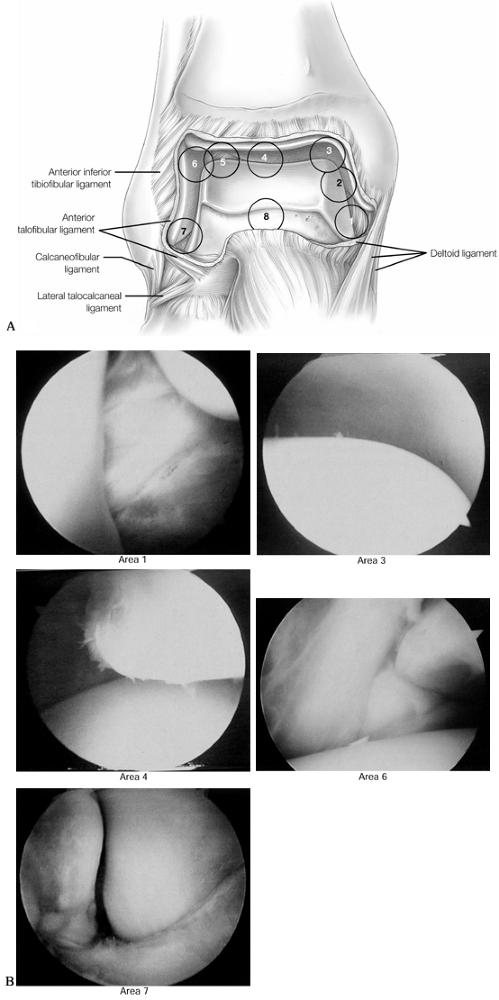
Figure 93.6. An 8-point anterior examination as viewed from the anteromedial portal. A: The anterior ankle is examined starting at the tip of the medial malleolus. (See COLOR FIG. 93.6B). B:
Arthroscopic views are demonstrated at positions 1, 3, 4, 6, and 7. (Copyright 1996 by Lippincott-Raven Publishers. From Ferkel RD. Arthroscopic Surgery: The Foot and Ankle. Philadelphia: Lippincott-Raven Publishers, 1996:110, with permission. Illustration by Susan Brust.) |
 |
|
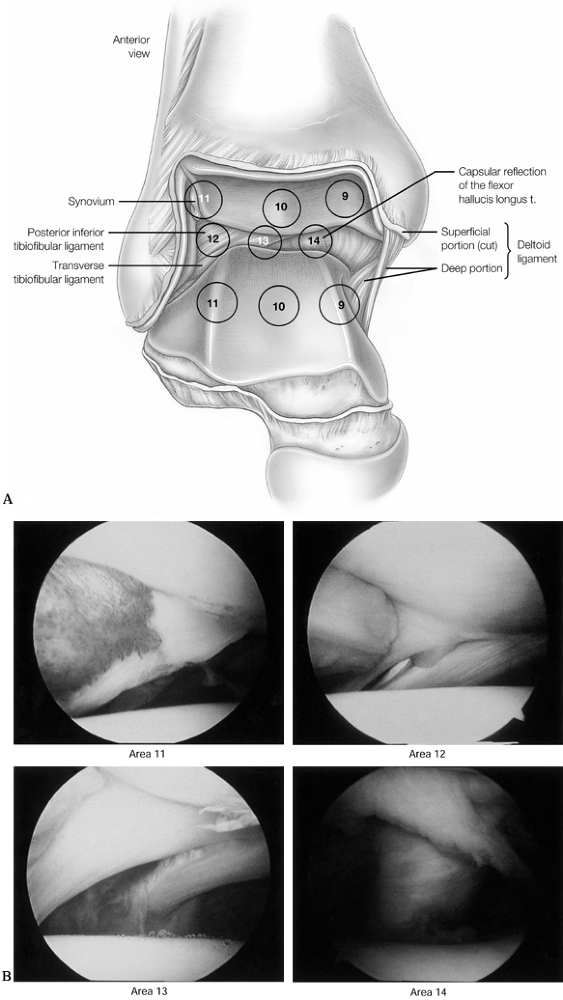
Figure 93.7. A 6-point central examination as viewed from the anteromedial portal. A: The central examination is performed to examine the tibiotalar articulation. (See COLOR FIG. 93.7B). B:
Arthroscopic views of points 11, 12, 13, and 14. (Copyrighted 1996 by Lippincott-Raven Publishers. From Ferkel RD. Arthroscopic Surgery: The Foot and Ankle. Philadelphia: Lippincott-Raven Publishers, 1996:112, with permission. Illustration by Susan Brust.) |
 |
|
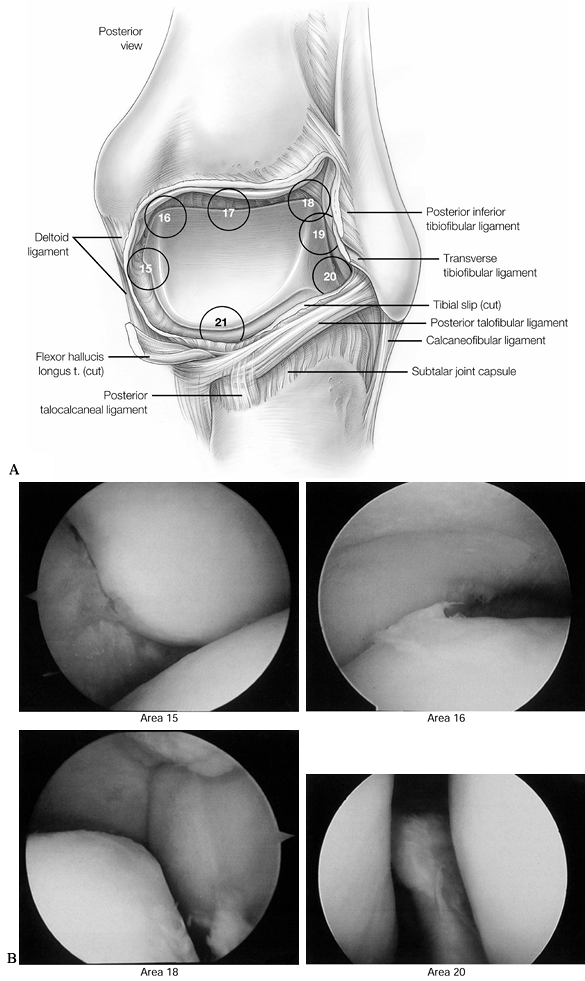
Figure 93.8. A 7-point posterior examination as viewed from the posterolateral portal. A:
The posterior examination begins along the posterior medial malleolus and is then rotated clockwise to complete the exam in the posterior recess. (See COLOR FIG. 93.8B). B: Arthroscopic views of points 15, 16, 18, and 20. (Copyright 1996 by Lippincott-Raven Publishers. From Ferkel RD. Arthroscopic Surgery: The Foot and Ankle. Philadelphia: Lippincott-Raven Publishers, 1996:114, with permission. Illustration by Susan Brust.) |
we commonly use the arthroscope in regard to wound sealing and healing.
Whereas not suturing portals at the knee can be advantageous, this is
not the case at the ankle. Careful attention to wound closure is
important. Close the portals with a 4-0 nylon, and then apply a
compression dressing and short-leg posterior splint. Immobilization and
elevation are important for the first 5 to 7 days postoperatively. If a
compression stocking is used, it can be removed at 48 hours, dressings
removed and bandages applied, followed by the stocking and splint. At 5
to 7 days, remove the splint and begin early motion with progressive
weight bearing as tolerated, depending on the pathology treated.
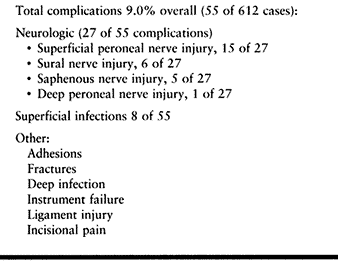
found an overall complication rate of 9%, with injury to superficial
sensory nerves the most frequent problem. The superficial peroneal
nerve was involved in 15 cases, the sural nerve in six cases, the
greater saphenous nerve in five cases, and the deep peroneal nerve in
one case. These complications were noted early in the development of
the technique and are thought to be much lower using the technique
described in the previous section. In this early study, Ferkel also
reported complications with the invasive distractor, such as transient
pain along the pin
tracks,
two stress fractures of the tibia, and one in the fibula secondary to
the pin placement. Superficial wound infection was noted in six
patients and deep wound infection in two patients. Compartment syndrome
has not been reported.
 |
|
Table 93.3. Complications of Ankle Arthroscopy (Based on 612 Cases) (25)
|
preoperative planning and patient selection, noninvasive distraction,
meticulous surgical technique, the use of switching sticks to change
portals, careful use of shavers by always pointing away from the
capsule, and appropriate postoperative care. We use perioperative
antibiotics routinely.
around the ankle. Most soft-tissue problems are related to the
synovium; however, the capsule and ligamentous tissues can also be a
source of pathology. Some of the common synovial etiologies include
rheumatologic, infectious, degenerative, posttraumatic and neuropathic
disorders (9,26,27,35,63).
Capsular and ligamentous disorders tend to cause soft-tissue
impingement located anterolateral, posterolateral, and in the region of
the syndesmosis.
localized to a specific anatomic area. Patients with nonspecific gen-
eralized synovitis of the ankle may present with swelling, aching, and
soreness throughout. Trauma to the ankle is the most common cause;
however, there may be no clear etiology. After a thorough workup and a
sufficient course of conservative therapy, consider ankle arthroscopy.
A high-flow volume system using a posterolateral portal for inflow is
crucial in maximizing arthroscopic visualization. Depending on the
findings, debride all synovitis, scar, or fibrosis. Treatment is
essentially the same for both generalized and localized synovitis.
Postoperatively, place the ankle in a short-leg splint for 1 week,
followed by an elastic compression stocking and range-of-motion
exercises with weight bearing as tolerated. Avoid active physical
therapy for 2 to 3 weeks to allow soft-tissue healing and resolution of
postoperative inflammation.
quite common. The discomfort is usually located anterolaterally. This
lateral gutter is bordered by the talus medially, the fibula laterally,
the tibia and syndesmosis superiorly, and the anterior inferior
tibiofibular ligament inferiorly. In 1950, Wolin et al. (77)
first described a “meniscoid” band of thickened tissue between the
fibula and talus as a source of anterolateral pinching and potential
pain. This mass was thought to originate from a torn joint capsule.
Waller (74) in 1982 described an anterolateral
corner compression syndrome, which was similar to Wolin’s description
but was proposed to be the result of recurrent inversion injuries. In
addition to soft-tissue impingement, other causes of chronic sprain
pain include osteochondral lesions of the talus, loose bodies, occult
fractures, peroneal tendon subluxation or tears, tarsal coalition,
subtalar pathology, and degenerative joint disease (18).
performed arthroscopies in more than 290 patients with persistent
anterolateral symptoms following inversion injury of the ankle. Their
evaluation of 75 of these patients treated with arthroscopic
debridement following failed conservative therapy demonstrated good to
excellent results in 63 (84%) patients, with an average follow-up of 34
months. Others have noted similar results (18,47,52,62).
The surgical findings generally include synovitis and fibrosis in the
anterolateral gutter, with an occasional thickened band of tissue
similar to the meniscoid lesion, as described by Wolin et al. (77) (Fig. 93.9).
 |
|
Figure 93.9.
Viewed from the anteromedial portal, anterolateral soft-tissue impingement with fibrosis and synovitis can be seen. (From Ferkel RD, Scranton PE Jr: Arthroscopy of the Foot and Ankle. J Bone Joint Surg Am 1993;75:1233. Copyright 1993 by The Journal of Bone and Joint Surgery, Inc., reprinted with permission.) |
-
Perform a careful ankle exam.
-
Use 70° arthroscope from the anteromedial
portal to look over the dome of the talus into the lateral gutter or
view from the anterolateral portal and shave from accessory
anterolateral portal. -
Excise synovitis, scar bands, and chondromalacia (Fig. 93.10).
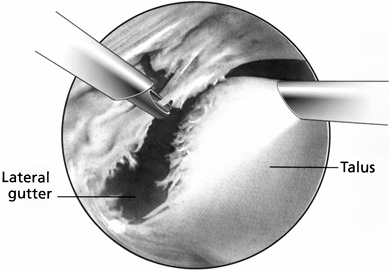 Figure 93.10.
Arthroscopic view from the anteromedial portal demonstrating excision
of the anterolateral soft-tissue impingement using a full radius shaver
entering from the anterolateral portal. -
Do not excise normal anterior talofibular ligament.
-
Postoperative management: Apply a
short-leg splint for 5 to 7 days, followed by a compression stocking
and supportive brace. Start physical therapy 2 to 3 weeks after
surgery. Participation in athletic endeavors can begin 4 to 6 weeks
following surgery.
exuberant scarring can be a source of impingement. Clinical diagnosis
is difficult unless there is a high incidence of suspicion. At
arthroscopy, the synovium is inflamed in this area and encompassing the
anterior inferior tibiofibular (AITF) ligament, often extending into
the distal tibiofibular joint. A fascicle of the AITF has been noted by
Bassett et al. (4) to be an additional factor in impingement, particularly if it is associated with laxity of the anterior talofibular ligament.
-
Carefully examine the ankle.
-
Debride synovitis and fibrosis of the anterior inferior tibiofibular ligament and tibiofibular joint.
-
Excise separate fascicles of the AITF ligament that are causing abrasion of the talus.
-
Rarely, it is necessary to remove the entire intra-articular portion of the AITF ligament.
independently or in conjunction with anterior soft-tissue impingement.
Clinical evaluation and imaging are often not successful in identifying
this entity. The diagnosis is usually made at the time of arthroscopy.
The patients usually have a history of recurrent inversion injuries of
the ankle.
Symptoms
may be more vague than in the patient with anterolateral impingement.
Arthroscopic viewing from both anterior and posterior portals and
distraction are essential in making the diagnosis (22).
hypertrophy or tearing of the posterior inferior tibiofibular ligament,
transverse tibiofibular ligament, or the tibial slip (the tibial slip
runs between the posterior inferior tibiofibular ligament and the
transverse tibiofibular ligament) (23) or a pathologic “labrum” on the posterior lip of the tibia, causing impingement.
-
Carefully examine the ankle.
-
Remove posterior synovitis and pathologic posterolateral synovial nodules.
-
Debride tears of the posterior ligaments.
-
Be careful not to injure flexor hallucis longus and neurovascular structures.
 |
|
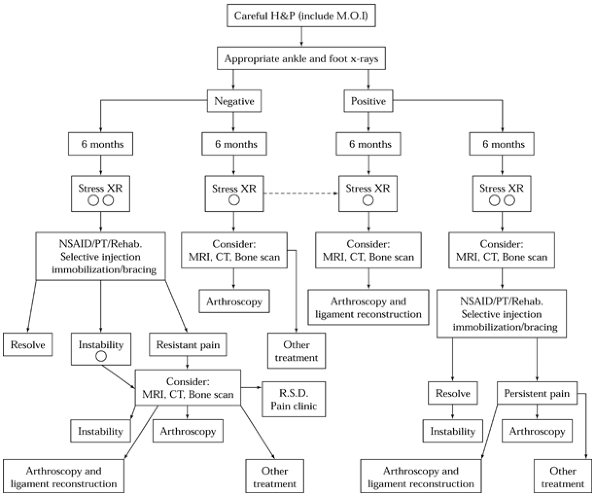
Figure 93.11. Algorithm for the management of chronic ankle pain. H&P, history and physical exam; XR, x-ray; R.S.D.,
reflex sympathetic dystrophy. (Copyrighted 1996 American Academy of Orthopedic Surgeons. From Stetson WB, Ferkel RD. Ankle Arthroscopy; II. Indications and Results. J Am Acad Orthop Surg 1996;4:24. Reprinted with permission.) |
osteochondritis dissecans, a talar dome fracture, and a flake fracture (3).
Controversy regarding uniform terminology is due mostly to the lack of
a widely accepted mechanism of injury. Berndt and Harty’s (5) original description in 1959 proposed the term “transchondral fracture” of the talus secondary to trauma (1,12). Other authors (11)
have concluded that because not all cases have a clearly defined
traumatic insult, the etiology must be due to bone pathology such as
idiopathic osteonecrosis. We prefer the term “osteochondral lesions of
the talus” to describe these lesions.
incidence of diagnosis of OLT in a group of patients with chronic ankle
pain has been reported as high as 81% (33). The incidence of bilateral lesions is approximately 10% (2,6). Medial lesions are more common and tend to be located more posterior than lateral lesions, which are more anterior (2,13,34).
Medial lesions are deeper, cup shaped, and usually undisplaced, whereas
lateral lesions are thin, wafer shaped, and often displaced. A history
of chronic lateral ankle pain is common, and depending on the extent of
the lesion, symptoms of swelling, stiffness, and giving way are common.
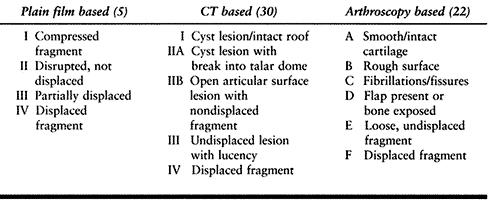
described a classification based on plain radiographs in which four
stages were proposed based on the compression and displacement of the
fragment. Ferkel and Sgaglione (31) proposed a classification based on CT appearance (Table 93.4),
which corresponds to the Berndt and Harty system but also considers the
integrity of the articular surface and the presence of subchondral
cysts (Fig. 93.12). Anderson et al. (2) have also developed an MRI classification. Based on our recent study (32),
we recommend that MRI be performed in cases of chronic pain with
unclear etiology, whereas CT can be performed when an OLT is seen on
plain x-ray studies. Ferkel and Cheng (23) have also reported an arthroscopic staging system to help predict clinical outcome (Table 93.4; Fig. 93.13; see COLOR FIG. 93.13).
 |
|
Table 93.4. Classifications of Osteochondral Lesions of the Talus
|
 |
|
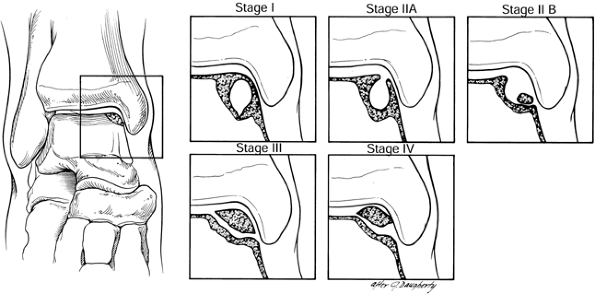
Figure 93.12.
CT scan classification of osteochondral lesions of the talus: Stage I is a cystic lesion within the dome of the talus, intact roof. Stage IIA is a cystic lesion with communication to the talar dome surface. Stage IIB is an open articular surface lesion with overlying nondisplaced fragment. Stage III is an undisplaced lesion with lucency. Stage IV is a displaced fragment. (Ferkel RD, Sgaglione NA. Arthroscopic Treatment of Osteochondral Lesions of the Talus: Long Term Results. Orthop Trans 1993;17:1011. Copyrighted 1996 by Lippincott-Raven Publishers. Illustration from Ferkel RD: Arthroscopic Surgery: The Foot and Ankle. Philadelphia: Lippincott-Raven Publishers, 1996. Illustration by Susan Brust.) |
 |
|
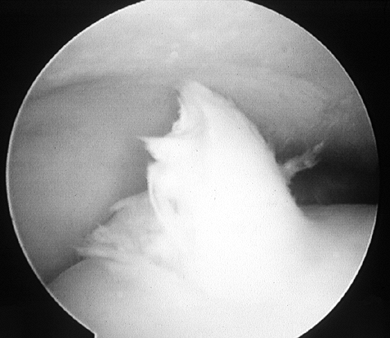
Figure 93.13. (See COLOR FIG. 93.13). Arthroscopic picture of a Stage D osteochondral lesion of the talus.
|
Conservative treatment consists of 6 to 12 weeks of casting, with
progression to weight bearing as tolerated. For those who fail
conservative treatment, open arthrotomy with malleolar osteotomy,
distal tibia grooving, and percutaneous drilling under fluoroscopy have
all been described for surgical treatment (1,31,36,72).
These surgical approaches all can have significant morbidity, including
soft-tissue trauma, malunion or nonunion of the malleoli, joint
stiffness, and prolonged rehabilitation.
visualization for treatment of osteochondral lesions of the talus and
is associated with reduced morbidity, results superior to open
treatment, and faster rehabilitation (24,38).
-
Conservative treatment for most stage I to III lesions
-
Immediate surgery for all stage IV lesions
-
Surgery for stages I to III that fail conservative treatment
-
Conservative treatment for stages I and II in adults, and stages I to III in children 18 or under
-
Surgery for adults with stages III and IV, and children with stage IV
-
If conservative treatment fails, surgery is performed regardless of the stage.
of the subchondral bone is required to create bleeding, fibrin clot formation, and eventual fibrocartilage formation (44,54,58). Different techniques have been developed to penetrate the subchondral bone, including drilling, abrasion, and microfracture (7,44). A recent comparison of the long-term effects of abrasion to drilling in rabbits demonstrated better results with drilling (34).
Recently, microfracture has been advocated to avoid placing holes
through the malleoli and to prevent heat necrosis; it also allows
increased holes to be placed in the lesion with less morbidity (69).
We recommend arthroscopic debridement and microfracture for small
defects, and arthroscopic debridement and drilling with microfracture
for larger defects. Bone grafting of defects larger than 1.5 cm in
depth may also be considered. All patients are generally kept
non-weight bearing for 4 to 8 weeks, but early range of motion should
start at 1 week.
-
Arthroscopically inspect, identify, and stage all lesions of articular surfaces.
-
Excise any loose bodies or osteochondral fragments.
-
Palpate and measure the talar articular surface to determine the size and extent of the lesion.
-
Use a banana knife and ring curet to remove the primary osteochondral lesion if it is loose and avascular.
-
Use 2.9 mm and 3.5 mm shavers, if desired, to debride the talar bed to smooth the edges.
-
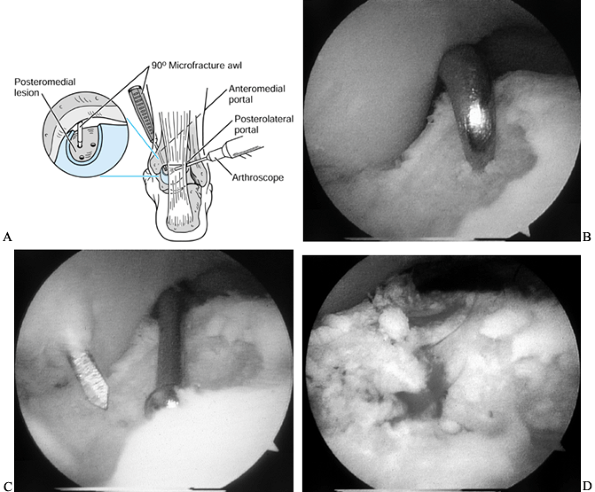
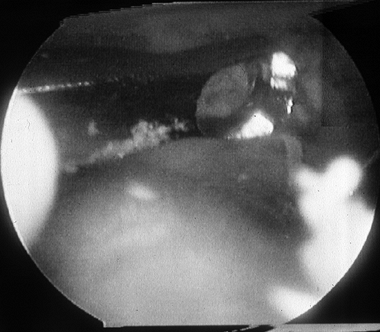
Insert a 90° microfracture awl for small lesions (Fig. 93.14A).
![]() Figure 93.14. (See COLOR FIG. 93.14B, COLOR FIG. 93.14C and COLOR FIG. 93.14D). Arthroscopic treatment of osteochondral lesions of the talus. A:
Figure 93.14. (See COLOR FIG. 93.14B, COLOR FIG. 93.14C and COLOR FIG. 93.14D). Arthroscopic treatment of osteochondral lesions of the talus. A:
The left ankle is shown. Viewing from the posterolateral portal, a
microfracture awl from the anteromedial portal penetrates the
subchondral bone of a posteromedial lesion. B: Microfracture of the subchondral surface using an awl. C: Using a drill guide for transmalleolar drilling of the subchondral bone. D: The result of the above two treatments is a bleeding bone surface providing vascular access for cartilage formation. -
For larger lesions, use a 90°
microfracture awl along the peripheral edge of the lesion and use a
MicroVector (Smith and Nephew, Endoscopy, Andover, MA) to drill
multiple holes in the center of the lesion (Fig. 93.14B and Fig. 93.14C; see COLOR FIG. 93.14B, COLOR FIG. 93.14C and COLOR FIG. 93.14D). -
Drilling also can be performed transtalarly, through the sinus tarsi; this is usually done with an 0.062-inch K-wire.
-
Use a bone graft for large deep cystic lesions (Fig. 93.15A, Fig. 93.15B, Fig. 93.15C and Fig. 93.15D; see COLOR FIG. 93.15B, COLOR FIG. 93.15C and COLOR FIG. 93.15D).
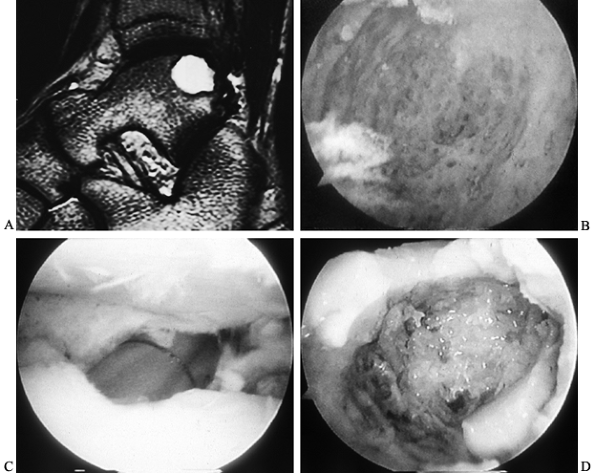 Figure 93.15. Management of large osteochondral lesions of the talus. A: Preoperative MRI, T2-weighted image, demonstrates a large posterior osteochondral lesion. B: Arthroscopic view from a posterior portal shows the inside of the osteochondral lesion and depth. C: Arthroscopic bone grafting is performed via an osteochondral transplant cylinder. D: Arthroscopic view from a posterior portal of the bone graft filling the cyst near completion.
consecutive patients with OLT and in a subgroup of 64 patients, who
fulfilled the study criteria, yielded 72% good to excellent results
(American Orthopaedic Foot and Ankle Society Ankle/Hindfoot score of
84). At an average follow-up of 71 months, there was no correlation
between
imaging
studies and clinical outcome; however, there was statistically
significant correlation between arthroscopic staging and long-term
results (31).
articular cartilage defects. Chondrocyte transplantation has been
studied extensively in Sweden and is currently undergoing clinical
trials in the United States (10,55).
Transplantation of autogenous osteochondral grafts taken from a donor
site on the supracondylar ridge of the femur has also been tried in the
ankle. Debate exists as to whether one large graft should be used or
multiple small grafts (mosaicplasty) to fill the osteochondral lesion
bed. A preliminary report (39) indicates
excellent results in 11 patients with mosaicplasty. All techniques
mentioned earlier so far require an arthrotomy, and future research is
needed to determine their effectiveness.
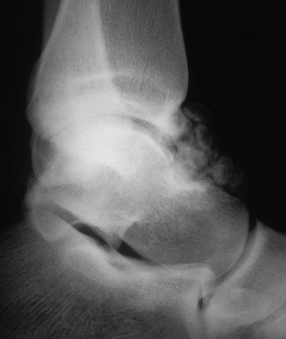
nontraumatic disorders, such as synovial chondromatosis, in which loose bodies may form as well (Fig. 93.16).
Those fragments that contain bone may be detected on radiographs, but a
cartilaginous fragment is not usually seen on plain radiographs. An
arthrogram would likely show these intra-articular loose bodies, but
MRI is the study of choice for cartilage lesions. Occasionally, a
magnetic resonance arthrogram using gadolinium may be necessary to
detect the more discrete lesions as well as show a possible cartilage
area of origin. The surgeon needs to know preoperatively if the loose
body is intra-articular, intracapsular, or extra-articular.
 |
|
Figure 93.16. Lateral radiograph of an ankle showing multiple loose bodies in the anterior and posterior recess of the ankle joint.
|
avoid missing any fragments. Closely examine the articular cartilage
following removal of fragments to address any residual articular defect.
-
Look both anteriorly and posteriorly for loose bodies.
-
Squeeze the posterior capsule to try to extrude loose bodies hidden in the posterior joint.
dressing with a short-leg splint for 5 to 7 days. Then change to a
compressive stocking and begin early motion. Results depend on the
underlying etiology of the loose bodies but are much less predictable
in patients with degenerative changes (51).
lip of the tibia and the adjacent talus. Normally, the angle between
the distal end of the tibia and the talus is greater than 60°. With
osteophytic formation on the distal part of the tibia or talar neck,
this angle can diminish to less than 60°, resulting in impingement.
is quite common following ankle injuries in athletes, with a reported
incidence of 45% in football players and 59.3% in dancers (60).
This spurring may cause decreased motion or pain, or both, at the ankle
with dorsiflexion. Other areas in the ankle, such as the medial
malleolus and the posterior lip of the tibia at the articular surface,
may also have similar osteophyte formation. A classification system has
been developed by Scranton and McDermott (68)
to describe patterns of osteophyte formation around the ankle. A
positive bone scan suggests that spurring may be the source of pain. CT
scans can be helpful to determine the size and location of the
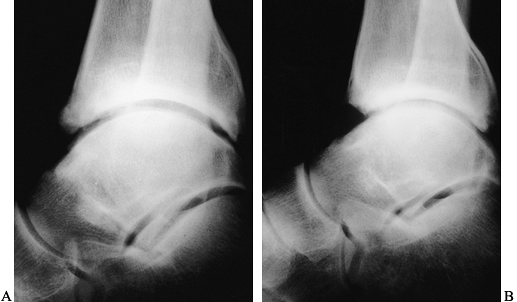
osteophytes. Obtain weight-bearing and non-weight-bearing lateral
radiographs in plantarflexion to identify the extent of the osteophyte
and any loose bodies (Fig. 93.17A and Fig. 93.17B).
 |
|
Figure 93.17. A: Lateral radiographs of the tibiotalar joint showing preoperative osteophytes anteriorly. B: A postoperative radiograph following arthroscopic removal of the osteophyte.
|
-
Remove all soft tissue around the
osteophytes. Peel the soft tissue off anterior and inferior spurs with
a Freer elevator and shaver. -
Identify the extent of the osteophyte before resection.
-
Remove the osteophytes with a burr or osteotome, and rongeurs, as needed.
-
Use intraoperative radiographs or fluoroscopy to verify complete excision.
a short-leg splint for 5 to 7 days, followed by early range-of-motion
exercises and progressive weight bearing as tolerated. Commence
physical therapy at 2 to 3 weeks postoperatively, and include
stretching, strengthening, and proprioceptive training.
posterolateral portal to find the joint space and remove the medial
corner of the osteophyte first, then switch back to the anterior
portals for visualization and treatment of the remainder of the
osteophyte.
with either posttraumatic or primary degenerative arthritis, a clearly
defined reason for arthroscopy is required (16). Ankles with advanced degenerative disease do not benefit from ankle arthroscopy (19).
Ankle arthrodesis may be indicated for the advanced degenerative ankle.
Open arthrodesis requires an extensive surgical approach and has
significant potential complications. With new advances in ankle
distraction and ankle arthroscopic equipment, arthroscopic arthrodesis
is an attractive alternative (56,61).
intolerable ankle pain in the ankle with advanced degenerative
arthritis that does not respond to conservative treatment.
Contraindications include varus or valgus mal- alignment of more than
15 degrees, malrotation of the ankle, significant bone loss, active
infection, previous failed fusion, reflex sympathetic dystrophy,
neuropathic destructive process and AP translation of the tibiotalar
joint requiring correction.
-
Position the patient supine on a
radiolucent operating table. Position the leg such that the image
intensifier can easily be positioned. The optimal position for
arthrodesis of the ankle is neutral dorsiflexion. Avoid equinus,
especially more than 10°, unless the patient has residual paralysis of
the knee from poliomyelitis. -
Perform standard diagnostic arthroscopy with ankle distraction.
-
Remove the entire articular surface of
the tibial plafond, talar dome, and medial and lateral talomalleolar
surfaces systematically using a motorized shaver, abrader, ring and cup
curets, and pituitary rongeurs (Fig. 93.18; see COLOR FIG. 93.18).![]() Figure 93.18. (See COLOR FIG. 93.18).
Figure 93.18. (See COLOR FIG. 93.18).
When performing arthroscopic fusion take care to remove all articular
cartilage with a combination of instruments. A curved curet is shown
here. -
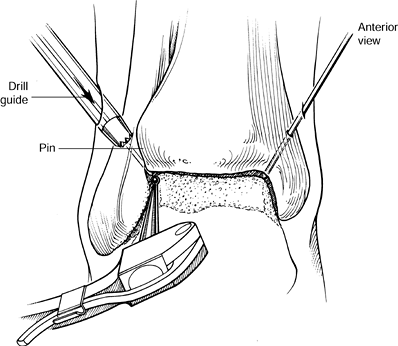
Make multiple small dimples in the subchondral bone of the tibia and talus with a burr to facilitate early bony union (Fig. 93.19; see COLOR FIG. 93.19).
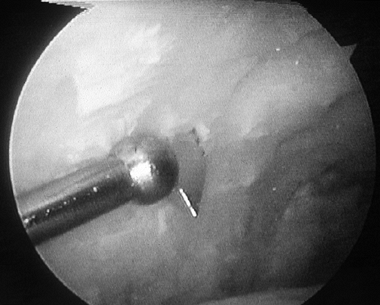 Figure 93.19. (See COLOR FIG. 93.19).
A small joint drill guide can be used to drill the guide wires
transmalleolar and thus arthroscopically assist in placement of the
screws for fusion. -
Take care at all times to maintain the anatomic bony contour of the talar dome and tibial plafond.
-
Remove all anterior and posterior osteophytes before insertion of screws.
-
Insert the MicroVector arthroscopically to facilitate guide pin insertion.
-
Then fix the ankle by placing a guide pin
for a cannulated screw from the proximal part of the medial malleolus
to just above the joint line. Drill a second pin laterally through the
lateral malleolus into the posterior aspect of the joint line. Insert
both medial and lateral guide pins from the posterior aspect of the
malleoli, and angle them 45° inferiorly and 45° anteriorly (Fig. 93.20).![]() Figure 93.20.
Figure 93.20.
Both pins are inserted from the posterior aspect of the malleoli and
angled approximately 45 degrees anterior and inferior. Copyrighted 1996
by Lippincott-Raven Publishers, Arthroscopic Surgery: The Foot and Ankle. Richard D. Ferkel, Figure 11-13, pp. 26-27. Illustration by Susan Brust. -
Release distraction and put the ankle into a neutral position. Under fluoroscopy, also check the position of the guide pins.
-
Advance the guide pins under fluoroscopic control, being careful not to penetrate the subtalar joint.
-
Measure the length of the pins and insert 6.5 or 7.3 mm self-drilling, self-tapping screws under fluoroscopic control (Fig. 93.21).
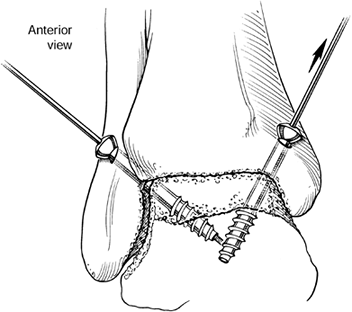 Figure 93.21.
Transmalleolar screw insertion with a 6.5 mm, self-drilling,
self-tapping screw is performed such that all threads of the screw are
within the talus; therefore, compression across the surfaces, and not
distraction, will assist in fusion. (Copyrighted 1996 by
Lippincott-Raven Publishers. Ferkel RD. Arthroscopic Surgery: The Foot and Ankle. Philadelphia: Lippincott-Raven Publishers, 1996:26, with permission. Illustration by Susan Brust.) -
Take radiographs to verify screw position and length, as well as ankle alignment.
is split in the recovery room. At 1 week, remove the stitches and apply
a new cast. Begin weight bearing at 2.5 to 3 weeks. Discontinue the
cast or removable cast-boot device when bony union is seen on
radiographs.
When compared with open arthrodesis, arthroscopic fusion seems to have
lower overall morbidity, quicker time to union, and shorter recovery
and rehabilitation (57).
to assess directly the articular surfaces, remove fracture debris,
assess for ligament damage, and in some instances, assist fracture
reduction and percutaneous screw insertion (28,29).
Arthroscopically assisted reduction and internal fixation can be
accomplished in fractures with minimal to mild displacement that are
easily reducible by manipulation, with minimal to mild ankle swelling
and no neurovascular injury. Arthroscopy is also useful in treating
syndesmosis disruptions, deltoid ligament tears, and posterior
malleolar fractures, and in assisting in removal of debris in reduction
of talar fractures. Triplane fractures have also been reportedly
reduced with arthroscopic assistance with success (53,76).
-
Place the patient supine on a radiolucent operating table.
-
Use a standard arthroscopic setup.
-
Apply gentle soft-tissue distraction.
-
Remove all fracture debris, loose bodies, and hematoma.
-
If the fracture cannot be reduced arthroscopically, then perform open reduction internal fixation.
-
If arthroscopic fracture reduction is
possible, reduce the fracture with large fracture clamps and maintain
the reduction with guide pins from the AO cannulated screw set. After
visual and fluoroscopic verification of reduction, measure the screw
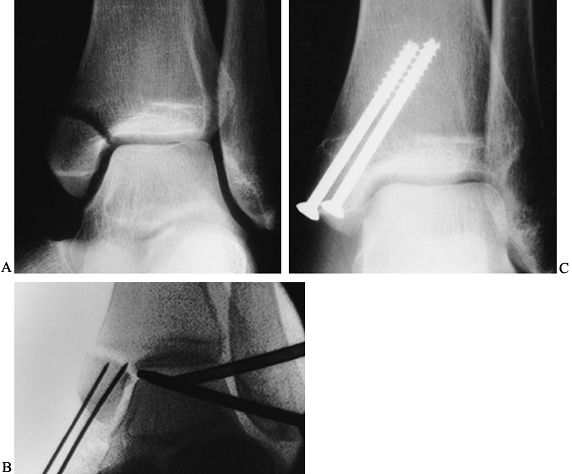
lengths and insert the appropriate size screws (Fig. 93.22A, Fig. 93.22B and Fig. 93.22C).![]() Figure 93.22. Arthroscopically assisted treatment of a medial malleolar fracture. A: Preoperative x-ray study shows a displaced fracture with rotation. B:
Figure 93.22. Arthroscopically assisted treatment of a medial malleolar fracture. A: Preoperative x-ray study shows a displaced fracture with rotation. B:
Intraoperative fluoroscopy shows initial fracture reduction and pin
placement. These guide pins can be used to complete the reduction and
then cross the fracture for screw placement. C: Screw placement and fracture healing 8 weeks postoperative.
recovery room. Keep the patient non-weight-bearing, and remove sutures
at the first postoperative visit. Subsequent immobilization is
determined by the nature of the fracture and its fixation (see Chapter 25).
47 consecutive patients with acute fractures of the ankle treated with
arthroscopy of the tibiotalar joint, followed by open reduction and
internal fixation. Damage to the articular surfaces was noted in 29 of
47 (62%) ankles. Fracture debris and hemarthrosis were noted in all
ankles. Several other institutions have reported on the utility of
arthroscopy for fractures (21,42,53,66). Further studies are needed to determine the long-term benefit of ankle arthroscopy in patients with acute ankle fractures.
Arthroscopy can be a useful tool in the evaluation of chronic lateral
ankle instability. Dynamic information that is not available with
stress radiographs can be obtained at the time of arthroscopy (40,49). In a recent study, 92% of patients with ankle instability had intra-articular pathology (27). Failure to recognize these lesions may jeopardize the patient’s clinical outcome following stabilization procedures (69). Before ligament reconstruction, we advocate arthroscopic ankle examination (70). Arthroscopic ligament stabilization is an evolving technique, and its use
has been reported by Hawkins (40) for patients with mild instability with promising short-term results.
development of new equipment and techniques over the past decade, we
have seen the applications of ankle arthroscopy grow remarkably.
Perhaps more important, the procedure has become more user friendly.
Therefore, more patients can be treated with the lower morbidity and
speedier recovery that is associated with arthroscopic surgery of the
ankle compared with the standard open arthrotomy procedures for
treatment of the same pathology. We can anticipate the evolution of
this field to continue to parallel the rapid technologic advances seen
in computers, optics, and audio and video equipment. These advances,
along with improved surgical technique, experience, and long-term
outcome studies, will pave the way for the next generation of ankle
specialists.
scheme: *, classic article; #, review article; !, basic research
article; and +, clinical results/outcome study.
FT, Steadman JR, Rodrigo JJ, Silliman J. Treatment of Articular
Cartilage Defects in Athletes: An Analysis of Functional Outcome and
Lesion Appearance. Orthopedics 1998;21:761.
DC, Peereboom J, Saxby TS. Pigmented Villonodular Synovitis in the
First Metatarsophalangeal Joint: Arthroscopic Treatment of an Unusual
Condition. Foot Ankle 1997;18:504.
M, Lindahl A, Nilsson A, et al. Treatment of Deep Cartilage Defects in
the Knee with Autologous Chondrocyte Transplantation. N Engl J Med 1994;331:889.
OD, Snook CA. A Reconstruction of Lateral Ligament Tears of the Ankle:
An Experimental Study and Clinical Evaluation of Seven Patients Treated
by a New Modification of the Elmslie Procedure. J Bone Joint Surg 1969;51A:904.
RD, Zanotti RM, Komenda GA. Arthroscopic Treatment of Chronic
Osteochondral Lesions of the Talus: Long Term Results. Submitted for
publication.
AB, Gould N. Osteochondritis Dissecans of the Talus (Transchondral
Fractures of the Talus): Review of the Literature and New Surgical
Approach for Medial Dome Lesions. Foot Ankle 1985;5:165.
SR, Menche DS, Blair B, et al. A Comparison of Abrasion Burr
Arthroplasty and Subchondral Drilling in the Treatment of
Full-thickness Cartilage Lesions in the Rabbit. Trans Orthop Res Soc 1994;19:483.
L, Kish G, Karpati Z, et al. Treatment of Osteochondritis Dissecans of
the Talus: Use of the Mosaicplasty Technique—A Preliminary Report. Foot Ankle 1997;18:628.
PH. Semilunar Cartilage Diseases. A Plea for Early Recognition by Means
of the Arthroscope and Early Treatment of This Condition. Ir Med J 1925;47:290.
GJ, Ferkel RD. Arthroscopic Assessment of Occult Intraarticular Injury
in Acute Ankle Fractures. Submitted for publication.
N, Shepard N. The Resurfacing of Adult Rabbit Articular Cartilage by
Multiple Perforations Through the Subchondral Bone. J Bone Joint Surg 1976;58A:230.
DD, Nelson RC, Laurine MH, et al. Acute Injuries of the Lateral
Ligaments of the Ankle: Comparison of Stress Radiography and
Arthrography. Radiology 1983;148:653.
JR, Blevins FT, Rodrigo JJ, Silliman J. Treatment of Articular
Cartilage Defects in Athletes: An Analysis of Functional Outcome and
Lesion Appearance. Orthopedics 1998;2:761.
I, Shino K, Inoue M, Nakata K, Maeda A. Articular Cartilage Lesions in
Ankles with Lateral Ligament Injury: An Arthroscopic Study. Am J Sports Med 1993;21:120.