
Cole & Sekiya: Surgical Techniques of the Shoulder, Elbow and Knee in Sports Medicine, 1st ed.
Copyright ©
2008 Saunders, An Imprint of Elsevier
CHAPTER 47 – Allograft Meniscus Transplantation: Bridge in Slot Technique
Jack Farr, MD,
Brian J. Cole, MD, MBA
It is generally believed that any significant meniscectomy alters the biomechanical and biologic environment of the normal knee, eventually resulting in pain, recurrent swelling, and effusions. Overt secondary osteoarthritis is often the endpoint. [1] [2] Recognition of these consequences has led to a strong commitment within the orthopedic community to meniscus-sparing interventions. However, there are cases in which meniscal preservation is not possible. In carefully selected patients, meniscal allografts can restore nearly normal knee anatomy and biomechanics, providing excellent pain relief and improved function.[5]
Several techniques exist for allograft meniscus transplantation, including bone plugs, a keyhole technique, and a dovetail technique. The senior authors prefer the bridge in slot technique, as described previously,[6] because of its simplicity and secure bone fixation, the ability to more easily perform concomitant procedures such as osteotomy and ligament reconstruction, and the advantages of maintaining the relationship of the native anterior and posterior horns of the meniscus.
It is essential to elicit a thorough history, including the causative mechanism, associated injuries, and prior treatments. Operative reports are helpful to evaluate arthritic changes that could constitute a contraindication to meniscal transplantation.
Factors Affecting Surgical Indication
Factors Affecting Surgical Planning
Indications and Contraindications
The ideal candidate has a history of prior total or subtotal meniscectomy with persistent pain localized to the involved compartment, intact articular surfaces (ideally, grade I or II), normal alignment, and a stable joint. Associated pathologic findings, such as malalignment, discrete chondral defects, and ligamentous instability, are not contraindications in an otherwise appropriate candidate because they can be addressed in either staged or concomitant procedures.
In addition to uncorrected comorbidities (malalignment, ligament deficiency, uncorrected localized chondral damage in the involved compartment), contraindications are overt arthroscopic or radiographic arthritic changes (especially associated with femoral condyle or tibial flattening), history of inflammatory arthritis, marked obesity, and previous infection.
Significant limb malalignment, ligamentous instability, or discrete chondral defects can be addressed either before or concomitant with meniscus transplantation.
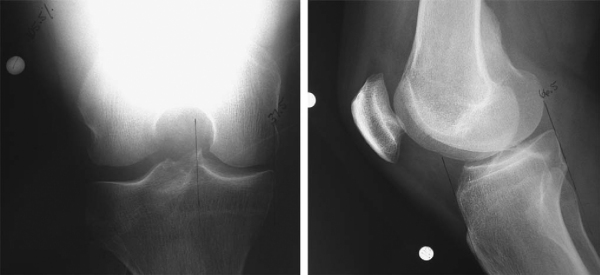
Meniscal allografts are size and compartment specific. Preoperative measurements are obtained from anteroposterior and lateral radiographs with magnification markers placed on the skin at the level of the joint line. After radiographic magnification is accounted for, meniscal width is measured on the anteroposterior radiograph from the edge of the ipsilateral tibial spine to the edge of the tibial plateau. Meniscal length is calculated by multiplying the depth of the tibial plateau (as measured on lateral radiographs) by 0.8 for the medial meniscus and 0.7 for the lateral meniscus (
Fig. 47-1
).
Meniscal Graft Processing and Preservation
Meniscal allografts are harvested by sterile surgical technique, most commonly within 24 hours of donor asystole. Unlike with fresh osteochondral allografts, cell viability in meniscal allografts does not seem to improve the morphologic or biochemical characteristics of the grafts; thus, the most commonly implanted grafts are either fresh-frozen or cryopreserved. The risk of disease transmission is minimized through rigid donor screening, graft culturing, and polymerase chain reaction testing for human immunodeficiency virus. Several tissue banks are evaluating secondary sterilization techniques to further improve the safety of meniscal allograft tissue.
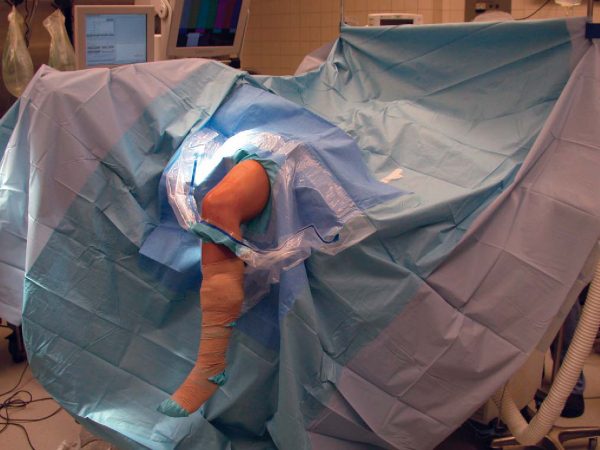
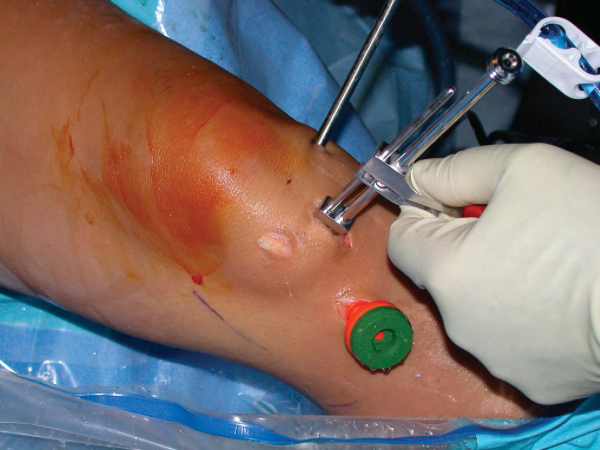
On the basis of the surgeon’s, anesthesiologist’s, and patient’s preferences, the procedure can be performed under general, spinal, or regional anesthesia or a combination thereof. The patient is positioned supine on a standard operating room table, with a thigh tourniquet, and the extremity is placed in a standard leg holder allowing full knee flexion or hyperflexion (
Fig. 47-2
). The posteromedial or posterolateral corner must be freely accessible for inside-out meniscus suturing to be performed.
Surgical Landmarks, Incisions, and Portals
| • | Patella | |
| • | Patellar tendon | |
| • | Tibial plateau | |
| • | Fibular head |
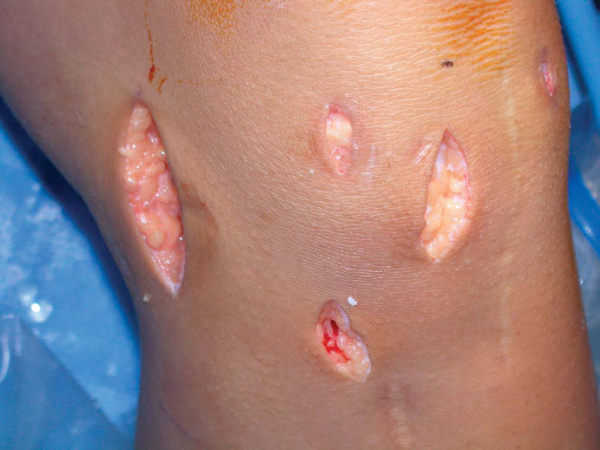
Portals and Approaches (
Fig. 47-3
)
| • | Inferomedial portal | |
| • | Inferolateral portal | |
| • | Additional outflow portals as needed | |
| • | Posteromedial or posterolateral approach | |
| • | Mini-arthrotomy through ipsilateral side of patellar tendon |
|
|
|
|
Figure 47-3 |
| • | Posterolateral approach: peroneal nerve, lateral collateral ligament | |
| • | Posteromedial approach: saphenous nerve, medial collateral ligament | |
| • | Mini-arthrotomy: patellar tendon |
Examination Under Anesthesia and Diagnostic Arthroscopy
Examination under anesthesia should evaluate range of motion and ligamentous stability. Diagnostic arthroscopy is useful to evaluate for other intraarticular pathologic processes, such as loose bodies, ligamentous deficiency, and chondral defects.
Specific Steps (
Box 47-1
)
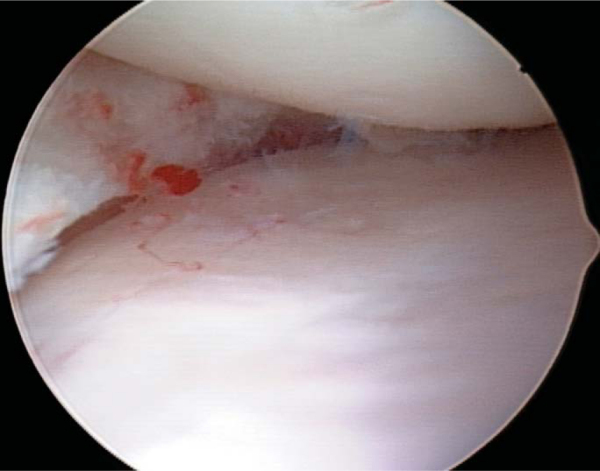
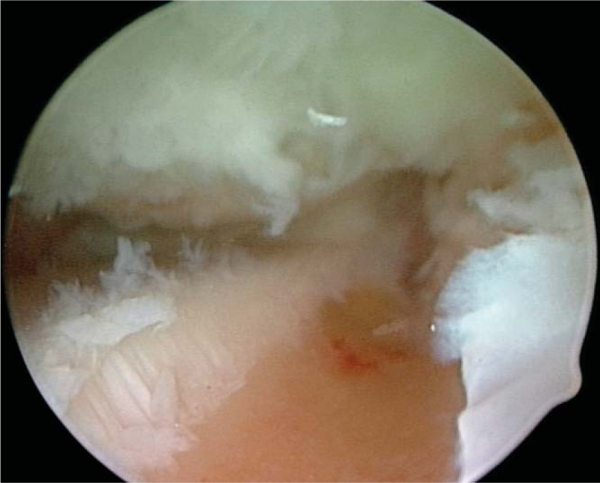
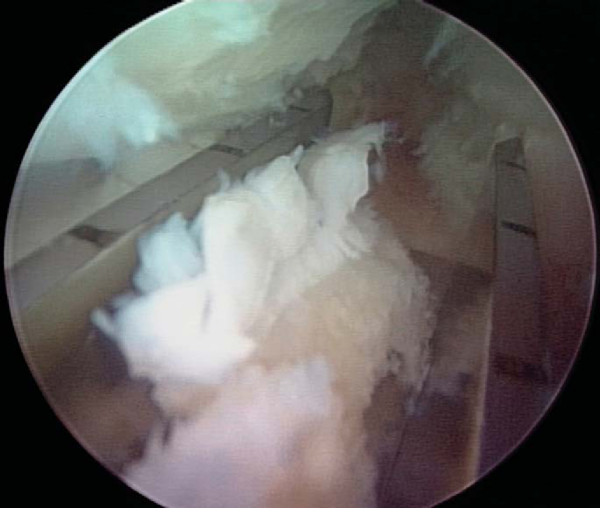
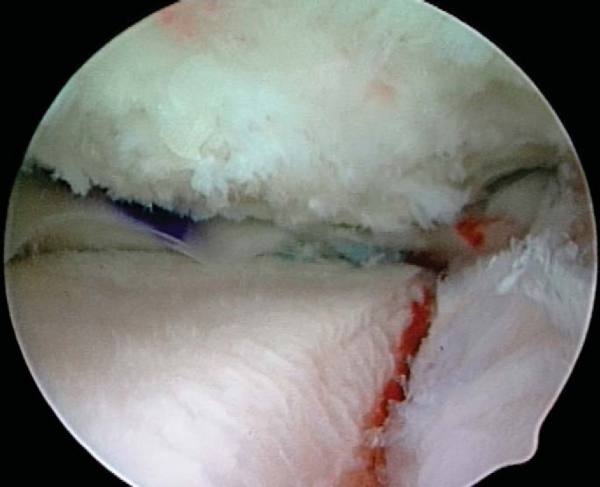
The initial steps for medial and lateral meniscus transplantation are similar. The remaining meniscus is débrided to a stable, 1- to 2-mm peripheral rim until punctate bleeding occurs (
Fig. 47-4
). The most anterior aspect of the meniscus can be excised under direct visualization by use of a No. 11 scalpel blade placed through the ipsilateral portal followed by the use of an aggressive arthroscopic shaver. The anterior and posterior horn insertion sites should be maintained because they are helpful markers during slot preparation. A limited notchplasty along the most inferior and posterior aspect of the ipsilateral femoral condyle allows improved visualization of the posterior horn and facilitates graft passage.
| Surgical Steps | ||||||||||||||||||
|
A mini-arthrotomy is performed in line with the anterior and posterior horn insertion sites of the involved meniscus (see
Fig. 47-3
). This allows correct orientation of the slot and introduction of the graft. Depending on the surgeon’s preference, the arthrotomy can be performed either directly adjacent to or through the patellar tendon in line with its fibers. An ipsilateral (either posteromedial or posterolateral) approach is required for meniscal repair (see
Fig. 47-3
). The incision should extend approximately one third above and two thirds below the joint line and allow adequate exposure to protect the neurovascular structures during passage of the inside-out sutures. The ipsilateral gastrocnemius muscle–tendon junction is elevated off the posterior capsule, and a meniscal retractor is placed anterior to it. Elevation of either the iliotibial band–tensor fascia lata or sartorius fascia anteriorly allows suture tying beneath these structures to minimize the chances of capturing the knee due to soft tissue tethering.
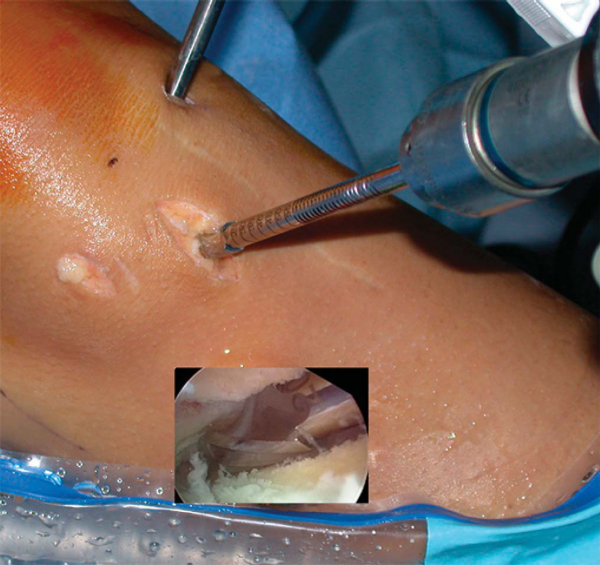
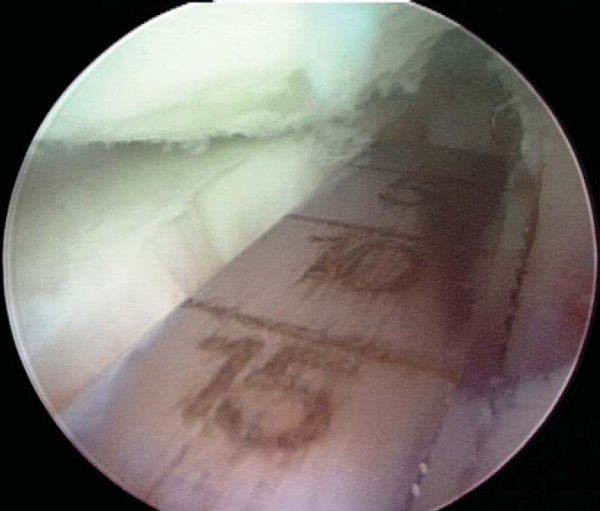
Slot orientation follows the normal anatomy of the meniscus attachment sites. By use of electrocautery, the centers of the anterior and posterior horn attachment sites are connected with a line. With this line as a guide, a 4-mm bur is used to make a reference slot in the tibial plateau. Its height and width will equal the dimensions of the bur, and its alignment in the sagittal plane should parallel the slope of the tibial plateau (
Fig. 47-5
). Slot dimensions should be confirmed by placement of a depth gauge in the reference slot, which also measures the anteroposterior length of the tibial plateau (
Fig. 47-6
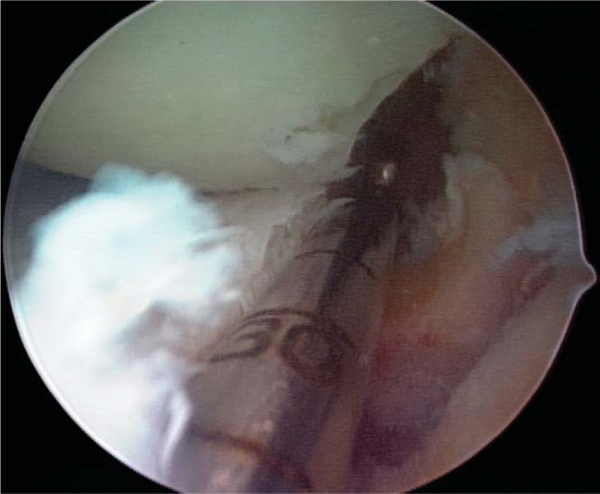
). With use of a drill guide, a guide pin is placed just distal and parallel to the reference slot (
Fig. 47-7
) and advanced to but not through the posterior cortex. The pin is subsequently overreamed with a 7- or 8-mm cannulated drill bit (
Fig. 47-8
), again with care taken to maintain the posterior cortex. A box cutter is then used to make a slot 7 to 8 mm wide by 10 mm deep (
Fig. 47-9
), which is smoothed and refined with a 7- to 8-mm rasp to ensure that the bone bridge will slide smoothly into the slot (
Fig. 47-10
).
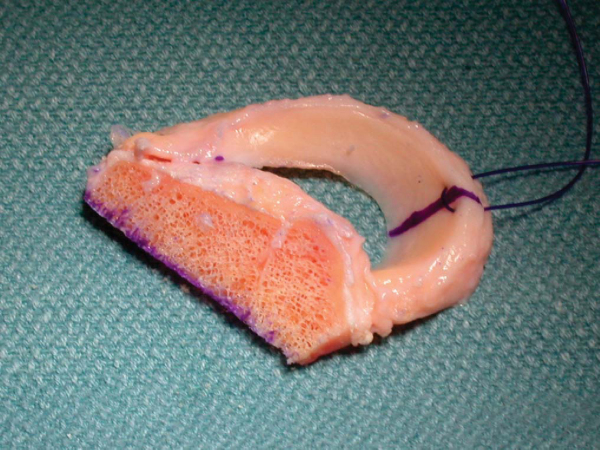
4. Meniscal Allograft Preparation
This technique uses a bone bridge to secure the graft to the tibial plateau. The bone bridge is intentionally undersized by 1 mm to facilitate graft passage and to reduce the risk of inadvertent bridge fracture during insertion. The attachment sites of the meniscus are identified on the bone block, and the accessory attachments are débrided. Only the true attachment sites should remain, usually 5 to 6 mm wide. The bone bridge is then cut to a width of 7 mm and a height of 1 cm. Also, any bone extending beyond the posterior horn attachment site is removed; bone anterior to the attachment site of the anterior horn should be preserved to maintain graft integrity during insertion. A vertical mattress traction suture of No. 0 polydioxanone (PDS) is placed at the junction of the posterior and middle thirds of the meniscus (
Fig. 47-11
).
On occasion, the anterior horn attachment can be larger, up to 9 mm wide. If the anterior horn attachment site is wider than the intended width of the bone bridge, the attachment should be left intact, and the width of the bone bridge should be increased accordingly in the area of the anterior horn insertion only; the remainder of the bone bridge should be trimmed to 7 mm as intended. To accommodate the increased width, the corresponding area of the recipient slot should be widened accordingly.
5. Meniscus Insertion and Fixation
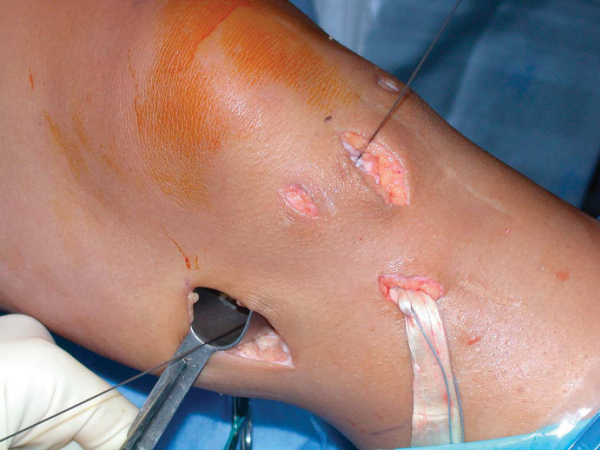
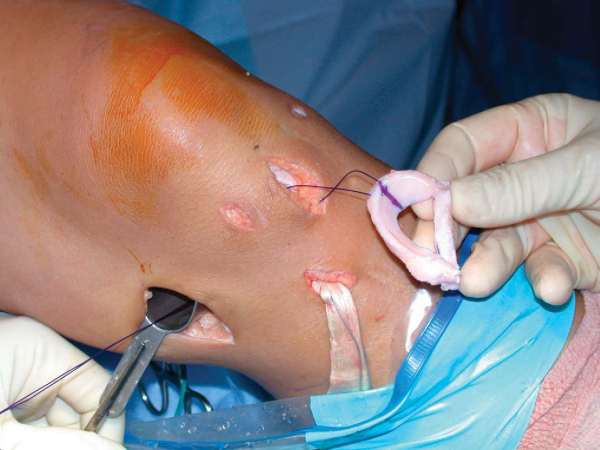
A single-barrel, zone-specific meniscal repair cannula placed through the contralateral portal on viewing through the ipsilateral portal is directed toward the capsular attachment site of the posterior and middle thirds of the meniscus. A long, flexible nitinol suture-passing pin is placed through the capsule to exit the accessory posteromedial or posterolateral incision. The proximal end of the nitinol pin is then withdrawn from the anterior arthrotomy site (
Fig. 47-12
), the allograft traction sutures are passed through the loop of the nitinol pin, and the pin and sutures are withdrawn through the accessory incision (
Fig. 47-13
). With the aid of the traction sutures, the meniscal allograft is pulled into the joint through the anterior arthrotomy while the bone bridge is advanced into the tibial slot, and the meniscus is manually reduced under the condyle with a finger placed through the arthrotomy (
Fig. 47-14
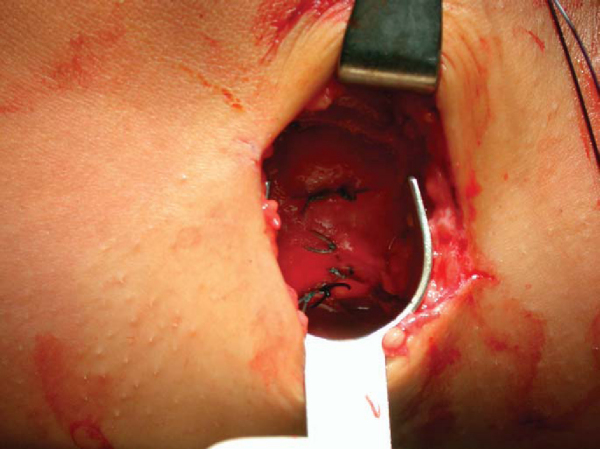
). Appropriate valgus or varus stress to open the ipsilateral compartment aids in graft introduction and reduction. Once the meniscus is reduced, the knee is cycled to ensure proper placement and capturing by the tibiofemoral articulation, and the bone bridge is secured within the tibial slot with a bioabsorbable cortical interference screw. Finally, the graft is attached to the capsule with standard inside-out vertical mattress sutures placed equally on the dorsal and ventral meniscal surfaces (
Fig. 47-15
). This fixation can be supplemented with appropriate all-inside fixation devices placed most posteriorly and outside-in suture placed most anteriorly.
|
|
|
|
Figure 47-12 |
|
|
|
|
Figure 47-13 |
Standard closure of the arthrotomy and accessory incisions is performed.
Anterior Cruciate Ligament Reconstruction and Medial Meniscus Allograft Transplantation
Tibial Osteotomy and Medial Meniscus Allograft Transplantation
| • | Perform all aspects of meniscus transplantation first. | |
| • | Perform opening wedge osteotomy such that line of osteotomy passes at least 1.5 cm below bottom of tibial slot. |
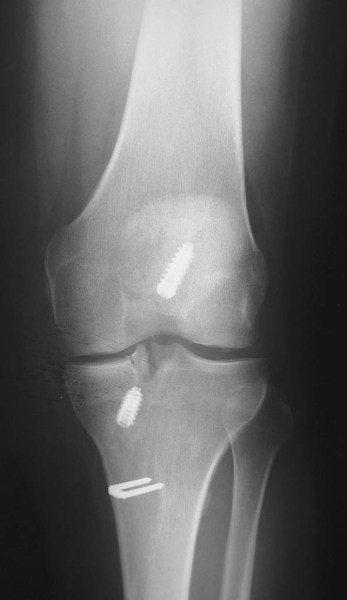
| • | At 7 to 10 days for suture removal and postoperative radiographs ( Fig. 47-16 ) |
Complications are those of meniscal repair:
| • | Incomplete healing of the meniscus repair | |
| • | Infection | |
| • | Arthrofibrosis | |
| • | Neurovascular injury (saphenous nerve medially, peroneal nerve laterally) |
Traumatic tears of the transplanted meniscus are treated with standard arthroscopic meniscal repair or partial meniscectomy as indicated.
After meniscal allograft transplantation, good to excellent results are achieved in nearly 85% of cases, and patients demonstrate a measurable decrease in pain and increase in activity level (
Table 47-1
). The risk of graft failure appears greatest with irradiated grafts, grade III to IV osteoarthritic changes, and residual malalignment or instability.
| Author | Followup | Outcome |
|---|---|---|
| Milachowski et al[10] (1989) | 14-month mean | 19 of 22 (86%) successful |
| Garrett[7] (1993) | 2-7 years | 35 of 43 (81%) successful |
| Noyes and Barber-Westin[11] (1995) | 30-month mean (range: 22-58 months) | 56 of 96 (58%) failed |
| van Arkel and de Boer[16] (1995) | 2-5 years | 20 of 23 (87%) successful |
| Goble et al[8] (1996) | 2-year minimum | 17 of 18 (94%) successful |
| Cameron and Saha[2] (1997) | 31-month mean (range: 12-66 months) | 58 of 63 (92%) successful |
| Carter[3] (1999) | 48-month mean | 45 of 51 (88%) successful |
| Rodeo[13] (2001) | 2-year minimum | 22 of 33 (67%) successful |
| 14 of 16 (88%) with bone fixation | ||
| 8 of 17 (47%) without bone fixation | ||
| Rath et al[12] (2001) | 5.4-year mean (range: 2-8 years) | 14 of 22 (64%) successful |
| Verdonk et al[17] (2005) | 7.2-year mean (range: 0.5-14.5 years) | 10 of 61 (16%) lateral transplants failed |
| 11 of 39 (28%) medial transplants failed | ||
| Cole et al[4] (2006) | 33.5-month mean (range: 24 to 57 months) | 41 of 45 (91%) successful |
| 85% of successful transplants would have surgery again |